1. はじめに
Transformer[1]登場以降、それを基盤とする大規模言語モデル(Large Language Models, LLM)は爆発的な進化を遂げてきました。現在では、コーディングをはじめとする様々な推論(Reasoning)タスクにおいて、高い性能を発揮しています。そして、LLMの学習のためのパイプラインも高度化しており、事前学習(Pre-training) だけでなく、教師ありファインチューニング(SFT)や強化学習(RLHF, GRPO, RLVR)などの 事後学習(Post-training) が重要な役割を果たしています。また、事後学習の役割も当初の モデルのAlignment から 高度なReasoning能力の獲得 へと変化してきています。
我々が普段利用しているChatGPTやGeminiといった商用LLMは、残念ながらその詳細な学習手法を公開していません。しかし、GPT-3やInstructGPT、DeepSeek-R1などの代表的なLLMの論文や技術レポートを通じて学習パイプラインの全体像を読み解くことができます。本記事では、これらのモデルを手がかりに、現代的なLLM学習パイプラインがどのように構成されているのか、これらのパイプラインをOSSで再現実装したコードを解説します。この記事が皆さんのLLMを用いた研究や開発を始める最初の手がかかりとなれば幸いです。
- 扱うこと: GPT-3、InstructGPT、そしてDeepSeek-R1を例にとり、事前学習と事後学習のパイプラインについて解説します。そして、これらのパイプラインを再現するコードをnanochat、StackLLaMaとopen-r1を用いて解説します。
- 扱わないこと: アーキテクチャの詳細や数学的な背景、高速化・分散学習技術などに関しては扱いません。
- 前提: TransformerとLLMの仕組みについては理解している前提です。
- 対象読者: これからLLMを使った研究や開発を始める方。
- 注意: 紹介する論文で用いられているコードは公開されていないため、本記事では有志によるOSSの再現実装を用いて解説します。これらのコードは動作の保証を目的としたものではなく、数式やアーキテクチャ図だけでは理解しづらい概念をコードを通して実践的に理解することを目的としています。
2. GPT-3(2020): 事前学習モデルの構築
GPT-3とは
GPT-3[2]は、OpenAIが開発した175Bのパラメータを持つLLMで、様々な自然言語処理タスクにおいて高い性能を発揮しました。In-context learning と呼ばれる概念を提唱し、ファインチューニングを行わなくても、プロンプトにタスクの例(one-shot, few-shot)を含めるだけで、多くの自然言語処理タスクを解くことができることを示しました。さらに、同年にOpenAIは スケーリング則(Scaling Laws) に関する論文[3][4]を発表し、Transformerベースの言語モデルの性能はパラメータ数N・データセットサイズD・計算予算Cの増加に伴い、理論上無限に向上し続けることを示しました。GPT-1(2018)の0.1B、GPT-2(2019)の1.5Bと比較して、GPT-3は175Bと大幅にパラメータ数が増加したことからスケーリング則の有効性が実証され、LLMの研究開発に大きな影響を与えました。また、GPT-3の重みは公開されず、APIとして提供されました。当時のブログ記事を見ると、自然言語によるコード生成や小説執筆などを行う多くのTwitterユーザの事例が紹介され、LLMの可能性を広く知らしめるきっかけとなりました。そのため、本記事ではGPT-3を題材として、LLMにおける事前学習パイプラインについて解説します。
事前学習
事前学習とは、大規模なデータを用いてモデルに汎用的な特徴量を学習させるプロセスです。GPT-3では、インターネットから収集された多様なテキストデータセットを使用して、自己教師あり学習(self-supervised learning) を用いて事前学習が行われました。
具体的には、与えられたテキストの一部を入力として受け取り、その続きのテキストを予測するタスク 次単語予測(Next Token Prediction) を通じて、単語の意味や文法的規則、論理関係、さらには一般的な知識を暗黙的に学習し、人間が書いた文章に近い自然なテキストを生成する能力を獲得しました。
継続事前学習について
「事前学習」と類似する用語に「継続事前学習」があります。継続事前学習とは、学習済みのLLMに対して、新たな大規模テキストデータを用いて追加の事前学習を行う手法です。これにより、LLMは特定のドメインに関する知識を獲得できます。例えば、医療分野や法律分野など、専門的な知識が必要なタスクにおいて有効です。また、英語などで事前学習されたLLMに対して、日本語データで継続事前学習を行うことで、日本語に特化したLLMを構築することも可能です。
パイプライン解説
GPT-3の学習は大きく分けて以下の2ステップで構成されています。
- STEP1: トークナイザーの学習
- STEP2: 事前学習
トークナイザーについて
トークナイザーとは、テキストデータをモデルが理解できる形式に変換するためのプログラムです。具体的には、テキストをトークンと呼ばれる小さな単位に分割し、それぞれのトークンを一意の整数IDにマッピングします。また、特殊トークン(例: 文の開始・終了、パディングなど)についても定義します。
STEP1: トークナイザーの学習
GPT-3では、Byte Pair Encoding(BPE) と呼ばれる手法を用いてトークナイザーが学習されました。その圧縮能力によって、語彙数を抑えつつ、多様な単語や表現をカバーすることというメリットがあります。以下にこのステップの概要を示します。
- 目的: テキストデータをトークン列に変換するためのトークナイザーを学習する
- データセット: 論文では明記されてないが、事前学習と同じテキストデータセットを使用したと推測される
- モデルアーキテクチャ: なし(ニューラルネットワーク未使用)
- 損失関数: なし(BPEアルゴリズムに基づく)
-
アルゴリズム:
アルゴリズムの詳細
- 文字列の頻出ペアを統計的に数える
- 頻度の高いペアを順に結合していく
- 語彙数が所定のサイズに達するまで繰り返す
- 最終的な語彙リストを保存
STEP2: 事前学習
GPT-3では、ほとんどGPT-2と同様の設定で事前学習が行われました。主な違いは、モデルのスケール(パラメータ数)とデータセットの規模です。以下にこのステップの概要を示します。
- 目的: 大規模なテキストデータを用いて、汎用的な言語理解能力を持つモデルを学習する
-
データセット: インターネットから収集されたテキストデータセット
-
データセットの詳細
- 低品質なデータをデータセットからフィルタリングすることが重要だと報告されている
-
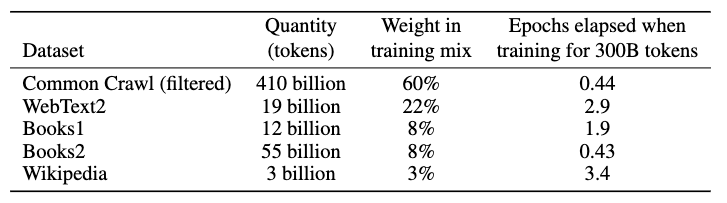
[2:1]より引用
-
- 前処理: トークナイザーを用いてテキストをトークン列に変換
- モデルアーキテクチャ: GPT-2と同様のDocoderベースのTransformerアーキテクチャに一部改良を加えたもの
-
損失関数: トークンごとのクロスエントロピー損失
-
損失関数の詳細
-
\mathcal{L}_{\text{pretrain}}= - \mathbb{E}_{x \sim \mathcal{D}}\sum_{t} \log p_\theta(y_t \mid y_{<t}) -
y_t t -
y_{<t} t -
D
-
-
-
コード解説
nanochatとは
GPT-3のコードは公開されていないため、類似するパイプラインが公開されているnanochatをベースに解説します。nanochatは、$100で動作する小規模なLLMを学習するをコンセプトにしたOSSで、$300を費やすとGPT-2相当のモデルを学習できる、とのことです。同じ著者によるnanoGPTというOSSもあり、こちらは小型のGPT-2モデルを学習することができます。但し、nanoGPTは実装がやや古いため、2025年現在でも活発にメンテナンスされているnanochatを使用します。
nanochatのスクリプト概要
https://github.com/karpathy/nanochat/tree/master/scripts には、様々なフェーズの学習スクリプトが用意されています。このセクションは以下のtok_train.pyとbase_train.pyを中心に解説します。その他のスクリプトは興味があれば参照してください。
- `tok_train.py`:   # トークナイザーの学習
- `base_train.py`:  # 事前学習
- `mid_train.py`:   # 中間学習
- `chat_sft.py`:    # SFT
- `chat_rl.py`:     # 強化学習
トークナイザーの学習スクリプト
scripts/tok_train.pyの抜粋
トークナイザーの学習を行なっている箇所を見ると、RustBPETokenizerを用いてBPEトークナイザーを学習していることがわかります。
# -----------------------------------------------------------------------------
# Train the tokenizer
t0 = time.time()
tokenizer = RustBPETokenizer.train_from_iterator(text_iter, args.vocab_size)
t1 = time.time()
train_time = t1 - t0
print(f"Training time: {train_time:.2f}s")
nanochat/tokenizer.pyの抜粋
その先の関数を見ると、train_from_iteratorメソッドでTokenizersのBPETrainerを用いてBPEトークナイザーを学習していることがわかります。
    def train_from_iterator(cls, text_iterator, vocab_size):
        # train from an iterator of text
        # Configure the HuggingFace Tokenizer
        tokenizer = HFTokenizer(BPE(
            byte_fallback=True, # needed!
            unk_token=None,
            fuse_unk=False,
        ))
        # Normalizer: None
        tokenizer.normalizer = None
        # Pre-tokenizer: GPT-4 style
        # the regex pattern used by GPT-4 to split text into groups before BPE
        # NOTE: The pattern was changed from \p{N}{1,3} to \p{N}{1,2} because I suspect it is harmful to
        # very small models and smaller vocab sizes, because it is a little bit wasteful in the token space.
        # (but I haven't validated this! TODO)
        gpt4_split_regex = Regex(SPLIT_PATTERN) # huggingface demands that you wrap it in Regex!!
        tokenizer.pre_tokenizer = pre_tokenizers.Sequence([
            pre_tokenizers.Split(pattern=gpt4_split_regex, behavior="isolated", invert=False),
            pre_tokenizers.ByteLevel(add_prefix_space=False, use_regex=False)
        ])
        # Decoder: ByteLevel (it pairs together with the ByteLevel pre-tokenizer)
        tokenizer.decoder = decoders.ByteLevel()
        # Post-processor: None
        tokenizer.post_processor = None
        # Trainer: BPE
        trainer = BpeTrainer(
            vocab_size=vocab_size,
            show_progress=True,
            min_frequency=0, # no minimum frequency
            initial_alphabet=pre_tokenizers.ByteLevel.alphabet(),
            special_tokens=SPECIAL_TOKENS,
        )
        # Kick off the training
        tokenizer.train_from_iterator(text_iterator, trainer)
        return cls(tokenizer)
tokenizers/tokenizers/src/models/bpe/trainer.rsの抜粋
さらに、tokensizersライブラリのBPETrainerのdo_trainメソッドを見ると、BPEトークナイザーの学習アルゴリズムが実装されていることがわかります。トークナイズ→ペアのカウント→マージの繰り返しでBPEトークナイザーを学習していることがわかります。
    pub fn do_train(
        &self,
        word_counts: &AHashMap<CompactString, u64>,
        model: &mut BPE,
    ) -> Result<Vec<AddedToken>> {
        let mut word_to_id: AHashMap<CompactString, u32> = AHashMap::with_capacity(self.vocab_size);
        let mut id_to_word: Vec<CompactString> = Vec::with_capacity(self.vocab_size);
        let max_token_length: usize = self.max_token_length.unwrap_or(usize::MAX);

        let progress = self.setup_progress();

        //
        // 1. Add all special tokens to the vocabulary
        //
        self.add_special_tokens(&mut word_to_id, &mut id_to_word);

        //
        // 2. Compute the initial alphabet
        //
        self.compute_alphabet(word_counts, &mut word_to_id, &mut id_to_word);

        //
        // 3. Tokenize words
        //
        self.update_progress(&progress, word_counts.len(), "Tokenize words");
        let (mut words, counts) =
            self.tokenize_words(word_counts, &mut word_to_id, &mut id_to_word, &progress);
        self.finalize_progress(&progress, words.len());

        //
        // 4. Count pairs in words
        //
        self.update_progress(&progress, words.len(), "Count pairs");
        let (mut pair_counts, mut where_to_update) = self.count_pairs(&words, &counts, &progress);
        // Insert them in the queue
        let mut queue = OctonaryHeap::with_capacity(pair_counts.len());
        where_to_update.drain().for_each(|(pair, pos)| {
            let count = pair_counts[&pair];
            if count > 0 {
                queue.push(Merge {
                    pair,
                    count: count as u64,
                    pos,
                });
            }
        });
        self.finalize_progress(&progress, words.len());

        //
        // 5. Do merges
        //
        self.update_progress(&progress, self.vocab_size, "Compute merges");
事前学習のスクリプト
scripts/base_train.pyの抜粋
まず、base_train.pyの冒頭部分を見ると、DataLoaderの初期化を行ない、tokenizing_distributed_data_loader_with_state関数を用いて、トークナイズされたデータをDataLoaderとして読み込んでいることがわかります。
# -----------------------------------------------------------------------------
# Initialize the DataLoaders for train/val
tokens_dir = os.path.join(base_dir, "tokenized_data")
dataloader_resume_state_dict = None if not resuming else meta_data["dataloader_state_dict"]
train_loader = tokenizing_distributed_data_loader_with_state(device_batch_size, max_seq_len, split="train", device=device, resume_state_dict=dataloader_resume_state_dict)
次に、学習ループの部分を見ると、以下のようになっています。
-
loss = model(x, y)の部分で、モデルに入力xを与えて出力を得て、正解yと比較して損失を計算しています。 -
loss.backward()の部分で、計算された損失に基づいてモデルのパラメータの勾配を計算しています。 -
x, y, dataloader_state_dict = next(train_loader)の部分で、次のバッチのデータをデータローダーから取得しています。
# -----------------------------------------------------------------------------
# Training loop
while True:
    ...
    # -------------------------------------------------------------------------
    # single training step
    # evaluate the gradient
    synchronize()
    t0 = time.time()
    for micro_step in range(grad_accum_steps):
        with autocast_ctx:
            loss = model(x, y)
        train_loss = loss.detach() # for logging
        loss = loss / grad_accum_steps # each .backward() is a grad sum => normalize loss here
        loss.backward()
        x, y, dataloader_state_dict = next(train_loader) # prefetch the next batch while the GPU is busy with forward/backward
    ...
    # -------------------------------------------------------------------------
nanochat/dataloader.pyの抜粋
tokenizing_distributed_data_loader_with_state関数を見ると、データセットを読み込み、トークナイズし、バッチに分割していることがわかります。特に、inputs_cpu = scratch[:-1]とtargets_cpu = scratch[1:]の部分で、Next Token Predictionタスクのために、入力と正解を1トークンずらして作成していることがわかります。その後、inputsとtargetsをGPUに転送し、バッチとして返しています。
    while True:
        # Accumulate enough tokens for one iteration before yielding.
        while len(token_buffer) < needed_tokens:
            doc_batch, (pq_idx, rg_idx) = next(batches)
            token_lists = tokenizer.encode(doc_batch, prepend=bos_token, num_threads=tokenizer_threads)
            for tokens in token_lists:
                token_buffer.extend(tokens)
        # Move tokens from the deque into the scratch buffer
        tokens = [token_buffer.popleft() for _ in range(needed_tokens)]
        # CUDA supports memory pinning for asynchronous transfers between CPU and GPU
        use_cuda_optimizations = device == "cuda"
        scratch = torch.tensor(tokens, dtype=torch.long, pin_memory=use_cuda_optimizations) # in PyTorch, long=int64
        # Create the inputs/targets as 1D tensors
        inputs_cpu = scratch[:-1]
        targets_cpu = scratch[1:]
        # Reshape to 2D and move to GPU async
        inputs = inputs_cpu.view(B, T).to(device=device, non_blocking=use_cuda_optimizations)
        targets = targets_cpu.view(B, T).to(device=device, non_blocking=use_cuda_optimizations)
        state_dict = {"pq_idx": pq_idx, "rg_idx": rg_idx} # we need this in case we wish to approximately resume training
        yield inputs, targets, state_dict
nanochat/model.pyの抜粋
モデルのforwardメソッドを見ると、入力idxに対して出力logitsを計算し、正解targetsが与えられた場合はクロスエントロピー損失を計算して返し、与えられなかった場合は単にlogitsを返すようになっています。そのため、Next Token Predictionタスクの損失計算が実装されていることがわかります。
    def forward(self, idx, targets=None, kv_cache=None, loss_reduction='mean'):
        if targets is not None:
            # training: given the targets, compute and return the loss
            # TODO experiment with chunked cross-entropy?
            loss = F.cross_entropy(logits.view(-1, logits.size(-1)), targets.view(-1), ignore_index=-1, reduction=loss_reduction)
            return loss
        else:
            # inference: just return the logits directly
            return logits
3. InstructGPT(2022): SFTとRLHFによるAlignmentモデルの構築
InstructGPTとは
InstructGPT[5]は、OpenAIがGPT-3をベースに、SFTとRLHFを用いて人間や社会にとってより有用な生成を行うように調整したモデルです。その結果、InstructGPTはユーザの指示に従った回答を生成する能力が大幅に向上しました。LLMの概念を一般に広めたChatGPT-3.5(2022)もInstructGPTと同様の手法で学習されており、異なるのは対話形式に特化したデータセットを用いている点のみです。そのため、本記事ではInstructGPTを通して、LLMのAlignmentを実現するための学習パイプラインを解説します。
Alignmentとは
このように、人間や社会にとって有用な生成を行うように調整することを アライメント(Alignment) と呼びます。Alignmnentには, 役立つこと(helpful)、誠実であること(honest)、無害であること(harmless)の3つの基準 (HHH) [6] が重要だとされています。Alignmentがされてない場合、LLMはユーザの意図を汲み取った回答が難しく、事実と異なる情報を生成したり、有害な内容を生成したりする可能性があります。
パイプライン解説
InstructGPTの学習パイプラインは大きく分けて以下の3つのステップで構成されています。
STEP2と3を合わせて RLHF(Reinforcement Learning with Human Feedback)[5:1]と呼びます。
- STEP1: 教師ありファインチューニング(SFT)
- STEP2: 報酬モデル(Reward Model)の学習
- STEP3: 強化学習(PPO)によるモデルの追加学習
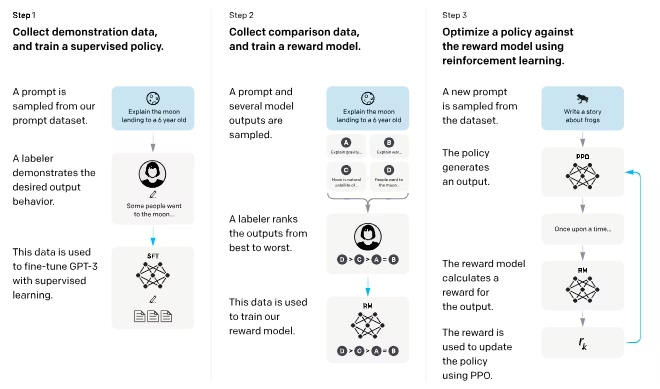
[5:2]より引用
STEP1: 教師ありファインチューニング(SFT)
事前学習済みモデルに対して、いきなり強化学習するのではなく、まずは教師あり学習で基本的な指示回答能力を獲得させます。以下にこのステップの概要を示します。
- 目的: 事前学習済みモデルに対して、プロンプトに対する基本的な指示回答能力を獲得させる
-
データセット: 人間が作成したプロンプトと理想的な回答のペア
-
フォーマット例
{"prompt": "The sky is", "completion": " blue."}SFTTrainerより引用
-
- モデルアーキテクチャ: 事前学習済みのLLM(例: GPT-3)
-
損失関数: トークンごとのクロスエントロピー損失
-
損失関数の詳細
-
\mathcal{L}_{\text{SFT}}= - \mathbb{E}_{(x, y) \sim \mathcal{D}}\sum_{t} \log p_\theta(y_t \mid x, y_{<t}) -
x -
y_t t -
y_{<t} t -
D
-
-
-
STEP2: 報酬モデル(Reward Model)の学習
どのような回答がより好ましいか機械的に判定することが難しいため、人間の評価者による比較データを用いて報酬モデルを学習します。以下にこのステップの概要を示します。
- 目的: 人間の評価者による比較データを用いて、回答の品質をスカラー値で出力する報酬モデルを学習する
-
データセット: プロンプトと複数の回答ペア、および人間の評価者による比較データ
-
フォーマット例
{"prompt": "The sky is", "chosen": " blue.", "rejected": " green."}(RewardTrainerより引用)
データセットの作成方法
- STEP1で学習したSFTモデルを用いて、あるプロンプトに対して複数の回答を生成
- 人間の評価者がそれらの回答を比較し、どの回答がより良いかを順位付け
- これらの比較データから、良い回答と悪い回答の組み合わせ
(x, y_w, y_l)
-
-
モデルアーキテクチャ: SREP1のSFTモデルをベースにした報酬モデル
-
モデルアーキテクチャの詳細
-
Starting from the SFT model with the final unembedding layer removed, we trained a model to take in a prompt and response, and output a scalar reward.
- 上記の記述から、以下のような構成であると推測される
- SFTモデルの最終の出力層を除去
- プロンプトと回答を連結して入力として受け取る
- 最終的にスカラーの報酬を出力する線形層を追加
-
-
-
損失関数: Bradley-Terryモデルに基づく負の対数尤度
-
損失関数の詳細
-
\mathcal{L}_{\text{RM}} = -\frac{1}{\binom{K}{2}}\; \mathbb{E}_{(x,y_w,y_l)\sim\mathcal D} \Big[\log \sigma\big(r_\theta(x,y_w) - r_\theta(x,y_l)\big)\Big] -
y_w -
y_l -
K -
r_\theta(x,y) -
D
-
- より好ましい回答の報酬
r_\theta(x,y_w) r_\theta(x,y_l)
-
-
Bradley-Terryモデルについて
Bradley-Terryモデルは、アイテム、チーム、またはオブジェクト間の一対比較の結果に関する確率モデルです。ある母集団から抽出されたアイテムのペアiとjが与えられたとき、一対比較
i \gt; j
{\displaystyle \Pr(i>j)={\frac {p_{i}}{p_{i}+p_{j}}}} Bradley-Terryモデルは様々な方法でパラメータ化可能である。式(1)はおそらく最も一般的な表現であるが、他にも多くのバリエーションが存在する。BradleyとTerryは、指数スコア関数
p_{i}=e^{\beta_{i}}
{\displaystyle \Pr(i>j)={\frac {e^{\beta _{i}}}{e^{\beta _{i}}+e^{\beta _{j}}}}={\frac {1}{1+e^{\beta _{j}-\beta _{i}}}}.} wikipediaより引用・翻訳
一対比較とは、一般的に2つの対象を一組ずつ比較し、どちらがより好ましいか、あるいは何らかの定量的特性において優れているか、あるいは両者が同一であるか否かを判断するあらゆる手法を指す。この比較手法は、選好・態度・投票システム・社会的選択・公共選択・要件定義・マルチエージェントAIシステムなどの科学的研究分野で広く用いられている。
wikipediaより引用・翻訳
このように、Bradley-Terryモデルはシグモイド関数を用いて、一対比較の確率をモデル化します。Bradley-Terryモデルはスポーツの試合結果から潜在的なチームの強さを推定する、アンケート結果から製品の好みを分析するなど、様々な分野で応用されています。
-
STEP3: 強化学習(PPO)によるモデルの追加学習
ある程度好ましい回答を生成できるようになったSFTモデルにと、回答の品質を評価する報酬モデルを用いて、好ましい回答を生成する能力をさらに向上させるために、強化学習(PPO)を用いてモデルを追加学習します。以下にこのステップの概要を示します。
- 目的: 好ましい回答を生成する能力をさらに向上させ、報酬モデルに過学習しないように制約をつける
- データセット: プロンプトデータセット(STEP1のprompt部分のみを使用)
- モデルアーキテクチャ: STEP1で学習したSFTモデル
- 報酬モデル: STEP2で学習した報酬モデル
-
損失関数: PPOの損失関数にKL正則化項を加えたもの
- 詳細は割愛します。この資料がわかりやすいです。
DPOについて

コード解説
StackLLaMaとは
InstructGPTのコードは公開されていないため、類似するパイプラインを持つStackLLaMaをベースに解説します。StackLLaMaは、LLaMa-2-7bをベースに、SFTとRLHFのInstructGPTのパイプラインを再現したものです。StackExchangeは、StackOverflowなどのQ&Aサイト群であり、様々な分野の質問と回答が蓄積されています。このパイプラインでは、StackExchangeの質問応答タスクに特化したLLMを構築することができます。より詳細な解説はこちらの記事をご覧ください。
スクリプト概要
https://github.com/huggingface/trl/tree/v0.4.6/examples/stack_llama/scripts には、StackLLaMaでLLMを学習するための一連のスクリプトが用意されています。このセクションはsupervised_finetuning.py, reward_modeling.pyとrl_training.pyとを中心に解説します。その他のスクリプトは興味があれば参照してください。
SFTのスクリプト
examples/stack_llama/supervised_finetuning.pyの抜粋
以下のコードで、AutoTokenizer.from_pretrainedを用いてトークナイザーの読み込み、create_datasets関数を用いてデータセットの前処理、run_training関数を用いて学習の実行を行なっています。
def main(args):
    tokenizer = AutoTokenizer.from_pretrained(args.model_path)
    train_dataset, eval_dataset = create_datasets(tokenizer, args)
    run_training(args, train_dataset, eval_dataset)
以下のコードで、データセットはlvwerra/stack-exchange-pairedを使用していることがわかります。データセットは、questionとresponse_i, response_jのフィールドを持ち、questionに対する2つの異なる回答response_i, response_jが格納されています。
def get_args():
    parser = argparse.ArgumentParser()
    ...
    parser.add_argument("--dataset_name", type=str, default="lvwerra/stack-exchange-paired")
以下のコードで、データセットの前処理を行なっています。prepare_sample_text関数内でデータセットからquestionとresponse_jを取り出し、Question: {question}\n\nAnswer: {response_j}のフォーマットで結合し、create_datasets関数内でtokenizerとprepare_sample_textをConstantLengthDatasetに渡して、トークナイズされたデータセットを作成しています。
def prepare_sample_text(example):
    """Prepare the text from a sample of the dataset."""
    text = f"Question: {example['question']}\n\nAnswer: {example['response_j']}"
    return text

def create_datasets(tokenizer, args):
    dataset = load_dataset(
        args.dataset_name,
        data_dir=args.subset,
        split=args.split,
        use_auth_token=True,
        num_proc=args.num_workers if not args.streaming else None,
        streaming=args.streaming,
    )
    if args.streaming:
        print("Loading the dataset in streaming mode")
        valid_data = dataset.take(args.size_valid_set)
        train_data = dataset.skip(args.size_valid_set)
        train_data = train_data.shuffle(buffer_size=args.shuffle_buffer, seed=args.seed)
    else:
        dataset = dataset.train_test_split(test_size=0.005, seed=args.seed)
        train_data = dataset["train"]
        valid_data = dataset["test"]
        print(f"Size of the train set: {len(train_data)}. Size of the validation set: {len(valid_data)}")

    chars_per_token = chars_token_ratio(train_data, tokenizer)
    print(f"The character to token ratio of the dataset is: {chars_per_token:.2f}")

    train_dataset = ConstantLengthDataset(
        tokenizer,
        train_data,
        formatting_func=prepare_sample_text,
        infinite=True,
        seq_length=args.seq_length,
        chars_per_token=chars_per_token,
    )
    valid_dataset = ConstantLengthDataset(
        tokenizer,
        valid_data,
        formatting_func=prepare_sample_text,
        infinite=False,
        seq_length=args.seq_length,
        chars_per_token=chars_per_token,
    )
    return train_dataset, valid_dataset
以下のコードで、LoraConfigを用いてLoRAの設定、AutoModelForCausalLM.from_pretrainedを用いてモデルの読み込みを行い、TrainingArgumentsを用いて学習の設定を行い、SFTTrainerを用いて学習を実行しています。
def run_training(args, train_data, val_data):
    print("Loading the model")

    lora_config = LoraConfig(
        r=16,
        lora_alpha=32,
        lora_dropout=0.05,
        bias="none",
        task_type="CAUSAL_LM",
    )

    train_data.start_iteration = 0

    print("Starting main loop")

    training_args = TrainingArguments(
        output_dir=args.output_dir,
        dataloader_drop_last=True,
        evaluation_strategy="steps",
        max_steps=args.max_steps,
        eval_steps=args.eval_freq,
        save_steps=args.save_freq,
        logging_steps=args.log_freq,
        per_device_train_batch_size=args.batch_size,
        per_device_eval_batch_size=args.batch_size,
        learning_rate=args.learning_rate,
        lr_scheduler_type=args.lr_scheduler_type,
        warmup_steps=args.num_warmup_steps,
        gradient_accumulation_steps=args.gradient_accumulation_steps,
        gradient_checkpointing=not args.no_gradient_checkpointing,
        fp16=not args.no_fp16,
        bf16=args.bf16,
        weight_decay=args.weight_decay,
        run_name="llama-7b-finetuned",
        report_to="wandb",
        ddp_find_unused_parameters=False,
    )

    model = AutoModelForCausalLM.from_pretrained(
        args.model_path, load_in_8bit=True, device_map={"": Accelerator().process_index}
    )

    trainer = SFTTrainer(
        model=model,
        args=training_args,
        train_dataset=train_data,
        eval_dataset=val_data,
        peft_config=lora_config,
        packing=True,
    )

    print_trainable_parameters(trainer.model)

    print("Training...")
    trainer.train()

    print("Saving last checkpoint of the model")
    trainer.model.save_pretrained(os.path.join(args.output_dir, "final_checkpoint/"))
Reward Modelingのスクリプト
examples/stack_llama/reward_modeling.pyの抜粋
以下のコードで、TrainingArgumentsを用いて学習の設定、LoraConfigを用いてLoRAの設定、AutoTokenizer.from_pretrainedを用いてトークナイザーの読み込み、AutoModelForSequenceClassification.from_pretrainedを用いてモデルの読み込みを行なっています。また、同様にlvwerra/stack-exchange-pairedを用いてデータセットの読み込みも行なっています。
# Load the human stack-exchange-paired dataset for tuning the reward model.
train_dataset = load_dataset("lvwerra/stack-exchange-paired", data_dir="data/reward", split="train")
if script_args.train_subset > 0:
    train_dataset = train_dataset.select(range(script_args.train_subset))
eval_dataset = load_dataset("lvwerra/stack-exchange-paired", data_dir="data/evaluation", split="train")
if script_args.eval_subset > 0:
    eval_dataset = eval_dataset.select(range(script_args.eval_subset))


training_args = TrainingArguments(
    output_dir=output_name,
    learning_rate=script_args.learning_rate,
    per_device_train_batch_size=script_args.per_device_train_batch_size,
    per_device_eval_batch_size=script_args.per_device_eval_batch_size,
    num_train_epochs=script_args.num_train_epochs,
    weight_decay=script_args.weight_decay,
    evaluation_strategy="steps",
    eval_steps=500,
    save_strategy="steps",
    save_steps=500,
    gradient_accumulation_steps=script_args.gradient_accumulation_steps,
    gradient_checkpointing=script_args.gradient_checkpointing,
    deepspeed=script_args.deepspeed,
    local_rank=script_args.local_rank,
    remove_unused_columns=False,
    label_names=[],
    bf16=script_args.bf16,
    logging_strategy="steps",
    logging_steps=10,
    optim=script_args.optim,
    lr_scheduler_type=script_args.lr_scheduler_type,
)
# Load the value-head model and tokenizer.
tokenizer_name = script_args.tokenizer_name if script_args.tokenizer_name is not None else script_args.model_name
tokenizer = AutoTokenizer.from_pretrained(tokenizer_name, use_auth_token=True)
tokenizer.pad_token = tokenizer.eos_token


peft_config = LoraConfig(
    task_type=TaskType.SEQ_CLS,
    inference_mode=False,
    r=8,
    lora_alpha=32,
    lora_dropout=0.1,
)

model = AutoModelForSequenceClassification.from_pretrained(
    script_args.model_name, num_labels=1, torch_dtype=torch.bfloat16
)
model = get_peft_model(model, peft_config)
以下のコードで、GPT2をベース報酬をモデルをファインチューニングしていることがわかります。
    model_name: Optional[str] = field(
        default="gpt2",
        metadata={
            "help": "The model that you want to train from the Hugging Face hub. E.g. gpt2, gpt2-xl, bert, etc."
        },
    )
以下のコードで、データセットの前処理を行なっています。報酬モデルで使用するデータセットは選好データセットのペアであるため、preprocess_function関数で質問文questionと2つの回答response_j, response_kを取り出し、Question: とAnswer: のフォーマットに変換し、トークナイズしています。
def preprocess_function(examples):
    new_examples = {
        "input_ids_j": [],
        "attention_mask_j": [],
        "input_ids_k": [],
        "attention_mask_k": [],
    }
    for question, response_j, response_k in zip(examples["question"], examples["response_j"], examples["response_k"]):
        tokenized_j = tokenizer("Question: " + question + "\n\nAnswer: " + response_j, truncation=True)
        tokenized_k = tokenizer("Question: " + question + "\n\nAnswer: " + response_k, truncation=True)

        new_examples["input_ids_j"].append(tokenized_j["input_ids"])
        new_examples["attention_mask_j"].append(tokenized_j["attention_mask"])
        new_examples["input_ids_k"].append(tokenized_k["input_ids"])
        new_examples["attention_mask_k"].append(tokenized_k["attention_mask"])

    return new_examples
以下のコードで、定義したproprocess_functionを用いてデータセットの前処理を行なっています。
# preprocess the dataset and filter out QAs that are longer than script_args.max_length
train_dataset = train_dataset.map(
    preprocess_function,
    batched=True,
    num_proc=num_proc,
    remove_columns=original_columns,
)
train_dataset = train_dataset.filter(
    lambda x: len(x["input_ids_j"]) <= script_args.max_length and len(x["input_ids_k"]) <= script_args.max_length
)

eval_dataset = eval_dataset.map(
    preprocess_function,
    batched=True,
    num_proc=num_proc,
    remove_columns=original_columns,
)
eval_dataset = eval_dataset.filter(
    lambda x: len(x["input_ids_j"]) <= script_args.max_length and len(x["input_ids_k"]) <= script_args.max_length
)
以下のコードで、collatorの定義を行なっています。collatorは学習中のバッチデータを整形する関数で、報酬モデルでは2つの回答ペアをそれぞれトークナイズしたデータをまとめてバッチ化しています。
@dataclass
class RewardDataCollatorWithPadding:
    tokenizer: PreTrainedTokenizerBase
    padding: Union[bool, str, PaddingStrategy] = True
    max_length: Optional[int] = None
    pad_to_multiple_of: Optional[int] = None
    return_tensors: str = "pt"

    def __call__(self, features: List[Dict[str, Any]]) -> Dict[str, Any]:
        features_j = []
        features_k = []
        for feature in features:
            features_j.append(
                {
                    "input_ids": feature["input_ids_j"],
                    "attention_mask": feature["attention_mask_j"],
                }
            )
            features_k.append(
                {
                    "input_ids": feature["input_ids_k"],
                    "attention_mask": feature["attention_mask_k"],
                }
            )
        batch_j = self.tokenizer.pad(
            features_j,
            padding=self.padding,
            max_length=self.max_length,
            pad_to_multiple_of=self.pad_to_multiple_of,
            return_tensors=self.return_tensors,
        )
        batch_k = self.tokenizer.pad(
            features_k,
            padding=self.padding,
            max_length=self.max_length,
            pad_to_multiple_of=self.pad_to_multiple_of,
            return_tensors=self.return_tensors,
        )
        batch = {
            "input_ids_j": batch_j["input_ids"],
            "attention_mask_j": batch_j["attention_mask"],
            "input_ids_k": batch_k["input_ids"],
            "attention_mask_k": batch_k["attention_mask"],
            "return_loss": True,
        }
        return batch
以下のコードで、RewardTrainerの定義とtrainerによる学習の実行を行なっています。損失関数として、InstructGPTで使用されたBradley-Terryモデルに基づく負の対数尤度を実装しています。
class RewardTrainer(Trainer):
    # Define how to compute the reward loss. We use the InstructGPT pairwise logloss: https://arxiv.org/abs/2203.02155
    def compute_loss(self, model, inputs, return_outputs=False):
        rewards_j = model(input_ids=inputs["input_ids_j"], attention_mask=inputs["attention_mask_j"])[0]
        rewards_k = model(input_ids=inputs["input_ids_k"], attention_mask=inputs["attention_mask_k"])[0]
        loss = -nn.functional.logsigmoid(rewards_j - rewards_k).mean()
        if return_outputs:
            return loss, {"rewards_j": rewards_j, "rewards_k": rewards_k}
        return loss


# Train the model, woohoo.
trainer = RewardTrainer(
    model=model,
    args=training_args,
    train_dataset=train_dataset,
    eval_dataset=eval_dataset,
    compute_metrics=compute_metrics,
    data_collator=RewardDataCollatorWithPadding(tokenizer=tokenizer, max_length=script_args.max_length),
)
...
trainer.train(script_args.resume_from_checkpoint)
RLHFのスクリプト
examples/stack_llama/rl_training.pyの抜粋
以下のコードで、PPOConfigを用いてPPOの設定を行なっています。
config = PPOConfig(
    steps=script_args.steps,
    model_name=script_args.model_name,
    learning_rate=script_args.learning_rate,
    log_with=script_args.log_with,
    batch_size=script_args.batch_size,
    mini_batch_size=script_args.mini_batch_size,
    gradient_accumulation_steps=script_args.gradient_accumulation_steps,
    optimize_cuda_cache=True,
    early_stopping=script_args.early_stopping,
    target_kl=script_args.target_kl,
    ppo_epochs=script_args.ppo_epochs,
    seed=script_args.seed,
    init_kl_coef=script_args.init_kl_coef,
    adap_kl_ctrl=script_args.adap_kl_ctrl,
)
以下のコードで、load_datasetを用いたデータセットの読み込みとAutoTokenizer.from_pretrainedを用いたトークナイザーの読み込みを行なっています。同様にlvwerra/stack-exchange-pairedを使用していることがわかります。
train_dataset = load_dataset("lvwerra/stack-exchange-paired", data_dir="data/rl", split="train")
...
tokenizer = AutoTokenizer.from_pretrained(script_args.tokenizer_name)
以下のコードで、データセットの前処理を行なっています。データセットから質問文questionのみを取り出し、Question: とAnswer: のフォーマットに変換し、トークナイズしています。
def build_dataset(
    tokenizer,
    dataset_name="lvwerra/stack-exchange-paired",
):
    """
    Build dataset for training. This builds the dataset from `load_dataset`, one should
    customize this function to train the model on its own dataset.

    Args:
        dataset_name (`str`):
            The name of the dataset to be loaded.

    Returns:
        dataloader (`torch.utils.data.DataLoader`):
            The dataloader for the dataset.
    """

    # load imdb with datasets
    ds = load_dataset(dataset_name, data_dir="data/rl", split="train")
    original_columns = ds.column_names
    num_proc = 24

    def preprocess_function(examples):
        new_examples = {
            "query": [],
            "input_ids": [],
        }
        for question in examples["question"]:
            query = "Question: " + question + "\n\nAnswer: "
            tokenized_question = tokenizer(query, truncation=True)
            new_examples["query"].append(query)
            new_examples["input_ids"].append(tokenized_question["input_ids"])

        return new_examples

    ds = train_dataset.map(
        preprocess_function,
        batched=True,
        num_proc=num_proc,
        remove_columns=original_columns,
    )
    ds = ds.filter(lambda x: len(x["input_ids"]) < 512, batched=False)

    ds.set_format(type="torch")
    return ds


# We retrieve the dataloader by calling the `build_dataset` function.
dataset = build_dataset(tokenizer)
以下のコードで、LoraConfigを用いてLoRAの設定、AutoModelForCausalLMWithValueHead.from_pretrainedを用いてモデルの読み込みを行なっています。
lora_config = LoraConfig(
    r=16,
    lora_alpha=32,
    lora_dropout=0.05,
    bias="none",
    task_type="CAUSAL_LM",
)
model = AutoModelForCausalLMWithValueHead.from_pretrained(
    config.model_name,
    load_in_8bit=True,
    device_map={"": current_device},
    peft_config=lora_config,
)
以下のコードで、PPOTrainerを用いてPPOの設定を行なっています。また、collator関数で学習中のバッチデータを整形しています。
def collator(data):
    return dict((key, [d[key] for d in data]) for key in data[0])

ppo_trainer = PPOTrainer(
    config,
    model,
    ref_model=None,
    tokenizer=tokenizer,
    dataset=dataset,
    data_collator=collator,
    optimizer=optimizer,
)
以下のコードで、pipelineを用いて報酬モデルの読み込みを行なっています。感情分析(sentiment-analysis)モデルが出力を{"label": "str", "score": float}の形式で返し、報酬モデルとして利用しやすいため、このように読み込みを行なっていると推測します。
sentiment_pipe = pipeline(
    "sentiment-analysis",
    model=reward_model_name,
    device_map={"": current_device},
    model_kwargs={"load_in_8bit": True},
    tokenizer=tokenizer,
    return_token_type_ids=False,
)
以下のコードで、強化学習(PPO)の学習ループを実装しています。output[0]["score"]でスコアを取得し、script_args.reward_baselineを引くことで報酬を計算しています。stats = ppo_trainer.step(question_tensors, response_tensors, rewards)でPPOの1ステップを実行しています。これで、あるプロンプトに対してLLMが回答を生成し、報酬モデルでその回答の報酬を計算し、PPOアルゴリズムでモデルを更新する一連の流れが実装されています。
for epoch, batch in tqdm(enumerate(ppo_trainer.dataloader)):
    if epoch >= config.total_ppo_epochs:
        break

    question_tensors = batch["input_ids"]

    response_tensors = ppo_trainer.generate(
        question_tensors,
        return_prompt=False,
        length_sampler=output_length_sampler,
        **generation_kwargs,
    )
    batch["response"] = tokenizer.batch_decode(response_tensors, skip_special_tokens=True)

    # Compute sentiment score
    texts = [q + r for q, r in zip(batch["query"], batch["response"])]
    pipe_outputs = sentiment_pipe(texts, **sent_kwargs)
    rewards = [torch.tensor(output[0]["score"] - script_args.reward_baseline) for output in pipe_outputs]

    # Run PPO step
    stats = ppo_trainer.step(question_tensors, response_tensors, rewards)
    ppo_trainer.log_stats(stats, batch, rewards)

    if script_args.save_freq and epoch and epoch % script_args.save_freq == 0:
        ppo_trainer.save_pretrained(script_args.output_dir + f"step_{epoch}")
4. DeepSeek-R1(2025): GRPOとRLVRによるReasoningモデルの構築
DeepSeek-R1とは
DeepSeek-R1[8]は、中国のヘッジファウンド会社「幻方量化」(High-Flyer)の子会社である「深度探索」(DeepSeek)が開発したReasoningモデルです。ルールベースの報酬設計と純粋な強化学習手法だけ用いてDeepSeek-R1-Zeroと呼ばれるReasoningモデルを構築したことで注目を集めました。その後、DeepSeek-R1-Zeroの欠点を克服するために、SFTと強化学習を組み合わせた複数ステップの学習パイプラインを構築し、数学的推論やコーディングなどの高度なReasoningタスクにおいて、当時最先端だったOpenAI-o1に匹敵する性能を達成しました。初めてReasoningモデルという概念を提唱したのはOpenAI-o1(2024)[9]であり、事前学習時に計算量を増やすだけでなく、推論時に計算量を増やすことで、性能が向上する 推論時スケール則 を提案したことで注目を集めました。しかし、OpenAI-o1の仕組みは公開されていない一方で、DeepSeek-R1は論文とその重みが公開され、LLMの研究開発に大きな影響を与えました。そのため、本記事ではDeepSeek-R1を通して、Reasoningモデルの学習パイプラインを解説します。
Reasoningモデルとは
Reasoningモデルとは、高度な推論能力を持つLLMのことで、コーディングや数学的推論などの複雑なタスクを解くことができます。人間は複雑な問題を解く際に、段階的に思考を行い、難しい問題をサブ問題に分解し、うまくいかない場合は間違いを認識し修正しながら解決します。このような段階的な思考をプロンプトに含めることで性能が向上する、CoT(Chain-of-Thought)[10] と呼ばれる手法が知られています。Reasoningモデルは、このような段階的な思考をLLM自体が学習し、推論時に自動的に段階的な思考を行うことができます。具体的には、<think>と</think>の特殊トークンの間にCoTの思考過程を記載したデータセットを作成し、推論時に同様のトークンを用いて思考過程を生成するように学習します。
DeepSeek-R1-Zeroの概要
DeepSeek-R1の多くの要素は、DeepSeek-R1-Zeroのものを流用しています。そのため、まずはDeepSeek-R1-Zeroの概要を解説します。
- 目的: 強化学習のみでReasoning能力を獲得する
- データセット: 論文内で明示されていないが、おそらくDeepSeekMathやDeepSeekCoderなどの数学・コーディング問題を含む自動生成データセットを使用
- モデルアーキテクチャ: DeepSeek-V3-Base
-
報酬設計: ルールベースの報酬設計
-
フォーマット報酬:
<think>...</think>の形式で回答が生成された場合に報酬を与える - 正解報酬: 数学問題では正解か不正解かで報酬を与え、コーディング問題ではテストケースを通過したかどうかで報酬を与える
-
フォーマット報酬:
-
損失関数: GRPOの損失関数, PPOと同様にKL項を含みます
- 詳細は割愛します。この記事がわかりやすいです。
-
システムプロンプト:
<think> </think>と<answer> </answer>タグを用いた特殊なフォーマットで回答を生成するように指示システムプロンプトの例
  A conversation between User and Assistant. The user asks a question, and the Assistant solves it.
  The assistant first thinks about the reasoning process in the mind and then provides the user
  with the answer. The reasoning process and answer are enclosed within <think> </think> and
  <answer> </answer> tags, respectively, i.e., <think> reasoning process here </think>
  <answer> answer here </answer>. User: prompt. Assistant:
パイプライン解説
DeeepSeek-R1-Zeroから、強化学習のみでReasoning能力を獲得することが可能であることが示されましたが、解釈性の低さや言語混合現象などの問題がありました。そこで、DeepSeek-R1ではSFTと強化学習を組み合わせた複数ステップのパイプラインを構築しました。DeepSeek-R1の学習パイプラインは大きく分けて以下の4つのステップで構成されています。 また、このようなルールベースの報酬設計を RLVR(Reinforcement Learning with Verifiable Rewards) と呼びます。
- STEP1: CoTデータセットを用いたSFT
- STEP2: ルールベースの報酬設計による強化学習(RLVR, GRPO)
- STEP3: Reasoningと非Reasoningタスクに対してのSFT
- STEP4: ReasoningとAlignmentのための強化学習(GRPO)

DeepSeek R1 and R1-Zero Explainedより引用
STEP1: CoTデータセットを用いたSFT
事前学習済みモデルに対して、いきなり強化学習するのではなく、まずは教師あり学習で基本的なReasoning能力を獲得させます。以下にこのステップの概要を示します。
- 目的: Reasoning能力の獲得
-
データセット: プロンプトとCoTを含む回答のペア
-
データセットの作り方
- 以下のような複数の手法でLLMを用いてCoTデータセットを生成
- few-shotプロンプトを用いて、DeepSeek-V3-Baseで生成
- 詳細な回答を生成するようにプロンプトを設計
- DeepSeek-R1-Zeroの生成したデータをフィルタリングして利用
- 以下のような複数の手法でLLMを用いてCoTデータセットを生成
-
CoTデータセットの例
-
<think> </think>タグで囲まれた思考過程と、<answer> </answer>タグで囲まれた最終回答を含む形式のデータセット例
{ "prompt": "How much is 1+1?", "completion": "<think>OK, the user wants to know how much is 1+1. Obviously, it's 2, but is this the only possible answer? What can change? Oh, maybe 1 is not decimal? In this case 1 + 1 is 10. But is this what the user really wants? It's more likely that they use the decimal numeral system, so the answer is more likely 2.</think> If you mean the decimal numeral system, then the answer is <answer>2</answer>." } -
-
- モデルアーキテクチャ: DeepSeek-V3-Base
- 損失関数: トークンごとのクロスエントロピー損失
STEP2: ルールベースの報酬設計による強化学習(RLVR, GRPO)
STEP1で学習したSFTモデルに対して、ルールベースの報酬設計を用いた強化学習を実施します。以下にこのステップの概要を示します。
- 目的: Reasoning能力の向上
- データセット: DeepSeek-R1-Zeroのデータセットを再利用
- 報酬設計: DeepSeek-R1-Zeroのルールベース報酬設計に加えて、言語一貫性の報酬を追加
- モデルアーキテクチャ: STEP1で学習したSFTモデル
- 損失関数: GRPOの損失関数
STEP3: Reasoningと非Reasoningタスクに対してのSFT
Reasoningタスクだけでなく、非Reasoningタスクに対しても高い性能を獲得させるため、Reasoningタスクと非Reasoningタスクの両方を含むデータセットを用いてSFTを実施します。以下にこのステップの概要を示します。
- 目的: Reasoningタスクと非Reasoningタスクの両方での能力向上
-
データセット: Reasoningデータセットと非Reasoningデータセット
- Reasoningデータセット: STEP2のモデルで生成し、人手によるフィルタリングとDeepSeek-V3の評価を通じて構築
- 非Reasoningデータセット: DeepSeek-V3のSFTデータセットを一部再利用
- モデルアーキテクチャ: STEP2で学習したGRPOモデル
- 損失関数: トークンごとのクロスエントロピー損失
STEP4: ReasoningとAlignmentのための強化学習
Reasoning能力の向上とAlignmentの両方を目的として、Reasoningタスクと非Reasoningタスクの両方を含むデータセットを用いて強化学習を実施します。以下にこのステップの概要を示します。
- 目的: Reasoning能力とAlignmentの向上
-
データセット:
- Reasoningデータセット: DeepSeek-R1-Zeroのデータセットを再利用
- 非Reasoningデータセット: DeepSeek-V3のプロンプトと選好データセット
-
報酬設計:
- Reasoningタスク: DeepSeek-R1-Zeroのルールベース報酬設計を再利用
- 非Reasoningタスク: 選好データに基づく報酬設計
選好データに基づく報酬設計の例
-
CoTの過程を含む選好データセットを用いている
Model-Based RM. For questions with free-form ground-truth answers, we rely on the reward model to determine whether the response matches the expected ground-truth. Conversely, for questions without a definitive ground-truth, such as those involving creative writing, the reward model is tasked with providing feedback based on the question and the corresponding answer as inputs. The reward model is trained from the DeepSeek-V3 SFT checkpoints. To enhance its reliability, we construct preference data that not only provides the final reward but also includes the chain-of-thought leading to the reward. This approach helps mitigate the risk of reward hacking in specific tasks.
(DeepSeek-V1[11]より引用)
-
- モデルアーキテクチャ: STEP3で学習したSFTモデル
- 損失関数: GRPOの損失関数
コード解説
open-r1とは
DeepSeek-R1のコードは公開されていないため、その再現実装であるopen-r1をベースに解説します。open-r1は、DeepSeek-R1をtransformersとtrlライブラリを用いて再現したプロジェクトです。SFTやGRPOのスクリプトが実装されており、論文で述べられている報酬関数も含まれています。
スクリプト概要
https://github.com/huggingface/open-r1/blob/main/src/open_r1/ には、open-r1でLLMを学習するための一連のスクリプトが用意されています。このセクションはgrpo.py, sft.pyとrewards.pyを中心に解説します。その他のスクリプトは興味があれば参照してください。より詳細な解説はこちらの記事をご覧ください。
SFTのスクリプト
open-r1/src/open_r1/sft.pyの抜粋
以下のコードで、get_dataset関数、get_tokenizer関数、get_model関数を用いてデータセット、モデルとトークナイザーの読み込み、SFTTrainerの初期化、そしてtrainer.train()で学習ループを実行しています。
def main(script_args, training_args, model_args):
    ######################################
    # Load dataset, tokenizer, and model #
    ######################################
    dataset = get_dataset(script_args)
    tokenizer = get_tokenizer(model_args, training_args)
    model = get_model(model_args, training_args)

    if tokenizer.chat_template is None:
        logger.info("No chat template provided, defaulting to ChatML.")
        model, tokenizer = setup_chat_format(model, tokenizer, format="chatml")

    ############################
    # Initialize the SFT Trainer
    ############################
    trainer = SFTTrainer(
        model=model,
        args=training_args,
        train_dataset=dataset[script_args.dataset_train_split],
        eval_dataset=(dataset[script_args.dataset_test_split] if training_args.eval_strategy != "no" else None),
        processing_class=tokenizer,
        peft_config=get_peft_config(model_args),
        callbacks=get_callbacks(training_args, model_args),
    )

    ###############
    # Training loop
    ###############
    logger.info("*** Train ***")
    checkpoint = None
    if training_args.resume_from_checkpoint is not None:
        checkpoint = training_args.resume_from_checkpoint
    elif last_checkpoint is not None:
        checkpoint = last_checkpoint
    train_result = trainer.train(resume_from_checkpoint=checkpoint)
    metrics = train_result.metrics
    metrics["train_samples"] = len(dataset[script_args.dataset_train_split])
    trainer.log_metrics("train", metrics)
    trainer.save_metrics("train", metrics)
    trainer.save_state()
コード内には直接記載されていないが、recipesを見ると、データセットとしてopen-r1/Mixture-of-Thoughtsが使用されていることがわかります。
GRPOのスクリプト
open-r1/src/open_r1/grpo.pyの抜粋
以下のコードで、get_dataset関数を、get_tokenizer関数とget_model関数を用いたデータセット、トークナイザーとモデルの読み込み、get_reward_funcs関数を用いた報酬関数の取得、GRPOTrainerの初期化、そしてtrainer.train()で学習ループを実行しています。
def main(script_args, training_args, model_args):
    ...
    # Load the dataset
    dataset = get_dataset(script_args)

    ################
    # Load tokenizer
    ################
    tokenizer = get_tokenizer(model_args, training_args)

    ##############
    # Load model #
    ##############
    logger.info("*** Loading model ***")
    model = get_model(model_args, training_args)

    # Get reward functions from the registry
    reward_funcs = get_reward_funcs(script_args)
    #############################
    # Initialize the GRPO trainer
    #############################
    trainer = GRPOTrainer(
        model=model,
        reward_funcs=reward_funcs,
        args=training_args,
        train_dataset=dataset[script_args.dataset_train_split],
        eval_dataset=(dataset[script_args.dataset_test_split] if training_args.eval_strategy != "no" else None),
        peft_config=get_peft_config(model_args),
        callbacks=get_callbacks(training_args, model_args),
        processing_class=tokenizer,
    )

    ###############
    # Training loop
    ###############
    logger.info("*** Train ***")
    checkpoint = None
    if training_args.resume_from_checkpoint is not None:
        checkpoint = training_args.resume_from_checkpoint
    elif last_checkpoint is not None:
        checkpoint = last_checkpoint
    train_result = trainer.train(resume_from_checkpoint=checkpoint)
    ...
コード内には直接記載されていないが、recipesを見ると、データセットとしてopen-r1/codeforcesが使用されていることがわかります。
報酬関数のスクリプト
open-r1/src/open_r1/rewards.pyの抜粋
以下のコードで、format_reward関数でフォーマット報酬を計算しています。回答が<think>...</think>タグと<answer>...</answer>タグで囲まれているかどうかを正規表現でチェックし、条件を満たす場合に1.0の報酬を与えます。
def format_reward(completions, **kwargs):
    """Reward function that checks if the reasoning process is enclosed within <think> and </think> tags, while the final answer is enclosed within <answer> and </answer> tags."""
    pattern = r"^<think>\n.*?\n</think>\n<answer>\n.*?\n</answer>$"
    completion_contents = [completion[0]["content"] for completion in completions]
    matches = [re.match(pattern, content, re.DOTALL | re.MULTILINE) for content in completion_contents]
    return [1.0 if match else 0.0 for match in matches]
以下のコードで、数学的推論タスクに対する正解報酬を計算するaccuracy_reward関数を定義しています。math_verifyライブラリを用いて、数学的表現をパースし、正解判定を行なっています。
def accuracy_reward(completions: list[list[dict[str, str]]], solution: list[str], **kwargs) -> list[Optional[float]]:
    """Reward function that checks if the completion is the same as the ground truth."""
    contents = [completion[0]["content"] for completion in completions]
    rewards = []
    for content, sol in zip(contents, solution):
        gold_parsed = parse(
            sol,
            extraction_mode="first_match",
        )
        if len(gold_parsed) != 0:
            # We require the answer to be provided in correct latex (no malformed operators)
            answer_parsed = parse(
                content,
                extraction_config=[
                    LatexExtractionConfig(
                        normalization_config=NormalizationConfig(
                            nits=False,
                            malformed_operators=False,
                            basic_latex=True,
                            equations=True,
                            boxed="all",
                            units=True,
                        ),
                        # Ensures that boxed is tried first
                        boxed_match_priority=0,
                        try_extract_without_anchor=False,
                    )
                ],
                extraction_mode="first_match",
            )
            # Compute binary rewards if verifiable, `None` otherwise to skip this example
            try:
                reward = float(verify(gold_parsed, answer_parsed))
            except Exception as e:
                print(f"verify failed: {e}, answer: {answer_parsed}, gold: {gold_parsed}")
                reward = None
        else:
            # If the gold solution is not parseable, we assign `None` to skip this example
            reward = None
            print("Failed to parse gold solution: ", sol)
        rewards.append(reward)

    return rewards
以下のコードで、parse関数で正解と回答をパースし、verify関数で正解判定を行なっています。
from math_verify import parse, verify

# Parse the gold and answer
# If you know that gold will only contain latex or expr (no latex env), use
# parse(gold, extraction_config=[LatexExtractionConfig()]) or parse(gold, extraction_config=[ExprExtractionConfig()])

gold = parse("${1,3} \\cup {2,4}$")
answer = parse("${1,2,3,4}$")

# Order here is important!
verify(gold, answer)
# >>> True
以下のコードで、extract_code関数でコードスニペットを抽出しています。
def extract_code(completion: str, language: str | None = "python") -> str:
    if language is None:
        return ""
    pattern = re.compile(rf"```{language}\n(.*?)```", re.DOTALL)
    matches = pattern.findall(completion)
    extracted_answer = matches[-1] if len(matches) >= 1 else ""
    return extracted_answer
以下のコードで、Codeforcesのコーディング問題に対する正解報酬を計算するcf_code_reward関数を定義しています。非同期処理を用いてcf_score_submission関数を並列実行し、Codeforcesについて回答をsubmissionしその正解判定を行なっています。
def cf_code_reward(
    completions,
    test_batch_size: int = 1,
    patch_code: bool = False,
    scoring_mode: Literal["pass_fail", "partial", "weighted_sum"] = "weighted_sum",
    **kwargs,
) -> list[float]:
    """Reward function that evaluates Codeforces problems using Piston+our CF package.

    Assumes the dataset has the same format as hf.co/datasets/open-r1/codeforces (verifiable-prompts subset)

    test_batch_size: evaluate these many test cases in parallel, then check if any of them failed (0 score): if so stop evaluating; otherwise continue with the next batch of test cases.
    """
    # for info on setting up piston workers, see slurm/piston/README.md
    piston_client = get_piston_client_from_env()

    languages = kwargs["language"] if "language" in kwargs else [None] * len(completions)
    code_snippets = [
        # note: grading is automatically skipped if a problem has no tests
        cf_patch_code(extract_code(completion[-1]["content"], language), language)
        if patch_code
        else extract_code(completion[-1]["content"], language)
        for completion, language in zip(completions, languages)
    ]

    async def run_catch_exceptions(task):
        try:
            return await task
        except Exception as e:
            print(f"Error from Piston worker: {e}")
            return None

    # load problem data. undo separating kwargs by column
    problems_data = [dict(zip(kwargs.keys(), values)) for values in zip(*kwargs.values())]

    loop = _init_event_loop()
    evals = [
        loop.create_task(
            run_catch_exceptions(
                cf_score_submission(
                    piston_client,
                    problem_data,
                    code,
                    test_batch_size=test_batch_size,
                    scoring_mode=scoring_mode,
                    submission_language=problem_data.get("language", None),
                )
            )
        )
        for problem_data, code in zip(problems_data, code_snippets)
    ]
    results = loop.run_until_complete(asyncio.gather(*evals))

    return results
以下のコードで、score_submission関数でCodeforcesのコーディング問題に対する正解判定を行なっています。正解の場合は1.0、不正解の場合は0.0の報酬を与えます。
async def score_submission(
    client: PistonClient,
    problem_data: dict,
    submission: str,
    test_batch_size: int = 1,
    scoring_mode: Literal["pass_fail", "partial", "weighted_sum"] = "weighted_sum",
    no_compile_reward: float = -0.1,
    no_submission_reward: float = -1.0,
    submission_language: str = "cpp",
) -> float:
    if submission_language not in ["python", "cpp"]:
        raise ValueError(f"Invalid submission language: {submission_language}")
    test_cases = problem_data["official_tests"] + (await get_generated_tests(problem_data["id"]))
    # invalid/not a coding problem
    if test_cases is None or len(test_cases) == 0:
        return None
    # no code extracted
    if not submission:
        return no_submission_reward

    passed_test_cases = 0
    # run one batch, check if any of them failed (0 score): if so stop evaluating (assuming non partial score); otherwise continue with the next batch of test cases.
    for test_batch_to_run in batched(test_cases, test_batch_size) if test_batch_size >= 1 else [test_cases]:
        results = await asyncio.gather(
            *[
                asyncio.create_task(
                    score_single_test_case(
                        client, problem_data, test_case["input"], test_case["output"], submission, submission_language
                    )
                )
                for test_case in test_batch_to_run
            ]
        )
        if any(result and result["compile"]["code"] != 0 for result in results):
            return no_compile_reward

        tests_passed_results = [
            result and result["run"]["code"] == 0 and result["run"]["stdout"].strip() == "1" for result in results
        ]
        if scoring_mode == "pass_fail" and any(not test_passed for test_passed in tests_passed_results):
            break
        passed_test_cases += sum(1 for test_passed in tests_passed_results if test_passed)

    pass_fail_score = 1.0 if passed_test_cases == len(test_cases) else 0.0

    if scoring_mode == "pass_fail":
        return pass_fail_score
    elif scoring_mode == "partial":
        return passed_test_cases / len(test_cases)
    elif scoring_mode == "weighted_sum":
        return pass_fail_score + 0.1 * (passed_test_cases / len(test_cases))
    else:
        raise ValueError(f"Invalid scoring mode: {scoring_mode}")
以下のコードで、get_repetition_penalty_reward関数異なる言語に対応したN-gramの分割方法を選択し、repetition_penalty_reward関数で繰り返しペナルティを計算しています。
def get_repetition_penalty_reward(ngram_size: int, max_penalty: float, language: str = "en"):
    """
    Computes N-gram repetition penalty as described in Appendix C.2 of https://huggingface.co/papers/2502.03373.
    Reference implementation from: https://github.com/eddycmu/demystify-long-cot/blob/release/openrlhf/openrlhf/reward/repetition.py

    Args:
    ngram_size: size of the n-grams
    max_penalty: Maximum (negative) penalty for wrong answers
    language: Language of the text, defaults to `en`. Used to choose the way to split the text into n-grams.
    """
    if max_penalty > 0:
        raise ValueError(f"max_penalty {max_penalty} should not be positive")

    if language == "en":

        def zipngram(text: str, ngram_size: int):
            words = text.lower().split()
            return zip(*[words[i:] for i in range(ngram_size)]), words

    elif language == "zh":
        from transformers.utils.import_utils import _is_package_available

        if not _is_package_available("jieba"):
            raise ValueError("Please install jieba to use Chinese language")

        def zipngram(text: str, ngram_size: int):
            import jieba

            seg_list = list(jieba.cut(text))
            return zip(*[seg_list[i:] for i in range(ngram_size)]), seg_list

    else:
        raise ValueError(
            f"Word splitting for language `{language}` is not yet implemented. Please implement your own zip-ngram function."
        )

    def repetition_penalty_reward(completions, **kwargs) -> float:
        """
        reward function the penalizes repetitions
        ref implementation: https://github.com/eddycmu/demystify-long-cot/blob/release/openrlhf/openrlhf/reward/repetition.py

        Args:
            completions: List of model completions
        """

        contents = [completion[0]["content"] for completion in completions]
        rewards = []
        for completion in contents:
            if completion == "":
                rewards.append(0.0)
                continue

            ngrams = set()
            total = 0
            ngram_array, words = zipngram(completion, ngram_size)

            if len(words) < ngram_size:
                rewards.append(0.0)
                continue

            for ng in ngram_array:
                ngrams.add(ng)
                total += 1

            scaling = 1 - len(ngrams) / total
            reward = scaling * max_penalty
            rewards.append(reward)
        return rewards

    return repetition_penalty_reward
5. おわりに
この記事では、GPT-3, InstructGPT, DeepSeek-R1などのLLMの歴史に大きな影響を与えた研究の事前学習と事後学習のパイプラインについて解説しました。また、これらのパイプラインをOSSを用いて再現するためのコード例も紹介しました。この記事を通して、LLMの事前学習や事後学習を始めるきっかけになれば幸いです。
研究目的であれば事前学習から行うこともありますが、多くのビジネスユースケースでは、プロンプトエンジニアリングで十分に対応できることが多いです。また、コストの問題だけでなく、大規模なモデルの追加には多くのデータが必要である一方、小規模なモデルでは追加学習の効果が限定的であることもあります。そのため、LLMに対して何かしらの学習をさせることは「最終手段」になることが多いです。しかし、一部のプロダクト開発では、LLMの性能を最大限に引き出すために、適切な学習手法を選択することが重要だと考えています。例えば、OpenAIのDeepResearchはGPT-o3をベースにブラウザやPythonを実行できる環境でファインチューニングを行い、高度なReasoning能力を獲得しています(OpenAI’s Deep Research Team on Why Reinforcement Learning is the Future for AI Agents)
この記事を通して、LLMの研究開発には多くの技術が関わっていることを理解いただけたかと思います。ここで紹介した手法やコードはあくまで一部に過ぎず、分散学習/量子化/自動混合精度/蒸留/枝狩り/モデルマージ/MoE/FlashAttention/KVキャッシュなど、様々な工夫が取りいられており、私もまだまだ勉強中の分野です。今後も引き続きキャッチアップし、理解した内容は記事として発信していきたいと思います。
Appendix
ファインチューニングと〇〇チューニングの違い
LLMの分野では、〇〇チューニングという用語が多く使われ、自分が勉強し始めた頃は混乱しました。以下に個人的な理解をまとめます。
-
ファインチューニング
ファインチューニングとは、事前学習済みモデルに対して、新たなタスクやドメインに適応させるために追加学習を行う手法です。近年のLLMの文脈では、以下の4つのパターンが存在すると考えています。- 転移学習: あるタスクやドメインで事前学習されたモデルを、別のタスクやドメインに適応させるために追加学習を行う手法です。YOLOなどの一般的な機械学習モデルの文脈で使われることが多いです。
- 事前学習モデルの下流タスク適応: 汎用的な特徴量を学習した事前学習モデルに対して、特定の下流タスクを解くために追加学習を行う手法です。LLMの文脈では、BERTやGPTなどの事前学習モデルに対して、感情分析や質問応答などの特定のタスクを解くために追加学習を行う場合に使われることが多いです。
- 教師ありファインチューニング: LLMの文脈では、この意味で使われることが多いです。
- 強化学習: あまり一般的ではありませんが、強化学習によってモデルを追加学習すること全般を、論文によってはこれもファインチューニングと呼ぶことがあります。
-
教師ありファインチューニング(SFT)
Alignmnetのための教師あり学習のことです。特に、(強化学習ではなく)教師あり学習というニュアンスが強調される印象があります。 -
指示チューニング(Instruction Tuning)
SFTと同義で使われることがあります。特に、指示に従った回答を生成する能力を向上させる、というニュアンスが強調される印象があります。 -
選好チューニング(Preference Tuning)
Alignmentのための強化学習のことです。強化学習によって、人間の好み(選好)に基づいた回答を生成する能力を向上させる、というニュアンスが強調される印象があります。
目的に応じた学習手法の選択
これまで多くの学習パイプラインを紹介しましたが、実際にLLMを事前学習、事後学習する際にはどのような手法を選択すればよいのでしょうか。以下に、目的に応じた学習手法の選択と必要なデータセットのガイドラインを示します。
-
事前学習:
- ユースケース:
- トークナイザーの語彙を大幅に変更したい場合
- 必要なもの:
- 自己教師あり学習に必要な大規模データセット
- 参考:
- ユースケース:
-
継続事前学習:
- ユースケース:
- 医療や法律など、特定のドメインに特化した知識を獲得したい場合
- 英語などで事前学習されたLLMに対して、日本語データで継続事前学習を行うことで、日本語に特化したモデルを構築したい場合
- 特殊トークンなどを追加したい場合
- 必要なもの:
- ドメイン固有の大規模テキストデータ
- 参考:
- ユースケース:
-
教師ありファインチューニング(SFT):
- ユースケース:
- 特定の指示に従った回答を生成したい場合
- 特定のフォーマットに従った回答を生成したい場合(JSON/箇条書きなど)
- 回答スタイルを制御したい場合(丁寧/カジュアルなど)
- 必要なもの:
- プロンプトと理想的な回答のペアからなるデータセット
- 参考
- ユースケース:
-
下流タスクに対するファインチューニング:
- ユースケース:
- 自然言語処理の特定のタスクに対してモデルを適応させたい場合
- 生成ではなくタスク性能そのものが重要な場合
- 必要なもの:
- タスク固有のラベル付きデータセット
- 参考
- ユースケース:
-
強化学習:
- ユースケース:
- ユーザによるフィードバックデータを元に改善したい場合
- コーディング、数学的推論、Tool Useなどの高度なReasoning能力を獲得したい場合
- 必要なもの:
- スコアを順位付けした比較データセット(DPO)
- 報酬モデルが存在する場合(PPO or GRPO)
- ルールベースで評価可能な評価関数(GRPO, RLVR)
- 参考
- ユースケース:
-
Vaswani A, Shazeer N, Parmar N, et al. Attention Is All You Need. arXiv.org. Published 2017. Accessed December 22, 2025. https://arxiv.org/abs/1706.03762
↩︎ -
Scaling Laws for Neural Language Models ↩︎
-
Scaling Laws for Autoregressive Generative Modeling ↩︎
-
Training language models to follow instructions with human feedback ↩︎ ↩︎ ↩︎
-
Constitutional AI: Harmlessness from AI Feedback ↩︎
-
Direct Preference Optimization: Your Language Model is Secretly a Reward Model ↩︎
-
DeepSeek-R1: Incentivizing Reasoning Capability in LLMs via Reinforcement Learning ↩︎
-
OpenAI o1 System Card ↩︎
-
Chain of Thought Prompting Elicits Reasoning in Large Language Models ↩︎
-
DeepSeek-V3 Technical Report
↩︎
Discussion