【更新版】とりあえず動かす!Cloud9 & React & Amplify & GraphQLの環境構築(Amplify初期化編)
導入
前に書いた記事(とりあえず動かす!Cloud9 & React & Amplify & GraphQLの環境構築)の更新版です。
Cloud9にReactプロジェクトを作成してAmplifyを構築して疎通確認するまでの手順をまとめました。前回記事からの変更点は要点ごとに記事を分けたことです。
留意事項
- リージョン:オレゴン(us-west-2)
- リージョンは↑で統一しているので、以降の手順を進める際にはリージョンをオレゴン(us-west-2)で進めます
- Reactのプロジェクト名:sampleapp
- 全て↑のフォルダ配下で行います
関連する記事の全体
- Cloud9&React準備編
- Amplify初期化編
- Amplify初期化編 ← イマココ
- function構築編
- 疎通確認編
- ホスティング編
- 後かたずけ編
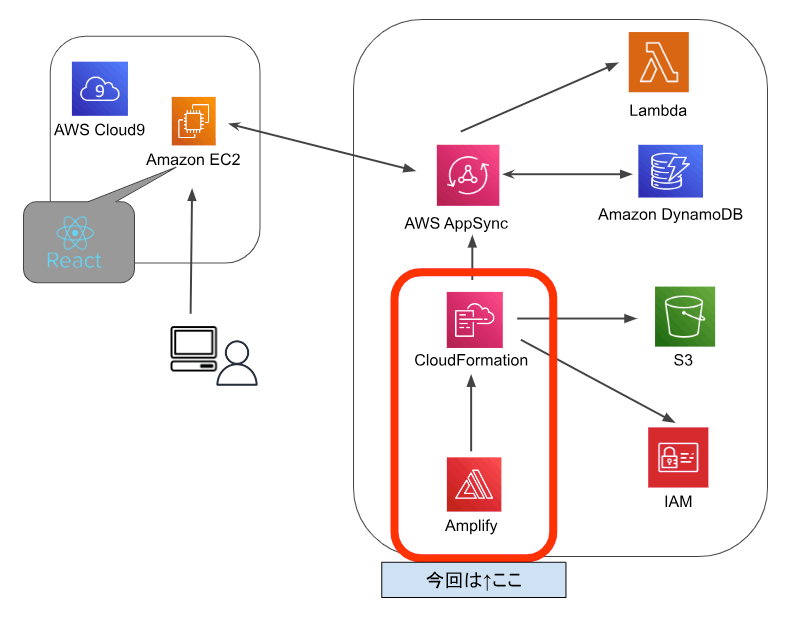
構成
最終的に下の構成にしたいので今回はいよいよAmplifyの初期化を行います。
Amplifyのプロジェクトを初期化
Amplifyのコマンドは対話形式で設定を行います。
前回の記事で構築したCloud9にあるReactプロジェクトsampleappの配下にターミナルで移動します。
以下コマンドでAmplifyの初期化を行います。
amplify init
コマンド実行後にAmplifyのプロジェクト名を聞かれるのでそのままEnterを押します。
Note: It is recommended to run this command from the root of your app directory
? Enter a name for the project (sampleapp)
次にプロジェクト情報を聞かれますが、同じく修正しないのでそのままEnterを押します。
The following configuration will be applied:

Project information
| Name: sampleapp
| Environment: dev
| Default editor: Visual Studio Code
| App type: javascript
| Javascript framework: react
| Source Directory Path: src
| Distribution Directory Path: build
| Build Command: npm run-script build
| Start Command: npm run-script start

? Initialize the project with the above configuration? (Y/n)
次にAmplifyの認証に利用するIAMのアクセスキーとシークレットキーを入力します。矢印キーで「AWS access keys」を選択してEnterを押します。
? Select the authentication method you want to use:
  AWS profile
❯ AWS access keys
次にIAM作成編でダウンロードしたCSVファイルを開いて、アクセスキーとシークレットアクセスキーをそれぞれ入力してEnterを押します。
? accessKeyId:  ********************
? secretAccessKey:  ****************************************
次にリージョンを選択します。ここでは矢印キーで「us-west-2」(オレゴン)を選択します。
? region:
  us-east-1
  us-east-2
  us-west-1
❯ us-west-2
  eu-north-1
  eu-south-1
  eu-west-1
(Move up and down to reveal more choices)
最後に出る以下の確認は「n」を押して拒否します。Google翻訳では「障害時に機密性の低い設定を共有することで、Amplify CLI の改善に貢献します」とのことですが、よくわかっていないので拒否します。
? Help improve Amplify CLI by sharing non-sensitive project configurations on failures (y/N) ‣
しばらくすると以下が表示されて初期化が完了です。
Deployment state saved successfully.
✔ Initialized provider successfully.
✅ Initialized your environment successfully.
✅ Your project has been successfully initialized and connected to the cloud!
Some next steps:

"amplify status" will show you what you've added already and if it's locally configured or deployed
"amplify add <category>" will allow you to add features like user login or a backend API
"amplify push" will build all your local backend resources and provision it in the cloud
"amplify console" to open the Amplify Console and view your project status
"amplify publish" will build all your local backend and frontend resources (if you have hosting category added) and provision it in the cloud


Pro tip:
Try "amplify add api" to create a backend API and then "amplify push" to deploy everything
以上でAmplifyの初期化が完了です。次回はGraphQLとfunctionを構築します。
参考サイト
Discussion