とりあえず動かす!Cloud9 & React & Amplify & GraphQLの環境構築
Cloud9にReactをインストールして、AmplifyでGraphQLを操作する手順をまとめました。Reactプロジェクトにはyarnを使ってます。ローカル環境でなくCloud9のみで動かすこと、とにかくAmpligyとGraphQLを使うこと、を目的にしてます。
ほとんど自分のメモ用です。。
以下の記事を参考に環境構築しました。 主に↑を参考にさせていただく
リージョン:オレゴン(us-west-2)
リージョンは↑で統一しているので、以降の手順を進める際にはリージョンをオレゴン(us-west-2)で進めます。
Cloud9を新規作成
Amplifyを使ってReactとGraphQLを疎通することが目的なので、デフォルト設定から特に変更はありません。GraphQLを更新の際にメモリ不足が気になる場合は「Configure settings」の「Instance Type」から「Other instance type」でメモリに余裕を持たせるようにします。

Cloud9自体の新規作成で特段必要な手順はありません。
EC2インスタンスのディスク容量を拡張
以下の記事を参考にEC2の容量を20GBへ拡張します。
Amplify CLIをインストールする際にnode.jsのパッケージ容量が増加したので、EC2のディスク容量を拡張しないとエラーになるためです。
Cloud9の一時認証情報を無力化する
Cloud9の左上「9」(cloud9のアイコン)→Preference→AWS Settings→「AWS managed temporary credencials」のトグルをOFFにします。


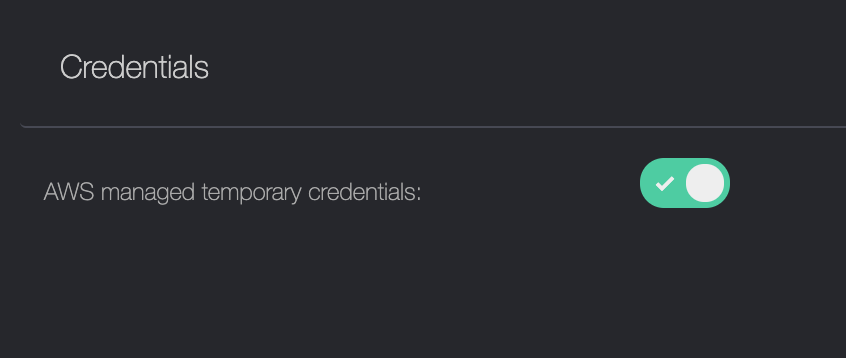
OFFにします。↑↑
npmのアップデート
以下の記事を参考にnpmをアップデートします。
Amplifyパッケージをインストールの際に最新のパッケージをインストールするためです。
create-react-appをインストールしてReactプロジェクト作成
Cloud9のターミナルから以下のコマンドで「create-react-app」をインストールします。「npm」はCloud9にインストール済みなので、新規インストール不要で利用できます。
npm install -g create-react-app
以下のコマンドでReactプロジェクトを新規作成します。この記事ではプロジェクト名を「sampleapp」で統一します。
create-react-app sampleapp
Reactプロジェクトを作成したらプロジェクト配下に移動しておく
cd sampleapp
以降のコマンド実行は、全てsampleappプロジェクトの配下で行います
Reactにyarnをインストール
以下コマンドでyarnをインストールします。
npm install -g yarn
AmplifyのCLIをインストール
以下コマンドでAmplifyコマンドを利用できるようにCLIをインストールします。
npm install -g @aws-amplify/cli
Amplifyのプロジェクトを初期化
以下コマンドでAmplifyの初期化を行う。
amplify init
Reactプロジェクト配下でamplifyコマンドから初期化するとReactプロジェクトとしての構築で読み込まれるため、対話形式の設定ですが基本的に「Y」 または「未入力のままENTER押下」で進めます。
? Enter a name for the project (sampleapp):
プロジェクト名はsampleappで統一のため、このままENTER押下します。
Project information
| Name: sampleapp
| Environment: dev
| Default editor: Visual Studio Code
| App type: javascript
| Javascript framework: react
| Source Directory Path: src
| Distribution Directory Path: build
| Build Command: npm run-script build
| Start Command: npm run-script start
? Initialize the project with the above configuration? (Y/n):
エディタの選択をVisual Studio Codeにしていますが、全てCloud9で行うため、特に変更せず「Y」で進めます。
? Select the authentication method you want to use: (Use arrow keys):
矢印キーで「AWS profile」を選択します。
? Setup new user (Y/n):
今回は新規にAmplify用のIAMユーザーを作成するため、Yで進めます。
Sign in to your AWS administrator account:
https://console.aws.amazon.com/
Press Enter to continue
すでにCloud9で操作しているため、AWSログインはしているので、ENTERを押下します。
Specify the AWS Region
? region: (Use arrow keys)
矢印キーで「us-west-2」を選択します。
Specify the username of the new IAM user
? user name: (amplify-abcde)
「amplify-abcde」という名前のIAMユーザーを作成するため、そのままENTERを押下します。
※新規作成するIAMユーザー名は毎回ランダムに変わるため、今回は「amplify-abcde」で進めます。
Complete the user creation using the AWS console
https://console.aws.amazon.com/iam/home?region=us-west-2#/users$new?step=final&accessKey&userNames=amplify-abcde&permissionType=policies&policies=arn:aws:iam::aws:policy%2FAdministratorAccess
Press Enter to continue
表示されたURLをコピーしてブラウザの別タブでペーストします。IAMユーザーの作成画面が表示されます。IAMユーザーの作成画面はデフォルトのまま右下の「次のステップ」〜「ユーザーの作成」まで進めます。
IAMユーザーが作成されるとアクセスキーIDとシークレットアクセスキーが表示されます。

※シークレットアクセスキーは「表示」をクリックして表示されます
アクセスキーIDとシークレットアクセスキーをコピーしておくか、jsonファイルをダウンロードします。
Cloud9のターミナルに戻って「Press Enter to continue」でENTERを押下します。
Enter the access key of the newly created user:
? accessKeyId: [hidden]
アクセスキーIDを入力します。
? secretAccessKey: [hidden]
シークレットアクセスキーを入力します。
? Profile Name: (default)
プロファイル名は「default」のままで変更しないため、何も入力せずENTERを押下します。
? Please choose the profile you want to use (Use arrow keys)
❯ default
同じくプロファイルキーは変更しないため、何も入力せずENTERを押下します。
Your project has been successfully initialized and connected to the cloud!
こちらが表示されたらAmplifyの初期化が完了です。
APIの新規作成
以下コマンドを実行してAPIを新規作成します。
amplify add api
? Please select from one of the below mentioned services: (Use arrow keys)
❯ GraphQL
   REST
今回の主題であるGraphQLを選択します。
Provide API name:
Reactプロジェクトと同じため、何も入力せずENTERを押下します。
? Choose the default authorization type for the API (Use arrow keys)
❯ API key
   Amazon Cognito User Pool
   IAM
   OpenID Connect
作成したIAMユーザーのAPIキーを利用するので、API Keyを選択します。
Enter a description for the API key:
APIの説明は記載しないので、何も入力せずENTERを押下します。
After how many days from now the API key should expire (1-365):
APIキーが無効になる期間はデフォルトのままにするため、7を入力します。
? Do you want to configure advanced settings for the GraphQL API (Use arrow keys)
❯ No, I am done.
   Yes, I want to make some additional changes.
GraphQLの追加設定はしないため、No, I am done.を選択します。
Do you have an annotated GraphQL schema? (y/N):
注釈をつけないので、Nを入力します。
? Choose a schema template: (Use arrow keys)
❯ Single object with fields (e.g., “Todo” with ID, name, description)
  One-to-many relationship (e.g., “Blogs” with “Posts” and “Comments”)
スキーマテンプレートから作成するテーブルは1つなので、Single object with fieldsを選択します。
? Do you want to edit the schema now? (y/N):
スキーマはこのタイミングで編集するのでYを入力します。
もしエディタが開かない場合は後述する手順でスキーマを編集してください。
? Choose your default editor: (Use arrow keys)
❯ Visual Studio Code
  Android Studio
  Xcode (Mac OS only)
  Atom Editor
  Sublime Text
  IntelliJ IDEA
  Vim (via Terminal, Mac OS only)
編集する際のエディターは好みのものを選択します。スキーマの編集でテンプレートの記載を全て削除し、以下を貼り付けます。(v2対応ずみスキーマ)
type Todo @model @auth(rules: [{allow: public}]){
    id: ID! @primaryKey
    name: String! @index(name: "SortByCreatedAt", sortKeyFields:["owner"], queryField: "listTodosSortedByName")
    owner: String
    updatedAt: AWSDateTime
    createdAt: AWSDateTime
}
エディターを閉じて、以下が表示されればAPIの作成に成功です。
Successfully added resource boardapp locally
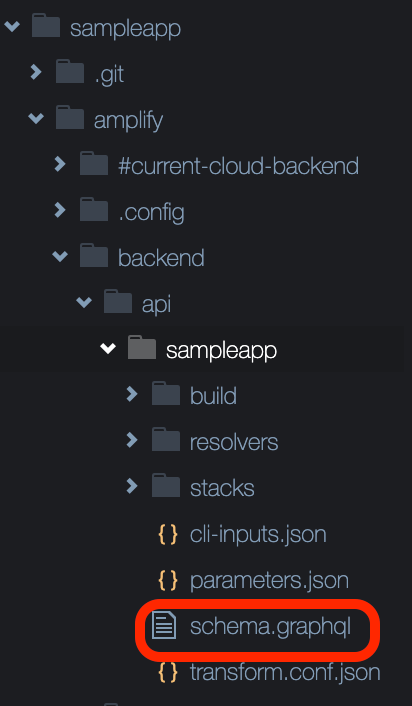
エディタが開かない場合
スキーマ編集の際にCloud9でエディタが開かない場合は手動で編集します。以下にあるファイルをCloud9上で開いて編集します
sampleapp/amplify/backend/api/sampleapp/schema.graphql
APIのアップロード
以下のコマンドで、作成したAPIをAmplifyコマンドでAWSへアップロードします。(ローカルのAPIをAWSへ反映します。)
amplify push
| Category | Resource name | Operation | Provider plugin |
| -------- | ------------- | --------- | ----------------- |
| Api | sampleapp | Create | awscloudformation |
? Are you sure you want to continue? (Y/n):
新規作成したAPIをアップロードするので、Yを入力します。
? Do you want to generate code for your newly created GraphQL API (Y/n):
GraphQLを生成するので、Yを入力します。
? Choose the code generation language target (Use arrow keys)
❯ javascript
   typescript
   flow
Reactのため、javascriptを選択します。
Enter the file name pattern of graphql queries, mutations and subscriptions (src/graphql/**/*.js):
graphql, queries, mutationsの3つを表示の形式で作成するので、Yを入力します。
Do you want to generate/update all possible GraphQL operations - queries, mutations and subscriptions (Y/n):
graphql, queries, mutationsの3つを作成するので、Yを入力します。
Enter maximum statement depth [increase from default if your schema is deeply nested] (2):
ネストはデフォルトのまま2つなので、2を入力します。APIのアップロードには数分かかるので、完了まで待ちます。
✔ Generated GraphQL operations successfully and saved at src/graphql
✔ All resources are updated in the cloud
これが表示されると完了です。
ReactにApmlifyのライブラリを追加
yarnでAmplifyのライブラリを追加します。
yarn add aws-amplify aws-amplify-react
ライブラリの追加後、src/index.jsに以下を追加します。
import { Amplify } from 'aws-amplify'
import config from "./aws-exports";
Amplify.configure(config)
追加後のsrc/index.js全体は以下の通りです。
import React from 'react';
import ReactDOM from 'react-dom';
import './index.css';
import App from './App';
import reportWebVitals from './reportWebVitals';
import { Amplify } from 'aws-amplify'
import config from "./aws-exports";
Amplify.configure(config)

ReactDOM.render(
  <React.StrictMode>
    <App />
  </React.StrictMode>,
  document.getElementById('root')
);

// If you want to start measuring performance in your app, pass a function
// to log results (for example: reportWebVitals(console.log))
// or send to an analytics endpoint. Learn more: https://bit.ly/CRA-vitals
reportWebVitals();
疎通用のApp.jsに書き換え
今回は疎通できればOKなので、src/App.js全体を消して、以下に書き換えます。
import {React, useState, useEffect, useReducer } from 'react';
import {API, graphqlOperation } from '@aws-amplify/api';
import { createTodo } from './graphql/mutations';
import { onCreateTodo } from './graphql/subscriptions';
import './App.css';
const QUERY = 'QUERY';
const SUBSCRIPTION = 'SUBSCRIPTION';
const initialState = {
todos: [],
};
const reducer = (state, action) => {
switch (action.type) {
case QUERY:
return {...state, todos: action.todos};
case SUBSCRIPTION:
return {...state, todos:[...state.todos, action.todo]}
default:
return state;
}
};
async function createNewTodo() {
const todo = { name: "Todo " + Math.floor(Math.random() * 10) };
await API.graphql(graphqlOperation(createTodo, { input: todo }));
}
function App() {
const [state, dispatch] = useReducer(reducer, initialState);
const [user] = useState(null);
useEffect(() => {
const subscription = API.graphql(graphqlOperation(onCreateTodo)).subscribe({
next: (eventData) => {
const todo = eventData.value.data.onCreateTodo;
dispatch({ type: SUBSCRIPTION, todo });
}
});
return () => subscription.unsubscribe();
}, []);
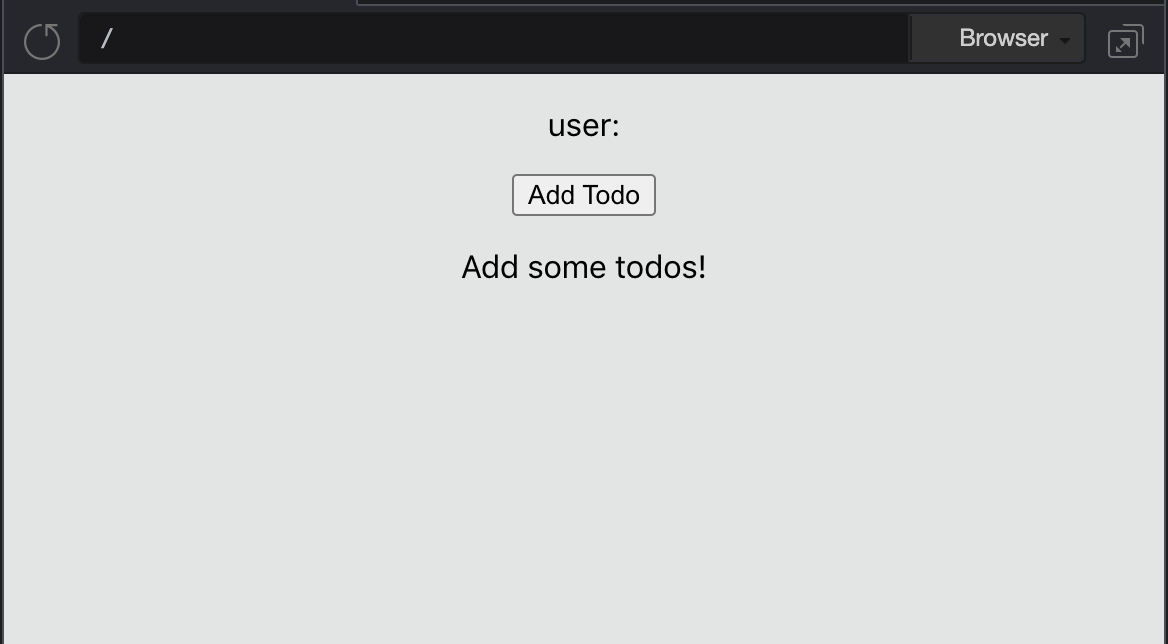
return (
<div className="App">
<p>user: {user!= null && user.username}</p>
<button onClick={createNewTodo}>Add Todo</button>
<div>
{state.todos.length > 0 ?
state.todos.map((todo) => <p key={todo.id}>{todo.name} ({todo.createdAt})</p>) :
<p>Add some todos!</p>
}
</div>
</div>
);
}
export default App;
後はyarnからReactを開始します。
(Cloud9の作成時にメモリを最小構成にした場合は、途中でメモリが上限に達して起動までに時間がかかります)
yarn start
「Preview」→「Preview Running Application」でCloud9のプレビューを表示します。

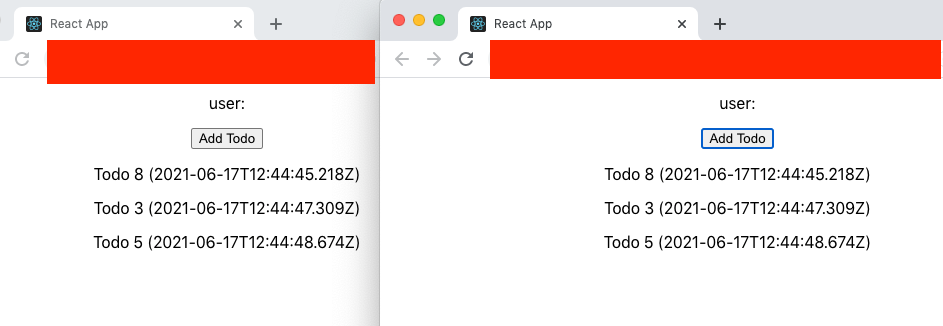
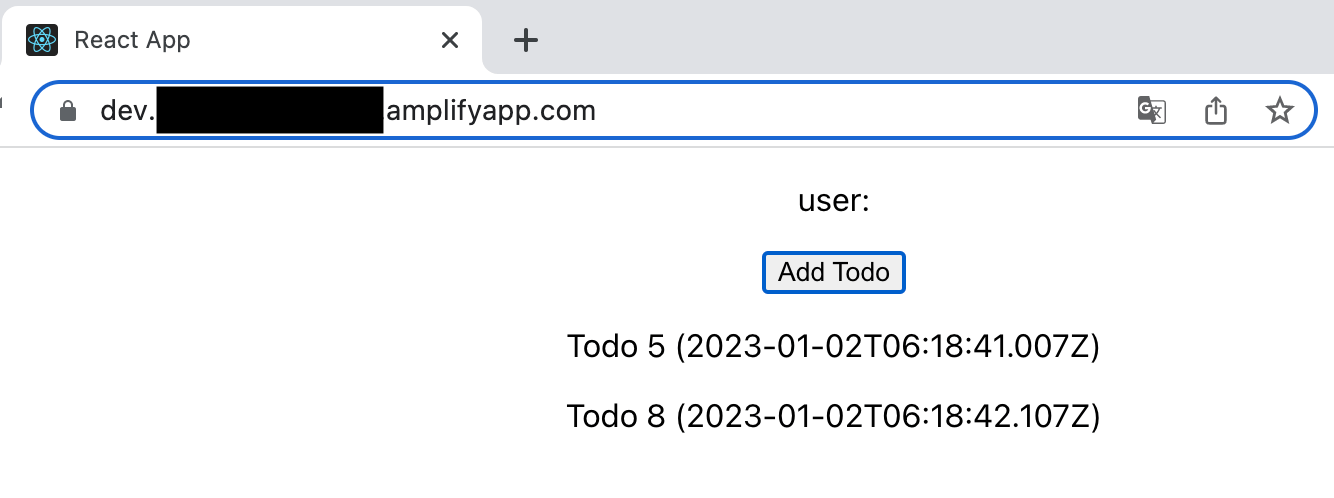
subscriptionを利用してリアルタイムに即時反映を行なっているので、ボタン押下直後にもう一方のブラウザにも入力内容が反映されます。詳細な説明は別の機会に。
ホスティングを行う場合
複雑なドメイン設定を行うことなくウェブアプリとして動かしたい場合は以下の手順でホスティングの設定を行います。
amplify add hosting
? Select the plugin module to execute … (Use arrow keys or type to filter)
Amplifyのコンソール上でホスティングするので「Hosting with Amplify Console (Managed hosting with custom domains, Continuous deployment)」を選択します。
? Choose a type (Use arrow keys)
お試しなので「Manual deployment」を選択します。
静的コンテンツと共にAmplifyにアップロードするので以下コマンドでpushします。
amplify publish
? This version of Amplify CLI introduces additional security enhancements for your GraphQL API. The changes are applied automatically with this deployment. This change won't impact your client code. Continue? (Y/n)
一度しか動かさないお試しなのでYを押下します。
┌──────────┬────────────────┬───────────┬───────────────────┐
│ Category │ Resource name  │ Operation │ Provider plugin   │
├──────────┼────────────────┼───────────┼───────────────────┤
│ Hosting  │ amplifyhosting │ Create    │ awscloudformation │
├──────────┼────────────────┼───────────┼───────────────────┤
│ Api      │ sampleapp      │ Update    │ awscloudformation │
└──────────┴────────────────┴───────────┴───────────────────┘
? Are you sure you want to continue? (Y/n)
内容を確認してYを押下します。
? Do you want to update code for your updated GraphQL API (Y/n)
更新してませんがYを押下します。
? Do you want to generate GraphQL statements (queries, mutations and subscription) based on your schema types?
This will overwrite your current graphql queries, mutations and subscriptions (Y/n)
同じく更新してないので上書きされるものはありませんがYを押下します。
✔ Zipping artifacts completed.
✔ Deployment complete!
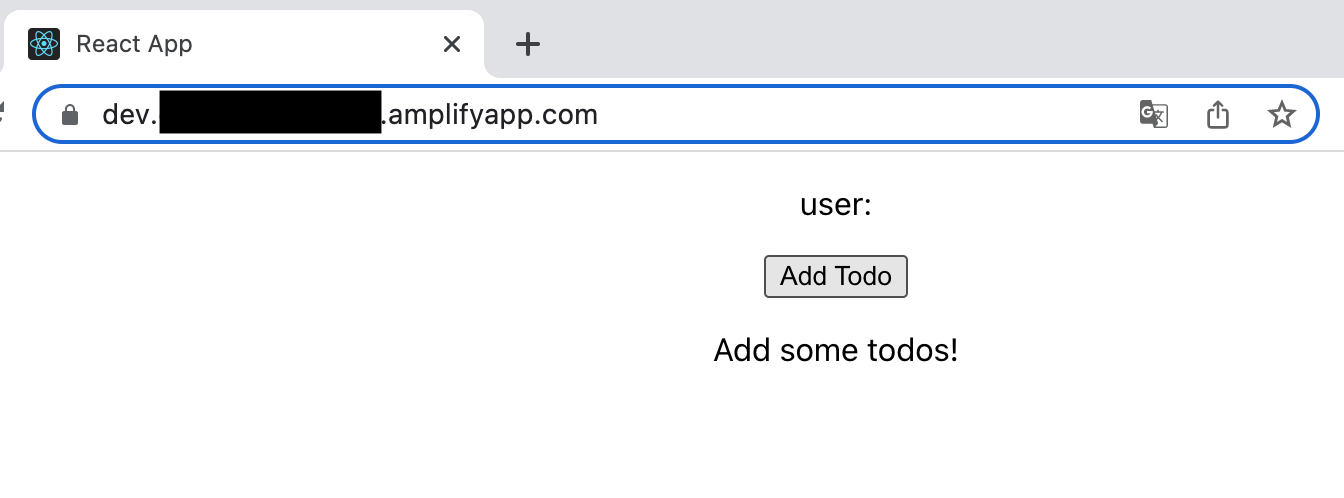
https://dev.abcdefg123456.amplifyapp.com
この表示がでればアップロード完了なので、表示されたURLにアクセスすると先ほどと同じように、お試し用のアプリが表示されます。(URLは環境ごとに異なります)
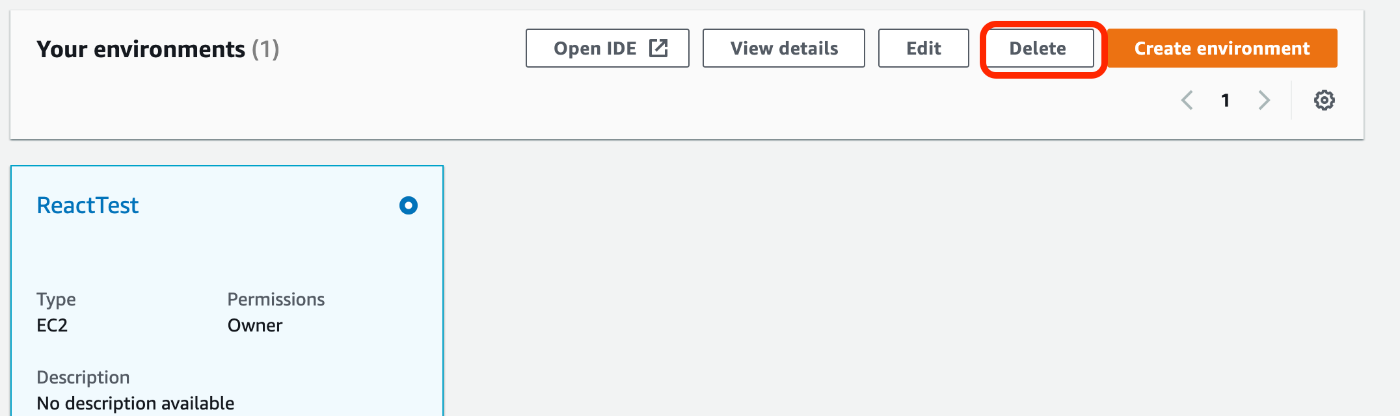
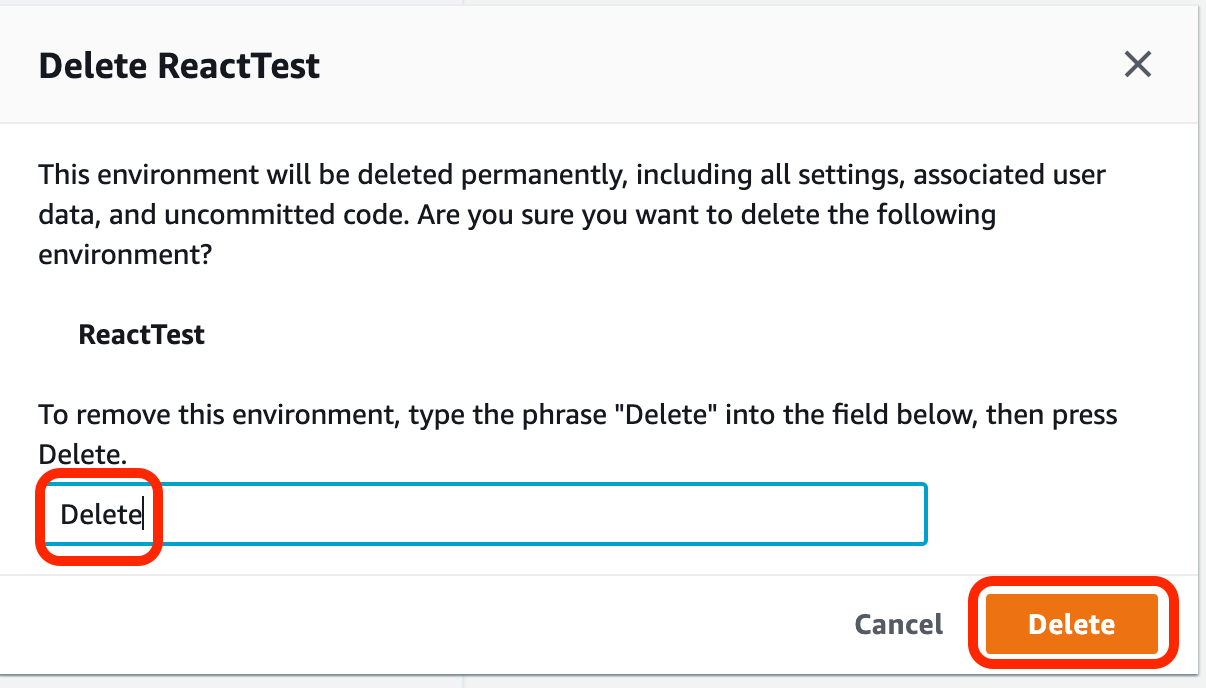
Amplify、Cloud9プロジェクト、IAMの削除
お試しで作った場合は、課金されないようにプロジェクトを削除します。プロジェクトを削除する場合は、Reactを 「Control + C」 で停止してから、以下のコマンドを実行します。
amplify delete
? Are you sure you want to continue? This CANNOT be undone. (This will delete all the environments of the project from the cloud and wipe out all the local fil
es created by Amplify CLI) (y/N)
yを入力します。
✔ Project deleted in the cloud
Project deleted locally.
しばらく待つと上記の表示が出て、AmplifyのAPIがAWSから削除され課金されなくなります。
次にCloud9のプロジェクトを削除します。
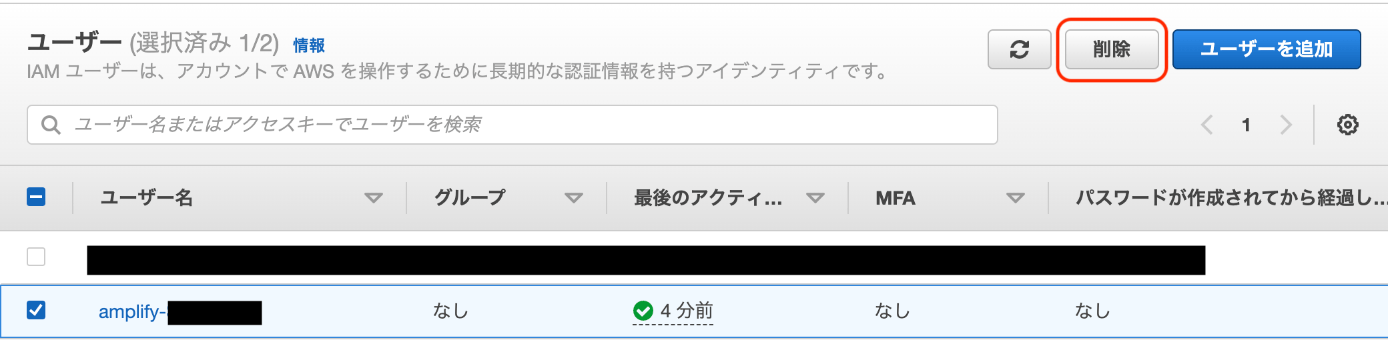
最後に作成したIAMユーザを削除して終了です。
Discussion