人物抽出のためのコード比較その②: YOLOv5, SORT
はじめに
人物抽出は、画像や動画から特定の人物を背景から分離する技術です。
AR(拡張現実)やVR(仮想現実)のようなアプリケーションでよく使用されます。
今回は前回の記事に引き続き、人物抽出の技術を紹介します。
この記事の続きは以下になります。
リアルタイム性と追従性を重視します。今回のキーワードはYOLOv5とSORTです。
環境
Python 3.8.10
(FACE01)
$ inxi -SCGxx --filter
System:    Kernel: 5.15.0-46-generic x86_64 bits: 64 compiler: N/A Desktop: Unity wm: gnome-shell dm: GDM3
           Distro: Ubuntu 20.04.4 LTS (Focal Fossa)
CPU:       Topology: Quad Core model: AMD Ryzen 5 1400 bits: 64 type: MT MCP arch: Zen rev: 1 L2 cache: 2048 KiB
Graphics:  Device-1: NVIDIA TU116 [GeForce GTX 1660 Ti] vendor: Micro-Star MSI driver: nvidia v: 515.65.01 bus ID: 08:00.0
方法
元動画
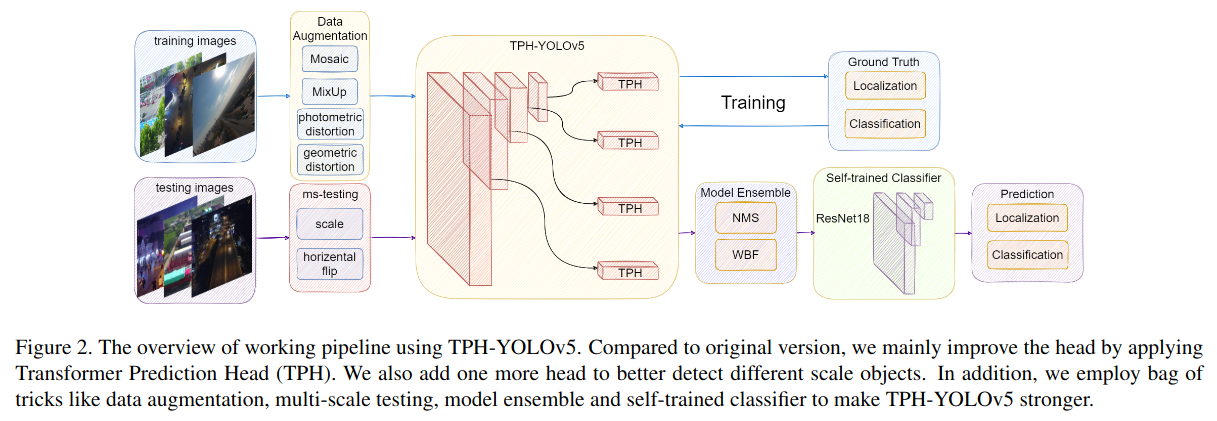
YOLOv5
YOLOv5(You Only Look Once version 5)は、物体検出タスクにおいて非常に高速で精度の高い結果を提供する深層学習モデルです。
リアルタイムの物体検出に特化しており、一度の推論で物体の位置とクラスを同時に予測します。自動運転、ビデオ監視、ロボットビジョンなど、さまざまなアプリケーションで使用することが可能です。
発展研究
import io
import cv2
import torch
import PySimpleGUI as sg
from PIL import Image, ImageTk

# YOLOv5モデルのロード
model = torch.hub.load('ultralytics/yolov5', 'yolov5s')

def process_frame(frame):
    # フレームをPILイメージに変換
    img = Image.fromarray(frame)

    # YOLOv5で予測
    results = model(img)

    # 人間のクラスIDを取得(YOLOv5の場合、0が人間)
    person_class_id = 0

    # フレームを透明化
    frame_alpha = cv2.cvtColor(frame, cv2.COLOR_BGR2BGRA)
    frame_alpha[..., 3] = 0  # 全部透明にする

    for *box, conf, cls in results.xyxy[0]:
        if int(cls) == person_class_id:
            x1, y1, x2, y2 = map(int, box)
            frame_alpha[y1:y2, x1:x2, 3] = 255  # 人物部分だけ不透明にする

    return frame_alpha

# 動画の読み込み
cap = cv2.VideoCapture('assets/input_video_3.mp4')

# PySimpleGUIの設定
sg.theme('Reddit')
layout = [[sg.Image(filename='', key='-IMAGE-')]]
window = sg.Window('Image', layout, location=(800,400))

frame_cnt = 0
while True:
    # フレームを読み込む
    ret, frame = cap.read()
    frame_cnt += 1
    if not frame_cnt % 5 == 0:  # 一定の割合で処理をスキップ
        continue
    if ret == False:
        break
    frame = cv2.resize(frame, (800, 600))

    # YOLOv5で人物以外の領域を透明化
    frame_alpha = process_frame(frame)

    # PNG形式にエンコード
    is_success, buffer = cv2.imencode(".png", frame_alpha)
    if is_success:
        # エンコードした画像をPIL.Imageに変換
        bio = io.BytesIO(buffer)
        image = Image.open(bio)

        # PySimpleGUIで表示
        event, values = window.read(timeout=25)
        if event == sg.WINDOW_CLOSED:
            break
        window['-IMAGE-'].update(data=ImageTk.PhotoImage(image))

    if event == sg.WINDOW_CLOSED:
        break
window.close()
cap.release()
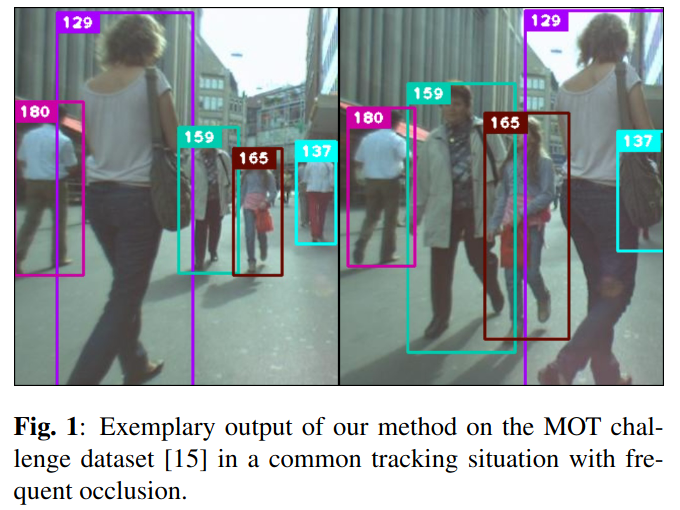
SORT
SORT(Simple Online and Realtime Tracking)は、リアルタイムで物体を追跡するためのアルゴリズムです。
その名前が示す通り、シンプルな設計とリアルタイム性を重視しています。
このアルゴリズムは、物体検出とカルマンフィルターを組み合わせることで、物体の動きを追跡します。
SORTは、物体検出(画像内の物体の位置とクラスを特定するタスク)の結果を入力として受け取り、それを用いて物体の追跡を行います。物体検出の結果は、一般的にバウンディングボックス(物体を囲む矩形)の形で表示可能です。
SORTはカルマンフィルターを使用して、物体の動きを予測します。
カルマンフィルターは、ノイズのある観測からシステムの状態を推定するためのアルゴリズムです。
SORTではこれを用いて、物体の位置と速度を同時に推定し、物体の現在の位置だけでなく、次のフレームでの位置も予測することが可能となります。
さらに、SORTはハンガリアンアルゴリズムを用いて、検出結果と追跡結果の間で最適なマッチングを行います。これにより、同一の物体が連続するフレームでトレースすることが可能になります。
DEEP SORT(Deep Simple Online and Realtime Tracking)
今回の記事では扱いませんが、DEEP SORTも紹介します。
SORT(Simple Online and Realtime Tracking)とDEEP SORT(Deep Simple Online and Realtime Tracking)は、両方ともリアルタイムの物体追跡アルゴリズムですが、以下の違いがあります。
-
特徴量抽出:SORTは物体のバウンディングボックスの位置と大きさのみを使用して追跡を行いますが、DEEP SORTは物体の外観特徴も考慮に入れます。これは、特徴抽出ネットワークを用いて、物体の外観から特徴ベクトルを抽出することで実現しています。この特徴ベクトルは、物体の識別と追跡に使用されます。
-
物体の一致:SORTはバウンディングボックス間のIoU(Intersection over Union)を計算し、それに基づいて物体の一致を決定します。一方、DEEP SORTは物体の一致を決定する際に、バウンディングボックスのIoUだけでなく、抽出された特徴ベクトルのコサイン距離も考慮に入れます。
-
物体の消失と再出現:SORTは物体が一時的に視界から消えた場合、すぐにその物体の追跡を停止します。一方、DEEP SORTは物体が一時的に視界から消えても、その物体の追跡を続けることができます。これは、DEEP SORTが物体の外観特徴を記憶しているため、物体が再び視界に入ったときにそれを再認識することができるからです。
これらの違いにより、DEEP SORTはSORTよりも高度な追跡性能を持つ一方で、計算コストが高くなるというトレードオフがあります。
SORTの実装
import numpy as np
try:
    from sklearn.utils.linear_assignment_ import linear_assignment
except ImportError:
    from scipy.optimize import linear_sum_assignment
    def linear_assignment(cost_matrix):
        x, y = linear_sum_assignment(cost_matrix)
        return np.array(list(zip(x, y)))

from filterpy.kalman import KalmanFilter


class Sort:
    def __init__(self, max_age=1, min_hits=3, iou_threshold=0.3):
        self.max_age = max_age
        self.min_hits = min_hits
        self.iou_threshold = iou_threshold
        self.trackers = []
        self.frame_count = 0

    def update(self, dets=np.empty((0, 5))):
        self.frame_count += 1
        trks = np.zeros((len(self.trackers), 5))
        to_del = []
        ret = []
        for t, trk in enumerate(trks):
            pos = self.trackers[t].predict()[0]
            trk[:] = [pos[0], pos[1], pos[2], pos[3], 0]
            if np.any(np.isnan(pos)):
                to_del.append(t)
        trks = np.ma.compress_rows(np.ma.masked_invalid(trks))
        for t in reversed(to_del):
            self.trackers.pop(t)
        matched, unmatched_dets, unmatched_trks = associate_detections_to_trackers(dets, trks, self.iou_threshold)

        # update matched trackers with assigned detections
        for m in matched:
            self.trackers[m[1]].update(dets[m[0], :])

        # create and initialise new trackers for unmatched detections
        for i in unmatched_dets:
            trk = KalmanBoxTracker(dets[i, :])
            self.trackers.append(trk)
        i = len(self.trackers)
        for trk in reversed(self.trackers):
            d = trk.get_state()[0]
            if (trk.time_since_update < 1) and (trk.hit_streak >= self.min_hits or self.frame_count <= self.min_hits):
                ret.append(np.concatenate((d, [trk.id+1])).reshape(1, -1))  # +1 as MOT benchmark requires positive
            i -= 1
            # remove dead tracklet
            if trk.time_since_update > self.max_age:
                self.trackers.pop(i)
        if len(ret) > 0:
            return np.concatenate(ret)
        return np.empty((0, 5))


def linear_assignment(cost_matrix):
  try:
    import lap
    _, x, y = lap.lapjv(cost_matrix, extend_cost=True)
    return np.array([[y[i],i] for i in x if i >= 0])
  except ImportError:
    from scipy.optimize import linear_sum_assignment
    x, y = linear_sum_assignment(cost_matrix)
    return np.array(list(zip(x, y)))

def iou_batch(bb_test,bb_gt):
  """
  From SORT: Computes IUO between two bboxes in the form [x1,y1,x2,y2]
  """
  bb_gt = np.expand_dims(bb_gt, 0)
  bb_test = np.expand_dims(bb_test, 1)

  xx1 = np.maximum(bb_test[..., 0], bb_gt[..., 0])
  yy1 = np.maximum(bb_test[..., 1], bb_gt[..., 1])
  xx2 = np.minimum(bb_test[..., 2], bb_gt[..., 2])
  yy2 = np.minimum(bb_test[..., 3], bb_gt[..., 3])
  w = np.maximum(0., xx2 - xx1)
  h = np.maximum(0., yy2 - yy1)
  wh = w * h
  o = wh / ((bb_test[..., 2] - bb_test[..., 0]) * (bb_test[..., 3] - bb_test[..., 1])
    + (bb_gt[..., 2] - bb_gt[..., 0]) * (bb_gt[..., 3] - bb_gt[..., 1]) - wh)
  return(o)

class KalmanBoxTracker(object):
  """
  This class represents the internal state of individual tracked objects observed as bbox.
  """
  count = 0
  def __init__(self,bbox):
    """
    Initialises a tracker using initial bounding box.
    """
    #define constant velocity model
    self.kf = KalmanFilter(dim_x=7, dim_z=4)
    self.kf.F = np.array([[1,0,0,0,1,0,0],[0,1,0,0,0,1,0],[0,0,1,0,0,0,1],[0,0,0,1,0,0,0],  [0,0,0,0,1,0,0],[0,0,0,0,0,1,0],[0,0,0,0,0,0,1]])
    self.kf.H = np.array([[1,0,0,0,0,0,0],[0,1,0,0,0,0,0],[0,0,1,0,0,0,0],[0,0,0,1,0,0,0]])

    self.kf.R[2:,2:] *= 10.
    self.kf.P[4:,4:] *= 1000. #give high uncertainty to the unobservable initial velocities
    self.kf.P *= 10.
    self.kf.Q[-1,-1] *= 0.01
    self.kf.Q[4:,4:] *= 0.01

    self.kf.x[:4] = convert_bbox_to_z(bbox)
    self.time_since_update = 0
    self.id = KalmanBoxTracker.count
    KalmanBoxTracker.count += 1
    self.history = []
    self.hits = 0
    self.hit_streak = 0
    self.age = 0

  def update(self,bbox):
    """
    Updates the state vector with observed bbox.
    """
    self.time_since_update = 0
    self.history = []
    self.hits += 1
    self.hit_streak += 1
    self.kf.update(convert_bbox_to_z(bbox))

  def predict(self):
    """
    Advances the state vector and returns the predicted bounding box estimate.
    """
    if((self.kf.x[6]+self.kf.x[2])<=0):
      self.kf.x[6] *= 0.0
    self.kf.predict()
    self.age += 1
    if(self.time_since_update>0):
      self.hit_streak = 0
    self.time_since_update += 1
    self.history.append(convert_x_to_bbox(self.kf.x))
    return self.history[-1]

  def get_state(self):
    """
    Returns the current bounding box estimate.
    """
    return convert_x_to_bbox(self.kf.x)

def associate_detections_to_trackers(detections,trackers,iou_threshold = 0.3):
  """
  Assigns detections to tracked object (both represented as bounding boxes)
  Returns 3 lists of matches, unmatched_detections and unmatched_trackers
  """
  if(len(trackers)==0):
    return np.empty((0,2),dtype=int), np.arange(len(detections)), np.empty((0,5),dtype=int)
  iou_matrix = iou_batch(detections, trackers)

  if min(iou_matrix.shape) > 0:
    a = (iou_matrix > iou_threshold).astype(np.int32)
    if a.sum(1).max() == 1 and a.sum(0).max() == 1:
      matched_indices = np.stack(np.where(a), axis=1)
    else:
      matched_indices = linear_assignment(-iou_matrix)
  else:
    matched_indices = np.empty(shape=(0,2))

  unmatched_detections = []
  for d, det in enumerate(detections):
    if(d not in matched_indices[:,0]):
      unmatched_detections.append(d)
  unmatched_trackers = []
  for t, trk in enumerate(trackers):
    if(t not in matched_indices[:,1]):
      unmatched_trackers.append(t)

  #filter out matched with low IOU
  matches = []
  for m in matched_indices:
    if(iou_matrix[m[0], m[1]]<iou_threshold):
      unmatched_detections.append(m[0])
      unmatched_trackers.append(m[1])
    else:
      matches.append(m.reshape(1,2))
  if(len(matches)==0):
    matches = np.empty((0,2),dtype=int)
  else:
    matches = np.concatenate(matches,axis=0)

  return matches, np.array(unmatched_detections), np.array(unmatched_trackers)


def convert_bbox_to_z(bbox):
    """
    Takes a bounding box in the form [x1,y1,x2,y2] and returns z in the form
    [x,y,s,r] where x,y is the centre of the box and s is the scale/area and r is
    the aspect ratio
    """
    w = bbox[2] - bbox[0]
    h = bbox[3] - bbox[1]
    x = bbox[0] + w/2.
    y = bbox[1] + h/2.
    s = w * h    #scale is just area
    r = w / float(h)
    return np.array([x, y, s, r]).reshape((4, 1))

def convert_x_to_bbox(x, score=None):
    """
    Takes a bounding box in the centre form [x,y,s,r] and returns it in the form
    [x1,y1,x2,y2] where x1,y1 is the top left and x2,y2 is the bottom right
    """
    w = np.sqrt(x[2] * x[3])
    h = x[2] / w
    if(score==None):
        return np.array([x[0]-w/2., x[1]-h/2., x[0]+w/2., x[1]+h/2.]).reshape((1,4))
    else:
        return np.array([x[0]-w/2., x[1]-h/2., x[0]+w/2., x[1]+h/2., score]).reshape((1,5))
YOLOv5のコード修正
import io
import cv2
import torch
import numpy as np
import random
import PySimpleGUI as sg
from PIL import Image, ImageTk
from sort import Sort

# YOLOv5モデルのロード
model = torch.hub.load('ultralytics/yolov5', 'yolov5s')

# SORTのインスタンスを作成
mot_tracker = Sort()

# トラッカーIDと色のマッピングを保存する辞書
id_color_map = {}


def process_frame(frame):
    # フレームをPILイメージに変換
    img = Image.fromarray(frame)

    # YOLOv5で予測
    results = model(img)

    # 人間のクラスIDを取得(YOLOv5の場合、0が人間)
    person_class_id = 0

    # フレームを透明化
    frame_alpha = cv2.cvtColor(frame, cv2.COLOR_BGR2BGRA)
    frame_alpha[..., 3] = 0  # 全部透明にする

    # 物体検出の結果を入力として追跡を行う
    dets = []
    for *box, conf, cls in results.xyxy[0]:
        if int(cls) == person_class_id:
            x1, y1, x2, y2 = map(int, (b.cpu() for b in box))
            dets.append([x1, y1, x2, y2, conf.cpu()])
    track_bbs_ids = mot_tracker.update(np.array(dets))

    for bbox in track_bbs_ids:
        x1, y1, x2, y2, track_id = map(int, bbox)

        # トラッカーIDに対応する色がまだ割り当てられていない場合は、新しい色を生成
        if track_id not in id_color_map:
            id_color_map[track_id] = (random.randint(0, 255), random.randint(0, 255), random.randint(0, 255))

        # トラッカーIDに対応する色を取得
        color = id_color_map[track_id]

        # ボーダーラインを描画
        cv2.rectangle(frame, (x1, y1), (x2, y2), color, 3)

        # cv2.rectangle(frame, (x1, y1), (x2, y2), color, 1)

        # トラッカーIDを表示(人物領域の内側に表示)
        cv2.putText(frame, str(track_id), (x1+5, y2-5), cv2.FONT_HERSHEY_SIMPLEX, 1, color, 2)

        # 人物部分だけ不透明にし、色を割り当てる
        frame_alpha[y1:y2, x1:x2, :3] = frame[y1:y2, x1:x2, :]
        frame_alpha[y1:y2, x1:x2, 3] = 255

    return frame_alpha


# 動画の読み込み
cap = cv2.VideoCapture('assets/input_video_3.mp4')

# PySimpleGUIの設定
sg.theme('Reddit')
layout = [[sg.Image(filename='', key='-IMAGE-')]]
window = sg.Window('Image', layout, location=(800,400))

frame_cnt = 0
while True:
    # フレームを読み込む
    ret, frame = cap.read()
    frame_cnt += 1
    if not frame_cnt % 5 == 0:  # 一定の割合で処理をスキップ
        continue
    if ret == False:
        break
    frame = cv2.resize(frame, (800, 600))

    # YOLOv5で人物以外の領域を透明化
    frame_alpha = process_frame(frame)

    # PNG形式にエンコード
    is_success, buffer = cv2.imencode(".png", frame_alpha)
    if is_success:
        # エンコードした画像をPIL.Imageに変換
        bio = io.BytesIO(buffer)
        image = Image.open(bio)

        # PySimpleGUIで表示
        event, values = window.read(timeout=25)
        if event == sg.WINDOW_CLOSED:
            break
        window['-IMAGE-'].update(data=ImageTk.PhotoImage(image))

    if event == sg.WINDOW_CLOSED:
        break
window.close()
cap.release()
考察
本来の予定では、YOLOv5の他にSSD(Single Shot MultiBox Detector)も実験するつもりでしたが、YOLOv5の処理速度が速く、リアルタイムでの処理が可能であったため、SSDの実装は行いませんでした。
YOLOv5の検出結果をもとに、SORTを用いて追跡を行うことで、人物の追跡を行うこともできました。こちらもリアルタイムで動作することができました。
結論
以上です。
これらの結果に満足したので、次回はFaster R-CNNなどの物体検出モデルを用いて実験してみたいと思います。また、DEEP SORTなどの追跡アルゴリズムを用いて、より精度の高い追跡を行ってみたいと思います。
Discussion