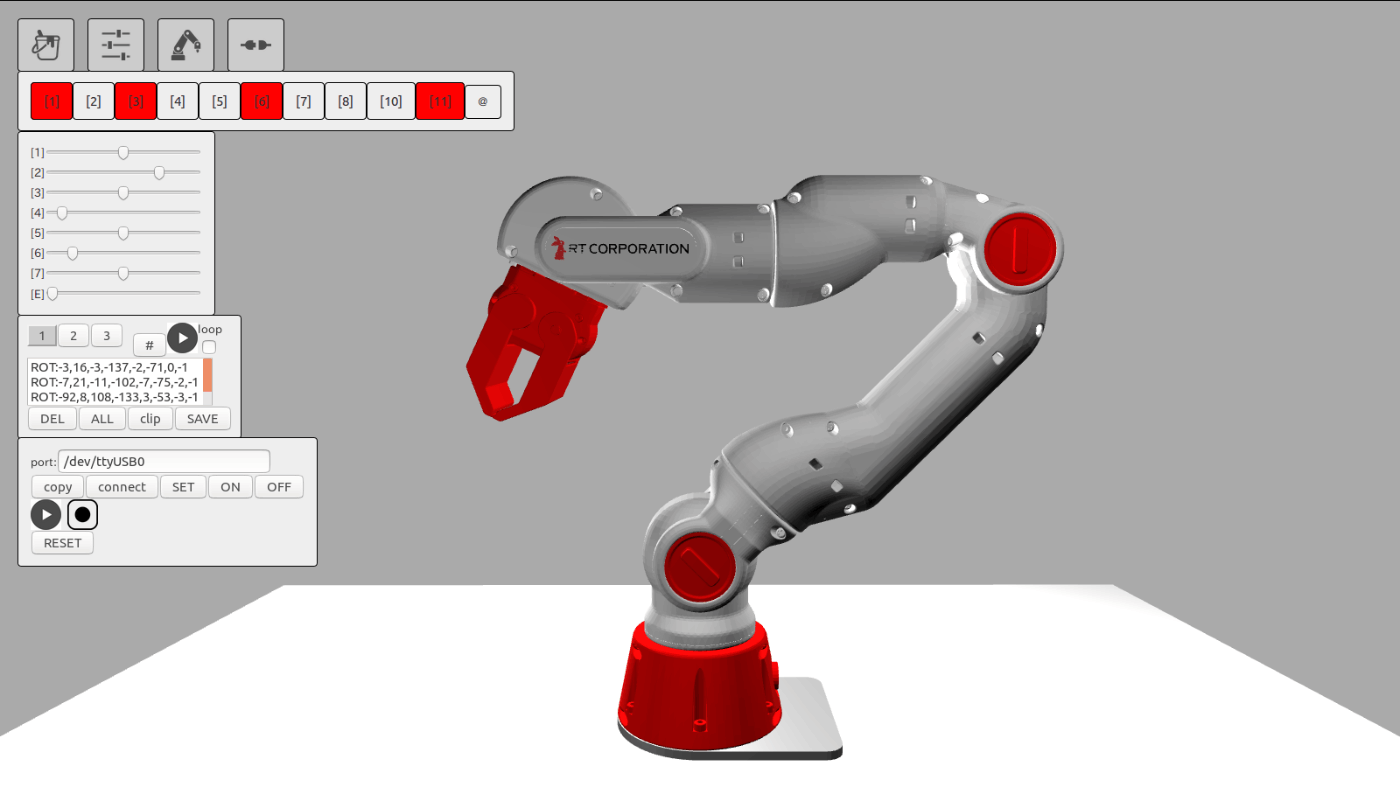
Web ページにロボットアームを表示して C++ で制御する
タイトルを変更しました
当初のタイトルは「Three.js + 物理エンジン cannon-es を試してみる」でしたが途中から cannon-es があまり関係なくなってきたので現在のタイトルに変更しました。
このスクラップでは後半から cannon-es について全く書かれていませんが何卒ご容赦ください。
最終的には下記のようなものができます。
成果物
このスクラップについて
Web ページ上でロボットアームのシミュレーションを実行したい。
前回は Unity Robotics Hub も試してみて Unity 上でロボットアームを動かすことには成功したが WebGL ビルドができなそうだったので断念した。
このスクラップでは Three.js の使い方を学ぶとともに Ammo.js などの物理エンジンを併用してロボットアームのシミュレーションを実行できるかどうかを模索したい。
Getting Started
mkdir hello-threejs
cd hello-threejs
touch index.html
<!DOCTYPE html>
<html>
  <head>
    <meta charset="utf-8" />
    <title>My first three.js app</title>
    <style>
      body {
        margin: 0;
      }
    </style>
  </head>
  <body>
    <script type="module">
      import * as THREE from "https://unpkg.com/three/build/three.module.js";

      const scene = new THREE.Scene();
      const camera = new THREE.PerspectiveCamera(
        75,
        window.innerWidth / window.innerHeight,
        0.1,
        1000
      );

      const renderer = new THREE.WebGLRenderer();
      renderer.setSize(window.innerWidth, window.innerHeight);
      document.body.appendChild(renderer.domElement);

      const geometry = new THREE.BoxGeometry(1, 1, 1);
      const material = new THREE.MeshBasicMaterial({ color: 0x00ff00 });
      const cube = new THREE.Mesh(geometry, material);
      scene.add(cube);

      camera.position.z = 5;

      function animate() {
        requestAnimationFrame(animate);
        cube.rotation.x += 0.01;
        cube.rotation.y += 0.01;
        renderer.render(scene, camera);
      }

      animate();
    </script>
  </body>
</html>
実行結果
こんなにお手軽に作れるのは素晴らしい。
TypeScript を使いたい
Next.js を使えば良いかな?
npx create-next-app --typescript --eslint --src-dir --import-alias "@/*" --use-npm hello-threets
cd hello-threets
npm install --save three
npm install --save-dev @types/three
npm run dev
// import '@/styles/globals.css' // この行をコメントアウトしました。
import type { AppProps } from "next/app";

export default function App({ Component, pageProps }: AppProps) {
  return <Component {...pageProps} />;
}
import { useEffect } from "react";
import {
  BoxGeometry,
  Mesh,
  MeshBasicMaterial,
  PerspectiveCamera,
  Scene,
  WebGLRenderer,
} from "three";

export default function Home() {
  useEffect(() => {
    const scene = new Scene();
    const camera = new PerspectiveCamera(
      75,
      window.innerWidth / window.innerHeight,
      0.1,
      1000
    );

    const renderer = new WebGLRenderer();
    renderer.setSize(window.innerWidth, window.innerHeight);
    document.body.appendChild(renderer.domElement);

    const geometry = new BoxGeometry(1, 1, 1);
    const material = new MeshBasicMaterial({ color: 0x00ff00 });
    const cube = new Mesh(geometry, material);
    scene.add(cube);

    camera.position.z = 5;

    function animate() {
      requestAnimationFrame(animate);
      cube.rotation.x += 0.01;
      cube.rotation.y += 0.01;
      renderer.render(scene, camera);
    }

    animate();
  }, []);
}
Three.js と Next.js を組み合わせたい場合は @react-three/fiber を使う方が良いかも知れない。
こういうのを作りたい
参考になりそう
コードが 2 回実行される
React の StrictMode が原因だった。
下記のように document.body.removeChild() を呼び出してクリーンアップすれば良いかな?
    return () => {
      document.body.removeChild(renderer.domElement);
    };
線を引いてみる
import { useEffect } from "react";
import {
  BufferGeometry,
  Line,
  LineBasicMaterial,
  PerspectiveCamera,
  Scene,
  Vector3,
  WebGLRenderer,
} from "three";

export default function Home() {
  useEffect(() => {
    const renderer = new WebGLRenderer();
    renderer.setSize(window.innerWidth, window.innerHeight);
    document.body.appendChild(renderer.domElement);

    const camera = new PerspectiveCamera(
      75,
      window.innerWidth / window.innerHeight,
      1,
      500
    );

    camera.position.set(0, 0, 100);
    camera.lookAt(0, 0, 0);

    const scene = new Scene();

    const material = new LineBasicMaterial({ color: 0x0000ff });
    const points = [];
    points.push(new Vector3(-10, 0, 0));
    points.push(new Vector3(0, 10, 0));
    points.push(new Vector3(10, 0, 0));

    const geometry = new BufferGeometry().setFromPoints(points);
    const line = new Line(geometry, material);

    scene.add(line);
    renderer.render(scene, camera);

    return () => {
      document.body.removeChild(renderer.domElement);
    };
  }, []);
}

実行結果
3D モデルの表示
下記の例を見ながら見よう見まねでやってみる。
モデルのサンプルをダウンロードする。
mkdir -p public/models/gltf/DamagedHelmet/glTF
cd public/models/gltf/DamagedHelmet/glTF
curl -O https://raw.githubusercontent.com/mrdoob/three.js/master/examples/models/gltf/DamagedHelmet/glTF/DamagedHelmet.bin
curl -O https://raw.githubusercontent.com/mrdoob/three.js/master/examples/models/gltf/DamagedHelmet/glTF/DamagedHelmet.gltf
curl -O https://raw.githubusercontent.com/mrdoob/three.js/master/examples/models/gltf/DamagedHelmet/glTF/Default_AO.jpg
curl -O https://raw.githubusercontent.com/mrdoob/three.js/master/examples/models/gltf/DamagedHelmet/glTF/Default_albedo.jpg
curl -O https://raw.githubusercontent.com/mrdoob/three.js/master/examples/models/gltf/DamagedHelmet/glTF/Default_emissive.jpg
curl -O https://raw.githubusercontent.com/mrdoob/three.js/master/examples/models/gltf/DamagedHelmet/glTF/Default_metalRoughness.jpg
curl -O https://raw.githubusercontent.com/mrdoob/three.js/master/examples/models/gltf/DamagedHelmet/glTF/Default_normal.jpg
テクスチャも必要らしい。
cd ../../../../..
mkdir -p public/textures/equirectangular/
cd public/textures/equirectangular/
curl -O https://raw.githubusercontent.com/mrdoob/three.js/master/examples/textures/equirectangular/blouberg_sunrise_2_1k.hdr
curl -O https://raw.githubusercontent.com/mrdoob/three.js/master/examples/textures/equirectangular/moonless_golf_1k.hdr
curl -O https://raw.githubusercontent.com/mrdoob/three.js/master/examples/textures/equirectangular/pedestrian_overpass_1k.hdr
curl -O https://raw.githubusercontent.com/mrdoob/three.js/master/examples/textures/equirectangular/quarry_01_1k.hdr
curl -O https://raw.githubusercontent.com/mrdoob/three.js/master/examples/textures/equirectangular/royal_esplanade_1k.hdr
curl -O https://raw.githubusercontent.com/mrdoob/three.js/master/examples/textures/equirectangular/san_giuseppe_bridge_2k.hdr
curl -O https://raw.githubusercontent.com/mrdoob/three.js/master/examples/textures/equirectangular/spot1Lux.hdr
curl -O https://raw.githubusercontent.com/mrdoob/three.js/master/examples/textures/equirectangular/venice_sunset_1k.hdr
import { useEffect } from "react";
import {
  ACESFilmicToneMapping,
  EquirectangularReflectionMapping,
  PerspectiveCamera,
  Scene,
  sRGBEncoding,
  WebGLRenderer,
} from "three";
import { RGBELoader } from "three/examples/jsm/loaders/RGBELoader";
import { GLTFLoader } from "three/examples/jsm/loaders/GLTFLoader";
import { OrbitControls } from "three/examples/jsm/controls/OrbitControls";

export default function Home() {
  useEffect(() => {
    const camera = new PerspectiveCamera(
      45,
      window.innerWidth / innerHeight,
      0.25,
      20
    );

    camera.position.set(-1.8, 0.6, 2.7);

    const scene = new Scene();

    new RGBELoader()
      .setPath("textures/equirectangular/")
      .load("royal_esplanade_1k.hdr", (texture) => {
        texture.mapping = EquirectangularReflectionMapping;

        scene.background = texture;
        scene.environment = texture;

        renderer.render(scene, camera);

        new GLTFLoader()
          .setPath("models/gltf/DamagedHelmet/glTF/")
          .load("DamagedHelmet.gltf", (gltf) => {
            scene.add(gltf.scene);
            renderer.render(scene, camera);
          });
      });

    const renderer = new WebGLRenderer({ antialias: true });
    renderer.setPixelRatio(window.devicePixelRatio);
    renderer.setSize(window.innerWidth, window.innerHeight);
    renderer.toneMapping = ACESFilmicToneMapping;
    renderer.toneMappingExposure = 1;
    renderer.outputEncoding = sRGBEncoding;
    renderer.render(scene, camera);

    const controls = new OrbitControls(camera, renderer.domElement);
    controls.addEventListener("change", () => {
      renderer.render(scene, camera);
    });

    controls.minDistance = 2;
    controls.maxDistance = 10;
    controls.target.set(0, 0, -0.1);
    controls.update();

    document.body.appendChild(renderer.domElement);

    return () => {
      document.body.removeChild(renderer.domElement);
    };
  }, []);
}
実行結果
RGBELoader とか OrbitControls とか無くても大丈夫かなと思ったけど全部使わないといい感じに表示されない。
Examples が永遠に遊んでいられるほど面白い
明日はチュートリアルをもう少し続ける
Basics / Fundamentals を読んでみる

https://threejs.org/manual/#en/fundamentals より引用
Renderer
three.js のメインオブジェクトで Camera と Renderer を受け取って 3D シーンを描画する。
Scene
シーングラフと呼ばれる木構造のルート。シーングラフには Mesh, Light, Group, Object3D, Camera などが含まれる。Scene は背景色やフォグ(?)などを設定する。シーングラフでは親の位置や向きが子に引き継がれる。例えば車を描画したい場合はタイヤを車台の子にすることで車台が動いた時にタイヤも動くようにできる。
Camera
Camera はシーンの四角錐台(frustum)を描画する。シーングラフに必ずしも含まれている必要はないが、含めた場合には親の位置と向きが引き継がれる。
Mesh
特定の Geometry と Material の組み合わせの描画を表す。Geometry と Material はいずれも複数の Mesh で共有することが可能。例えば同じ形の 2 つの立方体を描画したい場合は Geometry と Material は 1 つずつあれば良い。
Geometry
特定の形状の頂点データを表す。形状の一例としては球や立方体が含まれる。
Material
Geometry 表面の色や光加減を表す。Texture を参照することで画像を貼り付けることもできる。
Texture
画像を表す。画像はファイル読み込み、Canvas から生成、Scene の描画によって用意する。
Light
光源を表す。
Hello Cube
three.js 版の Hello World にあたる。
下記の構成図がわかりやすい。

https://threejs.org/manual/#en/fundamentals より引用
復習を兼ねてセットアップからやってみる。
npx create-next-app --typescript --eslint --src-dir --import-alias "@/*" --use-npm hello-cube
cd hello-cube
npm install --save three
npm install --save-dev @types/three
// import '@/styles/globals.css' // この行をコメントアウトしました。
import type { AppProps } from "next/app";

export default function App({ Component, pageProps }: AppProps) {
  return <Component {...pageProps} />;
}
import { useEffect } from "react";
import {
  BoxGeometry,
  Mesh,
  MeshBasicMaterial,
  PerspectiveCamera,
  Scene,
  WebGLRenderer,
} from "three";

export default function Home() {
  useEffect(() => {
    // Renderer を作成します。
    const renderer = new WebGLRenderer({ antialias: true });

    // Camera を作成します。
    const fov = 75;
    const aspect = 2;
    const near = 0.1;
    const far = 5;
    const camera = new PerspectiveCamera(fov, aspect, near, far);
    camera.position.z = 2;

    // Scene を作成します。
    const scene = new Scene();

    // Geometry を作成します。
    const boxWidth = 1;
    const boxHeight = 1;
    const boxDepth = 1;
    const geometry = new BoxGeometry(boxWidth, boxHeight, boxDepth);

    // Material を作成します。
    const material = new MeshBasicMaterial({ color: 0x44aa88 });

    // Mesh を作成します。
    const cube = new Mesh(geometry, material);

    // シーンを描画します。
    scene.add(cube);
    renderer.render(scene, camera);

    document.body.appendChild(renderer.domElement);

    return () => {
      document.body.removeChild(renderer.domElement);
    };
  }, []);
}

実行結果
PerspectiveCamera の解説図がとてもわかりやすい。

アニメーションにしてみる
import { useEffect } from "react";
import {
  BoxGeometry,
  Mesh,
  MeshBasicMaterial,
  PerspectiveCamera,
  Scene,
  WebGLRenderer,
} from "three";

export default function Home() {
  useEffect(() => {
    // Renderer を作成します。
    const renderer = new WebGLRenderer({ antialias: true });

    // Camera を作成します。
    const fov = 75;
    const aspect = 2;
    const near = 0.1;
    const far = 5;
    const camera = new PerspectiveCamera(fov, aspect, near, far);
    camera.position.z = 2;

    // Scene を作成します。
    const scene = new Scene();

    // Geometry を作成します。
    const boxWidth = 1;
    const boxHeight = 1;
    const boxDepth = 1;
    const geometry = new BoxGeometry(boxWidth, boxHeight, boxDepth);

    // Material を作成します。
    const material = new MeshBasicMaterial({ color: 0x44aa88 });

    // Mesh を作成します。
    const cube = new Mesh(geometry, material);

    // シーンを描画します。
    scene.add(cube);

    // クリーンアップ関数が呼び出されたかどうかを示します。
    let isCleared = false;

    function render(time: number) {
      time *= 0.001;

      cube.rotation.x = time;
      cube.rotation.y = time;

      renderer.render(scene, camera);

      if (!isCleared) {
        requestAnimationFrame(render);
      }
    }

    requestAnimationFrame(render);

    document.body.appendChild(renderer.domElement);

    return () => {
      document.body.removeChild(renderer.domElement);
      isCleared = true;
    };
  }, []);
}

実行結果(回転している)
3D らしくしてみる
Light を追加する、また、Material を MeshPhongMaterial に変更する。
import { useEffect } from "react";
import {
  BoxGeometry,
  DirectionalLight,
  Mesh,
  MeshPhongMaterial,
  PerspectiveCamera,
  Scene,
  WebGLRenderer,
} from "three";

export default function Home() {
  useEffect(() => {
    // Renderer を作成します。
    const renderer = new WebGLRenderer({ antialias: true });

    // Camera を作成します。
    const fov = 75;
    const aspect = 2;
    const near = 0.1;
    const far = 5;
    const camera = new PerspectiveCamera(fov, aspect, near, far);
    camera.position.z = 2;

    // Scene を作成します。
    const scene = new Scene();

    // Light を作成します。
    const color = 0xffffff;
    const intensity = 1;
    const light = new DirectionalLight(color, intensity);
    light.position.set(-1, 2, 4);
    scene.add(light);

    // Geometry を作成します。
    const boxWidth = 1;
    const boxHeight = 1;
    const boxDepth = 1;
    const geometry = new BoxGeometry(boxWidth, boxHeight, boxDepth);

    // Material を作成します。
    const material = new MeshPhongMaterial({ color: 0x44aa88 });

    // Mesh を作成します。
    const cube = new Mesh(geometry, material);

    // シーンを描画します。
    scene.add(cube);

    // クリーンアップ関数が呼び出されたかどうかを示します。
    let isCleared = false;

    function render(time: number) {
      time *= 0.001;

      cube.rotation.x = time;
      cube.rotation.y = time;

      renderer.render(scene, camera);

      if (!isCleared) {
        requestAnimationFrame(render);
      }
    }

    requestAnimationFrame(render);

    document.body.appendChild(renderer.domElement);

    return () => {
      document.body.removeChild(renderer.domElement);
      isCleared = true;
    };
  }, []);
}

実行結果(3D らしくなった)
MeshPhongMaterial の Phong とは何かと思ったが人の名前のようだ。
MeshBasicMaterial は光源に影響されず常に同じ色になるマテリアルなので光源がなくても表示された。
現在の状況の図、この図もとてもわかりやすい。

Responsive Design
Responsive Design は興味深いが一旦スキップ。
必要になったら思い出そう。
そろそろ物理エンジンを試すか
一番とっかかりやすそうな cannon-es から試してみよう。
ワークスペースの作成
npx create-next-app --typescript --eslint --src-dir --import-alias "@/*" --use-npm hello-cannon
cd hello-cannon
npm install --save three cannon-es
npm install --save-dev @types/three
three.js 部分のコーディング
// import '@/styles/globals.css'
import type { AppProps } from "next/app";

export default function App({ Component, pageProps }: AppProps) {
  return <Component {...pageProps} />;
}
import { useEffect } from "react";
import {
  BoxGeometry,
  Mesh,
  MeshBasicMaterial,
  PerspectiveCamera,
  Scene,
  WebGLRenderer,
} from "three";

export default function Home() {
  useEffect(() => {
    const fov = 75;
    const aspect = window.innerWidth / window.innerHeight;
    const near = 1;
    const far = 100;
    const camera = new PerspectiveCamera(fov, aspect, near, far);
    camera.position.z = 5;

    const scene = new Scene();

    const renderer = new WebGLRenderer({ antialias: true });
    renderer.setSize(window.innerWidth, window.innerHeight);

    const geometry = new BoxGeometry(2, 2, 2);
    const material = new MeshBasicMaterial({
      color: 0xff0000,
      wireframe: true,
    });

    const mesh = new Mesh(geometry, material);
    scene.add(mesh);

    document.body.appendChild(renderer.domElement);

    function animate() {
      requestAnimationFrame(animate);

      renderer.render(scene, camera);
    }

    animate();

    return () => {
      document.body.removeChild(renderer.domElement);
    };
  }, []);
}
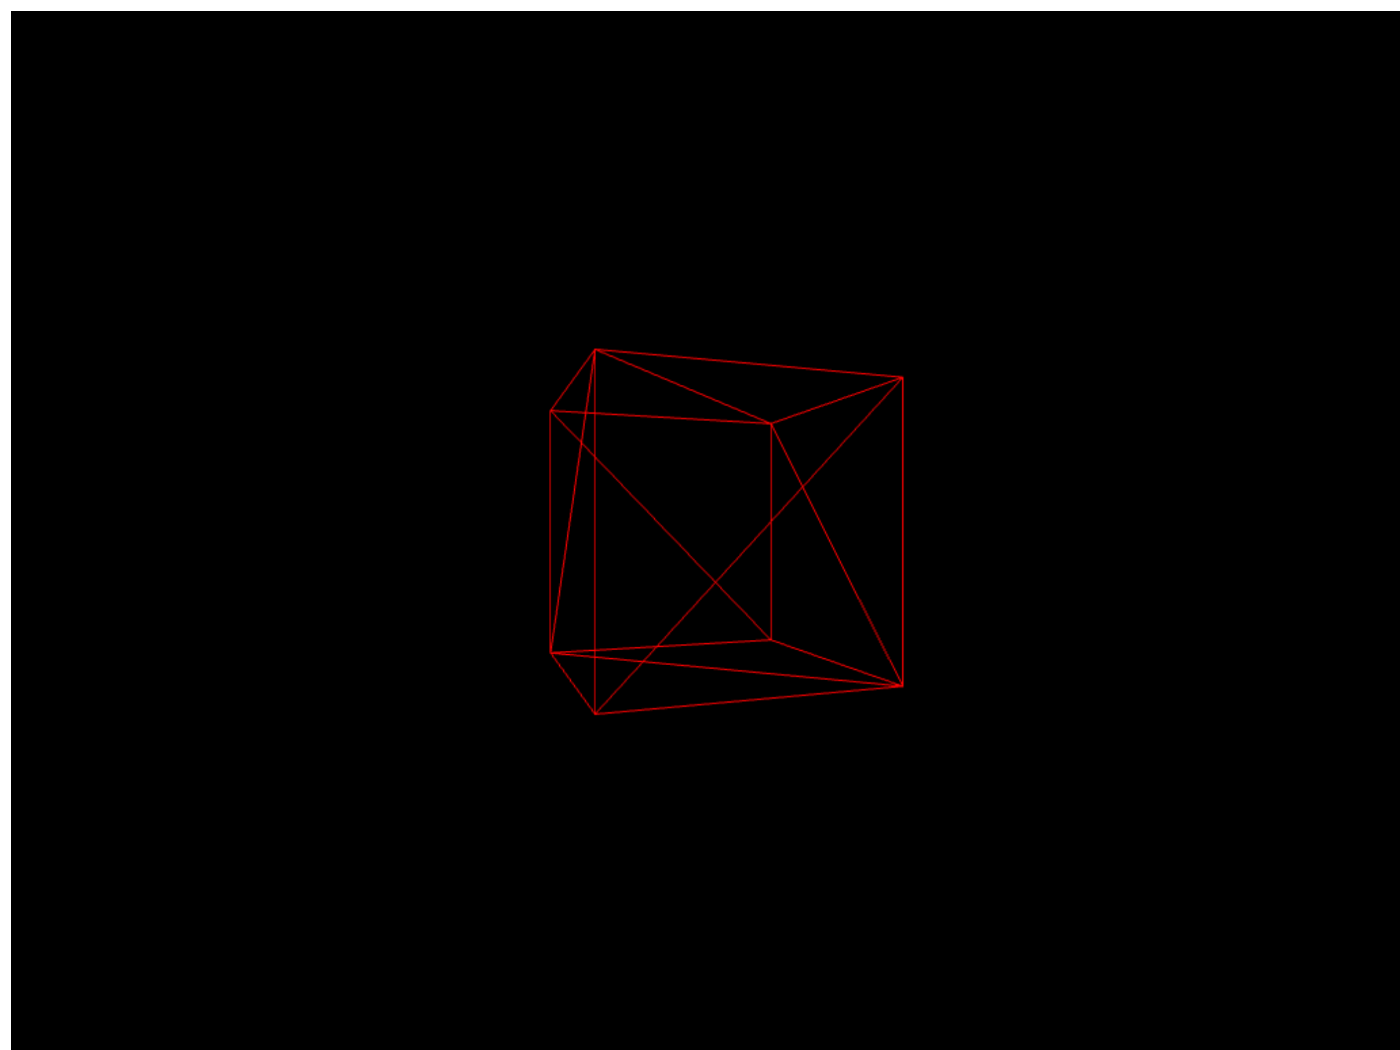
実行結果
cannon-es 部分のコーディング
import { Body, Box, Quaternion, Vec3, World } from "cannon-es";
import { useEffect } from "react";
import {
  BoxGeometry,
  Mesh,
  MeshBasicMaterial,
  PerspectiveCamera,
  Scene,
  Vector3,
  WebGLRenderer,
} from "three";

export default function Home() {
  useEffect(() => {
    const fov = 75;
    const aspect = window.innerWidth / window.innerHeight;
    const near = 1;
    const far = 100;
    const camera = new PerspectiveCamera(fov, aspect, near, far);
    camera.position.z = 5;

    const scene = new Scene();

    const renderer = new WebGLRenderer({ antialias: true });
    renderer.setSize(window.innerWidth, window.innerHeight);

    const geometry = new BoxGeometry(2, 2, 2);
    const material = new MeshBasicMaterial({
      color: 0xff0000,
      wireframe: true,
    });

    const mesh = new Mesh(geometry, material);
    scene.add(mesh);

    // cannon-es 部分
    const world = new World();
    const shape = new Box(new Vec3(1, 1, 1));
    const body = new Body({ mass: 1 });
    body.addShape(shape);
    body.angularVelocity.set(0, 10, 0);
    body.angularDamping = 0.5;
    world.addBody(body);

    document.body.appendChild(renderer.domElement);

    function animate() {
      requestAnimationFrame(animate);

      // cannon-es 部分
      world.fixedStep();
      mesh.position.copy(body.position as any);
      mesh.quaternion.copy(body.quaternion as any);

      renderer.render(scene, camera);
    }

    animate();

    return () => {
      document.body.removeChild(renderer.domElement);
    };
  }, []);
}
実行結果(静止画だとわかりにくいが Y 軸を中心に回転している)
次回
もう少しだけ Examples で遊んでからロボットアーム関係の検証をやってみよう。
カーテンの例をやってみる
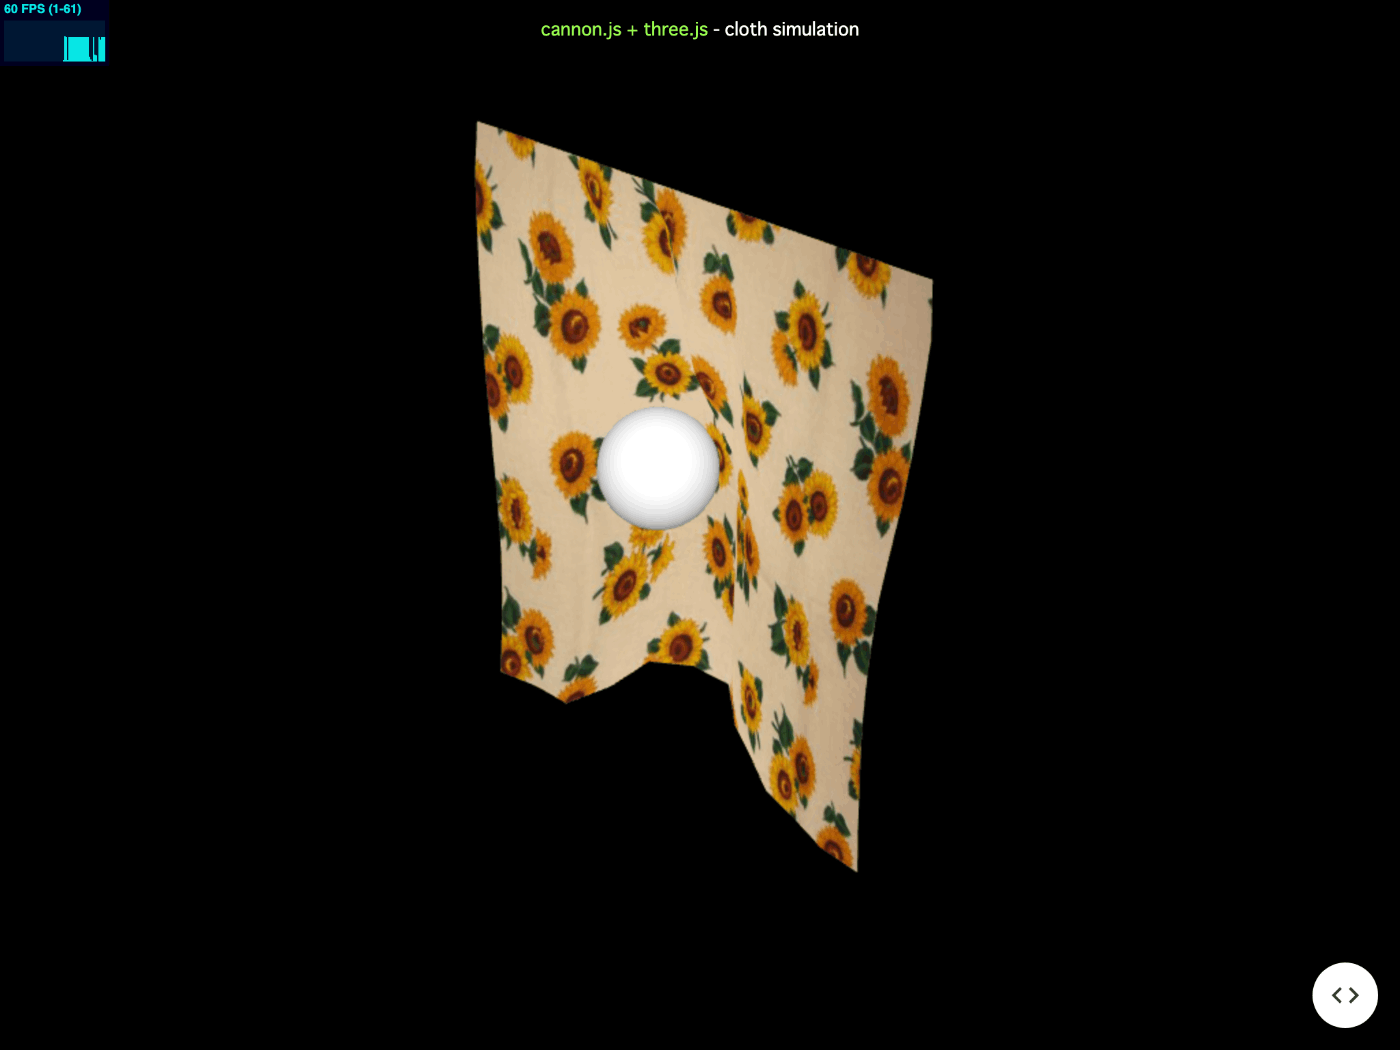
これが 200 行くらいでできているのってすごいな。
Three.js 部分を作る
テクスチャをダウンロードする。
mkdir -p public/images
cd public/images
curl -O https://raw.githubusercontent.com/pmndrs/cannon-es/master/examples/images/sunflower.jpg
import { useEffect } from "react";
import {
  AmbientLight,
  DirectionalLight,
  DoubleSide,
  Fog,
  Mesh,
  MeshPhongMaterial,
  PerspectiveCamera,
  RepeatWrapping,
  Scene,
  SphereGeometry,
  sRGBEncoding,
  TextureLoader,
  Vector3,
  WebGLRenderer,
} from "three";
import { OrbitControls } from "three/examples/jsm/controls/OrbitControls";
import { ParametricGeometry } from "three/examples/jsm/geometries/ParametricGeometry";

export default function Home() {
  const clothMass = 1;
  const clothSize = 1;
  const Nx = 12;
  const Ny = 12;
  const mass = (clothMass / Nx) * Ny;
  const restDistance = clothSize / Nx;

  const sphereSize = 0.1;
  const movementRadius = 0.2;

  function clothFunction(u: number, v: number, target: Vector3) {
    const x = (u - 0.5) * restDistance * Nx;
    const y = (v + 0.5) * restDistance * Ny;
    const z = 0;

    target.set(x, y, z);

    return target;
  }

  useEffect(() => {
    const scene = new Scene();

    const fov = 30;
    const aspect = window.innerWidth / window.innerHeight;
    const near = 0.5;
    const far = 10000;
    const camera = new PerspectiveCamera(fov, aspect, near, far);
    const cameraX = Math.cos(Math.PI / 4) * 3;
    const cameraY = 0;
    const cameraZ = Math.sin(Math.PI / 4) * 3;
    camera.position.set(cameraX, cameraY, cameraZ);

    const fogColor = 0x000000;
    const fogNear = 500;
    const fogFar = 10000;

    scene.fog = new Fog(fogColor, fogNear, fogFar);

    const renderer = new WebGLRenderer({ antialias: true });
    renderer.setSize(window.innerWidth, window.innerHeight);
    renderer.setClearColor(scene.fog.color);
    renderer.outputEncoding = sRGBEncoding;

    const controls = new OrbitControls(camera, renderer.domElement);
    controls.enableDamping = true;
    controls.enablePan = false;
    controls.dampingFactor = 0.3;
    controls.minDistance = 1;
    controls.maxDistance = 5;

    const ambientLight = new AmbientLight(0xffffff, 0.4);
    const directionalLight = new DirectionalLight(0xffffff, 1.75);

    scene.add(ambientLight);
    scene.add(directionalLight);

    const clothTexture = new TextureLoader().load("/images/sunflower.jpg");
    clothTexture.wrapS = RepeatWrapping;
    clothTexture.wrapT = RepeatWrapping;
    clothTexture.anisotropy = 16;
    clothTexture.encoding = sRGBEncoding;

    const clothMaterial = new MeshPhongMaterial({
      map: clothTexture,
      side: DoubleSide,
    });

    const clothGeometry = new ParametricGeometry(clothFunction, Nx, Ny);
    const clothMesh = new Mesh(clothGeometry, clothMaterial);

    scene.add(clothMesh);

    const sphereGeometry = new SphereGeometry(sphereSize, 20, 20);
    const sphereMaterial = new MeshPhongMaterial({ color: 0x888888 });
    const sphereMesh = new Mesh(sphereGeometry, sphereMaterial);

    scene.add(sphereMesh);

    function animate() {
      requestAnimationFrame(animate);
      controls.update();

      renderer.render(scene, camera);
    }

    animate();

    document.body.appendChild(renderer.domElement);

    return () => {
      document.body.removeChild(renderer.domElement);
    };
  }, []);
}
http://localhost:3000/ にアクセスする。
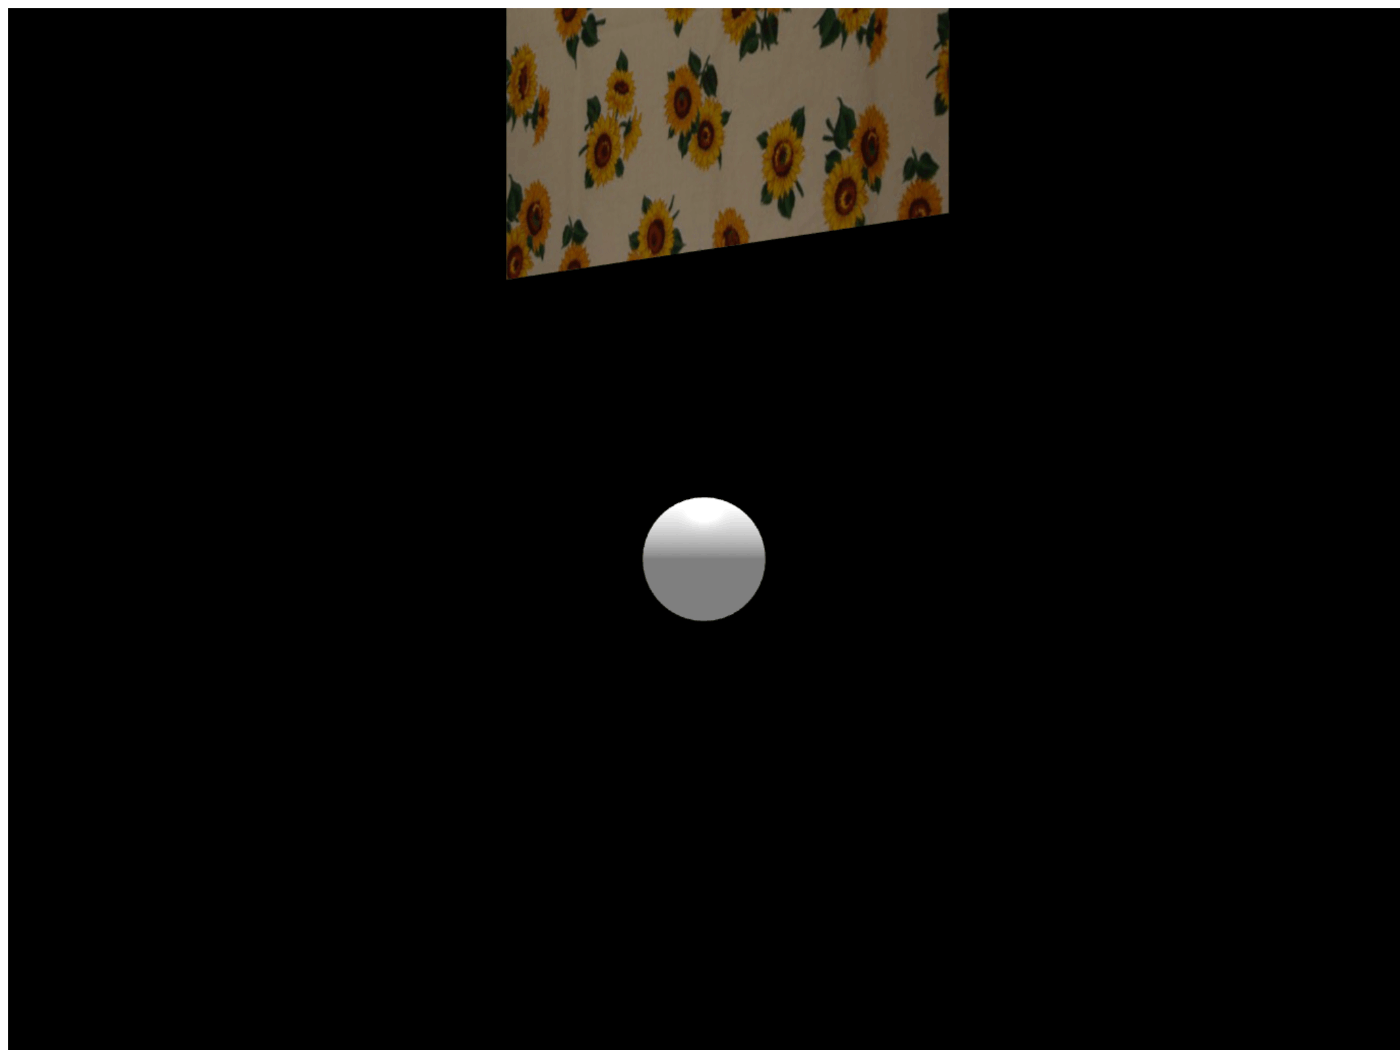
カーテンの場所が変だけど cannon-ts 部分も完成したらちゃんと表示されるのかな?
cannon-es 部分のコーディング
import {
  Body,
  ContactMaterial,
  DistanceConstraint,
  GSSolver,
  Material,
  Particle,
  Sphere,
  World,
} from "cannon-es";
import { useEffect } from "react";
import {
  AmbientLight,
  DirectionalLight,
  DoubleSide,
  Fog,
  Mesh,
  MeshPhongMaterial,
  PerspectiveCamera,
  RepeatWrapping,
  Scene,
  SphereGeometry,
  sRGBEncoding,
  TextureLoader,
  Vector3,
  WebGLRenderer,
} from "three";
import { OrbitControls } from "three/examples/jsm/controls/OrbitControls";
import { ParametricGeometry } from "three/examples/jsm/geometries/ParametricGeometry";

const clothMass = 1;
const clothSize = 1;
const Nx = 12;
const Ny = 12;
const mass = (clothMass / Nx) * Ny;
const restDistance = clothSize / Nx;

const sphereSize = 0.1;
const movementRadius = 0.2;

function clothFunction(u: number, v: number, target: Vector3) {
  const x = (u - 0.5) * restDistance * Nx;
  const y = (v + 0.5) * restDistance * Ny;
  const z = 0;

  target.set(x, y, z);

  return target;
}

export default function Home() {
  useEffect(() => {
    // cannon-es 初期化
    const world = new World();
    world.gravity.set(0, -9.81, 0);

    (world.solver as GSSolver).iterations = 20;

    const cannonClothMaterial = new Material("cloth");
    const cannonSphereMaterial = new Material("sphere");
    const cloth_sphere = new ContactMaterial(
      cannonClothMaterial,
      cannonSphereMaterial,
      {
        friction: 0,
        restitution: 0,
      }
    );

    cloth_sphere.contactEquationStiffness = 1e9;
    cloth_sphere.contactEquationRelaxation = 3;

    world.addContactMaterial(cloth_sphere);

    const sphereShape = new Sphere(sphereSize * 1.3);
    const sphereBody = new Body({
      type: Body.KINEMATIC,
    });

    sphereBody.addShape(sphereShape);
    world.addBody(sphereBody);

    const particles: Body[][] = [];

    for (let i = 0; i < Nx + 1; i++) {
      particles.push([]);
      for (let j = 0; j < Ny + 1; j++) {
        const index = j * (Nx + 1) + i;
        const point = clothFunction(i / (Nx + 1), j / (Ny + 1), new Vector3());
        const particle = new Body({
          mass: j === Ny ? 0 : mass,
        });

        particle.addShape(new Particle());
        particle.linearDamping = 0.5;
        particle.position.set(
          point.x,
          point.y - Ny * 0.9 * restDistance,
          point.z
        );
        particle.velocity.set(0, 0, -0.1 * (Ny - j));

        particles[i].push(particle);
        world.addBody(particle);
      }
    }

    for (let i = 0; i < Nx + 1; i++) {
      for (let j = 0; j < Ny + 1; j++) {
        if (i < Nx) {
          world.addConstraint(
            new DistanceConstraint(
              particles[i][j],
              particles[i + 1][j],
              restDistance
            )
          );
        }

        if (j < Ny) {
          world.addConstraint(
            new DistanceConstraint(
              particles[i][j],
              particles[i][j + 1],
              restDistance
            )
          );
        }
      }
    }

    // Three.js 初期化
    const scene = new Scene();

    const fov = 30;
    const aspect = window.innerWidth / window.innerHeight;
    const near = 0.5;
    const far = 10000;
    const camera = new PerspectiveCamera(fov, aspect, near, far);
    const cameraX = Math.cos(Math.PI / 4) * 3;
    const cameraY = 0;
    const cameraZ = Math.sin(Math.PI / 4) * 3;
    camera.position.set(cameraX, cameraY, cameraZ);

    const fogColor = 0x000000;
    const fogNear = 500;
    const fogFar = 10000;

    scene.fog = new Fog(fogColor, fogNear, fogFar);

    const renderer = new WebGLRenderer({ antialias: true });
    renderer.setSize(window.innerWidth, window.innerHeight);
    renderer.setClearColor(scene.fog.color);
    renderer.outputEncoding = sRGBEncoding;

    const controls = new OrbitControls(camera, renderer.domElement);
    controls.enableDamping = true;
    controls.enablePan = false;
    controls.dampingFactor = 0.3;
    controls.minDistance = 1;
    controls.maxDistance = 5;

    const ambientLight = new AmbientLight(0xffffff, 0.4);
    const directionalLight = new DirectionalLight(0xffffff, 1.75);

    scene.add(ambientLight);
    scene.add(directionalLight);

    const clothTexture = new TextureLoader().load("/images/sunflower.jpg");
    clothTexture.wrapS = RepeatWrapping;
    clothTexture.wrapT = RepeatWrapping;
    clothTexture.anisotropy = 16;
    clothTexture.encoding = sRGBEncoding;

    const clothMaterial = new MeshPhongMaterial({
      map: clothTexture,
      side: DoubleSide,
    });

    const clothGeometry = new ParametricGeometry(clothFunction, Nx, Ny);
    const clothMesh = new Mesh(clothGeometry, clothMaterial);

    scene.add(clothMesh);

    const sphereGeometry = new SphereGeometry(sphereSize, 20, 20);
    const sphereMaterial = new MeshPhongMaterial({ color: 0x888888 });
    const sphereMesh = new Mesh(sphereGeometry, sphereMaterial);

    scene.add(sphereMesh);

    let isCleared = false;

    function animate() {
      if (isCleared) {
        return;
      }

      // cannon-es ループ
      world.fixedStep();

      const newClothGeometry = new ParametricGeometry(
        (u, v, target) => {
          const i = Math.round(u * Nx);
          const j = Math.round(v * Ny);
          const position = particles[i][j].position;

          target.set(position.x, position.y, position.z);
          return target;
        },
        Nx,
        Ny
      );

      clothMesh.geometry = newClothGeometry;

      const { time } = world;
      sphereBody.position.set(
        movementRadius * Math.sin(time),
        0,
        movementRadius * Math.cos(time)
      );

      sphereMesh.position.set(
        sphereBody.position.x,
        sphereBody.position.y,
        sphereBody.position.z
      );

      // Three.js ループ
      controls.update();
      renderer.render(scene, camera);

      requestAnimationFrame(animate);
    }

    animate();

    document.body.appendChild(renderer.domElement);

    return () => {
      document.body.removeChild(renderer.domElement);
      isCleared = true;
    };
  }, []);
}
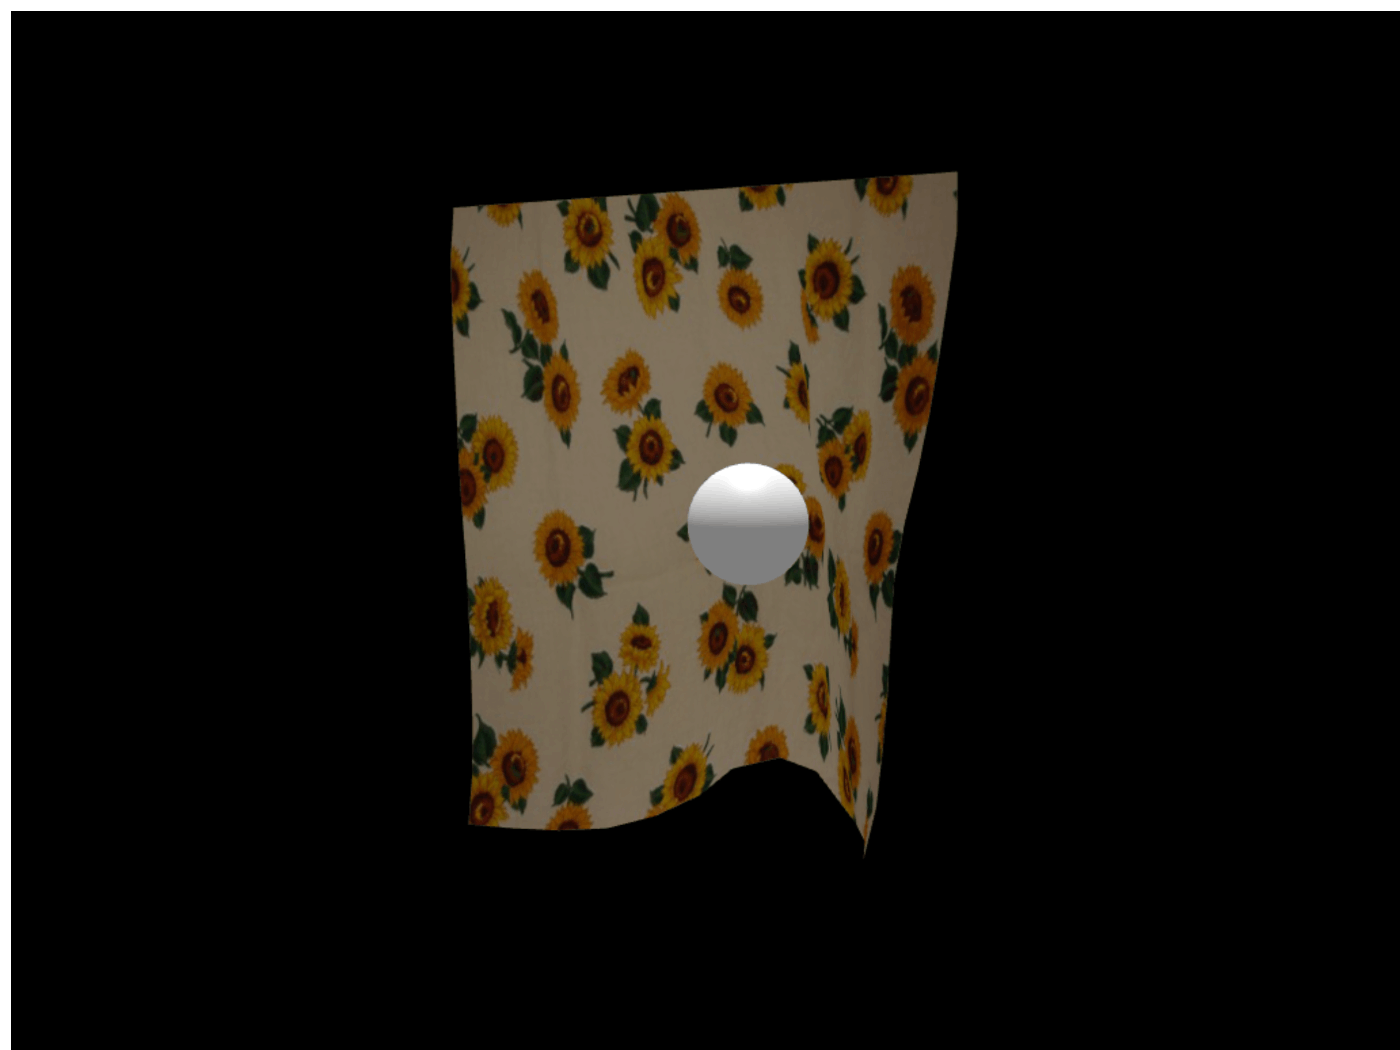
実行結果
やっと動いた。
初めて制約(Constraint)を使った。
ロボットアームを作るにはどの制約を使えば良いのだろう?
ヒンジかな?
次はヒンジの Example を試してみよう。
Hinge の Example では Demo クラスが使用されている
Demo クラスは多くの Examples で共通に使用されている。
明日
明日は Hinge の Example の完成を目標にする。
明日中に終わるか自信がないが頑張ろう。
素晴らしいサンプルを見つけた
ヒンジ制約を使ってみる
import { Body, Box, HingeConstraint, Vec3, World } from "cannon-es";
import { useEffect } from "react";
import {
  AmbientLight,
  BoxGeometry,
  DirectionalLight,
  Fog,
  Mesh,
  MeshLambertMaterial,
  PerspectiveCamera,
  Scene,
  SpotLight,
  WebGLRenderer,
} from "three";
import { OrbitControls } from "three/examples/jsm/controls/OrbitControls";

export default function Home() {
  useEffect(() => {
    // cannon-es 初期化
    const world = new World();
    world.gravity.set(0, -9.8, 0);

    const mass = 1;
    const size = 5;
    const distance = size * 0.1;

    const hingedShape = new Box(new Vec3(size * 0.5, size * 0.5, size * 0.1));
    const hingedBody = new Body({ mass, linearDamping: 0.3 });

    hingedBody.quaternion.setFromAxisAngle(new Vec3(1, 0, 0), Math.PI / 4);
    hingedBody.addShape(hingedShape);
    world.addBody(hingedBody);

    const staticShape = new Box(new Vec3(size * 0.5, size * 0.5, size * 0.1));
    const staticBody = new Body({ mass: 0 });
    staticBody.addShape(staticShape);
    staticBody.position.y = size + distance * 2;
    world.addBody(staticBody);

    const constraint = new HingeConstraint(staticBody, hingedBody, {
      pivotA: new Vec3(0, -size * 0.5 - distance, 0),
      axisA: new Vec3(-1, 0, 0),
      pivotB: new Vec3(0, size * 0.5 + distance, 0),
      axisB: new Vec3(-1, 0, 0),
    });

    world.addConstraint(constraint);

    // Three.js 初期化
    const scene = new Scene();
    const fogColor = 0x222222;
    const fogNear = 1000;
    const fogFar = 2000;

    scene.fog = new Fog(fogColor, fogNear, fogFar);

    const cameraFov = 24;
    const cameraAspect = window.innerWidth / window.innerHeight;
    const cameraNear = 5;
    const cameraFar = 2000;
    const camera = new PerspectiveCamera(
      cameraFov,
      cameraAspect,
      cameraNear,
      cameraFar
    );

    camera.position.set(0, 20, 30);
    camera.lookAt(0, 0, 0);

    const ambientLight = new AmbientLight(0xffffff, 0.1);
    scene.add(ambientLight);

    const spotLight = new SpotLight(0xffffff, 0.9, 0, Math.PI / 8, 1);
    spotLight.position.set(-30, 40, 30);
    spotLight.target.position.set(0, 0, 0);
    scene.add(spotLight);

    const directionalLight = new DirectionalLight(0xffffff, 0.15);
    directionalLight.position.set(-30, 40, 30);
    directionalLight.target.position.set(0, 0, 0);
    scene.add(directionalLight);

    const renderer = new WebGLRenderer({ antialias: true });

    renderer.setSize(window.innerWidth, window.innerHeight);
    renderer.setClearColor(scene.fog.color, 1);

    const controls = new OrbitControls(camera, renderer.domElement);
    controls.rotateSpeed = 1.0;
    controls.zoomSpeed = 1.2;
    controls.enableDamping = true;
    controls.enablePan = false;
    controls.dampingFactor = 0.2;
    controls.minDistance = 10;
    controls.maxDistance = 500;

    const hingedGeometry = new BoxGeometry(
      hingedShape.halfExtents.x * 2,
      hingedShape.halfExtents.y * 2,
      hingedShape.halfExtents.z * 2
    );

    const staticGeometry = new BoxGeometry(
      staticShape.halfExtents.x * 2,
      staticShape.halfExtents.y * 2,
      staticShape.halfExtents.z * 2
    );

    const materialColor = 0xdddddd;
    const material = new MeshLambertMaterial({
      color: materialColor,
    });

    const hingedMesh = new Mesh(hingedGeometry, material);
    const staticMesh = new Mesh(staticGeometry, material);

    scene.add(hingedMesh);
    scene.add(staticMesh);

    let isCleared = false;

    function animate() {
      if (isCleared) {
        return;
      }

      // cannon-es ループ
      world.fixedStep();

      // cannon-es → Three.js 反映
      staticMesh.position.set(
        staticBody.position.x,
        staticBody.position.y,
        staticBody.position.z
      );

      staticMesh.quaternion.set(
        staticBody.quaternion.x,
        staticBody.quaternion.y,
        staticBody.quaternion.z,
        staticBody.quaternion.w
      );

      hingedMesh.position.set(
        hingedBody.position.x,
        hingedBody.position.y,
        hingedBody.position.z
      );

      hingedMesh.quaternion.set(
        hingedBody.quaternion.x,
        hingedBody.quaternion.y,
        hingedBody.quaternion.z,
        hingedBody.quaternion.w
      );

      // Three.js ループ
      controls.update();
      renderer.render(scene, camera);
      requestAnimationFrame(animate);
    }

    animate();

    document.body.appendChild(renderer.domElement);

    return () => {
      document.body.removeChild(renderer.domElement);
      isCleared = true;
    };
  }, []);
}

実行結果
意外とあっさりできた。
重力を真下にしたり、linearDamping を設定して空気抵抗を設けるなど若干カスタマイズした。
次は衝突を検証してみよう

その前に
こちらの素晴らしいサンプルを解読してみたい。
Three.js Editor の存在を知った
Web 上で動作する簡易的な Blender みたいな感じ。

スクリプトも登録できるので簡単なゲームみたいなものが作れる。
app.json をインポート
Three.js Editor のメニューバーで File > Import を選択して app.json をインポートする。
Scene に登録されているスクリプトは下記のような感じ。
var rotate = 0;
var is_pause = true;
var rotate_coef_default = 0.002;
var rotate_coef_speed = 0.015;
var rotate_coef = rotate_coef_default;
var rotate_degree = 0.0;
const raycaster = new THREE.Raycaster();

var model = this.getObjectByName( 'Group' );
var dummy = this.getObjectByName('Dummy');

camera.position.set(1.36, 236.19, -497.54);

var controls = new THREE.OrbitControls(camera,renderer.domElement);
controls.target.set(0.0, 200.0, -18.96);

function update( event ) {
		if( is_pause == false ){
		rotate_degree = rotate_coef;
	}
	rotate = rotate_degree;

	controls.update();
	model.rotation.y += rotate;
}

function pause() {
	if( is_pause ){
		rotate_degree = rotate_coef_default;
		is_pause = false;
	}else{
		rotate_degree = 0.0;
		is_pause = true;
	}
}

function reset() {
	camera.position.set(1.36, 236.19, -497.54);
	controls.target.set(0.0, 200.0, -18.96);
	var rot = [0,0,0];
	var name = 'num';
	rot = [0,0,0];
	name = 'Link1.stl';
	this.getObjectByName(name).rotation.x = rot[0];
	this.getObjectByName(name).rotation.y = rot[1];
	this.getObjectByName(name).rotation.z = rot[2];
	rot = [90,0,0];
	name = 'Link2.stl';
	this.getObjectByName(name).rotation.x = rot[0];
	this.getObjectByName(name).rotation.y = rot[1];
	this.getObjectByName(name).rotation.z = rot[2];
	rot = [90,0,0];
	name = 'Link3.stl';
	this.getObjectByName(name).rotation.x = rot[0];
	this.getObjectByName(name).rotation.y = rot[1];
	this.getObjectByName(name).rotation.z = rot[2];
	rot = [90,0,0];
	name = 'Link4.stl';
	this.getObjectByName(name).rotation.x = rot[0];
	this.getObjectByName(name).rotation.y = rot[1];
	this.getObjectByName(name).rotation.z = rot[2];
	rot = [90,0,0];
	name = 'Link5.stl';
	this.getObjectByName(name).rotation.x = rot[0];
	this.getObjectByName(name).rotation.y = rot[1];
	this.getObjectByName(name).rotation.z = rot[2];
	rot = [90,0,0];
	name = 'Link6.stl';
	this.getObjectByName(name).rotation.x = rot[0];
	this.getObjectByName(name).rotation.y = rot[1];
	this.getObjectByName(name).rotation.z = rot[2];
	rot = [90,0,0];
	name = 'Link7.stl';
	this.getObjectByName(name).rotation.x = rot[0];
	this.getObjectByName(name).rotation.y = rot[1];
	this.getObjectByName(name).rotation.z = rot[2];
	rot = [90,0,0];
	name = 'HandA.stl';
	this.getObjectByName(name).rotation.x = rot[0];
	this.getObjectByName(name).rotation.y = rot[1];
	this.getObjectByName(name).rotation.z = rot[2];
	rot = [90,0,0];
	name = 'HandB.stl';
	this.getObjectByName(name).rotation.x = rot[0];
	this.getObjectByName(name).rotation.y = rot[1];
	this.getObjectByName(name).rotation.z = rot[2];
	model.rotation.y = 0.0;
}

function touchstart( event ) {
	mousedown( event );
}

function touchend( event ) {
	mouseup( event );
}

function mousedown( event ) {
	var mouse = new THREE.Vector2();
    mouse.x = (event.clientX / window.innerWidth) * 2 - 1;
    mouse.y = -(event.clientY / window.innerHeight) * 2 + 1;
	var pos = new THREE.Vector3(mouse.x, mouse.y, 1);
	raycaster.setFromCamera(mouse, camera);

	if( raycaster.intersectObject(scene.getObjectByName( "Plane" )).length > 0 ){
		rotate_coef = rotate_coef_speed;
	}
}

function mouseup( event ) {
	rotate_coef = rotate_coef_default;
}
THREE.OrbitControls がないので Publish してもそのままでは動かない。
どうにかして THREE.OrbitControls を与えてやれば動くのかな?
頑張って動かしてみた
まずは app.json の OrbitControls を置換する。
sed -i "" -e 's/THREE.OrbitControls/OrbitControls/' app.json
Three.js Editor で Publish した index.html を編集する。
<!DOCTYPE html>
<html lang="en">
  <head>
    <title></title>
    <meta charset="utf-8" />
    <meta name="generator" content="Three.js Editor" />
    <meta
      name="viewport"
      content="width=device-width, user-scalable=no, minimum-scale=1.0, maximum-scale=1.0"
    />
    <style>
      body {
        font-family: sans-serif;
        font-size: 11px;
        background-color: #000;
        margin: 0px;
      }
      canvas {
        display: block;
      }
    </style>
  </head>
  <body ontouchstart="">
    <script type="importmap">
      {
        "imports": {
          "three": "https://unpkg.com/three/build/three.module.js",
          "three/addons/": "https://unpkg.com/three/examples/jsm/"
        }
      }
    </script>
    <script type="module">
      import * as THREE from "three";
      import { OrbitControls } from "three/addons/controls/OrbitControls.js";
      import { APP } from "./js/app.js";
      import { VRButton } from "./js/VRButton.js";

      window.THREE = THREE;
      window.OrbitControls = OrbitControls;
      window.VRButton = VRButton; // Used by APP Scripts.

      THREE.ColorManagement.enabled = true;

      var loader = new THREE.FileLoader();
      loader.load("app2.json", function (text) {
        var player = new APP.Player();
        player.load(JSON.parse(text));
        player.setSize(window.innerWidth, window.innerHeight);
        player.play();

        document.body.appendChild(player.dom);

        window.addEventListener("resize", function () {
          player.setSize(window.innerWidth, window.innerHeight);
        });
      });
    </script>
  </body>
</html>
表示が遅いのは Three.js のバージョンなどが関係しているのだろうか?
WebServer
python3 http.server も良いけど下記の方がキャッシュを無効にできるので便利です。
npx http-server -c-1
バージョンを 0.106.2 にしたら軽快になった
<!DOCTYPE html>
<html lang="en">
  <head>
    <title></title>
    <meta charset="utf-8" />
    <meta name="generator" content="Three.js Editor" />
    <meta
      name="viewport"
      content="width=device-width, user-scalable=no, minimum-scale=1.0, maximum-scale=1.0"
    />
    <style>
      body {
        font-family: sans-serif;
        font-size: 11px;
        background-color: #000;
        margin: 0px;
      }
      canvas {
        display: block;
      }
    </style>
  </head>
  <body ontouchstart="">
    <script type="importmap">
      {
        "imports": {
          "three": "https://unpkg.com/three@0.106.2/build/three.module.js",
          "three/addons/": "https://unpkg.com/three@0.106.2/examples/jsm/"
        }
      }
    </script>
    <script type="module">
      import * as THREE from "three";
      import { OrbitControls } from "three/addons/controls/OrbitControls.js";
      import { APP } from "./js/app2.js";
      import { VRButton } from "./js/VRButton.js";

      window.THREE = THREE;
      window.OrbitControls = OrbitControls;
      window.VRButton = VRButton; // Used by APP Scripts.

      // THREE.ColorManagement.enabled = true;

      var loader = new THREE.FileLoader();
      loader.load("app2.json", function (text) {
        var player = new APP.Player();
        player.load(JSON.parse(text));
        player.setSize(window.innerWidth, window.innerHeight);
        player.play();

        document.body.appendChild(player.dom);

        window.addEventListener("resize", function () {
          player.setSize(window.innerWidth, window.innerHeight);
        });
      });
    </script>
  </body>
</html>
app.js は crane_x7_js に含まれるものを使うか、Publish に含まれるものを使う。
前者の場合は最後に export { APP }; を追記する。
後者の場合は xr を vr に置換する。
正直ここまでバージョンで違いがあるとは思わなかった。
今日はここまで
来週はどうやって動かしているのかを解読していきたい。
アームを動かしているコードの追跡
range_rot.js
range_html() → set_data()
function.js
set_rot_data() → set_rotate() → player.setObjRot()
app.js
setObjRot()
Three.js
scene.getObjectByName()
オブジェクト名
- Link1〜7
- HandA
- HandB
今日の目標
簡単なモックアップを作成する所まで行きたい。
ワークスペースの作成
npx create-next-app --javascript --eslint --src-dir --import-alias "@/*" --use-npm robot-arm
cd robot-arm
mkdir -p public/js
touch public/js/app.js public/js/VRButton.js public/app.json
npm run dev
TypeScript でやろうとしたけど大変だったので JavaScript にした。
コーディング
body {
  font-family: sans-serif;
  font-size: 11px;
  background-color: #000;
  margin: 0px;
}

canvas {
  display: block;
}
import { Html, Head, Main, NextScript } from "next/document";
import Script from "next/script";

export default function Document() {
  return (
    <Html lang="en">
      <Head />
      <body>
        <Main />
        <NextScript />
        <Script
          strategy="beforeInteractive"
          src="https://unpkg.com/three@0.117/build/three.min.js"
        ></Script>
        <Script
          strategy="beforeInteractive"
          src="https://unpkg.com/three@0.117/examples/js/controls/OrbitControls.js"
        ></Script>
        <Script strategy="beforeInteractive" src="/js/app.js"></Script>
        <Script strategy="beforeInteractive" src="/js/VRButton.js"></Script>
      </body>
    </Html>
  );
}
Three.js は 0.117 と 0.118 の間にパフォーマンスの壁があるようだ。
import { useEffect } from "react";

export default function Home() {
  useEffect(() => {
    const loader = new THREE.FileLoader();
    const player = new APP.Player();
    const onResize = () => {
      player.setSize(window.innerWidth, window.innerHeight);
    };

    const loadPromise = new Promise((resolve, reject) => {
      loader.load("app.json", resolve, () => {}, reject);
    });

    loadPromise.then((text) => {
      player.load(JSON.parse(text));
      player.setSize(window.innerWidth, window.innerHeight);
      player.play();

      document.body.appendChild(player.dom);
      window.addEventListener("resize", onResize);
    });

    return () => {
      loadPromise.then(() => {
        player.stop();
        document.body.removeChild(player.dom);
        window.removeEventListener("reisze", onResize);
      });
    };
  }, []);
}
コピー&ペースト
下記は Three.js Editor でダウンロードしたものを使用する。
- public/js/app.js
- public/js/VRButton.js
下記は CRANE_X7_JS に含まれるものを使用する。
- public/js/app.json
http://localhost:3000 にアクセスしてアームが表示されれば成功です。
ちなみに app.js の renderer.vr は renderer.xr に戻しても問題ない。
app.js と VRButton.js の最後の export 文は削除する必要がある。
動かしてみる
scene にアクセスする必要があるのでAPP.Player() に下記を追記する。
    this.setObjRot = function (obj_name, set_rot) {
      scene.getObjectByName(obj_name).rotation.x = set_rot[0];
      scene.getObjectByName(obj_name).rotation.y = set_rot[1];
      scene.getObjectByName(obj_name).rotation.z = set_rot[2];
    };
続いて setObjRot() を呼び出すコードを Home() に追記する。
import { useEffect } from "react";

export default function Home() {
  useEffect(() => {
    const loader = new THREE.FileLoader();
    const player = new APP.Player();
    const onResize = () => {
      player.setSize(window.innerWidth, window.innerHeight);
    };

    const loadPromise = new Promise((resolve, reject) => {
      loader.load("app.json", resolve, () => {}, reject);
    });

    loadPromise
      .then((text) => {
        player.load(JSON.parse(text));
        player.setSize(window.innerWidth, window.innerHeight);
        player.play();

        document.body.appendChild(player.dom);
        window.addEventListener("resize", onResize);
      })
      // 下記を追加しました。
      .then(() => {
        const rot = (90 * Math.PI) / 180;
        const deg = 0;
        const x = (deg * Math.PI) / 180;
        const y = 0;
        const z = rot;
        player.setObjRot("Link1.stl", [x, y, z]);
      });

    return () => {
      loadPromise.then(() => {
        player.stop();
        document.body.removeChild(player.dom);
        window.removeEventListener("reisze", onResize);
      });
    };
  }, []);
}

実行結果(90度回転している)
知的財産権の確認
今更だが心配になってきたので確認してみた。
crane_x7_js については Apache License 2.0 なので問題なさそう。
一方、ロボットアームのモデルデータのライセンスは下記の通り。
CRANE-X7は、アールティが開発した研究用アームロボットです。 このリポジトリのデータ等に関するライセンスについては、LICENSEファイルをご参照ください。 企業による使用については、自社内において研究開発をする目的に限り、本データの使用を許諾します。 本データを使って自作されたい方は、義務ではありませんが弊社ロボットショップで部品をお買い求めいただければ、励みになります。 商業目的をもって本データを使用する場合は、商業用使用許諾の条件等について弊社までお問合せください。
サーボモータのXM540やXM430に関するCADモデルの使用については、ROBOTIS社より使用許諾を受けています。 CRANE-X7に使用されているROBOTIS社の部品類にかかる著作権、商標権、その他の知的財産権は、ROBOTIS社に帰属します。
一応、crane_x7_js に含まれている app.json を使っているが、app.json は crane_x7_description から派生したものなので Apache License 2.0 の元で使用して良いかは微妙だ。
今回の場合は自社内における研究開発をする目的ということで許諾していただけるのかな?
権利者の方、問題がありましたら速やかに対処する所存ですのでお知らせいただければ幸いです。
Canvas のサイズを変えてみる
import { useEffect } from "react";

const canvasZoom = 0.5;

export default function Home() {
  useEffect(() => {
    const loader = new THREE.FileLoader();
    const player = new APP.Player();
    const onResize = () => {
      player.setSize(
        window.innerWidth * canvasZoom, // この行を変更しました。
        window.innerHeight * canvasZoom // この行を変更しました。
      );
    };

    const loadPromise = new Promise((resolve, reject) => {
      loader.load("app.json", resolve, () => {}, reject);
    });

    loadPromise
      .then((text) => {
        player.load(JSON.parse(text));
        onResize(); // この行を変更しました。
        player.play();

        document.body.appendChild(player.dom);
        window.addEventListener("resize", onResize);
      })
      .then(() => {
        const rot = (90 * Math.PI) / 180;
        const deg = 0;
        const x = (deg * Math.PI) / 180;
        const y = 0;
        const z = rot;
        player.setObjRot("Link1.stl", [x, y, z]);
      });

    return () => {
      loadPromise.then(() => {
        player.stop();
        document.body.removeChild(player.dom);
        window.removeEventListener("reisze", onResize);
      });
    };
  }, []);
}
実行結果
番号と角度を指定してアームを動かす
import { useEffect } from "react";

const canvasZoom = 1;

// 下記を追加しました。
const armParts = [
  { name: "Link1.stl", degree: 0 },
  { name: "Link2.stl", degree: 90 },
  { name: "Link3stl", degree: -90 },
  { name: "Link4stl", degree: 90 },
  { name: "Link5.stl", degree: -90 },
  { name: "Link6.stl", degree: 90 },
  { name: "Link7.stl", degree: -90 },
  { name: "HandA.stl", degree: 90 },
  { name: "HandB.stl", degree: 90 },
];

export default function Home() {
  useEffect(() => {
    const loader = new THREE.FileLoader();
    const player = new APP.Player();
    const onResize = () => {
      player.setSize(
        window.innerWidth * canvasZoom,
        window.innerHeight * canvasZoom
      );
    };

    // 下記を追加しました。
    const moveRobotArm = (armPartsIndex, degreeToRotate) => {
      const x = (armParts[armPartsIndex].degree * Math.PI) / 180;
      const y = 0;
      const z = (degreeToRotate * Math.PI) / 180;

      player.setObjRot(armParts[armPartsIndex].name, [x, y, z]);
    };

    const loadPromise = new Promise((resolve, reject) => {
      loader.load("app.json", resolve, () => {}, reject);
    });

    loadPromise
      .then((text) => {
        player.load(JSON.parse(text));
        onResize();
        player.play();

        document.body.appendChild(player.dom);
        window.addEventListener("resize", onResize);
      })
      // 下記を追加しました。
      .then(() => {
        const armPartsIndex = 1;
        const degreeToRotate = 90;

        moveRobotArm(armPartsIndex, degreeToRotate);
      });

    return () => {
      loadPromise.then(() => {
        player.stop();
        document.body.removeChild(player.dom);
        window.removeEventListener("reisze", onResize);
      });
    };
  }, []);
}

実行結果
自動的に動かしてみる
import { useEffect } from "react";

const canvasZoom = 1;
// 下記を変更しました。
const armParts = [
  { name: "Link1.stl", axisDegree: 0, initialDegree: 0, direction: 1 },
  { name: "Link2.stl", axisDegree: 90, initialDegree: 45, direction: 1 },
  { name: "Link3.stl", axisDegree: -90, initialDegree: 0, direction: 1 },
  { name: "Link4.stl", axisDegree: 90, initialDegree: -135, direction: 1 },
  { name: "Link5.stl", axisDegree: -90, initialDegree: 0, direction: 1 },
  { name: "Link6.stl", axisDegree: 90, initialDegree: -65, direction: 1 },
  { name: "Link7.stl", axisDegree: -90, initialDegree: 0, direction: 1 },
  { name: "HandA.stl", axisDegree: 90, initialDegree: 0, direction: 1 },
  { name: "HandB.stl", axisDegree: 90, initialDegree: 0, direction: -1 },
];

export default function Home() {
  useEffect(() => {
    const loader = new THREE.FileLoader();
    const player = new APP.Player();
    const onResize = () => {
      player.setSize(
        window.innerWidth * canvasZoom,
        window.innerHeight * canvasZoom
      );
    };

    const moveRobotArm = (armPartsIndex, degreeToRotate) => {
      const x = (armParts[armPartsIndex].axisDegree * Math.PI) / 180;
      const y = 0;
      const z = (degreeToRotate * Math.PI) / 180;

      player.setObjRot(armParts[armPartsIndex].name, [x, y, z]);
    };

    const loadPromise = new Promise((resolve, reject) => {
      loader.load("app.json", resolve, () => {}, reject);
    });

    let timer; // この行を追加しました。

    loadPromise
      .then((text) => {
        player.load(JSON.parse(text));
        onResize();
        player.play();

        document.body.appendChild(player.dom);
        window.addEventListener("resize", onResize);
      })
      // 下記を変更しました。
      .then(() => {
        timer = setInterval(() => {
          const interval = 4000;
          const time = Date.now() % interval;
          const degreeToRotate =
            Math.abs((time - interval / 2) / interval) * 90;

          for (let i = 0; i < armParts.length; i += 1) {
            const { initialDegree, direction } = armParts[i];
            moveRobotArm(i, initialDegree + degreeToRotate * direction);
          }
        }, 100);
      });

    return () => {
      loadPromise.then(() => {
        player.stop();
        document.body.removeChild(player.dom);
        window.removeEventListener("reisze", onResize);
        clearInterval(timer); // この行を追加しました。
      });
    };
  }, []);
}
実行結果
今日はここまで
明日はユーザーが指定した C++ コードでロボットアームを動かせるようにしてみよう。
C++ コードはバックエンド側で WebAssembly に変換してフロントエンド側で実行する。
WebAssembly については勉強を始めたばかりなので下記のスクラップを見て思い出しながら取り組もうと思う。
あまり物理エンジンが関係なくなってきた
物理エンジンも使ってピック&プレースのデモを作れたら面白そうだけど原理を全く理解できていないので道は遠そう。
練習のためにバーチャルわなげでも作ってみようかな。
今日こそ完成させる
Web ページに表示されたロボットアームをユーザーが指定する C / C++ プログラムで制御できるようにする。
C / C++ のソースコードはサーバー側で WebAssembly に変換する。
変換には Emscripten を使う。
Emscripten を Node.js で扱う
まずはこの方法から調べよう、下記が参考になりそう。
ワークスペースの作成
mkdir hello-emscripten
cd hello-emscripten
npm init -y
npm install --save-dev ts-node @types/node
touch control_robot_arm.c convert-to-wasm.ts
C 言語コーディング
#include <stdio.h>

int main() {
  printf("Hello, world\n");
}
emcc は標準入力が使える
cat control_robot_arm.c | emcc -x c++ -
Stack Overflow いつもありがとう。
標準出力は使えるのかわからない
下記ページなどを参考に少し試してみたけどできなかった。
標準入出力は一旦置いといて普通にファイルで入力してファイルで出力する方向でやってみよう。
wasm ファイルだけ出力する
普通に -o オプションを使用すれば OK です。
emcc -O3 -o control_robot_arm.wasm control_robot_arm.c
後から wasm → wat 変換に備えて -O3 オプションを指定して最適化しておく。
参考になりそう
wasm ファイルの中身を見てみたい
下記をインストールする。
リリースから実行ファイルをダウンロードできる。
macOS の場合は brew コマンドを使っても OK です。
brew install wabt
wat ファイルに変換したらコードが大量だった
Hello World と表示するだけなのに 2KB もあった。
コピペしようと思ったけどやめてお
main 関数が含まれていると大きくなるのかな?
ただ main 関数がないと出力ファイルに wasm を指定できないので js を指定する必要がある。
まずはコードを書き換える。
#include <stdio.h>

void say_hello() {
  printf("Hello, world\n");
}
続いてビルドして wat に変換する。
emcc -O3 control_robot_arm.c -o control_robot_arm.js
wasm2wat control_robot_arm.wasm -o control_robot_arm.wat
wat ファイルの中身を見てみる。
(module
  (type (;0;) (func))
  (func (;0;) (type 0)
    nop)
  (table (;0;) 1 1 funcref)
  (memory (;0;) 256 256)
  (export "a" (memory 0))
  (export "b" (func 0))
  (export "c" (table 0)))
なんか Hello World を表示するコードがある気配がない。
使用されていない関数は除外されるのかな?
前に WebAssembly を試した時にしっかり学んでおけば良かった。
最適化レベルを下げてみる
-O2 や -O1 しまいには -O0 を指定したけどダメだった。
関数エクスポートのオプション
たまたま下記を見ていたら EXPORTED_FUNCTIONS というそれらしいものを見つけた。
emcc c_files_here -o output.js -s TOTAL_STACK="192" -s TOTAL_MEMORY="2048" -s FAST_MEMORY="2048" -s EXPORTED_FUNCTIONS="[my functions here]"
参考になりそう
コードを変えてみる
なんとなくだけど printf() を使っているととても長くなる気がする。
int my_add(int a, int b) {
  return a + b;
}
ビルド
emcc -O3 control_robot_arm.c -o control_robot_arm.js -s EXPORTED_FUNCTIONS=_my_add
wasm2wat control_robot_arm.wasm -o control_robot_arm.wat
(module
  (type (;0;) (func))
  (type (;1;) (func (param i32 i32) (result i32)))
  (func (;0;) (type 0)
    nop)
  (func (;1;) (type 1) (param i32 i32) (result i32)
    local.get 0
    local.get 1
    i32.add)
  (table (;0;) 1 1 funcref)
  (memory (;0;) 256 256)
  (export "a" (memory 0))
  (export "b" (func 0))
  (export "c" (func 1))
  (export "d" (table 0)))
なんかそれらしいコードが出てきたが関数名が変わってしまっている気がする。
EMSCRIPTEN_KEEPALIVE
今月学んだ気がするがもう忘れている。
最適化レベルを 2 にする
emcc -O2 control_robot_arm.c -o control_robot_arm.js -s EXPORTED_FUNCTIONS=_my_add
wasm2wat control_robot_arm.wasm -o control_robot_arm.wat
(module
  (type (;0;) (func (result i32)))
  (type (;1;) (func))
  (type (;2;) (func (param i32 i32) (result i32)))
  (type (;3;) (func (param i32)))
  (type (;4;) (func (param i32) (result i32)))
  (func (;0;) (type 1)
    nop)
  (func (;1;) (type 2) (param i32 i32) (result i32)
    local.get 0
    local.get 1
    i32.add)
  (func (;2;) (type 0) (result i32)
    global.get 0)
  (func (;3;) (type 3) (param i32)
    local.get 0
    global.set 0)
  (func (;4;) (type 4) (param i32) (result i32)
    global.get 0
    local.get 0
    i32.sub
    i32.const -16
    i32.and
    local.tee 0
    global.set 0
    local.get 0)
  (func (;5;) (type 0) (result i32)
    i32.const 1024)
  (table (;0;) 1 1 funcref)
  (memory (;0;) 256 256)
  (global (;0;) (mut i32) (i32.const 66576))
  (export "memory" (memory 0))
  (export "__wasm_call_ctors" (func 0))
  (export "my_add" (func 1))
  (export "__errno_location" (func 5))
  (export "stackSave" (func 2))
  (export "stackRestore" (func 3))
  (export "stackAlloc" (func 4))
  (export "__indirect_function_table" (table 0)))
少し長くなったが関数名は保存された。
デッドコード削減
Emscripten は使用されていないコードを自動的に削減してくれる。
INVOKE_RUN
main() 関数を自動実行を抑制できる。
-s INVOKE_RUN=0 を指定すれば main() 関数がなくても wasm 出力が成功するかと思ったがやって見たらできなかった。
素直に js ファイルを出力した方が良さそう。
WASM コードを js から呼ぶ
touch index.html
npx http-server -c-1
<!DOCTYPE html>
<html lang="en">
  <head>
    <meta charset="UTF-8" />
    <meta http-equiv="X-UA-Compatible" content="IE=edge" />
    <meta name="viewport" content="width=device-width, initial-scale=1.0" />
    <title>Document</title>
    <script>
      async function main() {
        const { instance } = await WebAssembly.instantiateStreaming(
          fetch("control_robot_arm.wasm")
        );

        const num1 = 1;
        const num2 = 2;
        const sum = instance.exports.my_add(num1, num2);

        document.write(`num1 + num2 = ${num1} + ${num2} = ${sum}`);
      }

      main().catch((err) => console.error(err));
    </script>
  </head>
  <body></body>
</html>
num1 + num2 = 1 + 2 = 3
下記が参考になった。
WebAssembly コードから JavaScript コードを呼ぶ準備
extern を使えば良いのかな?
extern void printFloat(float value);

void call_js() {
  printFloat(1.0);
}
未定義のシンボルがあるとビルドが失敗するので ERROR_ON_UNDEFINED_SYMBOLS を指定する必要がある。
emcc -O2 control_robot_arm.c -o control_robot_arm.js -s EXPORTED_FUNCTIONS=_call_js -s ERROR_ON_UNDEFINED_SYMBOLS=0
wasm2wat control_robot_arm.wasm -o control_robot_arm.wat
期待通り下記の警告メッセージが表示される。
warning: undefined symbol: printFloat (referenced by top-level compiled C/C++ code)
emcc: warning: warnings in JS library compilation [-Wjs-compiler]
wat ファイルに printFloat が含まれるようになったが他にも色々なものが含まれるようになった。
  (import "env" "printFloat" (func (;0;) (type 4)))
  (import "wasi_snapshot_preview1" "args_sizes_get" (func (;1;) (type 0)))
  (import "wasi_snapshot_preview1" "args_get" (func (;2;) (type 0)))
  (import "env" "__main_argc_argv" (func (;3;) (type 0)))
  (import "wasi_snapshot_preview1" "proc_exit" (func (;4;) (type 2)))
C 言語から JavaScript ソースコードの呼び出しに成功
<!DOCTYPE html>
<html lang="en">
  <head>
    <meta charset="UTF-8" />
    <meta http-equiv="X-UA-Compatible" content="IE=edge" />
    <meta name="viewport" content="width=device-width, initial-scale=1.0" />
    <title>Document</title>
    <script>
      async function main() {
        const { instance } = await WebAssembly.instantiateStreaming(
          fetch("control_robot_arm.wasm"),
          {
            env: {
              printFloat: (value) => {
                document.write(
                  `Succeed to call a JavaScript function from C: value = ${value}`
                );
              },
            },
          }
        );

        const num1 = 1;
        const num2 = 2;
        const sum = instance.exports.call_js();
      }

      main().catch((err) => console.error(err));
    </script>
  </head>
  <body></body>
</html>
Succeed to call a JavaScript function from C: value = 1
これで C と JavaScript で双方向にやり取りができるようになった。
ビルドコマンド
忘れないように再掲する。
emcc -O2 \
  -s EXPORTED_FUNCTIONS=_exported_function_name \
  -s ERROR_ON_UNDEFINED_SYMBOLS=0 \
  -o control_robot_arm.js \
  control_robot_arm.c
TypeScript でコンパイルしてみる
exec か spawn かいつも迷うが下記ページが素晴らしく参考になる。
spawn はシェルを起動しないみたいなので spawn を使おうと思う。
import { spawn } from "child_process";

async function main() {
  const command = "emcc";
  const args = [
    "-O2",
    "-s",
    "EXPORTED_FUNCTIONS=_call_js",
    "-s",
    "ERROR_ON_UNDEFINED_SYMBOLS=0",
    "-o",
    "control_robot_arm.js",
    "control_robot_arm.c",
  ];

  const childProcess = spawn(command, args);

  childProcess.stdout.pipe(process.stdout);
  childProcess.stderr.pipe(process.stderr);
}

main().catch((err) => console.error(err));
rm -f control_robot_arm.js control_robot_arm.wasm
npx ts-node main.ts
成功すれば control_robot_arm.c と control_robot_arm.wasm が作成される。
Next.js の API Route に組み込む
cd ~/workspace/robo/robot-arm
touch src/pages/api/convert-to-wasm.js
import { spawn } from "child_process";
import { mkdir, readFile, writeFile } from "fs/promises";
import { join } from "path";

export default async function handler(req, res) {
  const workingDirectory = join(process.cwd(), "tmp", "" + Date.now());
  const sourceFilename = "source_code.cpp";
  const sourcePath = join(workingDirectory, sourceFilename);

  await mkdir(workingDirectory, { recursive: true });
  await writeFile(sourcePath, req.body.source);
  await new Promise((resolve, reject) => {
    const command = "emcc";
    const args = [
      "-O2",
      "-s",
      "EXPORTED_FUNCTIONS=_control_robot_arm",
      "-s",
      "ERROR_ON_UNDEFINED_SYMBOLS=0",
      "-o",
      sourceFilename + ".js",
      sourceFilename,
    ];

    const childProcess = spawn(command, args, {
      cwd: workingDirectory,
    });

    childProcess.stdout.pipe(process.stdout);
    childProcess.stderr.pipe(process.stderr);

    childProcess.on("error", reject);
    childProcess.on("exit", (code) => {
      if (code === 0) {
        resolve();
      } else {
        reject(new Error(`Non-zero exit code: code = ${code}`));
      }
    });
  });

  const wasmBuffer = await readFile(sourcePath + ".wasm");
  res.send(wasmBuffer);
}
curl http://localhost:3000/api/convert-to-wasm \
  -H 'Content-Type: application/json' \
  -d '{"source": "extern \"C\" void control_robot_arm() {}"}' | wasm2wat -
extern "C" がポイント、これがないとエクスポートされない。
(module
  (type (;0;) (func (result i32)))
  (type (;1;) (func))
  (type (;2;) (func (param i32)))
  (type (;3;) (func (param i32) (result i32)))
  (func (;0;) (type 1)
    nop)
  (func (;1;) (type 0) (result i32)
    global.get 0)
  (func (;2;) (type 2) (param i32)
    local.get 0
    global.set 0)
  (func (;3;) (type 3) (param i32) (result i32)
    global.get 0
    local.get 0
    i32.sub
    i32.const -16
    i32.and
    local.tee 0
    global.set 0
    local.get 0)
  (func (;4;) (type 0) (result i32)
    i32.const 1024)
  (table (;0;) 1 1 funcref)
  (memory (;0;) 256 256)
  (global (;0;) (mut i32) (i32.const 66576))
  (export "memory" (memory 0))
  (export "__wasm_call_ctors" (func 0))
  (export "control_robot_arm" (func 0))
  (export "__errno_location" (func 4))
  (export "stackSave" (func 1))
  (export "stackRestore" (func 2))
  (export "stackAlloc" (func 3))
  (export "__indirect_function_table" (table 0)))
control_robot_arm がしっかりエクスポートされている。
明日こそ
結局今日も完成しなかったが明日こそ終わりそう。
ローカルで動いたら Cloud Run にデプロイしよう。
CloudRun で emcc が動くコンテナイメージ作るのが大変そうだ。
前に書いた下記の記事や過去に ffmpeg を Docker で動かした時のソースコードを参考にしよう。
今日こそ完成させる(3 回目)
まずは C 言語プログラムの入力部を作成しよう。
ソースコード入力部の作成
import { useEffect, useState } from "react";

const canvasZoom = 0.5;
const armParts = [
  { name: "Link1.stl", axisDegree: 0, initialDegree: 0, direction: 1 },
  { name: "Link2.stl", axisDegree: 90, initialDegree: 45, direction: 1 },
  { name: "Link3.stl", axisDegree: -90, initialDegree: 0, direction: 1 },
  { name: "Link4.stl", axisDegree: 90, initialDegree: -135, direction: 1 },
  { name: "Link5.stl", axisDegree: -90, initialDegree: 0, direction: 1 },
  { name: "Link6.stl", axisDegree: 90, initialDegree: -65, direction: 1 },
  { name: "Link7.stl", axisDegree: -90, initialDegree: 0, direction: 1 },
  { name: "HandA.stl", axisDegree: 90, initialDegree: 0, direction: 1 },
  { name: "HandB.stl", axisDegree: 90, initialDegree: 0, direction: -1 },
];

export default function Home() {
  const [source, setSource] = useState("test");

  useEffect(() => {
    const loader = new THREE.FileLoader();
    const player = new APP.Player();
    const onResize = () => {
      player.setSize(
        window.innerWidth * canvasZoom,
        window.innerHeight * canvasZoom
      );
    };

    const moveRobotArm = (armPartsIndex, degreeToRotate) => {
      const x = (armParts[armPartsIndex].axisDegree * Math.PI) / 180;
      const y = 0;
      const z = (degreeToRotate * Math.PI) / 180;

      player.setObjRot(armParts[armPartsIndex].name, [x, y, z]);
    };

    const loadPromise = new Promise((resolve, reject) => {
      loader.load("app.json", resolve, () => {}, reject);
    });

    let timer;

    loadPromise
      .then((text) => {
        player.load(JSON.parse(text));
        onResize();
        player.play();

        document.body.appendChild(player.dom);
        window.addEventListener("resize", onResize);
      })
      .then(() => {
        const onTimeout = () => {
          const interval = 4000;
          const time = Date.now() % interval;
          const degreeToRotate =
            Math.abs((time - interval / 2) / interval) * 90;

          for (let i = 0; i < armParts.length; i += 1) {
            const { initialDegree, direction } = armParts[i];
            moveRobotArm(i, initialDegree + degreeToRotate * direction);
          }
        };

        const interval = 100;

        // timer = setInterval(onTimeout, interval);
      });

    return () => {
      loadPromise.then(() => {
        player.stop();
        document.body.removeChild(player.dom);
        window.removeEventListener("reisze", onResize);
        clearInterval(timer);
      });
    };
  }, []);

  return (
    <>
      <form>
        <div className="mb-3">
          <label htmlFor="source">Source (C/C++)</label>
          <textarea
            name="source"
            id="source"
            cols="80"
            rows="20"
            value={source}
            onChange={(e) => setSource(e.target.value)}
          ></textarea>
        </div>
        <div className="mb-3">
          <button type="submit">Run</button>
        </div>
      </form>
    </>
  );
}
label {
  display: block;
}

.mb-3 {
  margin-bottom: 1rem !important;
}
実行結果
C++ 制御プログラムのコーディング
touch src/control_robot_arm.cpp
#include <math.h>

struct ArmPart {
  double axisDegree;
  double initialDegree;
  int direction;
};

struct ArmPart armParts[] = {
  {   0.0,    0.0,  1},
  {  90.0,   45.0,  1},
  { -90.0,    0.0,  1},
  {  90.0, -135.0,  1},
  { -90.0,    0.0,  1},
  {  90.0,  -65.0,  1},
  { -90.0,    0.0,  1},
  {  90.0,    0.0,  1},
  {  90.0,    0.0, -1},
};

extern "C" void moveRobotArm(int armPartsIndex, double degreeToRotate);
extern "C" void control_robot_arm(int currentTime) {
  int interval = 4000.0;
  int time = currentTime % interval;
  double degreeToRotate = abs((time - interval / 2.0) / interval) * 90.0;
  double initialDegree;
  int direction;

  for (int i = 0; i < sizeof(armParts) / sizeof(ArmPart); i += 1) {
    initialDegree = armParts[i].initialDegree;
    direction = armParts[i].direction;
    moveRobotArm(i, initialDegree + degreeToRotate * direction);
  }
}
コンパイルが通るか確認する。
emcc -O2 \
  -s EXPORTED_FUNCTIONS=_control_robot_arm \
  -s ERROR_ON_UNDEFINED_SYMBOLS=0 \
  -o tmp/control_robot_arm.js \
  src/control_robot_arm.cpp
警告が出るとステータスコードが 0 以外になるので API の方も調整が必要かもしれない。
getStaticProps()
ファイルから C 言語ソースコードを読み込んでコンポーネントに渡す。
import { useEffect } from "react";
import { join } from "path";
import { readFile } from "fs/promises";

// ...

export default function Home(props) {
  const [source, setSource] = useState(props.source);
  // ...
}

export async function getStaticProps() {
  const sourcePath = join(process.cwd(), "src/control_robot_arm.cpp");
  const source = await readFile(sourcePath, "utf8");

  return {
    props: {
      source: source,
    },
  };
}
制御プログラムにコメントを書く
#include <math.h>

/** ロボットアーム稼働部分の情報を格納する構造体です。*/
struct ArmPart {
  /** 回転軸の角度(単位:度)*/
  double axisDegree;

  /** 回転角度(単位:度)*/
  double initialDegree;

  /** 回転方向 */
  int direction;
};


/** ロボットアーム稼働部分の情報を格納する変数です。*/
struct ArmPart armParts[] = {
  {   0.0,    0.0,  1},
  {  90.0,   45.0,  1},
  { -90.0,    0.0,  1},
  {  90.0, -135.0,  1},
  { -90.0,    0.0,  1},
  {  90.0,  -65.0,  1},
  { -90.0,    0.0,  1},
  {  90.0,    0.0,  1},
  {  90.0,    0.0, -1},
};

/**
 * ロボットアーム稼働部分に指令値を送る関数です。
 *
 * この関数は JavaScript 側から注入されるため C++ 側に定義は不要です。
 *
 * @param armPartsIndex 回転させたいロボットアーム稼働部分のインデックスです。
 * @param degreeToRotate 回転角度の指令値です。
 */
extern "C" void moveRobotArm(int armPartsIndex, double degreeToRotate);

/**
 * ロボットアームを制御する関数です。
 *
 * この関数は制御周期ごとに JavaScript 側から呼び出されます。
 *
 * @param currentTime 現在の時間(単位:ミリ秒)です。
 */
extern "C" void control_robot_arm(int currentTime) {
  // 周期 4000 ミリ秒、振幅 -1〜1 の三角波を生成します。
  int interval = 4000;
  double triangleWave = abs((currentTime % interval) * 2.0 / interval - 1.0);

  // 三角波と最大回転角度の積を指令値とします。
  double maxRotationDegree = 45.0;
  double degreeToRotate = triangleWave * maxRotationDegree;

  // for ループで使用する変数です。
  double initialDegree;
  int direction;

  // それぞれのロボットアーム稼働部分に指令値を送ります。
  for (int i = 0; i < sizeof(armParts) / sizeof(ArmPart); i += 1) {
    initialDegree = armParts[i].initialDegree;
    direction = armParts[i].direction;
    moveRobotArm(i, initialDegree + degreeToRotate * direction);
  }
}
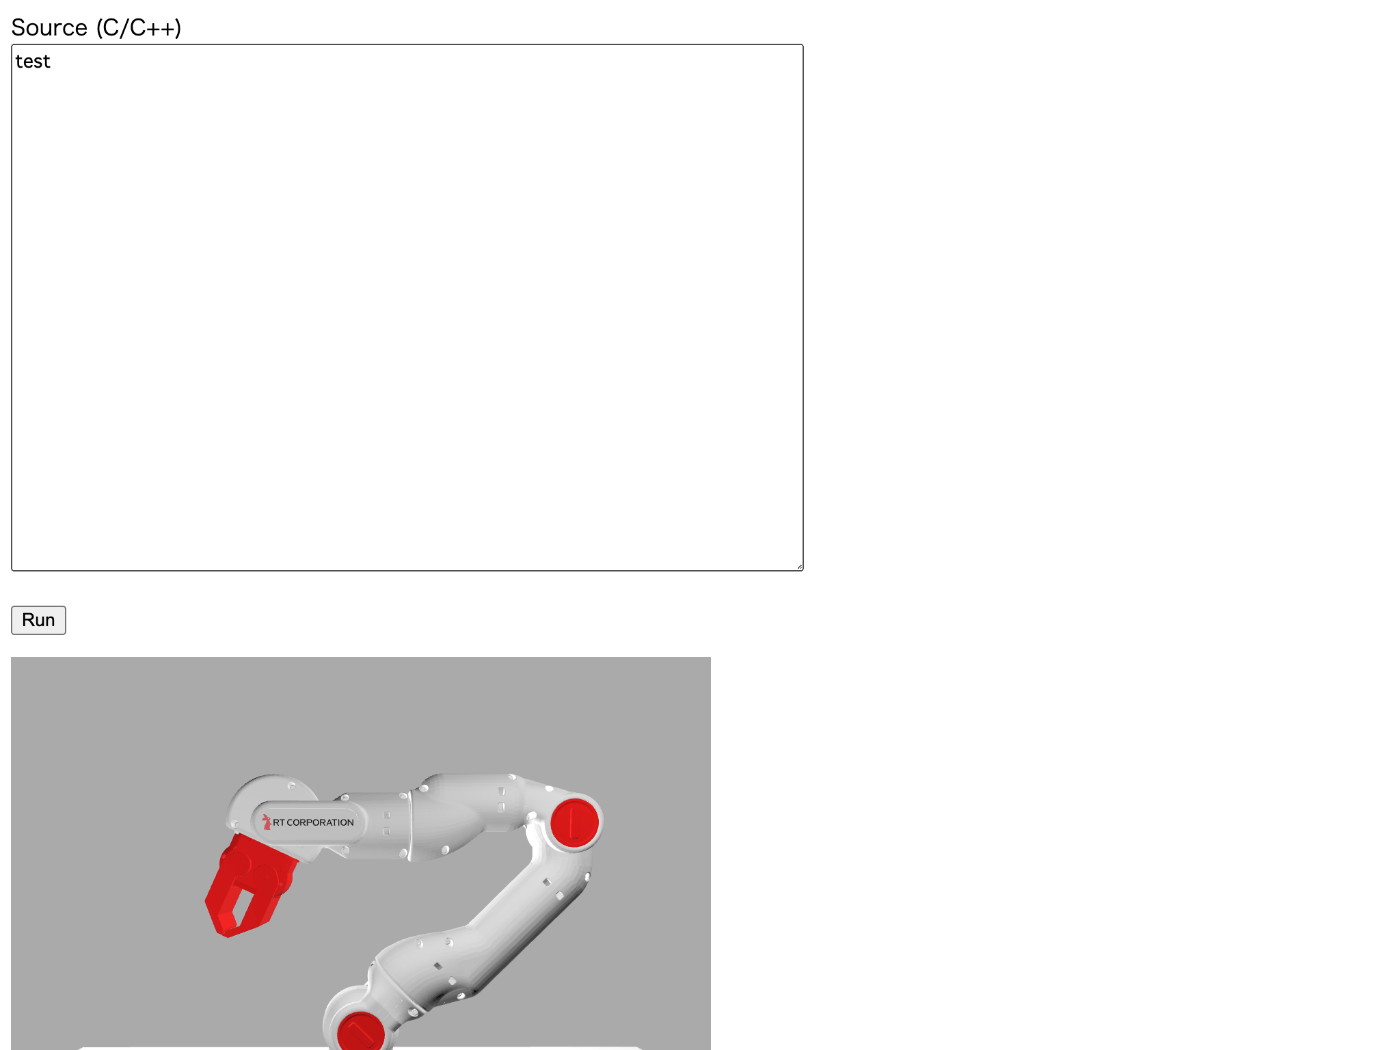
遂に完成
import { useEffect, useRef, useState } from "react";
import { join } from "path";
import { readFile } from "fs/promises";

const canvasZoom = 0.5;
const armParts = [
  { name: "Link1.stl", axisDegree: 0, initialDegree: 0, direction: 1 },
  { name: "Link2.stl", axisDegree: 90, initialDegree: 45, direction: 1 },
  { name: "Link3.stl", axisDegree: -90, initialDegree: 0, direction: 1 },
  { name: "Link4.stl", axisDegree: 90, initialDegree: -135, direction: 1 },
  { name: "Link5.stl", axisDegree: -90, initialDegree: 0, direction: 1 },
  { name: "Link6.stl", axisDegree: 90, initialDegree: -65, direction: 1 },
  { name: "Link7.stl", axisDegree: -90, initialDegree: 0, direction: 1 },
  { name: "HandA.stl", axisDegree: 90, initialDegree: 0, direction: 1 },
  { name: "HandB.stl", axisDegree: 90, initialDegree: 0, direction: -1 },
];

export default function Home(props) {
  const [source, setSource] = useState(props.source);
  const [isRunning, setIsRunning] = useState(false);
  const playerContainer = useRef(null);
  const timerContainer = useRef(null);

  useEffect(() => {
    const loader = new THREE.FileLoader();
    const player = new APP.Player();
    const onResize = () => {
      player.setSize(
        window.innerWidth * canvasZoom,
        window.innerHeight * canvasZoom
      );
    };

    const loadPromise = new Promise((resolve, reject) => {
      loader.load("app.json", resolve, () => {}, reject);
    });

    loadPromise.then((text) => {
      player.load(JSON.parse(text));
      onResize();
      player.play();

      document.body.appendChild(player.dom);
      window.addEventListener("resize", onResize);

      playerContainer.current = player;
    });

    return () => {
      loadPromise.then(() => {
        player.stop();
        document.body.removeChild(player.dom);
        window.removeEventListener("reisze", onResize);
        playerContainer.current = null;
      });
    };
  }, []);

  const onClickRunButton = async (event) => {
    try {
      event.preventDefault();

      const convertUrl = "/api/convert-to-wasm";
      const convertResponse = await fetch(convertUrl, {
        method: "POST",
        headers: {
          "Content-Type": "application/json",
        },
        body: JSON.stringify({ source }),
      });

      const { instance } = await WebAssembly.instantiate(
        await convertResponse.arrayBuffer(),
        {
          env: {
            moveRobotArm: (armPartsIndex, degreeToRotate) => {
              const x = (armParts[armPartsIndex].axisDegree * Math.PI) / 180;
              const y = 0;
              const z = (degreeToRotate * Math.PI) / 180;
              const rotation = [x, y, z];

              playerContainer.current.setObjRot(
                armParts[armPartsIndex].name,
                rotation
              );
            },
          },
        }
      );

      const onTimeout = () => {
        instance.exports.control_robot_arm(Date.now());
      };

      const interval = 100;

      timerContainer.current = setInterval(onTimeout, interval);
      setIsRunning(true);
    } catch (err) {
      console.error(err);
    }
  };

  const onClickStopButton = () => {
    clearTimeout(timerContainer.current);
    setIsRunning(false);
  };

  return (
    <>
      <form>
        <div className="mb-3">
          <label htmlFor="source">Source (C/C++)</label>
          <textarea
            name="source"
            id="source"
            cols="80"
            rows="20"
            value={source}
            onChange={(e) => setSource(e.target.value)}
          ></textarea>
        </div>
        <div className="mb-3">
          <button type="button" onClick={onClickRunButton} disabled={isRunning}>
            Run
          </button>{" "}
          <button
            type="button"
            onClick={onClickStopButton}
            disabled={!isRunning}
          >
            Stop
          </button>
        </div>
      </form>
    </>
  );
}

export async function getStaticProps() {
  const sourcePath = join(process.cwd(), "src/control_robot_arm.cpp");
  const source = await readFile(sourcePath, "utf8");

  return {
    props: {
      source: source,
    },
  };
}
実行結果
今日
emcc が実行できる Docker コンテナを作成してCloud Run でデプロイできるようにしてみたい。
これが終わったらスクラップをクローズしよう。
Emscripten の Docker イメージ
厳密には emsdk の Docker イメージが正しい。
サイズを確認してみる。
docker pull emscripten/emsdk
docker image ls | grep emscripten/emsdk
サイズは 1.7GB とかなり大きい。
できれば必要なファイルだけを拝借してサイズを削減したいが何が必要なのかわからないので難しそう。
Cloud Run で ffmpeg を使う Dockerfile
過去のソースコードから引っ張り出してきた、自社開発案件のものなのでご安心を。
FROM jrottenberg/ffmpeg:4.1-alpine AS ffmpeg
FROM node:lts-alpine
ENV LD_LIBRARY_PATH=/usr/local/lib
COPY / /
WORKDIR /usr/src/app
COPY package*.json ./
RUN npm install --production
COPY . .
EXPOSE 3001
CMD [ "node", "script/serve.js" ]
今更だけど COPY --from=ffmpeg / / って丸ごとコピーしてる感じで大丈夫なのかって感じがするけど大丈夫だったんだな。
emsdk の Dockerfile
ubuntu:jammy を使っているようだ。
emsdk をベースにしよう
node:lts とかに emsdk をインストールするよりも簡単そうだ。
Node.js をインストールする方法
Docker 公式ドキュメントに参考になりそうだ情報がある。
こちらは CentOS なので yum を apt-get とかに書き換えれば良さそう。
Node.js の Web サイトに Docker コンテナ化する方法があるのは知っていたけど ↑ は知らなかった。
Node.js が入ってた
docker run -it --rm emscripten/emsdk
node --version
v14.18.2
インストールするまでもなかった。
ワークスペースの作成
せっかくなので emcc 部分は単体でコンテナを作成してみよう。
作成には Express でも良いけど折角なので Nest.js を使用する。
nest new -p npm nest-emcc
cd nest-emcc
npm i --save @nestjs/config
touch .env
npm run start:dev
ポート番号だけ環境変数で指定できるようにしておく。
import { Module } from '@nestjs/common';
import { ConfigModule } from '@nestjs/config';
import { AppController } from './app.controller';
import { AppService } from './app.service';

@Module({
  imports: [ConfigModule.forRoot()],
  controllers: [AppController],
  providers: [AppService],
})
export class AppModule {}
import { NestFactory } from '@nestjs/core';
import { AppModule } from './app.module';

async function bootstrap() {
  const app = await NestFactory.create(AppModule);
  await app.listen(process.env.PORT);
}

bootstrap();
PORT=3000
npm run start:dev
http://localhost:3000/ にアクセスすると Hello World! と表示されることを確認する。
.gitignore に .env を追加するのを忘れないようにする。
.env
NestJS で Buffer を返す
パッケージのインストール
npm install --save-dev @types/node-fetch@2 node-fetch@2
コーディング
import {
  Body,
  Controller,
  HttpCode,
  Post,
  StreamableFile,
} from '@nestjs/common';
import { AppService } from './app.service';

@Controller()
export class AppController {
  constructor(private readonly appService: AppService) {}

  @Post()
  @HttpCode(200)
  convertToWasm(@Body('source') source: string): Promise<StreamableFile> {
    return this.appService.convertToWasm(source);
  }
}
import { Injectable, StreamableFile } from '@nestjs/common';
import { spawn } from 'child_process';
import { mkdir, readFile, writeFile } from 'fs/promises';
import { join } from 'path';

@Injectable()
export class AppService {
  async convertToWasm(source: string): Promise<StreamableFile> {
    const workingDirectory = join(process.cwd(), 'tmp', '' + Date.now());
    const sourceFilename = 'source_code.cpp';
    const sourcePath = join(workingDirectory, sourceFilename);

    await mkdir(workingDirectory, { recursive: true });
    await writeFile(sourcePath, source);
    await new Promise<void>((resolve, reject) => {
      const command = 'emcc';
      const args = [
        '-O2',
        '-s',
        'EXPORTED_FUNCTIONS=_control_loop',
        '-s',
        'ERROR_ON_UNDEFINED_SYMBOLS=0',
        '-o',
        sourceFilename + '.js',
        sourceFilename,
      ];

      const childProcess = spawn(command, args, {
        cwd: workingDirectory,
      });

      childProcess.stdout.pipe(process.stdout);
      childProcess.stderr.pipe(process.stderr);

      childProcess.on('error', reject);
      childProcess.on('exit', (code) => {
        if (code === 0) {
          resolve();
        } else {
          reject(new Error(`Non-zero exit code: code = ${code}`));
        }
      });
    });

    const wasmBuffer = await readFile(sourcePath + '.wasm');

    return new StreamableFile(wasmBuffer);
  }
}
supertest を使うよりも node-fetch を使う方が好き。
import { strictEqual } from 'assert';
import fetch from 'node-fetch';

describe('AppController (e2e)', () => {
  it('/ (POST)', async () => {
    const response = await fetch('http://localhost:3000/', {
      method: 'POST',
      headers: {
        'Content-Type': 'application/json',
      },
      body: JSON.stringify({
        source: 'extern "C" void control_loop() {}',
      }),
    });

    strictEqual(response.status, 200);
    strictEqual(
      response.headers.get('Content-Type'),
      'application/octet-stream',
    );
  });
});
テスト実行コマンドは下記の通り。
npm run test:e2e
curl によるテスト
curl http://localhost:3000/ \
  -H 'Content-Type: application/json' \
  -d '{"source": "extern \"C\" void control_loop() {}"}' | wasm2wat -
(module
  (type (;0;) (func (result i32)))
  (type (;1;) (func))
  (type (;2;) (func (param i32)))
  (type (;3;) (func (param i32) (result i32)))
  (func (;0;) (type 1)
    nop)
  (func (;1;) (type 0) (result i32)
    global.get 0)
  (func (;2;) (type 2) (param i32)
    local.get 0
    global.set 0)
  (func (;3;) (type 3) (param i32) (result i32)
    global.get 0
    local.get 0
    i32.sub
    i32.const -16
    i32.and
    local.tee 0
    global.set 0
    local.get 0)
  (func (;4;) (type 0) (result i32)
    i32.const 1024)
  (table (;0;) 1 1 funcref)
  (memory (;0;) 256 256)
  (global (;0;) (mut i32) (i32.const 66576))
  (export "memory" (memory 0))
  (export "__wasm_call_ctors" (func 0))
  (export "control_loop" (func 0))
  (export "__errno_location" (func 4))
  (export "stackSave" (func 1))
  (export "stackRestore" (func 2))
  (export "stackAlloc" (func 3))
  (export "__indirect_function_table" (table 0)))
良い感じですね。
CORS
emcc 部分を別で作成する場合は CORS の設定が必要となる。
NestJS で CORS を設定するにはどうすれば良いのだろう。
const app = await NestFactory.create(AppModule, { cors: true });
await app.listen(3000);
知りたいことが何でも書いてある NestJS 公式ドキュメントが好きです。
true の代わりに設定オブジェクトが渡せるようだ、デフォルトは下記。
{
  "origin": "*",
  "methods": "GET,HEAD,PUT,PATCH,POST,DELETE",
  "preflightContinue": false,
  "optionsSuccessStatus": 204
}
origin くらいは設定しておこうかな。
import { NestFactory } from '@nestjs/core';
import { AppModule } from './app.module';

async function bootstrap() {
  const app = await NestFactory.create(AppModule, {
    cors: {
      origin: process.env.CORS_ORIGIN,
      methods: 'GET,HEAD,PUT,PATCH,POST,DELETE',
      preflightContinue: false,
      optionsSuccessStatus: 204,
    },
  });
  await app.listen(process.env.PORT);
}

bootstrap();
main.ts の変更については再起動が必要になる様子。
import { strictEqual } from 'assert';
import fetch from 'node-fetch';

describe('AppController (e2e)', () => {
  it('/ (OPTIONS)', async () => {
    const response = await fetch('http://localhost:3000/', {
      method: 'OPTIONS',
      headers: {
        'Access-Control-Request-Method': 'POST',
        'Access-Control-Request-Headers': 'Content-Type',
        Origin: 'http://localhost:3000',
      },
    });

    strictEqual(response.status, 204);
    strictEqual(
      response.headers.get('Access-Control-Allow-Origin'),
      'http://localhost:3000',
    );
    strictEqual(
      response.headers.get('Access-Control-Allow-Methods'),
      'GET,HEAD,PUT,PATCH,POST,DELETE',
    );
    strictEqual(
      response.headers.get('Access-Control-Allow-Headers'),
      'Content-Type',
    );
  });

  it('/ (POST)', async () => {
    const response = await fetch('http://localhost:3000/', {
      method: 'POST',
      headers: {
        'Content-Type': 'application/json',
      },
      body: JSON.stringify({
        source: 'extern "C" void control_loop() {}',
      }),
    });

    strictEqual(response.status, 200);
    strictEqual(
      response.headers.get('Content-Type'),
      'application/octet-stream',
    );
  });
});
npm ci って何?
npm install との違いは下記の通り。
The project must have an existing package-lock.json or npm-shrinkwrap.json.
If dependencies in the package lock do not match those in package.json, npm ci will exit with an error, instead of updating the package lock.
npm ci can only install entire projects at a time: individual dependencies cannot be added with this command.
If a node_modules is already present, it will be automatically removed before npm ci begins its install.
It will never write to package.json or any of the package-locks: installs are essentially frozen.
何となくだがコンテナのビルドには npm ci を使った方が良さそう。
Dockerfile の動作確認
.gcloudignore だと gcloud meta list-files-for-upload が使えるが .dockerignore は下記のようにするしかないようだ。
docker image build --no-cache -t build-context -f - . <<EOF
FROM busybox
WORKDIR /build-context
COPY . .
CMD find .
EOF
docker container run --rm build-context
NestJS の Dockerfile の作り方
下記の記事がとても参考になりました。
Docker ビルドキャッシュに悩まされたら
docker build --no-cache . -t nest-emcc
ビルドに失敗する
{
  "scripts": {
    "docker:build": "docker build . -t nest-emcc"
  }
}
npm run build
[+] Building 1.0s (10/10) FINISHED
 => [internal] load build definition from Dockerfile                       0.0s
 => => transferring dockerfile: 399B                                       0.0s
 => [internal] load .dockerignore                                          0.0s
 => => transferring context: 34B                                           0.0s
 => [internal] load metadata for docker.io/emscripten/emsdk:latest         0.0s
 => [internal] load build context                                          0.0s
 => => transferring context: 3.04kB                                        0.0s
 => [1/6] FROM docker.io/emscripten/emsdk                                  0.0s
 => CACHED [2/6] WORKDIR /usr/src/app                                      0.0s
 => CACHED [3/6] COPY package*.json ./                                     0.0s
 => CACHED [4/6] RUN npm install                                           0.0s
 => [5/6] COPY . .                                                         0.0s
 => ERROR [6/6] RUN npm run build                                          0.8s
------
 > [6/6] RUN npm run build:
#10 0.381
#10 0.381 > nest-emcc@0.0.1 build /usr/src/app
#10 0.381 > nest build
#10 0.381
#10 0.787 internal/modules/cjs/loader.js:905
#10 0.787   throw err;
#10 0.787   ^
#10 0.787
#10 0.787 Error: Cannot find module 'webpack'
#10 0.787 Require stack:
#10 0.787 - /usr/src/app/node_modules/fork-ts-checker-webpack-plugin/lib/issue/issue-webpack-error.js
#10 0.787 - /usr/src/app/node_modules/fork-ts-checker-webpack-plugin/lib/hooks/tap-after-compile-to-get-issues.js
#10 0.787 - /usr/src/app/node_modules/fork-ts-checker-webpack-plugin/lib/hooks/tap-start-to-run-workers.js
#10 0.787 - /usr/src/app/node_modules/fork-ts-checker-webpack-plugin/lib/plugin.js
#10 0.787 - /usr/src/app/node_modules/fork-ts-checker-webpack-plugin/lib/index.js
#10 0.787 - /usr/src/app/node_modules/@nestjs/cli/lib/compiler/defaults/webpack-defaults.js
#10 0.787 - /usr/src/app/node_modules/@nestjs/cli/lib/compiler/webpack-compiler.js
#10 0.787 - /usr/src/app/node_modules/@nestjs/cli/actions/build.action.js
#10 0.787 - /usr/src/app/node_modules/@nestjs/cli/actions/index.js
#10 0.787 - /usr/src/app/node_modules/@nestjs/cli/commands/command.loader.js
#10 0.787 - /usr/src/app/node_modules/@nestjs/cli/commands/index.js
#10 0.787 - /usr/src/app/node_modules/@nestjs/cli/bin/nest.js
#10 0.787     at Function.Module._resolveFilename (internal/modules/cjs/loader.js:902:15)
#10 0.787     at Function.Module._load (internal/modules/cjs/loader.js:746:27)
#10 0.787     at Module.require (internal/modules/cjs/loader.js:974:19)
#10 0.787     at require (internal/modules/cjs/helpers.js:93:18)
#10 0.787     at Object.<anonymous> (/usr/src/app/node_modules/fork-ts-checker-webpack-plugin/lib/issue/issue-webpack-error.js:9:35)
#10 0.787     at Module._compile (internal/modules/cjs/loader.js:1085:14)
#10 0.787     at Object.Module._extensions..js (internal/modules/cjs/loader.js:1114:10)
#10 0.787     at Module.load (internal/modules/cjs/loader.js:950:32)
#10 0.787     at Function.Module._load (internal/modules/cjs/loader.js:790:12)
#10 0.787     at Module.require (internal/modules/cjs/loader.js:974:19) {
#10 0.787   code: 'MODULE_NOT_FOUND',
#10 0.787   requireStack: [
#10 0.787     '/usr/src/app/node_modules/fork-ts-checker-webpack-plugin/lib/issue/issue-webpack-error.js',
#10 0.787     '/usr/src/app/node_modules/fork-ts-checker-webpack-plugin/lib/hooks/tap-after-compile-to-get-issues.js',
#10 0.787     '/usr/src/app/node_modules/fork-ts-checker-webpack-plugin/lib/hooks/tap-start-to-run-workers.js',
#10 0.787     '/usr/src/app/node_modules/fork-ts-checker-webpack-plugin/lib/plugin.js',
#10 0.787     '/usr/src/app/node_modules/fork-ts-checker-webpack-plugin/lib/index.js',
#10 0.787     '/usr/src/app/node_modules/@nestjs/cli/lib/compiler/defaults/webpack-defaults.js',
#10 0.787     '/usr/src/app/node_modules/@nestjs/cli/lib/compiler/webpack-compiler.js',
#10 0.787     '/usr/src/app/node_modules/@nestjs/cli/actions/build.action.js',
#10 0.787     '/usr/src/app/node_modules/@nestjs/cli/actions/index.js',
#10 0.787     '/usr/src/app/node_modules/@nestjs/cli/commands/command.loader.js',
#10 0.787     '/usr/src/app/node_modules/@nestjs/cli/commands/index.js',
#10 0.787     '/usr/src/app/node_modules/@nestjs/cli/bin/nest.js'
#10 0.787   ]
#10 0.787 }
#10 0.801 npm ERR! code ELIFECYCLE
#10 0.801 npm ERR! errno 1
#10 0.804 npm ERR! nest-emcc@0.0.1 build: `nest build`
#10 0.805 npm ERR! Exit status 1
#10 0.805 npm ERR!
#10 0.805 npm ERR! Failed at the nest-emcc@0.0.1 build script.
#10 0.805 npm ERR! This is probably not a problem with npm. There is likely additional logging output above.
#10 0.810
#10 0.810 npm ERR! A complete log of this run can be found in:
#10 0.810 npm ERR!     /root/.npm/_logs/2023-03-28T01_56_20_743Z-debug.log
------
executor failed running [/bin/sh -c npm run build]: exit code: 1
Node.js のバージョンが古いのかな?
考えられる回避方法
- 別のイメージでビルドする
- ビルド時に package-lock.json を外してみる
別イメージでのビルドには成功した
FROM node as builder

WORKDIR /usr/src/app
COPY package*.json ./
RUN npm install
COPY . .
RUN npm run build
package-lock.json を外すビルドも成功した
FROM emscripten/emsdk as builder

WORKDIR /usr/src/app
COPY package.json ./
RUN npm install
COPY . .
RUN npm run build
とりあえずこちらの方法で試してみるか。
Dockerfile の内容
FROM emscripten/emsdk as builder
WORKDIR /usr/src/app
COPY package.json ./
RUN npm install
COPY . .
RUN npm run build
FROM emscripten/emsdk as runner
WORKDIR /usr/src/app
COPY package*.json ./
RUN npm ci
COPY /usr/src/app/dist ./dist
ENV PORT="3000"
ENV CORS_ORIGIN="http://example.com"
CMD [ "node", "dist/main" ]
/.git/
/dist/
/node_modules/
/test/
/tmp/
/.env
コンテナ起動
{
  "scripts": {
    "docker:run": "docker run --name nest-emcc -p 3000:3000 --rm nest-emcc"
  }
}
npm run docker:run
新規ターミナルを起動して下記コマンドを実行して動作確認する。
curl http://localhost:3000/ \
  -H 'Content-Type: application/json' \
  -d '{"source": "extern \"C\" void control_loop() {}"}' | wasm2wat -
遂にデプロイ
色々な方法があるが疲れたので Cloud Run で Dockerfile を使ってビルドしてらおう。
.gcloudignore を作らないとと思ったが .dockerignore の内容が反映されているので必要無さそう。
デプロイコマンド
{
  "scripts": {
    "deploy": "gcloud run deploy nest-emcc --source . --platform managed --region asia-northeast1 --allow-unauthenticated"
  }
}
npm run deploy
ビルド時間
6 分くらいかかる。
emcc のイメージをインストールしているから仕方がない。
Cloud Run での確認
curl https://nest-emcc-xxxx-an.a.run.app \
  -H 'Content-Type: application/json' \
  -d '{"source": "extern \"C\" void control_loop() {}"}' | wasm2wat -
コールドスタートは 7 秒、2 回目以降は 1〜2 秒。
今更だけど
Babylon.js がすごいぞ!
Babylon.js は Three.js のような 3D レンダリングライブラリ。
今のところ Babylon.js とは何かという説明は Babylon.js のサイトからは見つからない。
Wikipedia が一番わかりやすいかもしれない。
今日こそクローズするぞ
フロントエンド部分から emcc 部分を取り除いて Cloudflare にデプロイしたらクローズする。
ソースコードの変更
まずは src/pages/api/convert-to-wasm.js を削除する。
続いて 2 つのソースコードをに変更を加える。
/**
 * ロボットアームを制御する関数です。
 *
 * この関数は制御周期ごとに JavaScript 側から呼び出されます。
 *
 * @param currentTime 現在の時間(単位:ミリ秒)です。
 */
extern "C" void control_loop(int currentTime) {
  // 周期 4000 ミリ秒、振幅 -1〜1 の三角波を生成します。
  int interval = 4000;
  double triangleWave = abs((currentTime % interval) * 2.0 / interval - 1.0);

  // 三角波と最大回転角度の積を指令値とします。
  double maxRotationDegree = 45.0;
  double degreeToRotate = triangleWave * maxRotationDegree;

  // for ループで使用する変数です。
  double initialDegree;
  int direction;

  // それぞれのロボットアーム稼働部分に指令値を送ります。
  for (int i = 0; i < sizeof(armParts) / sizeof(ArmPart); i += 1) {
    initialDegree = armParts[i].initialDegree;
    direction = armParts[i].direction;
    moveRobotArm(i, initialDegree + degreeToRotate * direction);
  }
}
src/control_robot_arm.cpp では control_robot_arm() の名前を control_loop() に変更した。
  const onClickRunButton = async (event) => {
    try {
      event.preventDefault();

      const convertUrl = process.env.NEXT_PUBLIC_CONVERT_URL;  //この行を変更しました。
      const convertResponse = await fetch(convertUrl, {
        method: "POST",
        headers: {
          "Content-Type": "application/json",
        },
        body: JSON.stringify({ source }),
      });

      const { instance } = await WebAssembly.instantiate(
        await convertResponse.arrayBuffer(),
        {
          env: {
            moveRobotArm: (armPartsIndex, degreeToRotate) => {
              const x = (armParts[armPartsIndex].axisDegree * Math.PI) / 180;
              const y = 0;
              const z = (degreeToRotate * Math.PI) / 180;
              const rotation = [x, y, z];

              playerContainer.current.setObjRot(
                armParts[armPartsIndex].name,
                rotation
              );
            },
          },
        }
      );

      const onTimeout = () => {
        instance.exports.control_loop(Date.now()); //この行を変更しました。
      };

      const interval = 100;

      timerContainer.current = setInterval(onTimeout, interval);
      setIsRunning(true);
    } catch (err) {
      console.error(err);
    }
  };
src/pages/index.js では onClickRunButton() 関数の内容を変更した。
- convertUrl を環境変数から与えるようにした。
- 制御ループで呼び出す関数を control_loop に変更した。
最後に環境変数ファイルを作成する。
touch .env.local
NEXT_PUBLIC_CONVERT_URL="https://nest-emcc-xxxx-an.a.run.app"
api ディレクトリの削除
ビルドする時に api ディレクトリがあると余計なファイルが出力されてしまうので削除する。
rm -rf src/pages/api
ビルド
npm run build
> robot-arm@0.1.0 build
> next build

info  - Loaded env from /Users/susukida/workspace/robo/robot-arm/.env.local
info  - Linting and checking validity of types
info  - Compiled successfully
info  - Collecting page data
info  - Generating static pages (3/3)
info  - Creating an optimized production build .info  - Finalizing page optimizainfo  - Finalizing page optimization

Route (pages)                              Size     First Load JS
┌ ● /                                      1.14 kB        74.4 kB
├   /_app                                  0 B            73.3 kB
└ ○ /404                                   182 B          73.5 kB
+ First Load JS shared by all              73.3 kB
  ├ chunks/framework-2c79e2a64abdb08b.js   45.2 kB
  ├ chunks/main-0ecb9ccfcb6c9b24.js        27 kB
  ├ chunks/pages/_app-7172e87d084d5d88.js  298 B
  ├ chunks/webpack-8fa1640cc84ba8fe.js     750 B
  └ css/b48343aef66099ed.css               75 B

○  (Static)  automatically rendered as static HTML (uses no initial props)
●  (SSG)     automatically generated as static HTML + JSON (uses getStaticProps)

info  - Creating an optimized production build ..

Cloudflare Pages へのデプロイ
まずは GitHub にソースコードをプッシュする。
続いて Cloudflare Pages にログインして Web の GUI を使ってデプロイする。
Framework preset を選択するときに 2 つのオプションがあったので迷った。
- Next.js
- Next.js (Static HTML Export)
下記ドキュメントを参考にしたところ Next.js (Static HTML Export) で良いことがわかった。
ていうか Cloudflare Pages で制限はあるものの API Routes が実行できるってすごいな。
今度使ってみよう。
環境変数 NEXT_PUBLIC_CONVERT_URL を設定してデプロイする。
ビルドが失敗してしまった。
08:50:29.686	Cloning repository...
08:50:31.297	From https://github.com/tatsuyasusukida/robot-arm
08:50:31.298	 * branch            d28b8254e98f3d8381c7c89d89fc87cc592beb38 -> FETCH_HEAD
08:50:31.298
08:50:31.439	HEAD is now at d28b825 Remove apis
08:50:31.439
08:50:31.584
08:50:31.611	Success: Finished cloning repository files
08:50:32.246	Installing dependencies
08:50:32.256	Python version set to 2.7
08:50:35.658	v12.18.0 is already installed.
08:50:36.897	Now using node v12.18.0 (npm v6.14.4)
08:50:37.124	Started restoring cached build plugins
08:50:37.139	Finished restoring cached build plugins
08:50:37.611	Attempting ruby version 2.7.1, read from environment
08:50:41.245	Using ruby version 2.7.1
08:50:41.604	Using PHP version 5.6
08:50:41.769	5.2 is already installed.
08:50:41.797	Using Swift version 5.2
08:50:41.798	Started restoring cached node modules
08:50:41.813	Finished restoring cached node modules
08:50:42.054	Installing NPM modules using NPM version 6.14.4
08:50:43.024	npm WARN read-shrinkwrap This version of npm is compatible with lockfileVersion@1, but package-lock.json was generated for lockfileVersion@2. I'll try to do my best with it!
08:51:03.144	npm WARN optional SKIPPING OPTIONAL DEPENDENCY: @next/swc-android-arm64@13.2.4 (node_modules/@next/swc-android-arm64):
08:51:03.145	npm WARN notsup SKIPPING OPTIONAL DEPENDENCY: Unsupported platform for @next/swc-android-arm64@13.2.4: wanted {"os":"android","arch":"arm64"} (current: {"os":"linux","arch":"x64"})
08:51:03.145	npm WARN optional SKIPPING OPTIONAL DEPENDENCY: @next/swc-android-arm-eabi@13.2.4 (node_modules/@next/swc-android-arm-eabi):
08:51:03.145	npm WARN notsup SKIPPING OPTIONAL DEPENDENCY: Unsupported platform for @next/swc-android-arm-eabi@13.2.4: wanted {"os":"android","arch":"arm"} (current: {"os":"linux","arch":"x64"})
08:51:03.145	npm WARN optional SKIPPING OPTIONAL DEPENDENCY: @next/swc-linux-arm64-gnu@13.2.4 (node_modules/@next/swc-linux-arm64-gnu):
08:51:03.145	npm WARN notsup SKIPPING OPTIONAL DEPENDENCY: Unsupported platform for @next/swc-linux-arm64-gnu@13.2.4: wanted {"os":"linux","arch":"arm64"} (current: {"os":"linux","arch":"x64"})
08:51:03.146	npm WARN optional SKIPPING OPTIONAL DEPENDENCY: @next/swc-darwin-arm64@13.2.4 (node_modules/@next/swc-darwin-arm64):
08:51:03.146	npm WARN notsup SKIPPING OPTIONAL DEPENDENCY: Unsupported platform for @next/swc-darwin-arm64@13.2.4: wanted {"os":"darwin","arch":"arm64"} (current: {"os":"linux","arch":"x64"})
08:51:03.146	npm WARN optional SKIPPING OPTIONAL DEPENDENCY: @next/swc-darwin-x64@13.2.4 (node_modules/@next/swc-darwin-x64):
08:51:03.146	npm WARN notsup SKIPPING OPTIONAL DEPENDENCY: Unsupported platform for @next/swc-darwin-x64@13.2.4: wanted {"os":"darwin","arch":"x64"} (current: {"os":"linux","arch":"x64"})
08:51:03.146	npm WARN optional SKIPPING OPTIONAL DEPENDENCY: @next/swc-freebsd-x64@13.2.4 (node_modules/@next/swc-freebsd-x64):
08:51:03.146	npm WARN notsup SKIPPING OPTIONAL DEPENDENCY: Unsupported platform for @next/swc-freebsd-x64@13.2.4: wanted {"os":"freebsd","arch":"x64"} (current: {"os":"linux","arch":"x64"})
08:51:03.147	npm WARN optional SKIPPING OPTIONAL DEPENDENCY: @next/swc-linux-arm-gnueabihf@13.2.4 (node_modules/@next/swc-linux-arm-gnueabihf):
08:51:03.147	npm WARN notsup SKIPPING OPTIONAL DEPENDENCY: Unsupported platform for @next/swc-linux-arm-gnueabihf@13.2.4: wanted {"os":"linux","arch":"arm"} (current: {"os":"linux","arch":"x64"})
08:51:03.147	npm WARN optional SKIPPING OPTIONAL DEPENDENCY: @next/swc-linux-arm64-musl@13.2.4 (node_modules/@next/swc-linux-arm64-musl):
08:51:03.147	npm WARN notsup SKIPPING OPTIONAL DEPENDENCY: Unsupported platform for @next/swc-linux-arm64-musl@13.2.4: wanted {"os":"linux","arch":"arm64"} (current: {"os":"linux","arch":"x64"})
08:51:03.147	npm WARN optional SKIPPING OPTIONAL DEPENDENCY: @next/swc-win32-ia32-msvc@13.2.4 (node_modules/@next/swc-win32-ia32-msvc):
08:51:03.147	npm WARN notsup SKIPPING OPTIONAL DEPENDENCY: Unsupported platform for @next/swc-win32-ia32-msvc@13.2.4: wanted {"os":"win32","arch":"ia32"} (current: {"os":"linux","arch":"x64"})
08:51:03.147	npm WARN optional SKIPPING OPTIONAL DEPENDENCY: @next/swc-win32-arm64-msvc@13.2.4 (node_modules/@next/swc-win32-arm64-msvc):
08:51:03.147	npm WARN notsup SKIPPING OPTIONAL DEPENDENCY: Unsupported platform for @next/swc-win32-arm64-msvc@13.2.4: wanted {"os":"win32","arch":"arm64"} (current: {"os":"linux","arch":"x64"})
08:51:03.147	npm WARN optional SKIPPING OPTIONAL DEPENDENCY: @next/swc-win32-x64-msvc@13.2.4 (node_modules/@next/swc-win32-x64-msvc):
08:51:03.148	npm WARN notsup SKIPPING OPTIONAL DEPENDENCY: Unsupported platform for @next/swc-win32-x64-msvc@13.2.4: wanted {"os":"win32","arch":"x64"} (current: {"os":"linux","arch":"x64"})
08:51:03.148
08:51:03.149	added 265 packages from 164 contributors and audited 276 packages in 20.159s
08:51:03.261
08:51:03.261	102 packages are looking for funding
08:51:03.262	  run `npm fund` for details
08:51:03.262
08:51:03.262	found 0 vulnerabilities
08:51:03.262
08:51:03.282	NPM modules installed
08:51:03.691	Installing Hugo 0.54.0
08:51:04.399	Hugo Static Site Generator v0.54.0-B1A82C61A/extended linux/amd64 BuildDate: 2019-02-01T10:04:38Z
08:51:04.403	Started restoring cached go cache
08:51:04.423	Finished restoring cached go cache
08:51:04.579	go version go1.14.4 linux/amd64
08:51:04.595	go version go1.14.4 linux/amd64
08:51:04.598	Installing missing commands
08:51:04.599	Verify run directory
08:51:04.599	Executing user command: next build && next export
08:51:04.693	/opt/buildhome/repo/node_modules/next/dist/build/index.js:362
08:51:04.693	                    ...pageKeys.app ?? [],
08:51:04.694	                                     ^
08:51:04.694
08:51:04.694	SyntaxError: Unexpected token '?'
08:51:04.694	    at wrapSafe (internal/modules/cjs/loader.js:1054:16)
08:51:04.694	    at Module._compile (internal/modules/cjs/loader.js:1102:27)
08:51:04.694	    at Object.Module._extensions..js (internal/modules/cjs/loader.js:1158:10)
08:51:04.694	    at Module.load (internal/modules/cjs/loader.js:986:32)
08:51:04.694	    at Function.Module._load (internal/modules/cjs/loader.js:879:14)
08:51:04.695	    at Module.require (internal/modules/cjs/loader.js:1026:19)
08:51:04.695	    at require (internal/modules/cjs/helpers.js:72:18)
08:51:04.695	    at Object.<anonymous> (/opt/buildhome/repo/node_modules/next/dist/cli/next-build.js:10:37)
08:51:04.695	    at Module._compile (internal/modules/cjs/loader.js:1138:30)
08:51:04.695	    at Object.Module._extensions..js (internal/modules/cjs/loader.js:1158:10)
08:51:04.700	Failed: build command exited with code: 1
08:51:05.532	Failed: error occurred while running build command
多分だけど Node.js のバージョンが古くて ?? 演算子が使えない様子。
困ったなと思っていたけど、なんと Node.js のバージョンを指定できる。
環境変数 NODE_VERSION = 16 を追加して再度デプロイしてみる。
今度は無事にビルドが成功した。
CORS 再設定
Access-Control-Allow-Origin ってカンマ区切りで複数指定できるのかと思ってやってみたが出来なかった。
公式ドキュメントによると NestJS は cors パッケージを使用しているので nest-emcc のソースコードを変更すれば実現できそう。
必要が生じたらやることにしてまずは Cloudflare Pages の方だけを指定してみる。
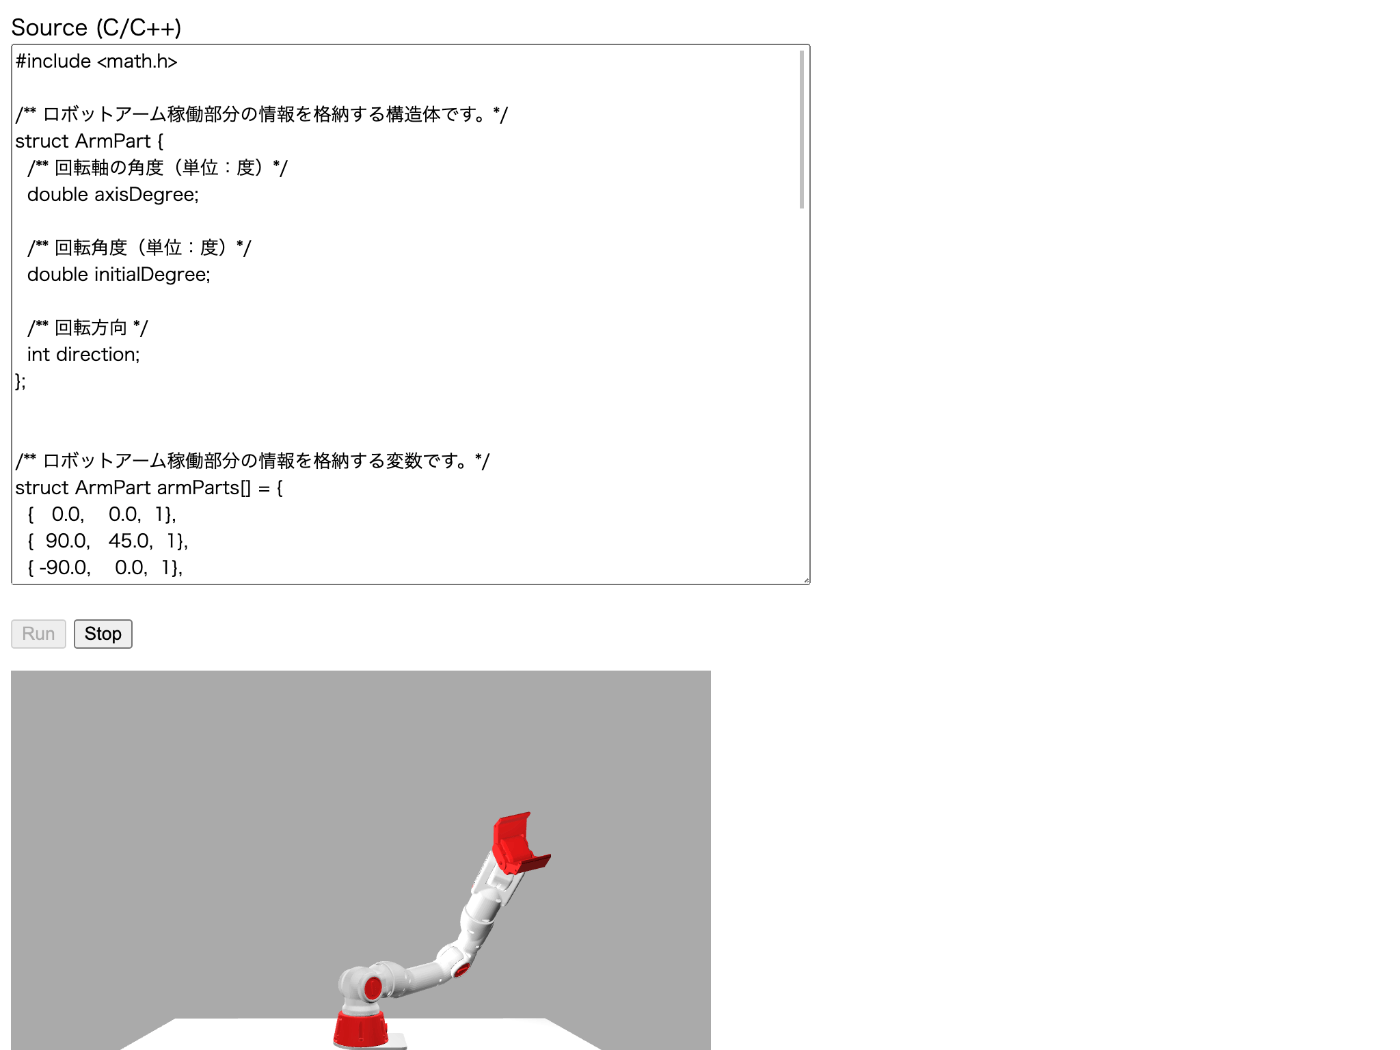
遂にローカル以外の環境での動作を確認できた!
他のブラウザでも動いた
- Firefox
- Safari
公開に向けて
今回使用させてもらったロボットアームのモデルデータが Apache か非商用かの判断が難しい。
おそらく非商用なのでモデルデータについては差し替える必要がある。
一度メーカーさんに問い合わせてみようかな。
あとコンパイルのエラーメッセージが表示されないのは不親切な感じがするので、その辺りについても emcc API の設計を見直す必要がある。
リポジトリ
Cloud Run で emcc を使って C/C++ → WebAssembly に変換する API のソースコードは下記からご利用いただけます。
Cloudflare Pages にデプロイした Next.js のフロントエンドの方は権利関係が微妙なので公開を控えようと思います。
おわりに
次のステップとしてはいきなりロボットアームの物理シミュレーションは大変そうなのでまずは簡単なサンプルを作って慣れようと思う。
3D レンダリングエンジンには Three.js も良いけど昨日たまたま見つけた Babylon.js を使ってみたい。