Apple silicon for research
Apple silicon
- M3 Macbook
- 16Gb RAM
- 500Gb strage
- 研究のための標準PCとして
- 込み入った計算、時間のかかる計算は据え置き機でやるイメージ
- 据え置き計算機へのログイン用、コーディング用、app利用
- ライティング用
Setup-1
- 一般的なアカウントセットアップ
- 周辺機器接続確認
- ロジクールMXマウス
- keycron k8p JIS
- iPad Air
- 35インチ外部モニタ
- 24インチ外部モニタ
- USB-C 拡張
- logi options+ : マウスの設定用
Setup-2
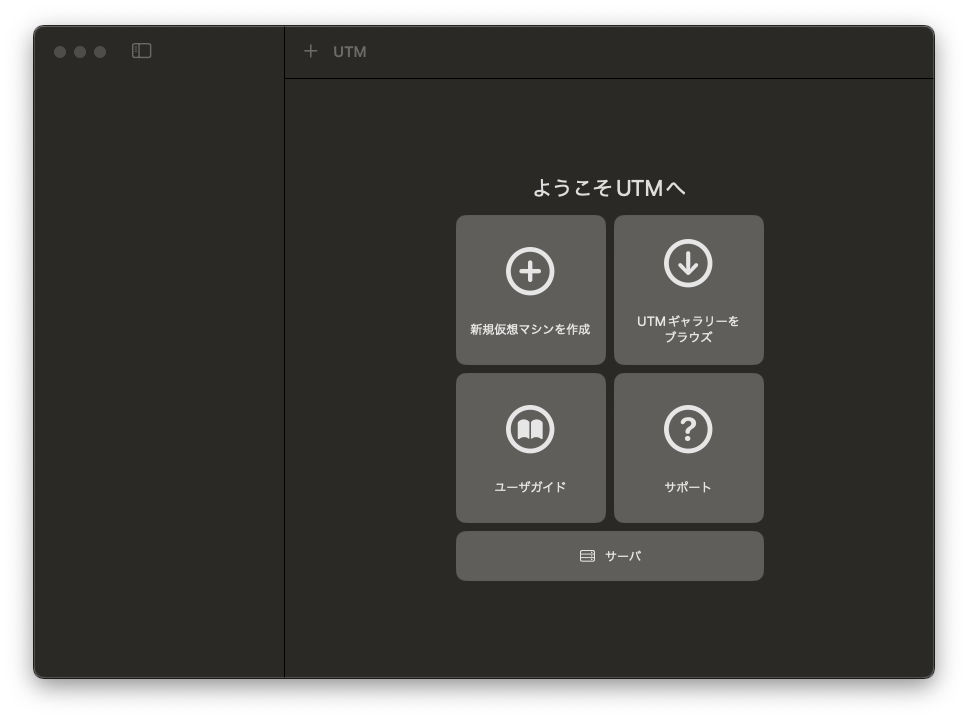
UTM
-
https://mac.getutm.app
- download
- UTM.dmgからUTMをダウンロード
- インストールしたアプリケーションを開く
- Ubuntu serverインストール手順: https://docs.getutm.app/guides/ubuntu/
-
Ubuntu server for arm : https://ubuntu.com/download/server/arm
-
Spice-agent について: https://docs.getutm.app/guest-support/linux/#spice-agent
-
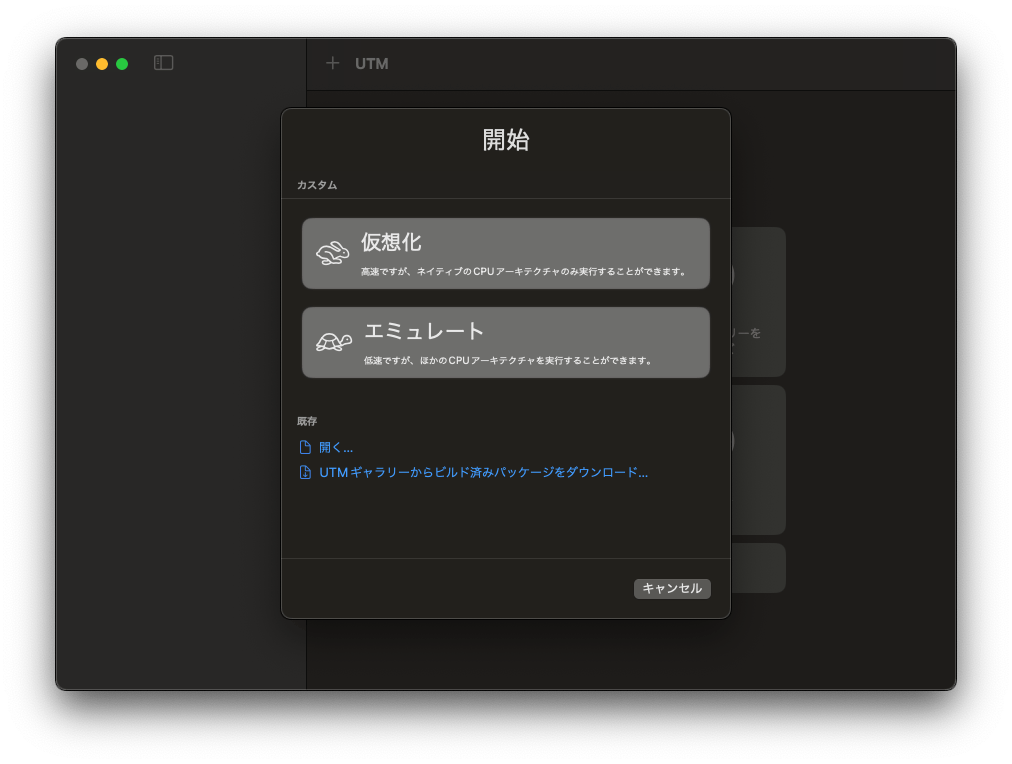
+を押して仮想マシン作成開始
-
仮想化を選択する

-
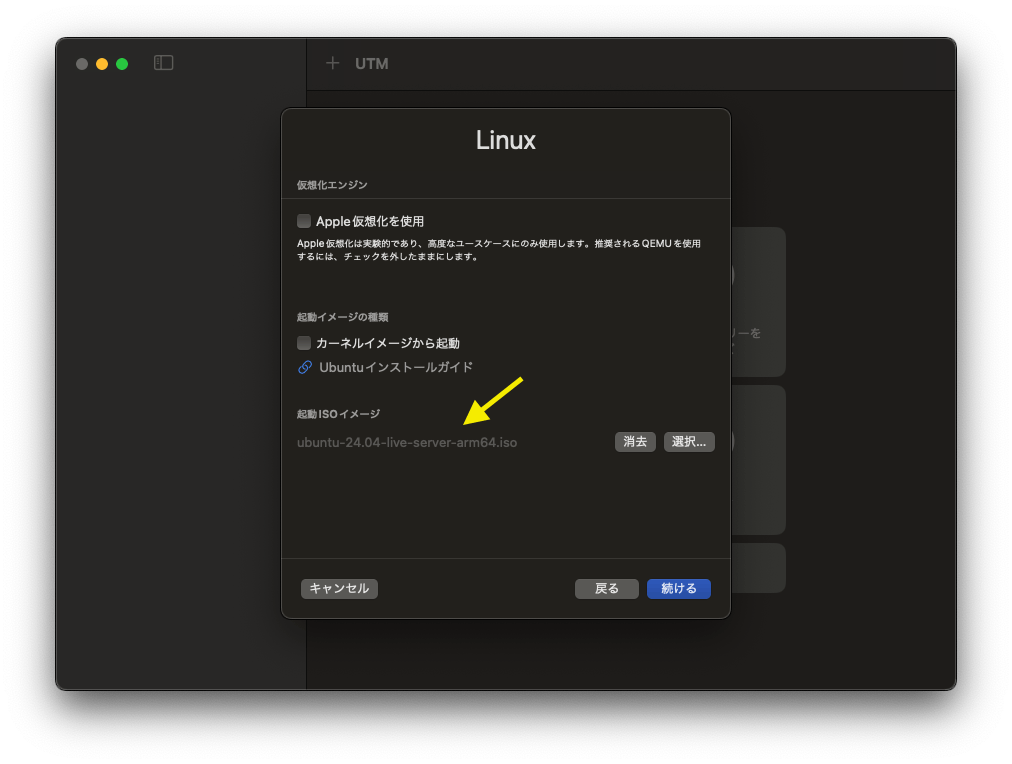
Linuxを選択する
-
上のubuntuサイトからダウンロードした起動ISOイメージを選択する。
-
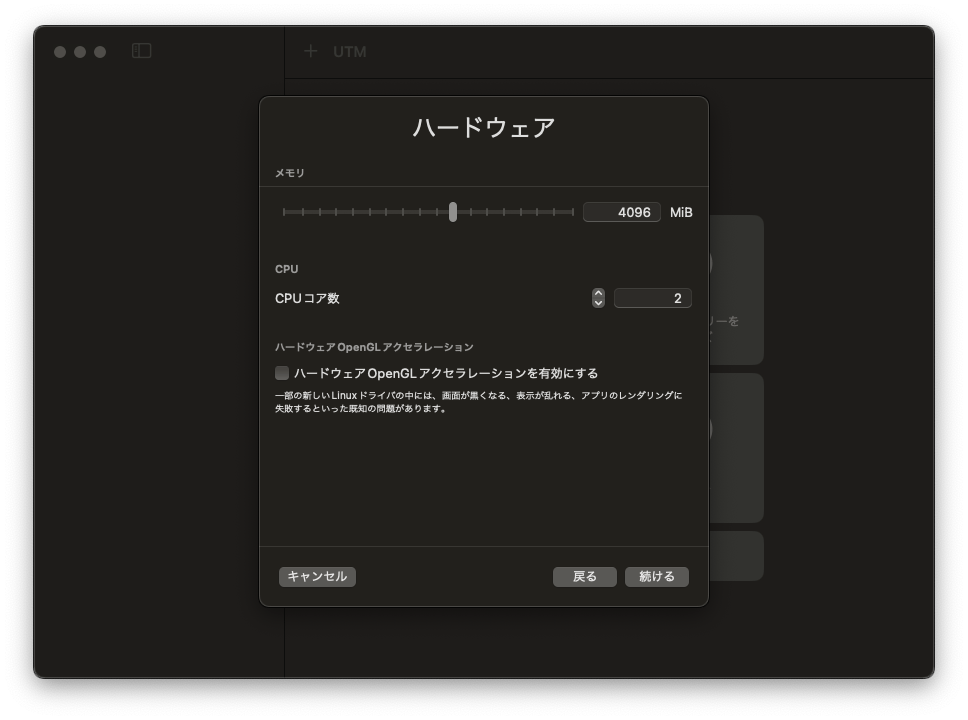
hardwareの設定。RAM4096MiB, CPU=2, OpenGLアクセラレーションを有効にするはチェックしない
-
Setup-3
- Ubuntu-serverにデスクトップ環境をインストール
- デスクトップ環境インストール後、spice-vdagentはすでにインストールされた状態になった。
- UTM立ち上げた後、しばらくubuntuのデスクトップが見えないが、待っているとログイン画面になる
Setup-4
- 共有フォルダの設定を仮想マシン作成の際にしておく
- ゲストubuntuの設定を以下のサイトに沿って行う
- https://docs.getutm.app/guest-support/linux/#virtfs
- ホストではホームディレクトリ下に共有フォルダ作成した
- ゲストではマウントポイントのフォルダをやはりホーム下に作成した
Setup-5
Ubuntu-server@UTM にconda導入
- https://docs.anaconda.com/miniconda/
- ARM64(aarch64)版のインストーラーをダウンロードして実行
- 場所は今回は$HOME/tools/miniconda3とした
- インストール後、新しい環境を作ってそちらに基本的に構築していく。ベース環境は手をつけずにそのままにしておく
- インストールしたパッケージは、
- ipython
- pandas
- seaborn
- matplotlib
- openpyxl
- xlrd
- scikit-learn
- jupyterlab
- numpy
- scipy
miniconda3のディレクトリをホーム直下でないところに作成した時
- インストーラーを実行しているときに、ホーム以外の場所に指定できる選択肢がある。
- 普通にできた。.condaなどはホームディレクトリに作成された
- .bashrcのcondaの記述もされた
- disk quotaの制限がある環境などでは、ホーム下でないところに作成する方が良さそう
Apple silicon Mac 購入時の設定情報をリサーチ
Log
- [2024-09-03-Tue] Start writing.
General
- Macの初期設定: https://qiita.com/ucan-lab/items/c1a12c20c878d6fb1e21
- 初期設定、zsh設定もあり: https://hirlab.net/nblog/category/macbook/art_911/#見た目がダサいのでどうにかする
Terminal環境
- Zsh解説: https://qiita.com/ucan-lab/items/1794940a64882021dcb1
- Homebrewについての解説: https://qiita.com/omega999/items/6f65217b81ad3fffe7e6
- Terminal、シェル初期設定: https://qiita.com/ucan-lab/items/b3132efb4f3907899a60
- zsh設定: https://ktksq.hatenablog.com/entry/mac-customize
- terminal解説 シェルプログラミング実用テクニックの著者の人: https://en-ambi.com/itcontents/entry/2019/02/19/103000/
- terminal設定案: https://qiita.com/hikagami/items/560bd0b2a413ef08ad46
- ターミナル設定、優しい解説: https://www.cfxlog.com/mac_terminal/#google_vignette
コーディング関係
Setup-7
Rosetta install
- Macにrosettaをインストールする必要がある場合: https://support.apple.com/ja-jp/102527
Rosettaが必要か、アプリの情報を調べる
- Finder でアプリのアイコンを選択します。
- Finder のメニューバーの「ファイル」メニューから「情報を見る」 を選択します。
- 開いた情報ウインドウで、「種類」というラベルの付いた情報を確認します。種類が「アプリケーション (Intel)」の場合、そのアプリを Apple シリコン搭載の Mac で使うには Rosetta が必要です。種類が「アプリケーション (Universal)」の場合、そのアプリは Apple シリコンと Intel プロセッサの両方に対応しているため、Rosetta は不要です。
一部のユニバーサルアプリ (Rosetta を必要としないアプリ) の場合、「Rosetta を使用して開く」という設定も表示されます。この設定を選択すると、Apple シリコンに対応するようにアップデートされていないため Rosetta が必要なプラグイン、機能拡張、その他のアドオンを、Web ブラウザなどのユニバーサルアプリで使えるようになります。ユニバーサルアプリ用にインストールしたアドオンがそのアプリで認識されない場合は、いったんアプリを終了し、この設定を選択してからもう一度試してみてください。
Setup-9
Terminal
さらにカスタマイズ
setup-10
R environment
rig
Install, remove, configure R versions.
Install rig
> brew tap r-lib/rig
==> Tapping r-lib/rig
Cloning into '/opt/homebrew/Library/Taps/r-lib/homebrew-rig'...
remote: Enumerating objects: 84, done.
remote: Counting objects: 100% (84/84), done.
remote: Compressing objects: 100% (57/57), done.
remote: Total 84 (delta 19), reused 78 (delta 16), pack-reused 0 (from 0)
Receiving objects: 100% (84/84), 9.54 KiB | 1.59 MiB/s, done.
Resolving deltas: 100% (19/19), done.
Tapped 2 casks (14 files, 18.2KB).

>  brew install --cask rig
==> Downloading https://formulae.brew.sh/api/cask.jws.json
==> Downloading https://github.com/r-lib/rig/releases/download/v0.7.0/rig-0.7.0-macOS-arm64.pkg
==> Downloading from https://objects.githubusercontent.com/github-production-release-asset-2e65be/426215921/cb102c4d-fa69-49df-86c3-ba60d3d7
##################################################################################################################################### 100.0%
==> Installing Cask rig
==> Running installer for rig with sudo; the password may be necessary.
Password:
installer: Package name is rig
installer: Installing at base path /
installer: The install was successful.
🍺  rig was successfully installed!
Show available version of R
> rig available --all
name   version  release date  type
------------------------------------------
4.1.0  4.1.0    2021-05-18    release
4.1.1  4.1.1    2021-08-10    release
4.1.2  4.1.2    2021-11-01    release
4.1.3  4.1.3    2022-03-10    release
4.2.0  4.2.0    2022-04-22    release
4.2.1  4.2.1    2022-06-23    release
4.2.2  4.2.2    2022-10-31    release
4.2.3  4.2.3    2023-03-15    release
4.3.0  4.3.0    2023-04-21    release
4.3.1  4.3.1    2023-06-16    release
4.3.2  4.3.2    2023-10-31    release
4.3.3  4.3.3    2024-02-29    release
4.4.0  4.4.0    2024-04-24    release
4.4.1  4.4.1    2024-06-14    release
4.4.2  4.4.2    2024-10-31    release
next   4.4.2                  patched
devel  4.5.0                  devel
s
Install R 4.3.0 by rig
> rig add 4.3.0
[INFO] Running `sudo` for adding new R versions. This might need your password.
Password:
[INFO] Downloading https://cran.rstudio.com/bin/macosx/big-sur-arm64/base/R-4.3.0-arm64.pkg -> /tmp/rig/arm64-R-4.3.0-arm64.pkg
[INFO] Running installer

[INFO] >
[INFO] > The downloaded binary packages are in
[INFO] >        /tmp/RtmpfLhlzT/downloaded_packages
Show installed version of R
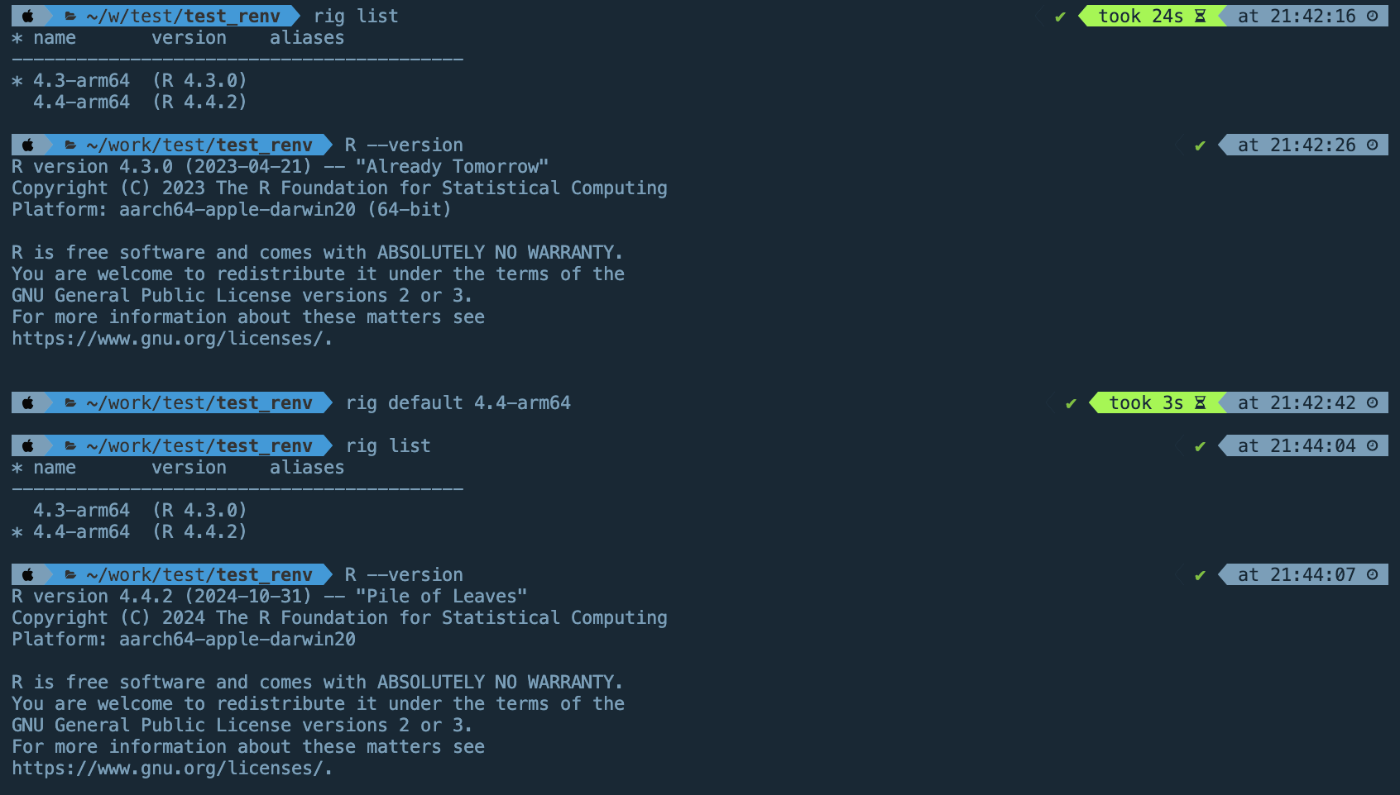
> rig list
* name       version    aliases
------------------------------------------
* 4.3-arm64  (R 4.3.0)
Check R version
> R --version
R version 4.3.0 (2023-04-21) -- "Already Tomorrow"
Copyright (C) 2023 The R Foundation for Statistical Computing
Platform: aarch64-apple-darwin20 (64-bit)

R is free software and comes with ABSOLUTELY NO WARRANTY.
You are welcome to redistribute it under the terms of the
GNU General Public License versions 2 or 3.
For more information about these matters see
https://www.gnu.org/licenses/.
Add another version of R
> rig add 4.4.2
[INFO] Running `sudo` for adding new R versions. This might need your password.
Password:
[INFO] arm64-R-4.4.2-arm64.pkg is cached at /tmp/rig/arm64-R-4.4.2-arm64.pkg
[INFO] Running installer

[INFO] > The downloaded binary packages are in
[INFO] >        /tmp/Rtmp6N7Uah/downloaded_packages
setup-11
R environment #2
renv
{renv}を使った分析環境の保存/再現はプロジェクト機能の使用を前提としている。プロジェクト機能を使わない場合でも{renv}は使用可能だが、相性が良くない。{renv}の使用と関係なく、プロジェクトは非常に便利な機能なので常に使用するように心がけよう。プロジェクト機能の詳細は第6章を参照を参照されたい。
プロジェクトを開いた状態(RStudioの右上に「Project: (none)」と表示されたらプロジェクト未使用中)で、現在の分析環境を保存する方法から紹介する。以下は架空の例であるが、renv_testという名のプロジェクトにmy_script.Rというファイルが存在し、ファイルの中身は以下の通りであるとする。
RStudioが開発を進めているRのPackage管理のためのパッケージである
The renv package helps you create reproducible environments for your R projects. This vignette introduces you to the basic nouns and verbs of renv, like the user and project libraries, and key functions like renv::init(), renv::snapshot() and renv::restore(). You’ll also learn about some of the infrastructure that makes renv tick, some problems that renv doesn’t help with, and how to uninstall it if you no longer want to use it.
Install renv
> install.packages("renv")

The downloaded binary packages are in
        /var/folders/yq/kcj8stqj1vs2_wshtwdh1bsm0000gn/T//RtmpfbvuTr/downloaded_packages
> library(renv)

Attaching package: ‘renv’

The following objects are masked from ‘package:stats’:

    embed, update

The following objects are masked from ‘package:utils’:

    history, upgrade

The following objects are masked from ‘package:base’:

    autoload, load, remove

Warning message:
package ‘renv’ was built under R version 4.3.3
Initialize renv environment
> renv::init()

renv: Project Environments for R

Welcome to renv! It looks like this is your first time using renv.
This is a one-time message, briefly describing some of renv's functionality.

renv will write to files within the active project folder, including:

  - A folder 'renv' in the project directory, and
  - A lockfile called 'renv.lock' in the project directory.

In particular, projects using renv will normally use a private, per-project
R library, in which new packages will be installed. This project library is
isolated from other R libraries on your system.

In addition, renv will update files within your project directory, including:

  - .gitignore
  - .Rbuildignore
  - .Rprofile

Finally, renv maintains a local cache of data on the filesystem, located at:

  - "~/Library/Caches/org.R-project.R/R/renv"

This path can be customized: please see the documentation in `?renv::paths`.

Please read the introduction vignette with `vignette("renv")` for more information.
You can browse the package documentation online at https://rstudio.github.io/renv/.
Do you want to proceed? [y/N]: y

- "~/Library/Caches/org.R-project.R/R/renv" has been created.
The following package(s) will be updated in the lockfile:

# CRAN -----------------------------------------------------------------------
- renv   [* -> 1.1.1]

The version of R recorded in the lockfile will be updated:
- R      [* -> 4.3.0]

- Lockfile written to "~/work/test/test_renv/renv.lock".
- renv activated -- please restart the R session.
>
list the directory
total 16
drwxr-xr-x@ 5 XXX  staff   160B Feb 16 23:39 .
drwxr-xr-x@ 3 XXX  staff    96B Feb 16 23:35 ..
-rw-r--r--@ 1 XXX  staff    26B Feb 16 23:39 .Rprofile
drwxr-xr-x@ 6 XXX  staff   192B Feb 16 23:39 renv
-rw-r--r--@ 1 XXX  staff   2.3K Feb 16 23:39 renv.lock
Inside the renv directory is,
total 88
drwxr-xr-x@ 6 XXX  staff   192B Feb 16 23:39 .
drwxr-xr-x@ 5 XXX  staff   160B Feb 16 23:39 ..
-rw-r--r--@ 1 XXX  staff    56B Feb 16 23:39 .gitignore
-rw-r--r--@ 1 XXX  staff    35K Feb 16 23:39 activate.R
drwxr-xr-x@ 3 XXX  staff    96B Feb 16 23:39 library
-rw-r--r--@ 1 XXX  staff   412B Feb 16 23:39 settings.json
Activate renv environment
> source("renv/activate.R")
- Project '~/work/test/test_renv' loaded. [renv 1.1.1]
setup-12
RStudio
Used by millions of people weekly, the RStudio integrated development environment (IDE) is a set of tools built to help you be more productive with R and Python.
The following documentation walks through an example of using the ggplot2 R package and RStudio for basic data visualization. If you are new to R and want to learn more about using R for Data Science, also see the R for Data Science textbook which is available in print or as a freely available website
RStudio is an integrated development environment (IDE) designed to support multiple languages, including both R and Python.