(1) CWLの作成環境をVScodeの「Dev Containers」の機能を使って構築する
今回の記事で使用したCWLのファイルをおいているリポジトリは以下からアクセスすることができます。
はじめに
皆さんは「ワークフロー言語」をご存知でしょうか? これらの言語は、一連の手順や操作を明示的に定義し、それらを連携させることで、より複雑な作業を効率的に行うことができます。
バイオインフォマティクス分野において、ワークフロー言語は重要な役割を担っています。
なぜワークフロー言語を使用するのか
バイオインフォマティクスにおけるデータ解析では、一つのツールのみで解析が終了することは極めて稀です。 通常、複数のツールを組み合わせて、大量のデータに対して一連のプロセスを繰り返し実行する必要があります。
これらの作業手順は、ワークフロー(またはパイプライン) と呼ばれます。
しかし、手動でこれらの手順を繰り返すと、ヒューマンエラーに加え、異なる実行環境による再現性の問題が発生することがあります。このような場合に、ワークフロー言語 を用いることで、各ステップを自動化し、かつ実行環境に依存せず解析の再現性を向上させる事ができます。
現在、さまざまな種類のワークフロー言語(Snakemake, Nextflow, Workflow Description language(WDL)...)が存在していますが、このドキュメントでは Common Workflow Language (CWL) について環境構築とその実例をご紹介します。

CWL公式ドキュメント
CWL概要説明
なぜCWLを使うのか?
では次に、数多くあるワークフロー言語の中でも、なぜCWLを使うのか? ということについてここで簡単に説明します。
1. 開発ツールが充実している
CWLでは、Rabix bentenや、作成したワークフローをウェブブラウザで可視化することが可能なCWLviewerなど、CWLのユーザーをサポートしてくれるツールが豊富に開発されています。
使用できるツール一覧は以下のページから確認できます。
2.自分の実行したい環境に合わせて最適な実行エンジンが選択できる
CWLでは、複数の実行エンジンで実行することができます。
例えば、cwltoolに加え、ジョブスケジューラに対応しているToilなどが存在します。
自分の実行したい環境に合わせて選択肢が多いことが特徴です。
一覧は以下のページから確認できます。
3.様々なワークフローがCWLで記述されている
実際にCWLを使って記述された解析ワークフローは数多くあります。
CWLの公式サイトにはワークフローリポジトリが紹介されていたり、User Galleryでは大規模な活用事例も見ることができます。
リポジトリ一覧
User Gallery
以下に具体的なワークフローの例をいくつかご紹介します。
この記事でご紹介するのは 日本の研究者の方々によって 作成されたワークフローです。
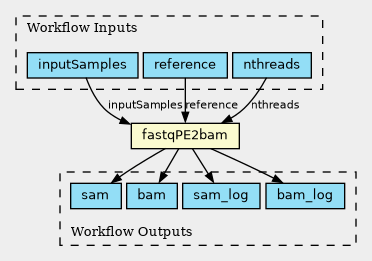
例1: ヒトゲノムバリアント検出ワークフロー ddbj/human-reseq
このワークフローは、DDBJ(DNA Data Bank of Japan)で開発されたヒトゲノムバリアント検出ワークフローです。
fastqファイルを入力として、BAMファイルに変換する fastqPE2bam.multisamples.cwlなどが含まれています。
CWL viewerで見てみよう
先程紹介したCWLviewerを使って、このワークフローを可視化してみましょう。
CWLviewerにアクセスし、githubのリンクを入力することで可視化ができます。
このように簡単に可視化ができます!
例2: DRY解析教本に掲載されているワークフローをCWLで記述
次世代シーケンサー(NGS)によって生成されるデータの解析手法を解説している 「次世代シーケンサーDRY解析教本」という本があります。
ここには、トランスクリプトームアセンブリなど、初学者に向けて様々な解析手法が丁寧に解説されています。
この本に掲載されている一連の解析手法についてもCWLで記述されています。
ここでは紹介しきれないほどのワークフローがCWLで記述されています!
皆さんもぜひ興味があるワークフローを Repositoriesから探してみてください!
4. ドキュメントが非常に充実している
CWLは様々なドキュメントが充実しています。例えば、公式ドキュメントからユーザーガイドを閲覧することができます。
また、このユーザーガイドは日本語に翻訳されており、非常に参考にしやすくなっています。
Common Workflow Language User Guide
Common Workflow Language User Guide (日本語版)
また、下記に示すような他にも日本の研究者による解説も多くあります。ぜひ参考にしてみてください。
さあ、CWLを始めよう! でも環境構築が難しいのでは...?
以上を踏まえて、CWLを記述することのメリットがわかったと思います。また、上記で述べたようにCWLには充実したドキュメントが用意されています。
特に日本語のドキュメントも豊富にあるため、日本語で学ぶことができるのは大きな利点です。CWLについてより深く理解したい方は、ぜひこれらのドキュメントを参考にしてみてください。
しかしながら、「よし、CWLを書くぞ!」と意気込んでも、環境構築という壁が立ちふさがると思います。 CWLを始めるにあたって、開発環境をセットアップすることは重要なステップですが、時に困難を伴うこともあるはずです(自分も環境構築で挫折しそうになることがよくあります)。
しかし、そんな不安を全て解消してくれるものがあるんです!
作業するマシンの環境に依存せず、CWLの開発環境を簡単に立ち上げ、実際にCWLファイルをガシガシ書いて実行することができるようになる、そのような方法があります! 以下のセクションの「環境構築編」では、Visual Studio CodeとDockerを使った開発環境の構築方法を説明します。
CWLを始めたいと思っているそこのあなた! ぜひ一緒に 簡単に 環境を整えて素晴らしいCWL lifeを過ごしましょう。
環境構築編
【STEP1-1】VScodeのインストール
はじめに、コードエディターであるVisual Studio Code (VScode)のインストール方法を説明します。
特徴としては拡張機能が豊富に存在している点が挙げられ、この記事でも拡張機能を活用しながら環境構築を進めていきます。
ダウンロードは以下のページにアクセスしておこないます。 皆さんも自分のコンピュータの環境に合わせて選んでください。
【STEP1-2】拡張機能を導入する
先程述べたように、VSCodeには豊富な拡張機能が存在します。
サイドバー(ここでは左)の拡張機能のボタン(四角が4つあつまっている部分)を押すと、様々な拡張機能がMarketplaceから検索できます。
ここで、「Dev Containers」 と検索してください。
この拡張機能が必要なのでインストールします(以前は「Remote Container extension」という名前だったようですが、どうやら変わったようです)。

インストール後、VScodeの画面をよくみると....


左下に「><」マークが出現
左下に「 >< 」というマークが出てきます。 このボタンを押すことで次の作業に移ることができます。これでVScodeは一旦準備完了です。
Dev containersに関する情報は以下の記事が参考になります。 こちらも合わせてご覧ください。
この拡張機能を使って、新しく環境構築などを行う(VScodeから自分にあった環境をつくる、など)ことも可能ですが、今回はGitHubにすでに用意されているテンプレートを使って簡単に実行できる方法をご紹介します(【STEP3】に記載しています)。
【STEP2】Docker Desktopのインストール
次にDocker Desktopをインストールします。 ダウンロードは下のリンクにアクセスすることで可能です。
今回はMac(Apple chip)版をインストールします。
インストール後、ダッシュボードを開くと以下のようになっています。

【STEP3】GitHubからテンプレートを取得する
ここまででVScodeとdockerのインストールが完了しました。 次にCWLを実行する環境のテンプレートをGitHubから取得します。
まず、以下に示しているリポジトリ(tom-tan/cwl-for-remote-container-template)にアクセスしてください。
今回はこのリポジトリをテンプレートにして環境を作っていきます。
このテンプレートでは、既にシンタックスハイライトの機能があるCWL(Rabix/benten)などの拡張機能が使用できるように準備されており、更には実行エンジンであるcwltoolなども含まれているので自らpip installする必要はありません。
ページ内の 「Use this template」(緑のボタン)をクリックし、「Create a new repository」を選択すると、自分のアカウントで新規リポジトリを作成することができます。

次に git clone を行います(GitHubのアカウントがない場合は、tom-tan/cwl-for-remote-container-templateを、アカウントがある場合は、your_account/cwl-for-remote-container-template ということになります)。
#アカウントが無い場合
git clone https://github.com/tom-tan/cwl-for-remote-container-template

#アカウントがある場合(Use this template後の状態  your_accountは自分のアカウント名に置き換えてください)
git clone https://github.com/your_account/cwl-for-remote-container-template
この作業が終了したら、つづいてVSCodeを開きます。 VSCode画面左下の緑の「 >< 」マークを押すと、 検索窓に以下のようなオプションが出てくるので、「コンテナーでフォルダーを開く」を選択し、先程git cloneしたローカルリポジトリを開きます。

最初の立ち上げ時には、5分程度かかりました。
ログを見ていると環境構築のために色々されていることがわかります。

ターミナルを開いてみると、以下のように
/workspaces/togotv_cwl_for_remote_container(repository_name)となっています。

実際にCWL関連のツールは使えるようになっているのか見てみましょう。
cwl と入力してtabを2回ほど押してみると...

このように、cwltoolなど実行に必要なツールが導入されています。
では、Dockerのコンテナが起動しているかどうかdocker desktopで確認してみると...

上記のように、立ち上がっているのがわかります。
これで一旦環境構築が完了しました!
【番外編】GitHub Codespacesで実行環境を作って作業する
ここまでは、ローカルの自分のマシンで行うことを前提に色々準備してきました。
しかしながら、「もっと楽に環境構築して動かしてみたい!!」 という方もいらっしゃるかと思います。
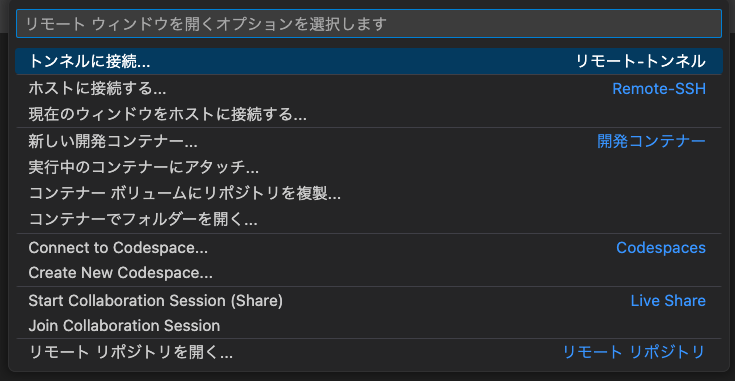
そこで活用できるのが「GitHub Codespaces」というクラウドでホストされている開発環境です。 その概要は以下の日本語ドキュメントをご覧ください。
先程テンプレートを取得する段階で、「Use this template」を押す時に気になった方がいらっしゃるかもしれませんが、この時、「Create a new repository」 と「Open in a codespace」と2つの選択肢があったかと思います。
このとき「Open in a codespace」を選べばブラウザでこの開発環境が立ち上げることができます。
また、VScode経由でも開くことが可能です。
そのためには 「GitHub codespaces」 という拡張機能をインストールしてください。
その後、左下の「><」ボタンを押してください。

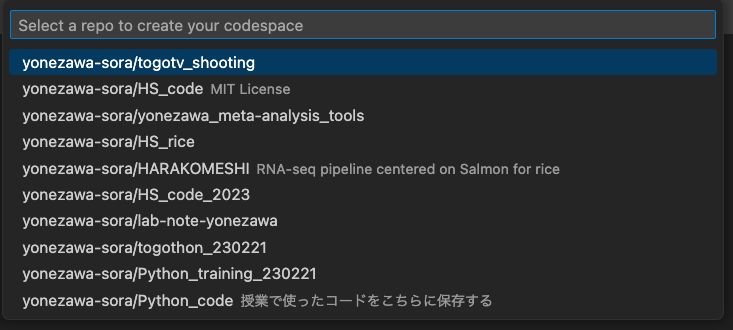
次に、「Create New Codespace」をクリックして、立ち上げたいリポジトリを選択します。
Create New Codespaceをクリックすると以下のような表示が出てきます。
ここからUse this templateで取得したリポジトリを選択して...
そうすると、自動的に環境が構築されていきます。
今回はすでに環境を構築しているものを使用します。なお、Codespaceで作成した環境は、自分のGitHubのページ(Your Codespaces)から確認できます。最初の環境の立ち上げには同様に5分程度時間がかかります。
zatsu-cwl-generatorを使ってCWLファイルを作成する
ここまではCWLに関する説明、および環境導入を行いました。この項目では実際にCWLファイルの記述、実行を行っていきます。
CWLファイルは記述する内容をYAMLかJSONの形式で記述し、「.cwl」という拡張子でファイルに保存します。そして実行時にこのCWLファイルを実行エンジンに入力すると、ワークフローが実行される、という流れになっています。
cwltool hoge.cwl # 例
しかしながら、いきなり書きはじめるというのはとても難しいと思います。
そこでCWLファイルを簡単に生成できるツール、zatsu-cwl-generatorを使ってCWLファイルを出力してみましょう!
先程作成した環境にはすでにインストールされているため、インストールする必要はありません。
grepコマンドのCWLファイルを作成する
それでは、実際に生成してみましょう。
この記事では、grepコマンドによる処理をCWLによって記述する例を紹介します。
実行するのは、grep one mock.txt > grep_out.txtというプロセスです。
以下のようなmock.txtを作成し、このファイルに対して、oneという文字列をgrepで検索し、その結果をgrep_out.txtに出力します。
grep one mock.txt > grep_out.txt
まず、ターミナルを開きます。
今回はzatsu_cwlというディレクトリを作成し、その中で作業を行います。
mkdir zatsu_cwl
cd zatsu_cwl
次に、ターミナルでzatsu-cwl-generatorと入力します。
次に、cwlファイルとして書きたい処理を '' で囲んで記入します。
今回はgrepコマンドの処理を例に実行してみます。
zatsu-cwl-generator 'grep one ./data/mock.txt > grepout.txt'
実行すると、標準出力に以下のようにcwlファイルが出力されます。
#!/usr/bin/env cwl-runner
# Generated from: grep one ./data/mock.txt > grepout.txt
class: CommandLineTool
cwlVersion: v1.0
baseCommand: grep
arguments:
  - $(inputs.one)
  - $(inputs.mock_txt)
inputs:
  - id: one
    type: Any
    default: one
  - id: mock_txt
    type: File
    default:
      class: File
      location: ./data/mock.txt
outputs:
  - id: all-for-debugging
    type:
      type: array
      items: [File, Directory]
    outputBinding:
      glob: "*"
  - id: out
    type: stdout
stdout: grepout.txt
この出力される形式はYAML形式になっています。
shebang(#!/usr/bin/env cwl-runner)以下には、今回CWLを実行するためのフィールドとして、上から順に
class 、 cwlversion、baseCommand、 arguments、 inputs 、 outputs、 stdout が出力されています。
この出力をリダイレクトしてファイルとして保存します。
今回はzatsu_cwlディレクトリに保存します。
zatsu-cwl-generator 'grep one mock.txt > grepout.txt' > grep_zatsu.cwl
記述が正しいかチェックする
zatsu-cwl-genratorで出力されたファイルに対し、実際の実行前に記述が本当に正しいか確認することができます。
cwltool –-validate コマンドを実行すると、記述したCWLファイルを評価することができます。
以下のようにoptionを追加します。
cwltool --validate grep_zatsu.cwl
すると以下のように出力されました。
INFO /usr/local/bin/cwltool 3.1.20240508115724
INFO Resolved 'grep_zatsu.cwl' to 'file:///workspaces/togotv_cwl_for_remote_container/zatsu_cwl/grep_zatsu.cwl'
grep_zatsu.cwl is valid CWL.
今回の場合はエラーは確認されず、記述としては正しいようです。
このように、記述がおかしい場合はコマンドで確認できる他、スクリプトを編集している際に、補助的に赤線で明示されますので参考にしてください。
実際に実行する
ファイルの記載が正しいことを確認できたので、次に実際にcwltoolというコマンドで試してみます(以降の操作はzatsu_cwlディレクトリでの作業です)。
cwltool grep_zatsu.cwl
実行してみると、以下のように解析が行われます。
INFO /usr/local/bin/cwltool 3.1.20240508115724
INFO Resolved 'grep_zatsu.cwl' to 'file:///workspaces/togotv_cwl_for_remote_container/zatsu_cwl/grep_zatsu.cwl'
INFO [job grep_zatsu.cwl] /tmp/i5d745lc$ grep \
    one \
    /tmp/vd9_s1sr/stg873258e0-d845-4666-98b9-2c121d5f8bbe/mock.txt > /tmp/i5d745lc/grepout.txt
INFO [job grep_zatsu.cwl] completed success
{
    "all-for-debugging": [
        {
            "location": "file:///workspaces/togotv_cwl_for_remote_container/zatsu_cwl/grepout.txt",
            "basename": "grepout.txt",
            "class": "File",
            "checksum": "sha1$a972f6d93fec7529fd4af8344ca298eea43dfbc5",
            "size": 16,
            "path": "/workspaces/togotv_cwl_for_remote_container/zatsu_cwl/grepout.txt"
        }
    ],
    "out": {
        "location": "file:///workspaces/togotv_cwl_for_remote_container/zatsu_cwl/grepout.txt",
        "basename": "grepout.txt",
        "class": "File",
        "checksum": "sha1$a972f6d93fec7529fd4af8344ca298eea43dfbc5",
        "size": 16,
        "path": "/workspaces/togotv_cwl_for_remote_container/zatsu_cwl/grepout.txt"
    }
}INFO Final process status is success
無事ワークフローが成功し、zatsu_cwlディレクトリ内に grepout.txt が出力されました。
このようにzatsu-cwl-generatorを使うことで、簡単にCWLファイルを作成することができます。
【発展】 自分で修正してみよう
上記のように実際に実行することができることを確認しました。
しかし、このファイルを修正することでより良い解析を実行することができます。
実は、先程作成したgrep処理のファイル(grep_zatsu.cwl)の編集時には、inputsフィールドのtype: Anyの部分に赤線が示されていました。
メッセージを見ると、 Expecting one of: ['Directory', 'File', 'boolean', 'double', 'float', 'int', 'long', 'null', 'stderr', 'stdout', 'string']という表示が出ていました。
ここではoneという文字列(string)を入力するので、そのように指定します。
以下のように修正が可能です。
このように、zatsu-cwl-generatorで生成されたファイルを修正しながら、CWLの文法を勉強していくということが可能です。
【発展】 --helpオプションを活用しよう
cwltool grep_zatsu.cwl --helpのように、CWLファイルの次に-h, --helpオプションをつけると、その CWLファイル自体のヘルプを見ることができます。 (cwltool --helpではありません!)
どういうことか実際にやってみましょう。
先程のセクションで修正したgrep_zatsu_v2.cwlで実行してみました。
cwltool grep_zatsu_v2.cwl --help
INFO /usr/local/bin/cwltool 3.1.20240508115724
INFO Resolved 'grep_zatsu_v2.cwl' to 'file:///workspaces/togotv_cwl_for_remote_container/zatsu_cwl/grep_zatsu_v2.cwl'
usage: grep_zatsu_v2.cwl [-h] [--one ONE] [--mock_txt MOCK_TXT] [job_order]

positional arguments:
  job_order            Job input json file

options:
  -h, --help           show this help message and exit
  --one ONE
  --mock_txt MOCK_TXT
このように、指定したパラメータ(今回は--oneと--mock_txt)に関する情報が取得できます。
ちなみにcwltool --help grep_zatsu_v2.cwlとやるとcwltoolに関するhelpが出力されるので、順序には注意が必要です。
cwltool --helpの場合
cwltool --help grep_zatsu_v2.cwl
usage: cwltool [-h] [--basedir BASEDIR] [--outdir OUTDIR] [--log-dir LOG_DIR] [--parallel] [--preserve-environment ENVVAR | --preserve-entire-environment] [--rm-container | --leave-container] [--cidfile-dir CIDFILE_DIR] [--cidfile-prefix CIDFILE_PREFIX]
               [--tmpdir-prefix TMPDIR_PREFIX] [--tmp-outdir-prefix TMP_OUTDIR_PREFIX | --cachedir CACHEDIR] [--rm-tmpdir | --leave-tmpdir] [--move-outputs | --leave-outputs | --copy-outputs] [--enable-pull | --disable-pull]
               [--rdf-serializer RDF_SERIALIZER] [--eval-timeout EVAL_TIMEOUT] [--provenance PROVENANCE] [--enable-user-provenance] [--disable-user-provenance] [--enable-host-provenance] [--disable-host-provenance] [--orcid ORCID]
               [--full-name CWL_FULL_NAME] [--print-rdf | --print-dot | --print-pre | --print-deps | --print-input-deps | --pack | --version | --validate | --print-supported-versions | --print-subgraph | --print-targets | --make-template]
               [--strict | --non-strict] [--skip-schemas] [--no-doc-cache | --doc-cache] [--verbose | --no-warnings | --quiet | --debug] [--write-summary WRITE_SUMMARY] [--strict-memory-limit] [--strict-cpu-limit] [--timestamps] [--js-console]
               [--disable-js-validation] [--js-hint-options-file JS_HINT_OPTIONS_FILE] [--user-space-docker-cmd CMD | --udocker | --singularity | --podman | --no-container] [--tool-help] [--relative-deps {primary,cwd}] [--enable-dev] [--enable-ext]
               [--enable-color | --disable-color] [--default-container DEFAULT_CONTAINER] [--no-match-user] [--custom-net CUSTOM_NET] [--enable-ga4gh-tool-registry | --disable-ga4gh-tool-registry] [--add-ga4gh-tool-registry GA4GH_TOOL_REGISTRIES]
               [--on-error {stop,continue}] [--compute-checksum | --no-compute-checksum] [--relax-path-checks] [--force-docker-pull] [--no-read-only] [--overrides OVERRIDES] [--target TARGET | --single-step SINGLE_STEP | --single-process SINGLE_PROCESS]
               [--mpi-config-file MPI_CONFIG_FILE]
               [cwl_document] ...

Reference executor for Common Workflow Language standards. Not for production use.

positional arguments:
  cwl_document          path or URL to a CWL Workflow, CommandLineTool, or ExpressionTool. If the `inputs_object` has a `cwl:tool` field indicating the path or URL to the cwl_document, then the `cwl_document` argument is optional.
  inputs_object         path or URL to a YAML or JSON formatted description of the required input values for the given `cwl_document`.

options:
  -h, --help            show this help message and exit
  --basedir BASEDIR
  --outdir OUTDIR       Output directory. The default is the current directory.
  --log-dir LOG_DIR     Log your tools stdout/stderr to this location outside of container This will only log stdout/stderr if you specify stdout/stderr in their respective fields or capture it as an output
  --parallel            Run jobs in parallel.
  --preserve-environment ENVVAR
                        Preserve specific environment variable when running CommandLineTools. May be provided multiple times. By default PATH is preserved when not running in a container.
  --preserve-entire-environment
                        Preserve all environment variables when running CommandLineTools without a software container.
  --rm-container        Delete Docker container used by jobs after they exit (default)
  --leave-container     Do not delete Docker container used by jobs after they exit
  --tmpdir-prefix TMPDIR_PREFIX
                        Path prefix for temporary directories. If --tmpdir-prefix is not provided, then the prefix for temporary directories is influenced by the value of the TMPDIR, TEMP, or TMP environment variables. Taking those into consideration, the
                        current default is /tmp/.
  --tmp-outdir-prefix TMP_OUTDIR_PREFIX
                        Path prefix for intermediate output directories. Defaults to the value of --tmpdir-prefix.
  --cachedir CACHEDIR   Directory to cache intermediate workflow outputs to avoid recomputing steps. Can be very helpful in the development and troubleshooting of CWL documents.
  --rm-tmpdir           Delete intermediate temporary directories (default)
  --leave-tmpdir        Do not delete intermediate temporary directories
  --move-outputs        Move output files to the workflow output directory and delete intermediate output directories (default).
  --leave-outputs       Leave output files in intermediate output directories.
  --copy-outputs        Copy output files to the workflow output directory and don't delete intermediate output directories.
  --enable-pull         Try to pull Docker images
  --disable-pull        Do not try to pull Docker images
  --rdf-serializer RDF_SERIALIZER
                        Output RDF serialization format used by --print-rdf (one of turtle (default), n3, nt, xml)
  --eval-timeout EVAL_TIMEOUT
                        Time to wait for a Javascript expression to evaluate before giving an error, default 60s.
  --print-rdf           Print corresponding RDF graph for workflow and exit
  --print-dot           Print workflow visualization in graphviz format and exit
  --print-pre           Print CWL document after preprocessing.
  --print-deps          Print CWL document dependencies.
  --print-input-deps    Print input object document dependencies.
  --pack                Combine components into single document and print.
  --version             Print version and exit
  --validate            Validate CWL document only.
  --print-supported-versions
                        Print supported CWL specs.
  --print-subgraph      Print workflow subgraph that will execute. Can combined with --target or --single-step
  --print-targets       Print targets (output parameters)
  --make-template       Generate a template input object
  --strict              Strict validation (unrecognized or out of place fields are error)
  --non-strict          Lenient validation (ignore unrecognized fields)
  --skip-schemas        Skip loading of schemas
  --no-doc-cache        Disable disk cache for documents loaded over HTTP
  --doc-cache           Enable disk cache for documents loaded over HTTP
  --verbose             Default logging
  --no-warnings         Only print errors.
  --quiet               Only print warnings and errors.
  --debug               Print even more logging
  --write-summary WRITE_SUMMARY, -w WRITE_SUMMARY
                        Path to write the final output JSON object to. Default is stdout.
  --strict-memory-limit
                        When running with software containers and the Docker engine, pass either the calculated memory allocation from ResourceRequirements or the default of 1 gigabyte to Docker's --memory option.
  --strict-cpu-limit    When running with software containers and the Docker engine, pass either the calculated cpu allocation from ResourceRequirements or the default of 1 core to Docker's --cpu option. Requires docker version >= v1.13.
  --timestamps          Add timestamps to the errors, warnings, and notifications.
  --js-console          Enable javascript console output
  --disable-js-validation
                        Disable javascript validation.
  --js-hint-options-file JS_HINT_OPTIONS_FILE
                        File of options to pass to jshint. This includes the added option "includewarnings".
  --user-space-docker-cmd CMD
                        (Linux/OS X only) Specify the path to udocker. Implies --udocker
  --udocker             (Linux/OS X only) Use the udocker runtime for running containers (equivalent to --user-space-docker-cmd=udocker).
  --singularity         Use Singularity or Apptainer runtime for running containers. Requires Singularity v2.6.1+ and Linux with kernel version v3.18+ or with overlayfs support backported.
  --podman              Use Podman runtime for running containers.
  --no-container        Do not execute jobs in a Docker container, even when `DockerRequirement` is specified under `hints`.
  --tool-help           Print command line help for tool
  --relative-deps {primary,cwd}
                        When using --print-deps, print paths relative to primary file or current working directory.
  --enable-dev          Enable loading and running unofficial development versions of the CWL standards.
  --enable-ext          Enable loading and running 'cwltool:' extensions to the CWL standards.
  --enable-color        Enable logging color (default enabled)
  --disable-color       Disable colored logging (default false)
  --default-container DEFAULT_CONTAINER
                        Specify a default software container to use for any CommandLineTool without a DockerRequirement.
  --no-match-user       Disable passing the current uid to `docker run --user`
  --custom-net CUSTOM_NET
                        Passed to `docker run` as the '--net' parameter when NetworkAccess is true, which is its default setting.
  --enable-ga4gh-tool-registry
                        Enable tool resolution using GA4GH tool registry API
  --disable-ga4gh-tool-registry
                        Disable tool resolution using GA4GH tool registry API
  --add-ga4gh-tool-registry GA4GH_TOOL_REGISTRIES
                        Add a GA4GH tool registry endpoint to use for resolution, default ['https://dockstore.org/api']
  --on-error {stop,continue}
                        Desired workflow behavior when a step fails. One of 'stop' (do not submit any more steps) or 'continue' (may submit other steps that are not downstream from the error). Default is 'stop'.
  --compute-checksum    Compute checksum of contents while collecting outputs
  --no-compute-checksum
                        Do not compute checksum of contents while collecting outputs
  --relax-path-checks   Relax requirements on path names to permit spaces and hash characters.
  --force-docker-pull   Pull latest software container image even if it is locally present
  --no-read-only        Do not set root directory in the container as read-only
  --overrides OVERRIDES
                        Read process requirement overrides from file.
  --target TARGET, -t TARGET
                        Only execute steps that contribute to listed targets (can be provided more than once).
  --single-step SINGLE_STEP
                        Only executes a single step in a workflow. The input object must match that step's inputs. Can be combined with --print-subgraph.
  --single-process SINGLE_PROCESS
                        Only executes the underlying Process (CommandLineTool, ExpressionTool, or sub-Workflow) for the given step in a workflow. This will not include any step-level processing: 'scatter', 'when'; and there will be no processing of step-
                        level 'default', or 'valueFrom' input modifiers. However, requirements/hints from the step or parent workflow(s) will be inherited as usual.The input object must match that Process's inputs.
  --mpi-config-file MPI_CONFIG_FILE
                        Platform specific configuration for MPI (parallel launcher, its flag etc). See README section 'Running MPI-based tools' for details of the format.

Options for recording the Docker container identifier into a file.:
  --cidfile-dir CIDFILE_DIR
                        Store the Docker container ID into a file in the specified directory.
  --cidfile-prefix CIDFILE_PREFIX
                        Specify a prefix to the container ID filename. Final file name will be followed by a timestamp. The default is no prefix.

Options for recording provenance information of the execution:
  --provenance PROVENANCE
                        Save provenance to specified folder as a Research Object that captures and aggregates workflow execution and data products.
  --enable-user-provenance
                        Record user account info as part of provenance.
  --disable-user-provenance
                        Do not record user account info in provenance.
  --enable-host-provenance
                        Record host info as part of provenance.
  --disable-host-provenance
                        Do not record host info in provenance.
  --orcid ORCID         Record user ORCID identifier as part of provenance, e.g. https://orcid.org/0000-0002-1825-0097 or 0000-0002-1825-0097. Alternatively the environment variable ORCID may be set.
  --full-name CWL_FULL_NAME
                        Record full name of user as part of provenance, e.g. Josiah Carberry. You may need to use shell quotes to preserve spaces. Alternatively the environment variable CWL_FULL_NAME may be set.
例として、grep_zatsu_v3.cwlにdocフィールドを以下のように書き加えてみました。
再度実行してみると以下のようになります。
cwltool grep_zatsu_v3.cwl -h
INFO /usr/local/bin/cwltool 3.1.20240508115724
INFO Resolved 'grep_zatsu_v3.cwl' to 'file:///workspaces/togotv_cwl_for_remote_container/zatsu_cwl/grep_zatsu_v3.cwl'
usage: grep_zatsu_v3.cwl [-h] [--one ONE] [--mock_txt MOCK_TXT] [job_order]

positional arguments:
  job_order            Job input json file

options:
  -h, --help           show this help message and exit
  --one ONE            please input grep pattern Default: one
  --mock_txt MOCK_TXT  please input text file Default: ./mock.txt
このようにdocフィールドを書いておくことで、他の研究者もワークフローを活用しやすくなります! (そしておそらく未来の自分も救ってくれるはずです)
終わりに
この記事では、環境構築と簡単なCWLファイルを作成するところまでご紹介しました。
しかしながら、CWLを更に楽しむために、引き続きこの環境でどんどんCWLファイルを作っていきます!
自分で修正しながら実際に ワークフローを作っていく 例については次の 記事で紹介しています。
また、3番目の 記事では、zatsu-cwl-generatorをフルに使ってバイオインフォマティクスの解析のワークフローを記述していきます。
今回の記事で使用したCWLのファイルをおいているリポジトリは以下からアクセスすることができます。
Discussion