Angularの公式チュートリアルをやっていく その12 - Customize the details page
Angularの公式チュートリアル「はじめての Angularアプリ」を進めていきます。
一覧
Angularの公式チュートリアルをやっていく その1 - Introduction
Angularの公式チュートリアルをやっていく その2 - Hello world
Angularの公式チュートリアルをやっていく その3 - Create home component
Angularの公式チュートリアルをやっていく その4 - Create housing location component
Angularの公式チュートリアルをやっていく その5 - Create an interface
Angularの公式チュートリアルをやっていく その6 - Add inputs to components
Angularの公式チュートリアルをやっていく その7 - Add property binding to components
Angularの公式チュートリアルをやっていく その8 - Add dynamic values to templates
Angularの公式チュートリアルをやっていく その9 - Use *ngFor in templates
Angularの公式チュートリアルをやっていく その10 - Angular services
Angularの公式チュートリアルをやっていく その11 - Add routing
Angularの公式チュートリアルをやっていく その12 - Customize the details page
Angularの公式チュートリアルをやっていく その13 - Integrate Angular forms
Angularの公式チュートリアルをやっていく その14 - Add search functionality
Angularの公式チュートリアルをやっていく その15 - Add HTTP communication
今回やるのは、↓の部分です。
家の詳細ページの作成とルーティングを行う。
前回で家の詳細ページを画面上に表示するためのファイルdetails.component.tsの作成は行いましたが、このファイルはまだ初期状態のままであり、画面遷移のためのリンクもまだ追加できていません。
そのため今回は、その家の詳細ページの実装とルーティングを行っていきます。
家の詳細ページへのリンクを設定する
家の詳細ページに遷移する為のリンクを、家の一覧ページに追加します。
下のようにhousing-location.component.tsを変更しましょう。
  import { Component, Input } from '@angular/core';
  import { CommonModule } from '@angular/common';
+ import { RouterModule } from '@angular/router';
  import { HousingLocation } from '../housinglocation';

  @Component({
    selector: 'app-housing-location',
    standalone: true,
-   imports: [CommonModule],
+   imports: [CommonModule, RouterModule],
    template: `
      <section class="listing">
        <img
          class="listing-photo"
          [src]="housingLocation.photo"
          alt="Exterior photo of {{ housingLocation.name }}"
        />
        <h2 class="listing-heading">{{ housingLocation.name }}</h2>
        <p class="listing-location">
          {{ housingLocation.city }}, {{ housingLocation.state }}
        </p>
+       <a [routerLink]="['/details', housingLocation.id]">Learn More</a>
      </section>
    `,
    styleUrls: ['./housing-location.component.css'],
  })
  export class HousingLocationComponent {
    @Input() housingLocation!: HousingLocation;
  }
新しく追加されたコードの下の部分に注目してください。
<a [routerLink]="['/details', housingLocation.id]">Learn More</a>
[routerLink]="['/details', housingLocation.id]"の部分ですが、
routerLinkには、配列の値を格納することができるみたいですね。
今回は、router.tsを確認すると、'details/:id'のパスに移動するためのリンクを作成したはずなので、
-
'/details'→ details -
housingLocation.id→ :id
をそれぞれ表しているようです。
つまり例えばrouterLinkを、
[routerLink]="['a', 'b', 'c']"の様に記述すれば、
'a/b/cへのリンクを表せるという訳です。
(ちなみに、'/details'のスラッシュ/を外して''details'にしてもリンクはちゃんと機能することは確認できました)
あとは画面が正しく表示されるか確認するだけですが……
なんと、公式ページの通りにコードを変更しただけではページはうまく動きません。
下の画像の様になります。

私が上で記載したように、
+ import { RouterModule } from '@angular/router';
と
-   imports: [CommonModule],
+   imports: [CommonModule, RouterModule],
も行わないとエラーは解消されません。
公式くんさぁ……(英語版の公式ページも同じだったので、日本語版有志の方々が悪いわけではありません)
全て変更できれば、画面は表示されます。

DetailsComponentでルートパラメータを受け取る
今回の場合、パスである'details/:id'の中の:idの部分が可変であり、ここに家のIDが入ります。
詳細ページはそのIDの値で内容が変化する為、このIDの値をコンポーネント内で取得しなければなりません。
その為に、details.component.tsファイルを下の様に変更しましょう。
- import { Component } from '@angular/core';
+ import { Component, inject } from '@angular/core';
  import { CommonModule } from '@angular/common';
+ import { ActivatedRoute } from '@angular/router';
+ import { HousingService } from '../housing.service';
+ import { HousingLocation } from '../housinglocation';

  @Component({
    selector: 'app-details',
    standalone: true,
    imports: [CommonModule],
    template: `
      <p>
-       details works!
+       details works! {{ housingLocationId }}
      </p>
    `,
    styleUrls: ['./details.component.css']
  })
  export class DetailsComponent {
+     route: ActivatedRoute = inject(ActivatedRoute);
+     housingLocationId = -1;
+     constructor() {
+         this.housingLocationId = Number(this.route.snapshot.params['id']);
+     }
  }
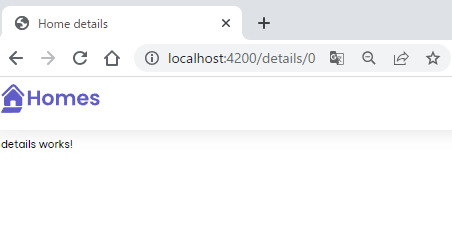
キチンとコードを変更できれば、以下のような画面になるはずです。

details.component.tsファイルのtemplateを以下のように変更したため、
+ details works! {{ housingLocationId }}
画面にその詳細ページに表示したい家のIDが画面に表れていますね。

DetailsComponentをカスタマイズする
今の詳細ページには文字列が表示されているだけなので、家の詳細データを表示できるようにカスタマイズしましょう。
下の様にdetails.component.tsとdetails.component.cssを変更します。
  import { Component, inject } from '@angular/core';
  import { CommonModule } from '@angular/common';
  import { ActivatedRoute } from '@angular/router';
  import { HousingService } from '../housing.service';
  import { HousingLocation } from '../housinglocation';

  @Component({
    selector: 'app-details',
    standalone: true,
    imports: [CommonModule],
-   template: `<p>details works! {{ housingLocationId }}</p>`,
+   template: `
+     <article>
+       <img class="listing-photo" [src]="housingLocation?.photo"
+         alt="Exterior photo of {{housingLocation?.name}}"/>
+       <section class="listing-description">
+         <h2 class="listing-heading">{{housingLocation?.name}}</h2>
+         <p class="listing-location">{{housingLocation?.city}}, {{housingLocation?.state}}</p>
+       </section>
+       <section class="listing-features">
+         <h2 class="section-heading">About this housing location</h2>
+         <ul>
+           <li>Units available: {{housingLocation?.availableUnits}}</li>
+           <li>Does this location have wifi: {{housingLocation?.wifi}}</li>
+           <li>Does this location have laundry: {{housingLocation?.laundry}}</li>
+         </ul>
+       </section>
+     </article>
+   `,
    styleUrls: ['./details.component.css'],
  })
  export class DetailsComponent {
    route: ActivatedRoute = inject(ActivatedRoute);
-   housingLocationId = -1;
+   housingService = inject(HousingService);
+   housingLocation: HousingLocation | undefined;

    constructor() {
-     this.housingLocationId = Number(this.route.snapshot.params['id']);
+     const housingLocationId = Number(this.route.snapshot.params['id']);
+     this.housingLocation = this.housingService.getHousingLocationById(housingLocationId);
    }
  }
+ .listing-photo {
+   height: 600px;
+   width: 50%;
+   object-fit: cover;
+   border-radius: 30px;
+   float: right;
+ }
+
+ .listing-heading {
+   font-size: 48pt;
+   font-weight: bold;
+   margin-bottom: 15px;
+ }
+
+ .listing-location::before {
+   content: url('/assets/location-pin.svg') / '';
+ }
+
+ .listing-location {
+   font-size: 24pt;
+   margin-bottom: 15px;
+ }
+
+ .listing-features > .section-heading {
+   color: var(--secondary-color);
+   font-size: 24pt;
+   margin-bottom: 15px;
+ }
+
+ .listing-features {
+   margin-bottom: 20px;
+ }
+
+ .listing-features li {
+   font-size: 14pt;
+ }
+
+ li {
+   list-style-type: none;
+ }
+
+ .listing-apply .section-heading {
+   font-size: 18pt;
+   margin-bottom: 15px;
+ }
+
+ label, input {
+   display: block;
+ }
+ label {
+   color: var(--secondary-color);
+   font-weight: bold;
+   text-transform: uppercase;
+   font-size: 12pt;
+ }
+ input {
+   font-size: 16pt;
+   margin-bottom: 15px;
+   padding: 10px;
+   width: 400px;
+   border-top: none;
+   border-right: none;
+   border-left: none;
+   border-bottom: solid .3px;
+ }
+ @media (max-width: 1024px) {
+   .listing-photo {
+     width: 100%;
+     height: 400px;
+   }
変更すると、詳細ページが以下のようになります。

ナビゲーションのリンクを確認する
前回のセクションで、ナビゲーションにリンクを追加したのを憶えているでしょうか?
これが正常に機能するのであれば、ナビゲーションをクリックすれば家の一覧画面に遷移するはずです。
確認してみましょう。
家の詳細ページのナビゲーションのロゴをクリックします。
画像の部分です。

上手く遷移ができなければこのリンクが働いていないという事なので、前回のセクションであるAngularの公式チュートリアルをやっていく その11 - Add routingを確認してみてください。
下の部分です。
+       <a [routerLink]="['/']">
          <header class="brand-name">
            <img
              class="brand-logo"
              src="/assets/logo.svg"
              alt="logo"
              aria-hidden="true"
            />
          </header>
+       </a>
これにてCustomize the details pageは完了です。
← 前へ Angularの公式チュートリアルをやっていく その11 - Add routing
→ 次へ Angularの公式チュートリアルをやっていく その13 - Integrate Angular forms
Discussion