ScalarDB Analytics with PostgreSQL
前回はシンプルにScalarDBの環境を、Amazon DynamoDBをバックエンドとして起動してみました。
この記事ではPostgreSQLを用いた分析環境を起動してみます。
こちらに手順がまとまっていますが、先に以下の手順のStep3までを終わらせてから実行を行う手順となっています。
この記事では前回構築した環境を用いず、新しいLinux環境で構築を行う手順をまとめていきます。
環境構築
必要となるものは多岐にわたりますが1個ずつ作業を行っていきます。
- Java 実行環境
- Git ツール群
- Docker と Docker Compose
- PostgreSQL
環境には Amazon Linux 2023 を用いますが、サンプルで準備されている環境が大きいためt2.xlargeをEBS 100GB で起動しています。
Java 実行環境 のインストール
AWSはAmazon CorrettoというOpenJDKを配布しているのでそちらを用います。
sudo yum update -y
sudo yum install -y java-11-amazon-corretto
java -version
以下のように表示されればインストールが完了です。
openjdk version "11.0.23" 2024-04-16 LTS
OpenJDK Runtime Environment Corretto-11.0.23.9.1 (build 11.0.23+9-LTS)
OpenJDK 64-Bit Server VM Corretto-11.0.23.9.1 (build 11.0.23+9-LTS, mixed mode)
git のインストール
sudo dnf update -y
sudo dnf install -y git
git --version
以下のように表示されればインストールが完了です。
git version 2.40.1
Docker と Docker Compose のインストール
こちらの神記事を参照して手順を1個ずつ実行していきます。ぜひハートを押してください!
sudo dnf update
sudo dnf install -y docker
sudo systemctl start docker
sudo gpasswd -a $(whoami) docker
sudo chgrp docker /var/run/docker.sock
sudo service docker restart
sudo systemctl enable docker
sudo curl -L "https://github.com/docker/compose/releases/download/v2.27.0/docker-compose-$(uname -s)-$(uname -m)" -o /usr/local/bin/docker-compose
sudo chmod +x /usr/local/bin/docker-compose
sudo ln -s /usr/local/bin/docker-compose /usr/bin/docker-compose
docker -v
docker-compose -v
以下のように表示されれば完了です。
Docker version 25.0.3, build 4debf41
Docker Compose version v2.27.0
PostgreSQL のインストール
sudo dnf install postgresql15
デモ環境のダウンロードと起動
これで必要な準備が終わりました。以下のコマンドでデモ環境を起動します。
cd /home/ec2-user/
git clone https://github.com/scalar-labs/scalardb-samples.git
cd scalardb-samples/scalardb-analytics-postgresql-sample
sudo docker-compose up -d
初回実行時のみコンテナイメージのダウンロードが発生しますが2回目以降は高速に起動するようになります。
WARN[0000] /home/ec2-user/scalardb-samples/scalardb-analytics-postgresql-sample/docker-compose.yml: `version` is obsolete
[+] Running 51/4
 ✔ backend-postgres Pulled                                                                                                        21.7s
 ✔ backend-dynamodb Pulled                                                                                                        22.1s
 ✔ backend-cassandra Pulled                                                                                                       23.8s
 ✔ analytics Pulled                                                                                                               21.4s
[+] Running 9/9
 ✔ Network scalardb-analytics-postgresql-sample_scalar-network           Created                                                   0.1s
 ✔ Volume "scalardb-analytics-postgresql-sample_analytics-data"          Created                                                   0.0s
 ✔ Volume "scalardb-analytics-postgresql-sample_backend-postgres-data"   Created                                                   0.0s
 ✔ Volume "scalardb-analytics-postgresql-sample_backend-cassandra-data"  Created                                                   0.0s
 ✔ Volume "scalardb-analytics-postgresql-sample_backend-dynamodb-data"   Created                                                   0.0s
 ✔ Container scalardb-analytics-postgresql-sample-backend-postgres-1     Started                                                  13.0s
 ✔ Container scalardb-analytics-postgresql-sample-backend-dynamodb-1     Started                                                  13.0s
 ✔ Container scalardb-analytics-postgresql-sample-analytics-1            Started                                                  12.6s
 ✔ Container scalardb-analytics-postgresql-sample-backend-cassandra-1    Started
以上で下準備としての以下のページが完了しました。 次に以下のページの内容を実行しながらDBの中身を見ていきます。
デモ環境の実行
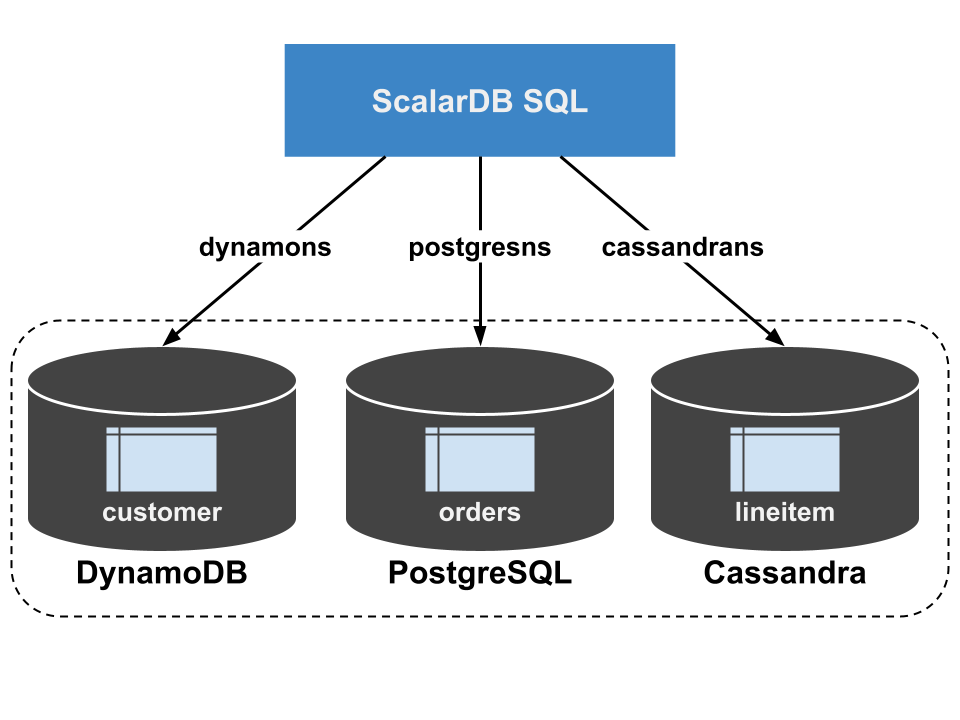
ScalarDB Analytics with PostgreSQL ではPostgreSQLを中心として複数のDBに分析クエリを投げることを実現しています。
その際、ScalarDB はユニバーサル トランザクション マネージャーとして機能し、複数DBエンジン間のコーディネーションや整合性の維持を行います。
foreign data wrapper (FDW)によりScalarDBの機能は拡張され、ScalarDB が管理するバックエンドストレージからデータを読み取ることが可能となります。
まずは以下のコマンドを実行し、コンテナ環境で検証用DBやコンテナ環境用ネットワークを起動します。(手順書にあるdocker composeではなくdocker-composeを使っています)
sudo docker-compose run --rm schema-loader \
  -c /etc/scalardb.properties \
  --schema-file /etc/schema.json \
  --coordinator \
  --no-backup \
  --no-scaling

DynamoDB,PostgreSQL,Cassandra3つのデータベースがコンテナ環境として起動されています。それぞれのバックエンドストレージは
volumes:
  analytics-data: {}
  backend-postgres-data: {}
  backend-cassandra-data: {}
  backend-dynamodb-data: {}
として定義されておりschema-loaderによって
  schema-loader:
    image: ghcr.io/scalar-labs/scalardb-schema-loader:3.10.2
    volumes:
      - ./scalardb.properties:/etc/scalardb.properties
      - ./schema.json:/etc/schema.json
    networks:
      - scalar-network
    profiles:
      - dev
    depends_on:
      - backend-postgres
      - backend-cassandra
      - backend-dynamodb
として設定されています、これが先ほど記載した以下に相当する部分です。
foreign data wrapper (FDW)によりScalarDBの機能は拡張され、ScalarDB が管理するバックエンドストレージからデータを読み取ることが可能となります。
ストレージは以下の設定ファイルに定義されています。
scalar.db.storage=multi-storage
scalar.db.multi_storage.storages=cassandra,postgres,dynamodb

scalar.db.multi_storage.storages.cassandra.storage=cassandra
scalar.db.multi_storage.storages.cassandra.contact_points=backend-cassandra
scalar.db.multi_storage.storages.cassandra.contact_port=9042
scalar.db.multi_storage.storages.cassandra.username=cassandra
scalar.db.multi_storage.storages.cassandra.password=cassandra

scalar.db.multi_storage.storages.postgres.storage=jdbc
scalar.db.multi_storage.storages.postgres.contact_points=jdbc:postgresql://backend-postgres:5432/test
scalar.db.multi_storage.storages.postgres.username=postgres
scalar.db.multi_storage.storages.postgres.password=postgres
scalar.db.multi_storage.storages.postgres.jdbc.connection_pool.min_idle=5
scalar.db.multi_storage.storages.postgres.jdbc.connection_pool.max_idle=10
scalar.db.multi_storage.storages.postgres.jdbc.connection_pool.max_total=25

scalar.db.multi_storage.storages.dynamodb.contact_points=ap-northeast-1
scalar.db.multi_storage.storages.dynamodb.username=access_key_id
scalar.db.multi_storage.storages.dynamodb.password=secret_access_key
scalar.db.multi_storage.storages.dynamodb.storage=dynamo
scalar.db.multi_storage.storages.dynamodb.dynamo.endpoint_override=http://backend-dynamodb:8000
scalar.db.multi_storage.storages.dynamodb.dynamo.table_metadata.namespace=table_metadata
scalar.db.multi_storage.storages.dynamodb.dynamo.namespace.prefix=scalar_

scalar.db.multi_storage.namespace_mapping=cassandrans:cassandra,postgresns:postgres,dynamons:dynamodb

scalar.db.multi_storage.default_storage=cassandra

scalar.db.sql.connection_mode=direct
各データベースにはschema.jsonによってスキーマが定義されています。例えばPostgreSQLなら以下と定義されています。
"postgresns.orders": {
    "transaction": true,
    "partition-key": [
      "o_orderkey"
    ],
    "columns": {
      "o_orderkey": "INT",
      "o_custkey": "INT",
      "o_orderstatus": "TEXT",
      "o_totalprice": "DOUBLE",
      "o_orderdate": "TEXT",
      "o_orderpriority": "TEXT",
      "o_clerk": "TEXT",
      "o_shippriority": "INT",
      "o_comment": "TEXT"
    }
  },
一度この状態でPostgreSQLにログインしてみます。パスワードはpostgresです。
psql -U postgres -h localhost test
\l
   Name    |  Owner   | Encoding |  Collate   |   Ctype    | ICU Locale | Locale Provider |   Access privileges
-----------+----------+----------+------------+------------+------------+-----------------+-----------------------
 postgres  | postgres | UTF8     | en_US.utf8 | en_US.utf8 |            | libc            |
 template0 | postgres | UTF8     | en_US.utf8 | en_US.utf8 |            | libc            | =c/postgres          +
           |          |          |            |            |            |                 | postgres=CTc/postgres
 template1 | postgres | UTF8     | en_US.utf8 | en_US.utf8 |            | libc            | =c/postgres          +
           |          |          |            |            |            |                 | postgres=CTc/postgres
 test      | postgres | UTF8     | en_US.utf8 | en_US.utf8 |            | libc            |
(4 rows)
testデータベースが作成されています。では次にデータをロードしていきます。
sudo docker-compose run --rm sample-data-loader
次に分析クエリを処理するPostgreSQLにScalarDBのスキーマをインポートします。
$ docker-compose run --rm schema-importer \
  import \
  --config /etc/scalardb.properties \
  --host analytics \
  --port 5432 \
  --database test \
  --user postgres \
  --password postgres \
  --namespace cassandrans \
  --namespace postgresns \
  --namespace dynamons \
  --config-on-postgres-host /etc/scalardb.properties
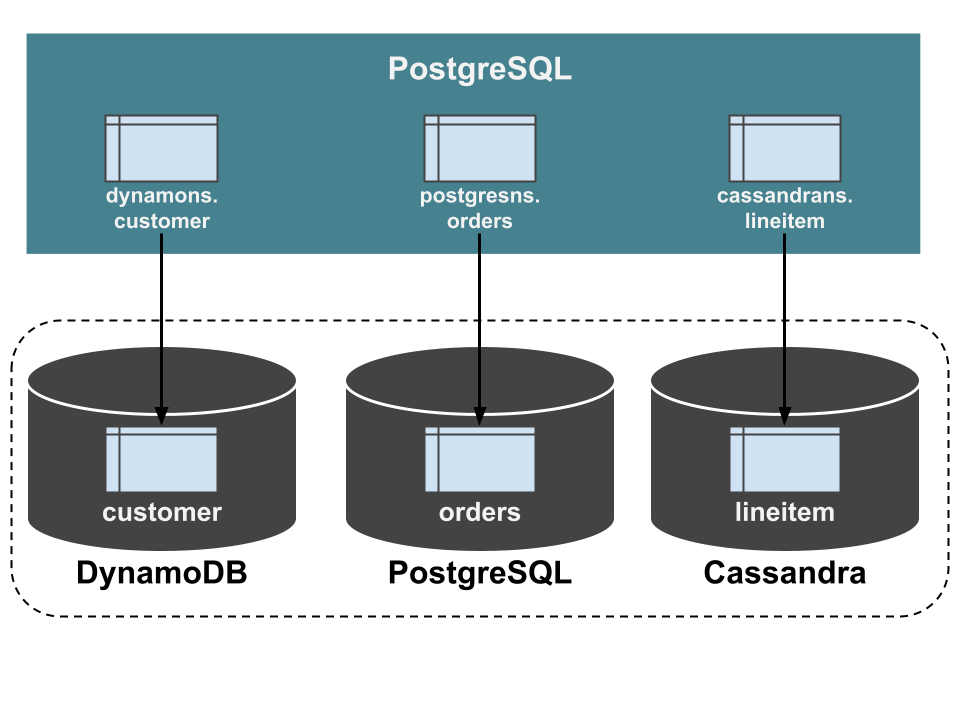
これによってDynamoDB,Cassandra,PostgreSQLのスキーマが分析用PostgreSQLに作成されます。

PostgreSQLにログインを行うと以下のような結果となります。
psql -U postgres -h localhost test
Password for user postgres:
> select c_mktsegment, count(*) from dynamons.customer group by c_mktsegment;
 c_mktsegment | count
--------------+-------
 AUTOMOBILE   |     4
 BUILDING     |     2
 FURNITURE    |     1
 HOUSEHOLD    |     2
 MACHINERY    |     1
(5 rows)
test=# \l
                                                List of databases
   Name    |  Owner   | Encoding |  Collate   |   Ctype    | ICU Locale | Locale Provider |   Access privileges
-----------+----------+----------+------------+------------+------------+-----------------+-----------------------
 postgres  | postgres | UTF8     | en_US.utf8 | en_US.utf8 |            | libc            |
 template0 | postgres | UTF8     | en_US.utf8 | en_US.utf8 |            | libc            | =c/postgres          +
           |          |          |            |            |            |                 | postgres=CTc/postgres
 template1 | postgres | UTF8     | en_US.utf8 | en_US.utf8 |            | libc            | =c/postgres          +
           |          |          |            |            |            |                 | postgres=CTc/postgres
 test      | postgres | UTF8     | en_US.utf8 | en_US.utf8 |            | libc            |
(4 rows)

test=# \dn
         List of schemas
    Name     |       Owner
-------------+-------------------
 cassandrans | postgres
 dynamons    | postgres
 postgresns  | postgres
 public      | pg_database_owner
(4 rows)
何が起きているか?
まず以下のコマンドの実行結果を見てみます。
\dn
         List of schemas
    Name     |       Owner
-------------+-------------------
 cassandrans | postgres
 dynamons    | postgres
 postgresns  | postgres
 public      | pg_database_owner
(4 rows)
SELECT table_name
FROM information_schema.tables
WHERE table_schema = 'dynamons';
 table_name
------------
 _customer
 customer
(2 rows)
PostgreSQLの中にdynamonsというスキーマが切られており、その中にcustomerと_customerという2種類のテーブルが定義されています。
select * from dynamons.customer
| c_address | c_custkey | c_phone | c_acctbal | c_mktsegment | c_nationkey | c_comment | c_name |
|---|---|---|---|---|---|---|---|
| I0B10bB0AymmC, 0PrRYBCP1yGJ8xcBPmWhl5 | 8 | 27-147-574-9335 | 6819 | BUILDING | 17 | among the slyly regular theodolites kindle blithely courts. carefully even theodolites haggle slyly along the ide | Customer#000000008 |
| 6LrEaV6KR6PLVcgl2ArL Q3rqzLzcT1 v2 | 10 | 15-741-346-9870 | 2753 | HOUSEHOLD | 5 | es regular deposits hagg le. fur | Customer#000000010 |
| KvpyuHCplrB84WgAiGV6sYpZq7Tj | 5 | 13-750-942-6364 | 794 | HOUSEHOLD | 3 | n accounts will have to unwind. foxes cajole accor | Customer#000000005 |
| MG9kdTD2WBHm | 3 | 11-719-748-3364 | 7498 | AUTOMOBILE | 1 | deposits eat slyly ironic, even instructions. express foxes detect slyly. blithely even accounts abov | Customer#000000003 |
| XxVSJsLAGtn | 4 | 14-128-190-5944 | 2866 | MACHINERY | 4 | requests. final, regular ideas sleep final accou | Customer#000000004 |
| xKiAFTjUsCuxfeleNqefumTrjS | 9 | 18-338-906-3675 | 8324 | FURNITURE | 8 | r theodolites according to the requests wake thinly excuses: pending requests haggle furiousl | Customer#000000009 |
| IVhzIApeRb ot,c,E | 1 | 25-989-741-2988 | 711 | BUILDING | 15 | to the even, regular platelets. regular, ironic epitaphs nag e | Customer#000000001 |
| XSTf4,NCwDVaWNe6tEgvwfmRchLXak | 2 | 23-768-687-3665 | 121 | AUTOMOBILE | 13 | l accounts. blithely ironic theodolites integrate boldly: caref | |
| sKZz0CsnMD7mp4Xd0YrBvx,LREYKUWAh yVn | 6 | 30-114-968-4951 | 7638 | AUTOMOBILE | 20 | tions. even deposits boost according to the slyly bold packages. final accounts cajole requests. furious | Customer#000000006 |
| TcGe5gaZNgVePxU5kRrvXBfkasDTea | 7 | 28-190-982-9759 | 9561 | AUTOMOBILE | 18 | ainst the ironic, express theodolites. express, even pinto beans among the exp | Customer#000000007 |
先ほどの集計クエリselect c_mktsegment, count(*) from dynamons.customer group by c_mktsegment;はこの集計のように見えますが実際は異なります。
SELECT * FROM information_schema.foreign_tables;
 foreign_table_catalog | foreign_table_schema | foreign_table_name | foreign_server_catalog |   foreign_server_name
-----------------------+----------------------+--------------------+------------------------+-------------------------
 test                  | cassandrans          | _lineitem          | test                   | multi_storage_cassandra
 test                  | postgresns           | _orders            | test                   | multi_storage_postgres
 test                  | dynamons             | _customer          | test                   | multi_storage_dynamodb
(3 rows)
このようにそれぞれのテーブルは外部デーブルであることがわかります。
PostgreSQL FDW
PostgreSQL Foreign Data Wrapper (FDW) は、PostgreSQLデータベース内で外部データソースにアクセスし、あたかもPostgreSQLのローカルテーブルのように操作するためのインターフェースです。FDWを使用することで、異なるデータベースシステムやファイルシステムなどの外部データソースをPostgreSQLの中で透過的に扱うことができます。つまりdynamonsとはDynamoDB Localが本体でPostgresの中のdynamonsはその操作が可能となる外部テーブル、という位置づけです。
DynamoDB Localにログインしてみると以下のようになっています。
 aws dynamodb list-tables --endpoint-url http://localhost:8000
{
    "TableNames": [
        "scalar_dynamons.customer",
        "scalar_table_metadata.metadata"
    ]
}
aws dynamodb scan --table-name scalar_dynamons.customer --endpoint-url http://localhost:8000
{
    "Items": [
        {
            "c_acctbal": {
                "N": "6819.429496737"
            },
            "c_mktsegment": {
                "S": "BUILDING"
            },
            "tx_prepared_at": {
                "N": "1719465568045"
            },
            "c_address": {
                "S": "I0B10bB0AymmC, 0PrRYBCP1yGJ8xcBPmWhl5"
            },
            "c_nationkey": {
                "N": "17"
            },
            "tx_id": {
                "S": "4d2e52df-5503-4834-8696-f57d10073d85"
<snip>
PostgresFDWはコミュニティベースで開発が進められているものですが、ScalarDBも独自のFDWを提供しています。例えば今回構築した環境では、DynamoDBへの接続はPostgresFDWではなくScalarDBFDWで接続されています。この用に多くのデータベースエンジンを横断的に接続しトランザクションを管理できるのがScalarDBの凄いところです。

ScalarDB の役割
DynamoDB Localで定義されているメタテーブルは以下のスキーマです。
aws dynamodb scan --table-name scalar_table_metadata.metadata --endpoint-url http://localhost:8000
{
    "Items": [
        {
            "partitionKey": {
                "L": [
                    {
                        "S": "c_custkey"
                    }
                ]
            },
            "columns": {
                "M": {
                    "c_address": {
                        "S": "text"
                    },
                    "before_tx_version": {
                        "S": "int"
                    },
                    "before_tx_id": {
                        "S": "text"
                    },
                    "tx_state": {
                        "S": "int"
                    },
                    "c_custkey": {
                        "S": "int"
                    },
                    "before_c_mktsegment": {
                        "S": "text"
                    },
                    "c_phone": {
                        "S": "text"
                    },
                    "before_c_address": {
                        "S": "text"
                    },
                    "tx_committed_at": {
                        "S": "bigint"
                    },
                    "before_tx_committed_at": {
                        "S": "bigint"
                    },
                    "before_tx_state": {
                        "S": "int"
                    },
                    "before_c_comment": {
                        "S": "text"
                    },
                    "before_c_phone": {
                        "S": "text"
                    },
                    "c_acctbal": {
                        "S": "double"
                    },
                    "c_mktsegment": {
                        "S": "text"
                    },
                    "tx_prepared_at": {
                        "S": "bigint"
                    },
                    "c_nationkey": {
                        "S": "int"
                    },
                    "before_c_nationkey": {
                        "S": "int"
                    },
                    "tx_id": {
                        "S": "text"
                    },
                    "c_comment": {
                        "S": "text"
                    },
                    "before_tx_prepared_at": {
                        "S": "bigint"
                    },
                    "before_c_name": {
                        "S": "text"
                    },
                    "before_c_acctbal": {
                        "S": "double"
                    },
                    "c_name": {
                        "S": "text"
                    },
                    "tx_version": {
                        "S": "int"
                    }
                }
            },
            "table": {
                "S": "scalar_dynamons.customer"
            }
        }
    ],
    "Count": 1,
    "ScannedCount": 1,
    "ConsumedCapacity": null
}
これはPostgreSQLに存在しているdynamons._customerテーブルと同じスキーマとなっています。前回の記事でも触れましたが、トランザクションマネージャが管理しているデータとなっています。
ScalarDBのトランザクションマネージャを介してDML(Insert, Update, Delete)処理が行われたレレコードは、1件づつこの値が時系列に書き込まれることになります。
DynamoDB Localに存在しているcustomerテーブルのレコード数とPostgreSQLで外部テーブルとして参照されている_customerテーブルのレコードは1対1で存在しています。一方で、PostgreSQL上に存在するdynamons.customerのビューは削除されたなどで無効になったレコードが除外されるため運用上は必ずしも一致しません。(今回はInsertしか行っていないため一致しています)dynamonsだけではなく同様にpostgresns、cassandransにも同じ構造が存在しています。この3つのデータベースにまたがるメタデータを最終的に管理しているのがScalarDBの心臓部分です。
<snip>
scalar.db.multi_storage.default_storage=cassandra
<snip>
設定ファイルを見るとcassandransにそのストレージが出来ていることがわかります。
では以下の手順でcassandraのツールをインストールします。
wget https://dlcdn.apache.org/cassandra/4.1.5/apache-cassandra-4.1.5-bin.tar.gz
tar -xzvf apache-cassandra-4.1.5-bin.tar.gz
cd apache-cassandra-4.1.5
その後以下のコマンドでログインしてKeyspaceの一覧を表示します。
cqlsh localhost
SELECT * FROM system_schema.keyspaces;
 keyspace_name      | durable_writes | replication
--------------------+----------------+-------------------------------------------------------------------------------------
        system_auth |           True | {'class': 'org.apache.cassandra.locator.SimpleStrategy', 'replication_factor': '1'}
      system_schema |           True |                             {'class': 'org.apache.cassandra.locator.LocalStrategy'}
        coordinator |           True | {'class': 'org.apache.cassandra.locator.SimpleStrategy', 'replication_factor': '1'}
        cassandrans |           True | {'class': 'org.apache.cassandra.locator.SimpleStrategy', 'replication_factor': '1'}
 system_distributed |           True | {'class': 'org.apache.cassandra.locator.SimpleStrategy', 'replication_factor': '3'}
             system |           True |                             {'class': 'org.apache.cassandra.locator.LocalStrategy'}
      system_traces |           True | {'class': 'org.apache.cassandra.locator.SimpleStrategy', 'replication_factor': '2'}

(7 rows)
coordinatorが存在していることがわかります。
SELECT table_name FROM system_schema.tables WHERE keyspace_name = 'coordinator';
 table_name
------------
      state

(1 rows)
coordinatorキースペースの中にstateというテーブルが存在しています。
SELECT * FROM state;

 tx_id                                | tx_created_at | tx_state
--------------------------------------+---------------+----------
 72832aca-018e-481e-9564-1368f1587d84 | 1719465569158 |        3
 675b28cf-b471-4979-85f8-9f83248a58d8 | 1719465570086 |        3
 4d2e52df-5503-4834-8696-f57d10073d85 | 1719465568334 |        3
 6cccaf9b-ec84-4f84-9b5e-1c5b0e197e05 | 1719476819906 |        4
 cdcf12b3-f728-4b28-b9f5-0810a80b1d22 | 1719467648266 |        4

(5 rows)
このレコードがScalarDBが各複数のデータベースにわたってデータを管理するメインの部分になります。データの詳細については機会があれば解説に挑戦してみたいと思います。

schema-loader, sample-data-loader, schema-importer
最後に環境構築に用いた三つのツールについて簡単に触れます。
前者2つがScalaRDB汎用の機能であり、3つ目が今回のサンプル用ツールという位置づけです。
schema-loader : サンプル用のスキーマを各データベースに作成しています。同時にCassandraにcoordinatorを作成します。
sample-data-loader : サンプルデータをScalarDBのトランザクション機能を活用して入れています。coordinatorにデータが書き込まれるのもこの時点です。
schema-importer : 各データベースにメタテーブルである_customerなどを作成しています。またPostgresFDW用にForeignテーブルを登録しています。これによりPostgreSQL上で集計クエリが実行可能になります。
Discussion