gRPC(Connect)のServer Streamingを使ったリアルタイム処理のテストをrunnとBufを使って書いてみた
最近業務でgRPCのServer Streamingを使ったリアルタイム処理をGoで書いているのですが複数のゴルーチンを起動した並行処理が絡んできたりと少しコードベースでテストを書くのが大変だなと感じており、前から気になっていたrunnを使ってE2Eテストを書いてみたためその備忘録です。
runnではgRPCランナーが実装されておりStreamingも全てサポートされているのでシナリオ自体は書けるのですがServer Streamingの裏側でRedisを購読しており、RedisにmessageをPublishしないと処理がブロックされてしまうのでgRPCランナー実行中に並行してRedisのPublishをしたかったのですが調べた限りrunnの機能だけでは実現できそうになかったため少し力技でテストを書きました。
もし、もっといい方法あるよという方がいましたらぜひコメントなど気軽にいただけると泣いて喜びます。
また、runnはBufとBSR(Buf Schema Registry)をサポートしたとのことだったのでせっかくなのでBufとBSRを使ってテストを書いてみました!
対象読者
- runnを使ったE2Eテスト(シナリオテスト)に興味がある方
- runnのgRPCランナーを使ったStreamingのテストについて知りたい方
- gRPCのStreamingを使ったリアルタイム処理のテストについて興味がある方
- runnのBufサポートの内容に興味がある方
使用技術
- go version go1.22.0 darwin/arm64
- runn version 0.115.0
- buf 1.32.1
成果物
やりたいこと
想定している仕組みは以下のような感じです。
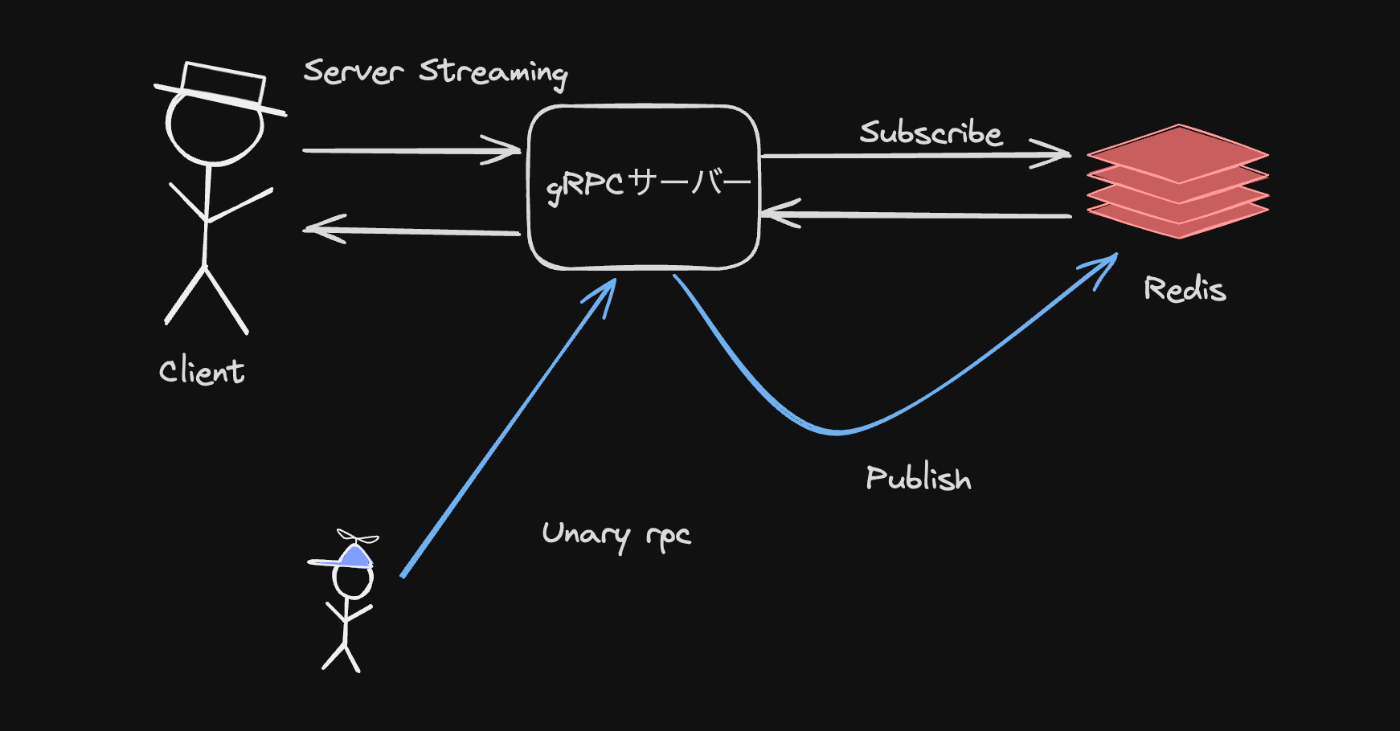
- クライアントはgRPCサーバー(今回はBufのConnectを使用予定)とServer Streamingでコネクションを確立する。
- gRPCサーバーは裏側でRedisのPubSubを使ってmessageを購読する。
- 別のクライアントがgRPCサーバーにUnary rpcでリクエストする。
- gRPCサーバーはリクエストを受け取ったらRedisにmessageをPublishする。
- Publishされたmessageを受け取ったらServer Streamingを使ってクライアントに通知。
このテストをrunnを使って書いていきます!
runnについて
runnに関してはリポジトリのドキュメントが充実しているのと以下のようなzenn本があるので詳しくは割愛しますがyamlでシナリオベースにテストが書けるGo製のテスティングツールです。runnはgRPCだけでなくHTTPやsshなど複数の実行ランナーをサポートしており負荷テストや一連の処理の自動化ツールとしても使え、非常に高機能です。
リアルタイム処理の実装
まずはprotoファイルを作っていきましょう。
今回はBuf CLIとBSR(Buf Schema Registry)を使ってProtobufモジュールを公開していきます。
BufやBSRについて詳しく知りたい方はわたしが書いた以下のzenn本などをご参照ください。
BSRにProtobufモジュールを公開する
mkdir -p runn-connect-streaming-demo/proto
cd runn-connect-streaming-demo/proto
buf config init
以下3つのprotoファイルを作成します。
syntax = "proto3";

package jyapp.runndemo.hello.v1;

message HelloRequest { string message = 1; }

message HelloResponse {}

service HelloService {
  rpc Hello(HelloRequest) returns (HelloResponse) {}
}
syntax = "proto3";

package jyapp.runndemo.greet.v1;

message GreetRequest { string message = 1; }

message GreetResponse {}

service GreetService {
  rpc Greet(GreetRequest) returns (GreetResponse) {}
}
syntax = "proto3";

package jyapp.runndemo.pubsub.v1;

message SubscribeRequest {}

message SubscribeResponse { string message = 1; }

service PubSubService {
  rpc Subscribe(SubscribeRequest) returns (stream SubscribeResponse) {}
}
hello.protoとgreet.protoはRedisにmessageをPublishするためのUnary rpcです。pubsub.protoはクライアントとgRPCサーバー間でServer Streamingのコネクションを確立し、Redisで受け取ったmessageをクライアントに伝搬するためのrpcです。
protoファイルが作成できたらbuf.yamlを以下のように修正してProtobufモジュールを定義します。
version: v2
+ modules:
+   - path: jyapp/runndemo
+     name: buf.build/jyapp/runndemo
lint:
  use:
    - DEFAULT
breaking:
  use:
    - FILE
BSRにログインしていなければログインをしておく。
buf registry login
ログインにはユーザー名とBSRの設定画面から作成できるトークンが必要です。ログインが完了したらProtobufモジュールを以下のコマンドでBSRにpushします。
% buf push --create-visibility public --create
buf.build/jyapp/runndemo:3c7f541462c54848988286002b79f2f5
--create-visibilityはProtobufモジュールを公開するリポジトリの可視性を設定しています。デフォルトではprivateですが今回はpublicにしています。--createはリポジトリがないときに作成するためのフラグです。
Connectサーバーを実装する
公開したProtobufモジュールを使ってGoのサーバーを実装していきます。今回はBufが開発しているConnectを使って実装していきます。
go mod init runn-connect-streaming-demo
次にprotoファイルからGoのコードを生成するのにbuf.gen.yamlを作成してローカルのprotoファイルもしくはBSRに公開したProtobufモジュールを使用して生成することができますがBSRはProtobufモジュールを公開したときに各種プログラミング言語のコードを生成して各種プログラミング言語で使用できるパッケージマネージャーなどを通して依存関係として追加することができます。JS、TSであればnpmですしGoであればGoモジュールとして追加できます。つまりBSRに公開していればコードの生成はもはや必要ありません。
今回はコード生成することなくGoモジュールを追加して実装していきたいと思います。
go get buf.build/gen/go/jyapp/runndemo/connectrpc/go@latest
go get buf.build/gen/go/jyapp/runndemo/protocolbuffers/go@latest
go get connectrpc.com/connect
package main

import (
	"context"
	"fmt"
	"net/http"

	"buf.build/gen/go/jyapp/runndemo/connectrpc/go/greet/v1/greetv1connect"
	"buf.build/gen/go/jyapp/runndemo/connectrpc/go/hello/v1/hellov1connect"
	"buf.build/gen/go/jyapp/runndemo/connectrpc/go/pubsub/v1/pubsubv1connect"
	greetv1 "buf.build/gen/go/jyapp/runndemo/protocolbuffers/go/greet/v1"
	hellov1 "buf.build/gen/go/jyapp/runndemo/protocolbuffers/go/hello/v1"
	pubsubv1 "buf.build/gen/go/jyapp/runndemo/protocolbuffers/go/pubsub/v1"
	"connectrpc.com/connect"
	"golang.org/x/net/http2"
	"golang.org/x/net/http2/h2c"
)

type GreetServer struct{}

func (g *GreetServer) Greet(
	ctx context.Context,
	req *connect.Request[greetv1.GreetRequest],
) (*connect.Response[greetv1.GreetResponse], error) {
	fmt.Println("call greet")
	return connect.NewResponse(&greetv1.GreetResponse{}), nil
}

type HelloServer struct{}

func (h *HelloServer) Hello(
	ctx context.Context,
	req *connect.Request[hellov1.HelloRequest],
) (*connect.Response[hellov1.HelloResponse], error) {
	fmt.Println("call hello")
	return connect.NewResponse(&hellov1.HelloResponse{}), nil
}

type PubSubServer struct{}

func (p *PubSubServer) Subscribe(
	ctx context.Context,
	req *connect.Request[pubsubv1.SubscribeRequest],
	stream *connect.ServerStream[pubsubv1.SubscribeResponse],
) error {
	return nil
}

func main() {
	var (
		greet  = &GreetServer{}
		hello  = &HelloServer{}
		pubsub = &PubSubServer{}
	)

	mux := http.NewServeMux()

	path, handler := greetv1connect.NewGreetServiceHandler(greet)
	mux.Handle(path, handler)

	path, handler = hellov1connect.NewHelloServiceHandler(hello)
	mux.Handle(path, handler)

	path, handler = pubsubv1connect.NewPubSubServiceHandler(pubsub)
	mux.Handle(path, handler)

	http.ListenAndServe(
		"localhost:8080",
		h2c.NewHandler(mux, &http2.Server{}),
	)
}
handlerの中身はまだ空のままですが、一旦動作確認。クライアントにevansを使っています。
% evans -p 8080 --proto proto/jyapp/runndemo/hello/v1/hello.proto

  ______
 |  ____|
 | |__    __   __   __ _   _ __    ___
 |  __|   \ \ / /  / _. | | '_ \  / __|
 | |____   \ V /  | (_| | | | | | \__ \
 |______|   \_/    \__,_| |_| |_| |___/

 more expressive universal gRPC client


jyapp.runndemo.hello.v1.HelloService@127.0.0.1:8080> call Hello
message (TYPE_STRING) => aaa
{}
次にRedisの導入をしていきます。Redisクライアントには公式のgo-redisを使います。
go get github.com/redis/go-redis/v9
package main

import (
	"context"
	"fmt"
	"net/http"

	"buf.build/gen/go/jyapp/runndemo/connectrpc/go/greet/v1/greetv1connect"
	"buf.build/gen/go/jyapp/runndemo/connectrpc/go/hello/v1/hellov1connect"
	"buf.build/gen/go/jyapp/runndemo/connectrpc/go/pubsub/v1/pubsubv1connect"
	greetv1 "buf.build/gen/go/jyapp/runndemo/protocolbuffers/go/greet/v1"
	hellov1 "buf.build/gen/go/jyapp/runndemo/protocolbuffers/go/hello/v1"
	pubsubv1 "buf.build/gen/go/jyapp/runndemo/protocolbuffers/go/pubsub/v1"
	"connectrpc.com/connect"
	"github.com/redis/go-redis/v9"
	"golang.org/x/net/http2"
	"golang.org/x/net/http2/h2c"
)

const (
	greetChannel = "greet"
	helloChannel = "hello"
)

type GreetServer struct {
	redisClient *redis.Client
}

func (g *GreetServer) Greet(
	ctx context.Context,
	req *connect.Request[greetv1.GreetRequest],
) (*connect.Response[greetv1.GreetResponse], error) {
	fmt.Println("call greet")

	msg := fmt.Sprintf("Hi, %s", req.Msg.Message)
	if err := g.redisClient.Publish(ctx, greetChannel, msg).Err(); err != nil {
		return nil, connect.NewError(connect.CodeInternal, err)
	}

	return connect.NewResponse(&greetv1.GreetResponse{}), nil
}

type HelloServer struct {
	redisClient *redis.Client
}

func (h *HelloServer) Hello(
	ctx context.Context,
	req *connect.Request[hellov1.HelloRequest],
) (*connect.Response[hellov1.HelloResponse], error) {
	fmt.Println("call hello")

	msg := fmt.Sprintf("Hello, %s", req.Msg.Message)
	if err := h.redisClient.Publish(ctx, helloChannel, msg).Err(); err != nil {
		return nil, connect.NewError(connect.CodeInternal, err)
	}

	return connect.NewResponse(&hellov1.HelloResponse{}), nil
}

type PubSubServer struct {
	redisClient *redis.Client
}

func (p *PubSubServer) Subscribe(
	ctx context.Context,
	req *connect.Request[pubsubv1.SubscribeRequest],
	stream *connect.ServerStream[pubsubv1.SubscribeResponse],
) error {
	pubsub := p.redisClient.Subscribe(ctx, greetChannel, helloChannel)
	defer func() {
		_ = pubsub.Close()
	}()

	ch := pubsub.Channel()

	for {
		select {
		case msg := <-ch:
			fmt.Printf("channel: %s payload: %s\n", msg.Channel, msg.Payload)
			if err := stream.Send(&pubsubv1.SubscribeResponse{
				Message: msg.Payload,
			}); err != nil {
				return connect.NewError(connect.CodeInternal, err)
			}
		case <-ctx.Done():
			fmt.Println("context canceled")
			return nil
		}
	}
}

func main() {
	rdb := redis.NewClient(&redis.Options{})
	defer func() {
		_ = rdb.Close()
	}()

	var (
		greet  = &GreetServer{redisClient: rdb}
		hello  = &HelloServer{redisClient: rdb}
		pubsub = &PubSubServer{redisClient: rdb}
	)

	mux := http.NewServeMux()

	path, handler := greetv1connect.NewGreetServiceHandler(greet)
	mux.Handle(path, handler)

	path, handler = hellov1connect.NewHelloServiceHandler(hello)
	mux.Handle(path, handler)

	path, handler = pubsubv1connect.NewPubSubServiceHandler(pubsub)
	mux.Handle(path, handler)

	fmt.Println("start connect server...")

	http.ListenAndServe(
		"localhost:8080",
		h2c.NewHandler(mux, &http2.Server{}),
	)

	fmt.Println("end connect server...")
}
redisはdockerで起動しておきます。
docker run --name runn-demo-redis -d -p 6379:6379 redis:7.2.5
起動できたら動作確認をしてみます。
Subscribe
evans -p 8080 --proto proto/jyapp/runndemo/pubsub/v1/pubsub.proto

  ______
 |  ____|
 | |__    __   __   __ _   _ __    ___
 |  __|   \ \ / /  / _. | | '_ \  / __|
 | |____   \ V /  | (_| | | | | | \__ \
 |______|   \_/    \__,_| |_| |_| |___/

 more expressive universal gRPC client


jyapp.runndemo.pubsub.v1.PubSubService@127.0.0.1:8080> call Subscribe
greet
evans -p 8080 --proto proto/jyapp/runndemo/greet/v1/greet.proto proto/jyapp/runndemo/hello/v1/hello.proto

  ______
 |  ____|
 | |__    __   __   __ _   _ __    ___
 |  __|   \ \ / /  / _. | | '_ \  / __|
 | |____   \ V /  | (_| | | | | | \__ \
 |______|   \_/    \__,_| |_| |_| |___/

 more expressive universal gRPC client


127.0.0.1:8080> package jyapp.runndemo.greet.v1

jyapp.runndemo.greet.v1@127.0.0.1:8080> service GreetService

jyapp.runndemo.greet.v1.GreetService@127.0.0.1:8080> call Greet
message (TYPE_STRING) => Connect!!
call greet
channel: greet payload: Hi, Connect!!
hello
jyapp.runndemo.greet.v1.GreetService@127.0.0.1:8080> package jyapp.runndemo.hello.v1

jyapp.runndemo.hello.v1@127.0.0.1:8080> service HelloService

jyapp.runndemo.hello.v1.HelloService@127.0.0.1:8080> call Hello
message (TYPE_STRING) => runn!!
{}
call hello
channel: hello payload: Hello, runn!!
問題なければ次からいよいよrunnを使ってテストを書いていきます!
runnを使ってテストを書く
まずはインストール。MacであればHomebrewを使ってインストールします。
brew install k1LoW/tap/runn
runnの詳しい説明は省きますがランブックと呼ばれるyamlファイルにテストシナリオなどを記述することでテストを実行することができます。
そして、runnはgRPCクライアントのgrpcurlを使ってランブックを以下のように出力することができます。
runn new -- grpcurl localhost:8080 jyapp.runndemo.pubsub.v1.PubSubService/Subscribe
desc: Generated by `runn new`
runners:
  greq: grpc://localhost:8080
steps:
- greq:
    jyapp.runndemo.pubsub.v1.PubSubService/Subscribe: {}
一旦、これをbooks配下にyamlファイルとして配置しておきます。
mkdir books
runn new -- grpcurl localhost:8080 jyapp.runndemo.pubsub.v1.PubSubService/Subscribe > books/pubsub.yaml
作成したランブックを以下のように修正します。
desc: pubsub
runners:
  greq:
    addr: localhost:8080
    tls: false
		bufDirs:
      - ../proto # ランブックの場所から相対パスで指定
steps:
  pubsub:
    greq:
      jyapp.runndemo.pubsub.v1.PubSubService/Subscribe:
        message: {}
        timeout: 3sec # ブロックするのでタイムアウトを設定したほうが良い
    # ここでテストを書く
    test: |
      current.res.status == 0
これでgRPCランナーを使用してjyapp.runndemo.pubsub.v1.PubSubService/Subscribeをコールすることができます。今回はServer Streamingのため処理がブロックされるのでタイムアウトを設定しておいたほうがいいでしょう。これで一旦実行してみます
runn run books/pubsub.yaml
F

1) demo/runn-connect-streaming-demo/books/pubsub.yaml 2a8f84e6acc5743c11756c074ea9aef8d338b2e3
  Failure/Error: test failed on "pubsub".steps.pubsub: condition is not true

  Condition:
    current.res.status == 0

    │
    ├── current.res.status => 4
    └── 0

  Failure step (demo/runn-connect-streaming-demo/books/pubsub.yaml):
  10     greq:
  11       jyapp.runndemo.pubsub.v1.PubSubService/Subscribe:
  12         message: {}
  13         timeout: 3sec # ブロックするのでタイムアウトを設定したほうが良い
  14     # ここでテストを書く
  15     test: |
  16       current.res.status == 0
Redisからメッセージを受け取れていないので処理がブロックしたままタイムアウトしてしまいました。
この処理がブロックしている間にRedisへのメッセージ送信を行い、Server Streamingのレスポンスを検証したいというのが本記事のゴールです。Server Streamingをテストするランブックを実行中に他のランブックからRedisへのメッセージ送信はできないでしょうか?
ランブックを実行中に他のランブックを実行したい
ということでやってみます。以下のランブックを新たに作成します。
desc: hello
runners:
  greq:
    addr: localhost:8080
    tls: false
    bufDirs:
      - ../proto # ランブックの場所から相対パスで指定
steps:
  hello:
    greq:
      jyapp.runndemo.hello.v1.HelloService/Hello:
        message:
          message: from hello runbook!!
    test: |
      current.res.status == 0
以下注意点です。
- buf CLIのv2を使用していてrunnのバージョンが古いとunsupportedのエラーが出るかもしれないのでその場合はバージョンを上げる。
- ローカルで実行する場合、tlsは
falseを指定。 -
bufDirsにprotobufモジュールのルートディレクトリの場所を指定する。 -
bufDirsへの指定はランブックの実行場所からのパスになるようなので親の階層にある場合は相対パスで指定する。
とりあえずこれで実行してみましょう。
go run ./...
start connect server...
runn run books/hello.yaml
.

1 scenario, 0 skipped, 0 failures
call hello
runn経由でサーバーにメッセージを飛ばすことはできたみたいです。では、このランブックを先に作ったpubsubのランブックと同時に実行できればうまくいきそうです。
--concurrentフラグを使いランブックを並列実行する
runnには--concurrentフラグが用意されていてランブックの実行を並列に実行できるようです。以下のようなコマンドで二つのランブックを同時に実行できそう。
runn run books/*.yaml --concurrent on
ただ、Server Streamingがつながる前にRedisへのメッセージのPublishが実行されてしまうとメッセージを受信できなくてブロックしてしまうので以下のようにスリープ処理を入れてServer Streamingがつながるのを待ちます。
desc: hello
runners:
  greq:
    addr: localhost:8080
    tls: false
    bufDirs:
      - ../proto # ランブックの場所から相対パスで指定
steps:
+ wait:
+   exec:
+    command: sleep 1
  hello:
    greq:
      jyapp.runndemo.hello.v1.HelloService/Hello:
        message:
          message: From hello runbook!!
    test: |
      current.res.status == 0
実行は以下のコマンドになります。
runn run --scopes run:exec books/*.yaml --concurrent on
ポイントは以下です。
- sleepの処理はrunnのExecuteランナーを使用する。
- Executeランナーを使用する場合は実行コマンドに
--scopes run:execを追加する必要がある。 - ランブックを同時実行するために
--concurrent onを追加して実行する。
一旦この状態で実行してみましょう。
runn run --scopes run:exec books/*.yaml --concurrent on
.F

1) demo/runn-connect-streaming-demo/books/pubsub.yaml 2a8f84e6acc5743c11756c074ea9aef8d338b2e3
  Failure/Error: test failed on "pubsub".steps.pubsub: condition is not true

  Condition:
    current.res.status == 0

    │
    ├── current.res.status => 4
    └── 0
失敗してしまいました。これはpubsub.yamlのtestセクションがレスポンスのステータスを正常終了である0を期待しているのにタイムアウトである4を受信してしまったために失敗してしまっています。
これについては悩んだのですが今の実装のままではServer Streamingの終了をタイムアウトでしかできないのでステータスコードの検証をタイムアウトである4に変更しました。外部からServer Streamingを正常終了させるrpcを追加するなども考えたのですが今回のケースではServer Streamingはコネクション切断しない限り処理をブロックしてメッセージを受信し続けるものとして作っているので外部から切断できるルートを作りたくなかったというのとステータスコードは今回さほど重要ではないというのが理由です。
desc: pubsub
runners:
  greq:
    addr: localhost:8080
    tls: false
    bufDirs:
      - ../proto # ランブックの場所から相対パスで指定
steps:
  pubsub:
    greq:
      jyapp.runndemo.pubsub.v1.PubSubService/Subscribe:
        message: {}
        timeout: 3sec # ブロックするのでタイムアウトを設定したほうが良い
    # ここでテストを書く
    test: |
-      current.res.status == 0
+      current.res.status == 4
修正できたら再度実行してみます。
go run main.go
start connect server...
runn run --scopes run:exec books/*.yaml --concurrent on
..

2 scenarios, 0 skipped, 0 failures
call pubsub
call hello
channel: hello payload: Hello, from hello runbook!!
context canceled
期待した挙動になっていそうです!!
最後に受信したメッセージの検証を追加して再度確認してみます。
desc: pubsub
runners:
  greq:
    addr: localhost:8080
    tls: false
    bufDirs:
      - ../proto # ランブックの場所から相対パスで指定
steps:
  pubsub:
    greq:
      jyapp.runndemo.pubsub.v1.PubSubService/Subscribe:
        message: {}
        timeout: 3sec # ブロックするのでタイムアウトを設定したほうが良い
    # ここでテストを書く
    test: |
      current.res.status == 4
+      && len(current.res.messages) == 1
+      && current.res.messages[0].message == 'Hello, from hello runbook!!'
runn run --scopes run:exec books/*.yaml --concurrent on
..

2 scenarios, 0 skipped, 0 failures
メッセージの検証もできました!
Greetrpcのテストも追加する
前回まででHellorpcでPublishしたメッセージをSubscriberpcで受け取れることをテストできました。次にGreetrpcでのテストを追加してみたいと思います。
同じ要領でランブックは作成できると思いますがbooks/配下の同じ階層にテストを置いてテストを実行しようとすると2つのテストが競合してしまいうまく行かなそうなので新たにディレクトリを作成して階層を分けたいと思います。
mkdir hello greet
mv books/hello.yaml books/hello
mv books/pubsub.yaml books/hello
bufモジュールのパス指定が変わるのでそれも修正しておきます。
desc: hello
runners:
  greq:
    addr: localhost:8080
    tls: false
    bufDirs:
+      - ../../proto # ランブックの場所から相対パスで指定
-      - ../proto # ランブックの場所から相対パスで指定
    # importPaths:
    #   - ../proto/jyapp/runndemo/hello
steps:
  wait:
    exec:
      command: sleep 1
  hello:
    greq:
      jyapp.runndemo.hello.v1.HelloService/Hello:
        message:
          message: from hello runbook!!
    test: |
      current.res.status == 0
desc: pubsub
runners:
  greq:
    addr: localhost:8080
    tls: false
    bufDirs:
+      - ../../proto # ランブックの場所から相対パスで指定
-      - ../proto # ランブックの場所から相対パスで指定
steps:
  pubsub:
    greq:
      jyapp.runndemo.pubsub.v1.PubSubService/Subscribe:
        message: {}
        timeout: 3sec # ブロックするのでタイムアウトを設定したほうが良い
    # ここでテストを書く
    test: |
      current.res.status == 4
      && len(current.res.messages) == 1
      && current.res.messages[0].message == 'Hello, from hello runbook!!'
一旦この状態でテストが通ることを確認しておきましょう。
runn run --scopes run:exec books/hello/*yaml --concurrent on
..

2 scenarios, 0 skipped, 0 failures
大丈夫そうです。
では、greetのテストを追加していきます。
desc: greet
runners:
  greq:
    addr: localhost:8080
    tls: false
    bufDirs:
      - ../../proto # ランブックの場所から相対パスで指定
steps:
  wait:
    exec:
      command: sleep 1
  hello:
    greq:
      jyapp.runndemo.greet.v1.GreetService/Greet:
        message:
          message: from greet runbook!!
    test: |
      current.res.status == 0
desc: pubsub
runners:
  greq:
    addr: localhost:8080
    tls: false
    bufDirs:
      - ../../proto # ランブックの場所から相対パスで指定
steps:
  pubsub:
    greq:
      jyapp.runndemo.pubsub.v1.PubSubService/Subscribe:
        message: {}
        timeout: 3sec # ブロックするのでタイムアウトを設定したほうが良い
    # ここでテストを書く
    test: |
      current.res.status == 4
      && len(current.res.messages) == 1
      && current.res.messages[0].message == 'Hi, from greet runbook!!'
作成できたら実行してみます。
runn run --scopes run:exec books/greet/*yaml --concurrent on
..

2 scenarios, 0 skipped, 0 failures
良さそうです!!
全てのランブックを実行する
作成したランブックのテストを以下のように実行しようとするとpubsub.yamlで他のテストのメッセージも受信してしまいテストが失敗してしまいます。
runn run --scopes run:exec books/**/*yaml --concurrent on
なのでテストの実行はテストケース単位で実行する必要があります。
とはいえテストケースごとにコマンドを叩くのも面倒なので以下のようなワンライナーで一括実行してみました。(ここでシェルワンライナー160本ノックを走り切った経験が活きてくる。シェルに苦手意識のある方おすすめですよ。)
find books -type f -name "*.yaml" | sed 's|[^/]*$|*.yaml|' | uniq | xargs -I {} runn run --scopes run:exec {} --concurrent on
..

2 scenarios, 0 skipped, 0 failures
..

2 scenarios, 0 skipped, 0 failures
何度も実行するようであればMakefileなどに書いておくと実行が楽かもしれません。
.PHONY: books
books:
	@find books -type f -name "*.yaml" | sed 's|[^/]*$$|*.yaml|' | uniq | xargs -I {} runn run --scopes run:exec {} --concurrent on
$がMakefile内だとエスケープが必要なのとタスク名をbooksとする場合はすでに同じ名前のディレクトリが存在するので.PHONY: booksの記載が必要な点に注意してください。
make books
..

2 scenarios, 0 skipped, 0 failures
..

2 scenarios, 0 skipped, 0 failures
いい感じです!
おわりに
リアルタイム処理のようなシステムの実装やテストは一般的なAPIと比べるとやはり複雑で難しいです。今回はServer Streamingを扱いましたがWebsocketサーバーとRedisのPubSubを組み合わせたようなオンライン処理のほうがより一般的かもしれません。
このようなリアルタイム性のあるシステムを構築する場合、複数のプロセスが並行で動作していたりするためテスト条件を満たすようにテストを書くのは複雑になりがちだと感じています。
今回紹介しましたrunnはgRPCランナーを実装していることでyamlベースでgRPCサーバーのシナリオテストを書くことができるのとBuf対応をしてくれていたり、ランブックの同時実行をサポートしていてくれたりと高機能なツールとなっており、それらを組み合わせることでリアルタイムシステムのテストを簡単に書くことができました。
しかし、課題として以下のような点があると思っています。
- テストケースが同時に実行できないのとsleep処理を挟んでいるため実行時間が長時間になってしまうかもしれない。
- Server Streamingの終了をタイムアウトで実行しているためステータスコードの検証ができない。
- PublishのランブックをsleepさせてServer Streamingのコネクション確立後に実行するようにしているが完全な制御ではないので今後不都合があるかもしれない
とはいえ、現状この記事で紹介したようなシステムのテストをするには十分かなという気はしてはいますがもっといい方法あるよとかがあればぜひコメントなどいただけると嬉しいです。
今回は以上となります🐼
(BSRにProtobufを公開したけどrunnのBuf対応にはあまり関係なかったので公開しなくても良かったかも...)
Discussion