Zennの記事をGitHub連携でカッチリ管理するおすすめ設定
はじめに
はじめまして、jonghyoと申します!
ZennのGitHub連携機能とっても便利ですよね!
記事を書くにあたって、GitHubリポジトリの設定を色々やったのでおすすめ設定を共有します。
記載内容などをカッチリ管理したい方必見です👀
内容の詳細は以下リポジトリをご覧ください。
こんな人におすすめ!
- 記事の内容や品質を楽に・カッチリチェックしたい!
- コミットメッセージもしっかり書いて、かっこいいリポジトリにしたい!
- Zennの記事をきれいに管理したい!
- これからZennとGitHubの連携設定を行なう方
TL;DR
- GitHubリポジトリの
Automatically delete head branches Loading,Dependabot有効化 - textlint, markdownlint-cli2, commitlint, secretlint, lefthookの導入
- GitHubActionsの導入
前提
この記事は以下を前提としています。
- GitHub上にZennの記事管理用のリポジトリ作成済み
- ZennとGitHub連携済み
- Node.js v22系の環境
- VSCode上で記事を執筆
おすすめ設定
GitHubリポジトリSettings
Automatically delete head branches Loading
Zenn記事管理用リポジトリの Settings > General > Pull RequestsのAutomatically delete head branches Loadingを有効にします。

新しく記事を作成する際は、featureブランチを切って管理した方が作業途中の記事が公開されずに済むのでベターですがmainにマージ後、古いfeatureブランチを自動で削除してくれるようになり便利です!
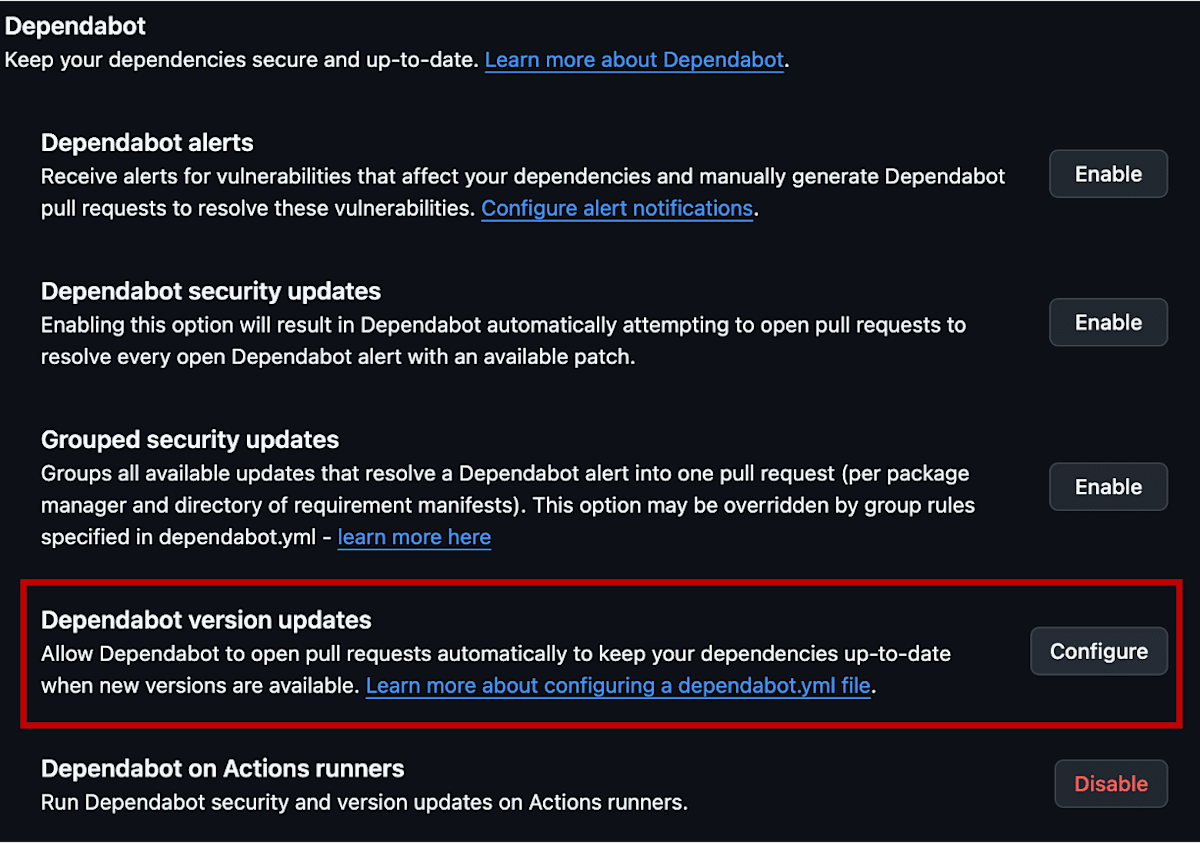
Dependabotの有効化
Settings > Code security > DependabotのDependabot version updatesを有効化します。
Dependabotの定義は以下です。
# To get started with Dependabot version updates, you'll need to specify which
# package ecosystems to update and where the package manifests are located.
# Please see the documentation for all configuration options:
# https://docs.github.com/code-security/dependabot/dependabot-version-updates/configuration-options-for-the-dependabot.yml-file

version: 2
updates:
  - package-ecosystem: 'github-actions'
    directory: '/'
    schedule:
      interval: weekly
      time: '10:00'
      timezone: Asia/Tokyo
    open-pull-requests-limit: 10
    commit-message:
      prefix: 'Common'
      include: 'scope'
    labels:
      - 'dependencies'
  - package-ecosystem: 'npm'
    directory: '/'
    schedule:
      interval: daily
      time: '10:00'
      timezone: Asia/Tokyo
    open-pull-requests-limit: 10
    commit-message:
      prefix: 'Common'
      include: 'scope'
    labels:
      - 'dependencies'
後述する、GitHub Actionsやnode_modulesを自動でアップデートしてくれるようにします。
Node modules
記事の管理を楽にするため、いくつかのnode_modulesを追加します。
の設定を入れます。
Linter
Linterは
を導入します。
textlint
textlintは文章構成ツールです。
今回は以下プラグインを追加して利用します。
| プラグイン | 詳細 |
|---|---|
| textlint-rule-preset-smarthr | SmartHRさんが提供するtextlintルールプリセット |
| textlint-filter-rule-comments | textlintのルールを適用させたくないファイルなどをフィルターするためのプラグイン |
| textlint-filter-rule-allowlist | 特定の文言にルールを適用させたくない場合にフィルターするためのプラグイン |
| textlint-rule-preset-ja-spacing | 日本語周りにおけるスペースの有無を決定するtextlintルールプリセット |
| textlint-rule-preset-ja-technical-writing | 技術文書向けのtextlintルールプリセット |
| textlint-rule-spellcheck-tech-word | 技術用語の表記揺れをチェックするルール |
| textlint-rule-prh | textlintのルールセットを自前で定義するためのプラグイン |
| textlint-plugin-mdx | textlintをmdxにも対応させるプラグイン。zennはmdx非対応なのでいらなかった... |
以下コマンドでインストールします。
npm install -D textlint textlint-rule-preset-smarthr textlint-filter-rule-comments textlint-rule-preset-ja-spacing textlint-rule-preset-ja-technical-writing textlint-rule-spellcheck-tech-word textlint-rule-prh
textlintのルールは使ってみた結果、以下で運用しています。
---
plugins:
  mdx: true
filters:
  comments: true
rules:
  # SmartHR のプリセットルールを使用(句点混在のルールはオフ)
  preset-smarthr:
    # 文末の句点が混在していてもエラーにしない
    ja-no-mixed-period: false
  preset-ja-spacing:
    # 全角と半角の間のスペースのルールをオフ
    ja-space-between-half-and-full-width: false
  preset-ja-technical-writing:
    # 文の長さの制限をオフ(長い文章が必要な場合に対応)
    sentence-length: false
    # 文末の句点が混在していてもエラーにしない
    ja-no-mixed-period: false
    # 漢字の連続使用制限をオフ(専門用語や固有名詞が多い場合に対応)
    max-kanji-continuous-len: false
    # 感嘆符(!)や疑問符(?)の使用制限をオフ
    no-exclamation-question-mark: false
  ja-technical-writing:
    # カンマ(,)の上限をオフ
    max-comma: false
  # 技術用語のスペルチェックを有効化
  spellcheck-tech-word: true
  # カスタムの置換ルールを適用
  prh:
    rulePaths:
      - ./rules.yml
rules.ymlは任意で表記揺れを防ぐ定義を作成できます。サーバーの表記揺れなどを定義しておくと防ぐことができます。
version: 1
rules:
  - expected: サーバー
    pattern: サーバ
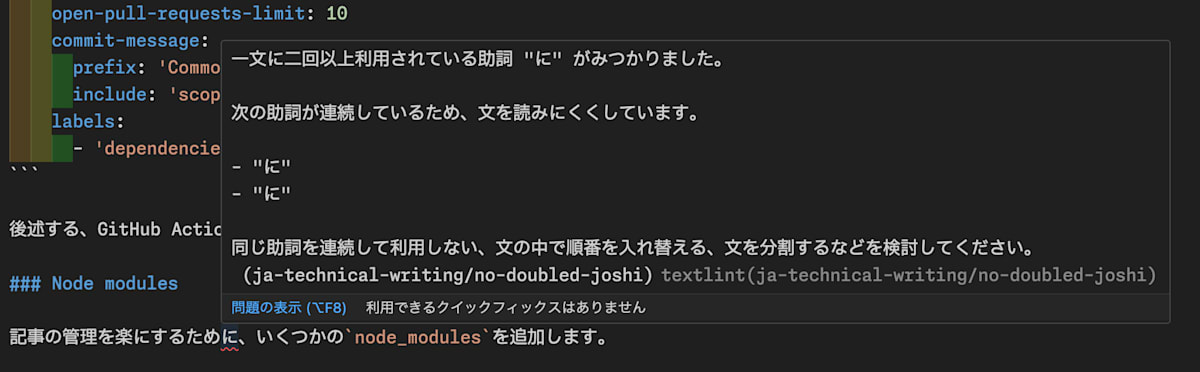
VSCodeのvscode-textlintをインストールします。
以下設定を.vscode/setting.jsonに追加すると、エディタ上でリアルタイムにチェックできます!
{
  "textlint.languages": [
    "mdx",
    "markdown",
    "plaintext",
    "html"
  ],
}
npmコマンドにもtextlintを追加します。
"scripts": {
    "start": "zenn preview",
    "lint:docs": "textlint --cache **/*.{md,mdx}",
    "lint:docs:fix": "textlint --cache --fix **/*.{md,mdx}"
  },
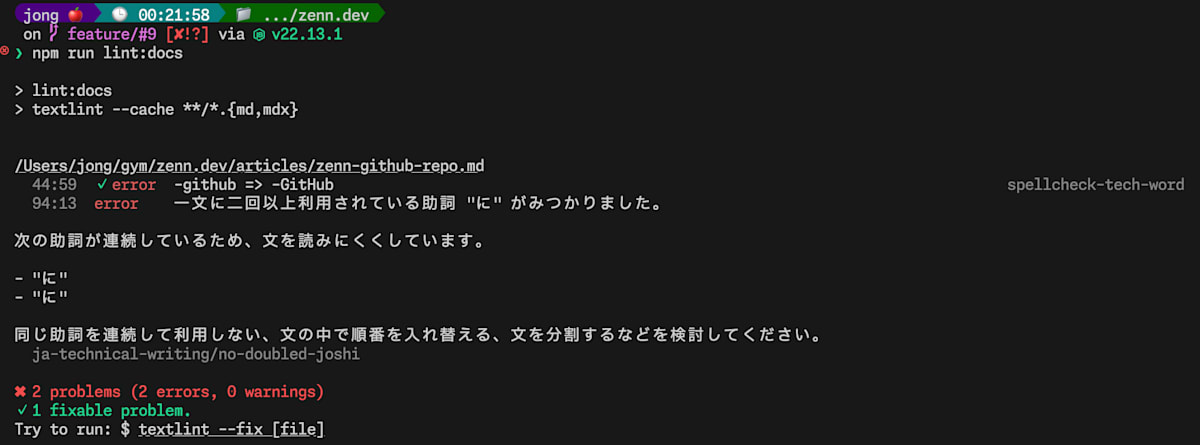
コマンドを実行することにより、textlintのチェックをCLI上でもかけることができます。
GitHub Actionsと連携する際便利になります!
markdownlint-cli2
markdownlint-cli2はmarkdown記法のlintをかけてくれるチェックツールです。
markdownの記法自体もきれいに書きたいので導入します。
以下コマンドでインストールします。
npm i -D markdownlint-cli2
使ってみた結果、以下設定で利用しています。
{
  "config": {
    "line-length": false, // MD013  行の長さ
    "no-hard-tabs": false, // MD010 Markdown中にTSVを書くとエラーになるため
    "no-trailing-punctuation": false, // MD026 ヘディングに句読点(.,;:!?)を許容したい
    "no-inline-html": false, // MD033 HTMLは許容
    "no-bare-urls": false, // MD034 URLのリンク化条件
    "no-space-in-emphasis": false, // MD037  $$など数式で問題になったため外す
    "link-fragments": false, // MD051 相対パス設定
    "first-line-h1": false, //MD041 first-line-heading
    "no-duplicate-heading": false //MD024 no-duplicate-heading
  },
  "ignores": [".git", "node_modules"] // 無視するディレクトリ
}
導入すると、markdownの書き方についてチェックしてくれるようになります。

npmコマンドにもmarkdownlint-cli2を追加します。
"scripts": {
    "start": "zenn preview",
    "markdownlint": "markdownlint-cli2 \"**/*.{md,mdx}\"",
    "markdownlint:fix": "markdownlint-cli2 --fix \"**/*.{md,mdx}\"",
    "lint:docs": "textlint --cache **/*.{md,mdx}",
    "lint:docs:fix": "textlint --cache --fix **/*.{md,mdx}"
  },
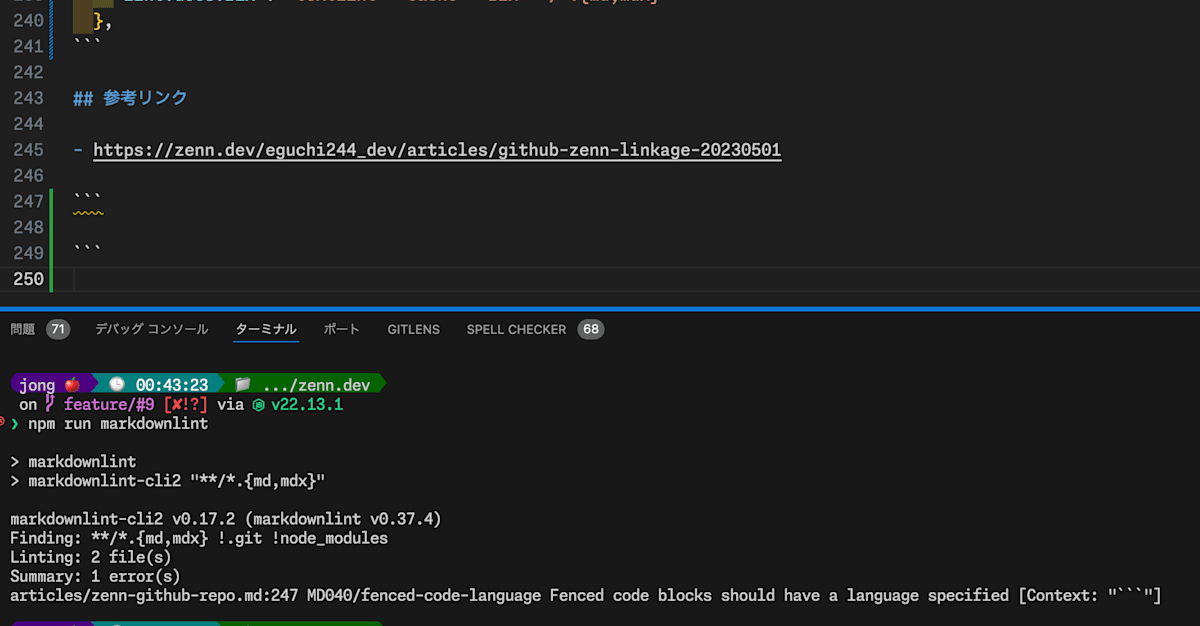
コマンドを実行することにより、markdownlint-cli2のチェックをCLI上でもかけることができます。
Formatter
コードフォーマッタはPrettierを採用しました。
以下コマンドでインストールします。
npm i -D prettier
設定は以下としました。
{
  "printWidth": 90,
  "tabWidth": 2,
  "useTabs": false,
  "semi": false,
  "singleQuote": true,
  "jsxSingleQuote": false,
  "quoteProps": "as-needed",
  "trailingComma": "none",
  "bracketSpacing": true,
  "bracketSameLine": false,
  "arrowParens": "always",
  "requirePragma": false,
  "insertPragma": false,
  "htmlWhitespaceSensitivity": "css",
  "embeddedLanguageFormatting": "auto",
  "singleAttributePerLine": false,
  "proseWrap": "never"
}
.vscode/setting.jsonに以下を追加することでフォーマッタが効くようになります。
{
  "textlint.languages": [
    "mdx",
    "markdown",
    "plaintext",
    "html"
  ],
  //追加
  "[markdown]": {
    "editor.formatOnSave": true,
    "editor.formatOnPaste": true,
    "editor.defaultFormatter": "esbenp.prettier-vscode"
  },
  "prettier.configPath": ".prettierrc"
}
Git hook
GitHubへプッシュする前に、textlintやmarkdownlintのチェックを潰し込めているか事前チェックできるようにします。
今回は動作が軽快なlefthookを採用しました。
Git hookで以下をチェックすることにしました。
| フェーズ | チェック | 詳細 |
|---|---|---|
| pre commit | secretlint | シークレット情報を誤ってGitHubにpushしないようにチェック |
| formatting | prettierフォーマットの修正を適用 | |
| textlint | textlintのチェック | |
| markdownlint | markdown記法をチェック | |
| commit-msg | commitlint | コミットメッセージがconventional commit formatに従っているかチェック |
以下コマンドでインストールします。
npm i -D lefthook secretlint @secretlint/secretlint-rule-preset-recommend @commitlint/cli @commitlint/config-conventional
secretlint
secretlintは以下設定とします。
rules:
  - id: '@secretlint/secretlint-rule-preset-recommend'
commitlint
commitlintは以下設定とします。
extends:
  - '@commitlint/config-conventional'
rules:
  subject-case:
    - 2
    - 'never'
    - - 'start-case'
      - 'sentence-case'
      - 'pascal-case'
conventional commit formatに従って
<type>(<scope>): <subject>
上記のようなフォーマットでコミットメッセージを入力しないとエラーとなります。subjectは小文字以外エラーになります。
e.g. 以下のようなコミットメッセージを求めるようになります
docs(zenn-github-repo): add articles
lefthook
lefthookの設定を以下のように行ないます。
# Refer for explanation to following link:
# https://github.com/evilmartians/lefthook/blob/master/docs/configuration.md

pre-commit:
  parallel: true
  commands:
    # common rules
    secretlint:
      glob: '*'
      run: npx secretlint --maskSecrets --secretlintignore .gitignore "{staged_files}"
    formatting:
      glob: '**/*.{js,ts,jsx,tsx,md,mdx,json,yml}'
      run: npx prettier --write "{staged_files}"
    # for docs edit rules
    textlint:
      glob: '**/*.{md,mdx}'
      run: npx textlint --cache {staged_files}
    markdownlint:
      glob: '**/*.{md,mdx}'
      run: npx markdownlint-cli2 {staged_files}
commit-msg:
  parallel: true
  commands:
    commitlint:
      run: npx commitlint -e
これで、Git hookで各種lintをかけられるようになりました。
この例ではコミットメッセージがconventional commit formatに従ってないので、エラーになりgit commitが抑止されています。

GitHub Actions
基本的にGit hookで各lintのチェックはかけられますが、GitHub上でササッと記事編集してPRを出すケースもあるのでCI側でもlintをかけられるようにします。
GitHub ActionsはPRをmainブランチに出したとき && mdファイルが編集されたときのみ実行されるようにします。
# This is a basic workflow to help you get started with Actions

name: reviewdog

# Controls when the action will run.
on:
  # Triggers the workflow on push or pull request events but only for the main branch
  pull_request:
    branches: [main]
    paths:
      - '**/*.md'

# A workflow run is made up of one or more jobs that can run sequentially or in parallel
jobs:
  reviewdog-github-check:
    name: reviewdog (github-check)
    runs-on: ubuntu-latest

    steps:
      - name: Checkout Repo
        uses: actions/checkout@master

      - name: Setup Node/npm
        uses: actions/setup-node@v4
        with:
          node-version: 22

      # キャッシュリストア
      - name: Restore cache
        id: cache-restore
        uses: actions/cache/restore@v4
        with:
          key: ${{ runner.os }}-cache
          path: |
            ~/.npm
            .textlintcache

      # 依存モジュールインストール
      - name: Install node modules
        if: ${{ steps.cache_dependency.outputs.cache-hit != 'true' }}
        run: 'npm ci --no-audit --progress=false --silent'

      # textlint
      - name: Exec textlint-github-pr-check
        uses: tsuyoshicho/action-textlint@v3
        with:
          github_token: ${{ secrets.github_token }}
          reporter: github-pr-review
          level: warning
          textlint_flags: '**/*.{md,mdx}'

      # markdownlint
      - name: Exec markdwonlint
        run: 'npm run markdownlint'

      # キャッシュセーブ
      - name: Always Save Cache
        id: cache-save
        if: always() && steps.cache-restore.outputs.cache-hit != 'true'
        uses: actions/cache/save@v4
        with:
          key: ${{ steps.cache-restore.outputs.cache-primary-key }}
          path: |
            ~/.npm
            .textlintcache
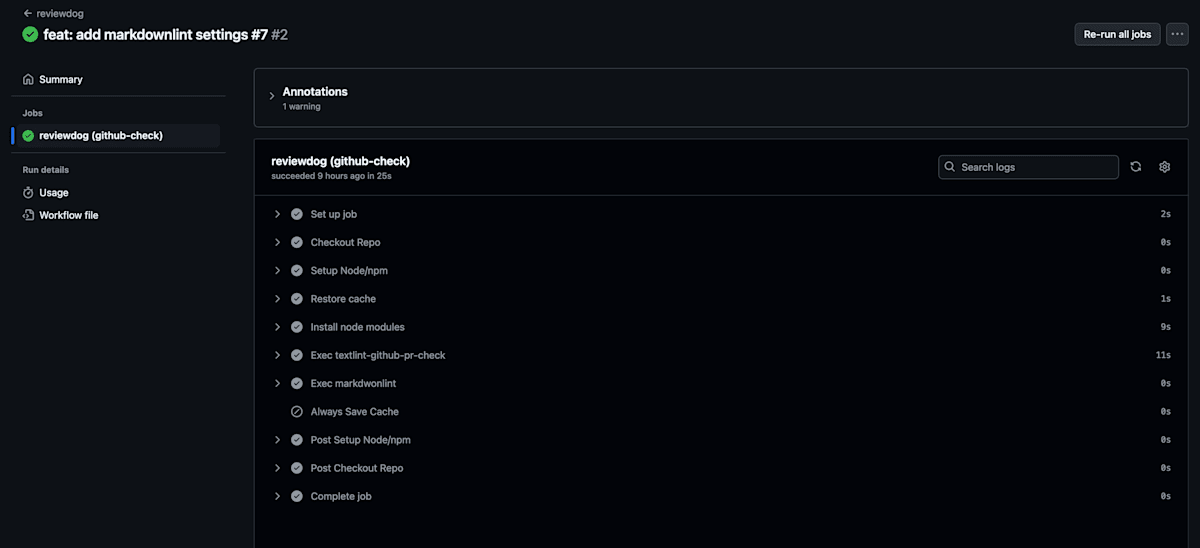
これでPRを出したときにmarkdownファイルの変更を検知してGitHub Actions上でlintのチェックがかかるようになります。
まとめ
textlintやmarkdownlintを入れることできれいに読みやすい記事がかけるようになりました。
「です・ます調」「だ・である調」は記事書いているときに混在しがちだったので助かってます。
ただ、たまにtextlintさん厳しい...😇 ※その際は、ルールのチューニングを..
皆さんもぜひ参考にしてみてください!
また、皆さんのおすすめの設定をぜひコメントで教えてください🙇
参考リンク
最後までお読みいただきありがとうございました!
Xでも技術ネタをポストしているので、よかったらフォローしてもらえると嬉しいです😋
Discussion
dprintならmarkdown対応してますよ!
ありがとうございます!
dprint、知らなかったです...
高速で動いて、良さげですね..!
記事にも記載させていただきました!