Mac初期設定
最初
トラックパッドの設定
- OS のバージョンアップ
- 環境設定でキーの速さ・カーソル移動を最大・タップでクリック
UIでやるなら
- システム環境設定で「キーボード」「マウス」「トラックパッド」と検索
- マウスはトラックパッドオプション(これは何?)
- トラックパッド
- 軌跡の速さを最速に
- タップでクリック
CLIでやるなら
# 以下をCLIで実行し再起動
defaults write -g com.apple.trackpad.scaling 8
defaults write -g InitialKeyRepeat -int 11
defaults write -g KeyRepeat -int 1

# キーのリピート時に変なアクセント記号を出さないようにする
defaults write -g ApplePressAndHoldEnabled -bool false
タップでクリック
defaults write com.apple.AppleMultitouchTrackpad Clicking -bool true
確認
# 値はUIで軌跡の速さを最速にした場合
❯ defaults read -g com.apple.trackpad.scaling
3

# こちらも値はUIで最速にした場合
❯ defaults read -g KeyRepeat
defaults read -g InitialKeyRepeat
2
15

❯ defaults read com.apple.AppleMultitouchTrackpad
ダークモードにする
- 外観 > ダーク
ファイアウォールの設定をする
- ファイアウォールで検索、オンに
指紋認証を設定する
Safariでbrewのインストール: https://brew.sh/ja/
/bin/bash -c "$(curl -fsSL https://raw.githubusercontent.com/Homebrew/install/HEAD/install.sh)"

# 表示されるPATHの設定をする

# chromeのインストール
brew install --cask google-chrome
Chromeにログイン
デフォルトにするには
- システム設定から変更(GUI)
- → システム設定 を開く
- 左側メニューから デスクトップとDock を選ぶ
- 下にスクロールすると デフォルトのWebブラウザ という項目があるので、プルダウンから好きなブラウザ(Safari / Chrome / Firefox / Edge など)を選択
画面閉じたらロックする設定をする
「ロック画面」で検索

Mac本体の追加設定
Handoffは切っておいてもいいかも

スクリーンショット保存先の変更
mkdir ~/Documents/screenshot
defaults write com.apple.screencapture location ~/Documents/screenshot
# killall SystemUIServer は一定以上のOSバージョンなら不要
chromeログイン後
key設定のためのkarabiner-elementsのインストール
ここはhammerspoonパイセンでもいいかも
brew install --cask karabiner-elements
いろいろ権限の設定
キーボードはUS配列の場合ANSI
参考ページ: https://misclog.jp/karabiner-elements/
Complex Modifications > add predefined rule > Import more rules from the Internet > International (Language Specific) ← Table of Contentsにある > For Japanese (rev6) > Import > コマンドキーを単体で押したときに、英数・かなキーを送信する。(左コマンドキーは英数、右コマンドキーはかな)> Enable

再起動する
caps lockをctrlにする
Macで、アップルメニュー >「システム設定」>「キーボード」>「キーボードショートカット」>「修飾キー」> Caps LockをControlに
raycastの設定
raycast参考資料
設定
インストール
brew install --cask raycast
アプリを立ち上げ流れで設定していく
拡張機能を入れろとかProのトライアルをしろとか出てくるがLaterを選択
hotkeyはspotlightを上書きする設定をする
-
上書きできない場合はspotlightを無効にする
- System Preferences > Keyboard > Shortcuts > Spotlight でspotlightのチェックを外す
cmd + ,で設定を立ち上げて1passwordを除外に
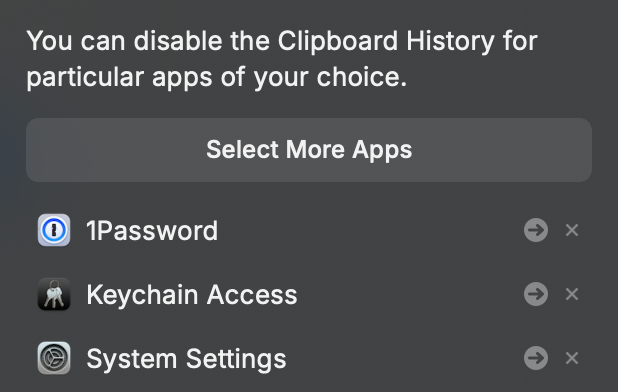
Keep historyも24hにしておく
clickboard history自体は暗号化されて保存されているらしいがパスワード類が保存されることは望ましく無いので注意
ブラウザ拡張のipasswordは貫通するのでそこからクリックボードに入れないようにする
iterm2 & shellの設定
iterm2のinstall
brew install --cask iterm2
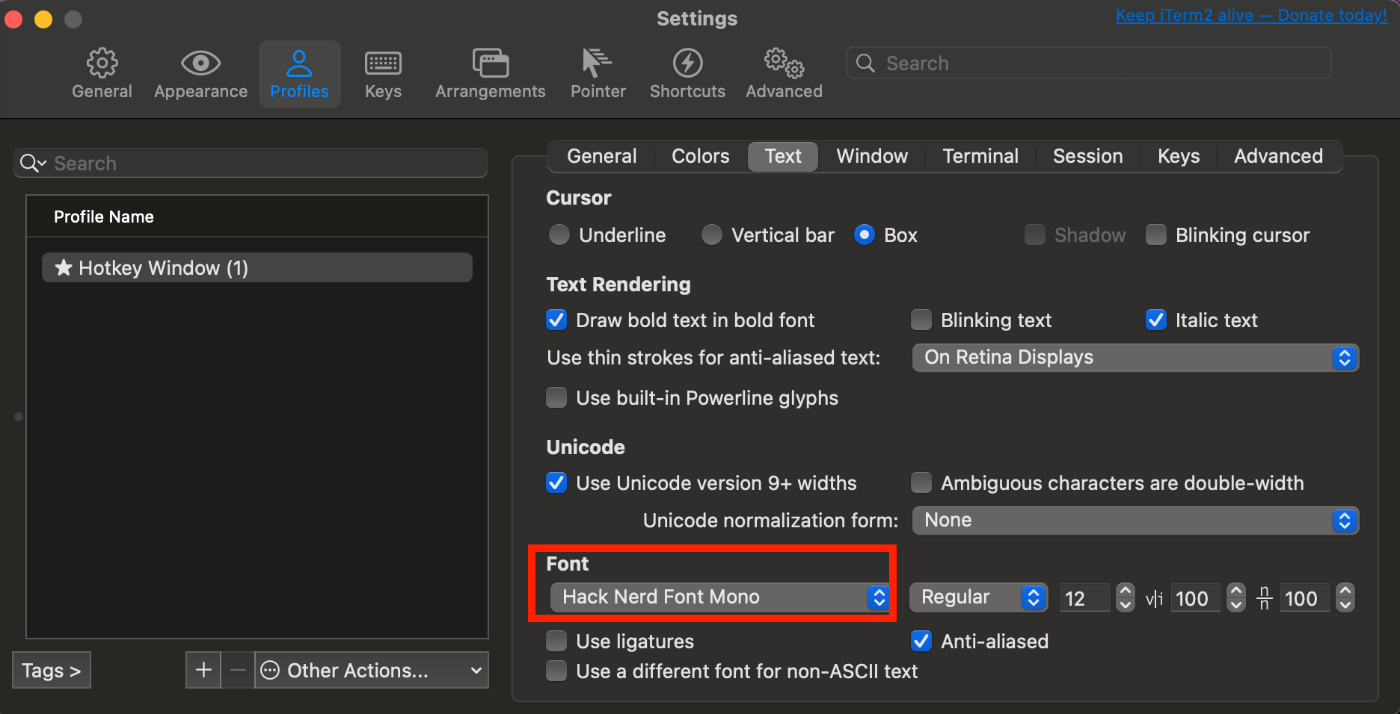
iTerm2の設定
このあたりをやる
iTerm2の設定
Preference(cmd + ,) > Profiles > 上部のボタンの右から2番目にあるKeysを選択し,さらに左のProfile NameからHotkey Windowを選択する.(Hotkey Windowがない場合はDefault)> 右下にあるConfigure Hotkey Window を選択し、Pin hotkey window, Floating windowを有効化 > iterm2を再起動する
zshになってるか確認
# 確認
echo $SHELL
starshipを入れる
brew install starship
公式ドキュメントにある設定をする
Zsh
~/.zshrc の最後に以下を追記してください
# ~/.zshrc

eval "$(starship init zsh)"
starship自体の設定
starship config
https://starship.rs/ja-JP/ によると
必要なもの
Nerd Fontの一つがインストールされていて、ターミナルで有効になっていること。
らしいのでインストールする
❯ brew install font-hack-nerd-font
iterm2で設定する
便利コマンドを入れる
ripgrep
brew install ripgrep
プログラミング言語の設定
python
uvを入れる
curl -LsSf https://astral.sh/uv/install.sh | sh
source "$HOME/.local/bin/env"をする必要あり?
node.jsの設定
- yarn
- npm
開発環境、App等の設定
開発環境
brew install neovim

neovimの設定をするとこの画像が出ることがある

設定画面 > Profiles > Terminal > Enable mouse reportingをoffに
App
# slack
brew install --cask slack
# google日本語入力
brew install --cask google-japanese-ime
# docker
brew install --cask docker
# iterm2
brew install --cask iterm2
# Notion
brew install --cask notion
# Discord
brew install --cask discord
# Blender
brew install --cask blender
# Cursor
brew install --cask cursor
# Obsidian
brew install --cask obsidian
# VSCode
brew install --cask visual-studio-code
# chatgpt: ctrl + spaceで起動するようにする
#  システム設定 > キーボード > キーボードショートカット > 入力ソース > チェックボックス外す
brew install --cask chatgpt
# Unity
brew install --cask unity-hub
steam
Gitレポジトリのclone設定
新しい SSH キーを生成して ssh-agent に追加する
GitHub アカウントへの新しい SSH キーの追加
をやってsshの設定
ssh -T git@github.com
# Attempts to ssh to GitHub
管理場所の設定
これをやる
brew install ghq
brew install peco
githubをcloneするpathを設定
mkdir -p ~/src/repository
git config --global ghq.root '~/src/repository'
~.zshrc に追加(ちなみにshellの確認は echo $SHELL )
function peco-src () {
  local selected_dir=$(ghq list -p | peco --query "$LBUFFER")
  if [ -n "$selected_dir" ]; then
    BUFFER="cd ${selected_dir}"
    zle accept-line
  fi
  zle clear-screen
}
zle -N peco-src
bindkey '^]' peco-src
これで ^] で同じディレクトリにcloneできるようになった
zsh plugin
zsh-syntax-highlighting: 構文ハイライト
プラグインマネージャーで入れる時は最後に入れないといけないらしく、手動インストールが推奨されている
brew install zsh-syntax-highlighting
echo "source $(brew --prefix)/share/zsh-syntax-highlighting/zsh-syntax-highlighting.zsh" >> ${ZDOTDIR:-$HOME}/.zshrc
# zshを再起動する
source ~/.zshrc
zsh-autosuggestions: 自動補完
brew install zsh-autosuggestions
source $(brew --prefix)/share/zsh-autosuggestions/zsh-autosuggestions.zsh
# zshを再起動する
source ~/.zshrc
zsh-completions: コマンド補完拡張
brew install zsh-completions
installした後にいろいろメッセージが出ることがある
zsh compinit: insecure directories, runcompaudit for list.
Ignore insecure ...
brew install時に出てくるメッセージを実行する
  chmod go-w '/opt/homebrew/share'
  chmod -R go-w '/opt/homebrew/share/zsh'
ちなみに全文
To activate these completions, add the following to your .zshrc:

  if type brew &>/dev/null; then
    FPATH=$(brew --prefix)/share/zsh-completions:$FPATH

    autoload -Uz compinit
    compinit
  fi

You may also need to force rebuild `zcompdump`:

  rm -f ~/.zcompdump; compinit

Additionally, if you receive "zsh compinit: insecure directories" warnings when attempting
to load these completions, you may need to run these commands:

  chmod go-w '/opt/homebrew/share'
  chmod -R go-w '/opt/homebrew/share/zsh'
chatgpt(App)の設定
homebrewの設定(Brewfile利用)
dump
brew bundle dump
これをcloneして make install-homebrew
Brewfileに記載のものをinstall
brew bundle --file=~/.Brewfile