
【随時更新】Mac初期設定
最初にやる設定
トラックパッドの設定
- OS のバージョンアップ
- 環境設定でキーの速さ・カーソル移動を最大・タップでクリック
UIでやるなら
- システム環境設定で「キーボード」「マウス」「トラックパッド」と検索
- マウスはトラックパッドオプション(これは何?)
- トラックパッド
- 軌跡の速さを最速に
- タップでクリック
CLIでやるなら
# 以下をCLIで実行し再起動
defaults write -g com.apple.trackpad.scaling 8
defaults write -g InitialKeyRepeat -int 11
defaults write -g KeyRepeat -int 1
# キーのリピート時に変なアクセント記号を出さないようにする
defaults write -g ApplePressAndHoldEnabled -bool false
タップでクリック
defaults write com.apple.AppleMultitouchTrackpad Clicking -bool true
確認
# 値はUIで軌跡の速さを最速にした場合
❯ defaults read -g com.apple.trackpad.scaling
3
# こちらも値はUIで最速にした場合
❯ defaults read -g KeyRepeat
defaults read -g InitialKeyRepeat
2
15
❯ defaults read com.apple.AppleMultitouchTrackpad
スクリーンショット保存先の変更
mkdir ~/Documents/screenshot
defaults write com.apple.screencapture location ~/Documents/screenshot
# killall SystemUIServer は一定以上のOSバージョンなら不要
スクリーンショットをjpgにする
defaults write com.apple.screencapture type jpg
killall SystemUIServer
画面閉じたらロックする設定をする
「ロック画面」で検索

Handoffは切っておいてもいいかも

caps lockをctrlにする
Macで、アップルメニュー >「システム設定」>「キーボード」>「キーボードショートカット」>「修飾キー」> Caps LockをControlに
その他設定でいじるもの
- ダークモードにする
- 外観 > ダーク
- ファイアウォールの設定をする
- ファイアウォールで検索、オンに
- 指紋認証を設定する
Zoomの設定をしておく
ビデオとエフェクト > バーチャル背景
一般 > プレゼンス状態
ミーティングとウェビナー > カメラオフ、マイクミュート
Homebrewの設定
Safariでbrewのインストール: https://brew.sh/ja/
/bin/bash -c "$(curl -fsSL https://raw.githubusercontent.com/Homebrew/install/HEAD/install.sh)"
# 表示されるPATHの設定をする
Homebrew Caskで最初に入れるアプリケーション
chromeのインストール
brew install --cask google-chrome
Chromeにログインしてデフォルトブラウザに
- システム設定から変更(GUI)
- → システム設定 を開く
- 左側メニューから デスクトップとDock を選ぶ
- 下にスクロールすると デフォルトのWebブラウザ という項目があるので、プルダウンから好きなブラウザ(Safari / Chrome / Firefox / Edge など)を選択
key設定のためのkarabiner-elementsのインストール
ここはhammerspoonパイセンでもいいかも
brew install --cask karabiner-elements
いろいろ権限の設定
権限を表示される通りに付与
キーボードはUS配列の場合ANSI
参考ページ: https://misclog.jp/karabiner-elements/
Complex Modifications > add predefined rule > Import more rules from the Internet > International (Language Specific) ← Table of Contentsにある > For Japanese (rev6) > Import > コマンドキーを単体で押したときに、英数・かなキーを送信する。(左コマンドキーは英数、右コマンドキーはかな)> Enable
再起動する
iTerm2 & Shellの設定
brew install --cask iterm2
hotkeyを設定する
Cmd + , -> keys -> Hotkey -> Create a Dedicated Hotkey Window...
option + space
このあたりをやる
Preference(cmd + ,) > Profiles > 上部のボタンの右から2番目にあるKeysを選択し,さらに左のProfile NameからHotkey Windowを選択する.(Hotkey Windowがない場合はDefault)> 右下にあるConfigure Hotkey Window を選択し、Pin hotkey window, Floating windowを有効化 > iterm2を再起動する
次にWindow > Style の Full-Width Top of ScreenをFill Screenに
zshになってるか確認
# 確認
echo $SHELL
starshipを入れる
公式ドキュメントのクイックインストールにある設定をする
brew install starship
~/.zshrc の最後に以下を追記
eval "$(starship init zsh)"
starship自体の設定
starship config で設定できるが今はしない
https://starship.rs/ja-JP/ によると
必要なもの
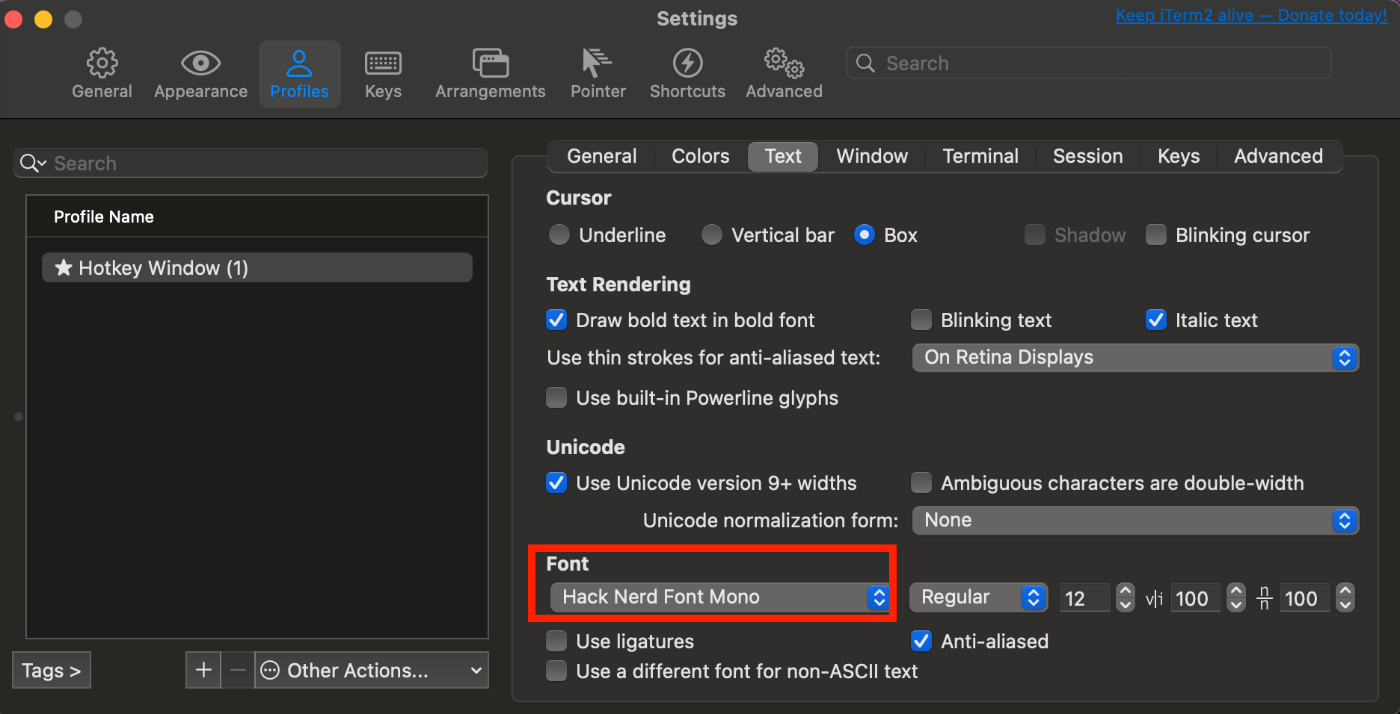
Nerd Fontの一つがインストールされていて、ターミナルで有効になっていること。
らしいのでインストールする
❯ brew install font-hack-nerd-font
iterm2で設定する
別のフォント
brew install --cask font-jetbrains-mono-nerd-font
ghostty
iTerm2だと調子が悪い時があるので入れる
brew install --cask ghostty
設定
mkdir -p ~/.config/ghostty && touch ~/.config/ghostty/config
# テーマの設定 (ghostty +list-themes で一覧確認可能)
theme = catppuccin-mocha
# フォント設定 (Nerd Font系がおすすめ)
font-family = "JetBrainsMono Nerd Font"
font-size = 14
# 背景の透過とブラー(すりガラス効果)
background-opacity = 0.9
background-blur-radius = 20
# ウィンドウの余白(コードが見やすくなります)
window-padding-x = 10
window-padding-y = 10
# タイトルバーを消してスッキリさせる (タブ表示にする場合は 'tabs')
macos-titlebar-style = hidden
# OptionキーをMetaキーとして認識させる (EmacsやCLIツールで重要)
macos-option-as-alt = true
# 常に新しいウィンドウではなくタブで開く
macos-window-introduction-animation = false
cmux
brew install --cask cmux
herdr
tmuxみたいなやつ
brew install herdr
tailscale
remoteするなら
1password
パスワード管理のために導入する
Raycast
raycast参考資料
設定
インストール
brew install --cask raycast
アプリを立ち上げ流れで設定していく
拡張機能を入れろとかProのトライアルをしろとか出てくるがLaterを選択
hotkeyはspotlightを上書きする設定をする
-
上書きできない場合はspotlightを無効にする
- System Preferences > Keyboard > Shortcuts > Spotlight でspotlightのチェックを外す
- 再起動したら復活している時があるので注意
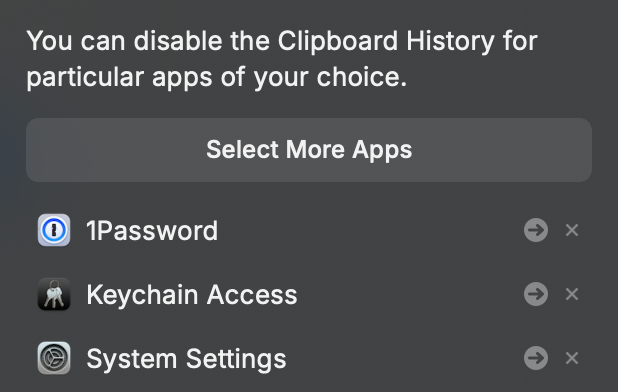
cmd + ,で設定を立ち上げて1passwordを除外に

Keep historyも24hにしておく
clickboard history自体は暗号化されて保存されているらしいがパスワード類が保存されることは望ましく無いので注意
ブラウザ拡張のipasswordは貫通するのでそこからクリックボードに入れないようにする
Obsidian
# Obsidian
brew install --cask obsidian
現在のディレクトリを一気に掘る
mkdir -p \
"0. Ground Zeros" \
"1. Gene/Awesome" \
"1. Gene/Log" \
"1. Gene/Role" \
"2. 2b2t" \
"3. Meme/Fleeting note" \
"4. Sense/Outline" \
"4. Sense/Sphere" \
"5. Scene" \
"9. Artifact/Archive" \
"9. Artifact/Files"
Githubで管理している場合はObsidian Gitを入れておくと良い
Git cloneの設定はghqの設定をしてから
ChatGPT
brew install --cask chatgpt
chatgpt: ctrl + spaceで起動するようにする
ctrl + spaceのかな変換を切る方法
- システム設定 > キーボード > キーボードショートカット > 入力ソース > チェックボックス外す
LLM関連
Claude Code
brew install --cask claude-code
Codex
brew install --cask codex
その他brewで入れるApp
# google日本語入力
brew install --cask google-japanese-ime
# VSCode
brew install --cask visual-studio-code
開発環境・プログラミング言語の設定
Python
uvを入れる
curl -LsSf https://astral.sh/uv/install.sh | sh
source "$HOME/.local/bin/env"をする必要あり?
brewで入れても良い
brew install uv
副業用python
uvでinstallすればOK
uv python install 3.13
これで
pytho3.14 --version
としてglobalなpythonが使える
mise
global pythonを使うだけならuvで入れたので十分だが、pipも使う必要がある古い作業環境の場合はmiseでpythonを用意
uvに合わせた作業環境にしてほしい気持ちがあるが。。
pyenvが重すぎたので諦めてmiseを採用している
Node.js も voltaを使っていたが、こちらもmiseを使えば良さそう
brew install mise
~/.zshrc登録 以下を追加
# mise
eval "$(mise activate zsh)"
python登録
# 一覧
mise ls-remote python
# install
mise install python <version>
# 今installされているもの
mise ls python
# globalで使う
mise use --global python@<version>
## 例
# mise use --global python@3.13
Github
Gitレポジトリのclone設定
新しい SSH キーを生成して ssh-agent に追加する
GitHub アカウントへの新しい SSH キーの追加
をやってsshの設定
ssh -T git@github.com
# Attempts to ssh to GitHub
管理場所の設定
これをやる
brew install ghq
brew install peco
githubをcloneするpathを設定
mkdir -p ~/src/repository
git config --global ghq.root '~/src/repository'
~.zshrc に追加(ちなみにshellの確認は echo $SHELL )
function peco-src () {
local selected_dir=$(ghq list -p | peco --query "$LBUFFER")
if [ -n "$selected_dir" ]; then
BUFFER="cd ${selected_dir}"
zle accept-line
fi
zle clear-screen
}
zle -N peco-src
bindkey '^]' peco-src
これで ^] でcloneしたディレクトリに移動できるようになった
cloneするときは
ghq get git@github.com:<ID>/<Repository Name>.git
便利コマンド(brew)
wget
brew install wget
jq
brew install jq
fdfind
findのRust強化
brew install fd
ripgrep
grepのRust強化
brew install ripgrep
fzf
brew install fzf
tree
brew install tree
eza(exaは非推奨) lsのRust強化
brew install eza
coreutils
brew install coreutils
bat catのRust強化
brew install bat
gh
brew install gh
zoxide
いわゆるRustのzコマンド: https://zenn.dev/h_ymt/articles/e4a07ca71fd1cb
brew install zoxide
lagygit
brew install lazygit
全部
brew install wget jq fd ripgrep fzf tree eza coreutils bat gh zoxide lazygit
vim設定
neovimを使う
設定は Lazyvim をそのまま使う
- install: https://www.lazyvim.org/installation
brew install neovim
# 既存のものをどかす(あれば)
mv ~/.config/nvim{,.bak}
# lazyvim
git clone https://github.com/LazyVim/starter ~/.config/nvim
rm -rf ~/.config/nvim/.git
Lazyvimに必要なもろもろ
nodeが入ってないと怒られる
また、fdfind, ripgrepが必要なので上記で入れる
ghコマンドの設定
# Enterpriseだと --hostname <domain> をつける
gh auth login
# 確認
gh auth status
~/.zshrcにghコマンドで編集するエディタをnvimに指定する設定を追加
また、terminalからレポジトリを開くコマンドを追加
export EDITOR=nvim
export GIT_EDITOR=nvim
alias ghopen='gh repo view --web'
.zshrc関連
alias
#alias ls='ls -G'
## eza前提のエイリアス
alias ls='eza --icons --group-directories-first --git'
alias ll='eza -l --icons --group-directories-first --git'
alias la='eza -la --icons --group-directories-first --git'
alias lt='eza -T --icons --git-ignore --level=2'
alias k=kubectl
alias vim='nvim'
便利スクリプト
function peco-src () {
local selected_dir=$(ghq list -p | peco --query "$LBUFFER")
if [ -n "$selected_dir" ]; then
BUFFER="cd ${selected_dir}"
zle accept-line
fi
zle clear-screen
}
zle -N peco-src
bindkey '^]' peco-src
function mt() {
local dir_name=$(date +%Y%m%d)
mkdir -p "$dir_name" && cd "$dir_name"
}
zshプラグイン
熟慮の末homebrewで管理することにした
zsh-users/zsh-autosuggestions
install
brew install zsh-autosuggestions
## .zshrcに以下を追加
source $(brew --prefix)/share/zsh-autosuggestions/zsh-autosuggestions.zsh
zsh-users/zsh-syntax-highlighting
install
brew install zsh-syntax-highlighting
echo "source $(brew --prefix)/share/zsh-syntax-highlighting/zsh-syntax-highlighting.zsh" >> ${ZDOTDIR:-$HOME}/.zshrc
brew install zsh-completions
~/.zshrcに追加
if type brew &>/dev/null; then
FPATH=$(brew --prefix)/share/zsh-completions:$FPATH
autoload -Uz compinit
compinit
fi
autoload -Uz compinitとcompinitは他でやっていれば最後のだけでいい
以下は必要であれば
mkdir -p ~/.zsh/conrtib/
git clone https://github.com/Aloxaf/fzf-tab ~/.zsh/contrib/fzf-tab
# ~/.zshrcに追加
autoload -U compinit; compinit
source ~/.zsh/contrib/fzf-tab/fzf-tab.plugin.zsh
brew install forgit
# ~/.zshrcに追加
[ -f $HOMEBREW_PREFIX/share/forgit/forgit.plugin.zsh ] && source $HOMEBREW_PREFIX/share/forgit/forgit.plugin.zsh
使い方例
ga # fzfであいまい検索しながらインタラクティブにgit addするファイルを選べる。
gi # fzfであいまい検索しながら.gitignoreに加えるファイルを選べる。
最終的な.zshrcのプラグイン設定
## zshプラグイン
source $(brew --prefix)/share/zsh-autosuggestions/zsh-autosuggestions.zsh
source $(brew --prefix)/share/zsh-syntax-highlighting/zsh-syntax-highlighting.zsh
if type brew &>/dev/null; then
FPATH=$(brew --prefix)/share/zsh-completions:$FPATH
fi
### forgit設定
[ -f $HOMEBREW_PREFIX/share/forgit/forgit.plugin.zsh ] && source $HOMEBREW_PREFIX/share/forgit/forgit.plugin.zsh
### fzf-tab設定
source ~/.zsh/contrib/fzf-tab/fzf-tab.plugin.zsh
### まとめる
autoload -Uz compinit; compinit
dotfile
~/.zshrc
# ╭────────────────────────────────────────────────────────────╮
# │ Aliases │
# ╰────────────────────────────────────────────────────────────╯
# eza があれば ls を置き換え、無ければ従来の ls にフォールバック
if command -v eza >/dev/null 2>&1; then
alias ls='eza --icons --group-directories-first --git'
alias ll='eza -l --icons --group-directories-first --git'
alias la='eza -la --icons --group-directories-first --git'
alias lt='eza -T --icons --git-ignore --level=2'
else
# macOS標準ls: 色つき + ディレクトリ先頭
alias ls='ls -G'
alias ll='ls -lG'
alias la='ls -laG'
fi
alias k='kubectl'
alias vim='nvim'
# ╭────────────────────────────────────────────────────────────╮
# │ Languages / Toolchains │
# ╰────────────────────────────────────────────────────────────╯
# pyenv
export PYENV_ROOT="$HOME/.pyenv"
if command -v pyenv >/dev/null 2>&1; then
[ -d "$PYENV_ROOT/bin" ] && export PATH="$PYENV_ROOT/bin:$PATH"
eval "$(pyenv init - zsh)"
fi
# ╭────────────────────────────────────────────────────────────╮
# │ Prompt / Shell Look & Feel │
# ╰────────────────────────────────────────────────────────────╯
# starship (存在チェックしてから初期化)
if command -v starship >/dev/null 2>&1; then
eval "$(starship init zsh)"
fi
# ╭────────────────────────────────────────────────────────────╮
# │ Zsh Plugins & Completion │
# ╰────────────────────────────────────────────────────────────╯
# Homebrew の prefix を一度だけ取得
if command -v brew >/dev/null 2>&1; then
export HOMEBREW_PREFIX="$(brew --prefix)"
fi
# autosuggestions / syntax-highlighting
[ -n "${HOMEBREW_PREFIX}" ] && \
[ -f "${HOMEBREW_PREFIX}/share/zsh-autosuggestions/zsh-autosuggestions.zsh" ] && \
source "${HOMEBREW_PREFIX}/share/zsh-autosuggestions/zsh-autosuggestions.zsh"
[ -n "${HOMEBREW_PREFIX}" ] && \
[ -f "${HOMEBREW_PREFIX}/share/zsh-syntax-highlighting/zsh-syntax-highlighting.zsh" ] && \
source "${HOMEBREW_PREFIX}/share/zsh-syntax-highlighting/zsh-syntax-highlighting.zsh"
# completions(FPATH 追加は compinit 前に)
if [ -n "${HOMEBREW_PREFIX}" ] && [ -d "${HOMEBREW_PREFIX}/share/zsh-completions" ]; then
FPATH="${HOMEBREW_PREFIX}/share/zsh-completions:${FPATH}"
fi
# forgit
if [ -n "${HOMEBREW_PREFIX}" ] && [ -f "${HOMEBREW_PREFIX}/share/forgit/forgit.plugin.zsh" ]; then
source "${HOMEBREW_PREFIX}/share/forgit/forgit.plugin.zsh"
fi
# fzf-tab
[ -f "${HOME}/.zsh/contrib/fzf-tab/fzf-tab.plugin.zsh" ] && \
source "${HOME}/.zsh/contrib/fzf-tab/fzf-tab.plugin.zsh"
# completion 初期化(キャッシュを使って速く)
autoload -Uz compinit
compinit -C -d "${HOME}/.zcompdump-${ZSH_VERSION}"
# ╭────────────────────────────────────────────────────────────╮
# │ Handy Functions │
# ╰────────────────────────────────────────────────────────────╯
# ghq × peco でプロジェクトにジャンプ
function peco-src () {
local selected_dir
selected_dir="$(ghq list -p 2>/dev/null | peco --query "$LBUFFER")"
if [ -n "$selected_dir" ]; then
BUFFER="cd ${selected_dir}"
zle accept-line
fi
zle clear-screen
}
zle -N peco-src
bindkey '^]' peco-src
# 今日の日付名のディレクトリを作って移動
function mt() {
local dir_name
dir_name="$(date +%Y%m%d)"
mkdir -p "$dir_name" && cd "$dir_name"
}
GitLab開発
brew install git-crypt glab
Discussion