Next.js+Firebase Authenticationでさくっとログイン機能を導入する
はじめに
前回の記事で作成したリアルタイムチャットにユーザー認証機能を導入してみます。
OGPの設定についてはこちら
つくったもの
初期設定
Firebase Authenticationの初期設定
Firebaseコンソール上からプロジェクトのページにアクセスし、サイドバーの構築>Authenticationからで行います。
プロジェクトの初期設定
前回記事の状態から行います。
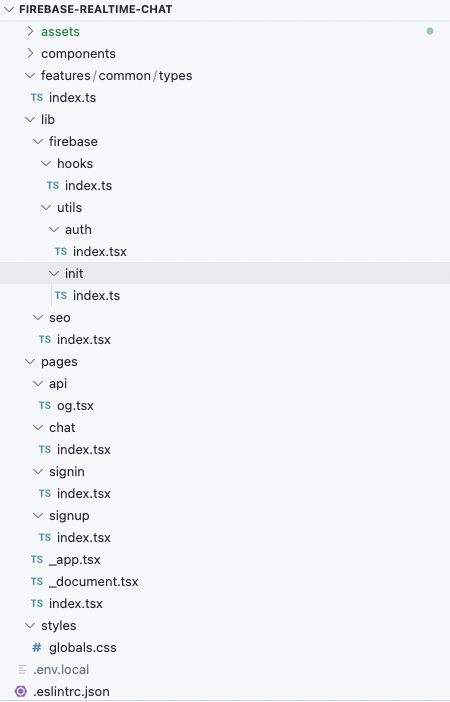
また、プロジェクトの最終的なディレクトリ構成は下記のようになっています。
import { getApps, getApp, FirebaseOptions, FirebaseApp, initializeApp } from 'firebase/app'

/**
 * @see {@link https://firebase.google.com/docs/web/learn-more#config-object}<br>
 */
export const firebaseConfig: FirebaseOptions = {
  apiKey: process.env.NEXT_PUBLIC_FIREBASE_API_KEY,
  authDomain: process.env.NEXT_PUBLIC_FIREBASE_AUTH_DOMAIN,
  projectId: process.env.NEXT_PUBLIC_FIREBASE_PROJECT_ID,
  storageBucket: process.env.NEXT_PUBLIC_FIREBASE_STORAGE_BUCKET,
  messagingSenderId: process.env.NEXT_PUBLIC_FIREBASE_MESSAGE_SENDER_ID,
  appId: process.env.NEXT_PUBLIC_FIREBASE_APP_ID,
  measurementId: process.env.NEXT_PUBLIC_AMESUREMENT_ID,
  databaseURL: 'https://realtime-chat-39dfb-default-rtdb.firebaseio.com/',
}

const app = initializeApp(firebaseConfig)

export const getFirebaseApp = (): FirebaseApp => {
  return !getApps().length ? app : getApp()
}
/**
 * @see {@link https://firebase.google.com/docs/reference/js/v8/firebase.User#properties_1}<br>
 */
export type User = {
  displayName: string | null
  phoneNumber: string | null
  photoURL: string | null
  providerId: string
  uid: string
}
/**
 * @see {@link https://firebase.google.com/docs/reference/js/v8/firebase.auth.Auth#currentuser}<br>
 */
export type AuthContextState = {
  currentUser: User | null | undefined
}
export type ReactNodeProps = {
  children?: React.ReactNode
}
ドキュメントを参考に初期設定を行います。
import { getAuth, getRedirectResult } from '@firebase/auth'
import { createContext, useEffect, useState, useContext } from 'react'
import { AuthContextState, User, ReactNodeProps } from '@/features/common/types'
import { getFirebaseApp } from '@/lib/firebase/utils/init'

const FirebaseAuthContext = createContext<AuthContextState>({
  currentUser: undefined,
})

// 認証プロバイダ
const FirebaseAuthProvider = ({ children }: ReactNodeProps) => {
  const [currentUser, setCurrentUser] = useState<User | null | undefined>(undefined)

  const firebaseApp = getFirebaseApp()
  const auth = getAuth(firebaseApp)

  // authはnullの可能性があるので、useEffectの第二引数にauthを指定しておく
  useEffect(() => {
      /**
     * authオブジェクトのログイン情報の初期化はonAuthStateChanged 発火時に行われる
     * onAuthStateChangedが発火する前(authオブジェクトの初期化が完了する前)にcurrentUserを参照してしまうと、ログインしていてもnullになってしまう
     * @see {@link https://firebase.google.com/docs/auth/web/manage-users}<br>
     * そのため、userデータの参照はonAuthStateChanged内で行う
     */
    const unsubscribed = auth.onAuthStateChanged((user) => {
      if (user) {
        setCurrentUser(user)
      }
      getRedirectResult(getAuth(firebaseApp))
    })
    return () => {
      // onAuthStateChangedはfirebase.Unsubscribeを返すので、ComponentがUnmountされるタイミングでUnsubscribe(登録解除)しておく
      unsubscribed()
    }
  }, [auth])
  return (
    <FirebaseAuthContext.Provider value={{ currentUser: currentUser }}>
      {children}
    </FirebaseAuthContext.Provider>
  )
}

export { FirebaseAuthContext, FirebaseAuthProvider }

export const userFirebaseAuthContext = () => useContext(FirebaseAuthContext)
...
const FirebaseAuthProvider = ({ children }: ReactNodeProps) => {
...
で認証プロバイダを作成します。
import { getAuth } from "@firebase/auth";
import { getFirebaseApp } from '@/lib/firebase/utils/init'
...
  const firebaseApp = getFirebaseApp()
  const auth = getAuth(firebaseApp)
...
では、 getFirebaseApp()からインスタンスを取得し、getAuthメソッドの引数に渡し、authオブジェクトを作成しています。
...
  useEffect(() => {
    /**
     * authオブジェクトのログイン情報の初期化はonAuthStateChanged 発火時に行われる
     * onAuthStateChangedが発火する前(authオブジェクトの初期化が完了する前)にcurrentUserを参照してしまうと、ログインしていてもnullになってしまう
     * @see {@link https://firebase.google.com/docs/auth/web/manage-users}<br>
     * そのため、userデータの参照はonAuthStateChanged内で行う
     */
    const unsubscribed = auth.onAuthStateChanged((user) => {
      if (user) {
        setCurrentUser(user)
      }
      getRedirectResult(getAuth(firebaseApp))
    })
    return () => {
      // onAuthStateChangedはfirebase.Unsubscribeを返すので、ComponentがUnmountされるタイミングでUnsubscribe(登録解除)しておく
      unsubscribed()
    }
  }, [auth])
...
ここでは、userの参照をonAuthStateChanged内で行うようにしています。
authオブジェクトのログイン情報の初期化はonAuthStateChangedメソッド発火時に行われるため、onAuthStateChangedが発火する前(authオブジェクトの初期化が完了する前)にcurrentUserを参照しようとすると、ログインしていてもnullになってしまうことがあるためです。
下記の記事が詳しいです。
    <FirebaseAuthContext.Provider value={{ currentUser: currentUser }}>
      {children}
    </FirebaseAuthContext.Provider>

 export { FirebaseAuthContext, FirebaseAuthProvider }

+ export const userFirebaseAuthContext = () => useContext(FirebaseAuthContext)
ここでは、作成した認証プロバイダをreturnし、名前付きでexportしています。
トップ階層を認証プロバイダでラップして完了です。
import '../styles/globals.css'
import type { AppProps } from 'next/app'
+ import { FirebaseAuthProvider } from '@/lib/firebase/utils/auth'
import Header from '@/components/common/header'


const App = ({ Component, pageProps }: AppProps) => {

  return (
+    <FirebaseAuthProvider>
      <Header title={'あざらしちゃっと'} />
      <Component {...pageProps} />
+    </FirebaseAuthProvider>
  )
}
export default App
サインアップの実装
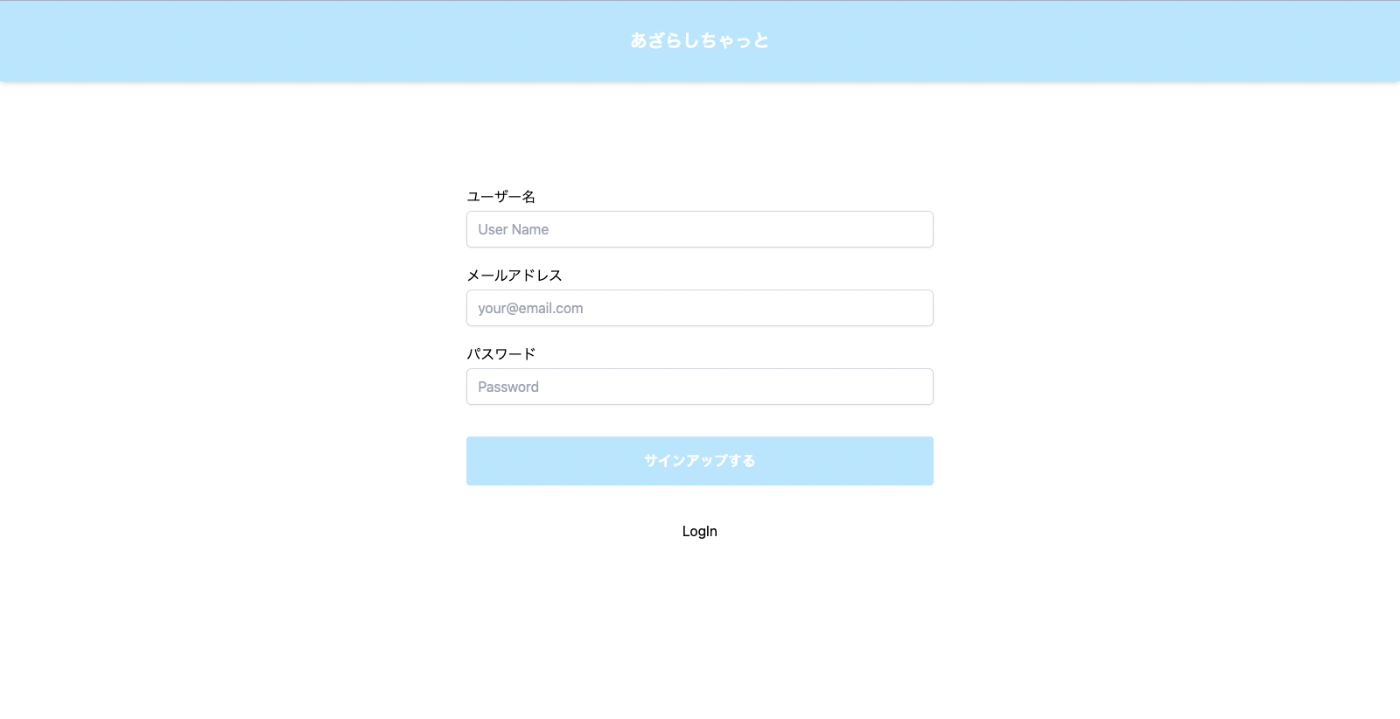
サインアップは以下のように実装します。
...
export type LoginForm = {
  username: string
  email: string
  password: string
}
import {
  createUserWithEmailAndPassword,
  getAuth,
  sendEmailVerification,
  updateProfile,
} from 'firebase/auth'
import { NextPage } from 'next'
import { FC } from 'react'
import { FirebaseError } from 'firebase/app'
import router from 'next/router'
import { useForm } from 'react-hook-form'
import { LoginForm } from '@/features/common/types'

export const SignUp: FC<NextPage> = () => {
  const isValid = async (data: LoginForm) => {
    try {
      const auth = getAuth()
      const userCredential = await createUserWithEmailAndPassword(auth, data.email, data.password)
      updateProfile(userCredential.user, {
        displayName: data.username,
      })
      await sendEmailVerification(userCredential.user)
      router.push('/')
    } catch (e) {
      if (e instanceof FirebaseError) {
        console.log(e)
      }
    }
  }

  const {
    register,
    handleSubmit,
    formState: { errors },
  } = useForm<LoginForm>()
  return (
    <>
      <div className='flex'>
        <div className='mx-auto flex w-full flex-col items-center md:w-3/5 lg:w-2/3'>
          <h1 className='my-10 text-2xl font-bold text-white'> Login </h1>
          <form className='mt-2 flex w-8/12 flex-col lg:w-1/2' onSubmit={handleSubmit(isValid)}>
            <div className='mb-4'>
              <label className='mb-1 block'>ユーザー名</label>
              <input
                className='mt-1 block w-full rounded-md border border-gray-300 py-2 px-3 shadow-sm focus:border-sky-300 focus:outline-none focus:ring focus:ring-sky-200  disabled:bg-gray-100'
                {...register('username', { required: 'ユーザー名を入力してください' })}
                placeholder='User Name'
                type='text'
              />
              <div className='mt-1 text-sm text-red-300'>{errors.username?.message}</div>
            </div>
            <div className='mb-4'>
              <label className='mb-1 block'>メールアドレス</label>
              <input
                className='mt-1 block w-full rounded-md border border-gray-300 py-2 px-3 shadow-sm focus:border-sky-300 focus:outline-none focus:ring focus:ring-sky-200  disabled:bg-gray-100'
                {...register('email', { required: 'メールアドレスを入力してください' })}
                placeholder='your@email.com'
                type={'email'}
              />
              <div className='mt-1 text-sm text-red-300'>{errors.email?.message}</div>
            </div>
            <div className='mb-4'>
              <label className='mb-1 block'>パスワード</label>
              <input
                className='mt-1 block w-full rounded-md border border-gray-300 py-2 px-3 shadow-sm focus:border-sky-300 focus:outline-none focus:ring focus:ring-sky-200  disabled:bg-gray-100'
                {...register('password', {
                  required: 'パスワードを入力してください',
                  minLength: { value: 6, message: '6文字以上入力してください' },
                })}
                placeholder='Password'
                type={'password'}
              />
              <div className='mt-1 text-sm text-red-300'>{errors.password?.message}</div>
            </div>
            <div className='mb-6'>
              <button
                className='mt-4 w-full rounded bg-sky-200 py-4 text-center font-sans text-xl font-bold leading-tight text-white md:px-12 md:py-4 md:text-base'
                type='submit'
              >
                サインアップする
              </button>
            </div>
          </form>
          <button className='mt-4 w-full text-center' onClick={() => router.push('/signin')}>
            LogIn
          </button>
        </div>
      </div>
    </>
  )
}
export default SignUp
ユーザーの新規作成はcreateUserWithEmailAndPasswordメソッドで行います。
createUserWithEmailAndPasswordメソッドの引数には認証状態とemail,passwordしか渡せないため、ユーザー名の登録はupdateProfileメソッドで行います。
ここでは、currentUserのdisplayName にユーザー名を紐づけています。
サインイン完了後は、router.push('/')で認証後のページへ画面遷移を行います。
フォーム入力のオブザーブやバリデーションはreact-hook-formというライブラリを利用しています。
使い方の例などは上記のドキュメントに記載があります。
例えば、バリデーションのエラー表示を行うには、useForm Hookから返されるformStateを利用します。
以下のように記述すると、password.errosオブジェクトにtype,message,refの情報が保存されます。
入力欄の状態に応じて、{errors.password?.message}でエラーメッセージを表示することができます。
const {
    register,
    handleSubmit,
    formState: { errors },
  } = useForm<LoginForm>()
  return (
    <form className='mt-2 flex w-8/12 flex-col lg:w-1/2' onSubmit={handleSubmit(isValid)}>
      <input
        className='mt-1 block w-full rounded-md border border-gray-300 py-2 px-3 shadow-sm focus:border-sky-300 focus:outline-none focus:ring focus:ring-sky-200  disabled:bg-gray-100'
        {...register('password', {
          required: 'パスワードを入力してください',
          minLength: { value: 6, message: '6文字以上入力してください' },
        })}
        placeholder='Password'
        type={'password'}
      />
      <div className='mt-1 text-sm text-red-300'>{errors.password?.message}</div>
    </form>
  )
サインインの実装
以下でサインインのフックを作成します。
import { getAuth, onAuthStateChanged, signOut } from 'firebase/auth'
import router from 'next/router'

export const signIn = () => {
  const auth = getAuth()
  const unsubscribed = auth.onAuthStateChanged(async (user) => {
    if (user === null) {
      await router.push('/signin')
    }
    unsubscribed()
  })
}
auth.onAuthStateChanged で現在サインインしているユーザーを取得します。
サインイン中の状態でないとき、
await router.push('/signin')
でサインインページに飛ばすようにしています。
トップ階層のuseEffectでsignInフックを呼び出して、サインイン済みかどうかで画面遷移を行います。
import '@/styles/globals.css'
import type { AppProps } from 'next/app'
import { useEffect } from 'react'
import { getAuth } from '@firebase/auth'
import { FirebaseAuthProvider } from '@/lib/firebase/utils/auth'
import Header from '@/components/common/header'
import { signIn } from '@/lib/firebase/hooks'


const App = ({ Component, pageProps }: AppProps) => {
  const auth = getAuth()
+  useEffect(() => {
+    signIn()
+  }, [auth])
  return (
    <FirebaseAuthProvider>
      <Header title={'あざらしちゃっと'} />
      <Component {...pageProps} />
    </FirebaseAuthProvider>
  )
}
export default App
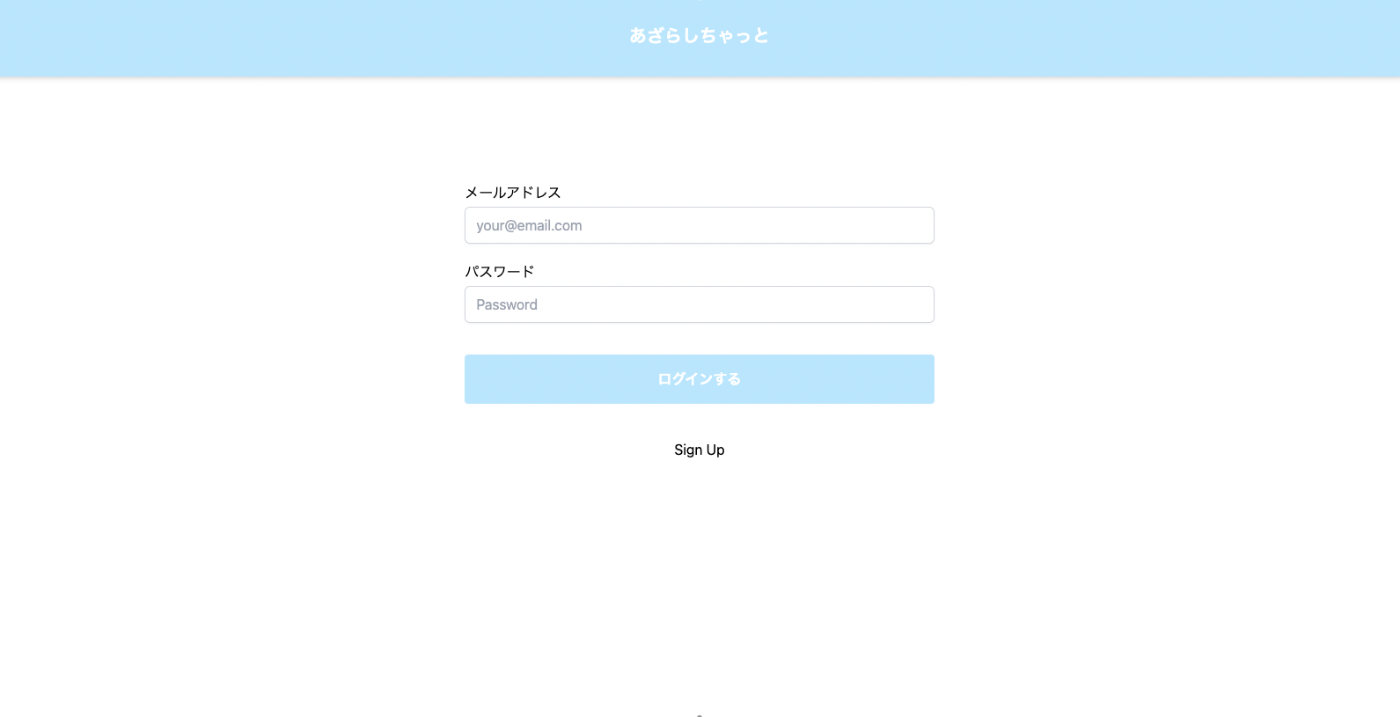
サインインページの実装はサインアウトとほぼ同じです。
import { getAuth, signInWithEmailAndPassword } from 'firebase/auth'
import { NextPage } from 'next'
import { FC, useState } from 'react'
import { FirebaseError } from 'firebase/app'
import router from 'next/router'
import { useForm } from 'react-hook-form'
import { LoginForm } from '@/features/common/types'

export const SignIn: FC<NextPage> = () => {
  const isValid = async (data: LoginForm) => {
    try {
      const auth = getAuth()
      await signInWithEmailAndPassword(auth, data.email, data.password)
      router.push('/')
    } catch (e) {
      if (e instanceof FirebaseError) {
        console.log(e)
      }
    }
  }

  const {
    register,
    handleSubmit,
    formState: { errors },
  } = useForm<LoginForm>()
  return (
    <>
      <div className='flex'>
        <div className='mx-auto flex w-full flex-col items-center md:w-3/5 lg:w-2/3'>
          <h1 className='my-10 text-2xl font-bold text-white'> Login </h1>
          <form className='mt-2 flex w-8/12 flex-col lg:w-1/2' onSubmit={handleSubmit(isValid)}>
            <div className='mb-4'>
              <label className='mb-1 block'>メールアドレス</label>
              <input
                className='mt-1 block w-full rounded-md border border-gray-300 py-2 px-3 shadow-sm focus:border-sky-300 focus:outline-none focus:ring focus:ring-sky-200  disabled:bg-gray-100'
                {...register('email', { required: 'メールアドレスを入力してください' })}
                placeholder='your@email.com'
                type={'email'}
              />
              <div className='mt-1 text-sm text-red-300'>{errors.email?.message}</div>
            </div>
            <div className='mb-4'>
              <label className='mb-1 block'>パスワード</label>
              <input
                className='mt-1 block w-full rounded-md border border-gray-300 py-2 px-3 shadow-sm focus:border-sky-300 focus:outline-none focus:ring focus:ring-sky-200  disabled:bg-gray-100'
                {...register('password', {
                  required: 'パスワードを入力してください',
                  minLength: { value: 6, message: '6文字以上入力してください' },
                })}
                placeholder='Password'
                type={'password'}
              />
              <div className='mt-1 text-sm text-red-300'>{errors.password?.message}</div>
            </div>
            <div className='mb-6'>
              <button
                className='mt-4  w-full rounded bg-sky-200 py-4 text-center font-sans text-xl font-bold leading-tight text-white md:px-12 md:py-4 md:text-base'
                type='submit'
              >
                ログインする
              </button>
            </div>
          </form>
          <button className='mt-4 w-full text-center' onClick={() => router.push('/signup')}>
            Sign Up
          </button>
        </div>
      </div>
    </>
  )
}
export default SignIn
サインアウトの実装
サインアウトはsignOut メソッドを呼び出して行います。
export const logOut = async () => {
  const auth = getAuth()
  await signOut(auth)
    .then(() => {
      router.push('/signin')
    })
    .catch((e) => {
      alert('ログアウトに失敗しました')
      console.log(e)
    })
}

エラーハンドリングをする
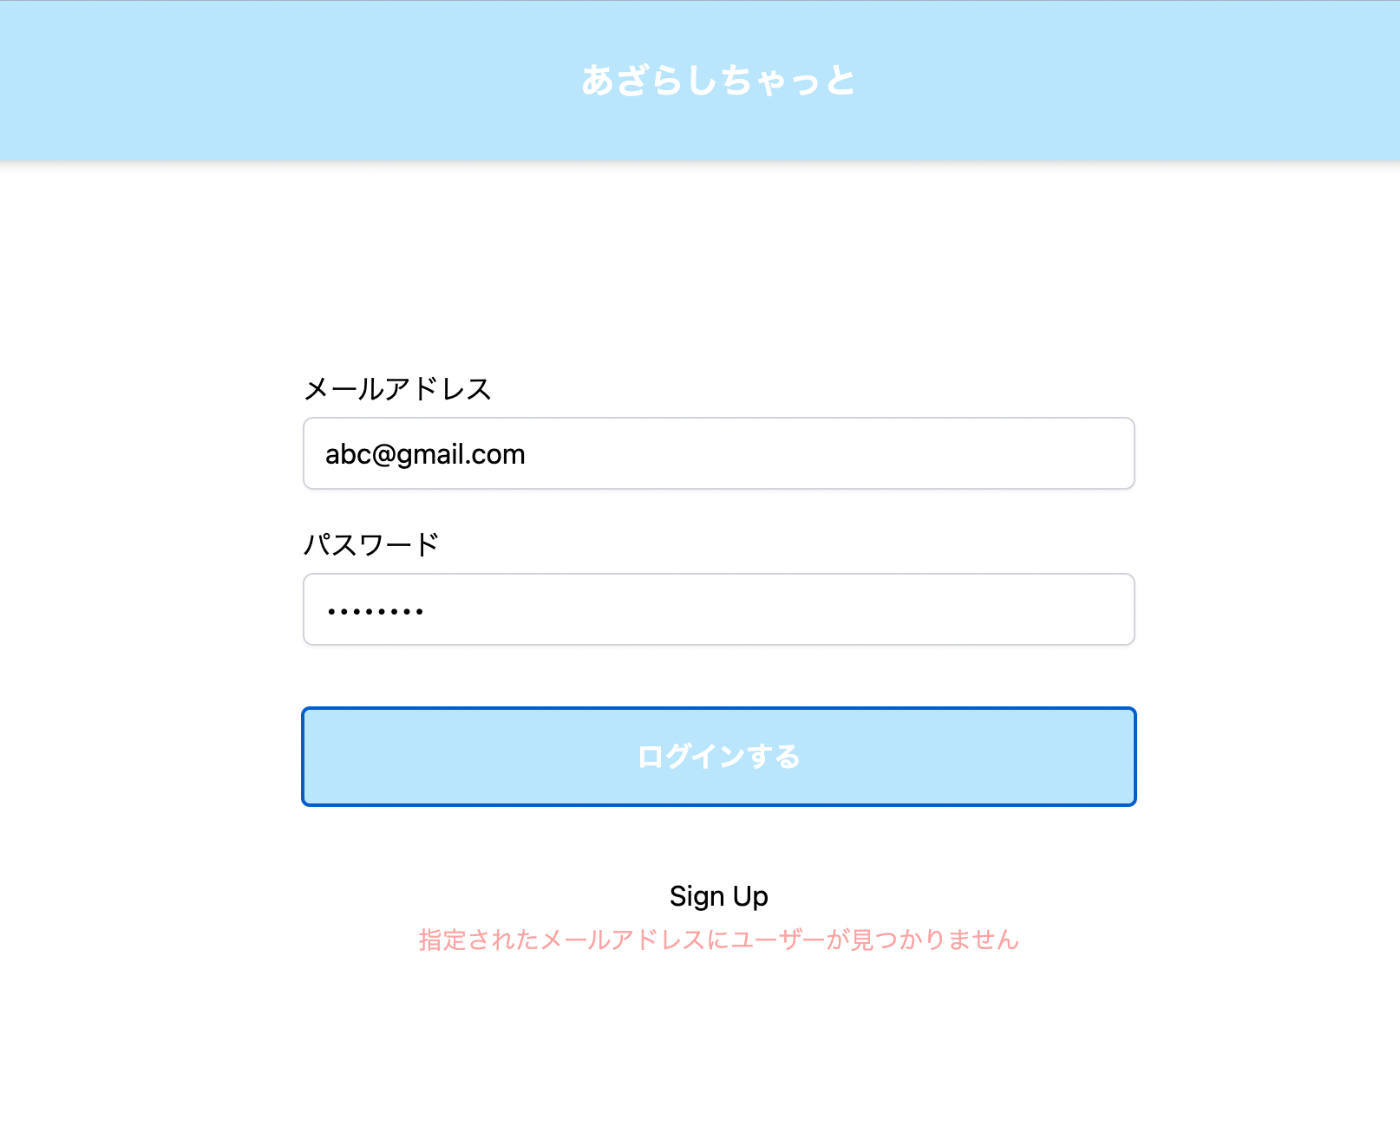
フォーム送信後のエラー内容を詳しく表示させてみましょう。
FirebaseAuthの各APIから返されるエラーは下記のリファレンスを参照します。
const isValid = async (data: LoginForm) => {
+  const [error, setError] = useState('')

  const isValid = async (data: LoginForm) => {
    try {
      const auth = getAuth()
      const userCredential = await createUserWithEmailAndPassword(auth, data.email, data.password)
      updateProfile(userCredential.user, {
        displayName: data.username,
      })
      await sendEmailVerification(userCredential.user)
      router.push('/')
    } catch (e) {
+      if (e instanceof FirebaseError) {
+        if (e.code === 'auth/invalid-email') {
+          setError('メールアドレスがまちがっています')
+        } else if (e.code === 'auth/user-disabled') {
+          setError('指定されたメールアドレスのユーザーは無効です')
+        } else if (e.code === 'auth/user-not-found') {
+          setError('指定されたメールアドレスにユーザーが見つかりません')
+        } else if (e.code === 'auth/wrong-password') {
+          setError('パスワードがまちがっています')
+        }
+      }
    }
...
<button className='mt-4 w-full text-center' onClick={() => router.push('/signin')}>
            LogIn
          </button>
+          <div className='mt-1 text-sm text-red-300'>{error ? <>{error}</> : <></>}</div>
        </div>
const isValid = async (data: LoginForm) => {
+  const [error, setError] = useState('')

  const isValid = async (data: LoginForm) => {
    try {
      const auth = getAuth()
      await signInWithEmailAndPassword(auth, data.email, data.password)
      router.push('/')
    } catch (e) {
+      if (e instanceof FirebaseError) {
+        if (e.code === 'auth/invalid-email') {
+          setError('メールアドレスがまちがっています')
+        } else if (e.code === 'auth/user-disabled') {
+          setError('指定されたメールアドレスのユーザーは無効です')
+        } else if (e.code === 'auth/user-not-found') {
+          setError('指定されたメールアドレスにユーザーが見つかりません')
+        } else if (e.code === 'auth/wrong-password') {
+          setError('パスワードがまちがっています')
+        }
+      }
    }
...
<button className='mt-4 w-full text-center' onClick={() => router.push('/signup')}>
            SignIn
          </button>
+          <div className='mt-1 text-sm text-red-300'>{error ? <>{error}</> : <></>}</div>
        </div>
チャット欄にユーザー名を表示する
最後に、サインインしたユーザーの名前をFirebase Realtime Databeに保存し、チャットで表示できるようにします。
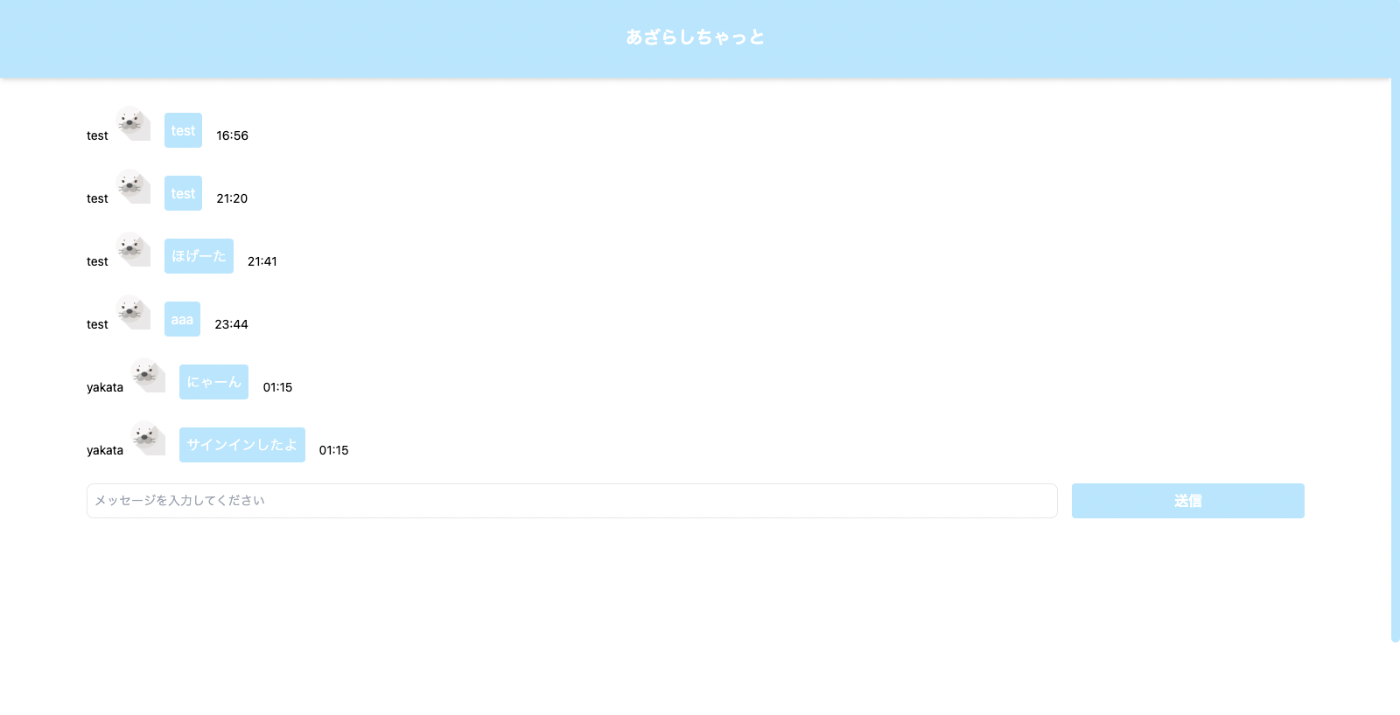
ソースコードは下記のようになります。
import { FormEvent, useEffect, useRef, useState } from 'react'
// Import Admin SDK
import { getDatabase, onChildAdded, push, ref } from '@firebase/database'
import { FirebaseError } from '@firebase/util'
import { NextPage } from 'next'
import { format } from 'date-fns'
import { ja } from 'date-fns/locale'
import Message from '@/components/chat/message'
import { userFirebaseAuthContext } from '@/lib/firebase/utils/auth'

const ChatPage: NextPage = () => {
  const auth = userFirebaseAuthContext()
+  const currentUserUid = auth.currentUser?.uid
+  const userName = auth.currentUser?.displayName
  const [message, setMessage] = useState<string>('')
  const [chatLogs, setChatLogs] = useState<
+    { userName: string; message: string; createdAt: string }[]
  >([])
  const scrollBottomRef = useRef<HTMLDivElement>(null)
  const createdAt = format(new Date(), 'HH:mm', {
    locale: ja,
  })
  const handleSendMessage = async (e: FormEvent<HTMLFormElement>) => {
    e.preventDefault()
    try {
      // databaseを参照して取得する
      const db = getDatabase()
      // 取得したdatabaseを紐付けるref(db, 'path')
-      const dbRef = ref(db, 'chat')
+      const dbRef = ref(db, 'signedChat')
      // pushはデータを書き込む際にユニークキーを自動で生成する
      // 今回はpush() で生成されたユニークキーを取得する
      // messageというキーに値(message)を保存する
      await push(dbRef, {
+        currentUserUid,
+        userName,
        message,
        createdAt,
      })
      // 書き込みが成功した際はformの値をリセットする
      setMessage('')
      scrollBottomRef?.current?.scrollIntoView!({
        behavior: 'smooth',
        block: 'end',
      })
    } catch (e) {
      if (e instanceof FirebaseError) {
        console.log(e)
      }
    }
  }

  useEffect(() => {
    try {
      // Get a database reference to our posts
      const db = getDatabase()
-      const dbRef = ref(db, 'chat')
+      const dbRef = ref(db, 'signedChat')
      // onChildAddedでデータの取得、監視を行う
      // onChildAddedはqueryとcallbackを引数に取り、Unsubscribeを返して、変更状態をsubscribeする関数
      // export declare function onChildAdded(query: Query, callback: (snapshot: DataSnapshot, previousChildName?: string | null) => unknown, cancelCallback?: (error: Error) => unknown): Unsubscribe;
      return onChildAdded(dbRef, (snapshot) => {
        // Firebaseデータベースからのデータはsnapshotで取得する
        // snapshot.val()はany型の値を返す
        const message = String(snapshot.val()['message'] ?? '')
        const createdAt = String(snapshot.val()['createdAt'] ?? '')
+        const userName = String(snapshot.val()['userName'] ?? '')
+        setChatLogs((prev) => [...prev, { userName, message, createdAt }])
      })
    } catch (e) {
      if (e instanceof FirebaseError) {
        console.error(e)
      }
      // unsubscribeする
      return
    }
  }, [])

  return (
    <div className='h-screen overflow-hidden'>
      <div className='container mx-auto bg-white dark:bg-slate-800'>
        <div className='relative m-2 h-screen items-center rounded-xl'>
          <div className='absolute inset-x-0 top-4 bottom-32 flex flex-col space-y-2 px-16'>
            <div className='overflow-y-auto'>
              {chatLogs.map((chat, index) => (
                <Message
                  createdAt={chat.createdAt}
                  key={`ChatMessage_${index}`}
                  message={chat.message}
+                  userName={chat.userName}
                />
              ))}
              <div ref={scrollBottomRef} />
            </div>
            <div>
              <form onSubmit={handleSendMessage}>
                <div className='grid grid-flow-row-dense grid-cols-5 gap-4'>
                  <input
                    className='col-span-3 block w-full overflow-hidden text-ellipsis rounded border py-2 px-4 pl-2 focus:ring-sky-500 sm:text-sm md:col-span-4 md:rounded-lg'
                    placeholder='メッセージを入力してください'
                    value={message}
                    onChange={(e) => setMessage(e.target.value)}
                  />
                  <button
                    className='col-span-2 rounded bg-sky-200 py-2 px-4 font-bold text-white hover:bg-sky-300 md:col-span-1'
                    type={'submit'}
                  >
                    送信
                  </button>
                </div>
              </form>
            </div>
          </div>
        </div>
      </div>
    </div>
  )
}
export default ChatPage
import Image from 'next/image'
import { FC } from 'react'
import LogoImage from '../../../assets/logo.jpg'
type MessageProps = {
  message: string
  createdAt: string
+  userName: string
}
const Message: FC<MessageProps> = ({ userName, message, createdAt }: MessageProps) => {
  return (
    <div className='grid auto-cols-max grid-flow-col'>
      <p className='my-4 pt-4 text-sm'>{userName}</p>
      <div>
        <Image alt='LogoImage' className='h-12 w-12' src={LogoImage} />
      </div>
+      <p className='m-4 rounded bg-sky-200 p-2 text-white'>{message}</p>
      <p className='my-4 pt-4 text-sm'>{createdAt}</p>
    </div>
  )
}

export default Message
今回実装したサンプルコードは下記のブランチにあります。
参考文献
Discussion