Menderで始める組み込みOTA 第6回 : Quickstart Part5 : OSアップデートを実行
MenderはオープンソースベースのLinux向けOTA(Over the Air Update)ソリューションです。
「Menderで始める組み込みOTA」記事インデックス
- 第0回 : 組み込み製品、IoTシステムに適したOTAとは?
- 第1回 : Menderのご紹介
- 第2回 : Quickstart Part1 : mender.ioの試用アカウントを取得
- 第3回 : Quickstart Part2 : Raspberry Pi 3/4を接続
- 第4回 : Quickstart Part3 : アプリケーションを更新(その1)
- 第5回 : Quickstart Part4 : アプリケーションを更新(その2)
- 第6回 : Quickstart Part5 : OSアップデートを実行 (本記事)
- 第7回 : Quickstart Part6 : コンテナアップデートを実行
- 第8回 : Quickstart Part7 : リモートターミナル機能のご紹介
- 第9回 : 接続編1 : QEMUエミュレータを接続
- 第10回 : 接続編2 : Armadillo IoT G3を接続
はじめに
今回はmender-artifactツールを利用して自分でOS(実際にはrootfs)のアップデート用のARTIFACTを作成し、これをSaaSの mender.io から接続中のRaspberry Pi 3/4 デバイスに対して配布します。これを実行するにはLinux PCまたはWindows10 WSL2などのLinux互換環境が必要です。 (以下では Windows10 WSL2 を利用しています)
基本的な流れは docs.mender.io にある「Deploy a system update」の内容と同じです。
前提として、これまでの回で実行した mender.io との接続 (第2回と第3回)、アプリケーションアップデート (第4回と第5回) が完了していることが必要です。
今回利用するターゲットのRaspberry Piはルートパーティションの2重化 (A/Bパーティションとも呼ぶ) が実装されており、アップデート失敗時のロールバックに対応します。
mender-artifact をダウンロード
以下ではLinux PCにてユーザーのホームディレクトリ以下に bin ディレクトリを作成し、ここに mender-artifact をセットアップします。
もしホームディレクトリにまだ bin ディレクトリが存在していない場合は、以下のように作成します。
codegear@Pavilion24:~$ ls ~/bin
ls: cannot access '/home/codegear/bin': No such file or directory
codegear@Pavilion24:~$ mkdir -p ${HOME}/bin
codegear@Pavilion24:~$ ls ~/bin ← ディレクトリは存在するが中に何もない状態
codegear@Pavilion24:~$ ls -ld ~/bin
drwxr-xr-x 2 codegear codegear 4096 Jun 13 12:23 /home/codegear/bin
codegear@Pavilion24:~$
実行パスに ${HOME}/bin を追加します。一時的に利用する場合にはシェルのプロンプトで以下を実行すると追加されますが、より一般的には .bashrc などの起動スクリプトの最後に以下のコマンドを追加します。(source コマンドを実行するか、いったんログアウトした後再度ログインすると反映されます)
export PATH="${PATH}:${HOME}/bin"
wget を利用して mender-artifact をダウンロードします。
wget https://downloads.mender.io/mender-artifact/3.7.1/linux/mender-artifact -O ${HOME}/bin/mender-artifact
実際にやってみると以下のような感じ
codegear@Pavilion24:~$ ls -l ~/bin
total 0
codegear@Pavilion24:~$ wget https://downloads.mender.io/mender-artifact/3.7.1/linux/mender-artifact -O ${HOME}/bin/mender-artifact
--2022-06-13 12:29:40--  https://downloads.mender.io/mender-artifact/3.7.1/linux/mender-artifact
Resolving downloads.mender.io (downloads.mender.io)... 13.225.173.118, 13.225.173.102, 13.225.173.21, ...
Connecting to downloads.mender.io (downloads.mender.io)|13.225.173.118|:443... connected.
HTTP request sent, awaiting response... 200 OK
Length: 20200936 (19M) [binary/octet-stream]
Saving to: ‘/home/codegear/bin/mender-artifact’

/home/codegear/bin/ 100%[===================>]  19.26M  39.5MB/s    in 0.5s

2022-06-13 12:29:42 (39.5 MB/s) - ‘/home/codegear/bin/mender-artifact’ saved [20200936/20200936]

codegear@Pavilion24:~$ ls -l ~/bin
total 19728
-rw-r--r-- 1 codegear codegear 20200936 Apr 21 22:04 mender-artifact
codegear@Pavilion24:~$
ダウンロードした mender-artifactに実行権限を付加します。
chmod +x ${HOME}/bin/mender-artifact
実際にやってみると以下のような感じ
codegear@Pavilion24:~$ chmod +x ${HOME}/bin/mender-artifact
codegear@Pavilion24:~$ ls -l ~/bin
total 19728
-rwxr-xr-x 1 codegear codegear 20200936 Apr 21 22:04 mender-artifact
codegear@Pavilion24:~$
hash -r を実行する (か、.bashrc を設定してある場合にはいったんログアウト後再度ログインするなどして)
以下のように mender-artifactが実行可能になりました。
codegear@Pavilion24:~$ hash -r
codegear@Pavilion24:~$ which mender-artifact
/home/codegear/bin/mender-artifact
codegear@Pavilion24:~$ mender-artifact
NAME:
   mender-artifact - interface for manipulating Mender artifacts

USAGE:
   mender-artifact [--version][--help] <command> [<args>]

VERSION:
   3.7.1

AUTHOR:
   Northern.tech AS <contact@northern.tech>

COMMANDS:
   help, h  Shows a list of commands or help for one command

   Artifact creation and validation:
     write     Writes artifact file.
     validate  Validates artifact file.

   Artifact inspection:
     read  Reads artifact file.
     dump  Dump contents from Artifacts

   Artifact modification:
     sign     Signs existing artifact file.
     modify   Modifies image or artifact file.
     cp       cp <src> <dst>
     cat      cat [artifact|sdimg|uefiimg]:<filepath>
     install  install -m <permissions> <hostfile> [artifact|sdimg|uefiimg]:<filepath> or install -d [artifact|sdimg|uefiimg]:<directory>
     rm       rm [artifact|sdimg|uefiimg]:<filepath>

GLOBAL OPTIONS:
   --help, -h     show help
   --version, -v  print the version
   NOTE:
       For the commands <write>, <modify>, the '--compression' flag functions as
       a global option
codegear@Pavilion24:~$
必要なシェル変数を設定
スナップショットを取得するRaspberry PiのIPアドレスとログインユーザーなどをシェル変数に設定します。
IPアドレスの取得は 第3回の 「Raspberry Piを起動し、PCからssh 接続する」 でやったように raspberrypi.local から判断するか、あるいは mender.io の Web UI画面の DEVICES で表示されるデバイスの詳細情報から取得可能です。
codegear@Pavilion24:~$ ping raspberrypi.local
PING raspberrypi.local (192.168.5.18) 56(84) bytes of data.
64 bytes from 192.168.5.18 (192.168.5.18): icmp_seq=1 ttl=63 time=105 ms
64 bytes from 192.168.5.18 (192.168.5.18): icmp_seq=2 ttl=63 time=2.40 ms
64 bytes from 192.168.5.18 (192.168.5.18): icmp_seq=3 ttl=63 time=2.70 ms
^C
--- raspberrypi.local ping statistics ---
3 packets transmitted, 3 received, 0% packet loss, time 2144ms
rtt min/avg/max/mdev = 2.398/36.631/104.802/48.203 ms
codegear@Pavilion24:~$
以下、mender.io の WebUI画面「DEVICES」から、ターゲットのデバイスをクリックす詳細情報を表示したところから...
Device inventry
「show XX more」 をクリックする。

↓ ipv4_eth0 のIPアドレス値をメモする。

IPアドレスとログインユーザー(Raspberry Pi の場合は pi)が判明したので、シェル変数を設定
IP_ADDRESS="192.168.5.18"
SSH_USER="pi"
ARTIFACTに設定するDevice_Type値を設定
DEVICE_TYPE="raspberrypi3" (または "raspberrypi4" など)
SSHポート番号を設定 (特に変更していなければ 22)
SSH_ARG="-p 22"
実際に実行すると以下のようになります。
codegear@Pavilion24:~$ IP_ADDRESS="192.168.5.18"
codegear@Pavilion24:~$ SSH_USER="pi"
codegear@Pavilion24:~$ DEVICE_TYPE="raspberrypi3"
codegear@Pavilion24:~$ SSH_ARG="-p 22"
codegear@Pavilion24:~$ echo $IP_ADDRESS, $SSH_USER, $DEVICE_TYPE, $SSH_ARG
192.168.5.18, pi, raspberrypi3, -p 22
codegear@Pavilion24:~$
マスターイメージを取得
mender-artifact を起動してネットワーク経由でraspberry piのマスターOSイメージを取得します。
これで作成される ARTIFACTのファイル名は system-v1.mender になります。
mender-artifact write rootfs-image \
    -f ssh://"${SSH_USER}@${IP_ADDRESS}" \
    -t "${DEVICE_TYPE}" \
    -n system-v1 \
    -o system-v1.mender \
    -S "${SSH_ARG}"
実際にやってみると以下のようになります。(デフォルトのパスワードは raspberry です。)
codegear@Pavilion24:~$ mender-artifact write rootfs-image \
 -f ssh:>     -f ssh://"${SSH_USER}@${IP_ADDRESS}" \
 "${D>     -t "${DEVICE_TYPE}" \
>     -n system-v1 \
>     -o system-v1.mender \
>     -S "${SSH_ARG}"
pi@192.168.5.18's password:
0%                              50%                              100%
|---------------------------------|---------------------------------|
......................................................................Writing Artifact...
Version                 ✓
Manifest                ✓
Manifest signature      ✓
Header                  ✓
Payload
.............................................................. - 100 %
codegear@Pavilion24:~$ ls -l system-v1.mender
-rw-r--r-- 1 codegear codegear 575837696 Jun 13 13:38 system-v1.mender
codegear@Pavilion24:~$
約1.5 GB 使用中のrootfsを元に 約575MB のARTIFACTファイルが作成されました。
ARTIFACT を mender.io に登録
作成した ARTIFACT ( ファイル名 : system-v1.mender ) を mender.io にアップロード登録します。
mender.io にログインし、RELEASES画面の下部にある UPLOAD ボタンを押します。すると以下のアップロードダイアログが表示されるので、赤のところをクリックするか、エクスプローラなどからドロップして先ほど作成した system-v1.mender を登録します。

以下の画面で UPLOAD ボタンを押すと、WebUIの下部に「Upload in progress (xx%)」の表示が現れます。

数分でARTIFACTが以下のように登録されました。

テスト用にRaspberry Pi側を更新
このARTIFACTを配布することで、Raspberry Pi を元の状態に戻せることをデモで示します。そのためにここでは(ssh接続後に)デバイス側のモジュールを追加して変更された状態を作り出します。具体的にはvimをインストールします。
sudo apt update && sudo apt install vim --assume-yes
実際にやってみると以下のようになります。
codegear@Pavilion24:~$ !ssh
ssh $IP_ADDRESS -l $SSH_USER
pi@192.168.5.18's password:
Linux raspberrypi 5.10.63-v7+ #1459 SMP Wed Oct 6 16:41:10 BST 2021 armv7l

The programs included with the Debian GNU/Linux system are free software;
the exact distribution terms for each program are described in the
individual files in /usr/share/doc/*/copyright.

Debian GNU/Linux comes with ABSOLUTELY NO WARRANTY, to the extent
permitted by applicable law.
Last login: Mon Jun 13 05:32:30 2022 from 192.168.5.20

SSH is enabled and the default password for the 'pi' user has not been changed.
This is a security risk - please login as the 'pi' user and type 'passwd' to set a new password.


Wi-Fi is currently blocked by rfkill.
Use raspi-config to set the country before use.

pi@raspberrypi:~ $ which vim
pi@raspberrypi:~ $ sudo apt update && sudo apt install vim --assume-yes
Get:1 http://archive.raspberrypi.org/debian bullseye InRelease [23.7 kB]
Get:2 http://raspbian.raspberrypi.org/raspbian bullseye InRelease [15.0 kB]
Hit:3 https://downloads.mender.io/repos/debian debian/bullseye/stable InRelease
Get:4 http://raspbian.raspberrypi.org/raspbian bullseye/main armhf Packages [13.2 MB]
Get:5 http://archive.raspberrypi.org/debian bullseye/main armhf Packages [279 kB]
Fetched 13.5 MB in 15s (885 kB/s)

(中略)

Setting up vim-tiny (2:8.2.2434-3+deb11u1) ...
Processing triggers for libc-bin (2.31-13+rpt2+rpi1) ...
Processing triggers for man-db (2.9.4-2) ...
pi@raspberrypi:~ $ which vim
/usr/bin/vim
pi@raspberrypi:~ $ vim ← vim が起動する。「:q (ENTER)」を入力して終了
pi@raspberrypi:~ $ exit
logout
Connection to 192.168.5.18 closed.
codegear@Pavilion24:~$
OSスナップショットのARTIFACTを配布
アップロードしたARTIFACTを配布するOTAジョブを作成・実行し、Raspberry Piの状態がスナップショット取得時の状態に戻ることを確認します。
DEPLOYMENT画面から CREATE A DEPLOYMENT ボタンを押して、新しいDEPLOYMENTジョブを作成します。Select a Release to deplot で新しく登録した system-v1 を選択します。
(あるいはRELEASES画面で system-v1 を選択すると表示される CREATE DEPLOYMENT WITH THIS RELEASE ボタンを押して開始することもできます)
以下の画面で Select a Release to deploy に system-v1 を選択し、あとはデフォルトでDEPLOYMENTジョブを作成します。

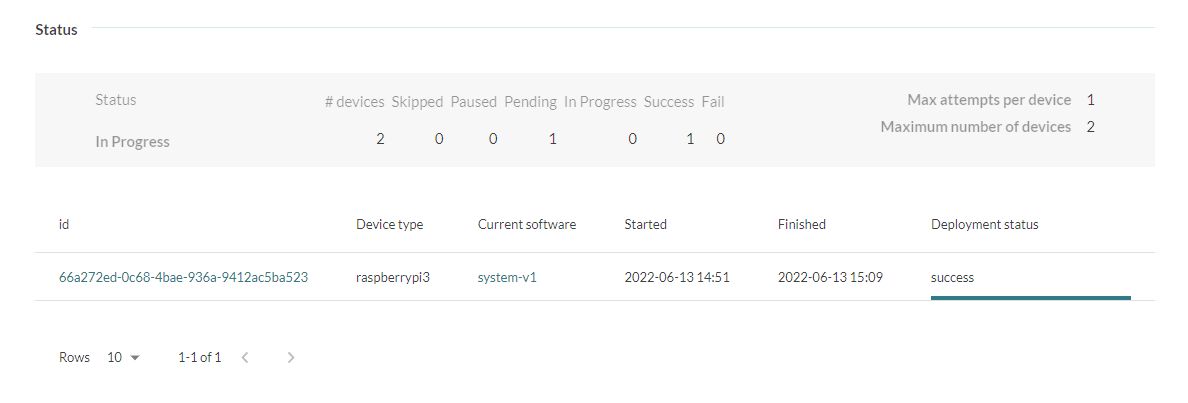
1台のデバイスに対してOTAジョブが開始されました。

View details ボタンを押すと、現在の状況が表示されます。

30分ほどで1台のデバイスに対してアップデートが完了しました。
元の状態に戻っていることを確認
ssh で raspberry pi に再度ログインし、vim が存在していないことを確認します。
codegear@Pavilion24:~$ ssh $IP_ADDRESS -l $SSH_USER
pi@192.168.5.18's password:
Linux raspberrypi 5.10.63-v7+ #1459 SMP Wed Oct 6 16:41:10 BST 2021 armv7l

The programs included with the Debian GNU/Linux system are free software;
the exact distribution terms for each program are described in the
individual files in /usr/share/doc/*/copyright.

Debian GNU/Linux comes with ABSOLUTELY NO WARRANTY, to the extent
permitted by applicable law.
Last login: Mon Jun 13 05:32:30 2022 from 192.168.5.20

SSH is enabled and the default password for the 'pi' user has not been changed.
This is a security risk - please login as the 'pi' user and type 'passwd' to set a new password.


Wi-Fi is currently blocked by rfkill.
Use raspi-config to set the country before use.

pi@raspberrypi:~ $ which vim ← vim は存在しない
pi@raspberrypi:~ $ vim
-bash: vim: command not found
pi@raspberrypi:~ $ df
Filesystem     1K-blocks    Used Available Use% Mounted on
/dev/root        3526592 1513984   1813748  46% /
devtmpfs          340904       0    340904   0% /dev
tmpfs             472488       0    472488   0% /dev/shm
tmpfs             188996     712    188284   1% /run
tmpfs               5120       4      5116   1% /run/lock
/dev/mmcblk0p1    258095   43506    214590  17% /uboot
/dev/mmcblk0p4   7944640     676   7597496   1% /data
tmpfs              94496       0     94496   0% /run/user/1000
pi@raspberrypi:~ $ sudo fdisk -l
Disk /dev/ram0: 4 MiB, 4194304 bytes, 8192 sectors
Units: sectors of 1 * 512 = 512 bytes
Sector size (logical/physical): 512 bytes / 4096 bytes
I/O size (minimum/optimal): 4096 bytes / 4096 bytes

(中略)

Disk /dev/mmcblk0: 15.06 GiB, 16172187648 bytes, 31586304 sectors
Units: sectors of 1 * 512 = 512 bytes
Sector size (logical/physical): 512 bytes / 512 bytes
I/O size (minimum/optimal): 512 bytes / 512 bytes
Disklabel type: dos
Disk identifier: 0xecc4c84c

Device         Boot    Start      End  Sectors  Size Id Type
/dev/mmcblk0p1 *       24576   548863   524288  256M  c W95 FAT32 (LBA)
/dev/mmcblk0p2        548864  7847935  7299072  3.5G 83 Linux
/dev/mmcblk0p3       7847936 15147007  7299072  3.5G 83 Linux
/dev/mmcblk0p4      15147008 31586303 16439296  7.8G 83 Linux
pi@raspberrypi:~ $ mount | grep mmcblk
/dev/mmcblk0p3 on / type ext4 (rw,relatime) ← 現在 rootfs に使用されているパーティションは mmcblk0p3
/dev/mmcblk0p1 on /uboot type vfat (rw,relatime,sync,fmask=0022,dmask=0022,codepage=437,iocharset=ascii,shortname=mixed,errors=remount-ro)
/dev/mmcblk0p4 on /data type ext4 (rw,relatime,x-systemd.growfs)
pi@raspberrypi:~ $ exit
logout
Connection to 192.168.5.18 closed.
codegear@Pavilion24:~$
確かに vim は存在していません。
この記事のまとめ
mender-artifact を利用して、既存のRaspberry PiからOSイメージを取得しARTIFACTを作成することができます。このARTIFACTを mender.io に登録しアップデートジョブを実行することで、OSイメージの更新ができました。
mender-artifact を利用してスナップショットをとる方法はOSイメージを取得する手軽な方法ですが、Debian/Ubuntuのようにファイルシステム上で動いているシステムでのみ利用可能で、initramfsのようにイメージファイルから起動するシステムでは利用できません。
一方、Yoctoやbuildrootのような組込み向けのシステムの場合には、起動可能かつ最初からmender-clientを組み込んだイメージを作ることが可能です。
これらについては以下を参照ください。
Yocto
Building a Mender Yocto Project image
buildroot
Raspberry Pi 3 Model B/B+ 32bit (mender HUB)
Raspberry Pi 4 Model B 32bit (mender HUB)
initramfsを利用するシステムの場合には、以下が参考になるかもしれません。
今後の予定
コードギアでは 「Menderで始める組み込みOTA」 のタイトルで以下のZenn記事を公開しました。
- 第0回 : 組み込み製品、IoTシステムに適したOTAとは?
- 第1回 : Menderのご紹介
- 第2回 : Quickstart Part1 : mender.ioの試用アカウントを取得
- 第3回 : Quickstart Part2 : Raspberry Pi 3/4を接続
- 第4回 : Quickstart Part3 : アプリケーションを更新(その1)
- 第5回 : Quickstart Part4 : アプリケーションを更新(その2)
- 第6回 : Quickstart Part5 : OSアップデートを実行 (本記事)
- 第7回 : Quickstart Part6 : コンテナアップデートを実行
- 第8回 : Quickstart Part7 : リモートターミナル機能のご紹介
- 第9回 : 接続編1 : QEMUエミュレータを接続
- 第10回 : 接続編2 : Armadillo IoT G3を接続
- 第11回 : 接続編3 : Jetson AGX Orinを接続
これ以降の記事も準備中です。ご期待ください。
Discussion