LangGraphのAgentをChainlitでWebアプリ化する(中間ステップ表示あり)
(マルチモーダル対応の記事を執筆しました: 2024/5/27追記)
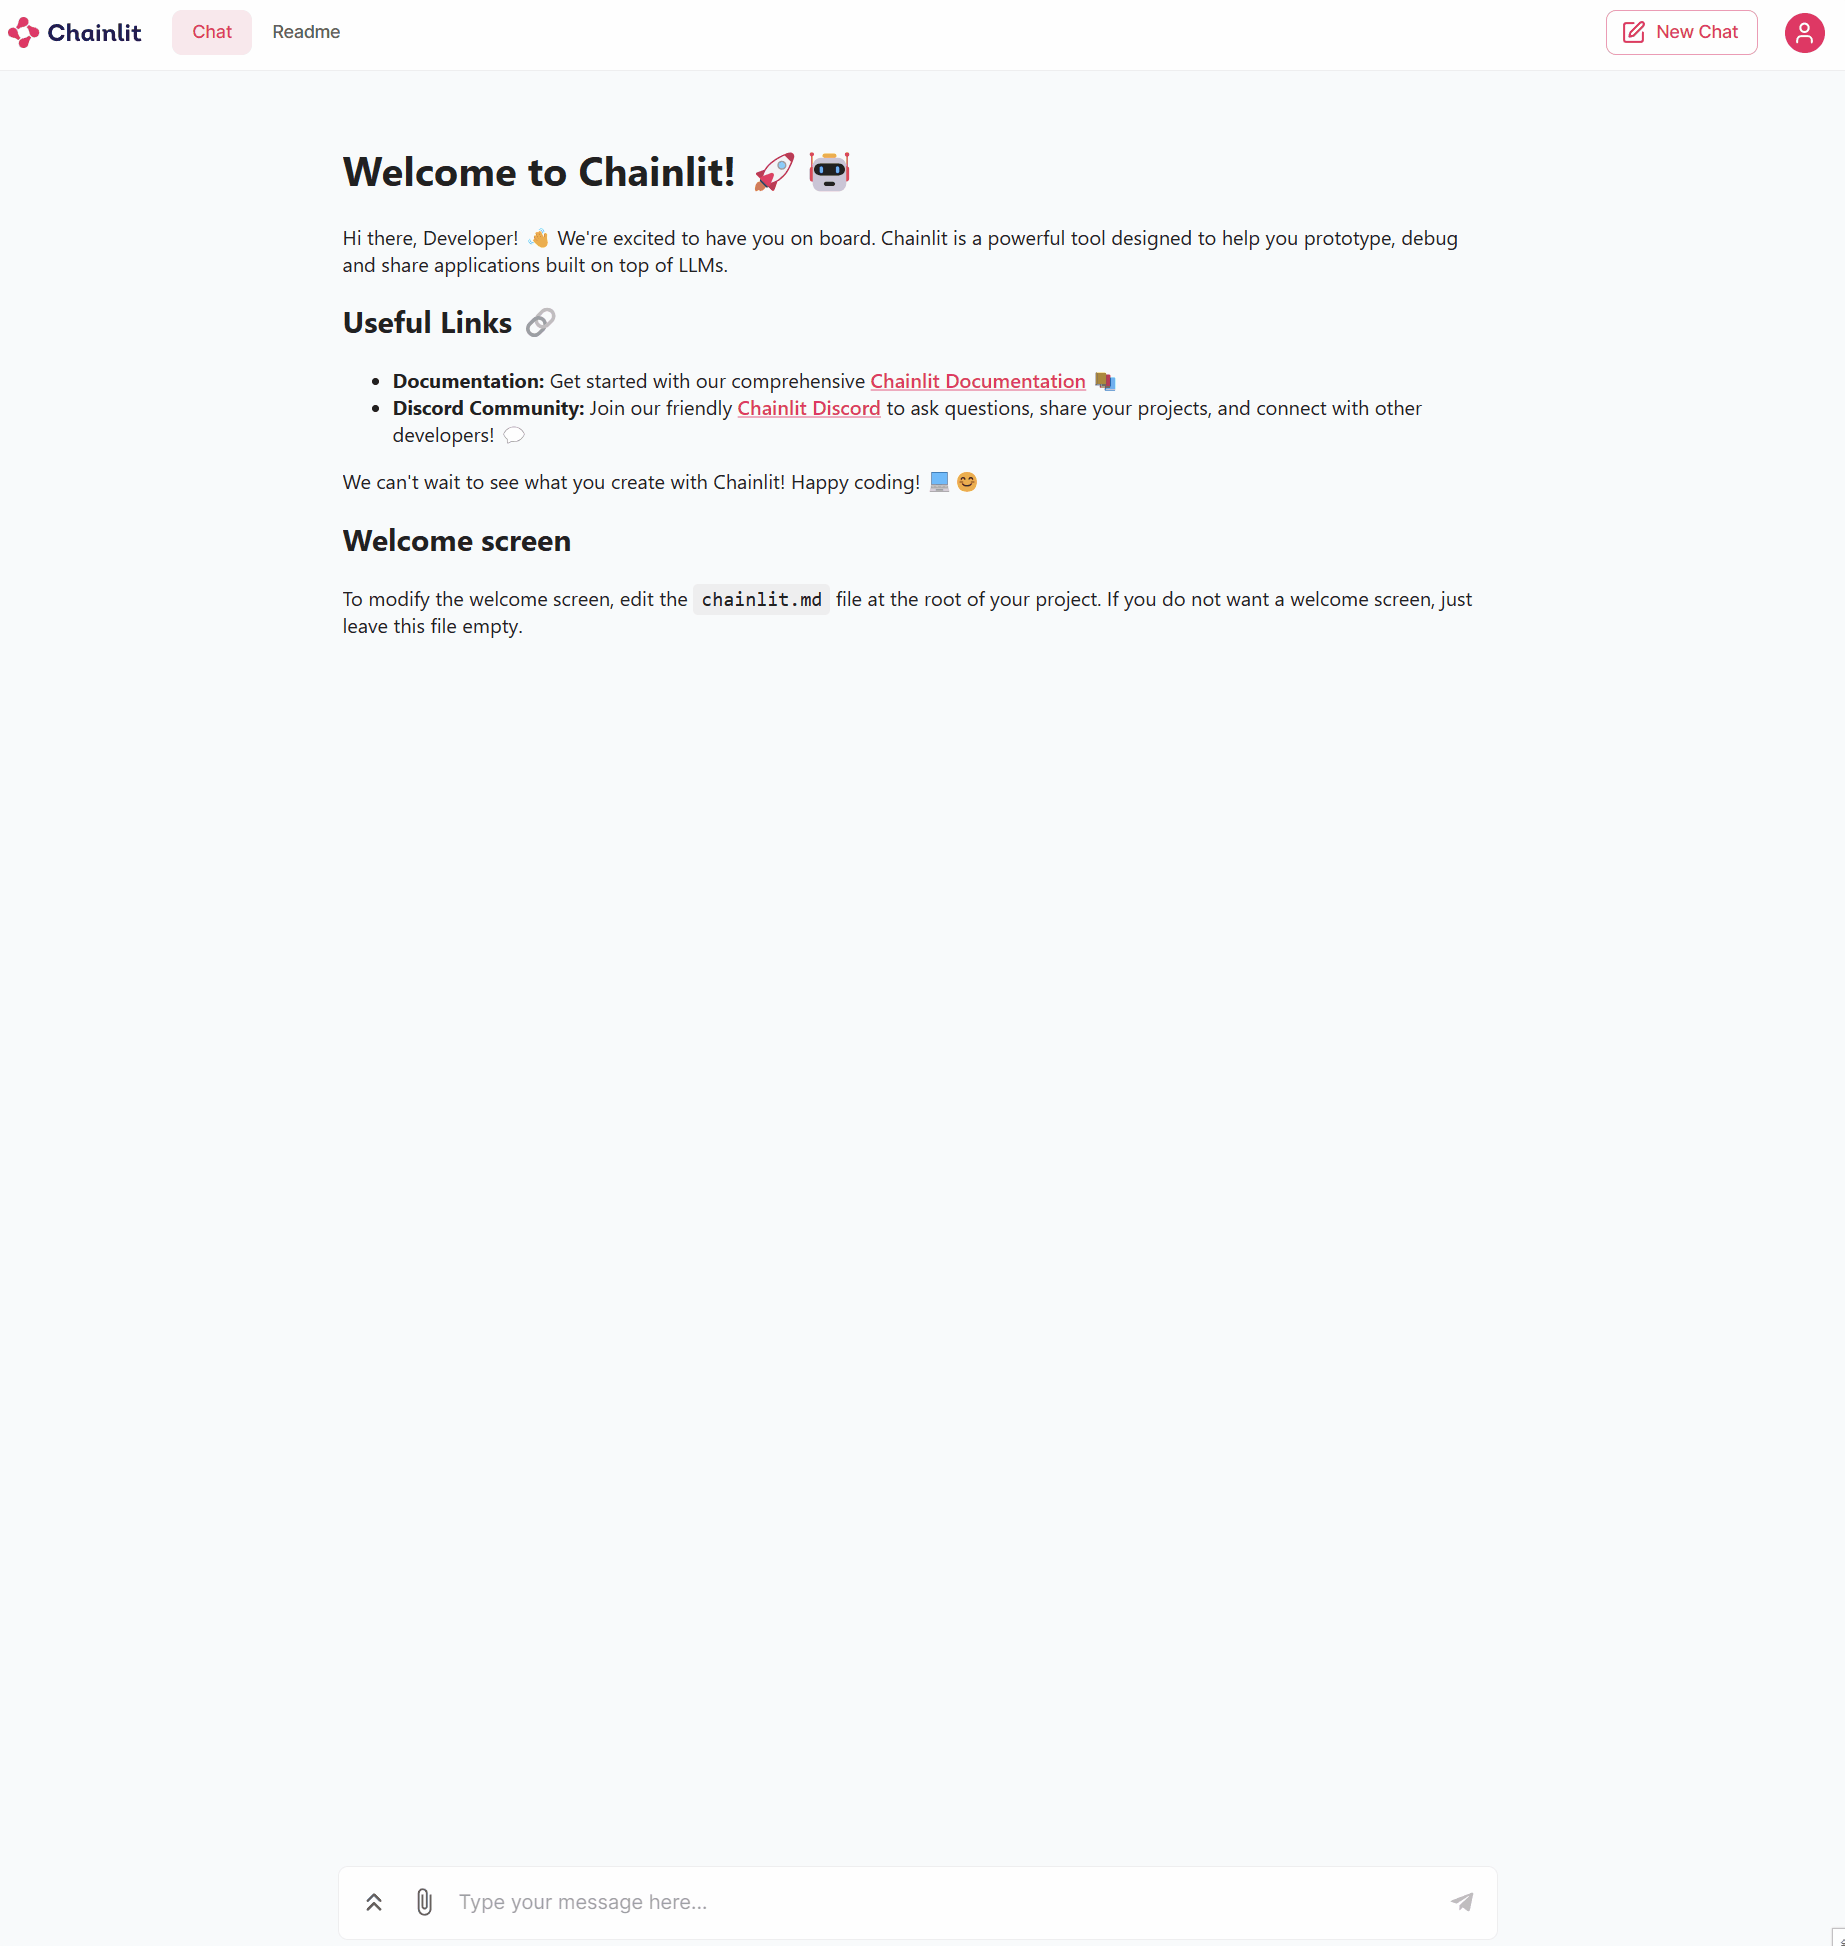
今回作ったもの
LangGraphのAgentをChainlitでWebアプリ化しました。
単発の動作ではなく、継続会話が可能です。
エージェントの中間ステップを表示することができ、最終的な応答をストリーミングで表示するので、エージェントのアプリとして必要な機能は一通り揃っているかと思います。
↓が完成したものの動作イメージです。
コードはこちらです。
このリポジトリをcloneして、graph_agent.envを作成し、以下のように記述してください。
OPENAI_API_KEY=YOUR_API_KEY
その後、以下のコマンドを実行してください。(要Docker)
docker compose up -d
http://localhost:8000/ にアクセスすると、Webアプリが表示されます。
停止する場合は、以下のコマンドを実行してください。
docker compose down
作成した背景
以前にこちらの記事を書きました。
この記事では、AgentをLangChainによって作成していましたが、Agentを作るならLangGraphの方が拡張性が高いと聞いたため、LangGraphを使ったバージョンにしてみました。
また、今回のようなチャットUIを作る場合は、StreamlitよりChainlitの方が簡単に作れるため、今回はStreamlit版は作成していません。
結論から言うと、前回のLangChain版よりもシンプルで、今後の拡張性も高く、安定して動くため、もし前回の記事を参考にされた方がおられましたら、今回のバージョンに変更することをお勧めします。
LangGraphとは
LangGraphの公式ドキュメントには以下のように書かれています。
LangGraph is a library for building stateful, multi-actor applications with LLMs, built on top of (and intended to be used with) LangChain. It extends the LangChain Expression Language with the ability to coordinate multiple chains (or actors) across multiple steps of computation in a cyclic manner. It is inspired by Pregel and Apache Beam. The current interface exposed is one inspired by NetworkX.
The main use is for adding cycles to your LLM application. Crucially, LangGraph is NOT optimized for only DAG workflows. If you want to build a DAG, you should just use LangChain Expression Language.
Cycles are important for agent-like behaviors, where you call an LLM in a loop, asking it what action to take next.
↓ DeepLによる翻訳
LangGraphは、LangChainの上に構築された(そしてLangChainと一緒に使われることを意図した)、LLMを使ったステートフルなマルチ・アクター・アプリケーションを構築するためのライブラリです。LangGraphは、LangChain式言語を拡張し、複数のチェーン(またはアクタ)を複数の計算ステップにわたって循環的に協調させることができます。PregelとApache Beamに触発されている。現在公開されているインターフェースは、NetworkXにインスパイアされたものである。
主な用途は、LLMアプリケーションにサイクルを追加することです。重要なことは、LangGraphはDAGワークフローだけに最適化されていないことです。DAGを構築したいのであれば、LangChain Expression Languageを使うべきです。
サイクルはエージェントのような動作に重要で、ループの中でLLMを呼び出し、次にどのようなアクションを取るかを尋ねます。
なかなか理解が難しいですが、LangGraphはLangChainでは難しかった、マルチエージェントアプリケーションを作成したり、単純なステップを踏むのではなく、動作をループさせて、より複雑な動作をさせることができるライブラリ、ということだと理解しました。
LangGraphを使ったマルチエージェントの作成例が、公式ブログで3つほど紹介されていますので、興味がある方はこちらを実践してみてください。
今回使用するのはマルチエージェントではなく、ドキュメントのQuickstartにある、シングルエージェントを使います。
そもそもAgentって?Chainlitって?
そもそもAgentやChainlitをご存じない方は、以前の記事で紹介していますので、そちらを参照してみてください。
コードの解説
アプリの動作は主に2つのファイルで構成されています。
graph_agent.pymain.py
graph_agent.py
まずはgraph_agent.pyです。
こちらはほぼLangGraphのサンプルコードをそのまま使用しています。
自作のツールを追加する場合は、こちらに追記してください。
import json
import operator

from langchain.agents import tool
from langchain_community.tools import DuckDuckGoSearchResults
from langchain_core.messages import BaseMessage, FunctionMessage
from langchain_core.utils.function_calling import convert_to_openai_function
from langchain_openai import ChatOpenAI
from langgraph.prebuilt import ToolInvocation, ToolExecutor
from langgraph.graph import StateGraph, END
from typing import TypedDict, Annotated, Sequence


# 使用するモデルを選択。
# 予算が許す場合はgpt-4-turboを推奨
MODEL = "gpt-3.5-turbo-0125"
# MODEL = "gpt-4-turbo"


# Agentの使用できるToolを定義
# 必要に応じて、他のToolを追加してください
@tool
async def ddg_search(query: str) -> str:
    """Searches DuckDuckGo for a query and returns the results."""
    search = DuckDuckGoSearchResults()
    return search.invoke(query)


# toolを配列にまとめて、ToolExecutorに渡す
# toolを追加した場合は、忘れずにここに追加してください
tools = [ddg_search]
tool_executor = ToolExecutor(tools)


# 以降はlanggraphのサンプルコードをほぼそのまま使用しています
# https://github.com/langchain-ai/langgraph/blob/main/examples/async.ipynb

# We will set streaming=True so that we can stream tokens
# See the streaming section for more information on this.
model = ChatOpenAI(model=MODEL, temperature=0, streaming=True)

functions = [convert_to_openai_function(t) for t in tools]
model = model.bind_functions(functions)

class AgentState(TypedDict):
    messages: Annotated[Sequence[BaseMessage], operator.add]


# Define the function that determines whether to continue or not
def should_continue(state):
    messages = state["messages"]
    last_message = messages[-1]
    # If there is no function call, then we finish
    if "function_call" not in last_message.additional_kwargs:
        return "end"
    # Otherwise if there is, we continue
    else:
        return "continue"


# Define the function that calls the model
async def call_model(state):
    messages = state["messages"]
    response = await model.ainvoke(messages)
    # We return a list, because this will get added to the existing list
    return {"messages": [response]}


# Define the function to execute tools
async def call_tool(state):
    messages = state["messages"]
    # Based on the continue condition
    # we know the last message involves a function call
    last_message = messages[-1]
    # We construct an ToolInvocation from the function_call
    action = ToolInvocation(
        tool=last_message.additional_kwargs["function_call"]["name"],
        tool_input=json.loads(
            last_message.additional_kwargs["function_call"]["arguments"]
        ),
    )
    # We call the tool_executor and get back a response
    response = await tool_executor.ainvoke(action)
    # We use the response to create a FunctionMessage
    function_message = FunctionMessage(content=str(response), name=action.tool)
    # We return a list, because this will get added to the existing list
    return {"messages": [function_message]}

# main.pyから呼び出して使いたいので、ここだけ関数化
def create_agent():
    # Define a new graph
    workflow = StateGraph(AgentState)

    # Define the two nodes we will cycle between
    workflow.add_node("agent", call_model)
    workflow.add_node("action", call_tool)

    # Set the entrypoint as `agent`
    # This means that this node is the first one called
    workflow.set_entry_point("agent")

    # We now add a conditional edge
    workflow.add_conditional_edges(
        # First, we define the start node. We use `agent`.
        # This means these are the edges taken after the `agent` node is called.
        "agent",
        # Next, we pass in the function that will determine which node is called next.
        should_continue,
        # Finally we pass in a mapping.
        # The keys are strings, and the values are other nodes.
        # END is a special node marking that the graph should finish.
        # What will happen is we will call `should_continue`, and then the output of that
        # will be matched against the keys in this mapping.
        # Based on which one it matches, that node will then be called.
        {
            # If `tools`, then we call the tool node.
            "continue": "action",
            # Otherwise we finish.
            "end": END,
        },
    )

    # We now add a normal edge from `tools` to `agent`.
    # This means that after `tools` is called, `agent` node is called next.
    workflow.add_edge("action", "agent")

    # Finally, we compile it!
    # This compiles it into a LangChain Runnable,
    # meaning you can use it as you would any other runnable
    app = workflow.compile()

    # appを返す
    return app
main.py
次にmain.pyです。
こちらはChainlitのコードになります。
こちらのStreaming LLM Tokensの項目を参考に、エージェントの中間出力をステップに表示するようにしているのと、最終的な応答をストリーミングしています。
細かくコメントを書いてみたので、そちらを参考にしてください。
import chainlit as cl

from langchain_core.messages import HumanMessage, AIMessage

from graph_agent import create_agent


@cl.on_chat_start
async def on_chat_start():
    # セッションが開始したら、エージェントを作成してセッションに保存
    app = create_agent()
    cl.user_session.set("app", app)

    # メッセージの履歴を保存するためのリストをセッションに保存
    cl.user_session.set("inputs", {"messages": []})


@cl.on_message
async def on_message(msg: cl.Message):
    # メッセージを受け取ったら、セッションからエージェントとメッセージの履歴を取得
    app = cl.user_session.get("app")
    inputs = cl.user_session.get("inputs")

    # ユーザーのメッセージを履歴に追加
    inputs["messages"].append(HumanMessage(content=msg.content))

    # 空のメッセージを送信して、ストリーミングする場所を用意しておく
    agent_message = cl.Message(content="")
    await agent_message.send()

    chunks = []

    # エージェントを実行
    async for output in app.astream_log(inputs, include_types=["llm"]):
        for op in output.ops:
            if op["path"] == "/streamed_output/-":
                # 途中経過をステップに表示する
                edge_name = list(op["value"].keys())[0]
                message = op["value"][edge_name]["messages"][-1]

                # actionノードの場合は、メッセージの内容を表示(Toolの戻り値が表示される)
                if edge_name == "action":
                    step_name = message.name
                    step_output = "```\n" + message.content + "\n```"

                # agentノードの場合は、function callの場合は、関数名と引数を表示
                elif hasattr(message, "additional_kwargs") and message.additional_kwargs:
                    step_name = edge_name
                    step_output = f"function call: {message.additional_kwargs["function_call"]["name"]}\n\n```\n{message.additional_kwargs["function_call"]["arguments"]}\n```"

                # その他のパターンではとりあえず何も表示しない
                else:
                    continue

                # ステップを送信
                async with cl.Step(name=step_name) as step:
                    step.output = step_output
                    await step.update()

            elif op["path"].startswith("/logs/") and op["path"].endswith(
                "/streamed_output_str/-"
            ):
                # 最終的な応答を、あらかじめ用意しておいたメッセージにストリーミング
                chunks.append(op["value"])
                await agent_message.stream_token(op["value"])

        # ストリーミングした応答を結合して、最終的な応答を作成
        res = "".join(chunks)

    # 最終的な応答を履歴に追加し、セッションに保存
    inputs["messages"].append(AIMessage(content=res))
    cl.user_session.set("inputs", inputs)
まとめ
LangGraphを使ってAgentを作成し、ChainlitでWebアプリ化しました。
冒頭に書いた通り、リポジトリをクローンしてgraph_agent.envを作成し、docker compose up -dを実行するだけで、Webアプリが起動しますので、ぜひ試してみてください。
簡単な実装ですが、Toolを追加することで実用的に使えるようになると思います。
今回はシングルエージェントを試しましたが、次はマルチエージェントも試してみたいと思います。
Discussion
いつも興味深いポストをありがとうございます。
私もLangGraphとChainlitの組み合わせに注目しています。
最近はCheckpointerでのMemoryの実装を試みていますがまだうまくいっていません。
一方で、音声会話型のAgent実装にも興味を持っていて、TTS/STTの実装はうまくいき、会話ができたときには感動しました。
今後もポスト楽しみにしています。
コメントありがとうございます!励みになります。
LangGraphとChainlitは相性良いですよね。
Chainlitの情報が少なくて大変なことも多いですが。。。
Checkpointerは私も試したことが無いですが、Chatの永続化はやりたいと思っています。
Chainlitの永続化はLiteral AIというのを契約しないと使えないと思っていたのですが、Custom Data Layerというのを使えば実装できるみたいなので、そのうちやりたいと思っています。
音声会話の実装すごいですね!
どこかで公開されていたりするのでしょうか?
ぜひとも参考にさせて戴きたいです
ありがとうございます。
TTS/STTはChainlitのCookbookの作例を参考に、OpenAIのAPIだけで動くようにしてみました。
コーディングの経験が非常に浅いので、どこでどのように公開すればよいのかわかっていませんが、参考にしていただけるのであれば、時間を見つけて公開も進めていければと思います。
あと、Checkpointerはその後コードを修正してMemoryを実装できました。
検索toolで最新の話題(オリンピックの結果など)にもついてきて、会話の記憶も持ってくれたので、ちょっとした友達みたいな存在になりそうな気がします(笑)