📺
Raspberry Pi - Iot.Device(.NET)で表示デバイスを制御する
前回の記事でIot.Deviceの利用について記載しました。
いろいろなデバイスが対応しており、今回は表示デバイスの制御について記載します。
💻開発環境
- ターゲット
- RaspberryPi 4B
- Linux pi4home 5.15.32-v8+ #1538 SMP PREEMPT Thu Mar 31 19:40:39 BST 2022 aarch64 GNU/Linux
- Visual Studio Code 1.93.0
- RaspberryPi 4B
📺表示デバイスを利用する
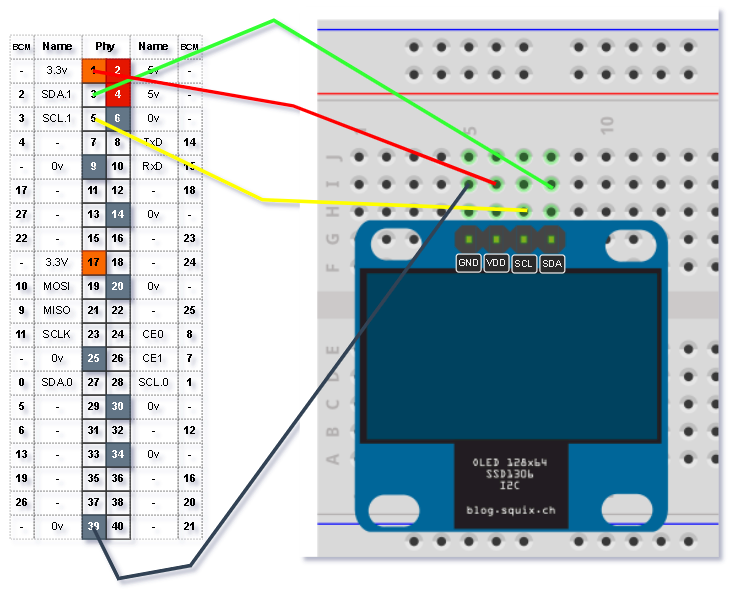
SSD1306(128x64、I2C接続)を利用します。
接続図

プロジェクト作成とパッケージのインストール
SSHで接続し、dotnetコマンドで構築します。
$ dotnet new console -o Ssd1306Tutorial
$ dotnet add package Iot.Device.Bindings
$ dotnet add package Iot.Device.Bindings.SkiaSharpAdapter
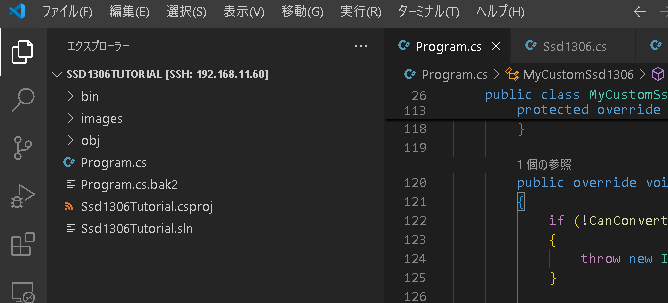
生成したプロジェクトをワークスペースで開きます。

表示データの準備
- ./images下のbitmapを連続して表示をします
- bitmapの使用は以下です
| 項目 | 値 |
|---|---|
| 幅 | 128 ピクセル |
| 高さ | 64 ピクセル |
| ビットの深さ | 1 |
使用した画像は、フリイラくんの走る猫を加工しました。
| ファイル名 | 画像 |
|---|---|
| frame_0.png |  |
| frame_1.png |  |
| frame_2.png |  |
| frame_3.png |  |
| frame_4.png |  |
| frame_5.png |  |
| frame_6.png |  |
| frame_7.png |  |
| frame_8.png |  |
コード
- はまったところも合わせて記載します
意図しない動作のコード
- 公式レポジトリにサンプルをもとにコードを作成しました
Program.cs
using System.Device.I2c;
using Iot.Device.Graphics;
using Iot.Device.Graphics.SkiaSharpAdapter;
using Iot.Device.Ssd13xx;
using Iot.Device.Ssd13xx.Commands;
using Ssd1306Cmnds = Iot.Device.Ssd13xx.Commands.Ssd1306Commands;
using System.Threading;

namespace Ssd1306Tutorial
{
    class Program
    {
        static void Main(string[] args)
        {
            SkiaSharpAdapter.Register();

            // Set up the I2C bus
            I2cConnectionSettings connectionSettings = new(1, 0x3C);
            var i2cDevice = I2cDevice.Create(connectionSettings);

            var device = new Ssd1306(i2cDevice, 128, 64);

            device.ClearScreen();
            Console.WriteLine("Display Images");

            // 画像を表示
            for (var i = 0; i < 1000; i++)
            {
                foreach (var image_name in Directory.GetFiles("images", "*.bmp").OrderBy(f => f))
                {
                    using BitmapImage image = BitmapImage.CreateFromFile(image_name);
                    device.DrawBitmap(image);
                    Thread.Sleep(10);
                }
            }

            device.ClearScreen();
            device.Dispose();
        }
    }
}
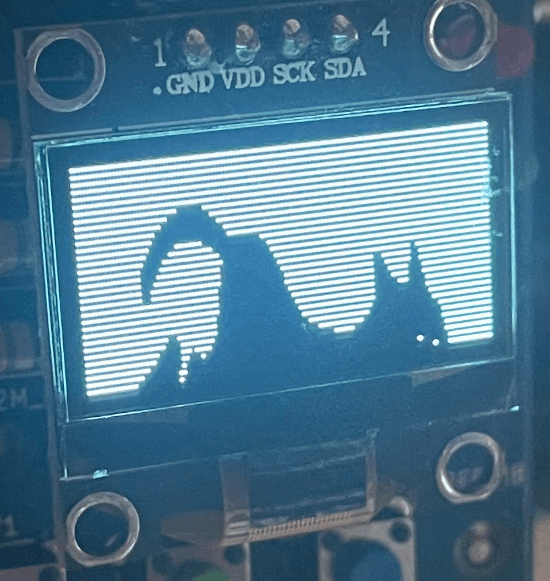
上記を実施したところ、以下のような表示になりました

- 画像の半分しか表示されていない
- 画像に1ラインごとに黒い線が入っている
原因の調査
-
ライブラリをみたところ、128x64に対応しておらず、x32の固定になっていました
-
以下にコメントをいれて修正箇所を抜粋します
-
レジスタの設定
Ssd1306.cspublic class Ssd1306 : Ssd13xx { 略 // Display size 128x32 or 128x64 private void Initialize() { SendCommand(new SetDisplayOff()); SendCommand(new Ssd1306Cmnds.SetDisplayClockDivideRatioOscillatorFrequency(0x00, 0x08)); - SendCommand(new SetMultiplexRatio(0x1F)); + // マルチプレックス比(表示の高さに相当する値) + // 128x64 の場合、SET_MUX_RATIO の値は 0x3F(63)を指定 + SendCommand(new SetMultiplexRatio(0x3F)); SendCommand(new Ssd1306Cmnds.SetDisplayOffset(0x00)); SendCommand(new Ssd1306Cmnds.SetDisplayStartLine(0x00)); SendCommand(new Ssd1306Cmnds.SetChargePump(true)); SendCommand(new Ssd1306Cmnds.SetMemoryAddressingMode(Ssd1306Cmnds.SetMemoryAddressingMode.AddressingMode.Horizontal)); SendCommand(new Ssd1306Cmnds.SetSegmentReMap(true)); SendCommand(new Ssd1306Cmnds.SetComOutputScanDirection(false)); - SendCommand(new Ssd1306Cmnds.SetComPinsHardwareConfiguration(false, false)); + // COMピンのハードウェア設定 + // 128x64 の場合、SET_COM_PIN_CFG は 0x12(代替 COMピン設定と通常の出力スキャン方向を使用) + SendCommand(new Ssd1306Cmnds.SetComPinsHardwareConfiguration(true, false)); SendCommand(new SetContrastControlForBank0(0x8F)); SendCommand(new Ssd1306Cmnds.SetPreChargePeriod(0x01, 0x0F)); SendCommand(new Ssd1306Cmnds.SetVcomhDeselectLevel(Ssd1306Cmnds.SetVcomhDeselectLevel.DeselectLevel.Vcc1_00)); SendCommand(new Ssd1306Cmnds.EntireDisplayOn(false)); SendCommand(new Ssd1306Cmnds.SetNormalDisplay()); SendCommand(new SetDisplayOn()); SendCommand(new Ssd1306Cmnds.SetColumnAddress()); - SendCommand(new Ssd1306Cmnds.SetPageAddress(Ssd1306Cmnds.PageAddress.Page1, Ssd1306Cmnds.PageAddress.Page3)); + // ページ数 + // 128x64 の場合、height / 8 = 64 / 8 = 8ページ + SendCommand(new Ssd1306Cmnds.SetPageAddress(Ssd1306Cmnds.PageAddress.Page1, Ssd1306Cmnds.PageAddress.Page7)); ClearScreen(); } -
描画処理
Ssd13xx.cspublic override void DrawBitmap(BitmapImage image) { if (!CanConvertFromPixelFormat(image.PixelFormat)) { throw new InvalidOperationException($"{image.PixelFormat} is not a supported pixel format"); } SetStartAddress(); int width = ScreenWidth; - Int16 pages = 4; + // 128x64 の場合、8ページ分の描画が必要 + Int16 pages = 8; List<byte> buffer = new();
整理したら、どこかでPull Requestを投げたい✊。
意図した動作のコード
-
公式レポジトリにサンプルをもとにコードを作成しました
-
Program側
Program.csusing System.Device.I2c; using Iot.Device.Graphics; using Iot.Device.Graphics.SkiaSharpAdapter; using System.Threading; using CustomDevices; namespace Ssd1306Tutorial { class Program { static void Main(string[] args) { SkiaSharpAdapter.Register(); // Set up the I2C bus I2cConnectionSettings connectionSettings = new(1, 0x3C); var i2cDevice = I2cDevice.Create(connectionSettings); // MyCustomSsd1306を使用して、ディスプレイを初期化 var device = new MyCustomSsd1306(i2cDevice, 128, 64); device.CustomInitialize(); device.ClearScreen(); Console.WriteLine("Display Images"); // 画像を表示 for (var i = 0; i < 1000; i++) { foreach (var image_name in Directory.GetFiles("images", "*.bmp").OrderBy(f => f)) { using BitmapImage image = BitmapImage.CreateFromFile(image_name); device.DrawBitmap(image); Thread.Sleep(10); } } device.ClearScreen(); device.Dispose(); } } } -
128x64ドットの対応Ssd1306クラス
MyCustomSsd1306.csusing System.Device.I2c; using Iot.Device.Graphics; using Iot.Device.Graphics.SkiaSharpAdapter; using Iot.Device.Ssd13xx; using Iot.Device.Ssd13xx.Commands; using Ssd1306Cmnds = Iot.Device.Ssd13xx.Commands.Ssd1306Commands; using System.Threading; namespace CustomDevices { public class MyCustomSsd1306 : Ssd1306 { public MyCustomSsd1306(I2cDevice i2cDevice, int width, int height) : base(i2cDevice, width, height) { } // カスタムの初期化方法を定義したい場合 public void CustomInitialize() { SendCommand(new SetMultiplexRatio(0x3F)); // 128x64用 SendCommand(new Ssd1306Cmnds.SetComPinsHardwareConfiguration(true, false)); // 128x64用 SendCommand(new Ssd1306Cmnds.SetPageAddress(Ssd1306Cmnds.PageAddress.Page0, Ssd1306Cmnds.PageAddress.Page7)); // 全ページを設定 } protected override void SetStartAddress() { SendCommand(new Ssd1306Cmnds.SetColumnAddress(0, 127)); // 全カラムを設定 SendCommand(new Ssd1306Cmnds.SetPageAddress(Ssd1306Cmnds.PageAddress.Page0, Ssd1306Cmnds.PageAddress.Page7)); } public override void DrawBitmap(BitmapImage image) { if (!CanConvertFromPixelFormat(image.PixelFormat)) { throw new InvalidOperationException($"{image.PixelFormat} is not a supported pixel format"); } SetStartAddress(); int width = ScreenWidth; Int16 pages = 8; List<byte> buffer = new(); for (int page = 0; page < pages; page++) { for (int x = 0; x < width; x++) { int bits = 0; for (byte bit = 0; bit < 8; bit++) { bits = bits << 1; bits |= image[x, page * 8 + 7 - bit].GetBrightness() > BrightnessThreshold ? 1 : 0; } buffer.Add((byte)bits); } } int chunk_size = 16; for (int i = 0; i < buffer.Count; i += chunk_size) { SendData(buffer.Skip(i).Take(chunk_size).ToArray()); } } } }
記事冒頭のアニメーションが表示されました🎉
さいごに
最初はデバイス側の故障かと思ったので、原因をつかむのに時間がかかりました。
PythonのSsd1306モジュールと比較したりして、解決はできました。
Iot.Deviceと言いながら、ネットワークにつながっていないので、
今後は、簡単なアプリケーションでも作ってみようと思います。
GitHubで編集を提案
Discussion