🌡️
Raspberry PiでIot.Device(.NET)を利用する
Raspberry Piで電子工作をする際は、Pythonを利用することが多かったのですが、
.NETでも簡単に実施できるようです。
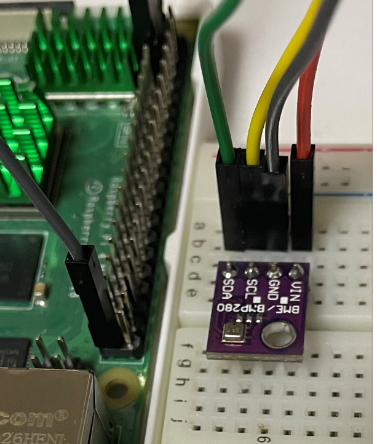
電子工作でよく利用するGPIO制御とセンサーデバイスの利用方法について紹介します。
💻開発環境
- ターゲット
- RaspberryPi 4B
- Linux pi4home 5.15.32-v8+ #1538 SMP PREEMPT Thu Mar 31 19:40:39 BST 2022 aarch64 GNU/Linux
- Visual Studio Code 1.93.0
- RaspberryPi 4B
事前準備
- SSHの有効化
- .NETのインストール
- .NET8での確認となります
SSHの有効化
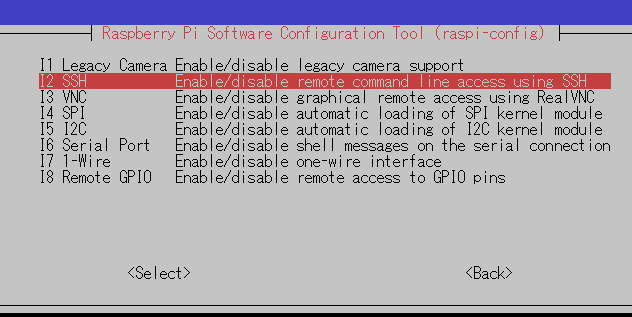
- GUIまたは、raspi-configコマンドよりSSHを有効化する
- コマンドの場合は、"Interface Options" -> SSH を選択し、有効化
- コマンドの場合は、"Interface Options" -> SSH を選択し、有効化
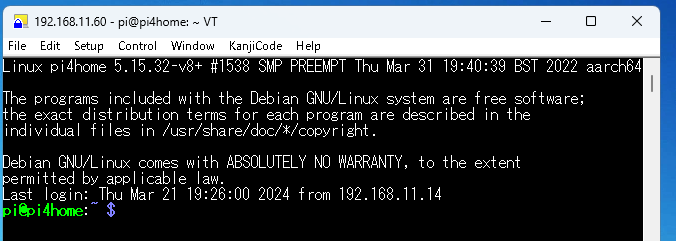
- teraterm等で接続を確認する
.NETのインストール
- 下記のコマンドより.NETをインストールする
$ curl -sSL https://dot.net/v1/dotnet-install.sh | bash /dev/stdin --channel LTS- 2023.03.20時点では、.NET8がインストールされる(注釈参照)
- 環境変数を追加する
$ echo 'export DOTNET_ROOT=$HOME/.dotnet' >> ~/.bashrc $ echo 'export PATH=$PATH:$HOME/.dotnet' >> ~/.bashrc $ source ~/.bashrc - インストールを確認する(バージョンを確認)
$ dotnet --version
8.0.203
🔰GPIO制御でLEDをチカチカ
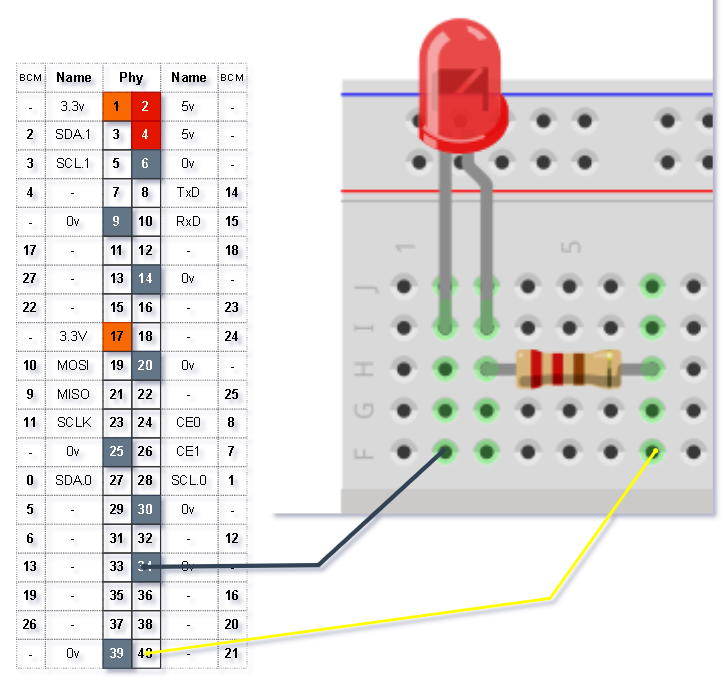
Lチカを行います。
接続図
プロジェクト作成とパッケージのインストール
SSHで接続し、dotnetコマンドで構築します。
$ dotnet new console -o BlinkTutorial
$ dotnet add package System.Device.Gpio
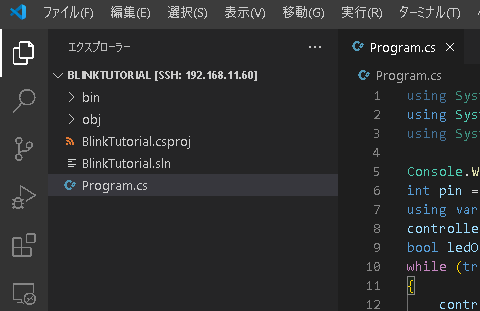
生成したプロジェクトをワークスペースで開きます。
コード
- 1秒ごとにLEDをチカチカさせます
Program.cs
using System;
using System.Device.Gpio;
using System.Threading;

Console.WriteLine("Blinking LED. Press Ctrl+C to end.");
int pin = 21;
using var controller = new GpioController();
controller.OpenPin(pin, PinMode.Output);
bool ledOn = true;
while (true)
{
    controller.Write(pin, ((ledOn) ? PinValue.High : PinValue.Low));
    Console.WriteLine($"Pin:{ledOn}!");
    Thread.Sleep(1000);
    ledOn = !ledOn;
}
実行
- ビルドし、動作を確認します
# ビルド
 $ dotnet build
MSBuild のバージョン 17.9.6+a4ecab324 (.NET)
  略
ビルドに成功しました。

経過時間 00:00:26.31

# 実行
$ ./bin/Debug/net8.0/BlinkTutorial
Blinking LED. Press Ctrl+C to end.
Pin:True!
Pin:False!
Pin:True!
Pin:False!
Pin:True!
LEDがチカチカできました🎉
🌡️温度・気圧を取得
接続図
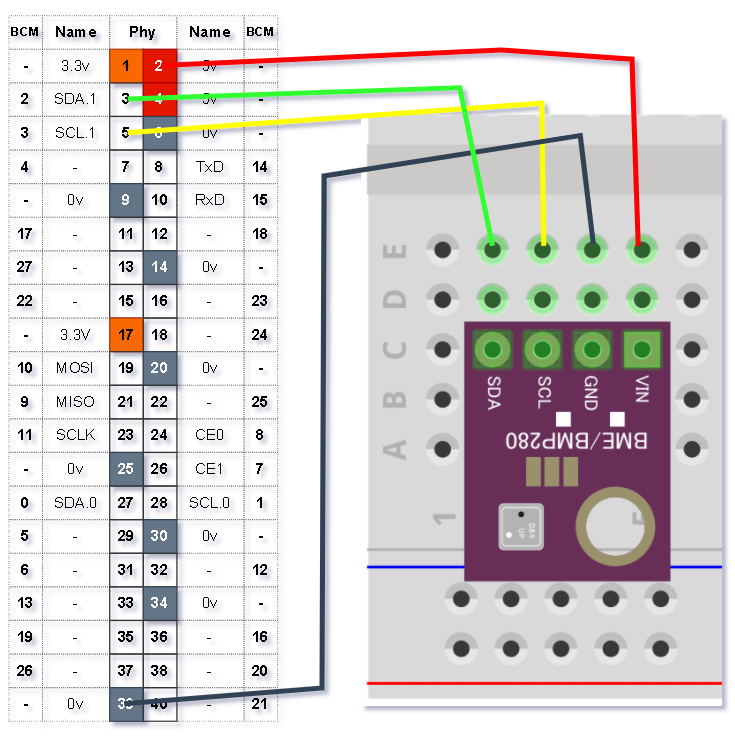
ピンの接続
| Pin | BME280 | 備考 |
|---|---|---|
| 5V | VIN | - |
| GND | GND | - |
| 2(SDA.1) | SDA | - |
| 3(SCL.1) | SCL | - |
プロジェクト作成とパッケージのインストール
SSHで接続し、dotnetコマンドで構築します。
$ dotnet new console -o IotTutorial
$ dotnet add package Iot.Device.Bindings
生成したプロジェクトをワークスペースで開きます。

コード
- 10秒ごとに温度と気圧を取得し、表示します
Program.cs
using System;
using System.Device.I2c;
using System.Threading;
using Iot.Device.Bmxx80;
using Iot.Device.Common;

// busId number for I2C pins
const int busId = 1;

Console.WriteLine($".Net IoT with BMP280 Sensor!");

// setup for BMP280
// I2cConnectionSettings i2cSettings = new(busId, Bmp280.DefaultI2cAddress);
I2cConnectionSettings i2cSettings = new(busId, 0x76);
I2cDevice i2cDevice = I2cDevice.Create(i2cSettings);
using var i2CBmp280 = new Bmp280(i2cDevice);

while (true) // while(!Console.KeyAvailable) if you're using the app via external console
{
    try
    {
        // set higher sampling and perform a synchronous measurement
        i2CBmp280.TemperatureSampling = Sampling.LowPower;
        i2CBmp280.PressureSampling = Sampling.UltraHighResolution;
        var readResult = i2CBmp280.Read();


        // print out the measured data
        string? temperature = readResult.Temperature?.DegreesCelsius.ToString("F");
        string? pressure = readResult.Pressure?.Hectopascals.ToString("F");
        Console.WriteLine("-----------------------------------------");
        Console.WriteLine($"Temperature: {temperature}\u00B0C");
        Console.WriteLine($"Pressure: {pressure}hPa");

        Thread.Sleep(10 * 1000); // wait 10 seconds
    }
    catch (Exception ex)
    {
        Console.WriteLine($"An error occured: {ex.Message}");
    }
}
実行
- ビルドし、動作を確認します
# ビルド
 $ dotnet build
MSBuild のバージョン 17.9.6+a4ecab324 (.NET)
  略
ビルドに成功しました。

# 実行
$ ./bin/Debug/net8.0/IotTutorial
.Net IoT with BMP280 Sensor!
-----------------------------------------
Temperature: 34.625°C
Pressure: 998.498hPa
-----------------------------------------
Temperature: 34.615°C
Pressure: 998.518hPa
-----------------------------------------
Temperature: 34.610°C
Pressure: 998.502hPa
-----------------------------------------
Temperature: 34.595°C
Pressure: 998.515hPa
温度と湿度が取得できました🎉
補足
- ライブラリで対応しているデバイスと購入したデバイスの差で例外発生
- 手持ちのBMP280を使用したところ、エラーとなりました
.Net IoT with BMP280 Sensor! Unhandled exception. System.IO.IOException: Error 121 performing I2C data transfer. at System.Device.I2c.UnixI2cBus.WriteReadCore(UInt16 deviceAddress, Byte* writeBuffer, Byte* readBuffer, UInt16 writeBufferLength, UInt16 readBufferLength) at System.Device.I2c.UnixI2cBus.Write(Int32 deviceAddress, ReadOnlySpan`1 buffer) at System.Device.I2c.UnixI2cDevice.Write(ReadOnlySpan`1 buffer) at System.Device.I2c.I2cDevice.WriteByte(Byte value) at Iot.Device.Bmxx80.Bmxx80Base..ctor(Byte deviceId, I2cDevice i2cDevice) at Iot.Device.Bmxx80.Bmx280Base..ctor(Byte deviceId, I2cDevice i2cDevice) at Iot.Device.Bmxx80.Bmp280..ctor(I2cDevice i2cDevice) at Program.<Main>$(String[] args) in /home/pi/study_dotnet8/IotTutorial/Program.cs:line 17 - 以下を修正(デバイスアドレスを見直し解決)
- I2cConnectionSettings i2cSettings = new(busId, Bmp280.DefaultI2cAddress); + I2cConnectionSettings i2cSettings = new(busId, 0x76);- ライブラリのデバイスアドレスのデフォルトは、Bmp280.DefaultI2cAddress(0x77)となっており
- デバイスへアクセスできず例外発生しました
- デバイスアドレスを変更後、再度確認したところ、またエラーとなりました
- メモを取っていませんでしたが、デバイスのレジスタにあるデバイスの識別子が対応していないとのメッセージ
- Pythonでのモジュールで発生した経験がなく、本モジュールではデバイスを厳しめに見ているのかも知れません
- 手持ちのBMP280を使用したところ、エラーとなりました
それ以外の注意事項は、↓を参照してください(デバイスアドレスの調べ方など)
おまけ
当然、デバッグ(ブレーク、ステップ実行)もできます。

参考文献
- Microsoft - .NET の IoT ライブラリのドキュメント
GitHubで編集を提案


Discussion