[Next.js] LexicalでMarkdownエディタを作るぞ!
この記事見てたら「自分でもリッチテキストエディタを作れるかも!」って思った。
前々からリッチテキストエディタ作ってみたい!って思ってたので作ってみる。
Lexicalでシンプルなテキストエディタを作成する
実装する機能は
- アンドゥ、リドゥ
- オートフォーカス
- エディタの中身をDBに保存できるようにする
- DBに保存した中身をエディタに表示する
- Heading(h1~h3)に変更する
- マークダウン
です。
↓完成品
準備
まずは Next.js の準備。適当な作業ディレクトリで以下のコマンドを実行
npx create-next-app@latest .
初期設定は全部デフォルト
✔ Would you like to use TypeScript? … Yes
✔ Would you like to use ESLint? … Yes
✔ Would you like to use Tailwind CSS? … Yes
✔ Would you like to use `src/` directory? … No
✔ Would you like to use App Router? (recommended) … Yes
✔ Would you like to customize the default import alias (@/*)? … Yes
必要なパッケージをインストール
npm install --save lexical @lexical/react
package.jsonはこんな感じ。
{
  "name": "text-editor",
  "version": "0.1.0",
  "private": true,
  "scripts": {
    "dev": "next dev",
    "build": "next build",
    "start": "next start",
    "lint": "next lint"
  },
  "dependencies": {
    "@lexical/react": "^0.12.2",
    "lexical": "^0.12.2",
    "next": "14.0.1",
    "react": "^18",
    "react-dom": "^18"
  },
  "devDependencies": {
    "@types/node": "^20",
    "@types/react": "^18",
    "@types/react-dom": "^18",
    "autoprefixer": "^10.0.1",
    "eslint": "^8",
    "eslint-config-next": "14.0.1",
    "postcss": "^8",
    "tailwindcss": "^3.3.0",
    "typescript": "^5"
  }
}
そしてデフォルトのページは変更
export default function Home() {
  return (
    <main className="flex items-center justify-center h-screen bg-gray-100">
      <div className="relative w-[800px] h-[600px] border-2 border-gray-300 bg-white text-gray-900">
        <p>This is Editor</p>
      </div>
    </main>
  );
}
ここまでで一旦確認。
npm run dev
サーバーを起動して、http://localhost:3000 にアクセス。
それで次のような画面になればOK

とりあえず何か入力できるようにする
まずはなんでもいいので文字を入力できるようにしたいです
そのためのテキストエディタ用のEditor.tsxを作成します。
+ import { Editor } from "./Editor";

export default function Home() {
  return (
    <main className="flex items-center justify-center h-screen bg-gray-100">
      <div className="relative w-[800px] h-[600px] border-2 border-gray-300 bg-white text-gray-900">
-	  <p>This is Editor</p>
+         <Editor />
      </div>
    </main>
  );
}
"use client";

import { LexicalComposer } from "@lexical/react/LexicalComposer";
import { RichTextPlugin } from "@lexical/react/LexicalRichTextPlugin";
import { ContentEditable } from "@lexical/react/LexicalContentEditable";
import LexicalErrorBoundary from "@lexical/react/LexicalErrorBoundary";

export function Editor() {
  const initialConfig = {
    namespace: "MyEditor",
    onError: (error: Error) => {
      console.log(error);
    },
  };

  return (
    <LexicalComposer initialConfig={initialConfig}>
      <RichTextPlugin
        contentEditable={
          <ContentEditable className="px-2 py-1 border-2 border-blue-200" />
        }
        placeholder={
          <div className="absolute top-1 left-2 text-gray-500">
            プレースホルダー
          </div>
        }
        ErrorBoundary={LexicalErrorBoundary}
      />
    </LexicalComposer>
  );
}
<LexicalComposer>は、useLexicalComposerContext()を使うためのもの。これを使ってエディタの状態を取得して、加工したり保存したりするので必須。
initialConfigはエディターの初期設定です。今は特に何も設定してないので「ふーん」くらいでスルーしてください。
プレースホルダーも入力欄も特に難しいものではないと思います。
npm run devをして、どういう挙動なのか確かめてみてください。
このエディタ、今は何もできません、Ctrl+Zでアンドゥもできないです。
しかし、ここに色々追加していき、シンプルなテキストエディタの完成を目指していきます!
Ctrl+Z でアンドゥをできるようにする
さて、エディタに機能を追加したいですが、どうやって追加すればいいんでしょうか?
簡単です。Lexicalが準備してくれている物を使います。
"use client";

import { LexicalComposer } from "@lexical/react/LexicalComposer";
import { RichTextPlugin } from "@lexical/react/LexicalRichTextPlugin";
import { ContentEditable } from "@lexical/react/LexicalContentEditable";
import LexicalErrorBoundary from "@lexical/react/LexicalErrorBoundary";
+ import { HistoryPlugin } from "@lexical/react/LexicalHistoryPlugin";

export function Editor() {
  const initialConfig = {
    namespace: "MyEditor",
    onError: (error: Error) => {
      console.log(error);
    },
  };

  return (
    <LexicalComposer initialConfig={initialConfig}>
      <RichTextPlugin
        contentEditable={
          <ContentEditable className="px-2 py-1 border-2 border-blue-200" />
        }
        placeholder={
          <div className="absolute top-1 left-2 text-gray-500">
            プレースホルダー
          </div>
        }
        ErrorBoundary={LexicalErrorBoundary}
      />
+      <HistoryPlugin />
    </LexicalComposer>
  );
}
たったこれだけでアンドゥ(Ctrl+Z)、リドゥ(Ctrl+Shift+Z)ができるようになりました!簡単ですね。
オートフォーカス機能を追加する
今度は自分でカスタムした機能を追加してみましょう。どうすればいいでしょうか?
これもそんなに難しくありません。
import { useLexicalComposerContext } from "@lexical/react/LexicalComposerContext";
import { useEffect } from "react";

export function AutoFocusPlugin() {
  const [editor] = useLexicalComposerContext();

  useEffect(() => {
    editor.focus();
  }, [editor]);

  return null;
}
// ~~~

+ import { AutoFocusPlugin } from "./AutoFocusPlugin";

export function Editor() {
  // ~~~
  return (
      <LexicalComposer initialConfig={initialConfig}>
      // ~~~
      <HistoryPlugin />
+     <AutoFocusPlugin />
    </LexicalComposer>
  );
}
これだけでページを表示した時にカーソルが最初からフォーカスするようになりました。
このように何か機能を追加するとしたら、Lixicalが用意した物を使うか、自前で準備するかすれば自由に追加できます。
後は何ができるか、さえ把握すればスムーズに目的のテキストエディタが作成できます(それが難しい)
エディタで編集した内容をDBに保存する
※実際には保存しません。編集した内容を取得する方法を扱います。
次はエディタで編集した内容を取得したいですが、どうしたらいいでしょうか?
エディタで編集した内容を取得するために、Lexicalエディタへの変更にコールバック関数を登録するプラグインを作成します。
import { EditorState } from "lexical";
import { useLexicalComposerContext } from "@lexical/react/LexicalComposerContext";
import { useEffect } from "react";

type OnChangeProps = {
  onChange: (state: EditorState) => void;
};

export function OnChangePlugin({ onChange }: OnChangeProps) {
  const [editor] = useLexicalComposerContext();
  useEffect(() => {
    // editor.registerUpdateListener で、エディタへの変更が
    // 行われた時に実行されるコールバック関数を登録する。また
    // registerUpdateListner はクリーンアップ関数を返すので
    // useEffect内のreturnに記述し、ちゃんとクリーンアップされるようにする
    return editor.registerUpdateListener(({ editorState }) => {
      onChange(editorState);
    });
  }, [editor, onChange]);
  return null;
}
さて、このeditorStateとはなんでしょうか?
確かめるためにeditorStateをコンソールに出力するようにしてみましょう。
+ import { OnChangePlugin } from "./OnChangePlugin";

export function Editor() {

+  const onChange = (editorState: EditorState) => {
+    // editorStateをコンソールに出力するだけ
+    console.log(editorState);
+  };

  return (
    <LexicalComposer initialConfig={initialConfig}>

+      <OnChangePlugin onChange={onChange} />
    </LexicalComposer>
  );
}
npm run devでサーバーを起動して、エディタに何か入力してみてください(Hello world!!!と入力してみました)
コンソールを見ると何やら難しそうなものが見えています。
しかし、よく見ると入力したHello, world!!!という文字列があります。
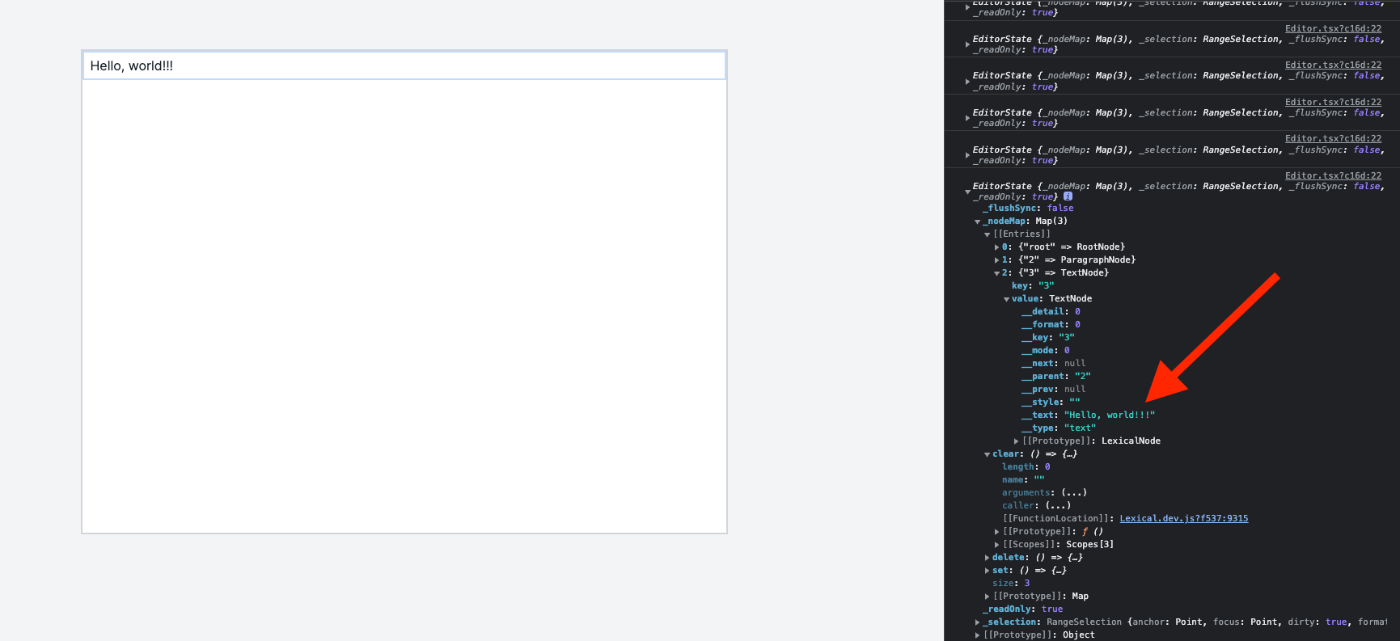
そう、このeditorStateにはエディタの最新状態が入っています。
というわけで、編集した内容を保存するには、このeditorStateをうまいことやって保存すれば良さそうです。
では、editorStateに必要な内容が含まれているのは分かったけど、どうやってeditorStateを保存しましょうか?
複雑なオブジェクトを保存する、というのは面倒くさいです。でも!
これも'Lexical`が用意してくれています。さすがですね!
export function Editor() {

  const onChange = (editorState: EditorState) => {
-    // editorStateをコンソールに出力するだけ
-    console.log(editorState);
+    // JSONに変換してDBに保存処理。今回はコンソールに出力するだけ
+    const editorStateJSON = editorState.toJSON();
+    console.log(JSON.stringify(editorStateJSON));
  };
Hello, world!!!と入力すると、こんな文字列が出力されます。
{"root":{"children":[{"children":[{"detail":0,"format":0,"mode":"normal","style":"","text":"Hello, world!!!","type":"text","version":1}],"direction":"ltr","format":"","indent":0,"type":"paragraph","version":1}],"direction":"ltr","format":"","indent":0,"type":"root","version":1}}
これをDBに保存すれば良さそうですね。
というわけでエディタの内容をDBに保存することができました。
エディタとしてまた一つ進歩しましたね!
保存した内容を表示する
さて、編集した内容を保存できたのはいいですが、今度は逆です。
DBから取得した内容をどうやってエディタに表示させましょうか?
これも簡単(Lexicalありがとう!)
エディタの初期設定をする部分がありましたね。そうです、initialConfigを利用します。
export function Editor() {
  const initialConfig = {
    namespace: "MyEditor",
    onError: (error: Error) => {
      console.log(error);
    },
+    // 先ほど保存したJSONをそのまま渡します。
+    editorState: `{"root":{"children":[{"children":[{"detail":0,"format":0,"mode":"normal","style":"","text":"Hello, world!!! updated","type":"text","version":1}],"direction":"ltr","format":"","indent":0,"type":"paragraph","version":1}],"direction":"ltr","format":"","indent":0,"type":"root","version":1}}`,
  };
こうすると、最初からエディタにHello, world!!! updatedと入力されているはずです。
追加で入力しても問題なく動作します。
これでエディタとして最低限はクリアできそうですね!
Headingを追加できるようにする
こっからリッチテキストエディタっぽくなっていきます。
文章をh1などに変更できるようにします!しかし、毎度のことですが、どうすればいいでしょうか?
とりあえずツールバーっぽい物を作成
export const ToolbarPlugin = () => {
  return (
    <div className="flex space-x-4 px-4 py-2 border-b border-gray-300">
      <button className="text-gray-400" type="button" role="checkbox">
        H1
      </button>
      <button className="text-gray-400" type="button" role="checkbox">
        H2
      </button>
      <button className="text-gray-400" type="button" role="checkbox">
        H3
      </button>
    </div>
  );
};
import { ToolbarPlugin } from "./ToolbarPlugin";

export function Editor() {
  // ~~~
    return (
    <LexicalComposer initialConfig={initialConfig}>
+     <ToolbarPlugin />
      <RichTextPlugin
        contentEditable={
          <ContentEditable className="px-2 py-1 border-2 border-blue-200" />
        }
        placeholder={
-          <div className="absolute top-1 left-2 text-gray-500">
+          <div className="absolute top-12 left-2 text-gray-500">
            プレースホルダー
          </div>
        }
        ErrorBoundary={LexicalErrorBoundary}
      />
      <HistoryPlugin />
      <AutoFocusPlugin />
      <OnChangePlugin onChange={onChange} />
    </LexicalComposer>
  );
}
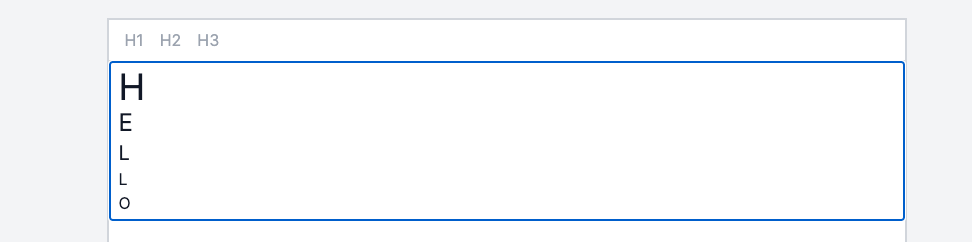
出来上がった画面がこちら

この H1, H2, H3 を押した時に、文章がそのタグに変わるようにすることが目標です。
まずはエディターにHeadingタグを利用することを伝えます。
つまり、またまたinitialConfigに登録します。
import { HeadingNode } from "@lexical/rich-text";
import { Klass, LexicalNode } from "lexical";

export const nodes: Array<Klass<LexicalNode>> = [HeadingNode];
+ import { nodes } from "./nodes";

export function Editor() {
  const initialConfig = {
    namespace: "MyEditor",
    onError: (error: Error) => {
      console.log(error);
    },
+    nodes: [...nodes],
  };
これで、h1タグなどの見出しを使えるようになりました。
でも、どうやって変更しましょうか?
これも簡単。エディタの状態を変更するために editor.update()を利用します。
ToolbarPlugin.tsxを変更
import { $getSelection, $isRangeSelection } from "lexical";
import { $createHeadingNode, HeadingTagType } from "@lexical/rich-text";
import { $setBlocksType } from "@lexical/selection";
import { useLexicalComposerContext } from "@lexical/react/LexicalComposerContext";

const SupportedBlockType = {
  paragraph: "Paragraph",
  h1: "Heading 1",
  h2: "Heading 2",
  h3: "Heading 3",
  h4: "Heading 4",
  h5: "Heading 5",
  h6: "Heading 6",
} as const;
type BlockType = keyof typeof SupportedBlockType;

export const ToolbarPlugin = () => {
  const [editor] = useLexicalComposerContext();

  const formatHeading = (headingSize: HeadingTagType) => {
    // エディタの状態を変更するために、editor.update()を使用する
    editor.update(() => {
      // editorから選択範囲を取得
      const selection = $getSelection();
      if ($isRangeSelection(selection)) {
        // 選択範囲をheadingSizeに変更する
        $setBlocksType(selection, () => $createHeadingNode(headingSize));
      }
    });
  };

  return (
    <div className="flex space-x-4 px-4 py-2 border-b border-gray-300">
      <button
        className="text-gray-400"
        type="button"
        role="checkbox"
        onClick={() => formatHeading("h1")}
      >
        H1
      </button>
      <button
        className="text-gray-400"
        type="button"
        role="checkbox"
        onClick={() => formatHeading("h2")}
      >
        H2
      </button>
      <button
        className="text-gray-400"
        type="button"
        role="checkbox"
        onClick={() => formatHeading("h3")}
      >
        H3
      </button>
    </div>
  );
};
これでタグを変更できるようになりました!
npm run devでサーバーを起動して実際に確かめてみましょう!
・・・なんか変ですよね
何も変わってません。本当に機能してるんでしょうか?
ちゃんと確認すると・・・

タグは変更されてます。でも見た目が変わらない・・・
そうCSSが効いてないんです!だから見た目が何も変わってないんです!
というわけでエディタ用のCSSを作成し、initialConfigに登録します
import type { EditorThemeClasses } from "lexical";

export const theme: EditorThemeClasses = {
  heading: {
    h1: "text-4xl",
    h2: "text-2xl",
    h3: "text-xl",
  },
};
// ~~~
+ import { theme } from "./theme";

export function Editor() {
  const initialConfig = {
    namespace: "MyEditor",
    onError: (error: Error) => {
      console.log(error);
    },
    nodes: [...nodes],
+   theme: theme,
  };
  // ~~~
}
ここまでやると、ちゃんとツールバーが機能するようになります。

はい、これでエディタの内容を見た目含めて変更できるようになりました!
しかし問題があります
このツールバー、同じボタン連続で押すとその度に内容が変更されるため、ちょっと無駄があります。
なので、同じボタンを連続で押しても内容の更新が起きないようにちょっと変更します
import { $getSelection, $isRangeSelection } from "lexical";
import {
  $createHeadingNode,
  HeadingTagType,
  $isHeadingNode,
} from "@lexical/rich-text";
import { $setBlocksType } from "@lexical/selection";
import { useLexicalComposerContext } from "@lexical/react/LexicalComposerContext";
import { useEffect, useState } from "react";

const SupportedBlockType = {
  paragraph: "Paragraph",
  h1: "Heading 1",
  h2: "Heading 2",
  h3: "Heading 3",
  h4: "Heading 4",
  h5: "Heading 5",
  h6: "Heading 6",
} as const;
type BlockType = keyof typeof SupportedBlockType;

export const ToolbarPlugin = () => {
  const [editor] = useLexicalComposerContext();
  const [blockType, setBlockType] = useState<BlockType>("paragraph");

  useEffect(() => {
    return editor.registerUpdateListener(({ editorState }) => {
      // editorStateからエディタの状態の読み取りを行う
      editorState.read(() => {
        // 現在の選択範囲を取得
        const selection = $getSelection();
        // 選択範囲が RangeSelection 出なければ何もしない
        if (!$isRangeSelection(selection)) return;

        // 選択範囲のアンカーノードを取得
        const anchorNode = selection.anchor.getNode();
        // アンカーノードが root ならそのノードを、そうでなければ最上位の要素を取得
        const targetNode =
          anchorNode.getKey() === "root"
            ? anchorNode
            : anchorNode.getTopLevelElementOrThrow();
        // 対象のノードが HeadingNode なら、そのタグを利用してblockTypeを設定
        if ($isHeadingNode(targetNode)) {
          const tag = targetNode.getTag();
          setBlockType(tag);
        } else {
          // そうでない場合は、ノードのタイプを利用してblockTypeを設定
          const nodeType = targetNode.getType();
          if (nodeType in SupportedBlockType) {
            setBlockType(nodeType as BlockType);
          } else {
            // それ以外ならデフォルトとして paragraph を設定
            setBlockType("paragraph");
          }
        }
      });
    });
  }, [editor]);

  const formatHeading = (headingSize: HeadingTagType) => {
    if (blockType !== headingSize) {
      // エディタの状態を変更するために、editor.update()を使用する
      editor.update(() => {
        // editorから選択範囲を取得
        const selection = $getSelection();
        if ($isRangeSelection(selection)) {
          // 選択範囲をheadingSizeに変更する
          $setBlocksType(selection, () => $createHeadingNode(headingSize));
        }
      });
    }
  };

  return (
    <div className="flex space-x-4 px-4 py-2 border-b border-gray-300">
      <button
        className="text-gray-400"
        type="button"
        role="checkbox"
        onClick={() => formatHeading("h1")}
      >
        H1
      </button>
      <button
        className="text-gray-400"
        type="button"
        role="checkbox"
        onClick={() => formatHeading("h2")}
      >
        H2
      </button>
      <button
        className="text-gray-400"
        type="button"
        role="checkbox"
        onClick={() => formatHeading("h3")}
      >
        H3
      </button>
    </div>
  );
};
これでOKです!
他の要素(quoteやlist)を追加したければ似たような感じで書けば追加できます。
マークダウン形式で入力できるようにする
最後はマークダウンです、どうやって実現させましょう?
これも lexical に準備されてます。楽!
import { Transformer, HEADING } from "@lexical/markdown";
import { MarkdownShortcutPlugin } from "@lexical/react/LexicalMarkdownShortcutPlugin";

export const TRANSFORMERS: Array<Transformer> = [HEADING];
// ~~~
+ import { MarkdownShortcutPlugin } from "@lexical/react/LexicalMarkdownShortcutPlugin";
// ~~~

+ import { TRANSFORMERS } from "./MarkdownPlugin";
// ~~~
export function Editor() {
  // ~~~
    return (
    <LexicalComposer initialConfig={initialConfig}>
      // ~~~
+     <MarkdownShortcutPlugin transformers={TRANSFORMERS} />
    </LexicalComposer>
  );
}
これで、例えば## Hello!!! と入力すればh2タグの Hello!!! になります!
最後にマークダウン表示の切り替えを実装します。どうしましょうか?
これも便利なものが用意されています。
import { Transformer, HEADING } from "@lexical/markdown";
import { useLexicalComposerContext } from "@lexical/react/LexicalComposerContext";
import { $createCodeNode, $isCodeNode } from "@lexical/code";
import { $getRoot, $createTextNode } from "lexical";
import {
  $convertFromMarkdownString,
  $convertToMarkdownString,
} from "@lexical/markdown";

export const TRANSFORMERS: Array<Transformer> = [HEADING];

export const MarkdownPlugin = () => {
  const [editor] = useLexicalComposerContext();

  const handleMarkdownToggle = () => {
    // エディタの状態を変更するために、editor.update()を使用する
    editor.update(() => {
      // rootノードを取得
      const root = $getRoot();
      // rootの最初の子ノードを取得
      const firstChild = root.getFirstChild();
      // 最初の子ノードが CodeNode で、その言語が markdown の場合
      if ($isCodeNode(firstChild) && firstChild.getLanguage() === "markdown") {
        // マークダウン文字列からエディタ状態へ変換する
        $convertFromMarkdownString(firstChild.getTextContent(), TRANSFORMERS);
      } else {
        // そうでない場合は、エディタの状態からマークダウン文字列へと変換
        const markdown = $convertToMarkdownString(TRANSFORMERS);
        // rootノードをクリアし、新しい CodeNode を追加する
        root
          .clear()
          .append(
            $createCodeNode("markdown").append($createTextNode(markdown))
          );
      }
      // ルートノードの最後にカーソルを移動する
      root.selectEnd();
    });
  };

  return (
    <div>
      <button
        className="absolute right-2 bottom-2 w-12 h-12 bg-gray-400 text-lg text-white font-semibold rounded-full hover:bg-gray-500"
        type="button"
        role="checkbox"
        onClick={handleMarkdownToggle}
      >
        M
      </button>
    </div>
  );
};
CodeNodeを扱う必要があるので、nodesに追加します。
import { HeadingNode } from "@lexical/rich-text";
+ import { CodeNode } from "@lexical/code";
import { Klass, LexicalNode } from "lexical";

- export const nodes: Array<Klass<LexicalNode>> = [HeadingNode]
+ export const nodes: Array<Klass<LexicalNode>> = [HeadingNode, CodeNode];
"use client";

import { LexicalComposer } from "@lexical/react/LexicalComposer";
import { EditorState } from "lexical";
import { RichTextPlugin } from "@lexical/react/LexicalRichTextPlugin";
import { ContentEditable } from "@lexical/react/LexicalContentEditable";
import LexicalErrorBoundary from "@lexical/react/LexicalErrorBoundary";
import { HistoryPlugin } from "@lexical/react/LexicalHistoryPlugin";
import { MarkdownShortcutPlugin } from "@lexical/react/LexicalMarkdownShortcutPlugin";

import { AutoFocusPlugin } from "./AutoFocusPlugin";
import { OnChangePlugin } from "./OnChangePlugin";
import { ToolbarPlugin } from "./ToolbarPlugin";
import { nodes } from "./nodes";
import { theme } from "./theme";
+ import { MarkdownPlugin, TRANSFORMERS } from "./MarkdownPlugin";

export function Editor() {
  const initialConfig = {
    namespace: "MyEditor",
    onError: (error: Error) => {
      console.log(error);
    },
    nodes: [...nodes],
    theme: theme,
  };

  const onChange = (editorState: EditorState) => {
    const editorStateJSON = editorState.toJSON();
    // DBに保存処理。今回はコンソールに出力するだけ
    // console.log(JSON.stringify(editorStateJSON));
  };

  return (
    <LexicalComposer initialConfig={initialConfig}>
      <ToolbarPlugin />
      <RichTextPlugin
        contentEditable={
          <ContentEditable className="px-2 py-1 border-2 border-blue-200" />
        }
        placeholder={
          <div className="absolute top-12 left-2 text-gray-500">
            プレースホルダー
          </div>
        }
        ErrorBoundary={LexicalErrorBoundary}
      />
      <HistoryPlugin />
      <AutoFocusPlugin />
      <OnChangePlugin onChange={onChange} />
      <MarkdownShortcutPlugin transformers={TRANSFORMERS} />
+     <MarkdownPlugin />
    </LexicalComposer>
  );
}
これでエディタ形式とマークダウン形式を切り替えることができるようになりました。
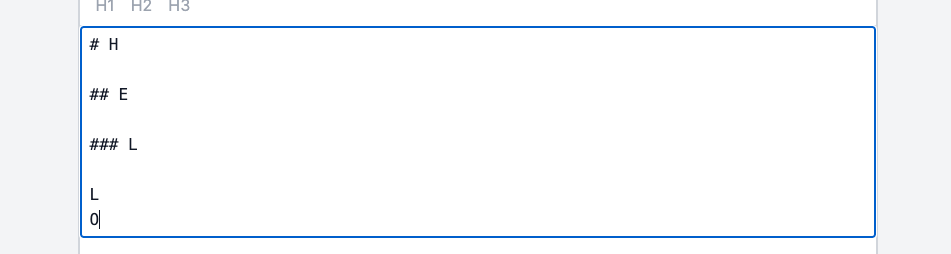
右下の M ボタンを押せば
↑これが
↓こうなります。
これで完成です!
まとめ
以前から作りたいと思っていたリッチテキストエディタを作成することができました。
さらに 「これ追加したい、どうしよう・・・」 ってなってもスムーズにできそうですね
それもこれもLexicalが準備してくれているからですね。ありがとう!
参考
超分かりやすい
playgroundが充実してる、必要な機能があればここを探せばいける
Discussion