ローカル環境のみ利用したdbtチュートリアル
dbtの公式チュートリアルはBigQueryなどクラウド環境を利用する前提で書かれていたので、ローカル環境だけでできるようにDuckDBを用いたチュートリアルを書きました。また、公式チュートリアルにはgitの操作なども含まれていたため、dbtを利用するのに最低限必要そうなもののみに絞って書こうと思います。
以下の素晴らしい記事を参考にして書いています。
dbtとは?
dbtはETL(Extract/Transform/Load)でいうところのtransformationのワークフローを助けてくれるツールです。
dbtを利用することのメリット
- 変数のようなものを利用できて、同じようなSQLを書かなくていい
- テーブル間の依存関係を表すグラフ(lineage)をSQLから生成することができる
- yamlにテーブル定義書を記述するため、テーブル定義書をgit管理できる
- SQLのテストが簡単にできる
ここら辺がメリットかなと個人的に思います。SQLのsnippetを保存し、関数のように利用できるmacro機能(Jinja and macros | dbt Developer Hub)がありますが、SQLが複雑化しないように管理したり、同様のmacroが乱立しないよう運用するなど、利用には注意が必要だと思います。
DuckDBのインストール
ローカルでDB操作ができるようにDuckDBをインストールします。
curl -OL https://github.com/duckdb/duckdb/releases/download/v0.6.1/duckdb_cli-osx-universal.zip
unzip duckdb_cli-osx-universal.zip
DuckDBの動作確認
./duckdb tutorial.db
v0.6.1 919cad22e8
Enter ".help" for usage hints.
D select 'aaaa';
┌─────────┐
│ 'aaaa'  │
│ varchar │
├─────────┤
│ aaaa    │
└─────────┘
D .exit
.helpでヘルプを表示、.exitでDuckDBのCLIから抜けられます。
dbtのインストール
今回は、DuckDBを利用するのでdbt-coreとdbt-duckdbをインストールします。BigQueryやSnowflakeなど、それぞれDBごとにライブラリが存在するので、DuckDB以外を利用する場合はDBにあったライブラリをインストールしてください。
pip install dbt-core dbt-duckdb
dbtプロジェクト初期セットアップ
dbt init 適当な名前を実行して、DBにduckdbを選択。
dbt init tutorial
09:32:44  Running with dbt=1.3.1
Which database would you like to use?
[1] duckdb

(Don't see the one you want? https://docs.getdbt.com/docs/available-adapters)

Enter a number: 1
09:33:00  No sample profile found for duckdb.
09:33:00
Your new dbt project "tutorial" was created!

For more information on how to configure the profiles.yml file,
please consult the dbt documentation here:

  https://docs.getdbt.com/docs/configure-your-profile

One more thing:

Need help? Don't hesitate to reach out to us via GitHub issues or on Slack:

  https://community.getdbt.com/

Happy modeling!
上記のコマンドを実行後、tutorialという名前のディレクトリとtutorialディレクトリの中に、以下のディレクトリが自動生成されます。
.
├── analyses
├── macros
├── models
│   └── example
├── seeds
├── snapshots
└── tests
それぞれのディレクトリの役割は、About dbt projects | dbt Developer Hubに記載されています。
| Resource | Description |
|---|---|
| models | 基本的なSQLを置く場所。ここのディレクトリ以下のSQLはdbt runを実行した際に実行される。 |
| snapshots | 状態があるようなデータのSQLを置いておく場所。例は、Snapshots | dbt Developer Hubがわかりやすい。 |
| seeds | csvなどの静的ファイルを置いておく場所。 dbt seedコマンドでdbtにロードできる。基本的にはマスターデータなどのlookup tableを置いておく場所。(The rest of the project | dbt Developer Hub) |
| tests | SQLのテストクエリを置いておく場所。 |
| macros | macroを置いておく場所。 |
| analysis | より分析っぽいアドホックなSQLを置く場所。ここに配置されたSQLは、dbt run時、変数置換は行われるが実行はされない。 |
~/.dbt/profiles.yml に以下を記載。
tutorial:
  outputs:
   dev:
     type: duckdb
     path: 先ほど作成したtutorial.dbまでのパス
  target: dev
データ登録
以下のデータをダウンロードし、 data ディレクトリに設置[1]。
mkdir tutorial/data
cd tutorial/data
curl -L https://raw.githubusercontent.com/dbt-labs/jaffle_shop/main/seeds/raw_customers.csv -o ./tutorial/data/raw_customers.csv
curl -L https://raw.githubusercontent.com/dbt-labs/jaffle_shop/main/seeds/raw_orders.csv -o ./tutorial/data/raw_orders.csv
DuckDBを起動し、csvをDBに登録。
./duckdb tutorial.db
v0.6.1 919cad22e8
Enter ".help" for usage hints.
D # テーブルが1つもないことを確認
D .tables
D
D # csvからテーブルを作成して登録
D CREATE TABLE raw_customers AS SELECT * FROM 'tutorial/data/raw_customers.csv';
D CREATE TABLE raw_orders AS SELECT * FROM 'tutorial/data/raw_orders.csv';
D
D # テーブルが登録できていることを確認
D .tables
raw_customers  raw_orders
D
D # テーブルの中身を確認
D SELECT * FROM raw_customers LIMIT 3;
┌───────┬────────────┬───────────┐
│  id   │ first_name │ last_name │
│ int32 │  varchar   │  varchar  │
├───────┼────────────┼───────────┤
│     1 │ Michael    │ P.        │
│     2 │ Shawn      │ M.        │
│     3 │ Kathleen   │ P.        │
└───────┴────────────┴───────────┘
D SELECT * FROM raw_orders LIMIT 3;
┌───────┬─────────┬────────────┬───────────┐
│  id   │ user_id │ order_date │  status   │
│ int32 │  int32  │    date    │  varchar  │
├───────┼─────────┼────────────┼───────────┤
│     1 │       1 │ 2018-01-01 │ returned  │
│     2 │       3 │ 2018-01-02 │ completed │
│     3 │      94 │ 2018-01-04 │ completed │
└───────┴─────────┴────────────┴───────────┘
D .exit
models/schema.ymlに読み込んだテーブルの情報を追記。
version: 2

sources:
  - name: main
    tables:
      - name: raw_customers
      - name: raw_orders
追記した-name mainのmainはスキーマ名を表しています。duckdb cli上でselect * from information_schema.tables;を実行することでテーブルのスキーマを確認できます。
exampleのSQLを削除する
models/exampleにexampleのsqlファイルやyamlファイルがあり必要ないので、削除しておきます。削除後dbt_project.ymlの末尾を以下のように書き換えます。
 models:
   tutorial:
-    # Config indicated by + and applies to all files under models/example/
-    example:
-      +materialized: view
+    +materialized: table
Transformを行う(モデルをビルドする)
dbtを利用してtransformを行います。まず、以下のクエリをmodels/以下に、 customers.sqlとして保存してください。
with customers as (

    select
        id as customer_id,
        first_name,
        last_name

    from {{ source('main', 'raw_customers') }}

),

orders as (

    select
        id as order_id,
        user_id as customer_id,
        order_date,
        status

    from {{ source('main', 'raw_orders') }}

),

customer_orders as (

    select
        customer_id,

        min(order_date) as first_order_date,
        max(order_date) as most_recent_order_date,
        count(order_id) as number_of_orders

    from orders

    group by 1

),

final as (

    select
        customers.customer_id,
        customers.first_name,
        customers.last_name,
        customer_orders.first_order_date,
        customer_orders.most_recent_order_date,
        coalesce(customer_orders.number_of_orders, 0) as number_of_orders

    from customers

    left join customer_orders using (customer_id)

)

select * from final
dbtプロジェクトのディレクトリ以下(今回の例で言うとtutorialディレクトリ以下)で、dbt runで上記のSQLが実行されtransformができます。
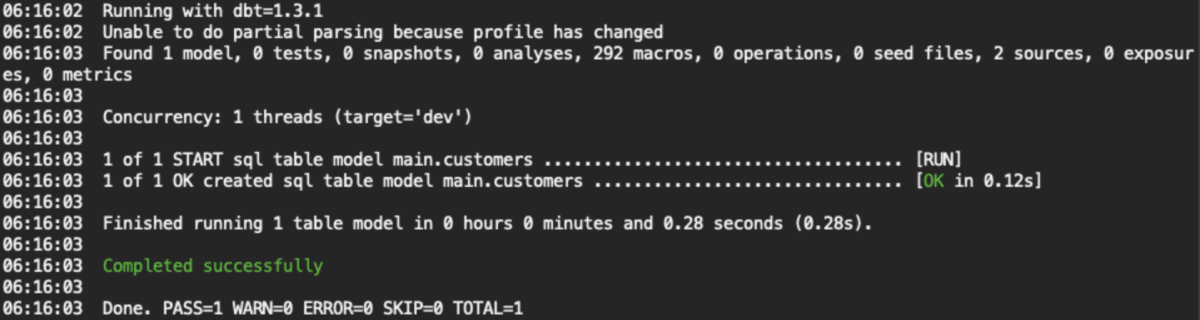
実行結果テキスト
cd tutorial
dbt run
06:16:02  Running with dbt=1.3.1
06:16:02  Unable to do partial parsing because profile has changed
06:16:03  Found 1 model, 0 tests, 0 snapshots, 0 analyses, 292 macros, 0 operations, 0 seed files, 2 sources, 0 exposures, 0 metrics
06:16:03
06:16:03  Concurrency: 1 threads (target='dev')
06:16:03
06:16:03  1 of 1 START sql table model main.customers .................................... [RUN]
06:16:03  1 of 1 OK created sql table model main.customers ............................... [OK in 0.12s]
06:16:03
06:16:03  Finished running 1 table model in 0 hours 0 minutes and 0.28 seconds (0.28s).
06:16:03
06:16:03  Completed successfully
06:16:03
06:16:03  Done. PASS=1 WARN=0 ERROR=0 SKIP=0 TOTAL=1
{{ source('main', 'raw_customers') }}などが実体に置き換えられたSQLは/target/compiled/tutorial/models以下に格納されています。
データとロジックを分離したTransformを行う(モデルの上にモデルをビルドする)
「データをクレンジングするロジック と データを変換するロジックは分ける」というSQLのbest practiceになるように、先程のSQLを書き換えます。
models/stg_customers.sqlとして以下を保存。
select
    id as customer_id,
    first_name,
    last_name

from {{ source('main', 'raw_customers') }}
models/stg_orders.sqlとして以下を保存。
select
    id as order_id,
    user_id as customer_id,
    order_date,
    status

from {{ source('main', 'raw_orders') }}
models/customers.sqlを以下に書き換えます。
with customers as (

    select * from {{ ref('stg_customers') }}

),

orders as (

    select * from {{ ref('stg_orders') }}

),

customer_orders as (

    select
        customer_id,

        min(order_date) as first_order_date,
        max(order_date) as most_recent_order_date,
        count(order_id) as number_of_orders

    from orders

    group by 1

),

final as (

    select
        customers.customer_id,
        customers.first_name,
        customers.last_name,
        customer_orders.first_order_date,
        customer_orders.most_recent_order_date,
        coalesce(customer_orders.number_of_orders, 0) as number_of_orders

    from customers

    left join customer_orders using (customer_id)

)

select * from final
dbt runを実行。stg_customersとstg_ordersとcustomersは別々のテーブルとして作成されます。dbtが自動で実行順序を推測して順番にクエリが実行されます。customersはstg_customersとstg_ordersに依存しているためcustomersが最後に実行されています。SQL同士で循環的な依存関係があった場合は、エラーを出してくれます。
テストを実行する
dbtでは、modelsディレクトリにあるSQLにテストを行うことができます。models/schema.ymlに以下を保存します。
 version: 2

 sources:
   - name: main
     tables:
       - name: raw_customers
       - name: raw_orders

+models:
+  - name: customers
+    columns:
+      - name: customer_id
+        tests:
+          - unique
+          - not_null
+
+  - name: stg_customers
+    columns:
+      - name: customer_id
+        tests:
+          - unique
+          - not_null
+
+  - name: stg_orders
+    columns:
+      - name: order_id
+        tests:
+          - unique
+          - not_null
+      - name: status
+        tests:
+          - accepted_values:
+              values: ['placed', 'shipped', 'completed', 'return_pending', 'returned']
+      - name: customer_id
+        tests:
+          - not_null
+          - relationships:
+              to: ref('stg_customers')
+              field: customer_id
dbt testでテストを実行することができます。dbtにデフォルトであるテストを実行したり、自作のカスタムテストを各テーブルの各カラムに対して実行することができます。
今回の場合は、以下の4種類のテストがmodels/schema.ymlに記載されています。
- unique: ユニークであるか
- not_null: nullが含まれていないか
- accepted_values: 指定した許容値のみかどうか
- relationships: テーブル間のリレーション(今回の例では、
ordersテーブル内のcustomer_idは、customersテーブルのidに含まれているというリレーション)
ドキメントを生成する
先ほど作成したmodels/schema.ymlをもとにドキュメントを作成することができます。models/schema.ymlを以下に書き換えます。
 version: 2

 sources:
   - name: main
     tables:
       - name: raw_customers
       - name: raw_orders

 models:
   - name: customers
+    description: One record per customer
     columns:
       - name: customer_id
+        description: Primary key
         tests:
           - unique
           - not_null
       - name: first_order_date
+        description: NULL when a customer has not yet placed an order.

   - name: stg_customers
+    description: This model cleans up customer data
     columns:
       - name: customer_id
+        description: Primary key
         tests:
           - unique
           - not_null

   - name: stg_orders
+    description: This model cleans up order data
     columns:
       - name: order_id
+        description: Primary key
         tests:
           - unique
           - not_null
       - name: status
         tests:
           - accepted_values:
               values: ['placed', 'shipped', 'completed', 'return_pending', 'returned']
       - name: customer_id
         tests:
           - not_null
           - relationships:
               to: ref('stg_customers')
               field: customer_id
dbt docs generateでドキュメントを生成。dbt docs serveでWebUIのドキュメントを起動できます(自動的にページが立ち上がらなかった場合、http://localhost:8080にChromeなどのブラウザでアクセスしてください)。画像のようなmodels/schema.ymlに記載した情報が記載されています。
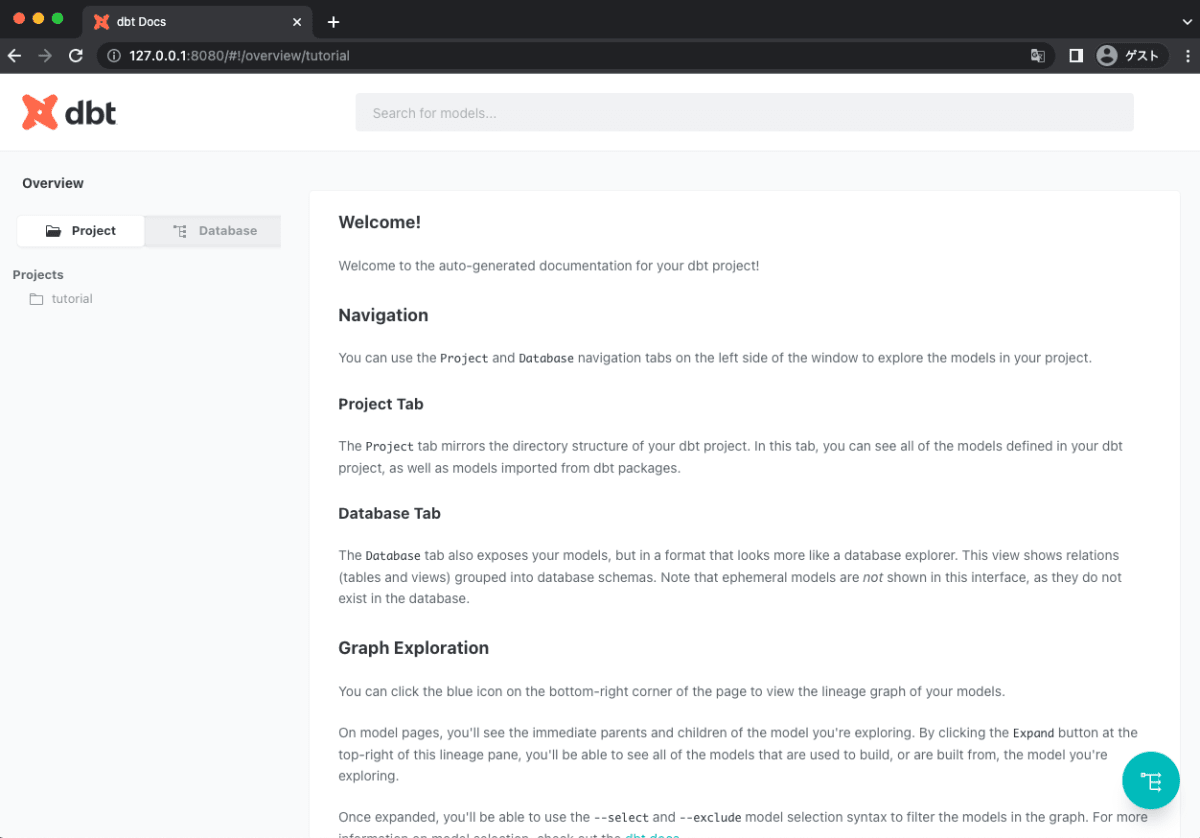
トップページ
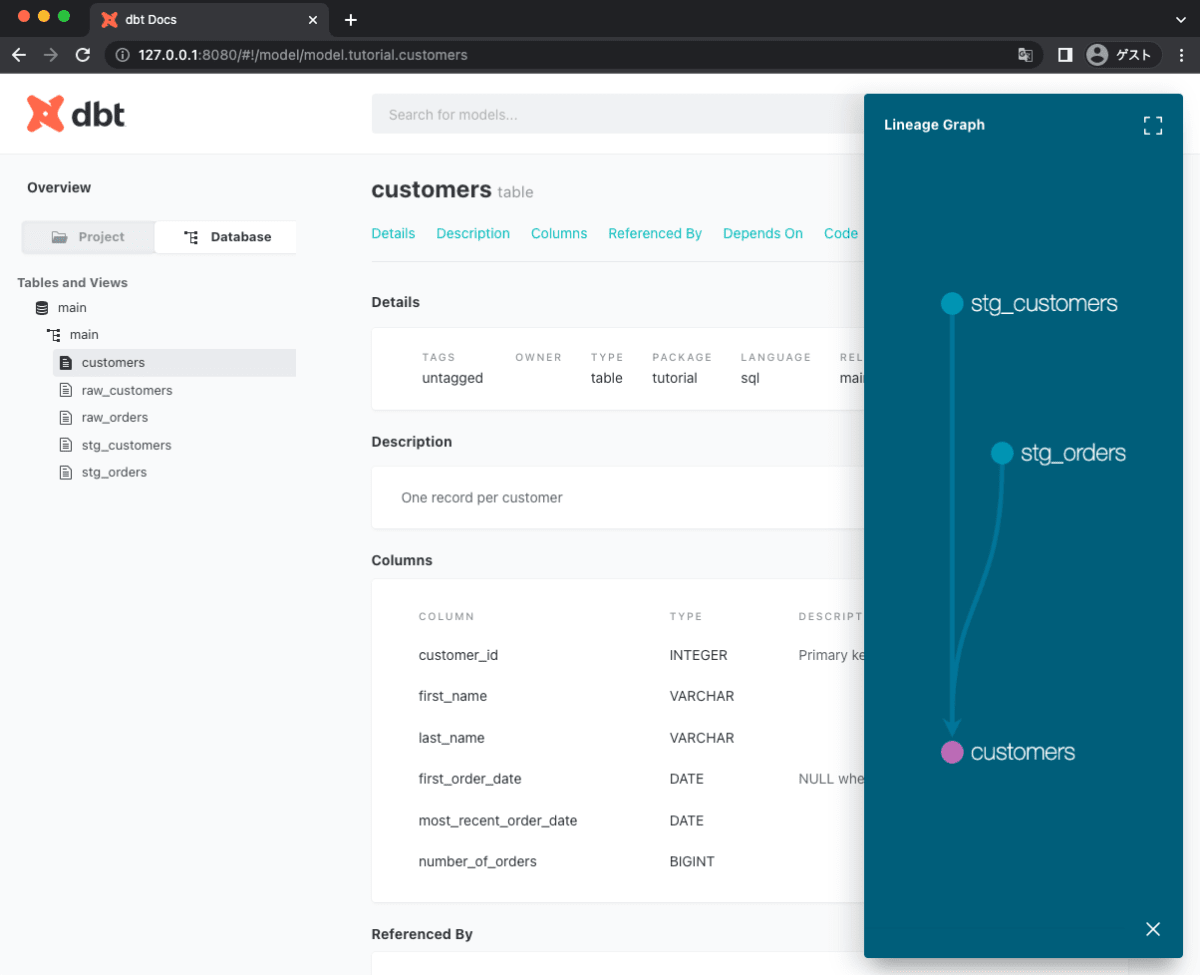
customersテーブルのドキュメント
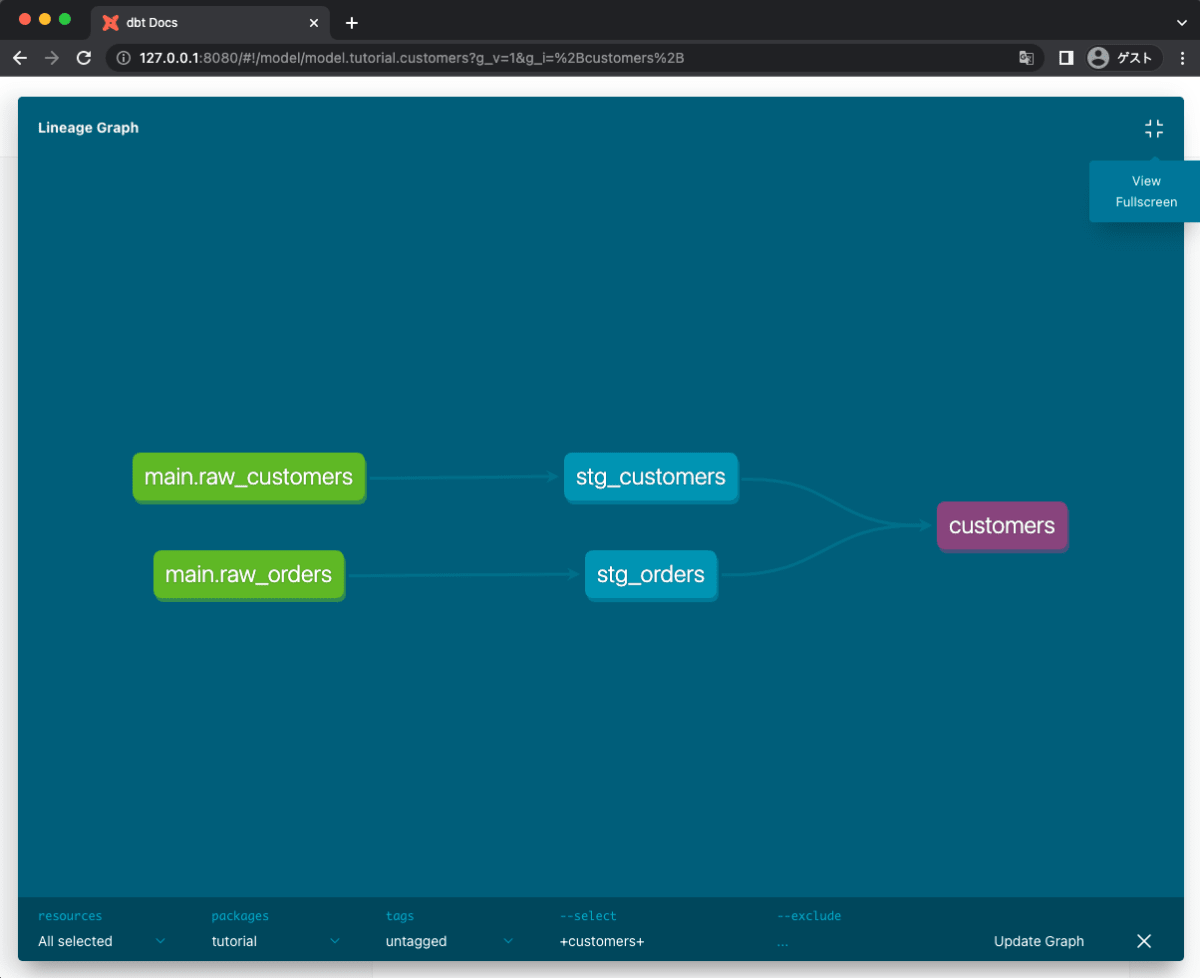
Lineageと呼ばれるテーブルの依存関係図
以上でチュートリアルは終了です。dbtの公式チュートリアルに則った基本的な使い方のみ紹介したので、他のテストはどうやるのかや、変数を利用したSQLの書き方などは別途、調べてください。
受領したデータをSQL+dbtを用いて分析に必要なデータをローカル環境のみ作成し、PythonからDuckDBに接続して予測モデルとかに入力するとかの実装ができるとシステム化を行う際などにシームレスに移行できていいなと思っています。
参考
-
dbt seedコマンドでseedとして登録することも可能ですが、dbt best practiceにはsourceデータは設置するべきではないとなっているので、DuckDBに手で登録する形を取っています。参考:The rest of the project | dbt Developer Hub ↩︎
Discussion