🔐
SvelteKitとAuthJsを使ってOAuthログイン機能を作る


はじめに
SvelteKitでOAuth認証を使うとなると今のところ自力で実装するかAuthJsしか選択肢がないと思います。(sk-authはメンテされてなくAuthJsとほぼ同じ)
一応SupabaseとSvault
がありますが、プロバイダが少なかったりします。
Google,GitHub,DiscordだけだったらSvaultのほうがいいのかもしれない
使いましょうAuthJs。
機能的にはNextAuthベースなのでプロバイダとかを簡単に設定できます。
基本的にはdocumentをなぞればいいだけですがたまにnext-authのままだったり、わかりにくかったりするので一応簡単に説明します。
準備
インスコ
npm install @auth/core @auth/sveltekit
データベース用Adapter
AuthJsがもともと用意しているAdapter
npm i @auth/<任意>-adapter
Adapterを自作
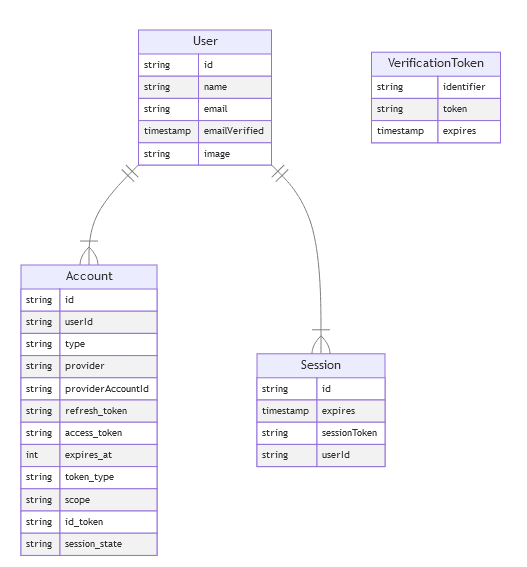
データベース構造
各自のデータベースにあわせて設定して下さい
設定
プロバイダはそれごとに違うので省略しますが、だいたい.envにclientIdとclientSecret置いとけばどうにかなります
詳しくは
src/hooks.server.ts
src/hooks.server.ts
import { AUTH_SECRET, GOOGLE_CLIENT_ID, GOOGLE_CLIENT_SECRET,GITHUB_CLIENT_ID ,GITHUB_CLIENT_SECRET } from '$env/static/private';
import Google from '@auth/core/providers/google';
const auth = SvelteKitAuth(async ({ locals }) => {
  return {
    adapter: Adapter(db),//JWTの場合不要
    providers: [
      Google({
        clientId: GOOGLE_CLIENT_ID,
        clientSecret: GOOGLE_CLIENT_SECRET
      }),
      GitHub({
        clientId: GITHUB_CLIENT_ID,
        clientSecret:GITHUB_CLIENT_SECRET
      })
    ],
    secret: AUTH_SECRET,
    trustHost: true,
    callbacks: {
      session: async ({ session, user }) => {
        //idとかをSessionに含める場合
        if (session.user){
          session.user.id = user.id;
          //session.user.role="admin"
        }
        return session
      }
    },
    pages:{
      signIn:"/signIn",//`signIn()`(プロバイダ指定なし)の時に飛ぶ
      newUser:"/setup",//初ログインの時にリダイレクトする。,
      error:"/auth/error"//認証中のエラー発生時にリダイレクト
    }
  };
}) satisfies Handle;

export const handle = sequence(auth);
src/routes/+layout.server.ts
src/routes/+layout.server.ts
import type { LayoutServerLoad } from "./$types";

export const load = (async ({ locals }) => {
  return {
    session: await locals.getSession()
  };
}) satisfies LayoutServerLoad;
Sessionの型を追加
src/types/authjs.d.ts
import { DefaultSession } from "@auth/core/types";
declare module '@auth/core/types' {
  interface Session {
    user: {
      //id等を追加する場合
      id:string
    } & DefaultSession.user
  }
}
ログインページの例
<script lang="ts">
import { signIn , signOut } from '@auth/sveltekit/client';
import { page } from '$app/stores';
</script>
{#if $page.data.session?.user}
  <h1>Welcome {$page.data.session.user.name}</h1>
  <button on:click={signOut}>SignOut</button>
{:else}
  <h1>Select provider to sign in</h1>
  <button on:click={()=>signIn("google")}>Google</button>
  <button on:click={()=>signIn("github")}>GitHub</button>
{/if}
ページ保護
ページごとに保護する
+page.server.ts
import { redirect } from "@sveltejs/kit";
import type { PageServerLoad } from "./$types";

export const load: PageServerLoad = async (event) => {
  const session = await event.locals.getSession();
  if (!session?.user) throw redirect(303, "/auth");
  return {};
};
パスごとに
src/hooks.server.ts
const protect=(async ({ event, resolve })=>{
  const protectedPages=["/protected","/admin"];
  if(protectedPages.some(s=>event.url.pathname.startsWith(s))){
    const session = await event.locals.getSession();
    if (!session) {
      throw redirect(303, "/signIn");
    }
  }
  return resolve(event);
}) satisfies Handle;
export const handle = sequence(auth,protect);
おわり
さすがNextAuth簡単ですね。
Svelte大好き人間なのでライブラリが増えれば増えるほど俺が喜びます。任せた。
ほな
Discussion
こちらもおすすめです
おお!知らなかったぱっと見よさそうですね!!!
ありがとうございます!!!!!!