Basic認証付きのCloudFront + S3環境をCloudFormationで構築する
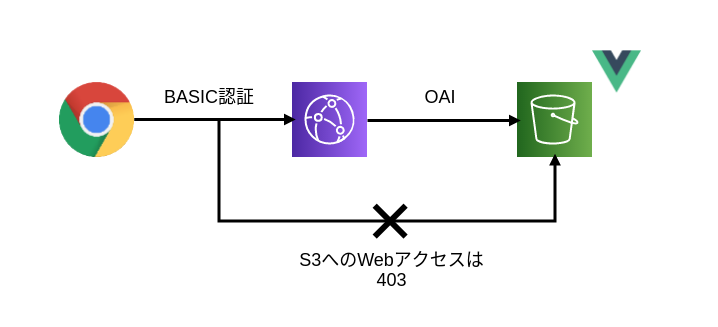
PoCや個人開発において以下のような構成を取りたいケースが多かったので、CloudFormationでサッと作れるようにしたので備忘メモ✍
デプロイすると、 https://xxxxx.cloudfront.net/ のドメインでBasic認証付きのWebページができあがります

また、今回は未着手ですが、バックエンドがほしければServerless Frameworkを追加するなど、色々応用もできるものと思います!
(Terraformの例でアレですがこのような方法で可能です)
方法
サンプルとして、今回はこのようなディレクトリ構成を仮定します👪
infra.yml がスタック定義、 dist/ 配下に配信したいWebアプリケーション一式、 bin/deploy がデプロイ用スクリプトのイメージです
スクリプト内で環境変数を用いるので、必要に応じて direnv などで注入できるようにして下さい
$ tree . -L 2
.
├── .envrc
├── bin/
│   └── deploy
├── dist/
└── infra.yml
スタック定義は以下になります。定義におけるポイントをコメントで補記しています🍚
変数となりうる値はパラメーター指定できるようにしているので、コピーしてそのまま使えるはずです
なお、Basic認証にはCloudFront Functionsを用いており、こちら の記事を参考にさせて頂きました
AWSTemplateFormatVersion: 2010-09-09
Parameters:
  BucketName:
    Type: String
    Description: BucketName
  AuthUser:
    Type: String
    Description: Username for basic authentication
    MinLength: 1
  AuthPass:
    Description: Password for basic authentication
    Type: String
    MinLength: 1
Resources:
  Distribution:
    Type: AWS::CloudFront::Distribution
    Properties:
      DistributionConfig:
        Origins:
          - Id: S3Origin
            DomainName:
              # ここをS3バケットのDomainNameにしていると、S3作成直後のリクエストが307になる
              # https://aws.amazon.com/jp/premiumsupport/knowledge-center/s3-http-307-response/
              Fn::GetAtt:
                - Bucket
                - RegionalDomainName
            S3OriginConfig:
              OriginAccessIdentity:
                Fn::Sub: origin-access-identity/cloudfront/${OriginAccessIdentity}
        Enabled: true
        Comment:
          Fn::Sub: ${BucketName}
        # dist/ 配下でデフォルトにて参照させたいファイルにあわせる
        DefaultRootObject: index.html
        DefaultCacheBehavior:
          TargetOriginId: S3Origin
          ViewerProtocolPolicy: redirect-to-https
          ForwardedValues:
            # バックエンドにSLSを用いるケースでCookieやクエリストリングを使いたい場合は要調整
            QueryString: false
            Cookies:
              Forward: none
          DefaultTTL: 0
          MaxTTL: 0
          MinTTL: 0
          FunctionAssociations:
            # CFへのリクエスト時にBasic認証をおこなう
            - EventType: viewer-request
              FunctionARN:
                Fn::GetAtt:
                  - CloudFrontFunction
                  - FunctionARN
        CustomErrorResponses:
          - ErrorCode: 403
            ResponsePagePath: /
            ResponseCode: 200
            ErrorCachingMinTTL: 0
        PriceClass: PriceClass_200
        # 日本国外からもアクセスさせたい場合は削除
        Restrictions:
          GeoRestriction:
            RestrictionType: whitelist
            Locations:
              - JP
        # 独自ドメインを利用したい場合は要調整
        ViewerCertificate:
          CloudFrontDefaultCertificate: true
  CloudFrontFunction:
    Type: AWS::CloudFront::Function
    Properties:
      Name:
        Fn::Sub: ${BucketName}-basic-auth
      FunctionConfig:
        Comment:
          Fn::Sub: ${BucketName}-basic-auth
        Runtime: cloudfront-js-1.0
      AutoPublish: true
      FunctionCode:
        Fn::Sub: |
          function handler(event) {
            var request = event.request;
            var headers = request.headers;

            var authUser = '${AuthUser}';
            var authPass = '${AuthPass}';
            var tmp = authUser + ':' + authPass;
            var authString = 'Basic ' + tmp.toString('base64');
            // echo Basic $(echo -n ${AuthUser}:${AuthPass} | base64)

            if (
              typeof headers.authorization === "undefined" ||
              headers.authorization.value !== authString
            ) {
              return {
                statusCode: 401,
                statusDescription: "Unauthorized",
                headers: { "www-authenticate": { value: "Basic" } }
              };
            }

            return request;
          }
  OriginAccessIdentity:
    # S3バケット用のOAIを作成
    # https://docs.aws.amazon.com/ja_jp/AmazonCloudFront/latest/DeveloperGuide/private-content-restricting-access-to-s3.html#private-content-creating-oai
    Type: AWS::CloudFront::CloudFrontOriginAccessIdentity
    Properties:
      CloudFrontOriginAccessIdentityConfig:
        Comment:
          Fn::Sub: ${BucketName}
  Bucket:
    # コンテンツ配信用バケット
    Type: AWS::S3::Bucket
    Properties:
      BucketName:
        Fn::Sub: ${BucketName}
      # OAI経由でS3へアクセスさせるため、S3のパブリックアクセスはすべてブロック
      PublicAccessBlockConfiguration:
        BlockPublicAcls: true
        BlockPublicPolicy: true
        IgnorePublicAcls: true
        RestrictPublicBuckets: true
  BucketPolicy:
    Type: AWS::S3::BucketPolicy
    Properties:
      Bucket:
        Fn::Sub: ${BucketName}
      PolicyDocument:
        Statement:
          # S3バケット用OAIからのS3オブジェクトへの読み取りアクセスを許可
          # https://docs.aws.amazon.com/ja_jp/AmazonCloudFront/latest/DeveloperGuide/private-content-restricting-access-to-s3.html#private-content-granting-permissions-to-oai
          Action:
            - s3:GetObject
          Effect: Allow
          Resource:
            - Fn::Sub: arn:aws:s3:::${BucketName}/*
          Principal:
            AWS:
              Fn::Sub: arn:aws:iam::cloudfront:user/CloudFront Origin Access Identity ${OriginAccessIdentity}
Outputs:
  DomainName:
    # スタック作成後ドメインを確認するため出力
    Value:
      Fn::GetAtt:
        - Distribution
        - DomainName
スタック定義を作ったら、次はデプロイ用スクリプトを作ります
やることとしては大きく以下の3つになります👺
- Webアプリのビルド
- ここは展開するものにあわせて任意に変えて下さい
- 今回のサンプルでは、
npm run build実行後にdist/配下にアプリが作成されていることを前提とします
- CloudFormationスタックの作成
-
aws cloudformation deployにて作成します - 環境変数をスタックのパラメーター変数に注入します
-
--no-fail-on-empty-changesetを指定しているため、定義とリソースに差分がない時は処理スキップとなります
-
- Webアプリの公開
-
aws s3 syncにてdist/配下のファイルを作成したS3バケットにアップロードします - この時、拡張子ごとにContent-Typeを明示的に指定 & 特定の拡張子のファイルのみアップロードするため、ヒアドキュメントで拡張子とContent-Typeの対応表を作っています
- AWS CLIの場合、デフォルトではContent-Typeは推測される ので、もしも不要であれば単純に
aws s3 sync "$base_path/dist" "s3://$bucket_name/"でもOKです- 私は
application/octet-streamが付与されるのを確実に避けたかったため、明示的に指定することとしました - また、
dist/配下に誤って認証情報やデータファイルを置いてしまったケースでもアップロードが防げるものと思います
- 私は
- AWS CLIの場合、デフォルトではContent-Typeは推測される ので、もしも不要であれば単純に
-
#!/bin/bash -eu

bucket_name="$AWS_S3_BUCKET_NAME"
auth_user="$AWS_CF_AUTH_USER"
auth_pass="$AWS_CF_AUTH_PASS"
base_path="$(cd "$(dirname "$0")/.." && pwd)"

echo "start build:"
npm run build

echo "start deploy: infra"
aws cloudformation deploy \
  --stack-name "$bucket_name-stack" \
  --template-file "$base_path/infra.yml" \
  --parameter-overrides "BucketName=$bucket_name" "AuthUser=$auth_user" "AuthPass=$auth_pass" \
  --no-fail-on-empty-changeset

echo "start deploy: $bucket_name"
while read condition content_type; do
  echo "----- $condition -----"
  aws s3 sync "$base_path/dist" "s3://$bucket_name/" \
    --exclude "*" --include "$condition" \
    --content-type "$content_type"
  [ $? -ne 0 ] && exit 9
done <<EOF
*.html   text/html
*.js     application/javascript
*.js.map application/octet-stream
*.css    text/css
*.ico    image/x-icon
*.png    image/png
*.jpg    image/jpeg
*.svg    image/svg+xml
*.ttf    application/x-font-ttf
*.eot    application/vnd.ms-fontobject
*.woff   application/font-woff
EOF

echo "show output"
aws cloudformation describe-stacks \
  --stack-name "$bucket_name-stack" \
  --query 'Stacks[0].Outputs[*]'

echo "done."

exit 0
環境変数については、以下の値の指定が必要ですので、実行前に確認して下さい
export AWS_ACCESS_KEY_ID=xxxxx
export AWS_SECRET_ACCESS_KEY=yyyyy/zzzzz
export AWS_DEFAULT_REGION=ap-northeast-1

export AWS_S3_BUCKET_NAME=your-bucket-name
export AWS_CF_AUTH_USER=user
export AWS_CF_AUTH_PASS=pass
実行が正常に終了すると、以下のような形式でドメイン名が表示されます
(初回はCloudFront Distributionが作成されるため時間がかかります⏳)
$ ./bin/deploy

(中略)

[
    {
        "OutputKey": "DomainName",
        "OutputValue": "xxxxx.cloudfront.net"
    }
]
done.
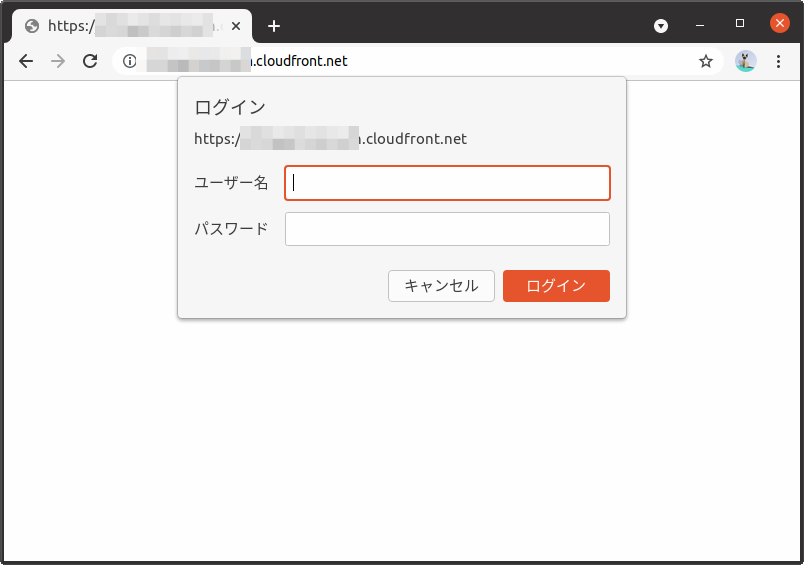
URLにアクセスして、Basic認証のダイアログが表示されれば成功です🎉

同じ要領で、 https://your-bucket-name.s3.ap-northeast-1.amazonaws.com/index.html にアクセスした際にリクエストが拒否されることも確認できます

めでたしめでたし👵
Discussion