Amplify × Nuxt.js × Stripeのローカル環境でStripeのWebhookを処理する


はじめに
StripeにはVisual Studio Code向けの拡張機能があり、この拡張機能を使用することでSteipeの発行するWebhook HTTPリクエストをローカル環境に飛ばすことができます。これによりWebhook処理の開発体験が向上します。また、AmplifyではAWS Lambdaを利用したREST APIの構築が可能です。しかし、(2022年2月現在)AmplifyはREST APIのモック実行をサポートしておらず、この問題を解消してStripeのローカル開発体験を向上させるために簡単な仕組みを作成しました。
なお、「Stripeとは、Amplifyとはなんぞや」といった内容には今回触れませんのでご了承ください
環境
- Windows 11 Pro 21H1
- WSL2
- Docker Desktop
- コンテナ内の環境
- Node.js v16.13.1
- Amplify CLI v7.6.12
- Nuxt.js v2.15.8
devcontainer環境で開発しています。必要な方はご確認ください。
.devcontainerの内容を表示する
// For format details, see https://aka.ms/devcontainer.json. For config options, see the README at:
// https://github.com/microsoft/vscode-dev-containers/tree/v0.163.1/containers/typescript-node
{
  "name": "Node.js & TypeScript",
  "build": {
    "dockerfile": "Dockerfile",
    // Update 'VARIANT' to pick a Node version: 10, 12, 14, 16
    "args": {
      "VARIANT": "16"
    }
  },
  // Set *default* container specific settings.json values on container create.
  "settings": {
    "vetur.validation.template": false,
    "vetur.experimental.templateInterpolationService": true,
    "editor.formatOnSave": true,
    "editor.defaultFormatter": "esbenp.prettier-vscode",
    "editor.codeActionsOnSave": {
      "source.fixAll.eslint": true
    }
  },
  // Add the IDs of extensions you want installed when the container is created.
  "extensions": [
    "dbaeumer.vscode-eslint",
    "octref.vetur",
    "esbenp.prettier-vscode",
    "orta.vscode-jest",
    "irongeek.vscode-env",
    "graphql.vscode-graphql",
    "stripe.vscode-stripe"
  ],
  // Use 'forwardPorts' to make a list of ports inside the container available locally.
  // "forwardPorts": [],
  // Use 'postCreateCommand' to run commands after the container is created.
  // "postCreateCommand": "yarn install",
  // Comment out connect as root instead. More info: https://aka.ms/vscode-remote/containers/non-root.
  "remoteUser": "node"
}
# See here for image contents: https://github.com/microsoft/vscode-dev-containers/tree/v0.163.1/containers/typescript-node/.devcontainer/base.Dockerfile

# [Choice] Node.js version: 16, 14, 12
ARG VARIANT="16-buster"
ARG STRIPE_CLI_VERSION="1.7.9"
FROM mcr.microsoft.com/vscode/devcontainers/typescript-node:0-${VARIANT}

# [Optional] Uncomment this section to install additional OS packages.
RUN apt-get update && export DEBIAN_FRONTEND=noninteractive \
    && apt-get -y install --no-install-recommends default-jre libgtk2.0-0 libgtk-3-0 libgbm-dev libnotify-dev libgconf-2-4 libnss3 libxss1 libasound2 libxtst6 xauth xvfb

# [Optional] Uncomment if you want to install an additional version of node using nvm
# ARG EXTRA_NODE_VERSION=10
# RUN su node -c "source /usr/local/share/nvm/nvm.sh && nvm install ${EXTRA_NODE_VERSION}"

# [Optional] Uncomment if you want to install more global node packages
RUN su node -c "npm install -g @aws-amplify/cli"
RUN curl "https://github.com/stripe/stripe-cli/releases/download/v${STRIPE_CLI_VERSION}/stripe_${STRIPE_CLI_VERSION}_linux_x86_64.tar.gz"
RUN tar -xvf stripe_${STRIPE_CLI_VERSION}_linux_x86_64.tar.gz
RUN cp stripe /usr/local/bin/
仕組み
簡単な話、Nuxt.jsのserverMiddlewareを使用し、特定のパスにリクエストが来たら子プロセスとしてamplify mock functionを実行しようといった内容です。
Lambda function
まずLambda関数の説明から。ここは特に仕組みと関係ありません。既にStripeのWebhookを処理できるLambdaをお持ちの方は読み飛ばして頂いて結構です。
REST APIを処理するLambdaを作成していない場合はamplify add functionで作成します。私はStripeWebhookという名前で作成しました。また、advanced settingsでsecretを追加し、STRIPE_API_KEYとSTRIPE_WEBHOOK_KEYを設定してください。
amplify add functionの内容
node ➜ /workspaces/my-project (main ✗) $ amplify add function
? Select which capability you want to add: Lambda function (serverless function)
? Provide an AWS Lambda function name: StripeWebhook
? Choose the runtime that you want to use: NodeJS
? Choose the function template that you want to use: Hello World

Available advanced settings:
- Resource access permissions
- Scheduled recurring invocation
- Lambda layers configuration
- Environment variables configuration
- Secret values configuration

? Do you want to configure advanced settings? Yes
? Do you want to access other resources in this project from your Lambda function? No
? Do you want to invoke this function on a recurring schedule? No
? Do you want to enable Lambda layers for this function? No
? Do you want to configure environment variables for this function? No
? Do you want to configure secret values this function can access? Yes
? Enter a secret name (this is the key used to look up the secret value): STRIPE_API_KEY
? Enter the value for STRIPE_API_KEY: [hidden]
? What do you want to do? Add a secret
? Enter a secret name (this is the key used to look up the secret value): STRIPE_WEBHOOK_KEY
? Enter the value for STRIPE_WEBHOOK_KEY: [hidden]
? What do you want to do? (Use arrow keys)
  Add a secret
  Update a secret
  Remove secrets
❯ I'm done
次に、コード内でsecretを取得する専用のクラスを定義します。これはAmplifyのsecretをTypeScriptで型付けしつつ取得できる(私的に)便利なクラスです。
import { SSM } from 'aws-sdk'

/**
 * aws-sdk.SSMのインスタンスからgetParametersのみをピックした型です。
 */
export type SSMSDK = Pick<SSM, 'getParameters'>

type RemoveIndexSignature<T> = {
  [K in keyof T as string extends K ? never : K]: T[K]
}

/**
 * Amplifyのsecretを取得するクラスです。
 */
export class Secret {
  /**
   * Secretを初期化します
   * @param ssmSDK aws-sdk.SSMのインスタンス
   */
  constructor(private ssmSDK: SSMSDK) {}

  /**
   * secretの値をオブジェクトとして取得します。
   * @param env process.env
   * @param keys 取得したいsecretのキー配列
   * @returns secretをプロパティに持つオブジェクト
   *
   * @example
   * declare global {
   *   namespace NodeJS {
   *     interface ProcessEnv {
   *       STRIPE_API_KEY: string
   *       STRIPE_WEBHOOK_KEY: string
   *     }
   *   }
   * }
   * const secret = await new Secret(new SSM()).get(process.env, [
   *   'STRIPE_API_KEY',
   *   'STRIPE_WEBHOOK_KEY',
   * ])
   * console.log(secret.STRIPE_API_KEY) // STRIPE_API_KEYの値
   */
  async get<
    T extends { [key: string]: string | undefined },
    Keys extends (keyof RemoveIndexSignature<T>)[]
  >(env: T, keys: Keys): Promise<{ [P in Keys[number]]: string }> {
    const { Parameters } = await this.ssmSDK
      .getParameters({
        Names: keys.map((secretName) => {
          const secretKey = env[secretName] as string | undefined
          if (!secretKey) {
            throw new Error(`${secretName} is not set. Did you set the value?`)
          }
          return secretKey
        }),
        WithDecryption: true,
      })
      .promise()
    return keys.reduce((result, key) => {
      const secret = Parameters?.find(
        (parameter) => parameter.Name === env[key]
      )
      if (!secret?.Value) {
        throw new Error(`${key} is not set. Did you set the value?`)
      }
      return { ...result, [key]: secret.Value }
    }, {}) as { [P in Keys[number]]: string }
  }
}
secretを取得するクラスを作成したら次は任意の処理をLambdaに記述します。
import { APIGatewayProxyHandler } from 'aws-lambda'
import { SSM, CognitoIdentityServiceProvider } from 'aws-sdk'
import { Stripe } from 'stripe'
import { Secret } from './secret'

/* Amplify Params - DO NOT EDIT
  STRIPE_API_KEY
  STRIPE_WEBHOOK_KEY
  ENV
  REGION
Amplify Params - DO NOT EDIT */

declare global {
  namespace NodeJS {
    interface ProcessEnv {
      STRIPE_API_KEY: string
      STRIPE_WEBHOOK_KEY: string
      ENV: string
      REGION: string
    }
  }
}

export const handler: APIGatewayProxyHandler = async (req) => {
  const secret = await new Secret(new SSM()).get(process.env, [
    'STRIPE_API_KEY',
    'STRIPE_WEBHOOK_KEY',
  ])
  const stripe = new Stripe(secret.STRIPE_API_KEY, {
    apiVersion: '2020-08-27',
  })
  if (!req.headers['stripe-signature']) {
    return {
      statusCode: 401,
      body: '',
    }
  }
  if (!req.body) {
    return {
      statusCode: 400,
      body: '',
    }
  }
  const event = stripe.webhooks.constructEvent(
    req.body,
    req.headers['stripe-signature'],
    secret.STRIPE_WEBHOOK_KEY
  )

  // 任意のevent処理をここに記述

  return {
    statusCode: 200,
    body: '',
  }
}
serverMiddleware
続いてserverMiddlewareの作成。
tools/rest-api-mock.tsを作成して下記内容で保存します。
import { spawn } from 'child_process'
import { writeFile, mkdir } from 'fs/promises'
import express, { text } from 'express'

/**
 * REST APIのモック実行を模倣します。
 */
const app = express()
// Stripeの署名検査は生のbody値を使用する必要があるため、jsonではなくtextとして受け取る
app.use(text({ type: '*/*' }))
app.all('/stripe-webhook', async (req, res) => {
  const eventFile = `tmp/${new Date().getTime()}.json` as const
  const baseDir = 'amplify/backend/function/StripeWebhook' as const
  await mkdir(`${baseDir}/tmp`, { recursive: true })
  await writeFile(
    `${baseDir}/${eventFile}`,
    JSON.stringify({
      httpMethod: req.method,
      path: req.path,
      body: req.body,
      headers: req.headers,
    })
  )
  spawn(
    'amplify',
    [
      'mock',
      'function',
      'StripeWebhook',
      '--event',
      // functionsディレクトリからの相対パスを渡す
      // 絶対パスを指定してもfunctionsディレクトリからの相対パスに変換されてしまうため注意
      eventFile,
    ],
    {
      stdio: 'inherit',
    }
  )
  res.status(200)
  res.end()
})

export default app
先ほど作成したserverMiddlewareを開発時のみ読み込むようにnuxt.config.tsに記述します。
export default {
  serverMiddleware:
    process.env.NODE_ENV === 'development'
      ? ['~/tools/rest-api-mock']
      : undefined,
}
これで準備は完了です。
実行
まずyarn devでNuxt開発サーバーを起動します。
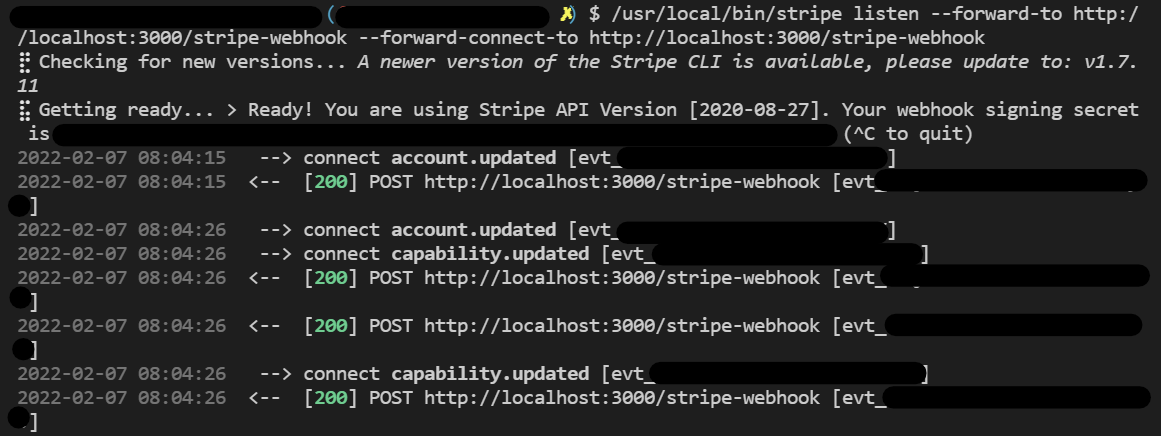
続いてStripe拡張機能のForward events to your local machineを起動し、ローカルのURLにhttp://localhost:3000/stripe-webhookを指定します。

起動するとVisual Studio CodeのターミナルにStripeが追加されます。(色は私が付けています。)
後はStripe上でアクションを実施するとローカルでwebhookが実行されます。
以上となります。
さいごに
Amplifyは開発速度を飛躍的に向上させる素晴らしいサービスで、2021年末のアップデートで私の一押しなAWS CDKとも組み合わせられるようになってますます勢いを感じます。
しかしながら、本格的に利用し始めると意外なところに落とし穴があって初心者にオススメしにくいのがネックです。ある程度AWSのサービスに慣れている方にはオススメですので是非お試しください。
Discussion