🔥
FlutterでFirebaseAuth+FirebaseUIAuthを設定する手順
| Github |  |
|---|
自分用のため、公式の説明を焼き直してまとめただけな上、自分が使った機能しか書いていません。
リファレンス
インストール
flutter pub add firebase_auth firebase_ui_auth firebase_ui_localizations
多言語対応
MaterialApp.localizationsDelegatesにFirebaseUILocalizations.delegateを追加します。
class MyApp extends ConsumerWidget {
  const MyApp({super.key});

  @override
  Widget build(BuildContext context, WidgetRef ref) {
    final router = ref.watch(routerProvider);
    return MaterialApp.router(
      title: 'My App',
      routerConfig: router,
      localizationsDelegates: [
        ...context.localizationDelegates,
+       FirebaseUILocalizations.delegate, // 追加
      ],
      supportedLocales: context.supportedLocales,
      locale: context.locale,
    );
  }
}
easy_localizationやflutter_riverpod,go_routerを使っている場合の例です。
メールリンクサインイン
こちらで
Google Sign In
flutter pub add firebase_ui_oauth_google
Firebaseの設定
Firebaseのコンソール上でAuthenticationのログインプロバイダにGoogleを追加します。
- Android用にSHA-1の設定が必要なので下の項目で説明します。
- iOS用にはGoogleService-Info.plistを更新する必要があります。
Android用設定
- SHA-1の設定で取得したSHA-1をFirebaseのAndroidアプリに登録します。
keytool -list -v -keystore ~/.android/debug.keystore -alias androiddebugkey -storepass android -keypass android -
OAuth同意画面の必須項目を設定します。
-
デベロッパーの連絡先情報が必須ですが、入力されていない場合がありますので入力します。 - 他の項目も必要に応じて入力します。
-
iOS用設定
CFBundleURLTypes属性をios/Runner/Info.plistに追加します。
	<key>CFBundleURLTypes</key>
	<array>
		<dict>
			<key>CFBundleTypeRole</key>
			<string>Editor</string>
			<key>CFBundleURLSchemes</key>
			<array>
				<!-- TODO Replace this value: -->
				<!-- Copied from GoogleService-Info.plist key REVERSED_CLIENT_ID -->
				<string>[YOUR REVERSED CLIENT ID]</string>
			</array>
		</dict>
	</array>
Dart実装
SignInScreen(
  providers: [
    GoogleProvider(clientId: '', iOSPreferPlist: true),
  ],
);
Sign in with Apple
flutter pub add firebase_ui_oauth_apple
Firebaseの設定
Firebaseのコンソール上でAuthenticationのログインプロバイダにAppleを追加します。
- Android/Webでも有効にするには設定が必要です。下の項目で説明します。
- Darwin向けにはFirebase上の設定は特にありません。
Android/Webの設定
Firebaseの設定に必要なのは4つあります。
手順は長いので折りたたみますが、ポチポチするだけです。
- Sign in with Apple用のServiceID
ServiceIDの取得
- Certificates, Identifiers & ProfilesのIdentifiersにアクセスします。
-
+ボタンをクリックしてServiceIDを作成します。descriptionとidentifierを入力して作成を完了します。-
descriptionはログイン画面にサービス名として表示される名前になります。


-
- 今作成したServiceIDが一覧にあると思うのでそれをクリックします。
-
Sign In with Appleにチェックを入れてConfigureをクリックします。-
Primary App IDには今回紐づけるアプリのBundle IDを入力します。 -
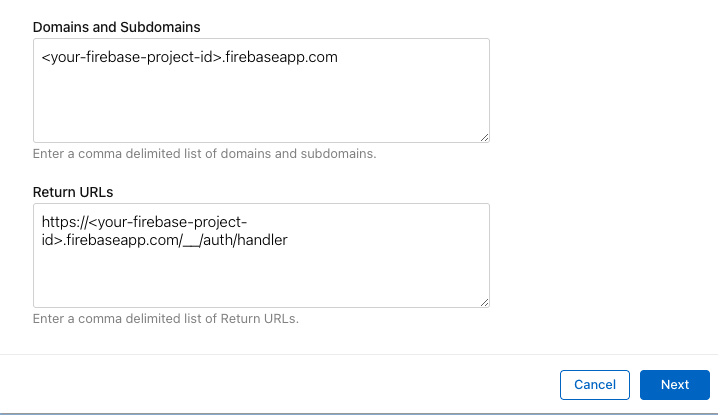
Domains and Subdomainsには<your-firebase-project-id>.firebaseapp.comを入力します。 -
Return URLsにはhttps://<your-firebase-project-id>.firebaseapp.com/__/auth/handlerを入力します。これはFirebaseコンソールでAppleのプロバイダ設定をする際にコピーできます。
-
- 設定が終わったら
Continue→Saveで設定を保存します。 - 先ほど設定したServiceIDをFirebaseのコンソールのAppleのプロバイダ設定に追加すれば完了です。
- Team ID → こちらで確認
- Key ID と 秘密鍵
作成方法
既にPush通知用などで秘密鍵を持っている場合はそれを使っても構いません。
- 今度はCertificates, Identifiers & ProfilesのKeysにアクセスします。
-
+ボタンをクリックしてKeyを作成します。-
Key Nameに任意の名前を入力します。 -
Sign in with Appleにチェックを入れます。 -
ConfigureからPrimary App IDに今回紐づけるアプリのBundle IDを選択します。 - 戻って
Continue→Registerで設定を完了します。 - Keyを
Downloadします。1度しかできないので安全な場所にバックアップしておきます。 - また、
Key IDが作られるのでこれもメモします。
-
用意できたらFirebaseコンソールに戻り、Appleのプロバイダ設定にOAuth コードフローの構成(省略可)に追加してください。
省略可ありますが、AndroidとWebで使うには必要です。
iOSの設定
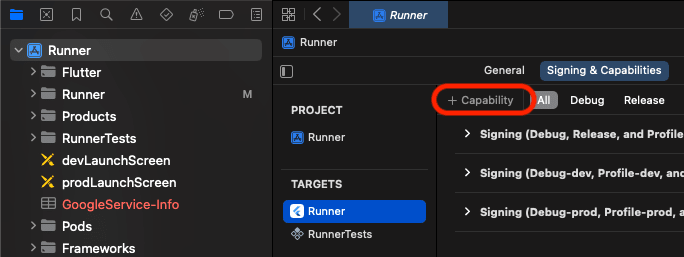
- Xcode上でSign in with Appleを有効にします。
open ios/Runner.xcworkspace
- Signing & Capabilitiesタブを開き、「+ Capability」から「Sign in with Apple」を追加します。

- Firebaseのコンソール上でSign in with Appleを有効にします。
Dart実装
SignInScreen(
  providers: [
    AppleProvider(),
  ],
);
<!--
匿名メールアドレスの転送設定
登録に利用されるランダムなメールアドレスとやりとり出来るメールアドレスやドメインを設定します。
- Certificates, Identifiers & ProfilesのServicesから
Sign in with Apple for Email CommunicationのConfigureをクリックします。 -
+ボタンをクリックしてEmail Domainを追加します。-
Domainにはやり取りしたいメールアドレスのドメインがあれば入力します。 -
Email Addressにnoreply@<your-firebase-project-id>.firebaseapp.comかカスタムしている場合はそれを入力します。

-->
-
Discussion