VSCode+PlatformIOでRISC-V CH32V203マイコンの開発環境を構築
VSCodeのPlatformIOアドオンの設定
VSCode上で、PlatformIOのアドオンを選択する。

PlatformIO用のCH32プラットフォームを追加します。
Advanced platform installationを選択して下記のURLを入力してInstallする。

下図のようにWCH CH32Vが追加されていることを確認できればOK.

platform-ch32vのアップデート
初回インストール時には最新版がクローンされるが、しばらく使っているとバージョンの差が発生する。クイックアクセスのところから、PlatformIO Core CLIを選択してターミナルを表示したら、以下のコマンドでアップデートできる。
> pio pkg update -g -p "ch32v"
Platform Manager: Updating ch32v @ 1.0.0+sha.60ac59a
git version 2.37.3.windows.1
remote: Enumerating objects: 964, done.
remote: Counting objects: 100% (964/964), done.
remote: Compressing objects: 100% (275/275), done.
Receiving objects: 100% (852/852), 1.43 MiB | 2.85 MiB/sack-reused 0 (from 0)Receiving objects:  99% (844/852), 1.43 MiB | 2.85 MiB/s
Receiving objects: 100% (852/852), 1.47 MiB | 2.92 MiB/s, done.
Resolving deltas: 100% (595/595), completed with 88 local objects.
From https://github.com/Community-PIO-CH32V/platform-ch32v
   60ac59a..b7397c2  develop    -> origin/develop
Updating 60ac59a..b7397c2
Fast-forward
 .github/workflows/examples.yml                     |    15 +-
 README.md                                          |    41 +-
 boards/ch32v003f4p6_evt_r0.json                    |    16 +-
 boards/ch32v203c8t6_evt_r0.json                    |    20 +-
 boards/ch32v307_evt.json                           |    20 +-
 :
 create mode 100644 System/ch32x035/system_ch32x035.h
 create mode 100644 platformio/ldscripts/Link_CH32X035.ld
 create mode 100644 platformio/ldscripts/Link_CH59x.ld
Tool Manager: tool-minichlink@0.1.0+sha.af02ba5 is already up-to-date
Tool Manager: tool-ninja@1.9.0 is already up-to-date
Tool Manager: tool-openocd-riscv-wch@2.1100.230329 is already up-to-date
Tool Manager: tool-wchisp@0.22.230228 is already up-to-date
Tool Manager: toolchain-riscv@1.80200.190731+sha.8ee4117 is already up-to-date
新規プロジェクト作成
今回使うチップはCH32V203K8T6です。
手元にある3種類のCH32V RISC-Vマイコン。右端のものを今回利用する。
しかし、この性能でこの値段は安い!(値段は秋月価格)

なお、自作した基板を使っています。詳細は後述。
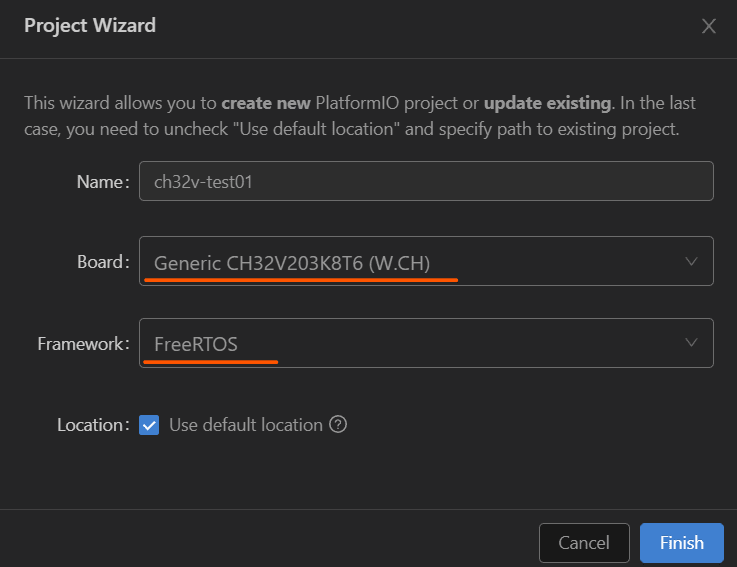
自作基板なので、Generic CH32V203K8T6 (W.CH)、FrameworkにFreeRTOSを選択してプロジェクトを作成。

接続の確認
今回は以下を試します。
- PA15に接続されているLEDをLチカ
- RTOSのタスクで500ms間隔で光らせる
- print文をシリアルモニタに出力させる
CH32V203シリーズのデータシート
利用する機能のブロック図がp5にある

USARTについては、3つ搭載されているみたいですが、USART1を利用します。
MCUからシリアルデータとして文字を出力したいので、USART1のTXのピンを確認するとPA9がそれっぽい(p21)。このピンとWCH-LinkEのRXを接続しておきます。

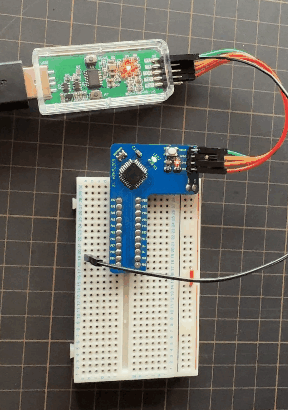
接続は以下のとおり
| WCH-LinkE | 基板 |
|---|---|
| 3V3 | 3V3 |
| GND | GND |
| SWDIO/TMS | SWDIO |
| SWCLK/TCK | SWCLK |
| RX | PA9 |
実際の接続は下図になります。WCH-LinkEはPCに接続しますが、1点注意があって極力USBハブとか長いケーブルは避けたほうが良いです。後述する書き込みチェック(チェックサムで確認)で頻繁にエラーが発生しました。

RTOSプログラムの実装
プロジェクトを作成しても、srcフォルダには何も出力されてないので、以下のblinky-freertosサンプルを真似てみることにします。
このサンプルにあるFreeRTOSConfig.hをコピーしてsrcフォルダに配置します。RTOSの基本設定です。今後ここで何が設定できるかは確認するとして今回はコピるだけです。
src/main.cファイルを作成して、サンプルを参考に実装は以下の内容にしました。
サンプルとは利用するピンの番号やグループが異なるので変更しています。
// src/main.c
#include "debug.h"
#include "FreeRTOS.h"
#include "task.h"

TaskHandle_t Task1Task_Handler;

void GPIO_Toggle_INIT(void){
  GPIO_InitTypeDef GPIO_InitStructure = {0};
  RCC_APB2PeriphClockCmd(RCC_APB2Periph_GPIOA, ENABLE);
  GPIO_InitStructure.GPIO_Pin = GPIO_Pin_15;
  GPIO_InitStructure.GPIO_Mode = GPIO_Mode_Out_PP;
  GPIO_InitStructure.GPIO_Speed = GPIO_Speed_50MHz;
  GPIO_Init(GPIOA, &GPIO_InitStructure);
}

void task1_task(void *pvParameters){
  while (1){
    printf("task1_task entry\r\n");
    GPIO_ResetBits(GPIOA, GPIO_Pin_15);
    vTaskDelay(500);
    GPIO_SetBits(GPIOA, GPIO_Pin_15);
    vTaskDelay(500);
  }
}

int main(void){

  NVIC_PriorityGroupConfig(NVIC_PriorityGroup_1);
  SystemCoreClockUpdate();
  Delay_Init();
  USART_Printf_Init(115200);
  Delay_Ms(1000);

  printf("SystemClk:%u\r\n", (unsigned)SystemCoreClock);
  #if defined(CH32V30X)
  printf("ChipID: %08x\r\n", (unsigned)DBGMCU_GetCHIPID());
  #else
  printf("DeviceID: %08x\r\n", (unsigned)DBGMCU_GetDEVID());
  #endif
  printf("FreeRTOS Kernel Version:%s\r\n", tskKERNEL_VERSION_NUMBER);

  GPIO_Toggle_INIT();
  xTaskCreate((TaskFunction_t)task1_task,
              (const char *)"task1",
              (uint16_t)256,
              (void *)NULL,
              (UBaseType_t)5,
              (TaskHandle_t *)&Task1Task_Handler);

  vTaskStartScheduler();

  while (1){
  }
}
PlatformIOのアドオンが有効であれば、下部のツールバーの赤線アイコンをクリックしてビルドを実行する。

参考までにビルドも添付。
platformio.exe run

Processing genericCH32V203K8T6 (platform: ch32v; board: genericCH32V203K8T6; framework: freertos)
--------------------------------------------------
Verbose mode can be enabled via `-v, --verbose` option
CONFIGURATION: https://docs.platformio.org/page/boards/ch32v/genericCH32V203K8T6.html
PLATFORM: WCH CH32V (1.0.0+sha.60ac59a) > Generic CH32V203K8T6
HARDWARE: CH32V203K8T6 144MHz, 20KB RAM, 64KB Flash
DEBUG: Current (wch-link) On-board (wch-link) External (minichlink)
PACKAGES:
 - framework-wch-freertos @ 2.10000.0+sha.5a99a7c
 - framework-wch-noneos-sdk @ 2.10000.0+sha.2cafe78
 - tool-openocd-riscv-wch @ 2.1100.230329 (11.0)
 - toolchain-riscv @ 1.80200.190731+sha.8ee4117
LDF: Library Dependency Finder -> https://bit.ly/configure-pio-ldf
LDF Modes: Finder ~ chain, Compatibility ~ soft
Found 0 compatible libraries
Scanning dependencies...
No dependencies
Building in release mode
Compiling .pio\build\genericCH32V203K8T6\FrameworkNoneOSCore\core_riscv.o
Compiling .pio\build\genericCH32V203K8T6\FrameworkNoneOSStartup\startup_ch32v20x_D6.o
Compiling .pio\build\genericCH32V203K8T6\FrameworkNoneOSSSystem\system_ch32v20x.o
Compiling .pio\build\genericCH32V203K8T6\FrameworkNoneOSDebug\debug.o
Compiling .pio\build\genericCH32V203K8T6\FrameworkInitFini\cpp_support.o
Compiling .pio\build\genericCH32V203K8T6\FrameworkFreeRTOSCore\croutine.o
Compiling .pio\build\genericCH32V203K8T6\FrameworkFreeRTOSCore\event_groups.o
Compiling .pio\build\genericCH32V203K8T6\FrameworkFreeRTOSCore\list.o
Compiling .pio\build\genericCH32V203K8T6\FrameworkFreeRTOSCore\portable\GCC\RISC-V\port.o
Compiling .pio\build\genericCH32V203K8T6\FrameworkFreeRTOSCore\portable\GCC\RISC-V\portASM.o
Compiling .pio\build\genericCH32V203K8T6\FrameworkFreeRTOSCore\portable\MemMang\heap_4.o
Compiling .pio\build\genericCH32V203K8T6\FrameworkFreeRTOSCore\queue.o
Compiling .pio\build\genericCH32V203K8T6\FrameworkFreeRTOSCore\stream_buffer.o
Compiling .pio\build\genericCH32V203K8T6\FrameworkFreeRTOSCore\tasks.o
Compiling .pio\build\genericCH32V203K8T6\FrameworkFreeRTOSCore\timers.o
Compiling .pio\build\genericCH32V203K8T6\src\main.o
Compiling .pio\build\genericCH32V203K8T6\FrameworkNoneOSVariant\ch32v20x_adc.o
Compiling .pio\build\genericCH32V203K8T6\FrameworkNoneOSVariant\ch32v20x_bkp.o
Compiling .pio\build\genericCH32V203K8T6\FrameworkNoneOSVariant\ch32v20x_can.o
Compiling .pio\build\genericCH32V203K8T6\FrameworkNoneOSVariant\ch32v20x_crc.o
Compiling .pio\build\genericCH32V203K8T6\FrameworkNoneOSVariant\ch32v20x_dbgmcu.o
Compiling .pio\build\genericCH32V203K8T6\FrameworkNoneOSVariant\ch32v20x_dma.o
Compiling .pio\build\genericCH32V203K8T6\FrameworkNoneOSVariant\ch32v20x_exti.o
Compiling .pio\build\genericCH32V203K8T6\FrameworkNoneOSVariant\ch32v20x_flash.o
Compiling .pio\build\genericCH32V203K8T6\FrameworkNoneOSVariant\ch32v20x_gpio.o
Compiling .pio\build\genericCH32V203K8T6\FrameworkNoneOSVariant\ch32v20x_i2c.o
Compiling .pio\build\genericCH32V203K8T6\FrameworkNoneOSVariant\ch32v20x_iwdg.o
Compiling .pio\build\genericCH32V203K8T6\FrameworkNoneOSVariant\ch32v20x_misc.o
Compiling .pio\build\genericCH32V203K8T6\FrameworkNoneOSVariant\ch32v20x_opa.o
Compiling .pio\build\genericCH32V203K8T6\FrameworkNoneOSVariant\ch32v20x_pwr.o
Compiling .pio\build\genericCH32V203K8T6\FrameworkNoneOSVariant\ch32v20x_rcc.o
Compiling .pio\build\genericCH32V203K8T6\FrameworkNoneOSVariant\ch32v20x_rtc.o
Compiling .pio\build\genericCH32V203K8T6\FrameworkNoneOSVariant\ch32v20x_spi.o
Compiling .pio\build\genericCH32V203K8T6\FrameworkNoneOSVariant\ch32v20x_tim.o
Compiling .pio\build\genericCH32V203K8T6\FrameworkNoneOSVariant\ch32v20x_usart.o
Compiling .pio\build\genericCH32V203K8T6\FrameworkNoneOSVariant\ch32v20x_wwdg.o
Archiving .pio\build\genericCH32V203K8T6\libFrameworkNoneOSVariant.a
Linking .pio\build\genericCH32V203K8T6\firmware.elf
Checking size .pio\build\genericCH32V203K8T6\firmware.elf
Advanced Memory Usage is available via "PlatformIO Home > Project Inspect"
RAM:   [=======   ]  73.9% (used 15140 bytes from 20480 bytes)
Flash: [==        ]  22.6% (used 14836 bytes from 65536 bytes)
Building .pio\build\genericCH32V203K8T6\firmware.bin
======================================================== [SUCCESS] Took 2.14 seconds ===
プログラムのアップロード
PCにWCH-LinkEを接続します。ココで認識してない場合やWCH-LinkEのセットアップしてない人は、WCH-LinkUtilityを使ってセットアップを済ませておく。(方法は割愛)
下図はCOM13としてますが、環境によって番号は変わるのと、Autoでも良い気がします。
接続が済んだら、赤字のUploadボタンを押すと、MCUにプログラムが書き込まれる。

もし、以下のようにチェックサムでエラーになる場合は、USBハブの利用をやめるか、ケーブルを短くしてみる。
** Verify Started **
Error: checksum mismatch - attempting binary compare
embedded:startup.tcl:1162: Error: ** Verify Failed **
in procedure 'program'
プログラムアップロード時の成功ログ
platformio.exe run --target upload

Processing genericCH32V203K8T6 (platform: ch32v; board: genericCH32V203K8T6; framework: freertos)
--------------------------------------------------
Verbose mode can be enabled via `-v, --verbose` option
CONFIGURATION: https://docs.platformio.org/page/boards/ch32v/genericCH32V203K8T6.html
PLATFORM: WCH CH32V (1.0.0+sha.60ac59a) > Generic CH32V203K8T6
HARDWARE: CH32V203K8T6 144MHz, 20KB RAM, 64KB Flash
DEBUG: Current (wch-link) On-board (wch-link) External (minichlink)
PACKAGES:
 - framework-wch-freertos @ 2.10000.0+sha.5a99a7c
 - framework-wch-noneos-sdk @ 2.10000.0+sha.2cafe78
 - tool-minichlink @ 0.1.0+sha.af02ba5
 - tool-openocd-riscv-wch @ 2.1100.230329 (11.0)
 - tool-wchisp @ 0.22.230228
 - toolchain-riscv @ 1.80200.190731+sha.8ee4117
LDF: Library Dependency Finder -> https://bit.ly/configure-pio-ldf
LDF Modes: Finder ~ chain, Compatibility ~ soft
Found 0 compatible libraries
Scanning dependencies...
No dependencies
Building in release mode
Checking size .pio\build\genericCH32V203K8T6\firmware.elf
Advanced Memory Usage is available via "PlatformIO Home > Project Inspect"
RAM:   [=======   ]  73.9% (used 15140 bytes from 20480 bytes)
Flash: [==        ]  22.6% (used 14836 bytes from 65536 bytes)
Configuring upload protocol...
AVAILABLE: isp, minichlink, wch-link
CURRENT: upload_protocol = wch-link
Uploading .pio\build\genericCH32V203K8T6\firmware.elf
Open On-Chip Debugger 0.11.0+dev-02415-gfad123a16-dirty (2023-01-03-10:00)
Licensed under GNU GPL v2
For bug reports, read
        http://openocd.org/doc/doxygen/bugs.html
debug_level: 1

Warn : Transport "sdi" was already selected
Ready for Remote Connections
[wch_riscv.cpu.0] Target successfully examined.
** Programming Started **
** Programming Finished **
** Verify Started **
** Verified OK **
** Resetting Target **
shutdown command invoked
======================================================== [SUCCESS] Took 4.01 seconds ====
書き込みが成功すると、プログラムが開始される。
シリアルモニタを起動すると、print文がちゃんと出力されています。
SystemClk:96000000
DeviceID: 00000500
FreeRTOS Kernel Version:V10.4.6
task1_task entry
task1_task entry
task1_task entry
task1_task entry
:
120円のRISC-VマイコンでRTOSプログラムすることができました。
サンプルにはほかにもI2C、SPI、USBなどの定番機能もあるので、気軽に楽しめそうです。
RISC-Vは今後も注目していこうと思ってます。
CH32V203K8T6向けの開発ボード
投稿記事で利用した基板は以下で販売してます。良かったらどうぞ。
- CH32V203K8T6向け
- WCH-LinkEからの給電して、ブレッドボードの電源ラインに接続
- L字型で極力省スペースにしてブレッドボードを使いやすくしてます。
以下は実装するかどうかは任意
- 電源LED
- リセット回路
- セラロックのフットプリント
- PA15にLED接続用のフットプリント


Discussion