AWS入門 - Copilot 使ってみる3
AWSを使う必要が出てきたので、色々と試してみる。
ここでは、Copilot を試す。
AWS Copilot
Copilotについて色々と試している。
今回はJob・Pipelineあたりを試してみる。
Job
JobとはイベントをトリガーしてECS Taskを実行する形式のもの。
Worker Serviceの場合はECS Serviceとして起動し、常時起動する形になっている。(なのでService扱いだと思う)
Jobの場合はECS Taskなので、イベントに応じて都度実行する形になっている。
現時点では”Scheduled Job”タイプのみサポートされている。
Schedule Job
EventBridgeでインベントをトリガーし、ECS Taskを実行する。
指定の時間・間隔でイベントをトリガーできる。
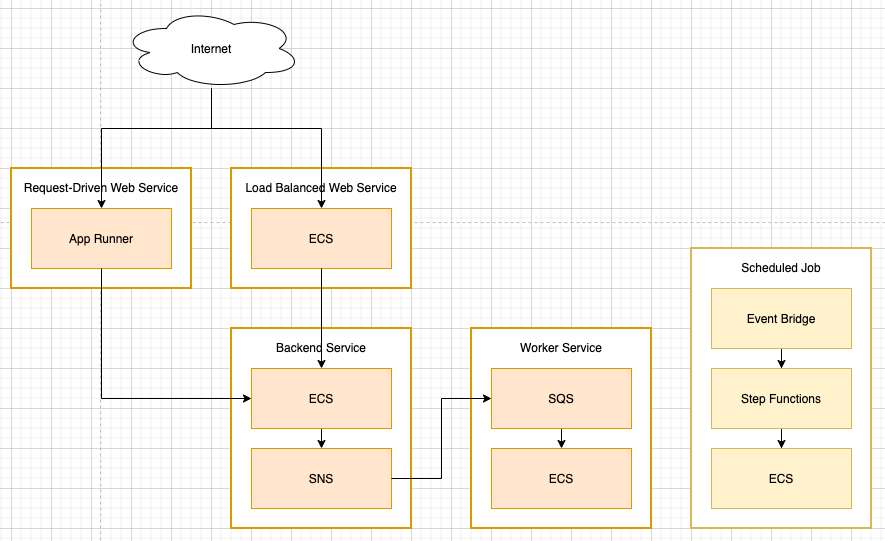
内部的には、EventBridge -> StepFunctions -> ECS Task のようにつながっている。
ECSだけでもScheduled Taskが設定できたり、EventBridgeから直接ECS Taskを実行できたりするっぽいが、CopilotではStepFunctionsを挟む形になっている。
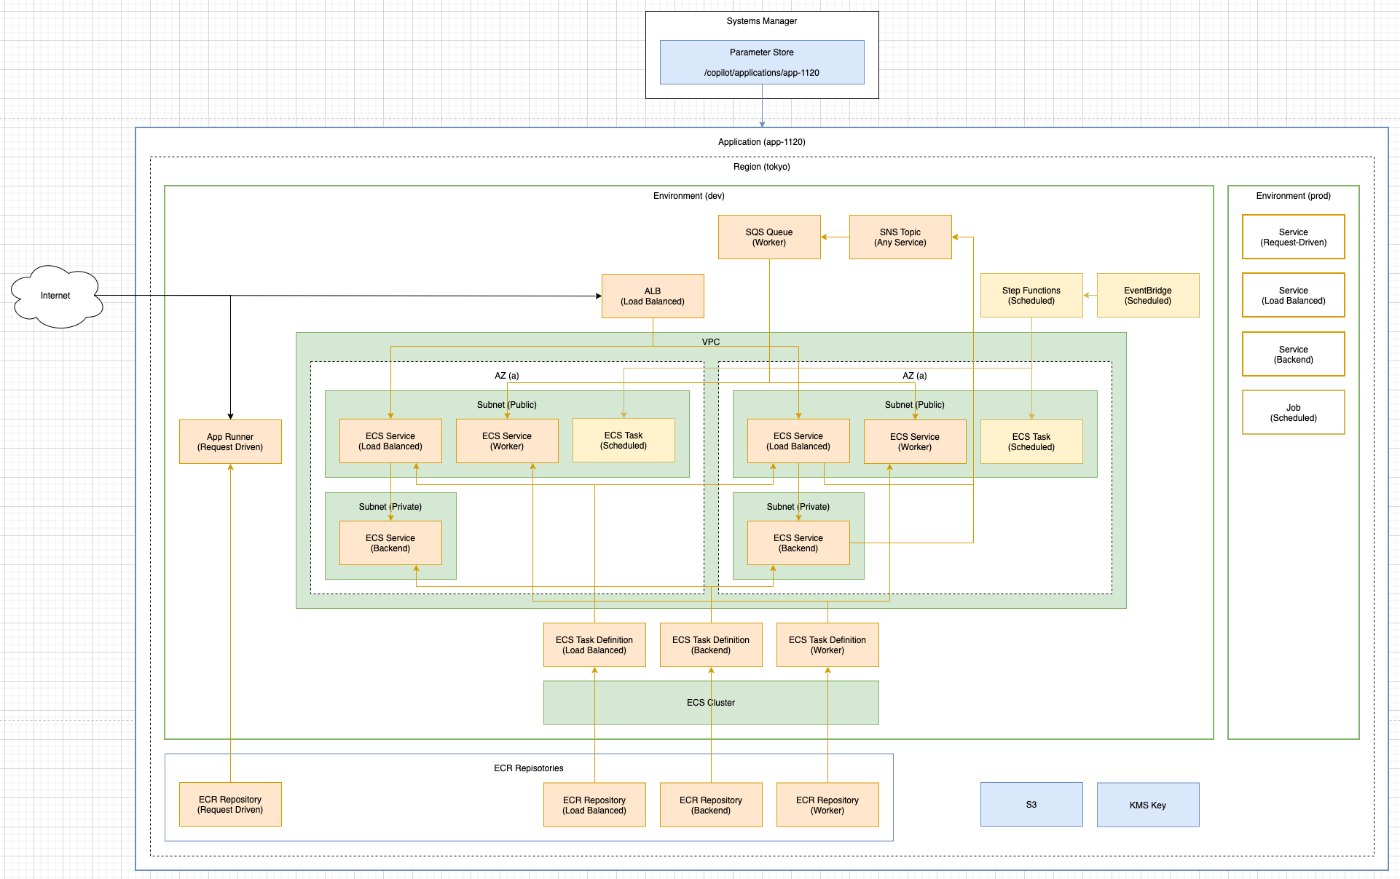
Since Copilot uses CloudFormation under the hood, all the resources created are visible and tagged by Copilot. Scheduled Jobs are composed of an AmazonECS Task Definition, Task Role, Task Execution Role, a Step Function State Machine for retrying on failures, and finally an Event Rule to trigger the state machine.
ここらへんが、その理由なのだろう。
$ copilot job init
Job name: job-sj
Dockerfile: ./Dockerfile.job
Schedule type: Rate
Rate: 3m
✔ Wrote the manifest for job job-sj at copilot/job-sj/manifest.yml
Your manifest contains configurations like your container size and job schedule (@every 3m).

✔ Created ECR repositories for job job-sj..

Recommended follow-up actions:
  - Update your manifest copilot/job-sj/manifest.yml to change the defaults.
  - Run `copilot job deploy --name job-sj --env test` to deploy your job to a test environment.
Pipeline
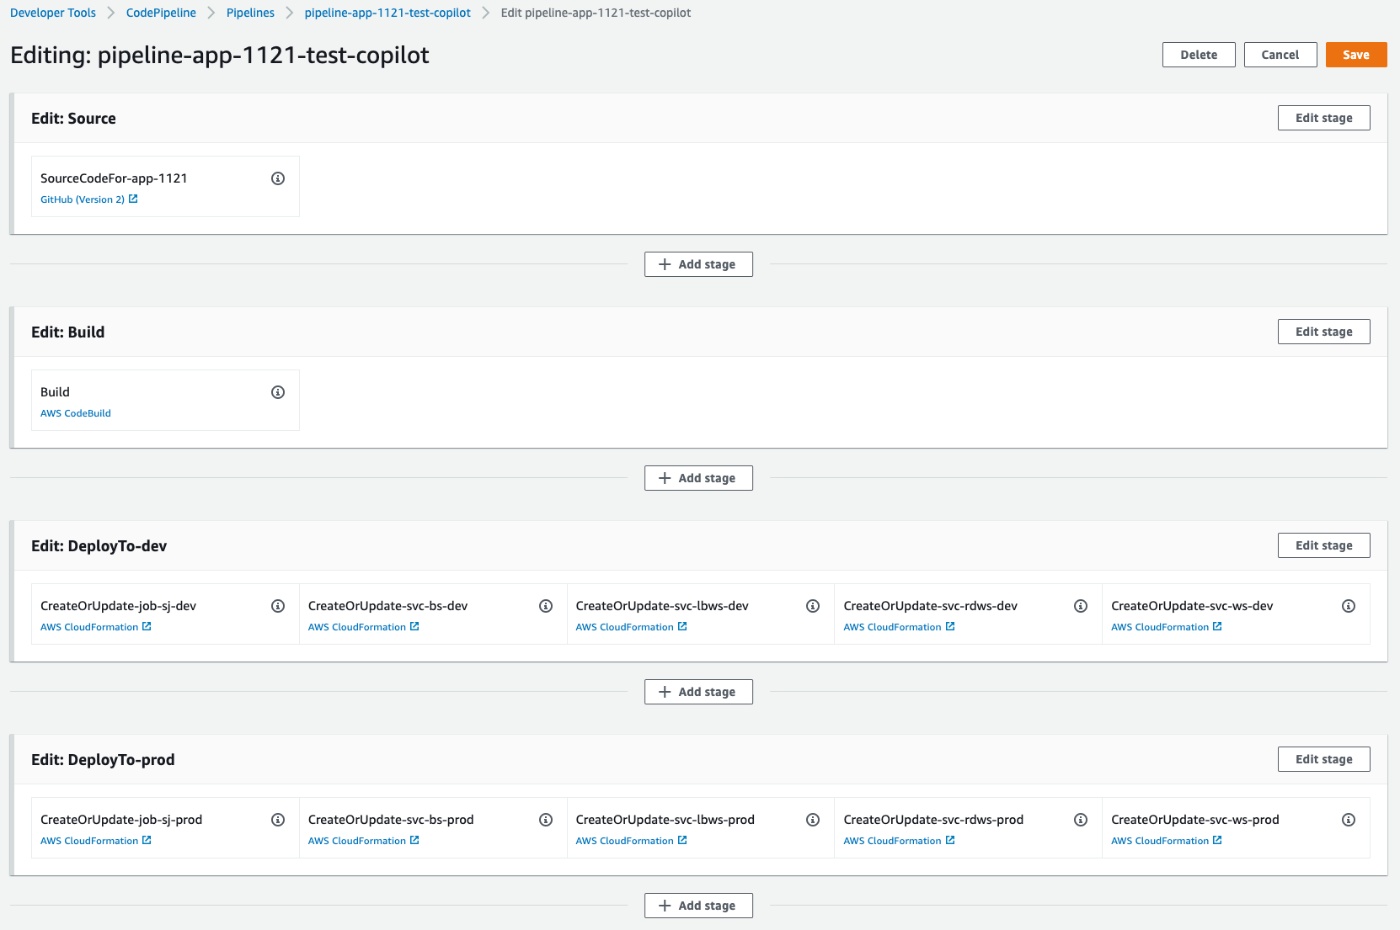
ApplicationのCI/CD環境。
CodePiplineが作成され、GitHubなどのpushに応じて起動されるよう設定される。
copilot pipeline init --url https://github.com/umatoma/test-copilot.git
1st stage: dev
2nd stage: prod
✔ Wrote the pipeline manifest for test-copilot at 'copilot/pipeline.yml'
The manifest contains configurations for your CodePipeline resources, such as your pipeline stages and build steps.
Update the file to add additional stages, change the branch to be tracked, or add test commands or manual approval actions.
✔ Wrote the buildspec for the pipeline's build stage at 'copilot/buildspec.yml'
The buildspec contains the commands to build and push your container images to your ECR repositories.
Update the build phase to unit test your services before pushing the images.

Required follow-up actions:
- Commit and push the buildspec.yml, pipeline.yml, and .workspace files of your copilot directory to your repository.
- Run `copilot pipeline update` to create your pipeline.
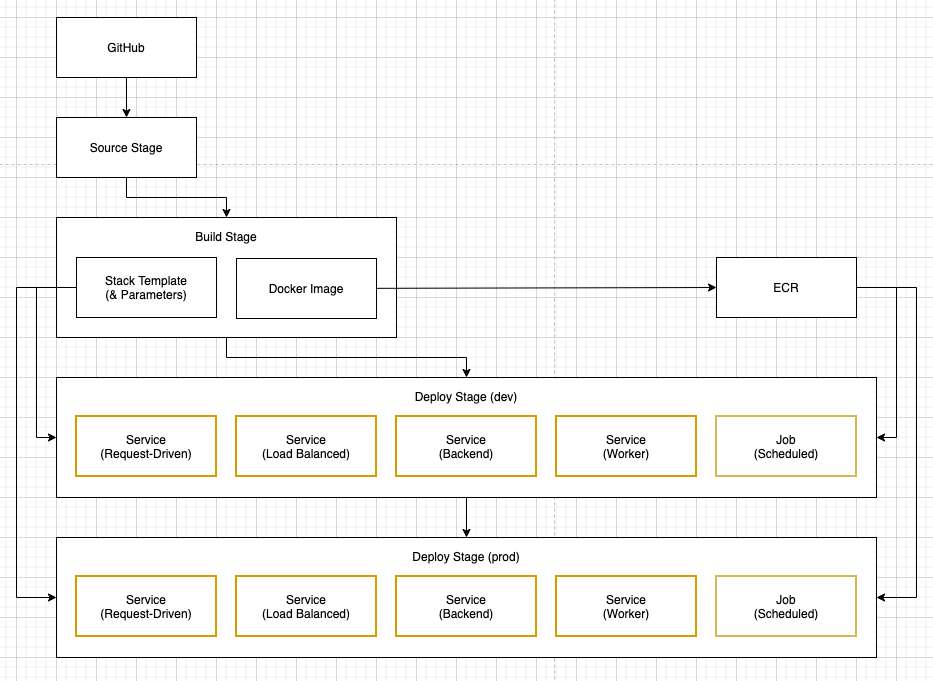
内部的には、Build Stageの時点で使用するDockerイメージと、それに対応するStack(Template&Parameters)が定まるようになっている。
なので、各Deploy Stageで、同じDockerイメージをデプロイできるようになっている。
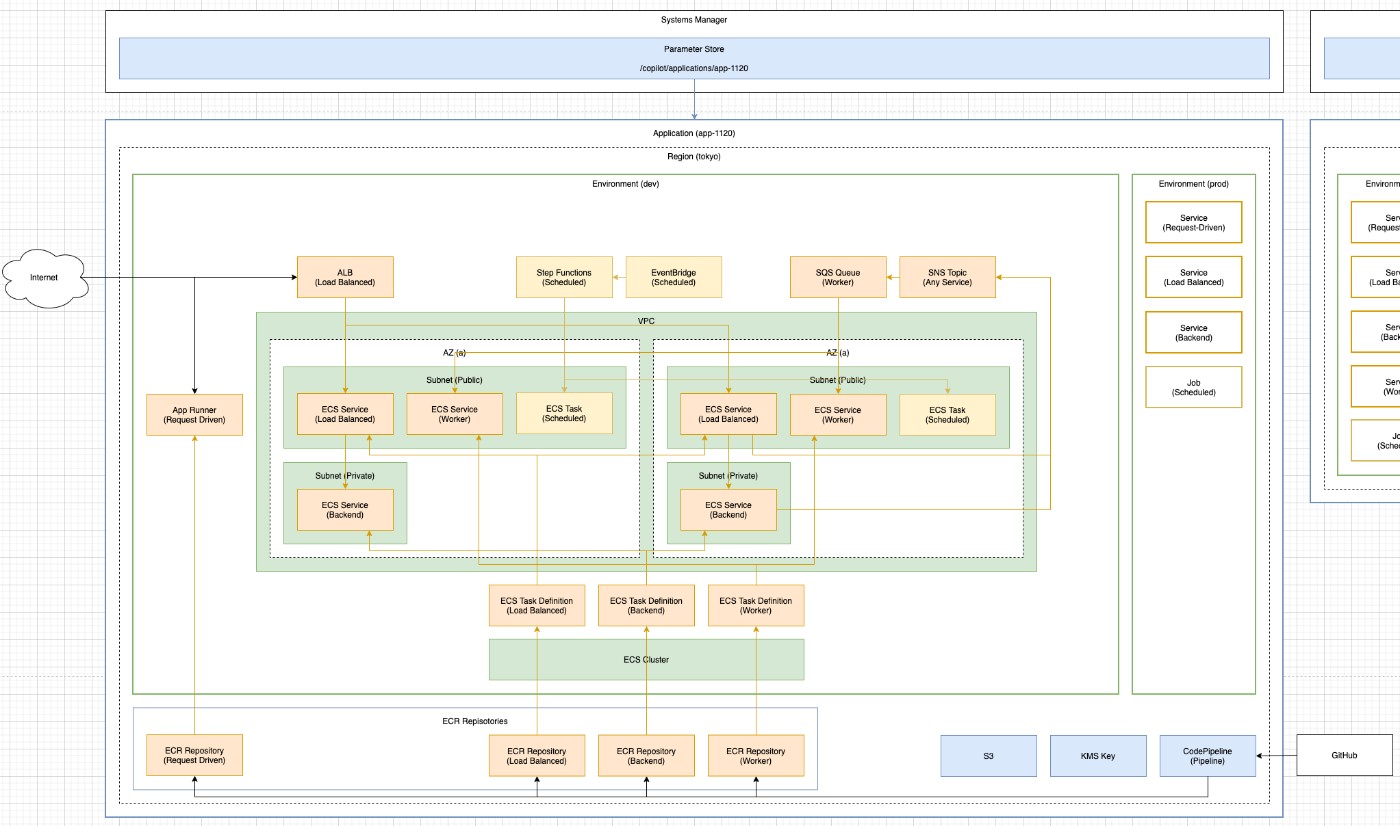
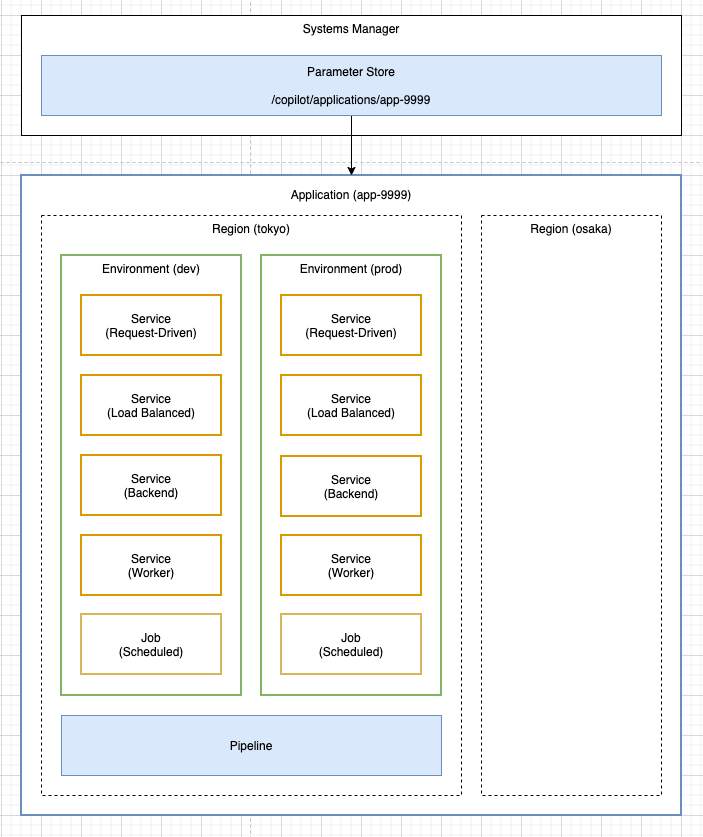
全体像はこんな感じ。
まとめ
これで、Service・Job・Pipelineを一通り触ってみた。
CI/CD含めて簡単に構築できてしまうのは良い。
これまでCopilotを試してみた感じからすると、
Copilotは「定められた構成でCFn Stackを作成・更新するためのCLI」、
な気がする。
Copilot特有の概念を維持するためSystems Managerに値を保存する以外は、
基本的にCFn Stackを更新しているだけである。(あとはECRにPushするぐらい)
任意のAWSリソースを追加する場合もCFn Stackのテンプレートを書く必要があるっぽいので、
やはりCFnに関する知識がある程度求められる気がする。
(知らなくても使えはするが、後々積む気がする)
後は、細かい機能を深堀りしていってみようと思う。
Copilotシリーズ
Discussion