CDN版Vue2アプリをVue3(+ES Modules)に書き直してみた
昨年、ビルドの必要がないWebブラウザだけで動くCDN版Vue.js Ver.2アプリの作り方を投稿しました。
あれから半年以上経ち、Vue3 リリースからもうすぐ2年になり、Vue3に対応するライブラリも増えてきましたので、Vue2アプリを Vue3 に書き直してみたいと思います。
Vue3 の目玉機能である Composition API に対応するとともに、今回は ES Modules を使ってES6コードで書いてみたいと思います。
以下のページを見ると、主要Webブラウザの現行バージョンではどれでも対応しているみたいなので、ブラウザによって動かないという心配はしなくてもよさそうです。
ES Modulesについて
ES Modules は、以下のように script タグに type="module" 要素を追加すると、ES6コードを書けるという仕組みです。
ブラウザで直接動かすコードを今までよりもわかりやすく書けるようになります。
<script type="module">
  ...
</script>
importmapの利用
今回 Vue や Vuetify 等のライブラリを読み込むために importmap という仕組みを利用しています。
例えば、以下のようにコードに書いておきます。
<script type="importmap">
  {
    "imports": {
      "vue": "https://unpkg.com/vue@3/dist/vue.esm-browser.js",
      "vuetify": "https://cdnjs.cloudflare.com/ajax/libs/vuetify/3.0.0-beta.1/vuetify.esm.js"
    }
  }
</script>
そうすると、Vue CLI、Vite を使って書いているのと同じように import ができます。とても可読性が良くなりました。
<script type="module">
  import { createApp, computed } from 'vue'
  import { createVuetify } from 'vuetify'
  ...
</script>
ただし、この機能はChrome等まだ一部のブラウザしか対応していないそうで、広く対応させるために es-module-shims を読み込ませておきます。
<script async src="https://ga.jspm.io/npm:es-module-shims@1.5.4/dist/es-module-shims.js"></script>
ブラウザで直接htmlを実行する場合
以下で説明するコードでは、HTMLファイルとは別にjsファイルをローカルから呼び出すようになっていますが、ブラウザでそのHTMLファイルをドロップして直接開くとエラーになり動きません。
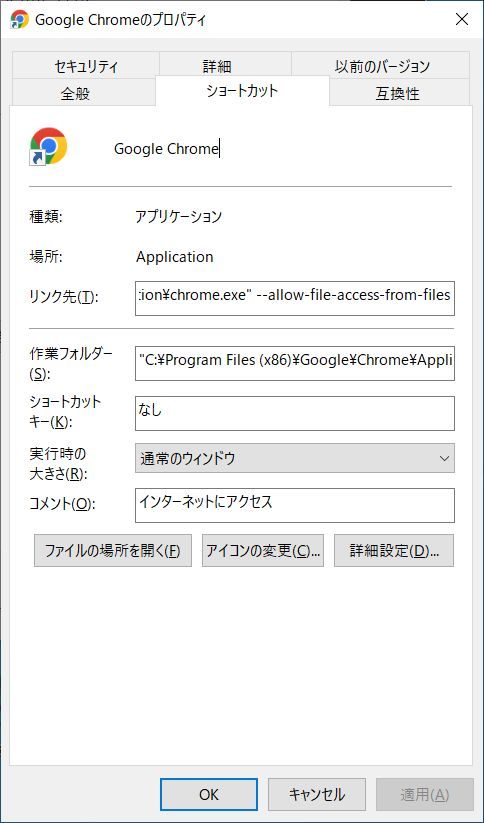
Chrome の場合、実行時に --allow-file-access-from-files パラメータを付けると参照するローカルファイルを読み込めるようになるようです。
"C:\Program Files (x86)\Google\Chrome\Application\chrome.exe" --allow-file-access-from-files

CDN版Vue2 -> CDN版Vue3 書き換え
Vue2 から Vue3 の書き換えでの大きな違いは Options API から Composition API を使用する点です。
データ取得コード
これまでは データファイル取得コードを各アプリに個別に実装していました。
今回は、それらを共通化してまとめて別ファイルから参照することにしました。
JSON版とCSV版の2つを作りました。
JSON
fetch API で JSON ファイルを取得、パースして各アプリに返します。
https://github.com/uedayou/vue-cdn-mashup-sample-apps/blob/master/vue3/esm/common/useGetData.js
import { ref, watch, onMounted } from 'vue'

export default function useGetData(url, method = 'GET', body = '') {
  const data = ref()
  const loading = ref(true)

  const initialize = async () => {
    loading.value = true
    try {
      const params = { method }
      if (method.match(/POST/i)) params.body = body
      data.value = await(await fetch(url, params)).json()
    } catch (e) {
      console.error(e)
    } finally {
      loading.value = false
    }
  }
  onMounted(initialize)
  watch(() => url, initialize)

  return { data, loading }
}
通常はそのままURLを渡せばよいです。
import useGetData from '../common/useGetData.js'
...
const { data, loading } = useGetData(url)
POST の時だけ以下のようにします。
import useGetData from '../common/useGetData.js'
...
const { data, loading } = useGetData(url, 'POST', body)
CSV
CSVファイルは、日本においてはShift JISのファイルが多いので適切にデコードするようにしました。
https://github.com/uedayou/vue-cdn-mashup-sample-apps/blob/master/vue3/esm/common/useGetCsv.js
import { ref, watch, onMounted } from 'vue'
import { parse } from 'csv-parse/dist/esm/sync'

export default function useGetCsv(url, encoding = 'utf8') {
  const data = ref([])
  const loading = ref(true)

  const initialize = async () => {
    loading.value = true
    try {
      const buf = await(await fetch(url)).arrayBuffer()
      const text = new TextDecoder(encoding).decode(buf)
      data.value = parse(text, {columns: true})
    } catch (e) {
      console.error(e);
    } finally {
      loading.value = false;
    }
  }
  onMounted(initialize)
  watch(() => url, initialize)

  return { data, loading }
}
UTF8のファイルには文字コードの指定はいりませんが
import useGetCsv from '../common/useGetCsv.js'
...
const { data, loading } = useGetCsv(url)
Shift JISであれば、以下のようにすれば文字化けしなくなると思います。
import useGetCsv from '../common/useGetCsv.js'
...
const { data, loading } = useGetCsv(url, 'SJIS')
VueUse を使う
Composition API の関数集 VueUse というのがあります。
この中に useFetch というものがあるのでそれを使うのも手かと思います。
<script type="importmap">
{
  "imports": {
    "vue": "https://unpkg.com/vue@3/dist/vue.esm-browser.js",
    "@vueuse/core": "https://unpkg.com/@vueuse/core/index.mjs",
    "@vueuse/shared": "https://unpkg.com/@vueuse/shared/index.mjs",
    "vue-demi": "https://unpkg.com/vue-demi@0.8.0/lib/v3/index.esm.mjs"
  }
}
</script>
<script type="module">
import { useFetch } from '@vueuse/core'
...
const { data } = useFetch(url)
</script>
上記のコードの通り、@vueuse/core, @vueuse/shared, vue-demi と複数のモジュールの読み込みが必要なようなので、今回は自作のuseGetData, useGetCsv を使っています。
テーブルアプリ
テーブルで表示するアプリです。
Vue2版は Vuetify2 を使っていましたが、Vue3+ESM版は Vuetify3(Beta 0) を使っています。
比較としてまず Vue2版のbody内のコードを掲載します。
https://github.com/uedayou/vue-cdn-mashup-sample-apps/blob/master/vue2/json/simpletable.html
<body>
  <div id="app">
    <v-app>
      <v-main>
        <v-container class="pt-10 pb-5">
          <v-simple-table>
            <template v-slot:default>
              <thead>
                <tr>
                  <th>ID</th>
                  <th>名称</th>
                  <th>URL</th>
                  <th>都道府県</th>
                  <th>市区町村</th>
                  <th>緯度</th>
                  <th>経度</th>
                </tr>
              </thead>
              <tbody>
                <tr v-for="item in items"
                  :key="item.id">
                  <td>{{ item.id }}</td>
                  <td>{{ item.label }}</td>
                  <td>{{ item.url }}</td>
                  <td>{{ item.pref }}</td>
                  <td>{{ item.city }}</td>
                  <td>{{ item.lat }}</td>
                  <td>{{ item.long }}</td>
                </tr>
              </tbody>
            </template>
          </v-simple-table>
        </v-container>
      </v-main>
    </v-app>
    <v-overlay :value="isLoading">
      <v-progress-circular indeterminate size="64"></v-progress-circular>
    </v-overlay>
  </div>
  <script src="https://cdn.jsdelivr.net/npm/vue@2.x/dist/vue.js"></script>
  <script src="https://cdn.jsdelivr.net/npm/vuetify@2.x/dist/vuetify.js"></script>
  <script src="https://cdn.jsdelivr.net/npm/axios/dist/axios.min.js"></script>
  <script>
    new Vue({
      el: '#app',
      vuetify: new Vuetify(),
      data() {
        return {
          items: [],
          isLoading: false,
        }
      },
      mounted() {
        var self = this;
        self.isLoading = true;
        axios.get(
          'https://uedayou.net/ld/library/20210505/東京都/公共図書館.json'
        )
        .then(function(response) {
          Object.keys(response.data).forEach(function(key) {
            var data = response.data[key];
            if (!data['http://www.w3.org/2003/01/geo/wgs84_pos#lat']) return;
            self.items.push({
              label: data['http://www.w3.org/2000/01/rdf-schema#label'][0].value,
              url: key,
              id: data['http://purl.org/dc/terms/identifier'][0].value,
              pref: data['http://schema.org/addressRegion'][0].value,
              city: data['http://schema.org/addressLocality'][0].value,
              lat: data['http://www.w3.org/2003/01/geo/wgs84_pos#lat'][0].value,
              long: data['http://www.w3.org/2003/01/geo/wgs84_pos#long'][0].value
            });
          });
        })
        .catch(function(error) {
          console.log(error);
        })
        .finally(function() {
          self.isLoading = false;
        });
      }
    })
  </script>
</body>
次に、Vue3+ESM版です。
HTML部は v-simple-table を v-table に変更した以外はほとんど変更はありません。
https://github.com/uedayou/vue-cdn-mashup-sample-apps/blob/master/vue3/esm/json/simpletable.html
<body>
  <div id="app">
    <v-app>
      <v-main>
        <v-container class="pt-5 pb-5">
          <v-table>
            <template v-slot:default>
              <thead>
                <tr>
                  <th>ID</th>
                  <th>名称</th>
                  <th>URL</th>
                  <th>都道府県</th>
                  <th>市区町村</th>
                  <th>緯度</th>
                  <th>経度</th>
                </tr>
              </thead>
              <tbody>
                <tr v-for="item in items"
                  :key="item.id">
                  <td>{{ item.id }}</td>
                  <td>{{ item.label }}</td>
                  <td>{{ item.url }}</td>
                  <td>{{ item.pref }}</td>
                  <td>{{ item.city }}</td>
                  <td>{{ item.lat }}</td>
                  <td>{{ item.long }}</td>
                </tr>
              </tbody>
            </template>
          </v-table>
        </v-container>
      </v-main>
    </v-app>
    <v-overlay v-model="loading" class="align-center justify-center">
      <v-progress-circular indeterminate size="64"></v-progress-circular>
    </v-overlay>
  </div>
  <script async src="https://ga.jspm.io/npm:es-module-shims@1.5.4/dist/es-module-shims.js"></script>
  <script type="importmap">
    {
      "imports": {
        "vue": "https://unpkg.com/vue@3/dist/vue.esm-browser.js",
        "vuetify": "https://cdnjs.cloudflare.com/ajax/libs/vuetify/3.0.0-beta.1/vuetify.esm.js"
      }
    }
  </script>
  <script type="module">
    import { createApp, computed } from 'vue'
    import { createVuetify } from 'vuetify'
    import useGetData from '../common/useGetData.js'

    const url = 'https://uedayou.net/ld/library/latest/東京都/公共図書館.json'

    const Component = {
      setup() {
        const { data, loading } = useGetData(url)
        const items = computed(() => {
          const _items = []
          for (const key in data.value) {
            const _data = data.value[key]
            if (!('http://www.w3.org/2003/01/geo/wgs84_pos#lat' in _data)) continue
            const item = {
              label: _data['http://www.w3.org/2000/01/rdf-schema#label'][0].value,
              url: key,
              id: _data['http://purl.org/dc/terms/identifier'][0].value,
              pref: _data['http://schema.org/addressRegion'][0].value,
              city: _data['http://schema.org/addressLocality'][0].value,
              lat: _data['http://www.w3.org/2003/01/geo/wgs84_pos#lat'][0].value,
              long: _data['http://www.w3.org/2003/01/geo/wgs84_pos#long'][0].value
            }
            _items.push(item)
          }
          return _items
        })
        return { items, loading }
      },
    }

    const vuetify = createVuetify()
    const app = createApp(Component)
    app.use(vuetify)
    app.mount('#app')
  </script>
</body>
コード部の簡単な解説ですが、Vue2 版は new Vue() 内にコードを書いています。
new Vue({
  el: '#app',
  vuetify: new Vuetify(),
  data() {
    return { items: [], isLoading: false }
  },
  mounted() {
    ...
  }
})
Vue3 版は Composition API により以下のようになります。
const Component = {
  setup() {
    const { data, loading } = useGetData(url)
    const items = computed(() => {
      const _items = []
      for (const key in data.value) {
        ...
      }
      return _items
    })
    return { items, loading }
  }
}

const vuetify = createVuetify()
const app = createApp(Component)
app.use(vuetify)
app.mount('#app')
Vue2版では、data() {} 内の戻り値の変数について mounted() {} 内でJSONファイルを読み込み格納処理を行っています。
Vue3版では、setup() {} 内で上記処理を全て行います。
setup関数内の戻り値が data() {}内の戻り値と同じく HTMLテンプレート内で参照できる値になります。
useGetData(url) でJSONデータを読み込み、その読み込み完了が検知されると以下の computed 関数が実行される仕組みです。
以下のコードでは、data変数に変更があったらその都度実行されるはずです。
const items = computed(() => {
  const _items = []
  for (const key in data.value) {
    ...
  }
  return _items
})
地図アプリ
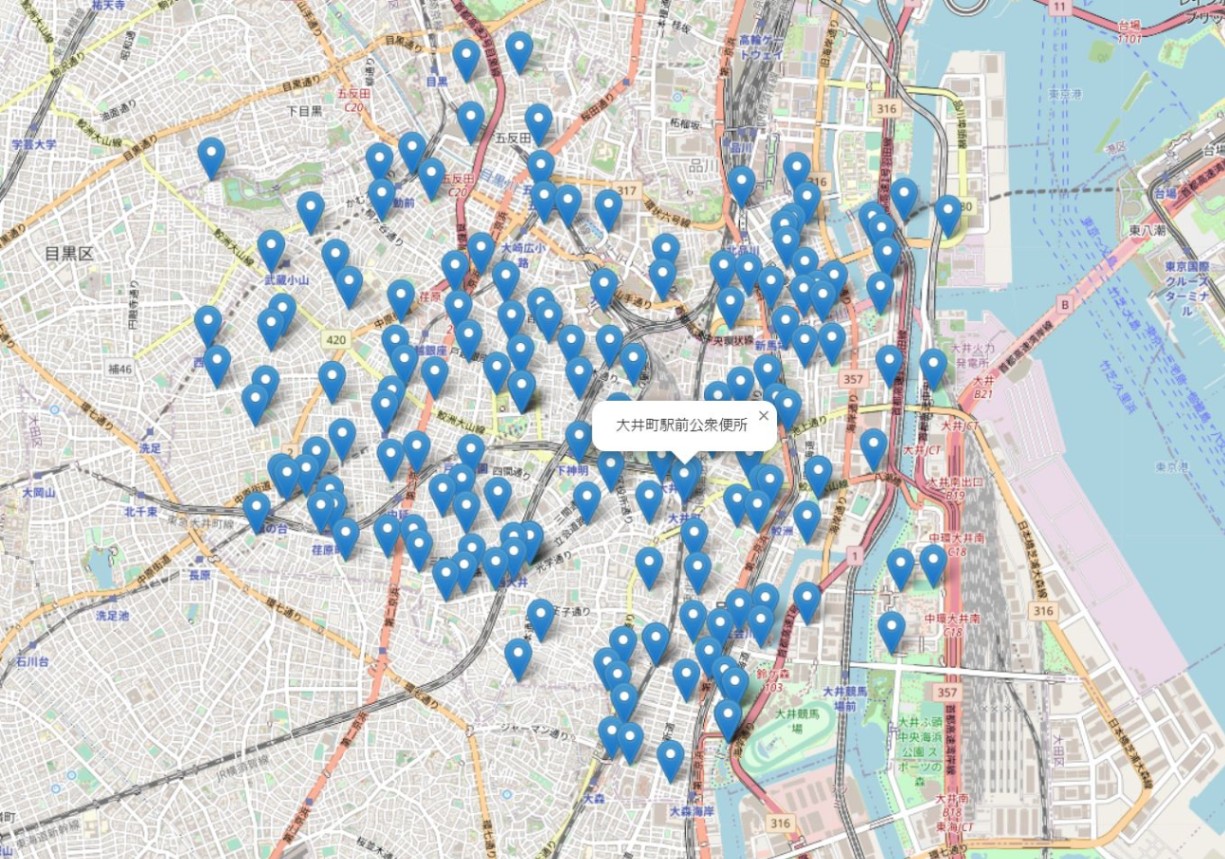
緯度経度を持つデータを地図上に表示するアプリです。
leaflet と vue-leaflet (vue2-leaflet) を使っています。
Vue2 と Vue3+ESM のコードは以下の通りです。
https://github.com/uedayou/vue-cdn-mashup-sample-apps/blob/master/vue2/csv/map.html
<body>
  <div id="app">
    <l-map :bounds="bounds" style="position: absolute; top: 0;right: 0; bottom: 0; left: 0;">
      <l-tile-layer :url="tileurl"></l-tile-layer>
      <l-marker v-for="item in items"
        :lat-lng="{lat: item['緯度'], lon: item['経度'] }" >
        <l-popup>
          {{ item['施設名'] }}
        </l-popup>
      </l-marker>
    </l-map>
  </div>
  <script src="https://cdn.jsdelivr.net/npm/vue@2.x/dist/vue.js"></script>
  <script src="https://unpkg.com/leaflet/dist/leaflet.js"></script>
  <script src="https://unpkg.com/vue2-leaflet"></script>
  <script src="https://cdn.jsdelivr.net/npm/axios/dist/axios.min.js"></script>
  <script src="https://unpkg.com/papaparse@latest/papaparse.min.js"></script>
  <script type="text/javascript">
    Vue.component('l-map', window.Vue2Leaflet.LMap);
    Vue.component('l-tile-layer', window.Vue2Leaflet.LTileLayer);
    Vue.component('l-marker', window.Vue2Leaflet.LMarker);
    Vue.component('l-popup', window.Vue2Leaflet.LPopup);
    new Vue({
      el: '#app',
      data() {
        return {
          items: [],
          tileurl: 'https://{s}.tile.openstreetmap.org/{z}/{x}/{y}.png',
          bounds: null,
        }
      },
      mounted() {
        var self = this;
        axios.get(
          'https://www.city.shinagawa.tokyo.jp/ct/other000081600/toilet.csv',
          {
            responseType: 'arraybuffer',
            transformResponse: function(data) {
              // shift_jis to utf8
              return new TextDecoder("sjis").decode(data);
            }
          }
        ).then(function(response) {
          const parsed = Papa.parse(
            response.data,
            {
              header: true,
              skipEmptyLines: true,
            });
          self.items = parsed.data;
          self.items.forEach( function(item) {
            self.setBounds(+item['緯度'], +item['経度']);
          });
        }).catch(function(error) {
          console.log(error);
        });
      },
      methods: {
        setBounds: function(lat, long) {
          if (!this.bounds) this.bounds = [[lat, long],[lat, long]];
          if (this.bounds[1][0] > lat) this.bounds[1][0] = lat;
          if (this.bounds[0][0] < lat) this.bounds[0][0] = lat;
          if (this.bounds[1][1] > long) this.bounds[1][1] = long;
          if (this.bounds[0][1] < long) this.bounds[0][1] = long;
        }
      }
    });
  </script>
</body>
https://github.com/uedayou/vue-cdn-mashup-sample-apps/blob/master/vue3/esm/csv/map.html
<body>
  <div id="app">
    <l-map ref="map" :bounds="bounds" @ready="onReady" style="position: absolute; top: 0;right: 0; bottom: 0; left: 0;">
      <l-tile-layer url="https://{s}.tile.openstreetmap.org/{z}/{x}/{y}.png"></l-tile-layer>
      <l-marker v-for="item in items"
        :lat-lng="{lat: item.lat, lon: item.long }" >
        <l-popup>
          {{ item['施設名'] }}
        </l-popup>
      </l-marker>
    </l-map>
  </div>
  <script async src="https://ga.jspm.io/npm:es-module-shims@1.5.4/dist/es-module-shims.js"></script>
  <script type="importmap">
    {
      "imports": {
        "vue": "https://unpkg.com/vue@3/dist/vue.esm-browser.js",
        "@vue-leaflet/vue-leaflet": "../lib/vue-leaflet/dist/vue-leaflet.esm.js",
        "leaflet/": "https://unpkg.com/leaflet@1.8.0/",
        "csv-parse/": "https://www.unpkg.com/csv-parse@5.0.4/"
      }
    }
  </script>
  <script type="module">
    import { createApp, computed, ref } from 'vue'
    import { LMap, LTileLayer, LMarker, LPopup } from '@vue-leaflet/vue-leaflet'
    import useGetCsv from '../common/useGetCsv.js'

    const encoding = 'sjis'
    const url = 'https://www.city.shinagawa.tokyo.jp/ct/other000081600/toilet.csv'

    const Component = {
      components: {
        LMap,
        LTileLayer,
        LMarker,
        LPopup
      },
      setup() {
        const map = ref()
        const { data, loading } = useGetCsv(url, encoding)

        const items = computed(() => {
          const _items = []
          for (const row of data.value) {
            if (!('緯度' in row) || !('経度' in row)) continue
              _items.push({
                ...row,
                lat: +row['緯度'],
                long: +row['経度']
              })
          }
          return _items
        })

        const bounds = computed(() => {
          let _bounds
          for (const {lat, long} of items.value) {
            if (!_bounds) _bounds = [[lat, long],[lat, long]];
            if (_bounds[1][0] > lat) _bounds[1][0] = lat
            if (_bounds[0][0] < lat) _bounds[0][0] = lat
            if (_bounds[1][1] > long) _bounds[1][1] = long
            if (_bounds[0][1] < long) _bounds[0][1] = long
          }
          return _bounds
        })

        const onReady = () => {
          map.value.leafletObject.fitBounds(bounds.value)
        }

        return { items, bounds, map, onReady }
      }
    }

    const app = createApp(Component)
    app.mount('#app')
  </script>
</body>
地図アプリについては、HTML部のタグの変更はありません。
コード部については、コンポーネントの登録がとても楽になりました。
CDN版Vue2 では以下のように登録していました。
Vue.component('l-map', window.Vue2Leaflet.LMap);
Vue.component('l-tile-layer', window.Vue2Leaflet.LTileLayer);
Vue.component('l-marker', window.Vue2Leaflet.LMarker);
Vue.component('l-popup', window.Vue2Leaflet.LPopup);
Vue3+ESM だと、非常にわかりやすく登録できるようになりました。
const Component = {
  components: {
    LMap,
    LTileLayer,
    LMarker,
    LPopup
  },
  setup() {
    ...
  }
}
コード部について、Vue2はテーブルアプリと同じく mouned() 関数内で、ファイル読み込みを行いデータ格納を行っていました。
Vue3 では computed 関数を使い、useGetCsv 関数でCSVファイル読み込みが行われた後、 items 変数に必要なデータを格納する処理が行われます。
items 変数にデータ格納が終わった後、bounds 変数(地図で適切な領域を表示するためのバウンダリデータ) の更新が実行されます。
setup() {
  const { data, loading } = useGetCsv(url, encoding)

  const items = computed(() => {
    const _items = []
    for (const row of data.value) {
      ...
    }
    return _items
  })

  const bounds = computed(() => {
    let _bounds
    for (const {lat, long} of items.value) {
      ...
    }
  })

  ...

  return { items, bounds, map, onReady }
}
イメージビューア
データ内の画像ファイルを表示するアプリです。
Vue用のイメージビューア v-viewer を使います。
CDN版Vue2 と Vue3+ESM コードの比較です。
https://github.com/uedayou/vue-cdn-mashup-sample-apps/blob/master/vue2/sparql/imageviewer.html
<body>
  <div id="app">
    <div class="images" v-viewer.rebuild="{ inline: true }">
      <img v-for="src in images" :src="src" :key="src">
    </div>
  </div>
  <p>
    SPARQLエンドポイント: <a href="https://jpsearch.go.jp/rdf/sparql/" target="_blank" rel="noreferrer">ジャパンサーチ</a> - 葛飾北斎の絵画
  </p>
  <script src="https://cdn.jsdelivr.net/npm/vue@2.x/dist/vue.js"></script>
  <script src="https://unpkg.com/viewerjs/dist/viewer.js"></script>
  <script src="https://unpkg.com/v-viewer/dist/v-viewer.js"></script>
  <script src="https://cdn.jsdelivr.net/npm/axios/dist/axios.min.js"></script>
  <script type="text/javascript">
    Vue.use(VueViewer.default);
    new Vue({
      el: '#app',
      data () {
        return {
          images: [],
        }
      },
      mounted() {
        var self = this;
        axios.get(
          'https://jpsearch.go.jp/rdf/sparql/', {
            params: {
              query: `
              PREFIX schema: <http://schema.org/>
              PREFIX chname: <https://jpsearch.go.jp/entity/chname/>
              PREFIX rdfs: <http://www.w3.org/2000/01/rdf-schema#>
              SELECT ?s ?label ?image WHERE {
                ?s schema:creator chname:葛飾北斎 ;
                   schema:image ?image ;
                   rdfs:label ?label .
              }
              limit 10`,
              output: 'json',
            }
          }
        ).then(function(response) {
          response.data.results.bindings.forEach(function(item) {
            self.images.push(item.image.value)
          });
        }).catch(function(error) {
          console.log(error);
        });
      }
    });
  </script>
</body>
https://github.com/uedayou/vue-cdn-mashup-sample-apps/blob/master/vue3/esm/sparql/imageviewer.html
<body>
  <div id="app">
    <div class="images" v-viewer.rebuild="{ inline: true }">
      <img v-for="src in images" :src="src" :key="src">
    </div>
  </div>
  <p>
    SPARQLエンドポイント: <a href="https://jpsearch.go.jp/rdf/sparql/" target="_blank" rel="noreferrer noopener">ジャパンサーチ</a> - 葛飾北斎の絵画
  </p>
  <script async src="https://ga.jspm.io/npm:es-module-shims@1.5.4/dist/es-module-shims.js"></script>
  <script type="importmap">
    {
      "imports": {
        "vue": "https://unpkg.com/vue@3/dist/vue.esm-browser.js",
        "viewerjs": "https://unpkg.com/viewerjs@1.3.3/dist/viewer.esm.js",
        "v-viewer": "../lib/v-viewer/dist/index.es.js"
      }
    }
  </script>
  <script type="module">
    import { createApp, computed } from 'vue'
    import VueViewer from 'v-viewer'
    import useGetData from '../common/useGetData.js'

    const params = {
      query: `
        PREFIX schema: <http://schema.org/>
        PREFIX chname: <https://jpsearch.go.jp/entity/chname/>
        PREFIX rdfs: <http://www.w3.org/2000/01/rdf-schema#>
        SELECT ?s ?label ?image WHERE {
          ?s schema:creator chname:葛飾北斎 ;
             schema:image ?image ;
             rdfs:label ?label .
        }
        limit 10`,
      output: 'json',
    }
    const query = new URLSearchParams(params);
    const url = `https://jpsearch.go.jp/rdf/sparql/?${query}`;

    const Component = {
      setup() {
        const { data } = useGetData(url)

        const images = computed(() => {
          if (!data.value) return
          const _images = []
          for (const item of data.value.results.bindings) {
            _images.push(item.image.value)
          }
          return _images
        })

        return { images }
      }
    }

    const app = createApp(Component)
    app.use(VueViewer)
    app.mount('#app')
  </script>
</body>
HTML部の変更はありません。
コード部も、これまでと同様、mounted() の処理を computed() 内で実行するように変更した以外は大きな変更はありません。
おわりに
以前投稿したブラウザで直接動かせるCDN版Vue2アプリの紹介記事内のコードについて、今回 Vue3に書き換え、ES Modules にも対応させました。
Vue3 の Composition API により、個人的には書きやすくなったように思います。
また、ES Modules で従来より可読性がかなり向上しました。
複雑な処理が必要なアプリでは、これらの方法は現実的ではないかもしれないですが、ちょっとしたアプリ開発では Vue3 + ES Modules によりブラウザで直接動くコードを書いてみるのも良いかもしれないと思いました。
今回紹介したコードも含めて、以下の GitHub のリポジトリに書き換えたコードがあります。
JSON, CSV, GraphQL, SPARQL からのデータを読み込む Vue3 + ES Modules アプリがありますので、興味がありましたら見てみてください。
Vite + Vue3 + Vuetify3 で作ったアプリの解説も投稿していますので、併せて参照ください。


Discussion