CloudFormationとAnsibleでALB+EC2+RDSのLaravel環境を構築する(解説編)
検証用に php/Laravel のアプリケーションを AWS へ素早くデプロイしたかったので、CFn と Ansible を使って爆速で ALB+EC2+RDS の環境を作れるようにしました。
手順編はこちら
リポジトリはこちら
動作環境
- macOS Monterey 12.1(Intel)
全体の構成
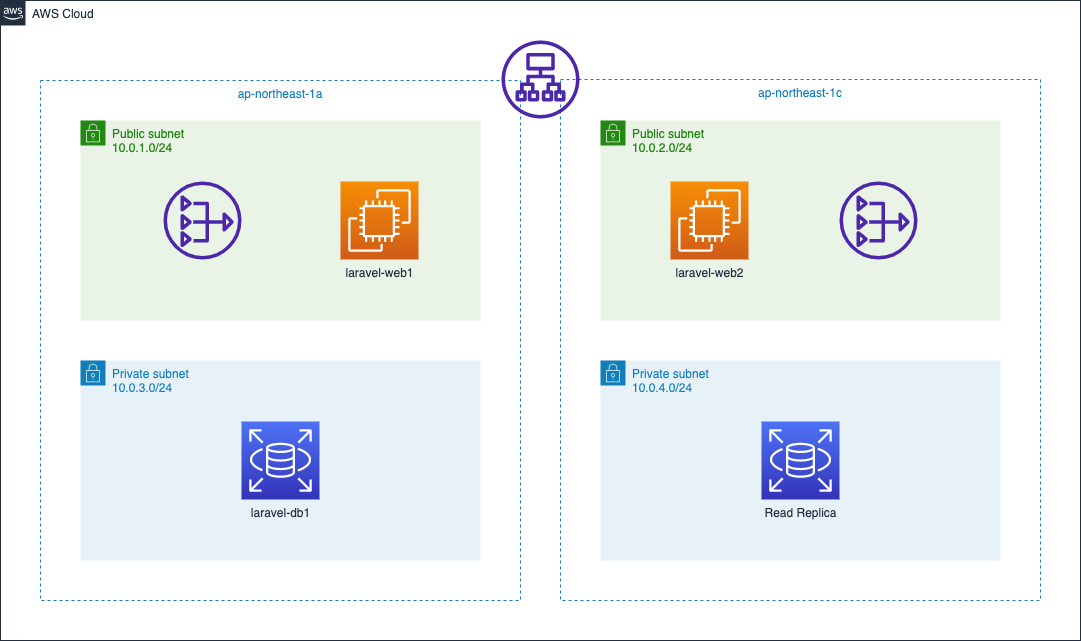
構成はこんな感じ

ディレクトリは以下のようになっています。
project-root/
- docs/ # ドキュメントの格納場所
- CFn/ # Cloud Formationのテンプレート
- ansible/ # Ansibleの定義
- docker/ # ローカル実行用のdocker定義
- src/ # Laravelアプリケーションのソース
- LICENSE
- docker-compose.yml
- Makefile # docker composeコマンドを楽に使うためのMakefile
- README.md
プロジェクトルートのdocker-compose.ymlとMakefileは Laravel の実行環境を立ち上げるためのものです。
Laravel のアプリケーションはsrc下にあり、CFn下は Cloud Formation による AWS 側の定義があり、ansibleの下は Ansible での EC2 の設定が記載されています。
本記事ではCloud FormationについてとAnsibleについて解説します。
Cloud Formation
Cloud Formation のテンプレートは、今回network.ymlとapplication.ymlに分けています。
network.yml
VPC/Subnet/Security Group/Routing の設定を行い、application.ymlで必要になる値をOutputsで出力しています。
基本的な書き方は公式ドキュメントを見ていただくのが良いと思いますが、
特筆すべきは、各サブネットで宣言している Cidr を!Select [1, !Cidr [!GetAtt LaravelVPCfromCFn.CidrBlock, 2, 8]]のような書き方をすることによって、
VPC で宣言したCidrから自動的に分割して割り振ってくれるように記載したところです。
参考:[小ネタ]「!Cidr」というチョット便利な CloudFormation の組み込み関数 | DevelopersIO
AWSTemplateFormatVersion: 2010-09-09
Resources:
  # ------------------------------------------------------------#
  #  VPC
  # ------------------------------------------------------------#
  LaravelVPCfromCFn:
    Type: AWS::EC2::VPC
    Properties:
      CidrBlock: 10.0.0.0/21
      EnableDnsSupport: true
      Tags:
        - Key: Name
          Value: LaravelVPCfromCFn
  LaravelInternetGateway:
    Type: AWS::EC2::InternetGateway
    Properties:
      Tags:
        - Key: Name
          Value: LaravelInternetGateway
  LaravelAttachGateway:
    Type: AWS::EC2::VPCGatewayAttachment
    Properties:
      VpcId: !Ref LaravelVPCfromCFn
      InternetGatewayId: !Ref LaravelInternetGateway
  # ------------------------------------------------------------#
  #  Subnet
  # ------------------------------------------------------------#
  LaravelWeb1Subnet:
    Type: AWS::EC2::Subnet
    Properties:
      AvailabilityZone: "ap-northeast-1a"
      VpcId: !Ref LaravelVPCfromCFn
      CidrBlock: !Select [1, !Cidr [!GetAtt LaravelVPCfromCFn.CidrBlock, 2, 8]]
      Tags:
        - Key: Name
          Value: LaravelWeb1Subnet
  LaravelWeb2Subnet:
    Type: AWS::EC2::Subnet
    Properties:
      AvailabilityZone: "ap-northeast-1c"
      VpcId: !Ref LaravelVPCfromCFn
      CidrBlock: !Select [2, !Cidr [!GetAtt LaravelVPCfromCFn.CidrBlock, 3, 8]]
      Tags:
        - Key: Name
          Value: LaravelWeb2Subnet
  LaravelRDS1Subnet:
    Type: AWS::EC2::Subnet
    Properties:
      AvailabilityZone: "ap-northeast-1a"
      VpcId: !Ref LaravelVPCfromCFn
      CidrBlock: !Select [3, !Cidr [!GetAtt LaravelVPCfromCFn.CidrBlock, 4, 8]]
      Tags:
        - Key: Name
          Value: LaravelRDS1Subnet
  LaravelRDS2Subnet:
    Type: AWS::EC2::Subnet
    Properties:
      AvailabilityZone: "ap-northeast-1c"
      VpcId: !Ref LaravelVPCfromCFn
      CidrBlock: !Select [4, !Cidr [!GetAtt LaravelVPCfromCFn.CidrBlock, 5, 8]]
      Tags:
        - Key: Name
          Value: LaravelRDS2Subnet
  # ------------------------------------------------------------#
  #  SecurityGroup
  # ------------------------------------------------------------#
  LaravelALBSG:
    Type: AWS::EC2::SecurityGroup
    Properties:
      GroupName: LaravelALBSG
      GroupDescription: LaravelALBSG-Description
      VpcId: !Ref LaravelVPCfromCFn
      SecurityGroupIngress:
        - IpProtocol: tcp
          FromPort: 80
          ToPort: 80
          CidrIp: 0.0.0.0/0
        - IpProtocol: tcp
          FromPort: 443
          ToPort: 443
          CidrIp: 0.0.0.0/0
      Tags:
        - Key: Name
          Value: LaravelALBSG
  LaravelWebSG:
    Type: AWS::EC2::SecurityGroup
    Properties:
      GroupName: LaravelWebSG
      GroupDescription: LaravelWebSG-Description
      VpcId: !Ref LaravelVPCfromCFn
      SecurityGroupIngress:
        - IpProtocol: tcp
          FromPort: 22
          ToPort: 22
          CidrIp: 0.0.0.0/0
        - IpProtocol: tcp
          FromPort: 80
          ToPort: 80
          CidrIp: 0.0.0.0/0
      Tags:
        - Key: Name
          Value: LaravelWebSG
  LaravelRDSSG:
    Type: AWS::EC2::SecurityGroup
    Properties:
      GroupName: LaravelRDSSG
      GroupDescription: LaravelRDSSG-Description
      VpcId: !Ref LaravelVPCfromCFn
      SecurityGroupIngress:
        - IpProtocol: tcp
          FromPort: 3306
          ToPort: 3306
          CidrIp: !Select [1, !Cidr [!GetAtt LaravelVPCfromCFn.CidrBlock, 2, 8]]
        - IpProtocol: tcp
          FromPort: 3306
          ToPort: 3306
          CidrIp: !Select [2, !Cidr [!GetAtt LaravelVPCfromCFn.CidrBlock, 3, 8]]
      Tags:
        - Key: Name
          Value: LaravelRDSSG
  # ------------------------------------------------------------#
  #  RouteTable
  # ------------------------------------------------------------#
  LaravelWeb1SubnetRouteTable:
    Type: "AWS::EC2::RouteTable"
    Properties:
      VpcId: !Ref LaravelVPCfromCFn
      Tags:
        - Key: Name
          Value: LaravelWeb1SubnetRouteTable
  LaravelWeb2SubnetRouteTable:
    Type: "AWS::EC2::RouteTable"
    Properties:
      VpcId: !Ref LaravelVPCfromCFn
      Tags:
        - Key: Name
          Value: LaravelWeb2SubnetRouteTable
  # ------------------------------------------------------------#
  # Routing
  # ------------------------------------------------------------#
  LaravelWeb1SubnetRoute:
    Type: "AWS::EC2::Route"
    Properties:
      RouteTableId: !Ref LaravelWeb1SubnetRouteTable
      DestinationCidrBlock: "0.0.0.0/0"
      GatewayId: !Ref LaravelInternetGateway
  LaravelWeb2SubnetRoute:
    Type: "AWS::EC2::Route"
    Properties:
      RouteTableId: !Ref LaravelWeb2SubnetRouteTable
      DestinationCidrBlock: "0.0.0.0/0"
      GatewayId: !Ref LaravelInternetGateway
  # ------------------------------------------------------------#
  # RouteTable Associate
  # ------------------------------------------------------------#
  LaravelWeb1SubnetRouteAssociation:
    Type: "AWS::EC2::SubnetRouteTableAssociation"
    Properties:
      SubnetId: !Ref LaravelWeb1Subnet
      RouteTableId: !Ref LaravelWeb1SubnetRouteTable
  LaravelWeb2SubnetRouteAssociation:
    Type: "AWS::EC2::SubnetRouteTableAssociation"
    Properties:
      SubnetId: !Ref LaravelWeb2Subnet
      RouteTableId: !Ref LaravelWeb2SubnetRouteTable
Outputs:
  LaravelVPCfromCFn:
    Value: !Ref LaravelVPCfromCFn
    Export:
      Name: LaravelVPC
  LaravelWeb1Subnet:
    Value: !Ref LaravelWeb1Subnet
    Export:
      Name: LaravelWeb1Subnet
  LaravelWeb2Subnet:
    Value: !Ref LaravelWeb2Subnet
    Export:
      Name: LaravelWeb2Subnet
  LaravelRDS1Subnet:
    Value: !Ref LaravelRDS1Subnet
    Export:
      Name: LaravelRDS1Subnet
  LaravelRDS2Subnet:
    Value: !Ref LaravelRDS2Subnet
    Export:
      Name: LaravelRDS2Subnet
  LaravelALBSG:
    Value: !Ref LaravelALBSG
    Export:
      Name: Laravel-ALB-SG
  LaravelWebSG:
    Value: !Ref LaravelWebSG
    Export:
      Name: Laravel-Web-SG
  LaravelRDSSG:
    Value: !Ref LaravelRDSSG
    Export:
      Name: Laravel-RDS-SG
application.yml
次にapplication.ymlですが、こちらでは ALB/Target Group/EC2/RDS の定義を宣言しています。
基本的にnetwork.yml側で出力した値を使いつつ、EC2(Amazon Linux 2)2 台構成、RDS(MySQL)のよくある構成が作成できるようになっています。
Cloud Formation の時点では php 要素は一つもないので、別にJava用でもGo用でもRuby用でもPython用でもなんでも使い回せるかと思います。
流用するときはキーペアをご自身が用意しているものに書き換えてお使いください。
AWSTemplateFormatVersion: 2010-09-09
Resources:
  # ------------------------------------------------------------#
  #  TargetGroup
  # ------------------------------------------------------------#
  LaravelTargetGroup:
    Type: "AWS::ElasticLoadBalancingV2::TargetGroup"
    Properties:
      VpcId: !ImportValue LaravelVPC
      Name: LaravelTargetGroup
      Protocol: HTTP
      Port: 80
      HealthCheckProtocol: HTTP
      HealthCheckPath: "/"
      HealthCheckPort: "traffic-port"
      HealthyThresholdCount: 2
      UnhealthyThresholdCount: 2
      HealthCheckTimeoutSeconds: 5
      HealthCheckIntervalSeconds: 10
      Matcher:
        HttpCode: 200
      Tags:
        - Key: Name
          Value: LaravelTargetGroup
      TargetGroupAttributes:
        - Key: "deregistration_delay.timeout_seconds"
          Value: 300
        - Key: "stickiness.enabled"
          Value: false
        - Key: "stickiness.type"
          Value: lb_cookie
        - Key: "stickiness.lb_cookie.duration_seconds"
          Value: 86400
      Targets:
        - Id: !Ref LaravelWeb1
          Port: 80
        - Id: !Ref LaravelWeb2
          Port: 80
  # ------------------------------------------------------------#
  #  Internet ALB
  # ------------------------------------------------------------#
  LaravelALB:
    Type: "AWS::ElasticLoadBalancingV2::LoadBalancer"
    Properties:
      Name: LaravelALB
      Tags:
        - Key: Name
          Value: LaravelALB
      Scheme: "internet-facing"
      LoadBalancerAttributes:
        - Key: "deletion_protection.enabled"
          Value: false
        - Key: "idle_timeout.timeout_seconds"
          Value: 60
      SecurityGroups:
        - !ImportValue Laravel-ALB-SG
      Subnets:
        - !ImportValue LaravelWeb1Subnet
        - !ImportValue LaravelWeb2Subnet
  ALBListener:
    Type: "AWS::ElasticLoadBalancingV2::Listener"
    Properties:
      DefaultActions:
        - TargetGroupArn: !Ref LaravelTargetGroup
          Type: forward
      LoadBalancerArn: !Ref LaravelALB
      Port: 80
      Protocol: HTTP
  # ------------------------------------------------------------#
  #  EC2
  # ------------------------------------------------------------#
  LaravelWeb1:
    Type: AWS::EC2::Instance
    Properties:
      KeyName: MyKeypair
      ImageId: ami-0218d08a1f9dac831
      InstanceType: t2.micro
      Monitoring: false
      NetworkInterfaces:
        - AssociatePublicIpAddress: true
          DeviceIndex: 0
          SubnetId: !ImportValue LaravelWeb1Subnet
          GroupSet:
            - !ImportValue Laravel-Web-SG
      Tags:
        - Key: Name
          Value: LaravelWeb1
  LaravelWeb2:
    Type: AWS::EC2::Instance
    Properties:
      KeyName: MyKeypair
      ImageId: ami-0218d08a1f9dac831
      InstanceType: t2.micro
      Monitoring: false
      NetworkInterfaces:
        - AssociatePublicIpAddress: true
          DeviceIndex: 0
          SubnetId: !ImportValue LaravelWeb2Subnet
          GroupSet:
            - !ImportValue Laravel-Web-SG
      Tags:
        - Key: Name
          Value: LaravelWeb2
  # ------------------------------------------------------------#
  #  RDS
  # ------------------------------------------------------------#
  LaravelRDSSecret:
    Type: AWS::SecretsManager::Secret
    Properties:
      Description: LaravelRDSSecret
      GenerateSecretString:
        SecretStringTemplate: '{"username": "root"}'
        GenerateStringKey: "password"
        PasswordLength: 16
        ExcludeCharacters: '"@/\'
  LaravelRDS:
    Type: AWS::RDS::DBInstance
    Properties:
      DBInstanceIdentifier: LaravelRDS
      Engine: mysql
      EngineVersion: 5.7
      DBInstanceClass: db.t2.micro
      StorageType: gp2
      AllocatedStorage: 10
      MasterUsername: !Sub "{{resolve:secretsmanager:${LaravelRDSSecret}:SecretString:username}}"
      DBName: laravel
      MasterUserPassword: !Sub "{{resolve:secretsmanager:${LaravelRDSSecret}:SecretString:password}}"
      VPCSecurityGroups:
        - !ImportValue Laravel-RDS-SG
      DBSubnetGroupName: !Ref LaravelRDSSubnetGroup
      MultiAZ: false
      AvailabilityZone: !Sub ${AWS::Region}a
      Tags:
        - Key: Name
          Value: LaravelRDS
  LaravelRDSSecretInstanceAttachment:
    Type: "AWS::SecretsManager::SecretTargetAttachment"
    Properties:
      SecretId: !Ref LaravelRDSSecret
      TargetId: !Ref LaravelRDS
      TargetType: AWS::RDS::DBInstance
  LaravelRDSSubnetGroup:
    Type: AWS::RDS::DBSubnetGroup
    Properties:
      DBSubnetGroupDescription: LaravelRDSSubnetGroup
      SubnetIds:
        - !ImportValue LaravelRDS1Subnet
        - !ImportValue LaravelRDS2Subnet
      Tags:
        - Key: Name
          Value: LaravelRDSSubnetGroup
Amazon Linux 2 だし MySQL 5 系だしインスタンスタイプは t2 系だしで少し古い感じがするので、そこはお好みでバージョンを上げて頂いたほうが良いかもしれません。
他に特筆すべき点として、RDS の設定項目はSecrets Managerを使用しました。
  LaravelRDSSecret:
    Type: AWS::SecretsManager::Secret
    Properties:
      Description: LaravelRDSSecret
      GenerateSecretString:
        SecretStringTemplate: '{"username": "root"}'
        GenerateStringKey: "password"
        PasswordLength: 16
        ExcludeCharacters: '"@/\'
この書き方だとusernameはrootなのですが、passwordは自動生成されます。
こうしておいて、Laravel 側でパスワードを動的に取得すれば、ローテションさせることもできます。
今回はそこまでやらずにSecrets Managerに手動でパスワードを見に行ってEC2にセットする方法を取っています。
Ansible
続いて Ansible 側の解説です。
今回EC2に php や nginx をインストールする部分の自動化に Ansible を用いました。
そのまま IaC で管理することができるようになっています。
- ディレクトリ構成
ansible-container/
logs/
roles/
ansible.cfg
docker-compose.yaml
inventory.txt
laravel_web.yml
site.yml
Makefile
README.md
Ansible の実行環境
私は Ansible を使うとき、毎回 docker 上で起動するようにしています。(Windows/Mac の両方から使いたいため)
Dockerfile,docker-compose.yml,Makefileをコピーすれば割とどんなプロジェクトでも使い回せます。
Makefileはビルドするのではなく、docker composeコマンドをラップするためだけに使っています。
例えばdocker compose up -dというコマンドを、make upと打つだけで実行できるようにしています。
こちらはお好みでどうぞ。
roles
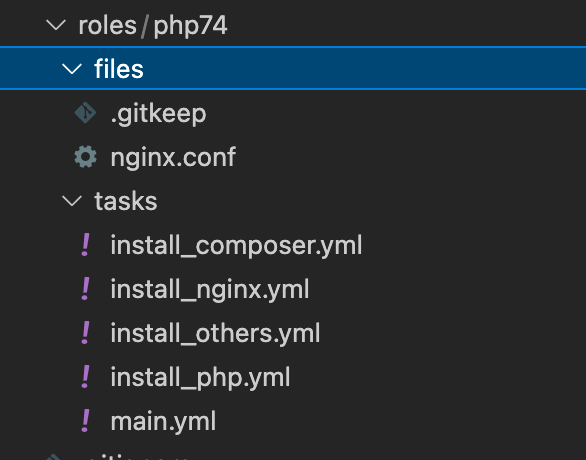
次にroles下の解説です。main.ymlではinstall_php.yml->install_composer.yml->install_nginx.yml->install_others.ymlの順に実行しています。

それぞれ解説します。
install_php.yml
php と php-fpm ほか今回の構成に必要なパッケージをyumでインストールし、php-fpmの設定も行っています。
php-fpm の設定ファイルは、IaC 上で管理するのではなく、linefileで一行ずつ探して置換しています。
- name: yum update
  yum:
    name: "*"
    state: latest

- name: enable php7.4
  shell: |
    amazon-linux-extras enable php7.4

- name: install_php
  yum:
    name:
      - php-cli
      - php-pdo
      - php-fpm
      - php-json
      - php-mysqlnd
      - php-bcmath
      - php-mbstring
      - php-xml
    state: present

- name: restart php-fpm
  service:
    name: php-fpm
    state: restarted

- name: setting php-fpm user
  lineinfile:
    path: /etc/php-fpm.d/www.conf
    regexp: "^user = "
    line: "user = nginx"

- name: setting php-fpm group
  lineinfile:
    path: /etc/php-fpm.d/www.conf
    regexp: "^group = "
    line: "group = nginx"

- name: setting php-fpm listen.owner
  lineinfile:
    path: /etc/php-fpm.d/www.conf
    regexp: "^listen.owner ="
    line: "listen.owner = nginx"

- name: setting php-fpm listen.group
  lineinfile:
    path: /etc/php-fpm.d/www.conf
    regexp: "^listen.group ="
    line: "listen.group = nginx"

- name: setting php-fpm listen.mode
  lineinfile:
    path: /etc/php-fpm.d/www.conf
    regexp: "^listen.mode ="
    line: "listen.mode = 0660"
install_composer.yml
composer のインストールを行っています。
公式ページに記載されているコマンドをshellモジュールでそのまま叩いて、バイナリをコピーしたあと、古いものを削除しています。
サクッと作ったので、毎回 changed になってしまいますので、気になる方は最初のインストールの前に、/usr/local/bin/composerがあるか見て、なければスキップすればいいんじゃないかなと思います。
- 公式
Composer
- name: install composer
  shell: |
    php -r "copy('https://getcomposer.org/installer', 'composer-setup.php');" && \
    php -r "if (hash_file('sha384', 'composer-setup.php') === \
    '906a84df04cea2aa72f40b5f787e49f22d4c2f19492ac310e8cba5b96ac8b64115ac402c8cd292b8a03482574915d1a8') \
    { echo 'Installer verified'; } else { echo 'Installer corrupt'; unlink('composer-setup.php'); } echo PHP_EOL;" && \
    php composer-setup.php && \
    php -r "unlink('composer-setup.php');"

- name: move composer binary
  copy:
    remote_src: yes
    src: /home/ec2-user/composer.phar
    dest: /usr/local/bin/composer
    owner: ec2-user
    group: ec2-user
    mode: 0755

- name: Remove old file
  file:
    path: /home/ec2-user/composer.phar
    state: absent
install_nginx.yml
nginx は EC2 でインストールするときはamazon-linux-extras enable nginx1を実行する必要があるのでまず実行しておいて、単にインストールししたあとに設定ファイルを配置しています。
こちらも毎回必ず再起動させる作りになっているので、冪等性を気にする場合は、nginx.confが chenged のときだけ実行するか、もしくはhandlersで制御してあげればいいかなと思います。
- name: enable nginx1
  shell: |
    amazon-linux-extras enable nginx1

- name: install nginx
  yum:
    name:
      - nginx
    state: present

- name: create document root
  file:
    path: /var/www/
    state: directory
    owner: root
    group: root
    mode: 0777

- name: setting nginx
  copy:
    src: nginx.conf
    dest: /etc/nginx/nginx.conf

- name: restart & enable nginx
  systemd:
    name: nginx
    state: restarted
    enabled: yes
- nginx.conf
一度 EC2 に手動でインストールして、設定ファイルを引っ張ってきて、必要な場所を変更しました。
といっても、ドキュメントルートを変えたくらいです。ここは今後の検証でちょくちょくいじることになるかと思います。
# For more information on configuration, see:
#   * Official English Documentation: http://nginx.org/en/docs/
#   * Official Russian Documentation: http://nginx.org/ru/docs/

user nginx;
worker_processes auto;
error_log /var/log/nginx/error.log;
pid /run/nginx.pid;

# Load dynamic modules. See /usr/share/doc/nginx/README.dynamic.
include /usr/share/nginx/modules/*.conf;

events {
    worker_connections 1024;
}

http {
    log_format  main  '$remote_addr - $remote_user [$time_local] "$request" '
                      '$status $body_bytes_sent "$http_referer" '
                      '"$http_user_agent" "$http_x_forwarded_for"';

    access_log  /var/log/nginx/access.log  main;

    sendfile            on;
    tcp_nopush          on;
    tcp_nodelay         on;
    keepalive_timeout   65;
    types_hash_max_size 4096;

    include             /etc/nginx/mime.types;
    default_type        application/octet-stream;

    # Load modular configuration files from the /etc/nginx/conf.d directory.
    # See http://nginx.org/en/docs/ngx_core_module.html#include
    # for more information.
    include /etc/nginx/conf.d/*.conf;

    server {
        listen       80;
        listen       [::]:80;
        server_name  _;
        root         /var/www/php-docker-nginx-postgresql/src/public;

        # Load configuration files for the default server block.
        include /etc/nginx/default.d/*.conf;

        location / {
            try_files $uri $uri/ /index.php?$query_string;
        }

        location ~ \.php$ {
            root           /var/www;
            fastcgi_pass   unix:/run/php-fpm/www.sock;
            fastcgi_index  index.php;
            fastcgi_param  SCRIPT_FILENAME $document_root$fastcgi_script_name;
            include        fastcgi_params;
        }
    }

# Settings for a TLS enabled server.
#
#    server {
#        listen       443 ssl http2;
#        listen       [::]:443 ssl http2;
#        server_name  _;
#        root         /usr/share/nginx/html;
#
#        ssl_certificate "/etc/pki/nginx/server.crt";
#        ssl_certificate_key "/etc/pki/nginx/private/server.key";
#        ssl_session_cache shared:SSL:1m;
#        ssl_session_timeout  10m;
#        ssl_ciphers PROFILE=SYSTEM;
#        ssl_prefer_server_ciphers on;
#
#        # Load configuration files for the default server block.
#        include /etc/nginx/default.d/*.conf;
#
#        error_page 404 /404.html;
#            location = /40x.html {
#        }
#
#        error_page 500 502 503 504 /50x.html;
#            location = /50x.html {
#        }
#    }

}
install_others.yml
mysql と git が必要なので、インストールしています。
ここもこのあとの検証中に必要なパッケージが見つかったら随時記載していくことになるかと思います。
- name: install other packages
  yum:
    name:
      - mysql
      - git
    state: present
まとめ
今回はCloudFormation と Ansible で ALB+EC2+RDS の Laravel 環境を構築する(手順編)で手順を記載した記事の解説編ということで、解説を行いました。
この PJ はこのあとdeployerを導入して、最終的には CI/CD まで組む検証をしようかなと思っています。
誰かの参考になれば幸いです!
Discussion