pysaml2+Keycloak+OpenLDAPでSAMLのArtifact-BindingによるSSOを行う.
はじめに
-
SAMLによるSSOを行い,LDAPの
jpegPhoto属性を利用して顔写真データ(base64エンコードデータ)を受け取るSP(Service Provider)を実装しようとしてました. -
SPの実装には,python3-samlライブラリとそのサンプルコードを参考に作成してましたが,IdPからユーザ側(ブラウザ側)に
jpegPhoto含めたデータを渡そうとしたら,エラーが発生しました.具体的には,ユーザ情報をセッションクッキーに保存しようとしたら,容量オーバーの問題が発生しました. -
SAMLプロトコルには,SPとIdPでユーザ情報の送受信を行う
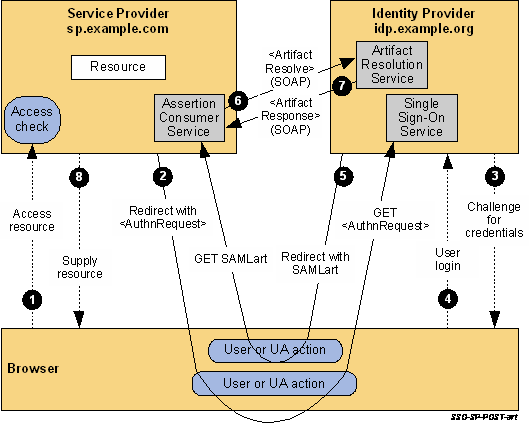
Artifact-Bindingプロトコルが存在し,それを実装すればどうにかいけそうかなと思いました(下記,参照)
-
しかし,python3-samlライブラリには,ブラウザを介するRedirect/POST Bindingsしかサポートされていません.
-
pysaml2ならできそうなのでこれを使って試してみます.
Keycloak:OpenLDAP連携
- KeycloakにOpenLDAPで登録しているユーザを連携させます.下記の記事を参考にしてください.
※jpegPhotoの設定
jpegPhoto属性を追加する際,Mapperの設定は下記のように行いました.
-
Name(クライアント・スコープの名前):jpegPhoto -
Mapper type(マッパータイプ):user-attribute-ldap-mapper -
User Model Attribute:jpegPhoto -
LDAP Attribute:jpegPhoto -
Read Only:Off -
Always Read Value From LDAP:On -
Is Mandatory In LDAP:Off -
Attribute default value:空白 -
Force a Default Value:Off -
Is Binary Attribute:On
ログイン時のUpdate Account Information画面を非表示
-
jpegPhotoを追加してログインすると,Update Account Information画面が表示されます.

-
submitを何度押しても,画面が変わりません.jpegPhoto追加せずにログインしたら,この画面は出てこないのでjpegPhotoのような大きいバイナリーデータを無理矢理Keycloak側に読み込ませた結果,表れたものだと思います. -
また,keycloakのログを見ると,下記のデータが表示されます.
2025-01-25 21:56:42,981 WARN  [org.keycloak.authentication.DefaultAuthenticationFlow]
(executor-thread-188) REQUIRED and ALTERNATIVE elements at same level!
Those alternative executions will be ignored: [null]
-
Update Account Information画面を非表示にするために,ConfigureのAuthentication⇨Required actions画面に移動し,Verify Profileをoffにしてください.

- また,Keycloak側でLDAPデータを保存しよう(Saveボタンを押下)としても,
エラーが出るので,やはり大規模なバイナリデータを扱うための設定ができてない可能性があると思われます.

pysaml2インストール
pysaml2ライブラリのインストールを行います.
$ pip install pysaml2
- 外部の依存関係をインストール
pysaml2実行に必要なxmlsec1をインストールします.以下は,Ubuntu環境下でのインストール例です.
sudo apt-get install xmlsec1
他のディストリビューションやMacOSの場合はGitHubのREADMEを参考にしてください.
Keycloak:クライアント作成
Clients⇨Create clientをクリックし,samlクライアントを作成します.
Settings画面内での設定
重要な変数に関しては下記のように設定しました.他の変数に関しては,デフォルトのままです.
General settings
-
Client ID:例:https://~/hogehoge
Access settings
-
Valid redirect URIs:例:https://~/hogehoge/?acs
SAML capabilities
-
Name ID format:username -
Force name ID format:On -
Force POST binding:Off -
Force artifact binding:On -
Include AuthnStatement:On
Signature and Encryption
-
Sign documents:Off -
Sign assertions:On
Advanced画面内での設定
-
Artifact Binding URL:例:https://~/hogehoge/?acs
他の変数に関しては,デフォルト設定にしています.
SAML Attribute設定
-
SPが受け取るSAML情報に,IdP(Keycloak&OpenLDAP)が持つユーザ属性データを追加します.
-
対象クライアントの
Client scopes画面のAssigned client scopeに,{クライアント作成時に設定したClient ID}-dedicatedがあると思います.

- これをクリックすると,LDAP・Keycloakの連携時のようなMapper画面が出てきます.
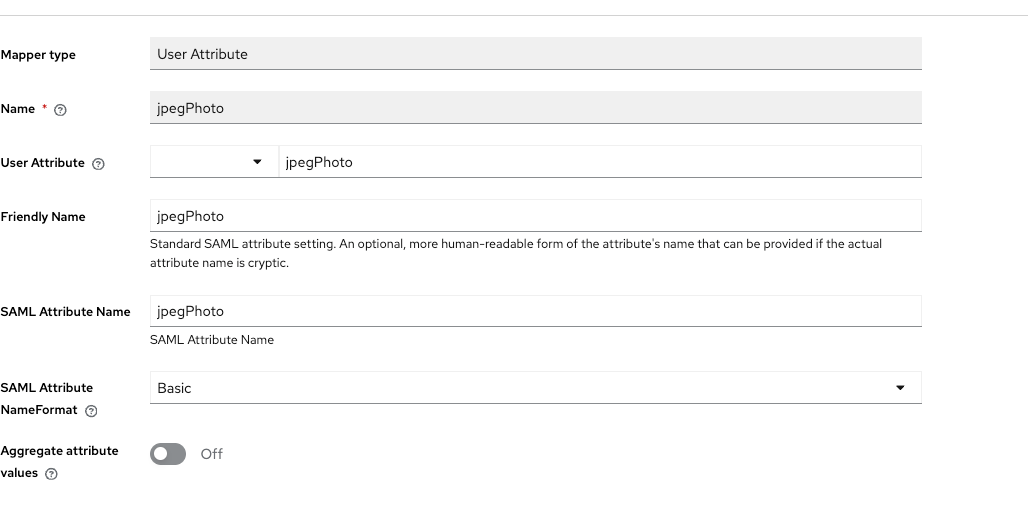
Add mapperをクリックし,SAML送信時に追加したいUser Attribute(Keycloak側で表示されるユーザ属性名.LDAP連携時に設定したUser Model Attributeのこと)を選択します.

-
jpegPhotoの例を下記に表示します.

Keycloak(SAML IdP)側のメタデータ情報をSP側に反映
-
Keycloak側で作成したクライアント設定と同等の設定をSPでも設定を行います.
-
クライアントを作成したrealm内で
Realm Settings⇨Generalを開き,SAML IdPのMetadataのURLを取得します.

-
.envファイルを作成し,このURLを加えます..envでは,セッションキーの設定も行っています.
SECRET_KEY="<各自適当に設定する>"
IDP_SAML_META_DATA_URL="https://~/auth/realms/~/protocol/saml/descriptor"
これを元に,settings.pyを作成します.
-
setting.py:SPのURL情報とIDPのメタデータURLを設定.
import os, json, socket

# dotenv library to set SECRET_KEY for session
from dotenv import load_dotenv

# load the environment variables
dotenv_path = os.path.join(os.path.dirname(__file__), ".env")
load_dotenv(dotenv_path)

# url related settings
FQDN = socket.gethostname()
ISS_URL_ORIGIN = f"https://{FQDN}"
ISS_URL_PREFIX_PATH_NAME = "<各自適当に設定>"
""" 例:ISS_URL_PREFIX_PATH_NAME="hogehoge"  """
IDP_SAML_META_DATA_URL = os.environ.get("IDP_SAML_META_DATA_URL")
-
settings.pyを利用して,sp側の設定の柱となるsaml_sp_conf.pyを作成します. -
鍵ファイル(key_file)と証明書ファイル(cert_file)については各自,opensslコマンドを利用するなどして用意してください.
from saml2.entity_category.edugain import COC
from saml2 import BINDING_HTTP_REDIRECT, BINDING_HTTP_POST, BINDING_HTTP_ARTIFACT, BINDING_SOAP
from saml2.saml import NAME_FORMAT_BASIC

# import cusotom settings from settings.py
from settings import ISS_URL_ORIGIN, ISS_URL_PREFIX_PATH_NAME, IDP_SAML_META_DATA_URL

try:
    from saml2.sigver import get_xmlsec_binary
except ImportError:
    get_xmlsec_binary = None


if get_xmlsec_binary:
    xmlsec_path = get_xmlsec_binary(["/opt/local/bin","/usr/local/bin"])
else:
    xmlsec_path = '/usr/local/bin/xmlsec1'

# Make sure the same port number appear in service_conf.py
BASE = ISS_URL_ORIGIN + "/" + ISS_URL_PREFIX_PATH_NAME

"""
ここで,SAML SPの主要な設定を行います.
"""

SAML_SP_CONFIG = {
    "entityid": BASE,
    'entity_category': [COC],
    "description": "saml service provider",
    "service": {
        "sp": {
            'allow_unsolicited': True,
            "authn_requests_signed": True,
            "want_response_signed": True,
            "logout_requests_signed": False,
            "endpoints": {
                "assertion_consumer_service": [
                    # (f"{BASE}/acs/post", BINDING_HTTP_POST)
                    (f"{BASE}/?acs", BINDING_HTTP_ARTIFACT),
                ],
                "single_logout_service": [
                    (f"{BASE}/?sls", BINDING_HTTP_ARTIFACT),
                    (f"{BASE}/?sls", BINDING_HTTP_POST),
                ],
            }
        },
    },
    "key_file": "./certs/sp.key",
    "cert_file": "./certs/sp.crt",
    "xmlsec_binary": xmlsec_path,
    "metadata":
        {"remote": [
            {"url": IDP_SAML_META_DATA_URL},
        ]},
    "name_form": NAME_FORMAT_BASIC,
}
Artifact-Bindingの認証フロー図
- Artifact-Bindingのフローを確認します.
Security Assertion Markup Language (SAML) V2.0 Technical Overview Committee Draft 02
SPをflaskで実装
-
saml_sp_conf.py等を用いて,flaskアプリを作成します.
pythonコード
index.py
import os
# saml_sp blueprint
from saml_sp import fetch_jpeg_photo_bp

# flask related libraries
from flask import Flask

# dotenv library to set SECRET_KEY for session
from dotenv import load_dotenv

# load the environment variables
dotenv_path = os.path.join(os.path.dirname(__file__), ".env")
load_dotenv(dotenv_path)

# app settings
app = Flask(__name__)
app.config["SECRET_KEY"] = os.environ.get("SECRET_KEY")
app.register_blueprint(fetch_jpeg_photo_bp)


if __name__ == "__main__":
    # 適当に設定してください.
    ssl_context = ("~", "~")
    # 例:ssl_context = ("./certs/server.cer", "./certs/server.key")
    app.run(host="0.0.0.0", port=18081, debug=True, ssl_context=ssl_context)
-
saml_sp.py:ここで,SAMLプロトコルのロジックを作成しています.
import io, base64
from PIL import Image

# import custom libraries
from settings import ISS_URL_ORIGIN, ISS_URL_PREFIX_PATH_NAME
from xml_attribute_parser import XMLAttributeParser
from saml_sp_conf import SAML_SP_CONFIG, BASE

# flask libraries
from flask import Blueprint, request, render_template, redirect, session, make_response, url_for, jsonify

# saml2 libraries
from saml2 import entity, saml, BINDING_HTTP_ARTIFACT
from saml2.client import Saml2Client
from saml2.config import Config as Saml2Config

# bp settings
fetch_jpeg_photo_bp = Blueprint(ISS_URL_PREFIX_PATH_NAME, __name__, static_folder='static', url_prefix= f'/{ISS_URL_PREFIX_PATH_NAME}', template_folder="templates")

"""
base64エンコードされたデータを画像データに変換したい場合は,この関数を
使ってみてください.
"""
def generate_image_from_base64_data(base64_data):
    img_binary = base64.b64decode(base64_data)
    inst = io.BytesIO(img_binary)
    img = Image.open(inst)
    return img

"""
spからidpにAuthnRequestやArtifactResolveを送信する際に使用します.
"""
def saml2_client():
    spConfig = Saml2Config()
    spConfig.load(SAML_SP_CONFIG)
    spConfig.allow_unknown_attributes = True
    saml_client = Saml2Client(config=spConfig)
    return saml_client


@fetch_jpeg_photo_bp.route("/", methods=["GET", "POST"])
def index():
    saml_client = saml2_client()
    jpeg_photo = False
    if "sso" in request.args:
        # IdPへの認証リクエストを作成
        _reqid, info = saml_client.prepare_for_authenticate(
        )
        for key, value in info['headers']:
            if key == 'Location':
                redirect_url = value
        """
        ここで,IdP側にリダイレクトします.
        """
        response = redirect(redirect_url, code=302)
        return response

    elif 'acs' in request.args:
        """
        IdPでの認証に成功すると,SPはここに戻ります.
        その際,SAMLartを受け取ります.
        """
        # Artifact Resolve(Artifactを送信し,IdPから属性情報を持つxmlデータを取得)
        artifact = request.form['SAMLart']
        response = saml_client.artifact2message(artifact, "idpsso")
        raw_soap_data = response.content

        # soapレスポンスデータを解析し,dict型の属性情報を生成
        xml_attribute_parser = XMLAttributeParser(raw_soap_data)
        attribute_dict = xml_attribute_parser.convert_xml_to_dict()

        # jpegPhotoを取得
        jpeg_photo = attribute_dict.get("jpegPhoto", False)
    return render_template("index.html", jpeg_photo=jpeg_photo)
-
xml_attribute_parser.py:soapレスポンスデータから,Keycloakのクライアント側で設定したSAML Attributeのみを抽出するクラスXMLAttributeParserを作成しています.
pysaml2のソースコードからArtifactResponseを,dict型等扱いやすいオブジェクトに変換するメソッドが見つけることができなかった(そもそも,実装されていないかも)ので,自作しました.
import xml.etree.ElementTree as ET

class XMLAttributeParser:
    def __init__(self, xml):
        self.root = ET.fromstring(xml)
        self.attribute_tag = '{urn:oasis:names:tc:SAML:2.0:assertion}Attribute'
        self.attribute_value_tag = '{urn:oasis:names:tc:SAML:2.0:assertion}AttributeValue'

    def __get_attribute_value(self, attribute):
        return attribute.find(self.attribute_value_tag).text

    def convert_xml_to_dict(self):
        attributes_dict = {}
        for attribute in self.root.iter(self.attribute_tag):
            attribute_name = attribute.attrib["Name"]
            attribute_value = self.__get_attribute_value(attribute)
            attributes_dict[attribute_name] = attribute_value
        return attributes_dict
templates
-
templatesフォルダ配下に,SP側のhtmlファイルを作成します.
-
base.html
<!DOCTYPE html>
<html lang="en">
  <head>
    <meta charset="utf-8">
    <meta http-equiv="X-UA-Compatible" content="IE=edge">
    <meta name="viewport" content="width=device-width, initial-scale=1">

    <title>A Python SAML Service Provider</title>

    <link rel="stylesheet" href="//maxcdn.bootstrapcdn.com/bootstrap/3.2.0/css/bootstrap.min.css">
    <!-- ISS_URL_PREFIX_PATH_NAMEで設定した名前を使います.ここでは,student-id2となっています -->
    <link rel="stylesheet" type="text/css" href="{{ url_for('student-id2.static', filename='css/style.css') }}">
    {% block head %}{% endblock %}
  </head>
  <body>
    <h1>Issuer of face photo data using python saml service</h1>
    {% block content %}{% endblock %}
  </body>
</html>
index.html
{% extends "base.html" %}

{% block content %}

<!-- show jpeg_photo -->
{% if jpeg_photo %}
  <img id="facePhoto" src="data:image/jpeg;base64,{{jpeg_photo}}" alt="face photo" width="200" height="200">
  <button onclick="downloadImage(document.getElementById('facePhoto').src.split(',')[1], 'downloaded_image.jpg')">ダウンロード</button>
{% else %}
  <div class="alert alert-danger" role="alert">You have to get your face photo data</div>
{% endif %}
  <a href="?sso" class="btn btn-primary">Get your facephoto</a>
<script>
  function downloadImage(base64Data, filename) {
    const link = document.createElement('a');
    link.download = filename;
    link.href = `data:image/jpeg;base64,${base64Data}`;
    document.body.appendChild(link);
    link.click();
    document.body.removeChild(link);
  }
  </script>
{% endblock %}
static/css
- static/cssフォルダ下に,```style.css``を作成します.
body{
    padding: 40px;
}

img {
    margin: auto;
    display: block;
}

p {
    font-size: 20px; /* 16ピクセル */
  }
最後に
-
ログアウト処理も実装しようとしましたが,実装できずに終わりました.
- 元のpysaml2のドキュメントがあまり整備されてなく,最低限度のサンプルコードしかなかったため,GitHubのソースコードを見ながらログアウト実装方法を模索してました.しかし,中身が大変複雑なため,時間に余裕がない場合,お勧めできません.
-
ドキュメント等が整備されてないため,ログアウトの流れもしっかり含んだSPを実装したい場合は,(他言語にも慣れている場合なら)他言語の有益なライブラリを探した方がいいと思います.
-
そもそもSAMLである必要がないなら,
OpenID Connectのプロトコルを用いて,顔写真データを渡す方法を模索した方がいいと思います.
参考資料
pysaml2関連
- GitHubリポジトリ
- 公式ドキュメント
- 参考にさせていただいた記事
- artifact binding実装で参考になったGitHub Issue
Artifact-bindingで参考にした資料


Discussion