WhisperをSageMaker Asynchronous Inferenceで利用する


WhisperはOpenAIがリリースした汎用音声認識モデルです。このWhisperをAWSのSageMakerの非同期推論オプション(Asynchronous Inference)でデプロイして使ってみます。この非同期オプションは推論に長い時間(最大15分)かかる場合に使用します。またこのオプションはリクエストがない時にインスタンスを0にスケールダウンできるので、リアルタイム推論よりもコストダウンが可能です。
SageMakerの非同期推論は以下のような構成になっています。

(Aamazon SageMaker Developer Guideより)
ユーザからのリクエストは以下のような流れで非同期に処理されます。
- クライアントは、処理して欲しいデータ一式を1つのファイルにまとめて、S3のバケットにアップロードします。
- クライアントは、S3のオブジェクトのURLを引数にSageMakerのエンドポイントにリクエストします。
- SageMakerは、HTTPステータスコード 202(Accepted)で推論処理結果が格納されるS3のURLを含むJSONを返します。
- SageMakerは、機械学習のインスタンス(ml instance: 実態はコンテナでユーザが自前でコンテナイメージを用意する事も可能)が起動していない場合は起動します。この時、別途S3にアップロードしておいた、モデルデータを所定の位置に展開しておきます。
- SageMakerは、ml instanceをS3のファイルをbodyにしてHTTPのPOSTメソッドを呼び出します。
- ml instanceは、処理結果をHTTPレスポンスとして、SageMakerに返します。
- SageMakerは、受け取ったレスポンスをS3に格納します。
- クライアントは、SNSで通知を受け取るか、S3に処理結果が格納されていないかポーリングします。
- クライアントは、結果がS3にあれば処理結果をダウンロードします。
大まかな流れがわかった所で、実際に使ってみます。
事前準備
手順
この手順はJupyterLab上で実施します。
推論用の独自コンテナのイメージを作成
まず、Whisperを稼働させるための以下のDockerfileを作成します。
Cudaのベースイメージに、Python、Webサーバ用パッケージ(Nginx, gunicorn, flask)、FFmpeg、Whisperをインストールし、後述のサーバ・アプリケーションをコピーしています。
FROM nvidia/cuda:11.7.1-runtime-ubuntu20.04

RUN apt-get -y update
RUN DEBIAN_FRONTEND=noninteractive apt-get -y install \
        python3-pip \
        python3-setuptools \
        ffmpeg \
        git \
         nginx \
         ca-certificates \
    && rm -rf /var/lib/apt/lists/*

RUN pip --no-cache-dir install git+https://github.com/openai/whisper.git setuptools-rust flask gunicorn

ENV PYTHONUNBUFFERED=TRUE
ENV PYTHONDONTWRITEBYTECODE=TRUE
ENV PATH="/opt/program:${PATH}"

COPY src /opt/program
WORKDIR /opt/program
このコンテナは以下のような構成になっています。
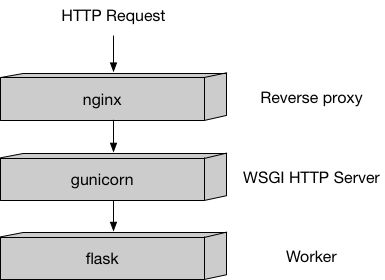
(amazon-sagemaker-examplesのBuilding your own algorithm containerより)
コンテナの起動処理については、こちらのserve、nginx.conf、wsgi.pyを参照してください。コンテナは、起動時にSageMakerによりserveが呼び出されます。なお、trainは学習処理で使用するので、ここでは何もしないように実装しています。
コンテナで稼働する推論のWebアプリケーションは以下のようになります。
まず、pingとinvocationsの2つのエンドポイントを持ちます。
pingは、SageMakerが起動完了の確認やヘルスチェックに使用します。
invocationsは、クライアントからSageMakerのエンドポイントに推論のリクエストがきた時に非同期で呼び出されます。
このときのbodyにはクライアントが指定したS3のファイルの中身が渡されます。
ここでは、
-
pingが呼び出された時にモデルを起動するようにし、起動できたら200のレスポンスを返すようにしています。モデルはSageMakerによって/opt/ml/modelに展開されています。 -
invocationsが呼び出さた時に、Whisperによって文字起こしが実行されるようにしています。文字起こし結果をレスポンスのbodyにしています。
from __future__ import print_function
import imp

import os, tempfile
from urllib import request

import whisper

import flask

prefix = "/opt/ml/"
model_path = os.path.join(prefix, "model")

class TranslateService(object):
    model = None

    @classmethod
    def get_model(cls):
        if cls.model == None:
            cls.model = whisper.load_model("large", download_root=model_path)

        return cls.model

    @classmethod
    def transcribe(cls, voice_file):
        model = cls.get_model()
        res = model.transcribe(voice_file)

        return res["text"]


app = flask.Flask(__name__)

@app.route("/ping", methods=["GET"])
def ping():
    health = TranslateService.get_model() is not None

    status = 200 if health else 404
    return flask.Response(response="\n", status=status, mimetype="application/json")

@app.route("/invocations", methods=["POST"])
def transcribe():
    res = None
    with tempfile.NamedTemporaryFile() as f:
        f.write(flask.request.get_data())
        res = TranslateService.transcribe(f.name)
        f.close()

    return flask.Response(response=res, status=200, mimetype="text/plain")
こちらのbuild_and_push.shを使って、ECRにコンテナイメージを確認します。
!./build_and_push.sh sagemaker-whisper
WhisperのモデルをS3に配置
Whisperのモデルをダウンロードするディレクトリを作成し、モデルをダウンロードします。
ダウンロードするURLはこちらで確認します。
!mkdir model
%cd model
!curl -O "https://openaipublic.azureedge.net/main/whisper/models/e4b87e7e0bf463eb8e6956e646f1e277e901512310def2c24bf0e11bd3c28e9a/large.pt"
モデルデータをSageMakerで使うために、tar.gz形式でアーカイブします。
!tar -czf model.tar.gz large.pt
アーカイブ後にS3にアップロードします。
import boto3

role_name = "SageMaker-local"

iam = boto3.client("iam")
role = iam.get_role(RoleName=role_name)["Role"]["Arn"]
import sagemaker as sage

sess = sage.Session()
model_location = sess.upload_data("./model.tar.gz", key_prefix="whisper/model")
モデルをデプロイしてエンドポイントを作成
アップロード後にSageMakerに推論用のモデルの定義を作成します。
account = sess.boto_session.client('sts').get_caller_identity()['Account']
region = sess.boto_session.region_name
image = '{}.dkr.ecr.{}.amazonaws.com/sagemaker-whisper:latest'.format(account, region)
model_name = 'whisper'

container_params = {
    "Image": image,
    "ModelDataUrl": model_location,
}

model = sess.create_model(model_name, role, container_params)
モデルの定義を作成後に、モデルをデプロイするエンドポイントの設定を作成します。
sagemaker_client = sess.boto_session.client('sagemaker', region_name='us-west-2')
model = "whisper"
endpoint_config_name = "whisper-config"

create_endpoint_config_response = sagemaker_client.create_endpoint_config(
    EndpointConfigName=endpoint_config_name,
    ProductionVariants=[
        {
            "VariantName": "variant1",
            "ModelName": model,
            "InstanceType": "ml.p3.2xlarge",
            "InitialInstanceCount": 1
        }
    ],
    AsyncInferenceConfig={
        "OutputConfig": {
            "S3OutputPath": f"s3://{sess.default_bucket()}/whisper/output"
        },
    }
)
エンドポイントの設定が完了したら、実際にデプロイします。
endpoint_name = 'whisper'
endpoint_config_name = "whisper-config"

create_endpoint_response = sagemaker_client.create_endpoint(
                                            EndpointName=endpoint_name,
                                            EndpointConfigName=endpoint_config_name)
推論(文字起こし)を実行
エンドポイントがInServiceの状態になったら、以下のように適当な音声ファイル(例:example_voice.mp3)をS3にアップロードし、SageMakerのエンドポイントを非同期で呼び出します。
model_location = sess.upload_data("./example_voice.mp3", key_prefix="whisper/input")
sagemaker_runtime = boto3.client("sagemaker-runtime", region_name='us-west-2')

input_location = f"s3://{sess.default_bucket()}/whisper/input/example_voice.mp3"

response = sagemaker_runtime.invoke_endpoint_async(
                            EndpointName=endpoint_name,
                            InputLocation=input_location)

print(response)
レスポンスのヘッダ(x-amzn-sagemaker-outputlocation)に文字起こし結果が格納されるS3のURLが設定されるので、推論完了後にS3からファイルをダウンロードします。
オートスケーリングの設定を、リクエストがない時はインスタンス数を0にする
リクエストがない時にインスタンス数を0にするには以下のようにします。
autoscaling_client = sess.boto_session.client('application-autoscaling')

variant_name = "variant1"
endpoint_name = 'whisper'

resource_id=f'endpoint/{endpoint_name}/variant/{variant_name}'

response = autoscaling_client.register_scalable_target(
    ServiceNamespace='sagemaker',
    ResourceId=resource_id,
    ScalableDimension='sagemaker:variant:DesiredInstanceCount',
    MinCapacity=0,
    MaxCapacity=1
)

response = autoscaling_client.put_scaling_policy(
    PolicyName='Invocations-ScalingPolicy',
    ServiceNamespace='sagemaker',
    ResourceId=resource_id,
    ScalableDimension='sagemaker:variant:DesiredInstanceCount',
    PolicyType='TargetTrackingScaling',
    TargetTrackingScalingPolicyConfiguration={
        'TargetValue': 1.0,
        'CustomizedMetricSpecification': {
            'MetricName': 'ApproximateBacklogSizePerInstance',
            'Namespace': 'AWS/SageMaker',
            'Dimensions': [
                {'Name': 'EndpointName', 'Value': endpoint_name }
            ],
            'Statistic': 'Average',
        },
        'ScaleInCooldown': 120,
        'ScaleOutCooldown': 120
    }
)
備考
本記事のソースコードはGitHubにて公開しています。
本記事は、Amazon SageMaker Examplesにてライセンスされるコードを含んでいます。ライセンスについてはそちらを参照してください。
Discussion