Terraform / Helm / KustomizeでEKS入門
やること
主にフロントエンドを担当しているのですが、SREに興味がありk8sを勉強しています。
今回はEKSクラスターを立ててアプリを動かします。k8sとkubectlコマンドの基本理解が前提です。
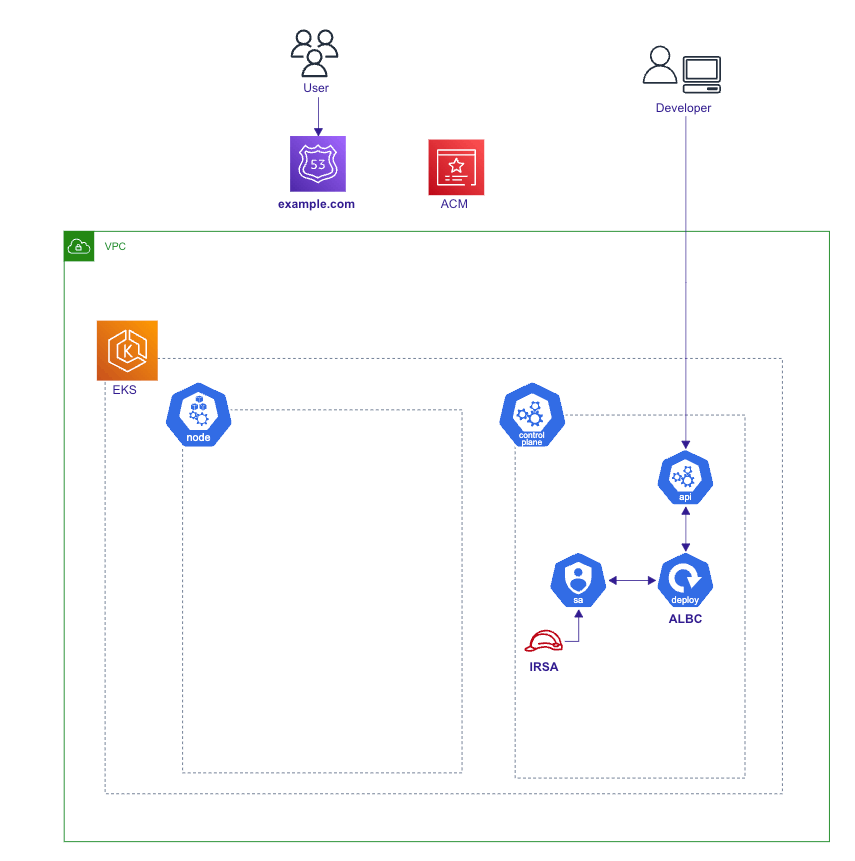
全体像はこんな感じです。
- ALB以外のAWSリソースはTeraformで管理
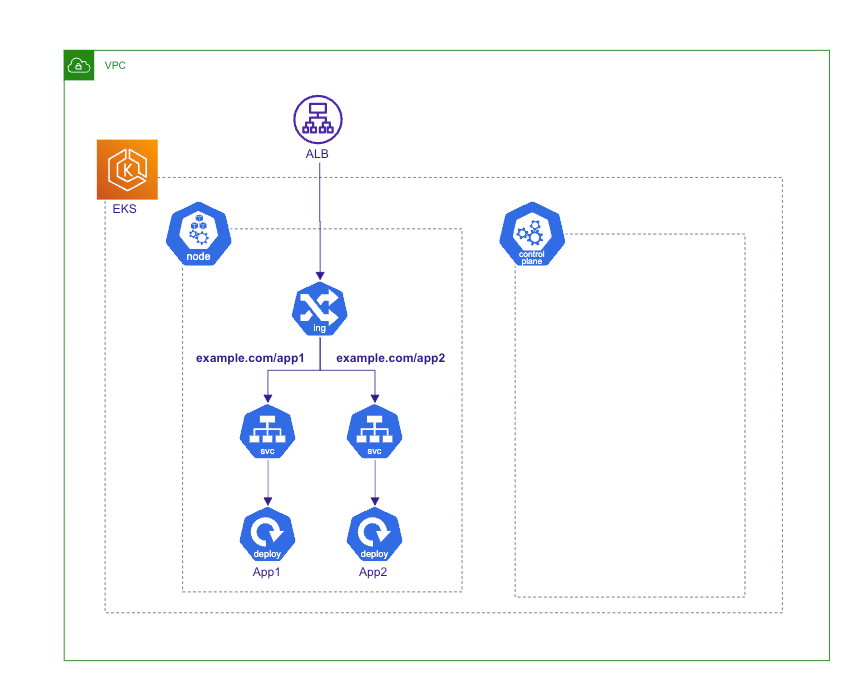
- ALBとワーカ-ノード内のk8sリソースはKustomizeをつかってk8sマニフェストで管理
- Helmチャートを使ってAWS Load Balancer Controller(ALBC)をインストール

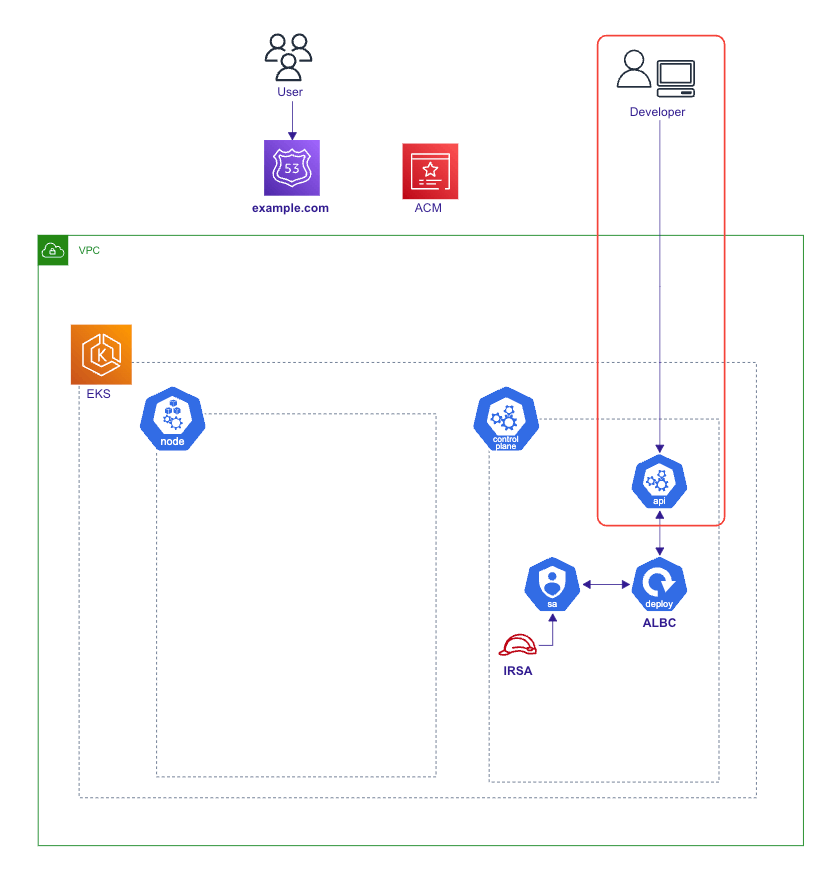
TerraformによるAWSリソースの構築
下図の部分をTerraformで管理します。ALBはk8sマニフェストで管理します。

1. 事前準備
VPCの作成
VPCモジュールを使用してサクッと作ります。
ingressリソースによって作成されるロードバランサをデプロイするサブネットをk8sが特定できるようにするため、サブネットにタグをつける必要があります。
provider "aws" {
  region = "us-east-2" // 東京より少し料金が安いのでオハイオを選択
}

data "aws_availability_zones" "available" {}
data "aws_region" "current" {}
data "aws_caller_identity" "current" {}
locals {
  cluster_name = "education-eks-cluster"
}

module "vpc" {
  source  = "terraform-aws-modules/vpc/aws"
  version = "3.14.2"

  name = "education-vpc"

  cidr = "10.0.0.0/16"
  azs  = slice(data.aws_availability_zones.available.names, 0, 3)

  private_subnets = ["10.0.1.0/24", "10.0.2.0/24", "10.0.3.0/24"]
  public_subnets  = ["10.0.4.0/24", "10.0.5.0/24", "10.0.6.0/24"]

  enable_nat_gateway   = true
  single_nat_gateway   = true
  enable_dns_hostnames = true

  // ingressリソースによって作成されるロードバランサをデプロイするサブネットをk8sが特定できるようにするため、サブネットにタグをつける
  public_subnet_tags = {
    "kubernetes.io/cluster/${local.cluster_name}" = "shared"
    "kubernetes.io/role/elb"                      = 1
  }

  private_subnet_tags = {
    "kubernetes.io/cluster/${local.cluster_name}" = "shared"
    "kubernetes.io/role/internal-elb"             = 1
  }
}
EKSクラスターの作成
こちらもEKSモジュールを使用すればサクッと作れます。
ingressなどのk8s管理リソースを制御するための追加のセキュリティグループの設定が必要なところがポイントです。
module "eks" {
  source  = "terraform-aws-modules/eks/aws"
  version = "18.0.5"

  cluster_name    = local.cluster_name
  cluster_version = "1.24"

  vpc_id                         = module.vpc.vpc_id
  subnet_ids                     = module.vpc.private_subnets
  cluster_endpoint_public_access = true

  // 極力安く済ませたいので、ワーカーノードはGraviton2のSpotインスタンスを使用
  eks_managed_node_group_defaults = {
    ami_type       = "AL2_ARM_64"
    desired_size   = 1
    instance_types = ["t4g.small"]
    capacity_type  = "SPOT"
  }

  eks_managed_node_groups = {
    one = {
      name         = "node-group-1"
      min_size     = 1
      max_size     = 3
      desired_size = 1
    }

    two = {
      name         = "node-group-2"
      min_size     = 1
      max_size     = 2
      desired_size = 1
    }
  }

  cluster_security_group_additional_rules = {
    egress_nodes_ephemeral_ports_tcp = {
      description                = "To node 1025-65535"
      protocol                   = "tcp"
      from_port                  = 1025
      to_port                    = 65535
      type                       = "egress"
      source_node_security_group = true
    }
  }

  node_security_group_additional_rules = {
    admission_webhook = {
      description                   = "Admission Webhook"
      protocol                      = "tcp"
      from_port                     = 0
      to_port                       = 65535
      type                          = "ingress"
      source_cluster_security_group = true
    }

    ingress_self_all = {
      description = "Node to node all ports/protocols"
      protocol    = "-1"
      from_port   = 0
      to_port     = 0
      type        = "ingress"
      self        = true
    }

    egress_all = {
      description      = "Node all egress"
      protocol         = "-1"
      from_port        = 0
      to_port          = 0
      type             = "egress"
      cidr_blocks      = ["0.0.0.0/0"]
      ipv6_cidr_blocks = ["::/0"]
    }
  }
}
2. EKSクラスタへの接続
~/.kube/configを更新してcontextを作成したEKSクラスタに設定します。
公式Doc.

resource "null_resource" "kubeconfig" {
  triggers = {
    cluster_name = module.eks.cluster_id
  }
  provisioner "local-exec" {
    command = "aws eks update-kubeconfig --name ${module.eks.cluster_id} --region ${var.region}"
  }
}
プロバイダに作成したクラスタ情報および~/.kube/configを読み込ませて、ローカルPC上でkubectlコマンドが使えるようにします。
認証にはtoken, config_path, execのうち、状況に応じてどれか一つを指定すればOKのようです。
公式Doc.
data "aws_eks_cluster" "eks" {
  name = module.eks.cluster_id
}

data "aws_eks_cluster_auth" "eks" {
  name = module.eks.cluster_id
}

provider "kubernetes" {
  host                   = module.eks.cluster_endpoint
  cluster_ca_certificate = base64decode(data.aws_eks_cluster.eks.certificate_authority[0].data)
  token       = data.aws_eks_cluster_auth.eks.token

  // token, config_path, execのうち、状況に応じてどれか一つを指定すればOK
  # config_path = "~/.kube/config"
  # exec {
  #   api_version = "client.authentication.k8s.io/v1beta1"
  #   command     = "aws"
  #   args = [
  #     "eks",
  #     "get-token",
  #     "--cluster-name",
  #     data.aws_eks_cluster.eks.name
  #   ]
  # }
}
3. AWS Load Balancer Controller(ALBC)アドオンのインストール
ここが初心者的に難しいポイントなのですが、EKSのOpenID Connect(OIDC)プロバイダーおよびIAMロールのサービスアカウント(IRSA)を作成します。
公式Doc.

OIDCプロバイダーおよびIRSAの作成
locals {
  albc_ns = "kube-system"
  sa_name = "aws-load-balancer-controller"
}

# ALBCに許可するpolicyを作成
data "http" "albc_policy_json" {
  url = "https://raw.githubusercontent.com/kubernetes-sigs/aws-load-balancer-controller/v2.1.0/docs/install/iam_policy.json"
}
resource "aws_iam_policy" "aws_loadbalancer_controller" {
  name   = "EKSIngressAWSLoadBalancerController"
  policy = data.http.albc_policy_json.body
}

# ServiceAccountとIAMロールを紐づけるIRSAを作成
module "albc_irsa" {
  source                         = "terraform-aws-modules/iam/aws//modules/iam-assumable-role-with-oidc"
  version                        = "~> 5.0"
  create_role                    = true
  role_name                      = "EKSIngressAWSLoadBalancerController"
  provider_url                   = replace(module.eks.cluster_oidc_issuer_url, "https://", "")
  role_policy_arns               = [aws_iam_policy.aws_loadbalancer_controller.arn]
  oidc_fully_qualified_subjects  = ["system:serviceaccount:${local.albc_ns}:${local.sa_name}"]
  oidc_fully_qualified_audiences = ["sts.amazonaws.com"]
}

# OIDCプロバイダを作成
data "tls_certificate" "my_certificate" {
  url = data.aws_eks_cluster.eks.identity.0.oidc.0.issuer
}
resource "aws_iam_openid_connect_provider" "my_openid_connect_provider" {
  client_id_list  = ["sts.amazonaws.com"]
  thumbprint_list = [data.tls_certificate.my_certificate.certificates.0.sha1_fingerprint]
  url             = data.aws_eks_cluster.eks.identity.0.oidc.0.issuer
}

# ServiceAccountを作成
resource "kubernetes_service_account" "aws_loadbalancer_controller" {
  metadata {
    name      = local.sa_name
    namespace = local.albc_ns
    annotations = {
      "eks.amazonaws.com/role-arn" = module.albc_irsa.iam_role_arn
    }
    labels = {
      "app.kubernetes.io/component"  = "controller"
      "app.kubernetes.io/name"       = "aws-load-balancer-controller"
      "app.kubernetes.io/managed-by" = "terraform"
    }
  }
}
こちら設定が難しかったのですが、下記が参考になりました。
ALBCアドオンのインストール
次に、Helmチャートのモジュールを使ってingressとALBを連携させるALBCアドオンをインストールします。
data "aws_eks_cluster" "eks" {
  name = module.eks.cluster_id
}

data "aws_eks_cluster_auth" "eks" {
  name = module.eks.cluster_id
}

provider "helm" {
  kubernetes {
    host                   = data.aws_eks_cluster.eks.endpoint
    cluster_ca_certificate = base64decode(data.aws_eks_cluster.eks.certificate_authority[0].data)
    token       = data.aws_eks_cluster_auth.eks.token
  }
}
resource "helm_release" "aws-load-balancer-controller" {
  name       = "aws-load-balancer-controller"
  repository = "https://aws.github.io/eks-charts"
  chart      = "aws-load-balancer-controller"
  version    = "1.4.2"
  namespace  = "kube-system"
  depends_on = [
    kubernetes_service_account.aws_loadbalancer_controller,
    null_resource.kubeconfig
  ]

  set {
    name  = "clusterName"
    value = data.aws_eks_cluster.eks.name
  }

  set {
    name  = "serviceAccount.create"
    value = false
  }

  set {
    name  = "serviceAccount.name"
    value = "aws-load-balancer-controller"
  }

  set {
    name  = "image.repository"
    value = "602401143452.dkr.ecr.ap-northeast-1.amazonaws.com/amazon/aws-load-balancer-controller"
  }

  set {
    name  = "image.tag"
    value = "v2.4.4"
  }
}
Kustomizeを使ったk8sリソースの構築
Kustomizeを使ってワーカーノードの中のk8sリソースおよびALB管理します。
Kustomizeを使うと環境ごとに変数だけ上書きしてk8sマニフェストを再利用できます。kubectlをインストールしたときにデフォルトで入っています。

1. 事前準備
下記のようにk8sマニフェストを用意します。
ディレクトリ構成
.
└── kustomize
    ├── base
    │   ├── configmap.yaml
    │   ├── deployment.yaml
    │   ├── ingress.yaml
    │   ├── kustomization.yaml
    │   ├── namespace.yaml
    │   └── service.yaml
    └── overlays
        ├── production
        │   └── kustomization.yaml
        └── staging
            └── kustomization.yaml
マニフェスト
apiVersion: v1
kind: Namespace
metadata:
  name: default
apiVersion: v1
kind: ConfigMap
metadata:
  name: configmap

data:
  ENV: "Kubernetes"
apiVersion: apps/v1
kind: Deployment
metadata:
  name: deployment1
spec:
  selector:
    matchLabels:
      app.kubernetes.io/name: app1
  replicas: 3
  template:
    metadata:
      labels:
        app.kubernetes.io/name: app1
    spec:
      containers:
        - image: nginx:1.20
          imagePullPolicy: Always
          name: app
          ports:
            - containerPort: 80
          env:
            - name: ENV
              valueFrom:
                configMapKeyRef:
                  name: configmap
                  key: ENV
          volumeMounts:
            - name: mount
              mountPath: '/mount'
              readOnly: true

      volumes:
        - name: mount
          emptyDir: {}
---
apiVersion: apps/v1
kind: Deployment
metadata:
  name: deployment2
spec:
  selector:
    matchLabels:
      app.kubernetes.io/name: app2
  replicas: 3
  template:
    metadata:
      labels:
        app.kubernetes.io/name: app2
    spec:
      containers:
        - image: nginx:1.18
          imagePullPolicy: Always
          name: app
          ports:
            - containerPort: 80
          env:
            - name: ENV
              valueFrom:
                configMapKeyRef:
                  name: configmap
                  key: ENV
          volumeMounts:
            - name: mount
              mountPath: '/mount'
              readOnly: true

      volumes:
        - name: mount
          emptyDir: {}
apiVersion: v1
kind: Service
metadata:
  name: service1
spec:
  ports:
    - port: 80
      targetPort: 80
      protocol: TCP
  type: NodePort
  selector:
    app.kubernetes.io/name: app1
---
apiVersion: v1
kind: Service
metadata:
  name: service2
spec:
  ports:
    - port: 80
      targetPort: 80
      protocol: TCP
  type: NodePort
  selector:
    app.kubernetes.io/name: app2
apiVersion: kustomize.config.k8s.io/v1beta1
kind: Kustomization
resources:
  - deployment.yaml
  - ingress.yaml
  - service.yaml
  - namespace.yaml
  - configmap.yaml
apiVersion: networking.k8s.io/v1
kind: Ingress
metadata:
  name: ingress
  namespace: production
  annotations:
    alb.ingress.kubernetes.io/scheme: internet-facing
    alb.ingress.kubernetes.io/target-type: instance
spec:
  defaultBackend:
    service:
      name: app1
      port:
        number: 80

  ingressClassName: alb
  rules:
    - http:
        paths:
          - path: /app1
            pathType: Prefix
            backend:
              service:
                name: service1
                port:
                  number: 80
          - path: /app2
            pathType: Prefix
            backend:
              service:
                name: service2
                port:
                  number: 80
apiVersion: kustomize.config.k8s.io/v1beta1
kind: Kustomization
namespace: staging
resources:
  - ../../base
replicas:
  - name: deployment1
    count: 2
  - name: deployment2
    count: 2
apiVersion: kustomize.config.k8s.io/v1beta1
kind: Kustomization
namespace: production
resources:
  - ../../base
replicas:
  - name: deployment1
    count: 4
  - name: deployment2
    count: 4
2. ロードバランサに設定するセキュリティグループの追加
デプロイする前に、ALBに設定するセキュリティグループの設定を行います。
下記のようにanotationを追加することで、ingressリソースいよって作成されるロードバランサにセキュリティグループ適用されます。
公式Doc.
apiVersion: networking.k8s.io/v1
kind: Ingress
metadata:
  name: ingress
  namespace: production
  annotations:
    alb.ingress.kubernetes.io/scheme: internet-facing
    alb.ingress.kubernetes.io/target-type: instance
+   alb.ingress.kubernetes.io/security-groups: alb, internal
+   alb.ingress.kubernetes.io/manage-backend-security-group-rules: 'true'
spec:
  defaultBackend:
    service:
      name: app1
      port:
        number: 80
...
適用するセキュリティグループはTerraformで別途作成します。
上記anotationと同じ名前のタグをつける必要があります。
ロードバランサに設定するセキュリティグループ
// 外部公開用のALBに設定するSG
resource "aws_security_group" "allow_http" {
  name        = "allow_http"
  description = "Allow HTTP access."
  vpc_id      = module.vpc.vpc_id

  ingress {
    description = "Allow HTTP access."
    from_port   = 80
    to_port     = 80
    protocol    = "tcp"
    cidr_blocks = ["0.0.0.0/0"]
  }

  egress {
    from_port        = 0
    to_port          = 0
    protocol         = "-1"
    cidr_blocks      = ["0.0.0.0/0"]
    ipv6_cidr_blocks = ["::/0"]
  }

  tags = {
    Name = "alb"
  }
}

resource "aws_security_group" "allow_https" {
  name        = "allow_https"
  description = "Allow HTTPS access."
  vpc_id      = module.vpc.vpc_id

  ingress {
    description = "Allow HTTPS access."
    from_port   = 443
    to_port     = 443
    protocol    = "tcp"
    cidr_blocks = ["0.0.0.0/0"]
  }

  egress {
    from_port        = 0
    to_port          = 0
    protocol         = "-1"
    cidr_blocks      = ["0.0.0.0/0"]
    ipv6_cidr_blocks = ["::/0"]
  }

  tags = {
    Name = "alb"
  }
}

// 内部用のELBに設定するSG
resource "aws_security_group" "internal" {
  name        = "allow_internal"
  description = "Allow internal access"
  vpc_id      = module.vpc.vpc_id

  ingress {
    description     = "Allow internal access."
    from_port       = 80
    to_port         = 80
    protocol        = "tcp"
    security_groups = [aws_security_group.allow_http.id, aws_security_group.allow_https.id]
  }

  egress {
    from_port        = 0
    to_port          = 0
    protocol         = "-1"
    cidr_blocks      = ["0.0.0.0/0"]
    ipv6_cidr_blocks = ["::/0"]
  }

  tags = {
    Name = "internal"
  }
}
3. Kustomizeでデプロイ
下記コマンドでstagingnamespaceにデプロイします。
$ kubectl apply -k kustomize/overlays/staging
ここでingressリソースを確認するとALBが作成されていることがわかります。
$ kubectl get ing --all-namespaces
NAMESPACE   NAME      CLASS   HOSTS   ADDRESS   PORTS
staging     ingress   alb     *       k8s-staging-ingress-xxxxxxx-123456789.us-east-2.elb.amazonaws.com  80
4. ドメイン名を付けてHTTPSで通信する
最後に、作成されたALBのDNS名に対して自分で用意したドメイン名を付けてHTTPS対応をします。(ドメインの準備についてはこちらご参照ください)
Route53およびACMの設定はTerraformで管理して、ALBの設定はk8sマニフェストで管理します。
ここら辺が二重管理になってしまうのでうまく統合できたらいいですね。。。

TerraformでドメインのACM証明書およびALBへのAレコードを作成
ACM証明書およびALBへのAレコードを作成
locals {
  root_domain_name = "example.com"
  root_domain_zone_id = "Zxxxxxxxxxxxxxxx"
  alb_dns_name = "k8s-staging-ingress-xxxxxxx-123456789.us-east-2.elb.amazonaws.com"
  alb_hostzone_id = "Zyyyyyyyy"
}

# Domain record
data "aws_route53_zone" "root" {
  name = local.root_domain_name
}
resource "aws_route53_record" "root" {
  zone_id = data.aws_route53_zone.root.zone_id
  name    = data.aws_route53_zone.root.name
  type    = "A"
  alias {
    name                   = local.alb_dns_name
    zone_id                = local.alb_hostzone_id
    evaluate_target_health = true
  }
}

# ACM
resource "aws_acm_certificate" "this" {
  domain_name               = aws_route53_record.root.name
  subject_alternative_names = ["*.${aws_route53_record.root.name}"]
  validation_method         = "DNS"

  lifecycle {
    create_before_destroy = true
  }
}

resource "aws_route53_record" "cert_validation" {
  for_each = {
    for dvo in aws_acm_certificate.this.domain_validation_options : dvo.domain_name => {
      name   = dvo.resource_record_name
      record = dvo.resource_record_value
      type   = dvo.resource_record_type
    }
  }

  allow_overwrite = true
  name            = each.value.name
  records         = [each.value.record]
  type            = each.value.type
  ttl             = "300"

  zone_id = local.root_domain_zone_id
}

resource "aws_acm_certificate_validation" "this" {
  certificate_arn = aws_acm_certificate.this.arn
  validation_record_fqdns = [
    for record in aws_route53_record.cert_validation : record.fqdn
  ]
}
IngressリソースでHTTPS対応
先ほど作成したACM証明書のARNを使って、ingressリソースを下記のように修正します。
公式Doc.
apiVersion: networking.k8s.io/v1
kind: Ingress
metadata:
  name: ingress
  namespace: production
  annotations:
    alb.ingress.kubernetes.io/scheme: internet-facing
    alb.ingress.kubernetes.io/target-type: instance
    alb.ingress.kubernetes.io/security-groups: alb, internal
    alb.ingress.kubernetes.io/manage-backend-security-group-rules: 'true'
+   alb.ingress.kubernetes.io/actions.ssl-redirect: '{"Type": "redirect", "RedirectConfig": { "Protocol": "HTTPS", "Port": "443", "StatusCode": "HTTP_301"}}'
+   alb.ingress.kubernetes.io/certificate-arn: arn:aws:acm:us-east-2:123456789:certificate/xxxxxxxxxxxxx
+   alb.ingress.kubernetes.io/listen-ports: '[{"HTTPS":443}]'
spec:
+ tls:
+   - hosts:
+       - example.com
  defaultBackend:
    service:
      name: app1
      port:
        number: 80
...
再度デプロイすれば、HTTPSでアクセスできるようになります。
$ kubectl apply -k kustomize/overlays/staging
さいごに
今回EKSを勉強するにあたり、1週間ほどクラスタを立てておよそ$40程度かかりました。スポットインスタンスやオハイオリージョンを使ったりで多少は安くなっているかもしれません。
次はGithubActionsとfluxを使ったCI/CDパイプラインを作成します。
Discussion