Kustomize / flux / GithubActionsでGitOps入門
やること
主にフロントエンドを担当しているのですが、SREに興味がありk8sを勉強しています。
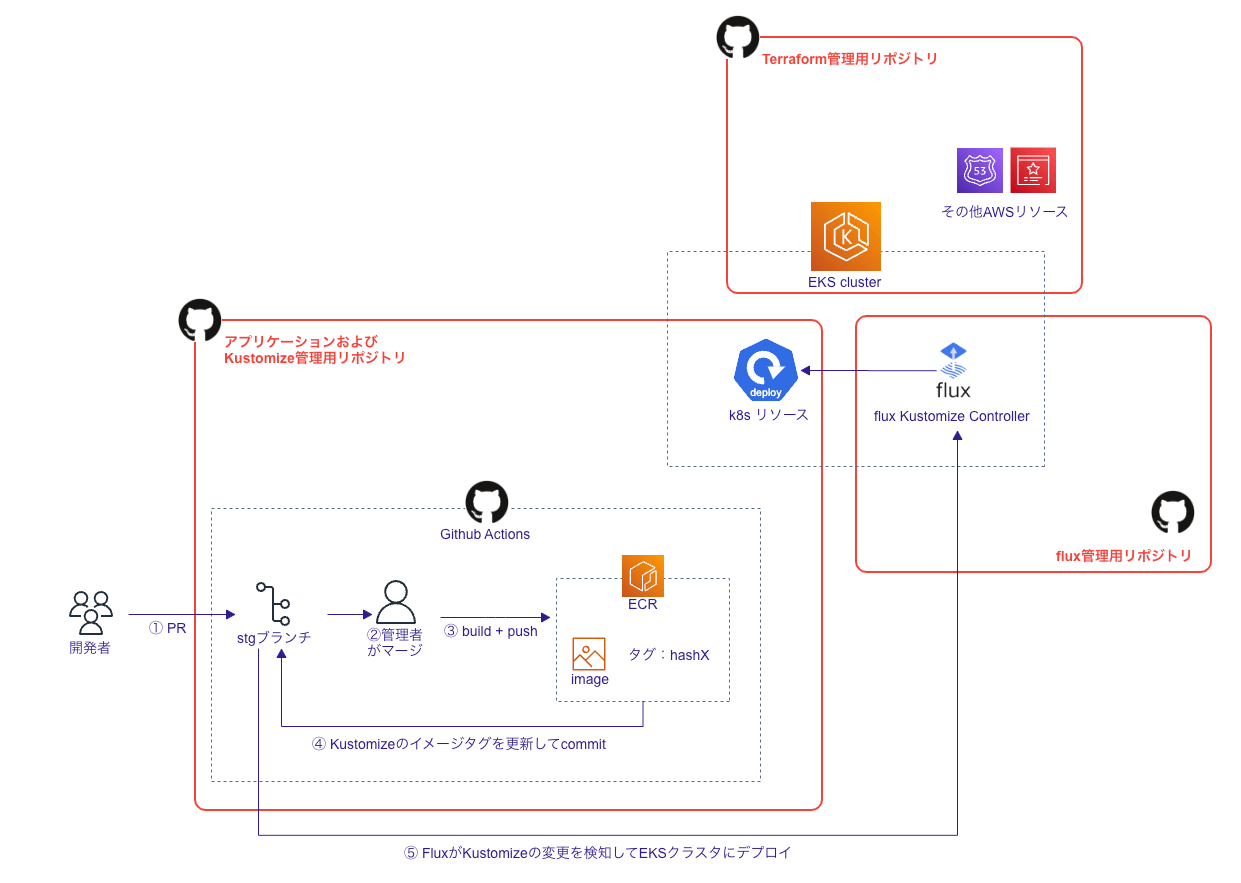
今回は前回作成したEKSクラスターを使って、stagingブランチにアプリケーションコードの変更がマージされるとEKSクラスターのstagnig namespaceにリソースがデプロイされるCI/CDパイプラインを作成します。
全体像はこんな感じです。

Gitリポジトリ
本記事では3つのGitリポジトリでコードを管理します。少し分かりづらいですがご容赦ください。
- AWSリソースをTerraformで管理するリポジトリ
- アプリケーションコードおよびKustomize管理用のリポジトリ
- flux管理用のリポジトリ
GithubActionsでアプリケーションコードの変更からコンテナイメージを作成
GithubActionsを使ってパイプラインの下記部分のを作成します。
- stagingブランチに変更がマージされるとECRにイメージがpushされる
- その後、Kustomizeのイメージタグを更新して変更をcommitする

事前準備
下記のように、GithubActionsにECRにイメージをpushできる権限を与えます。
こちらはTeraformで設定するので、Terraform管理用のリポジトリにコードを置いておきます。
GithubActionsへの権限付与
variable "repository_name" {
  description = "GitHubのリポジトリ名"
  type        = string
  default     = "eks-sample-app"
}
variable "github_user" {
  description = "GitHubのユーザー名"
  type        = string
  default     = "xxxxx"
}

data "aws_iam_policy_document" "github_actions" {
  statement {
    actions = [
      "ecr:BatchGetImage",
      "ecr:BatchCheckLayerAvailability",
      "ecr:CompleteLayerUpload",
      "ecr:GetDownloadUrlForLayer",
      "ecr:InitiateLayerUpload",
      "ecr:PutImage",
      "ecr:UploadLayerPart",
    ]
    resources = [
      aws_ecr_repository.repository.arn,
    ]
  }

  statement {
    actions = [
      "ecr:GetAuthorizationToken",
    ]
    resources = ["*"]
  }
}

resource "aws_iam_policy" "github_actions" {
  name   = "ECRPushPolicy"
  policy = data.aws_iam_policy_document.github_actions.json
}

resource "aws_iam_role_policy_attachment" "github_actions" {
  role       = aws_iam_role.github_actions.name
  policy_arn = aws_iam_policy.github_actions.arn
}

resource "aws_iam_role" "github_actions" {
  name               = "GitHubActionsRole"
  assume_role_policy = data.aws_iam_policy_document.github_actions_assume_role.json
}

data "aws_iam_policy_document" "github_actions_assume_role" {
  statement {
    actions = ["sts:AssumeRoleWithWebIdentity"]
    principals {
      type        = "Federated"
      identifiers = ["arn:aws:iam::${data.aws_caller_identity.current.account_id}:oidc-provider/token.actions.githubusercontent.com"]
    }
    condition {
      test     = "StringLike"
      variable = "token.actions.githubusercontent.com:sub"
      values   = ["repo:${var.github_user}/${var.repository_name}:*"]
    }
  }
}

data "tls_certificate" "github_actions" {
  url = "https://token.actions.githubusercontent.com"
}

resource "aws_iam_openid_connect_provider" "github" {
  url             = "https://token.actions.githubusercontent.com"
  client_id_list  = ["sts.amazonaws.com"]
  thumbprint_list = [data.tls_certificate.github_actions.certificates[0].sha1_fingerprint]
}
GithubActionsのworkflowを設定
前提として、アプリケーションコードおよびKustomize管理用のリポジトリのディレクトリ構成は下記のようになっています。
アプリケーションコードおよびKustomize管理用のリポジトリのディレクトリ構成
.
├── app.js
├── Dockerfile
├── .github
│   └── workflows
│       ├── production.workflow.yaml
│       └── staging.workflow.yaml
└── kustomize
    ├── base
    │   ├── configmap.yaml
    │   ├── deployment.yaml
    │   ├── ingress.yaml
    │   ├── kustomization.yaml
    │   ├── namespace.yaml
    │   └── service.yaml
    └── overlays
        ├── production
        │   └── kustomization.yaml
        └── staging
            └── kustomization.yaml
下記のようにGithubActionsのworkflowを記述します。
stagingブランチでjsファイルもしくはyamlファイルが変更されたときにworkflowがキックされます。
事前にAWS_ACCOUNT_IDを環境変数としてGituhbリポジトリに登録しておきます。
(GITHUB_TOKENの登録は不要です。)
on:
  pull_request:
    branches:
      - staging
    paths:
      - '**/*.js'
      - '**/*.yaml'
    types: [closed]

permissions: write-all

name: Staging Build and Push an Image to ECR

env:
  AWS_DEFAULT_REGION: us-east-2
  AWS_DEFAULT_OUTPUT: json
  AWS_ACCOUNT_ID: ${{ secrets.AWS_ACCOUNT_ID }}
  CONTAINER_IMAGE: eks-sample-test-sample-app:${{ github.sha }}

jobs:
  build-and-push:
    name: Staging Build and Push
    runs-on: ubuntu-latest
    steps:
        # stagingブランチに変更がマージされるとビルドしてECRにイメージをpushする
      - name: Checkout
        uses: actions/checkout@v2
        with:
          token: ${{secrets.GITHUB_TOKEN}}

      - name: Configure AWS credentials
        uses: aws-actions/configure-aws-credentials@v1
        with:
          role-to-assume: arn:aws:iam::${{ secrets.AWS_ACCOUNT_ID }}:role/GitHubActionsRole
          aws-region: us-east-2

      - name: Login to ECR
        id: login-ecr
        uses: aws-actions/amazon-ecr-login@v1

      - name: Build and tag the image
        run: |
          docker build \
            -t $CONTAINER_IMAGE \
            -t $AWS_ACCOUNT_ID.dkr.ecr.$AWS_DEFAULT_REGION.amazonaws.com/$CONTAINER_IMAGE .

      - name: Docker Push
        run: |
          docker push $AWS_ACCOUNT_ID.dkr.ecr.$AWS_DEFAULT_REGION.amazonaws.com/$CONTAINER_IMAGE

      # その後、Kustomizeのイメージタグを更新して変更をcommitする
      - name: Set image tag
        run: |
          cd kustomize/overlays/staging
          kustomize edit set image $AWS_ACCOUNT_ID.dkr.ecr.$AWS_DEFAULT_REGION.amazonaws.com/$CONTAINER_IMAGE
          cat kustomization.yaml

      - name: Commit kustomization
        run: |
          git config --local user.email "action@github.com"
          git config --local user.name "GitHub Action"
          git commit -a -m "$CONTAINER_IMAGE"

      - name: Git push changes to staging
        uses: ad-m/github-push-action@master
        with:
          GITHUB_TOKEN: ${{ secrets.GITHUB_TOKEN }}
          branch: staging
          force: true
fluxを使ってEKSへのデプロイパイプライン作成
上記のGithubActionパイプラインが実行され、Kustomizeのイメージタグ設定が更新されると、Kustomizeの変更がEKSクラスタにデプロイされるようなパイプラインをfluxを使って作成します。
fluxの設定ファイルは専用のGitリポジトリで管理することになります。

fluxのインストール
$ brew install fluxcd/tap/flux
Bootstrap
flux bootrstapコマンドで現在のk8sのcurrent contextであるEKSクラスターにKustomize Controllerがデプロイされると同時に、flux管理用のGithubリポジトリが作成されます。

事前にGithubのPersonal Access Token(PAT)を準備します。
Github PATの準備
repoとworkflowにチェックがついていればOKです。

Github PATを使って、下記のようにbootstrapを行います。
公式Doc.
$ export GITHUB_TOKEN=<your-token>

$ flux bootstrap github \
  --owner=<my-github-username> \
  --repository=sample-flux-repo \
  --path=sample-ecs-custer \
  --personal
bootstrapが終わると。flux-systemsというnamespaceにGitOpsツールキットコンポーネントがインストールされているのが分かります。
$ kubectl get deployments -n flux-system
NAME                      READY   UP-TO-DATE   AVAILABLE   AGE
helm-controller           1/1     1            1           9h
kustomize-controller      1/1     1            1           9h
notification-controller   1/1     1            1           9h
source-controller         1/1     1            1           9h
また、下記の構成でsample-flux-repoというGithubリポジトリが作成されています。
sample-flux-repo
.
└── sample-ecs-custer
    └── flux-system
        ├── gotk-components.yaml
        ├── gotk-sync.yaml
        └── kustomization.yaml
アプリケーションコードおよびKustomize管理用のリポジトリとの連携
flux create sourceコマンドでアプリケーションコードおよびKustomize管理用のリポジトリ(eks-sample-app)と連携を設定します。
下記はstagingブランチの変更を30秒おきに監視する設定です。
公式Doc.
$ flux create source git eks-sample-app-src \
  --url=https://github.com/<acount-name>/eks-sample-app \
  --branch=staging \
  --interval=30s \
  --export > ./sample-ecs-custer/staginig/app-source.yaml
作成されるyamlファイル
apiVersion: source.toolkit.fluxcd.io/v1beta2
kind: GitRepository
metadata:
  name: eks-sample-app-src
  namespace: flux-system
spec:
  interval: 30s
  ref:
    branch: staging
  url: https://github.com/yasuhiko-nara/eks-sample-app
アプリケーションコードの変更による自動デプロイ
flux create kustomizeコマンドで、アプリケーションコードに変更があった場合に自動でEKSクラスターにデプロイする設定をします。

下記はstagingブランチの変更を1分おきに監視する設定です。
公式Doc.
$ flux create kustomization eks-sample-app-sync \
  --target-namespace=staginig \
  --source=eks-sample-app-src \
  --path="./kustomize/overlays/staginig" \ # Kustomize管理用のリポジトリのkustomizaitonリソースのpath
  --prune=true \
  --interval=1m \
  --export > ./sample-ecs-custer/staginig/app-sync.yaml
作成されるyamlファイル
apiVersion: kustomize.toolkit.fluxcd.io/v1beta2
kind: Kustomization
metadata:
  name: eks-sample-app-sync
  namespace: flux-system
spec:
  interval: 1m0s
  path: ./kustomize/overlays/staging
  prune: true
  sourceRef:
    kind: GitRepository
    name: eks-sample-app-src
  targetNamespace: staginig
最終的にディレクトリ構成はこんな感じになります。
ディレクトリ構成
.
└── sample-ecs-custer
    ├── flux-system
    │   ├── gotk-components.yaml
    │   ├── gotk-sync.yaml
    │   └── kustomization.yaml
    └── staging
        ├── app-source.yaml
        └── app-sync.yaml
上記の変更をflux管理用のGithubリポジトリにpushすると、パイプラインが完成します。
さいごに
今回初めてEKSを触ってみたのですが、いまのところECSの方が圧倒的に便利だなと感じています。これからk8sをしっかり勉強してEKSの良さを語れるようになりたいです。
- (今回の方法では)Terraformの実行結果で得られるARNなどの変数をk8sマニフェストのannotationに設定する必要があり、コードの二重管理が発生してしまう
- ECSの権限設定(TaskRole/TaskExecutionRole)に対してEKSの権限設定(IRSA)が理解が難しい
- KustomizeやHelm、その他fluxなどのCI/CD関連ツールの学習コストが高い
Discussion