Stripe API を試してみる
はじめに
このスクラップでは Stripe の下記の機能を試してみる
- Stripe Checkout
- Stripe Billing API
Stripe Checkout のドキュメントはこちら
Stripe Billing API のドキュメントはこちら
上記とは別タブで開発者ツールのドキュメントもある
Stripe Billing では期間を 2 カ月にしたり、金額を減額したりできるのだろうか?併せて調べてみよう
余力があれば Payment Links についても調べてみたい
まずはアカウントを作成する所から始めよう
その前に日報を書こう
前回のスクラップ
前回のスクラップでは Chatwork API を使ってメッセージの送受信を試した
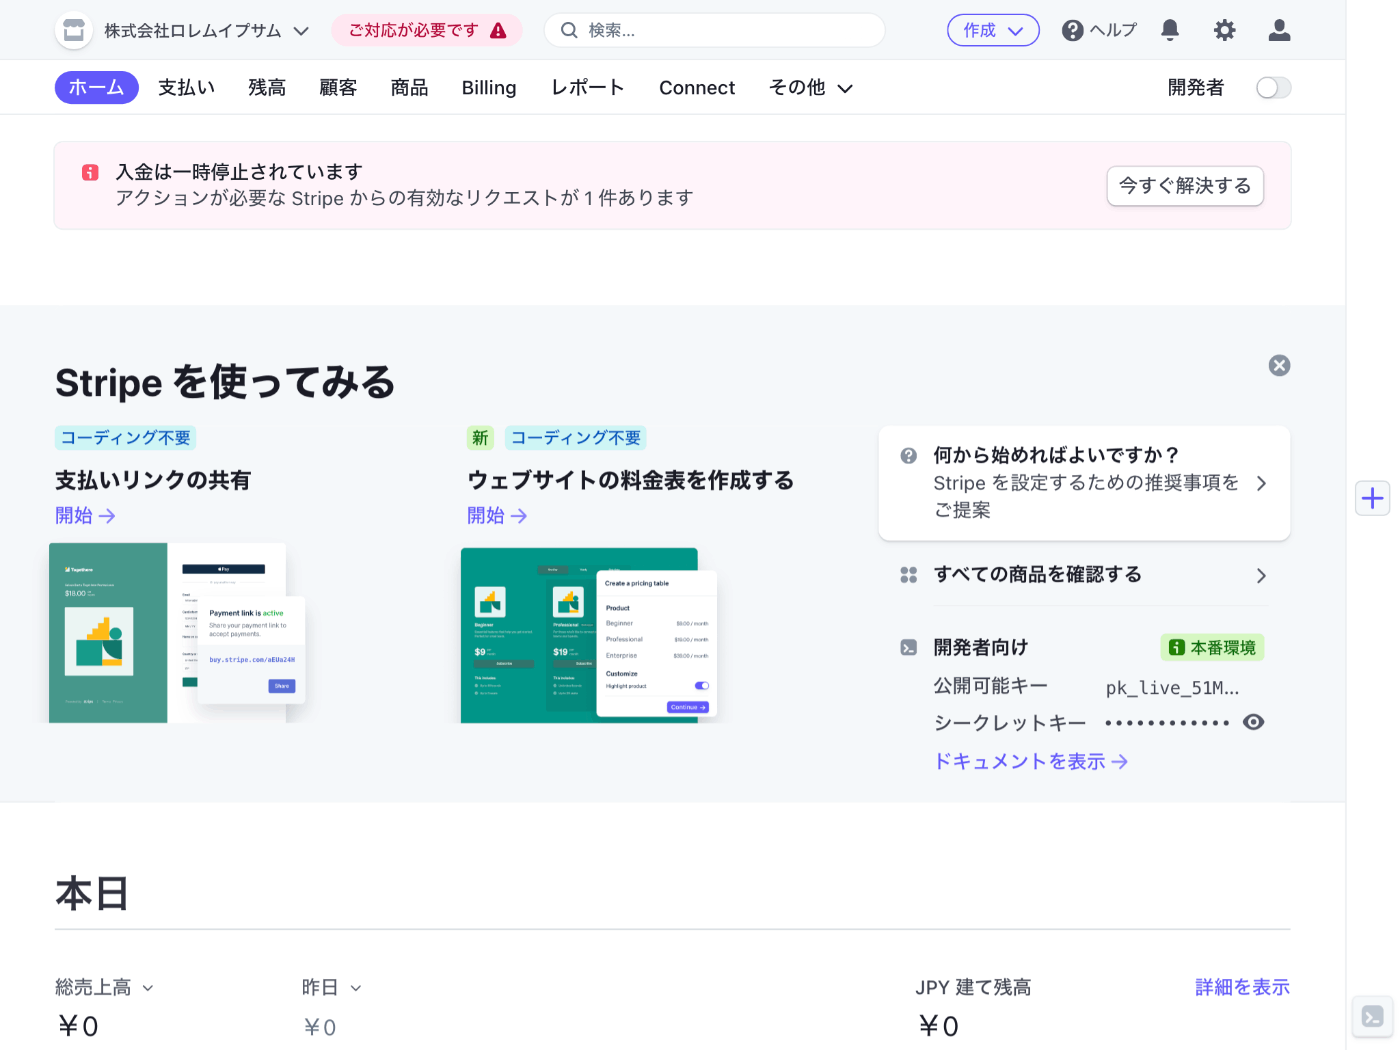
Stripe アカウント作成
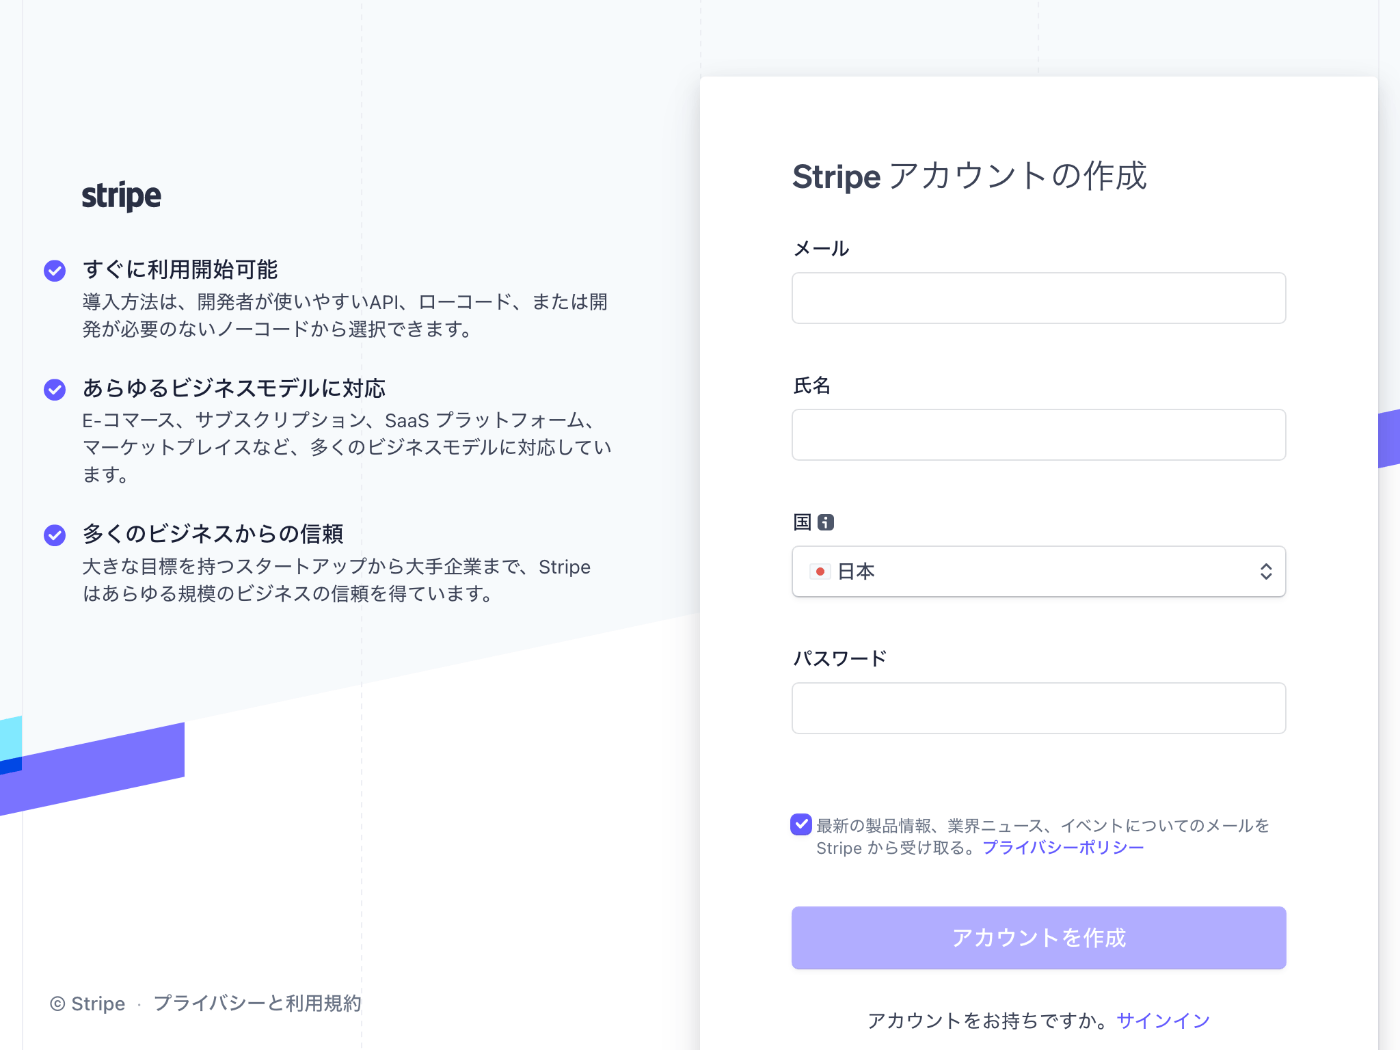
確認メールが届くのでメールに記載のメールアドレスの確認ボタンを押して登録を完了する

支払いを受け取るには会社情報の入力が必要になる様子
今のところ支払いを受け取る予定はないので後から設定するリンクをクリックする

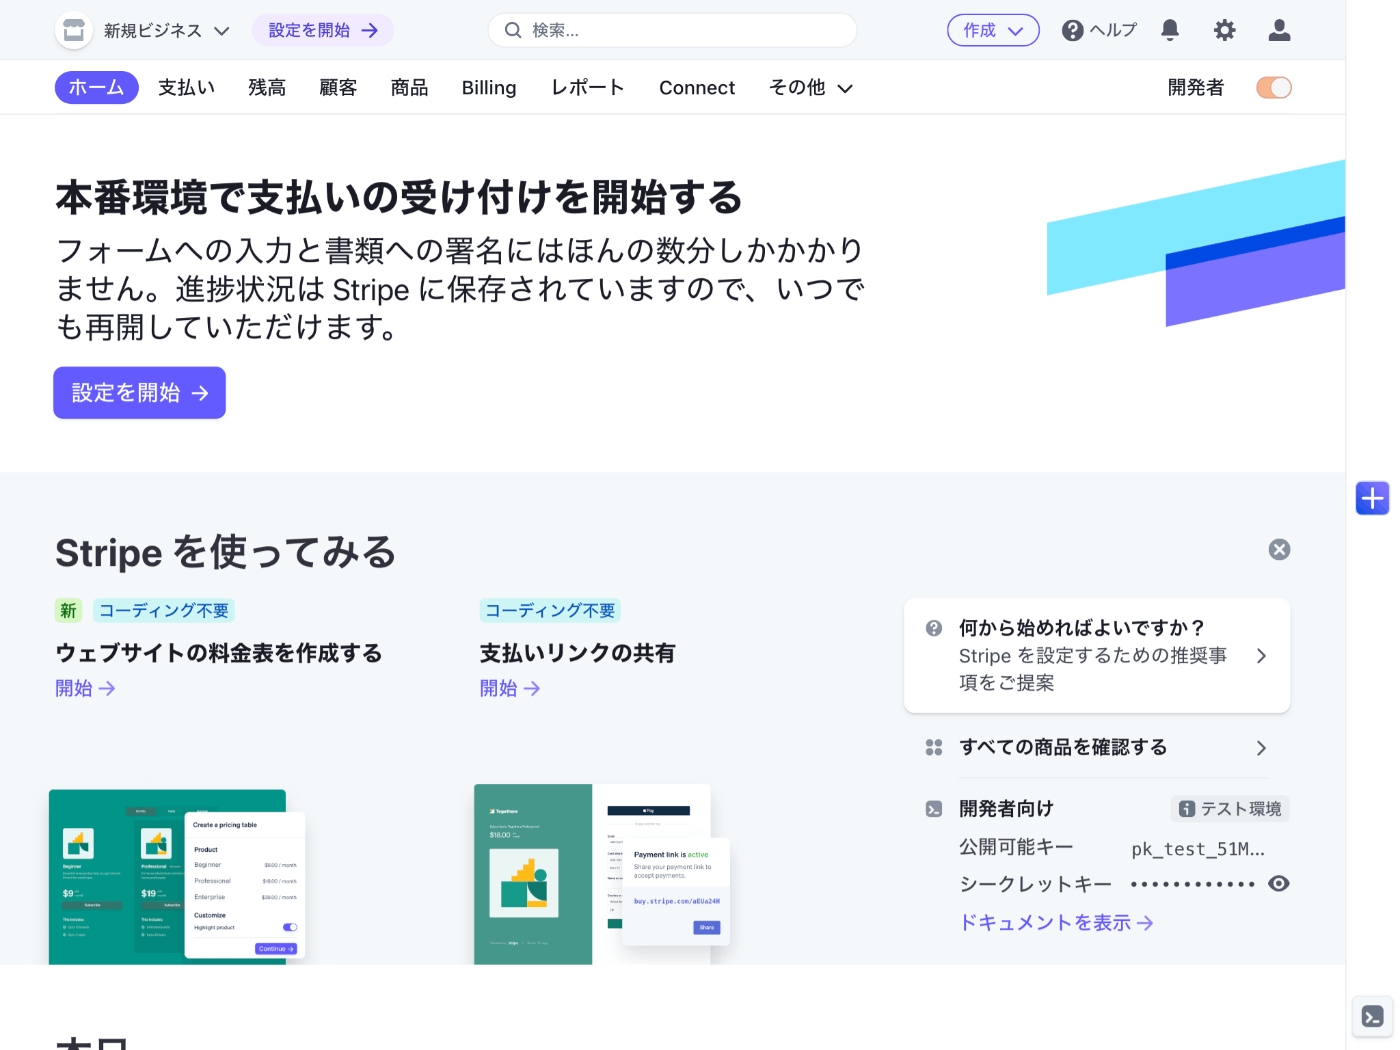
初めは https://dashboard.stripe.com/setup に表示される
ヘッダーナビのホームを押すと https://dashboard.stripe.com/test/dashboard に移動する
今日はここまで
来週は Stripe Checkout の Quick Start から始める
技術検証を再開、Stripe Checkout の Quick Start から
次に何をやるのか残しておくと再開する時に便利
Next.js のプロジェクトを作成する
npx create-next-app \
  --typescript \
  --eslint \
  --src-dir \
  --import-alias "@/*" \
  --use-npm \
  hello-stripe
最近 create-next-app の動作が変更された様子で指定しなければならないオプションが増えた
これだけ指定しても experimental app/ directory を使用するかどうかを尋ねられる
cd hello-stripe
npm run dev
無事に http://localhost:3000/ で起動した

Stripe 関連のパッケージのインストール
npm install --save stripe @stripe/stripe-js
環境変数の読み込み
STRIPE_SECRET_KEY なる環境変数が必要
touch .env.local
STRIPE_SECRET_KEY="sk_test_XXXXXXXXXXXXXXXXXXXXXXXXXXXXXXXXXXXXXXXXXXXXXXXXXXXXXXXXXXXXXXXXXXXXXXXXXXXXXXXXXXXXXXXXXXXXXXXXXXX"
Stripe の API キーを取得するには https://dashboard.stripe.com/test/apikeys にアクセスするか Stripe のダッシュボードから開発者 > API キー にアクセスする
標準キーセクションに含まれるシークレットキーのテストキーを表示ボタンを押してパスワードを入力するとシークレットキーが表示される
API のコーディング
touch src/pages/api/checkout_session.ts
import type { NextApiRequest, NextApiResponse } from "next";
import { Stripe } from "stripe";

export default async function handler(
  req: NextApiRequest,
  res: NextApiResponse
) {
  if (req.method === "POST") {
    try {
      const stripe = new Stripe(process.env.STRIPE_SECRET_KEY!, {
        apiVersion: "2022-11-15",
      });

      const session = await stripe.checkout.sessions.create({
        line_items: [
          {
            price: "pr_1234",
            quantity: 1,
          },
        ],
        mode: "payment",
        success_url: `${req.headers.origin}/?success=true`,
        cancel_url: `${req.headers.origin}/?canceled=true`,
      });

      if (session.url) {
        res.redirect(303, session.url);
      } else {
        throw new Error("!session.url");
      }
    } catch (err) {
      res.status(500).send(err);
    }
  } else {
    res.setHeader("Allow", "POST");
    res.status(405).end("Method Not Allowed");
  }
}
TypeScript のコードはドキュメントに無いので少し大変
商品の定義
Stripe では決済対象の商品を事前に登録できる
API を見る限りだとオンデマンドで登録することも可能な様子
よほどオプション体系が複雑ではない限りは商品を事前登録した方が良さそう
前の投稿で "pr_1234" とあるが、こちらが事前に登録した商品の ID
商品を登録するには https://dashboard.stripe.com/test/products にアクセスするかダッシュボード > 商品タブ > 商品を追加ボタンをクリックする
Quick Start にも商品追加フォームがあるのでこれを使っても良い
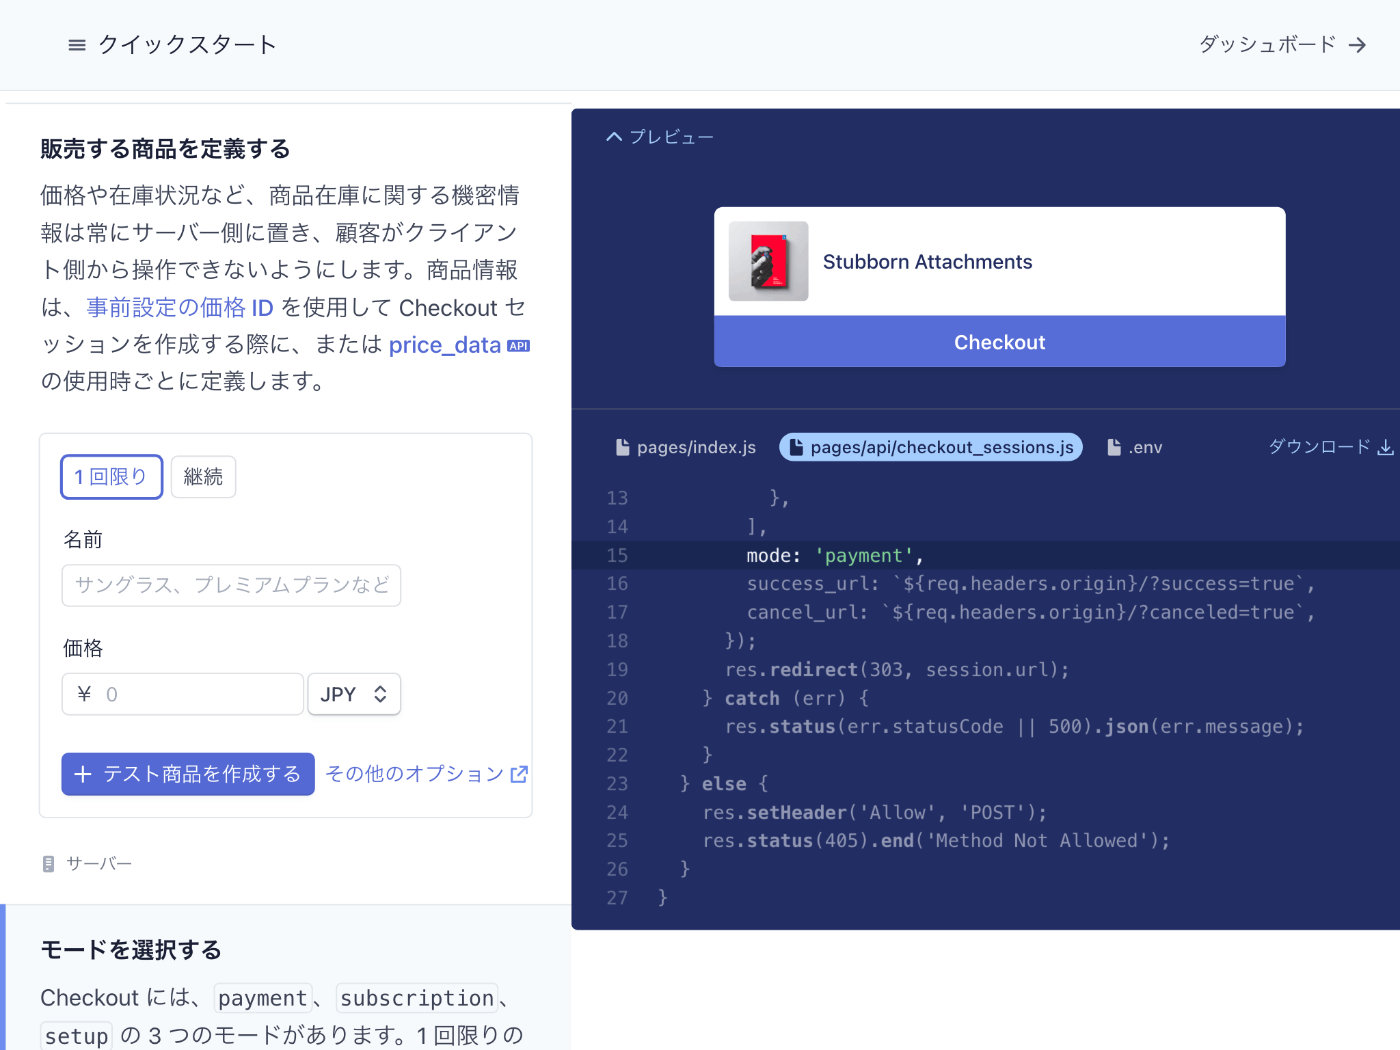
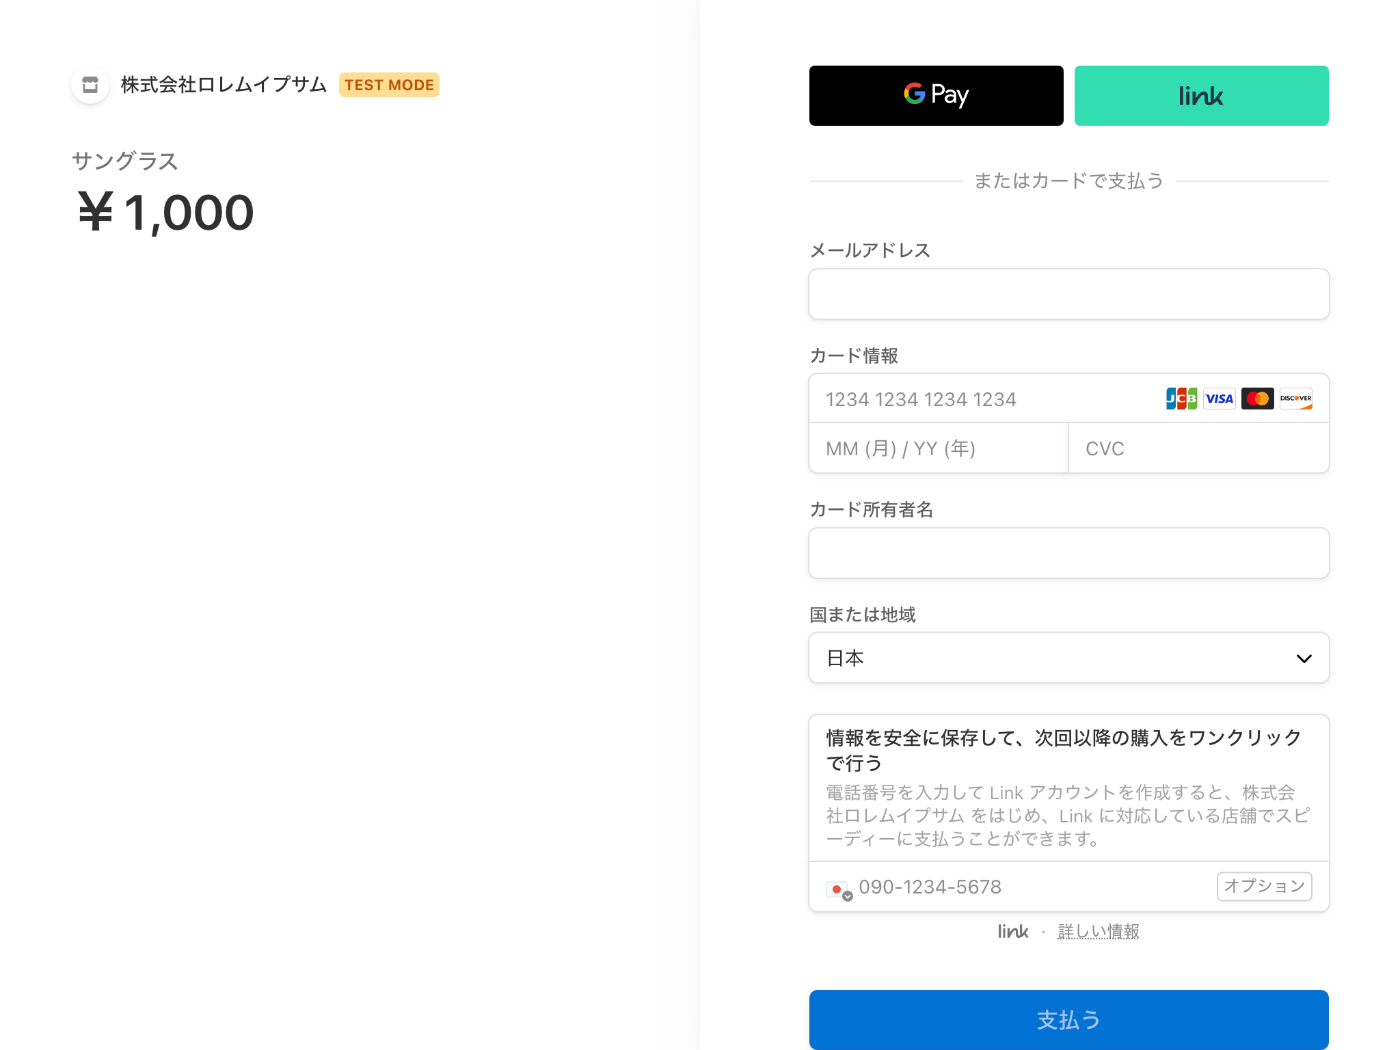
Quick Start の商品追加フォームを使って 1,000 円のサングラスを登録してみた
商品 ID の部分が "price_XXXXXXXXXXXXXXXXXXXXXXXX" のように更新されるのでコピー&ペーストする
モードの選択
stripe.checkout.sessions.create メソッドの mode オプションは 1 回限りの購入の場合は "payment" を指定する
ページのコーディング
import { loadStripe } from "@stripe/stripe-js";
import { useEffect } from "react";

const stripePromise = loadStripe(
  process.env.NEXT_PUBLIC_STRIPE_PUBLISHABLE_KEY!
);

export default function PreviewPage() {
  useEffect(() => {
    const query = new URLSearchParams(window.location.search);

    if (query.get("success")) {
      console.log("Order placed!");
    }

    if (query.get("canceled")) {
      console.log("Order canceled");
    }
  });

  return (
    <form action="/api/checkout_sessions" method="POST">
      <section>
        <button type="submit" role="link">
          Checkout
        </button>
      </section>
      <style jsx>
        {`
          section {
            background: #ffffff;
            display: flex;
            flex-direction: column;
            width: 400px;
            height: 112px;
            border-radius: 6px;
            justify-content: space-between;
          }
          button {
            height: 36px;
            background: #556cd6;
            border-radius: 4px;
            color: white;
            border: 0;
            font-weight: 600;
            cursor: pointer;
            transition: all 0.2s ease;
            box-shadow: 0px 4px 5.5px 0px rgba(0, 0, 0, 0.07);
          }
          button:hover {
            opacity: 0.8;
          }
        `}
      </style>
    </form>
  );
}
_app.tsx の import '@/styles/globals.css' をコメントアウトしておく
// import '@/styles/globals.css'
import type { AppProps } from 'next/app'

export default function App({ Component, pageProps }: AppProps) {
  return <Component {...pageProps} />
}
環境変数の追加
Stripe の公開可能な API キーを NEXT_PUBLIC_STRIPE_PUBLISHABLE_KEY として環境変数に登録する必要がある
STRIPE_SECRET_KEY="sk_test_XXXXXXXXXXXXXXXXXXXXXXXXXXXXXXXXXXXXXXXXXXXXXXXXXXXXXXXXXXXXXXXXXXXXXXXXXXXXXXXXXXXXXXXXXXXXXXXXXXX"
NEXT_PUBLIC_STRIPE_PUBLISHABLE_KEY="pk_test_XXXXXXXXXXXXXXXXXXXXXXXXXXXXXXXXXXXXXXXXXXXXXXXXXXXXXXXXXXXXXXXXXXXXXXXXXXXXXXXXXXXXXXXXXXXXXXXXXXX"
Webhook
今は使わないけど Webhook を使う場合には Webhook の秘密鍵も登録する必要がある様子
STRIPE_WEBHOOK_SECRET="whsec_12345"
支払方法の設定確認
https://dashboard.stripe.com/settings/payment_methods にアクセスするかダッシュボードから設定(右上の歯車アイコン)>(Payments の)支払い方法を選ぶ
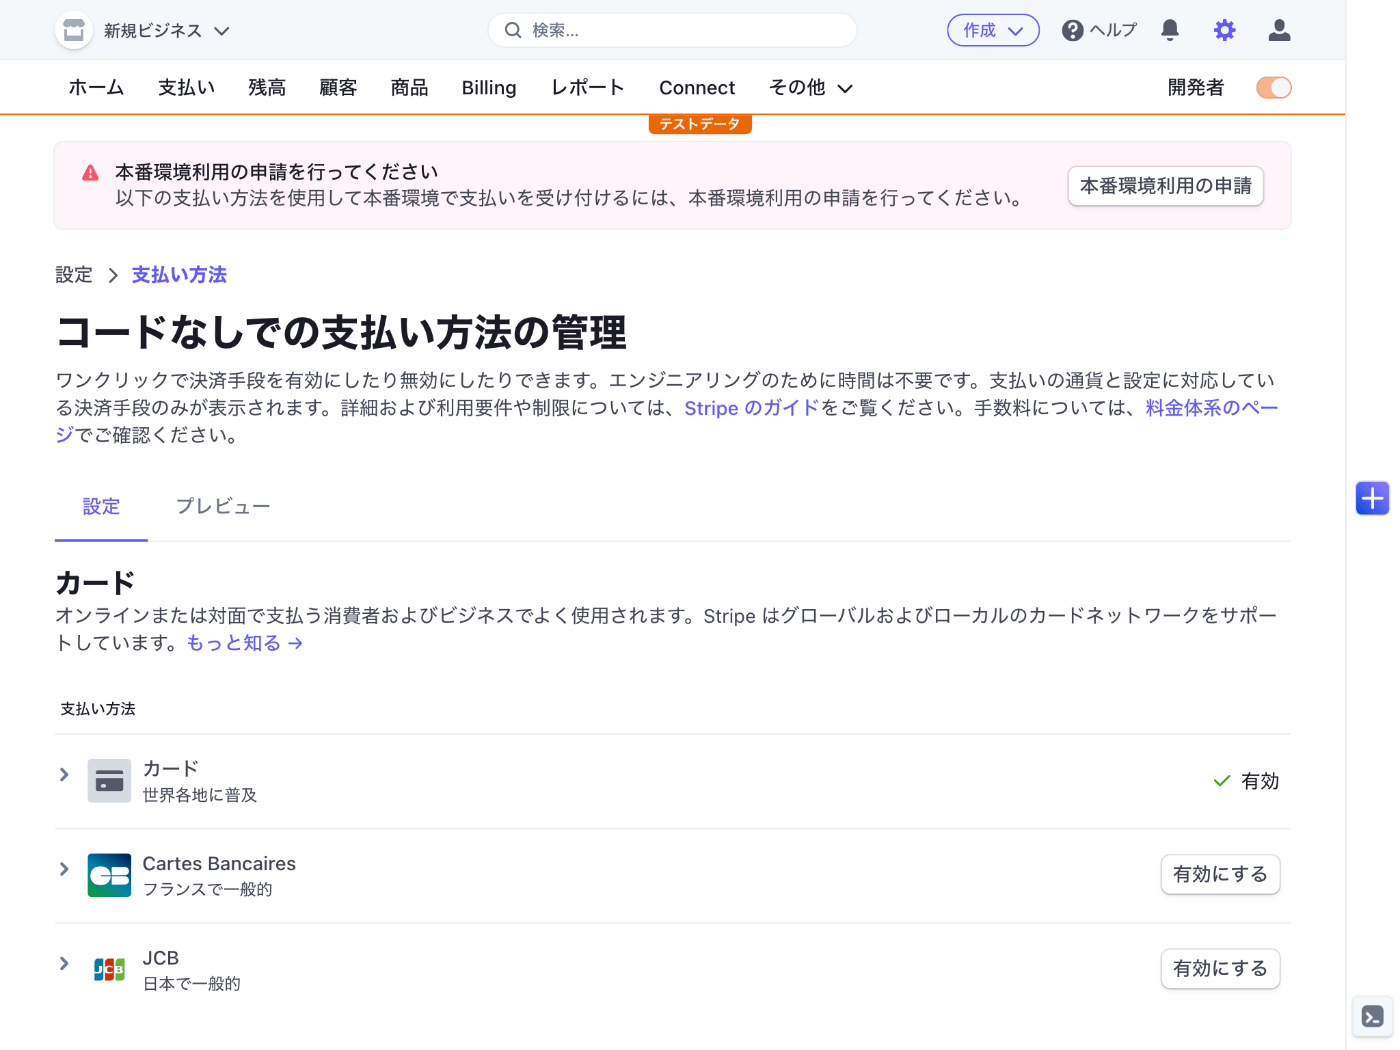
JCB はオプションで有効にする必要があるのか!
せっかくなので今有効にしてみよう
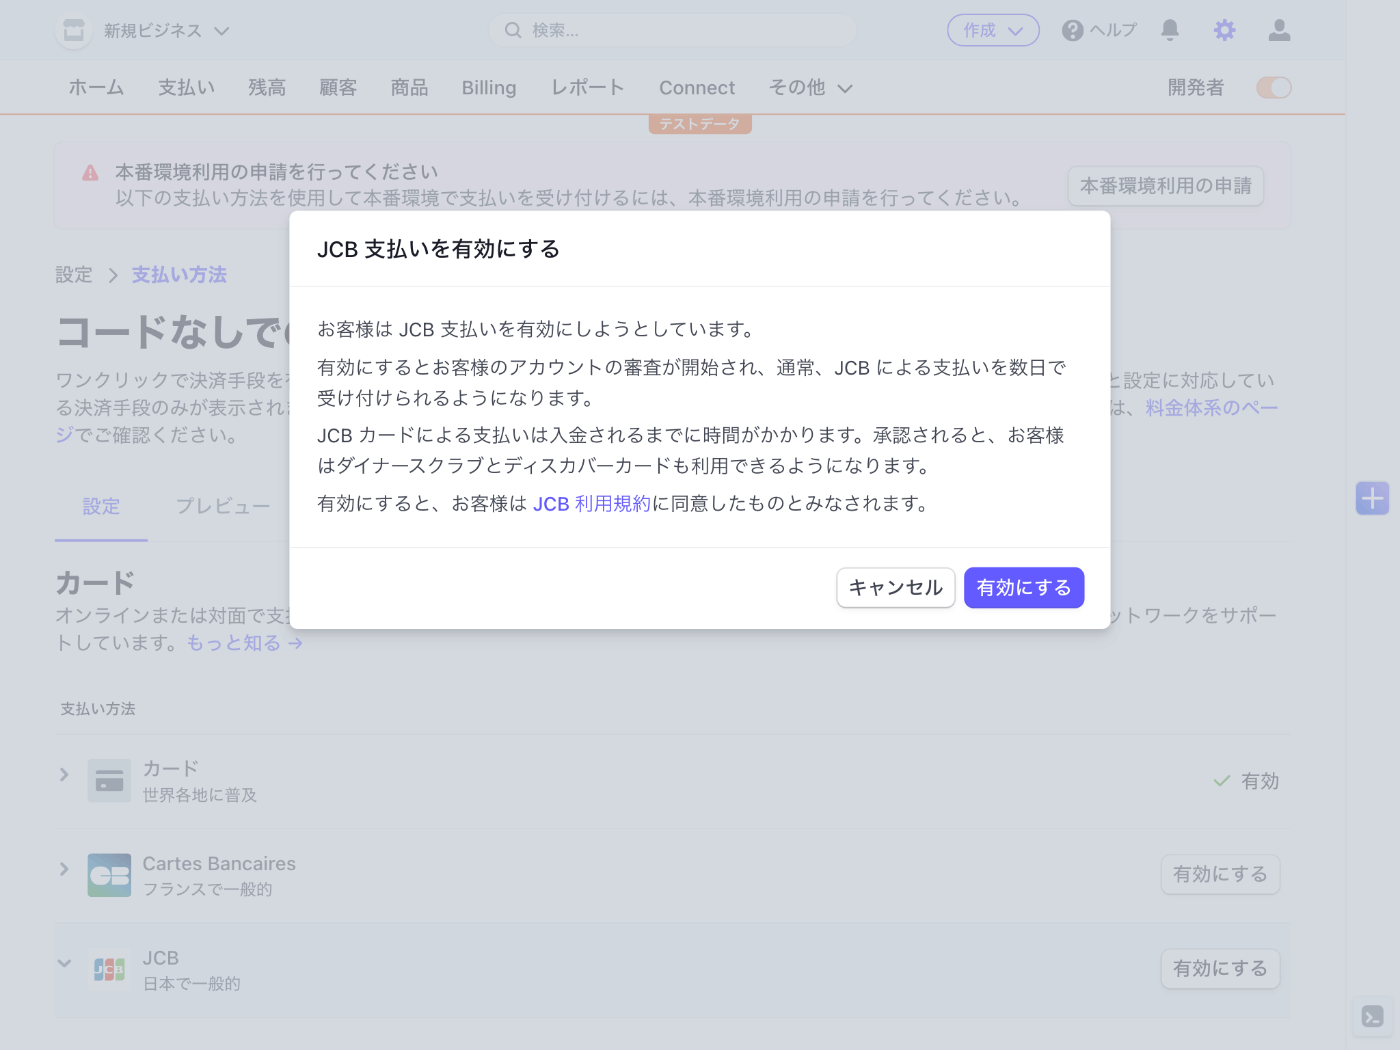
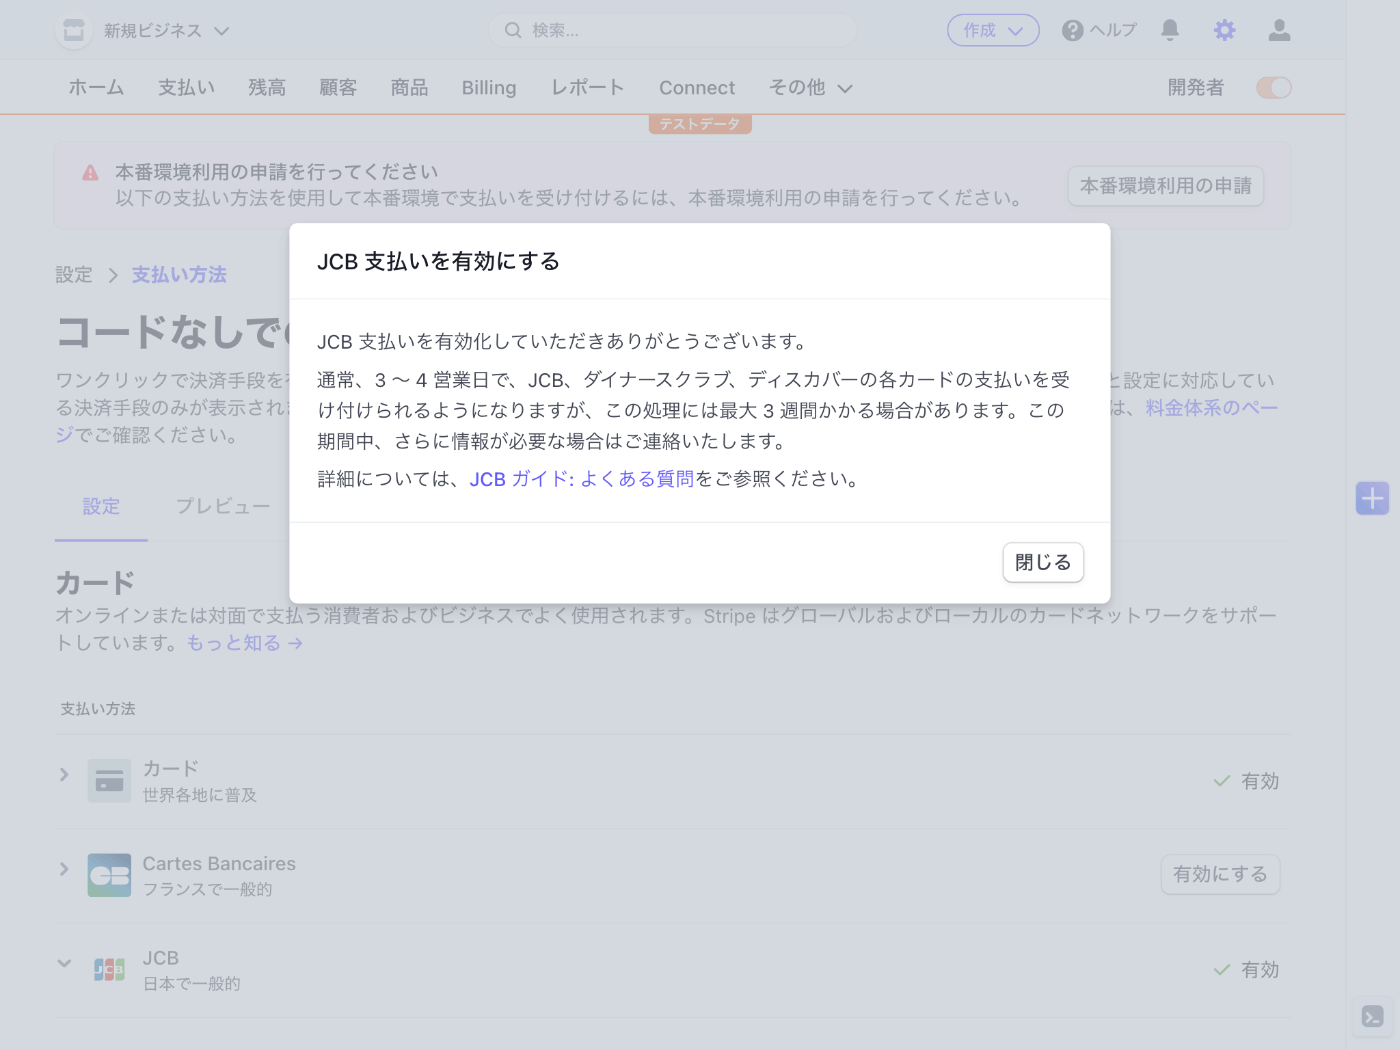
本番環境では JCB を有効にするのに最大 3 週間の期間を要するみたい
少し余裕をみて支払いを受けたい 1 カ月くらい前から準備した方が良さそう
動作確認
http://localhost:3000/ にアクセスする

Checkout ボタンをクリック

404 Not Found が出てしまった
原因は API のファイル名が間違っていること
下記のコマンドを実行してファイル名を変更する
mv src/pages/api/checkout_session.ts src/pages/api/checkout_sessions.ts
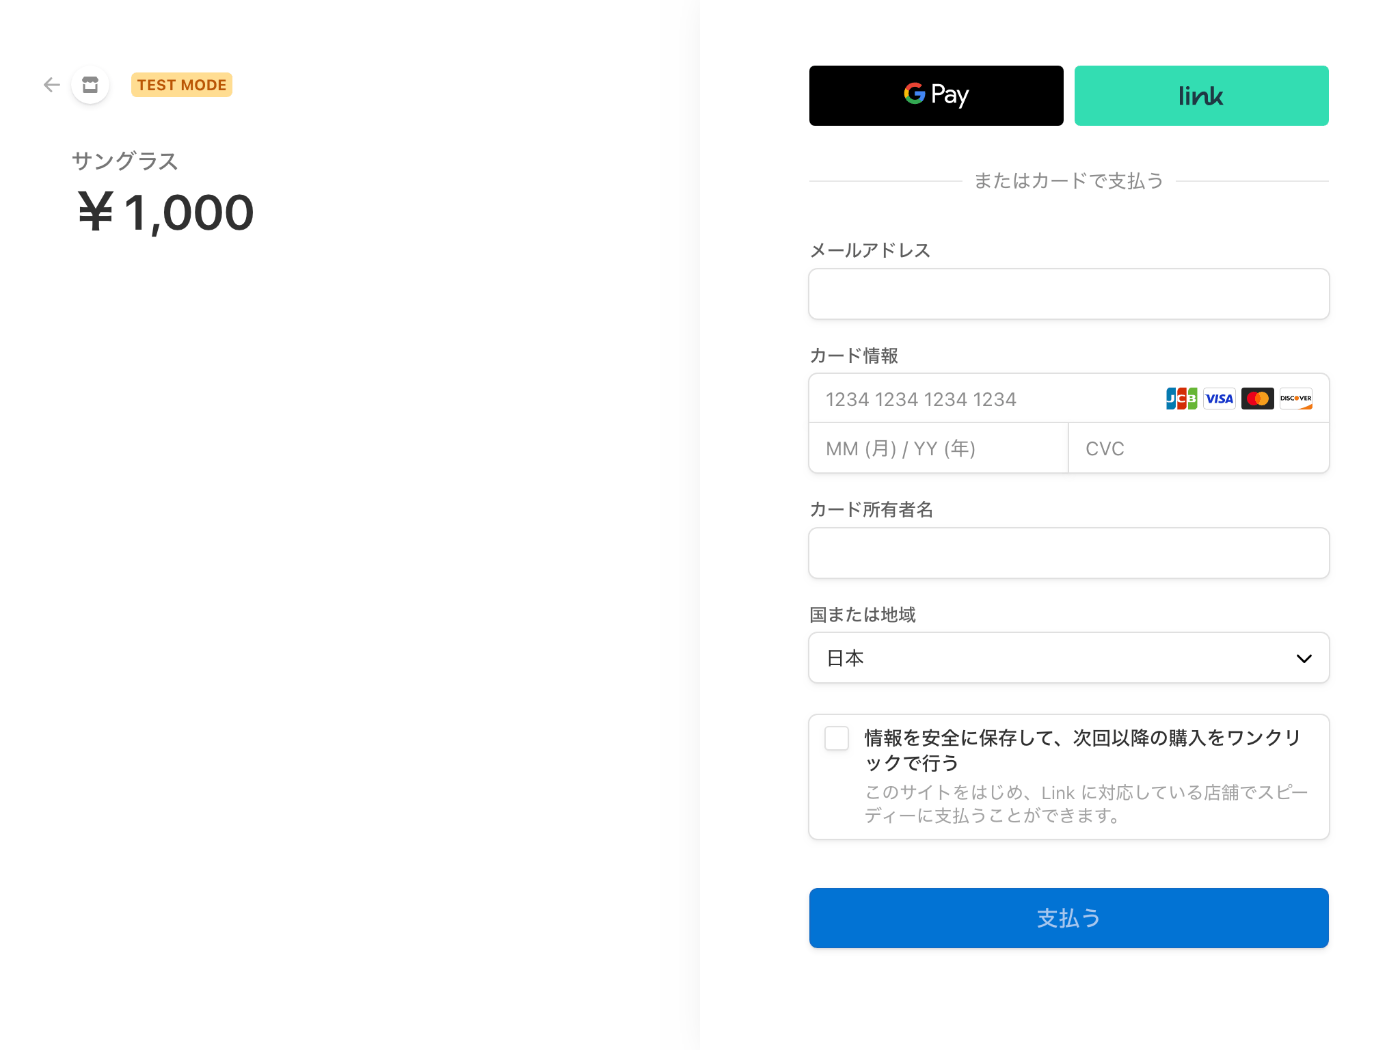
決済ページが表示された!
クレジットカードには下記のいずれかを使用する
- 4242 4242 4242 4242 Stripe Shell で実行する
- 4000 0025 0000 3155 支払いには認証が必要です
- 4000 0000 0000 9995 支払いが拒否されました
有効期限や CVC は適当で良いのかな?→ 適当で大丈夫
決済が成功すると http://localhost:3000/?success=true へリダイレクトされる
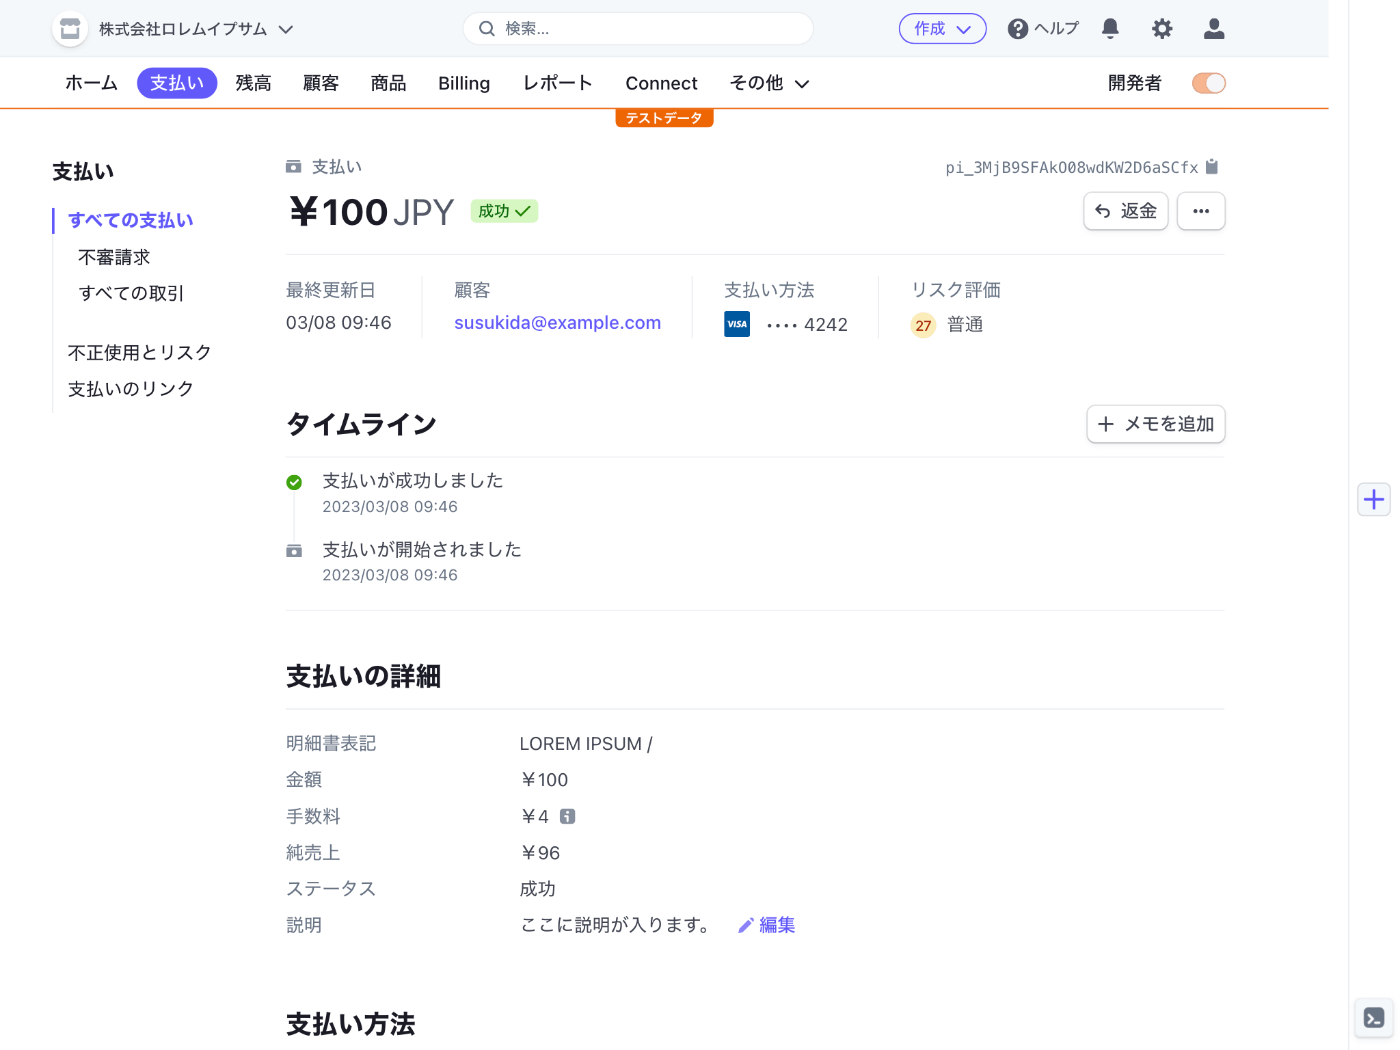
ダッシュボードから支払確認
支払情報はダッシュボード > 支払いタブから確認できる

決済ページのカスタマイズ
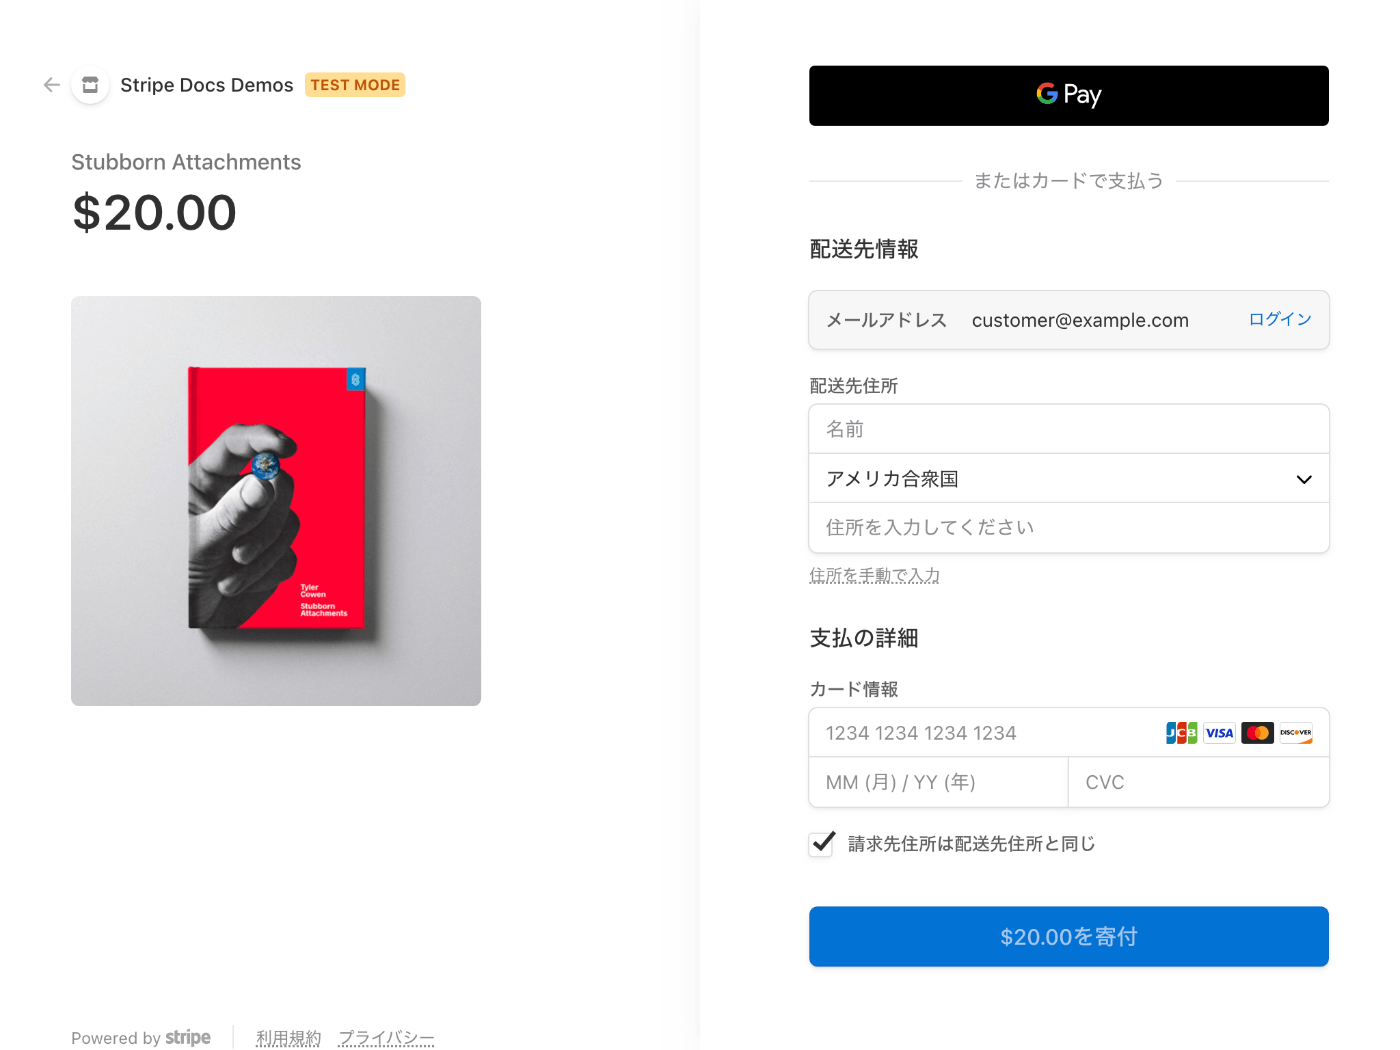
Stripe のセッションを作成する時に customer_email オプションを指定することで決済ページでメールアドレスが入力済みの状態になる、これはマストでやったほうが良さそう
送信ボタンは auto, book, donate, pay の 4 つを選べる、book は予約する、donate は寄付する、になるのかな?
billing_address_collection と shipping_address_collection を使用して住所を収集できる、これは決済前に収集している場合は不要だが使うと便利な場面もありそう
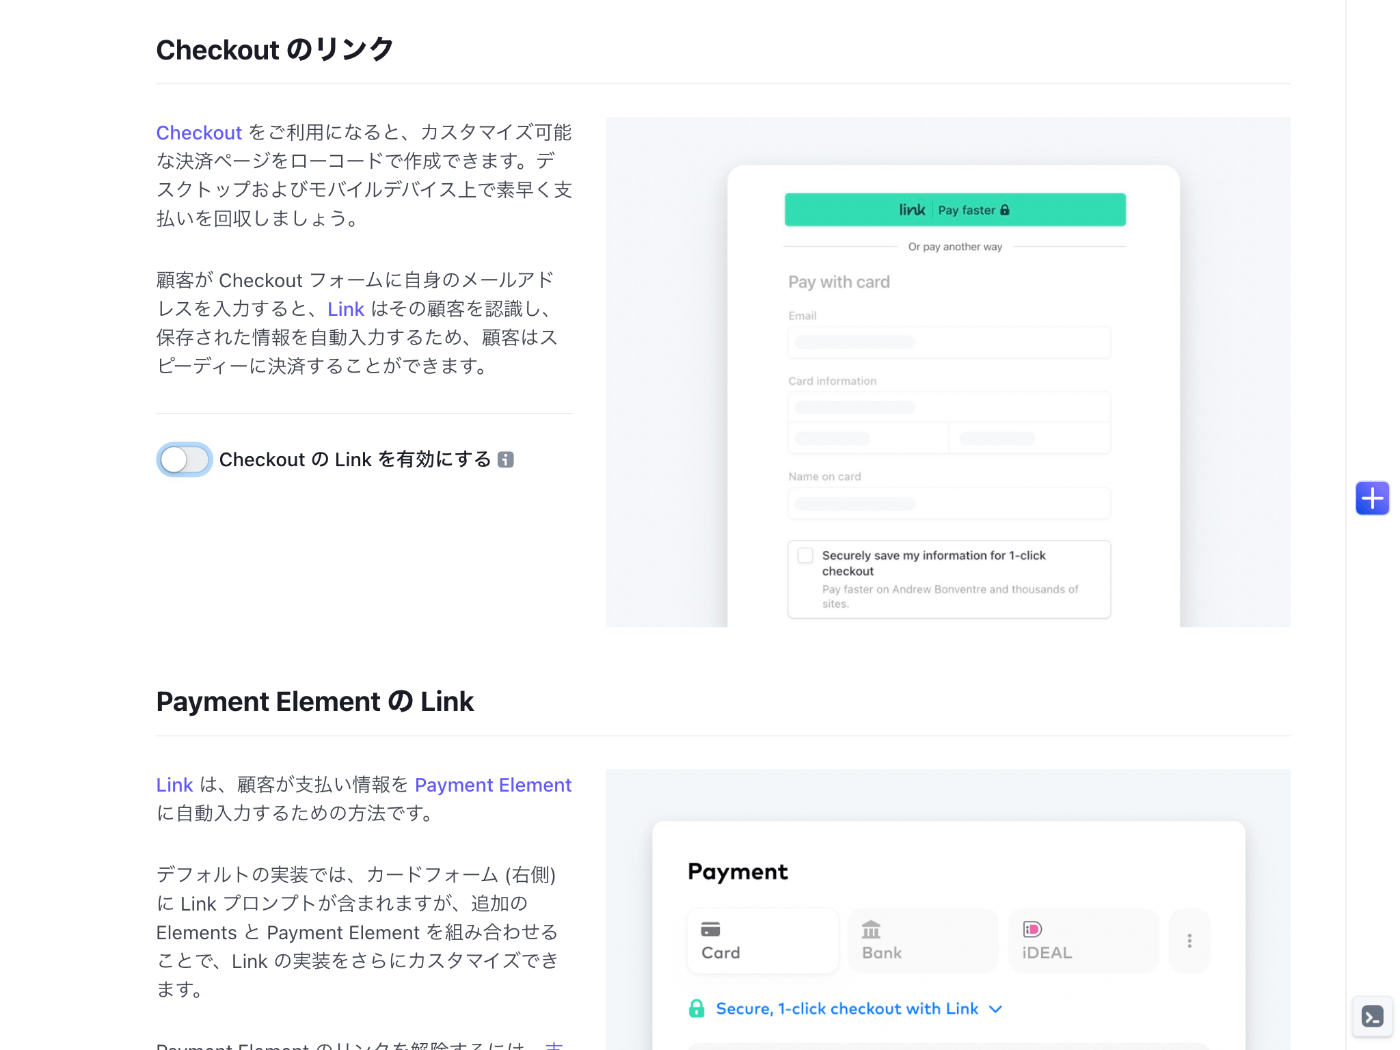
これらのオプションを有効にすると下記のようなページになる
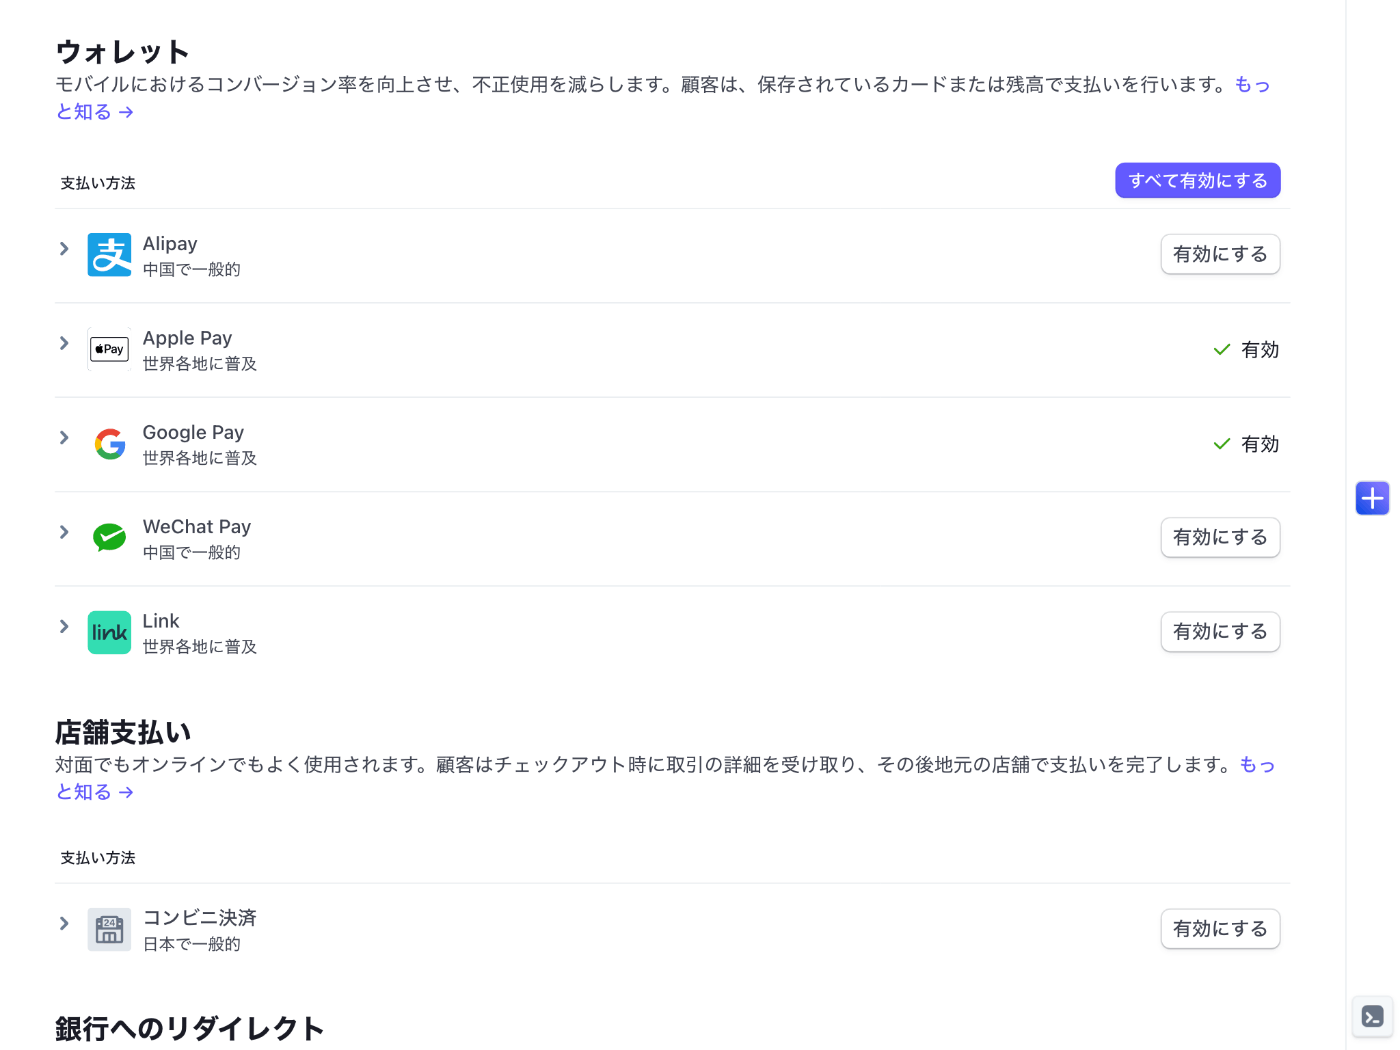
Link ボタンを消して Google Pay と Apple Pay の 2 つを有効にしたい場合はどうすれば良いだろう
Link を無効にする
下記のドキュメントによると https://dashboard.stripe.com/settings/link にアクセスして無効にできる様子
Checkout の Link を無効にしてみる
Google Pay だけが表示されるようになった!

Apple Pay を表示する
Apple Pay の有効化は支払い方法の設定ページから有効化できる
支払い方法の設定ページ → https://dashboard.stripe.com/test/settings/payment_methods
多分だが Apple Pay が使える時は Apple Pay ボタンが表示される
下記によると Mac では Touch ID 対応のデバイスでなければ Apple Pay を使えない様子
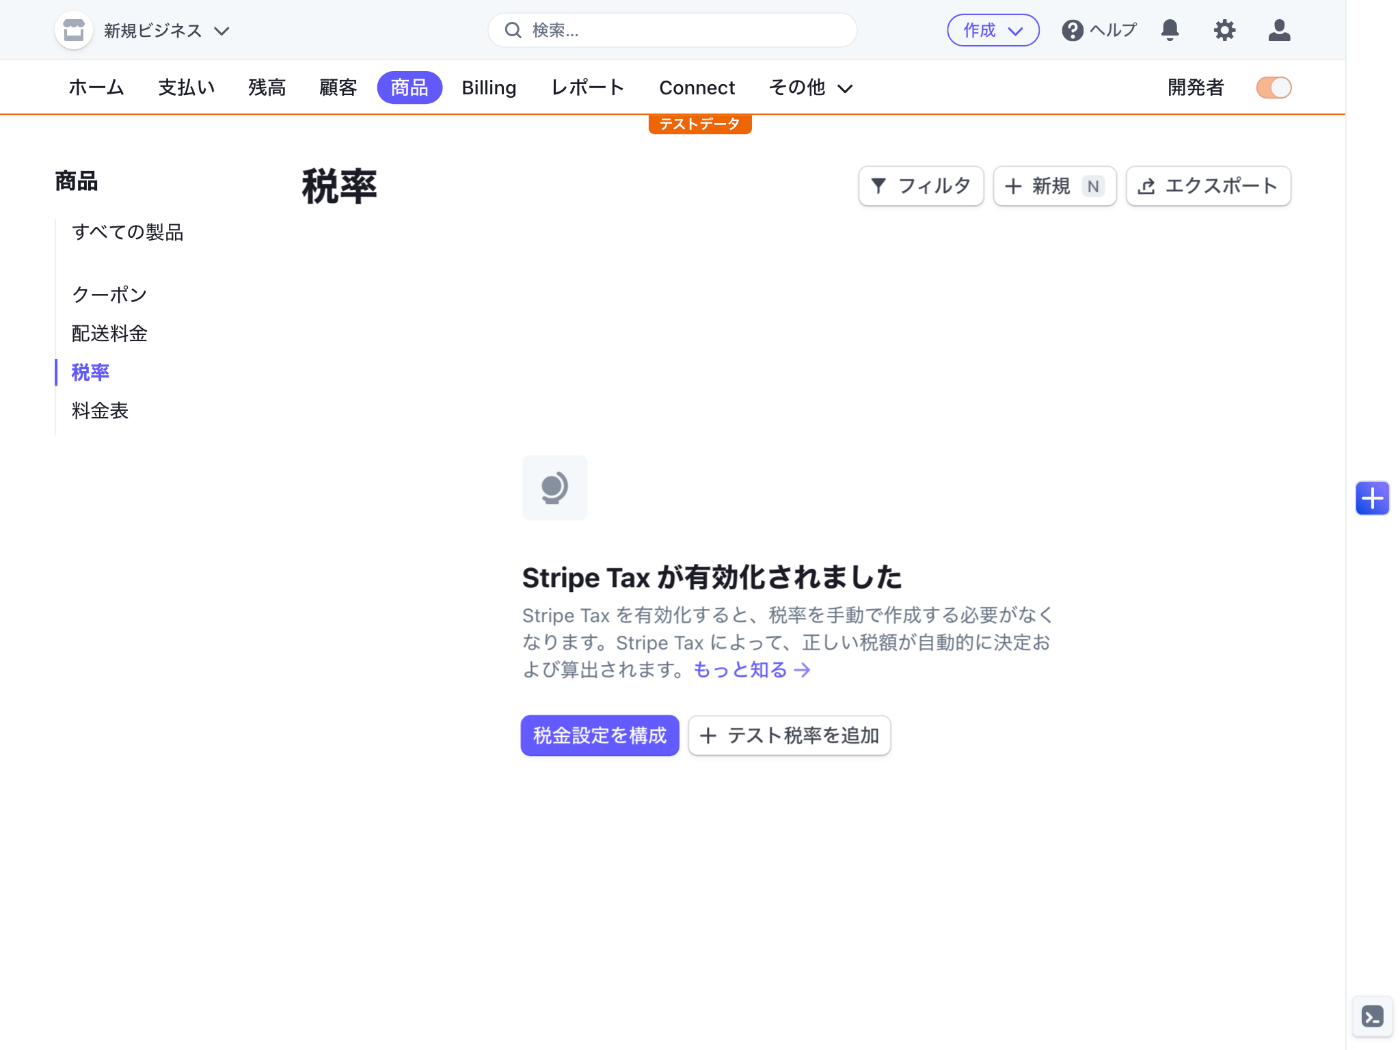
Stripe Tax による税金の処理
魅力的だが料金が 0.5 % 増えるのがデメリット
自分でやるなら確実に利用するが少しでもコスト削減したいニーズがあるのは否めない
国内であれば税込で商品を登録しておけば良いだけなので
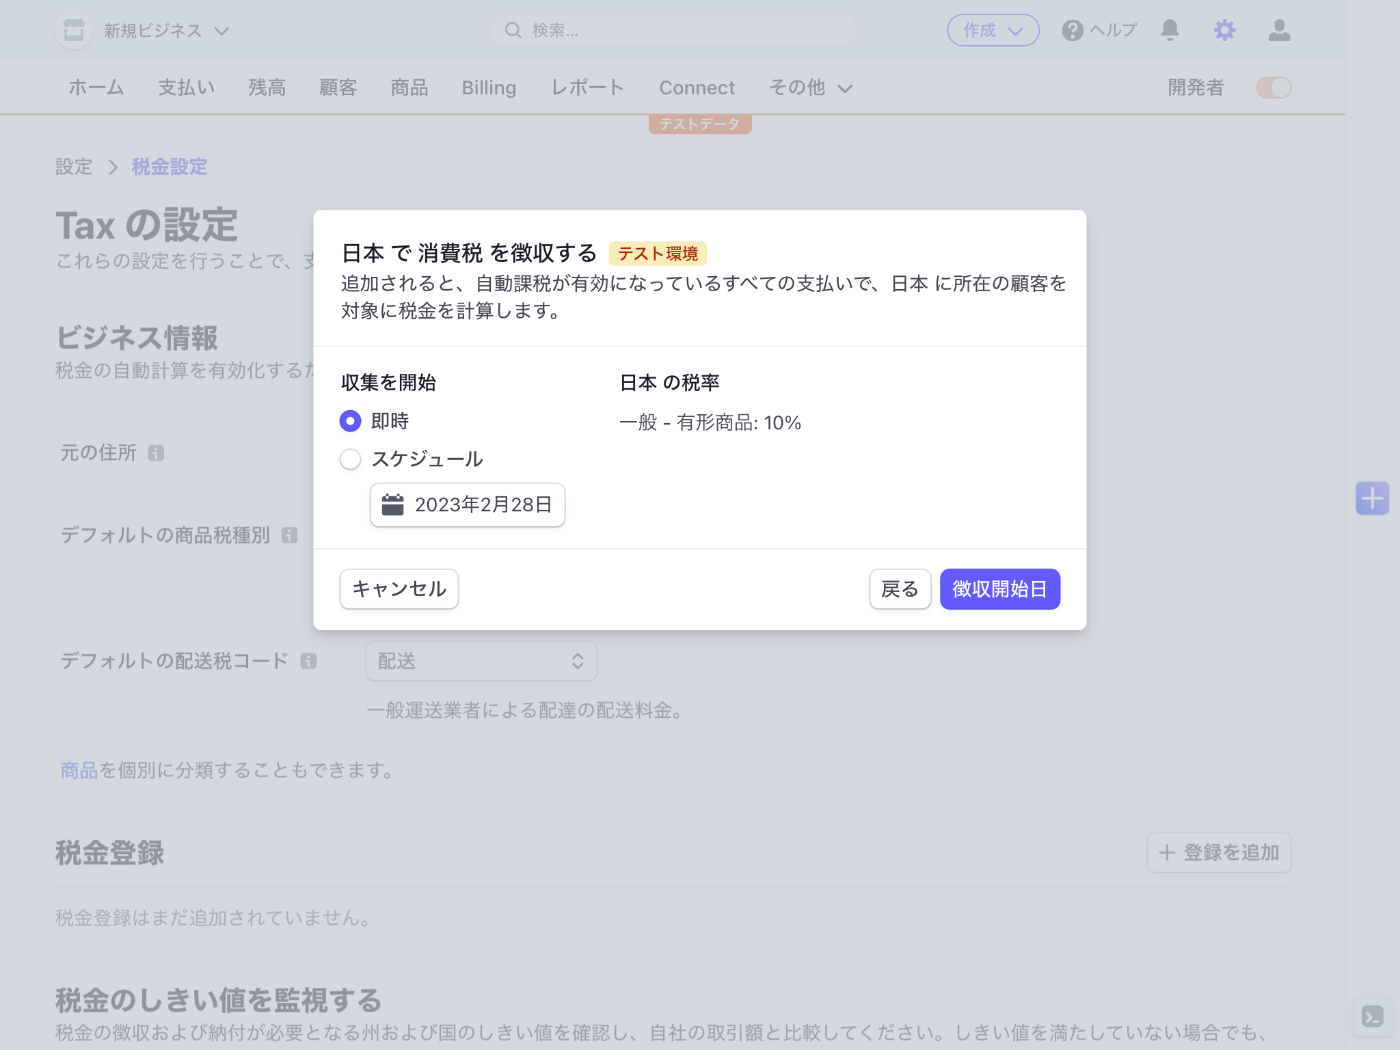
有効化するには https://dashboard.stripe.com/setup/tax/activate にアクセスして始めるボタンをクリックする
税金設定ページが表示されたらビジネス情報の設定や税金登録をを行う

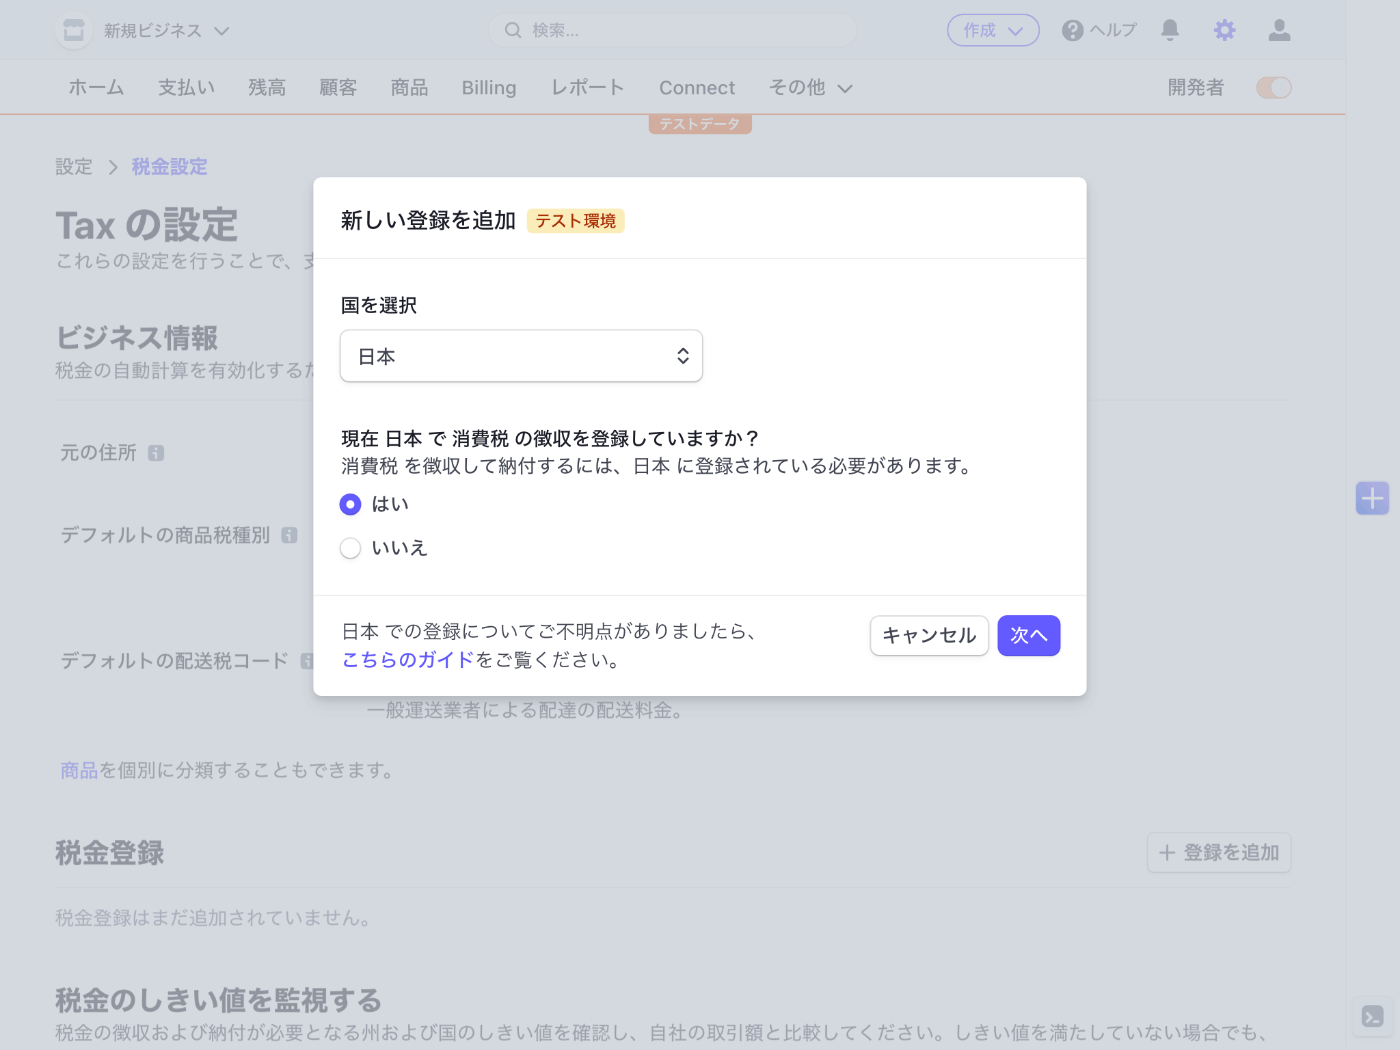
軽減税率とかはどうなるのだろう?
決済ページで税金を表示するには automatic_tax パラメーターを { enabled: true } に設定する
とりあえずこの時点で決済してみようとすると下記のエラーメッセージが表示される
{
  "type": "StripeInvalidRequestError",
  "raw": {
    "message": "The price `price_1MftX5FAkO08wdKWvnR5ektn` does not have a `tax_behavior` set which is required for automatic tax computation. Please visit https://stripe.com/docs/tax/products-prices-tax-categories-tax-behavior#tax-behavior for more information.",
    "request_log_url": "https://dashboard.stripe.com/test/logs/req_AwtZAUELRl4bXT?t=1677459665",
    "type": "invalid_request_error",
    "headers": {
      "server": "nginx",
      "date": "Mon, 27 Feb 2023 01:01:05 GMT",
      "content-type": "application/json",
      "content-length": "419",
      "connection": "keep-alive",
      "access-control-allow-credentials": "true",
      "access-control-allow-methods": "GET, POST, HEAD, OPTIONS, DELETE",
      "access-control-allow-origin": "*",
      "access-control-expose-headers": "Request-Id, Stripe-Manage-Version, X-Stripe-External-Auth-Required, X-Stripe-Privileged-Session-Required",
      "access-control-max-age": "300",
      "cache-control": "no-cache, no-store",
      "idempotency-key": "aec9ead6-8236-4fbd-87bd-e111819b1829",
      "original-request": "req_AwtZAUELRl4bXT",
      "request-id": "req_AwtZAUELRl4bXT",
      "stripe-should-retry": "false",
      "stripe-version": "2022-11-15",
      "strict-transport-security": "max-age=63072000; includeSubDomains; preload"
    },
    "statusCode": 400,
    "requestId": "req_AwtZAUELRl4bXT"
  },
  "rawType": "invalid_request_error",
  "headers": {
    "server": "nginx",
    "date": "Mon, 27 Feb 2023 01:01:05 GMT",
    "content-type": "application/json",
    "content-length": "419",
    "connection": "keep-alive",
    "access-control-allow-credentials": "true",
    "access-control-allow-methods": "GET, POST, HEAD, OPTIONS, DELETE",
    "access-control-allow-origin": "*",
    "access-control-expose-headers": "Request-Id, Stripe-Manage-Version, X-Stripe-External-Auth-Required, X-Stripe-Privileged-Session-Required",
    "access-control-max-age": "300",
    "cache-control": "no-cache, no-store",
    "idempotency-key": "aec9ead6-8236-4fbd-87bd-e111819b1829",
    "original-request": "req_AwtZAUELRl4bXT",
    "request-id": "req_AwtZAUELRl4bXT",
    "stripe-should-retry": "false",
    "stripe-version": "2022-11-15",
    "strict-transport-security": "max-age=63072000; includeSubDomains; preload"
  },
  "requestId": "req_AwtZAUELRl4bXT",
  "statusCode": 400
}
商品の税率を設定してください、ということかな?→ 当たりだった
商品の編集ページへ移動して料金情報を展開すると内税か外税を設定できるようになる
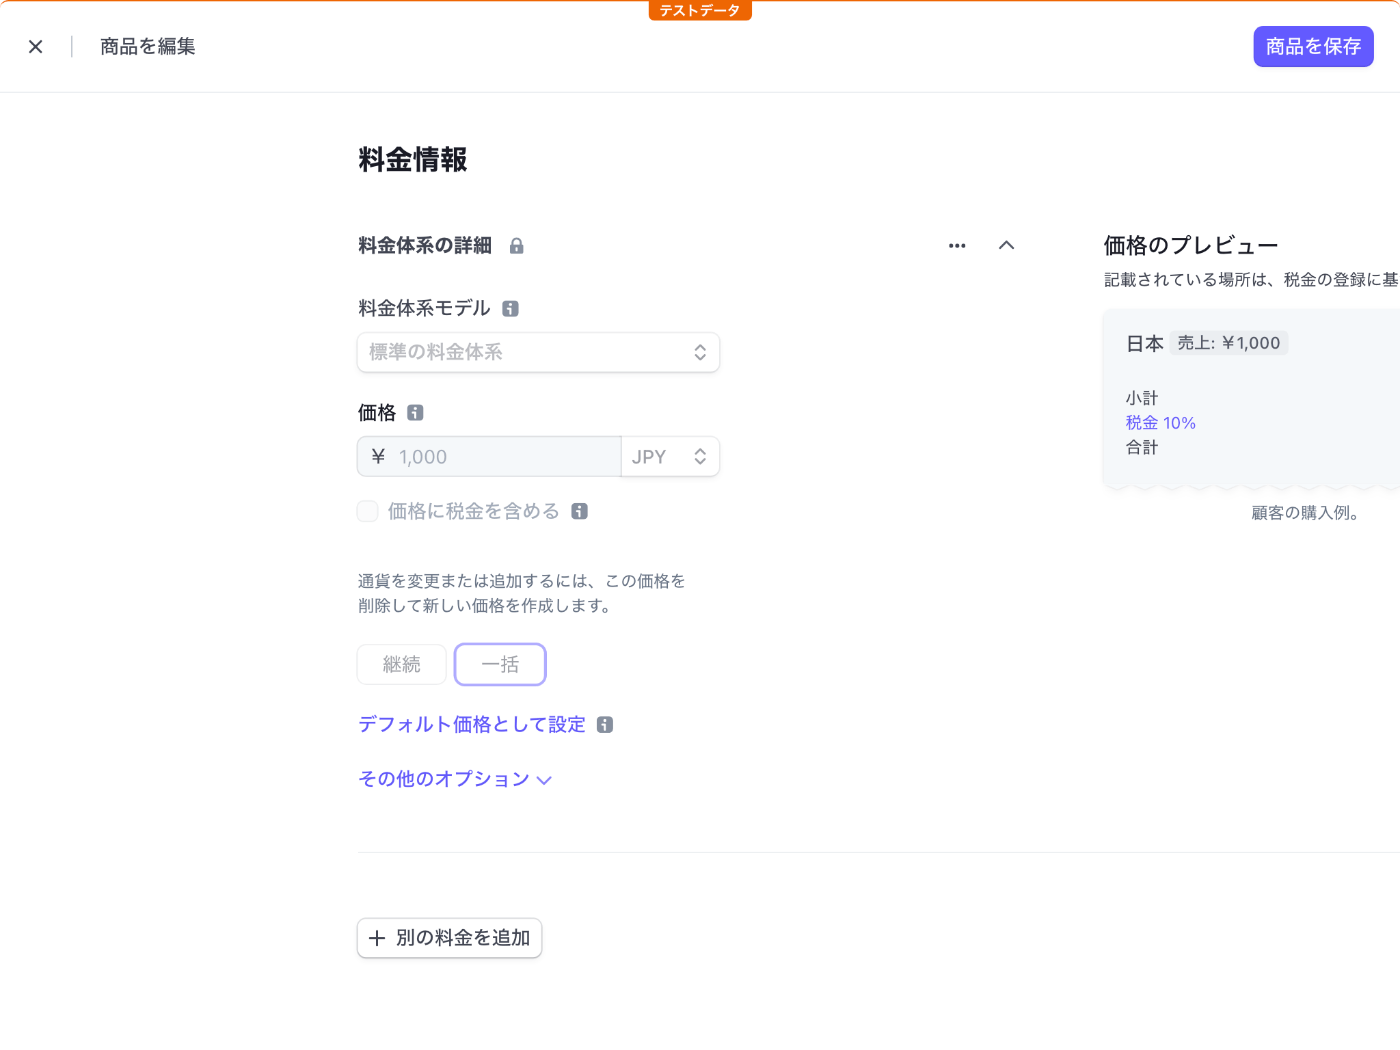
1 回でも購入された商品の場合は 1 度設定すると変更されなくなるので注意
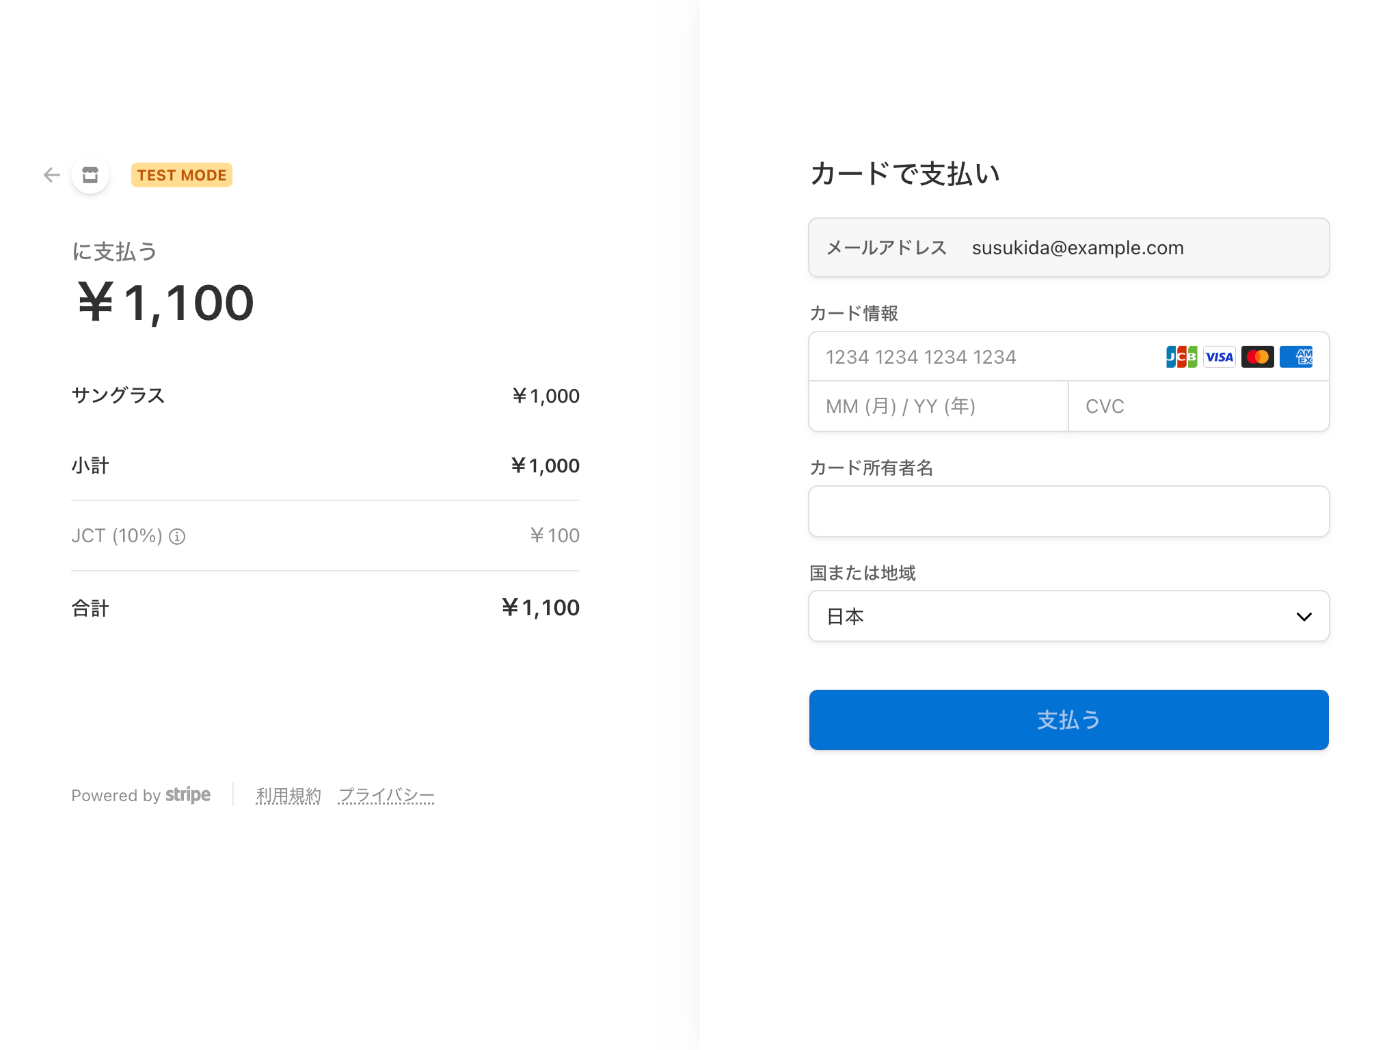
無事に消費税が表示されるようになった
JCT は Japan Consumption Tax かな?ちょっと分かりにくいかも知れない
このページは何に使うのだろう?
動作確認のため 10 % 消費税を登録してみた
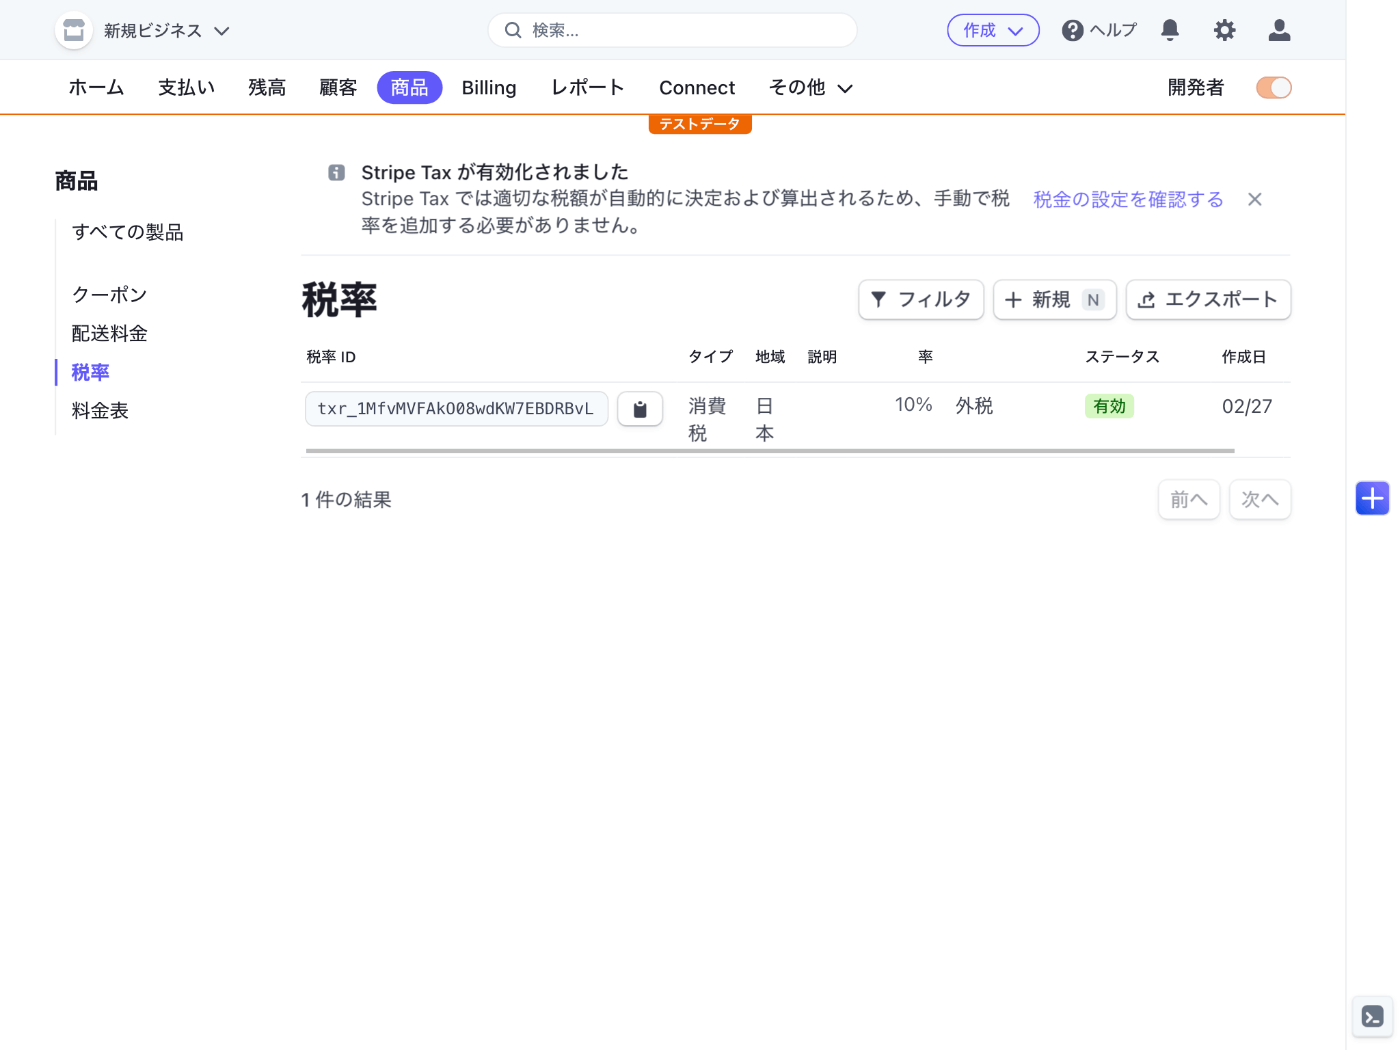
Stripe Tax が有効化されたとのメッセージが表示されたので必要なさそう
Stripe Tax は無効にはできなそうだが、税金登録から日本を外すことで料金は発生しなそう
ソースはよくある質問ページ
Stripe Tax と Tax Rates
Stripe では Stripe Tax と Tax Rates の 2 つの税金関連機能があり Tax Rates は無料
Tax Rates を使用するには下記のように tax_rates オプションを使用する
// Set your secret key. Remember to switch to your live secret key in production.
// See your keys here: https://dashboard.stripe.com/apikeys
const stripe = require('stripe')('sk_test_51MerCAFAkO08wdKW2sXp9JxKMjB1P3cSWOMrFolAUDYR8cJRMLxKqBcedSCXbqtb7XxzbfyixfJkItMX9AhhGPFc00aDY9NYQj');

const session = await stripe.checkout.sessions.create({
  payment_method_types: ['card'],
  line_items: [{
    price: '{{PRICE_ID}}',
    quantity: 1,
    tax_rates: ['{{TAX_RATE_ID}}'],
  }],
  mode: 'payment',
  success_url: 'https://example.com/success',
  cancel_url: 'https://example.com/cancel',
});
automatic_tax オプションが残っているとエラーメッセージが表示されるので注意
編集後のコードは下記のとおり
import type { NextApiRequest, NextApiResponse } from "next";
import { Stripe } from "stripe";

export default async function handler(
  req: NextApiRequest,
  res: NextApiResponse
) {
  if (req.method === "POST") {
    try {
      const stripe = new Stripe(process.env.STRIPE_SECRET_KEY!, {
        apiVersion: "2022-11-15",
      });

      const session = await stripe.checkout.sessions.create({
        customer_email: "susukida@example.com",
        line_items: [
          {
            price: "price_1MftX5FAkO08wdKWvnR5ektn",
            quantity: 1,
            tax_rates: [process.env.TAX_RATE_ID!],
          },
        ],
        mode: "payment",
        success_url: `${req.headers.origin}/?success=true`,
        cancel_url: `${req.headers.origin}/?canceled=true`,
      });

      if (session.url) {
        res.redirect(303, session.url);
      } else {
        throw new Error("!session.url");
      }
    } catch (err) {
      res.status(500).send(err);
    }
  } else {
    res.setHeader("Allow", "POST");
    res.status(405).end("Method Not Allowed");
  }
}
http://localhost:3000/ にアクセスして動作確認する
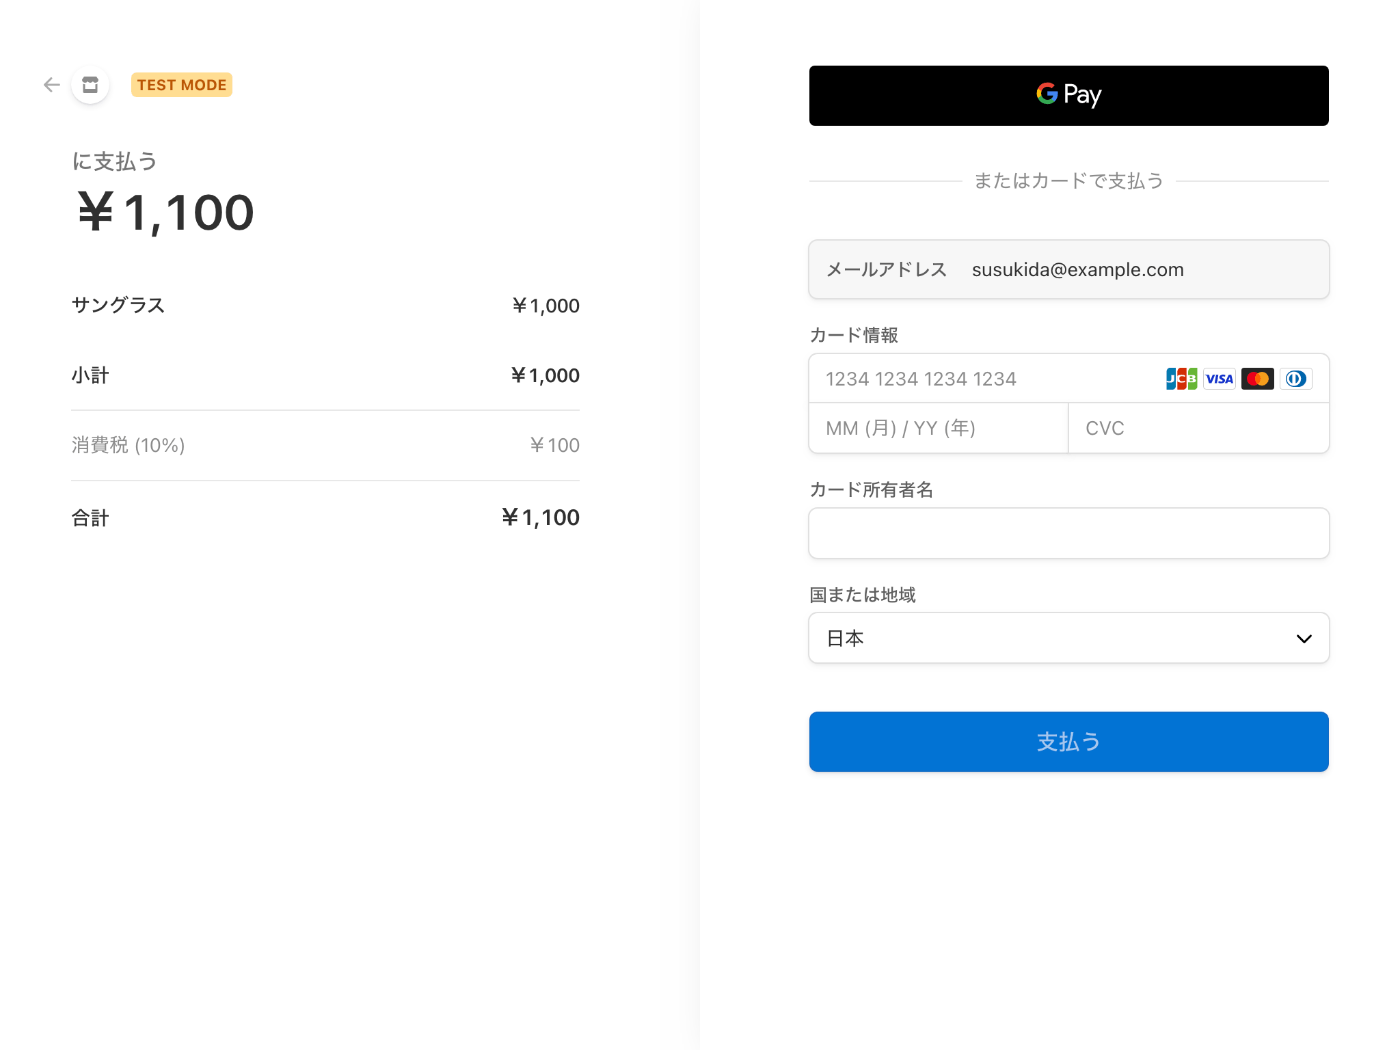
税金は表示されたが「に支払う」が気になる
「に支払う」問題の解決
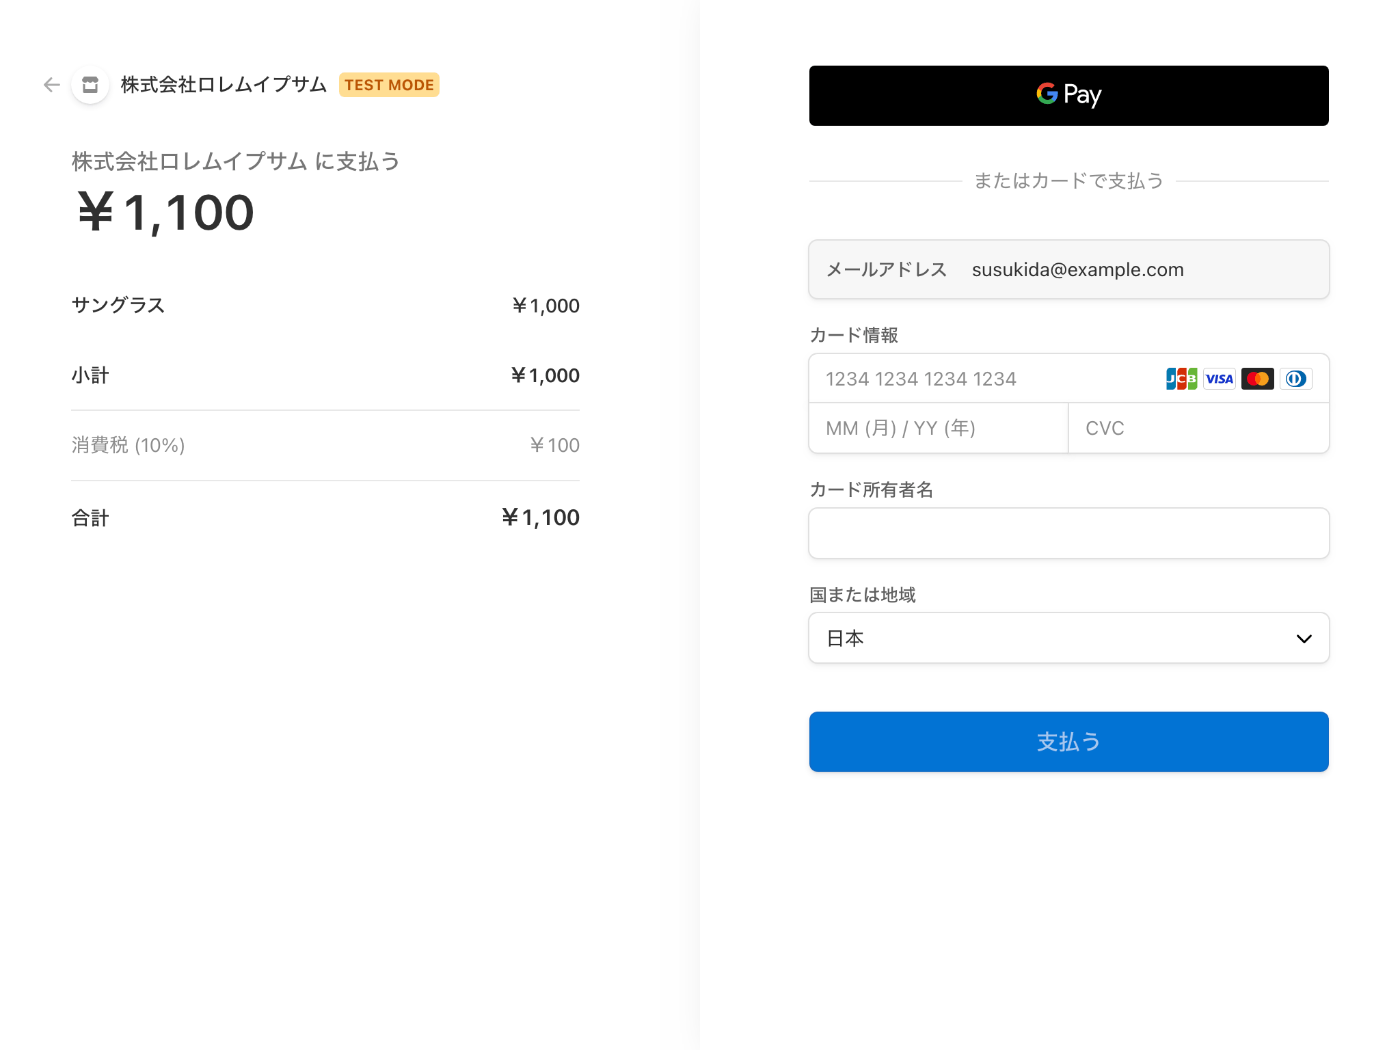
アカウント詳細の設定ページから会社名を設定したら解決した
次は Stripe Billing について調べる
こちらもクイックスタートで学ばせてもらう
Next.js バージョンのドキュメントが無いが React & Node.js を参考に進めていこう
Stripe も LINE 同様にドキュメントが素晴らしい
終了時間が来てしまった
一旦中断、明日か明後日に再開しよう
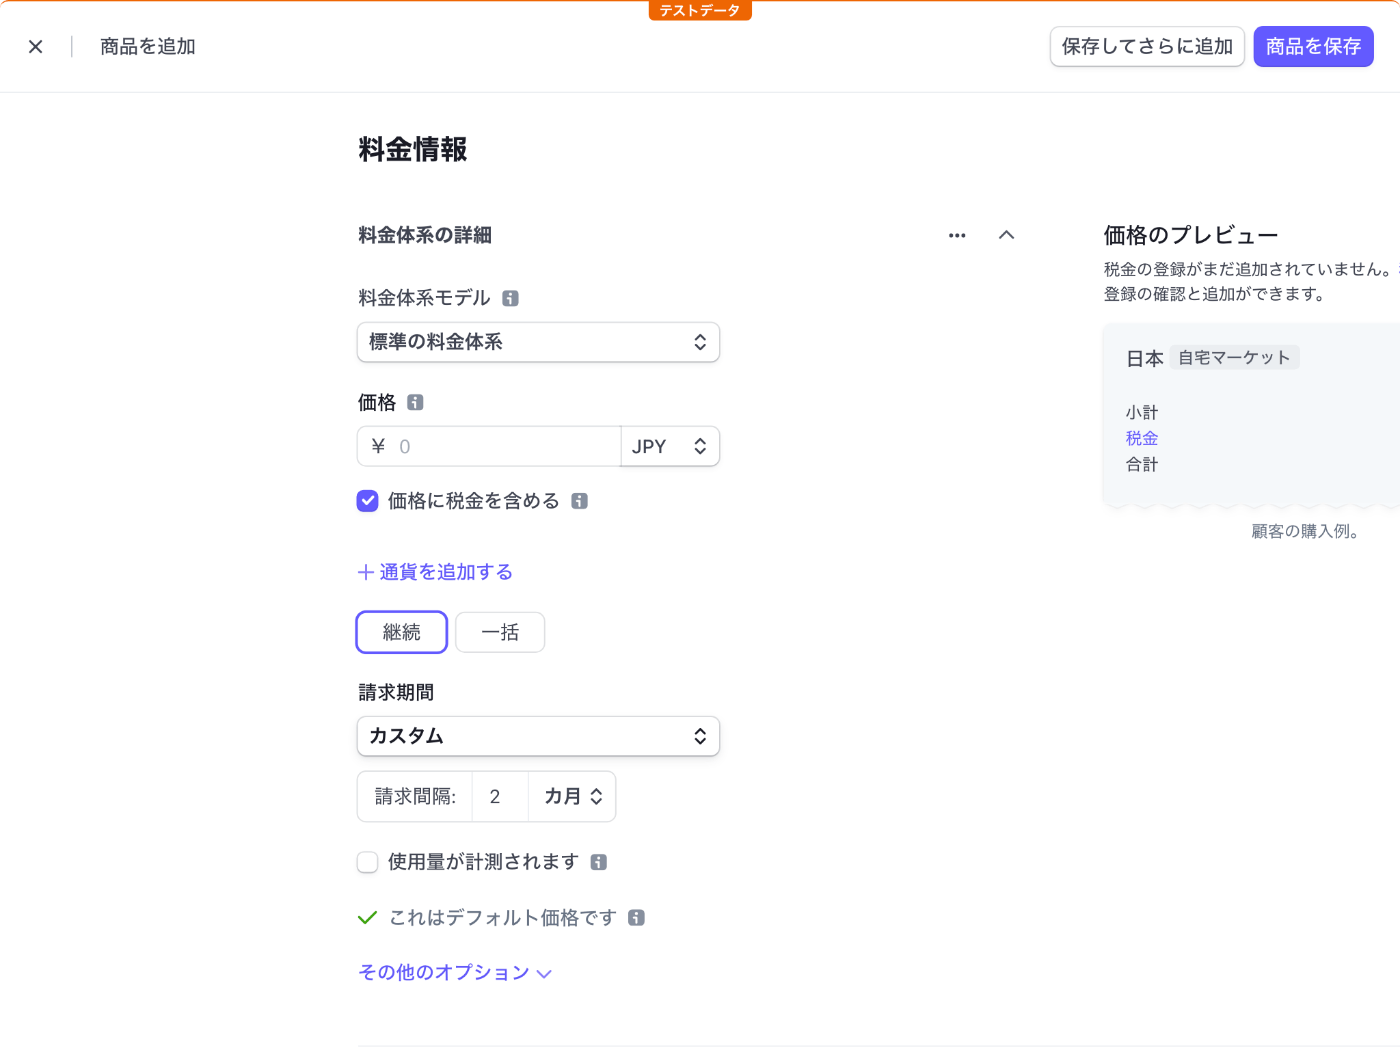
使用量ベースの料金体系
従量課金の機能を使えば毎月請求額を変えることができそう
請求期間
請求期間もカスタムが選択できるので 2 カ月などが設定できそう、すごいね
今日は Stripe Billing のクイックスタートを試してみる
他にもやることがあるので 1 時間だけやろう。
ワークスペースの作成
npx create-next-app \
  --typescript \
  --eslint \
  --src-dir \
  --import-alias "@/*" \
  --use-npm \
  hello-stripe-billing
cd hello-stripe-billing
料金体系モデルの作成
https://dashboard.stripe.com/test/products/create にアクセスするかドキュメントページに表示されている商品作成フォームを使用してサブスクリプション商品を登録する。

今回は毎月 1,000 円のプレミアムプランを登録してみた。
検索キーはよくわからないが検索時のコードとして使用されるのだろうか?
まずは premium-plan と設定してみた。
料金のプレビューページの追加
Logo や CSS は省略する。
export default function ProductDisplay() {
return (
<section>
<div className="product">
<div className="description">
<h3>Starter plan</h3>
<h5>¥ 1,000 / month</h5>
</div>
</div>
<form action="/api/create-checkout-session" method="POST">
<input type="hidden" name="lookup_key" value="premium-plan" />
<button id="checkout-and-portal-button" type="submit">
Checkout
</button>
</form>
</section>
)
}
global.css のインポートをコメントアウトする。
// import '@/styles/globals.css'
import type { AppProps } from 'next/app'

export default function App({ Component, pageProps }: AppProps) {
  return <Component {...pageProps} />
}
できたページは下記の通り。

成功ページとキャンセルページの追加
成功ページとキャンセルページ(メッセージページ)を追加する。
import { useEffect, useState } from "react";
function ProductDisplay() {
return (
<section>
<div className="product">
<div className="description">
<h3>Premium plan</h3>
<h5>¥ 1,000 / month</h5>
</div>
</div>
<form action="/api/create-checkout-session" method="POST">
<input type="hidden" name="lookup_key" value="premium-plan" />
<button id="checkout-and-portal-button" type="submit">
Checkout
</button>
</form>
</section>
);
}
function SuccessDisplay({ sessionId }: { sessionId: string }) {
return (
<section>
<div className="product Box-root">
<div className="description Box-root">
<h3>Subscription to premium plan successful!</h3>
</div>
</div>
<form action="/api/create-portal-session" method="POST">
<input
type="hidden"
id="session-id"
name="session_id"
value={sessionId}
/>
<button id="checkout-and-portal-button" type="submit">
Manage your billing information
</button>
</form>
</section>
);
}
function Message({ message }: { message: string }) {
return (
<section>
<p>{message}</p>
</section>
);
}
export default function App() {
const [message, setMessage] = useState("");
const [success, setSuccess] = useState(false);
const [sessionId, setSessionId] = useState("");
useEffect(() => {
const query = new URLSearchParams(window.location.search);
if (query.get("success")) {
setSuccess(true);
setSessionId(query.get("session_id")!);
}
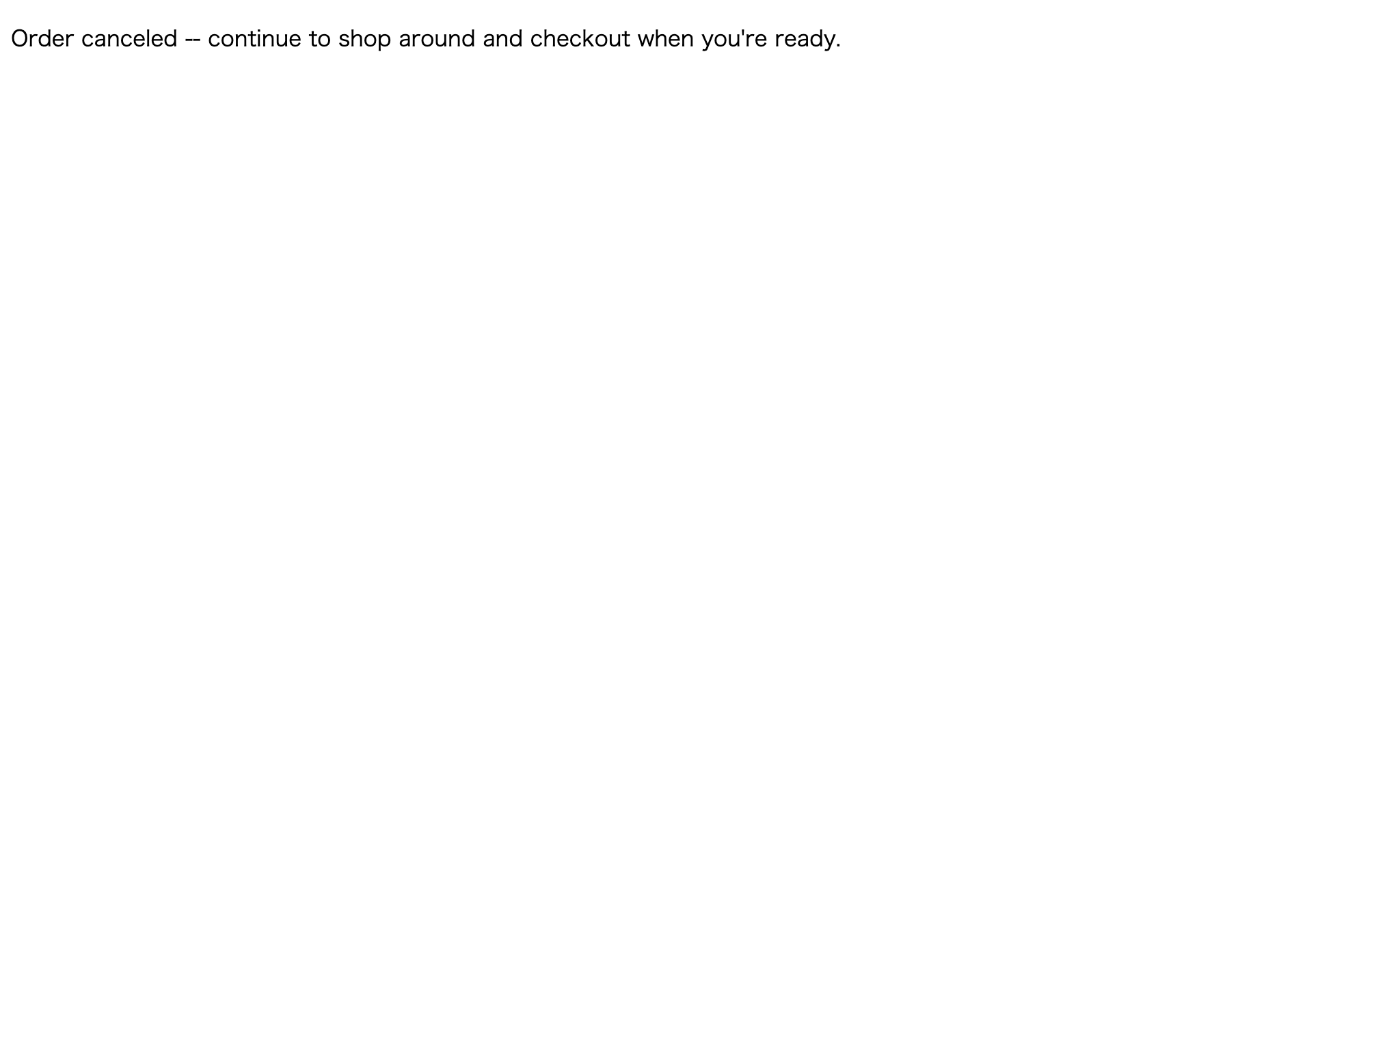
if (query.get("canceled")) {
setSuccess(false);
setMessage(
"Order canceled -- continue to shop around and checkout when you're ready."
);
}
}, [sessionId]);
if (!success && message === "") {
return <ProductDisplay></ProductDisplay>;
} else if (success && sessionId !== "") {
return <SuccessDisplay sessionId={sessionId}></SuccessDisplay>;
} else {
return <Message message={message}></Message>;
}
}
App でクエリ文字列に応じて表示するコンポーネントを変えている。
ついでに Starter plan を Premium plan に変更した。
http://localhost:3000/ アクセス時

http://localhost:3000/?success=true アクセス時

http://localhost:3000/?canceled=true アクセス時
Stripe パッケージのインストール
npm install --save stripe
気になる
ドキュメントのカスタマーポータルセッションにリダイレクトするセクションに下記の記述がある。
session_id は、customer_id を取得するデモンストレーションに使用されます。本番環境では、これは通常、認証済みユーザーと一緒にデータベースに保存されます。
「これ」が何を指しているのかは曖昧だが恐らく customer_id だろう。
customer_id を EC サイト等のデータベースに保存する必要があるらしい。
チェックアウトセッションの作成
touch src/pages/api/create-checkout-session.ts .env.local
import type { NextApiRequest, NextApiResponse } from "next";
import { Stripe } from "stripe";

export default async function handler(
  req: NextApiRequest,
  res: NextApiResponse
) {
  const stripe = new Stripe(process.env.STRIPE_SECRET_KEY!, {
    apiVersion: "2022-11-15",
  });

  const prices = await stripe.prices.list({
    lookup_keys: [req.body.lookup_key],
    expand: ["data.product"],
  });

  const session = await stripe.checkout.sessions.create({
    billing_address_collection: "auto",
    line_items: [
      {
        price: prices.data[0].id,
        quantity: 1,
      },
    ],
    mode: "subscription",
    success_url:
      process.env.BASE_URL! + "/?success=true&session_id={CHECKOUT_SESSION_ID}",
    cancel_url: process.env.BASE_URL! + "/?canceled=true",
  });

  res.redirect(303, session.url!);
}
{CHECKOUT_SESSION_ID} の部分は Stripe 側で入れてくれるのかな?
BASE_URL="http://localhost:3000"
STRIPE_SECRET_KEY="sk_test_XXXXXXXXXXXXXXXXXXXXXXXXXXXXXXXXXXXXXXXXXXXXXXXXXXXXXXXXXXXXXXXXXXXXXXXXXXXXXXXXXXXXXXXXXXXXXXXXXXX"
http://localhost:3000/ にアクセスして Checkout ボタンを押すと決済ページが表示される。
Google Pay を使ってみる
ちょっと怖いけど Google Pay を使ってみたらワンクリックで動作確認ができたので楽だった。
Link 無効化したけど使う人がいるかも知れないので有効化しておこう。
{CHECKOUT_SESSION_ID} の部分はやはり Stripe 側で入れてくれた。
例は下記の通り。
cs_test_XXXXXXXXXXXXXXXXXXXXXXXXXXXXXXXXXXXXXXXXXXXXXXXXXXXXXXXXXX
ポータルセッションの作成
touch src/pages/api/create-portal-session.ts
import type { NextApiRequest, NextApiResponse } from "next";
import { Stripe } from "stripe";

export default async function handler(
  req: NextApiRequest,
  res: NextApiResponse
) {
  const stripe = new Stripe(process.env.STRIPE_SECRET_KEY!, {
    apiVersion: "2022-11-15",
  });

  const sessionId: string = req.body.session_id;
  const checkoutSession = await stripe.checkout.sessions.retrieve(sessionId);

  const returnUrl = process.env.BASE_URL!;
  const portalSession = await stripe.billingPortal.sessions.create({
    customer: checkoutSession.customer as string,
    return_url: returnUrl,
  });

  res.redirect(303, portalSession.url);
}
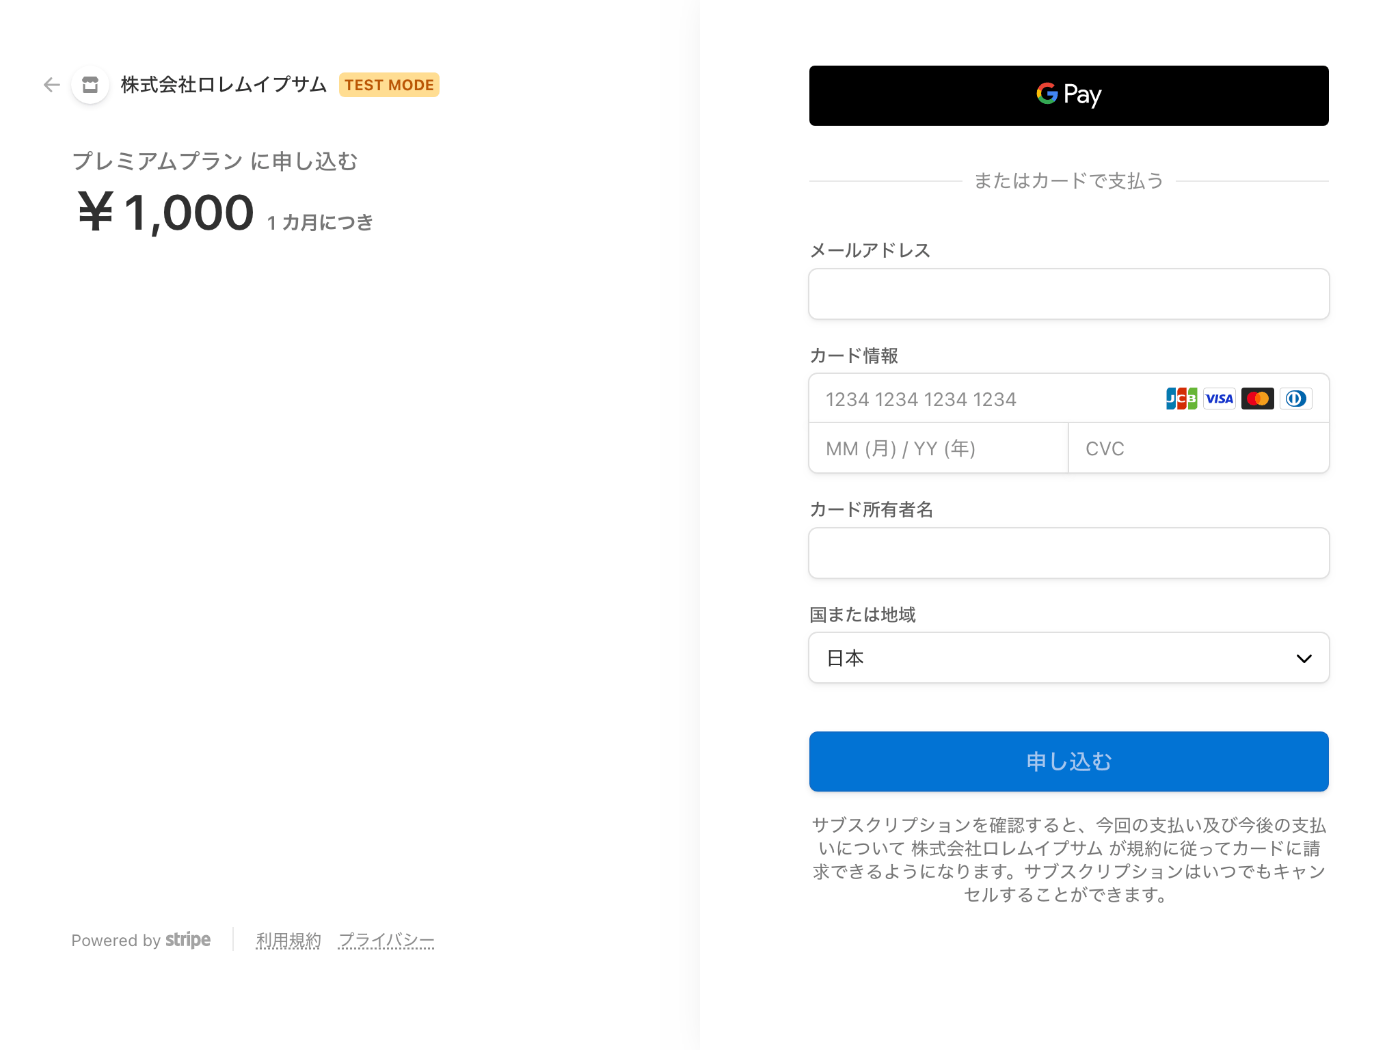
Manage your billing information ボタンを押すと下記ページが表示される。
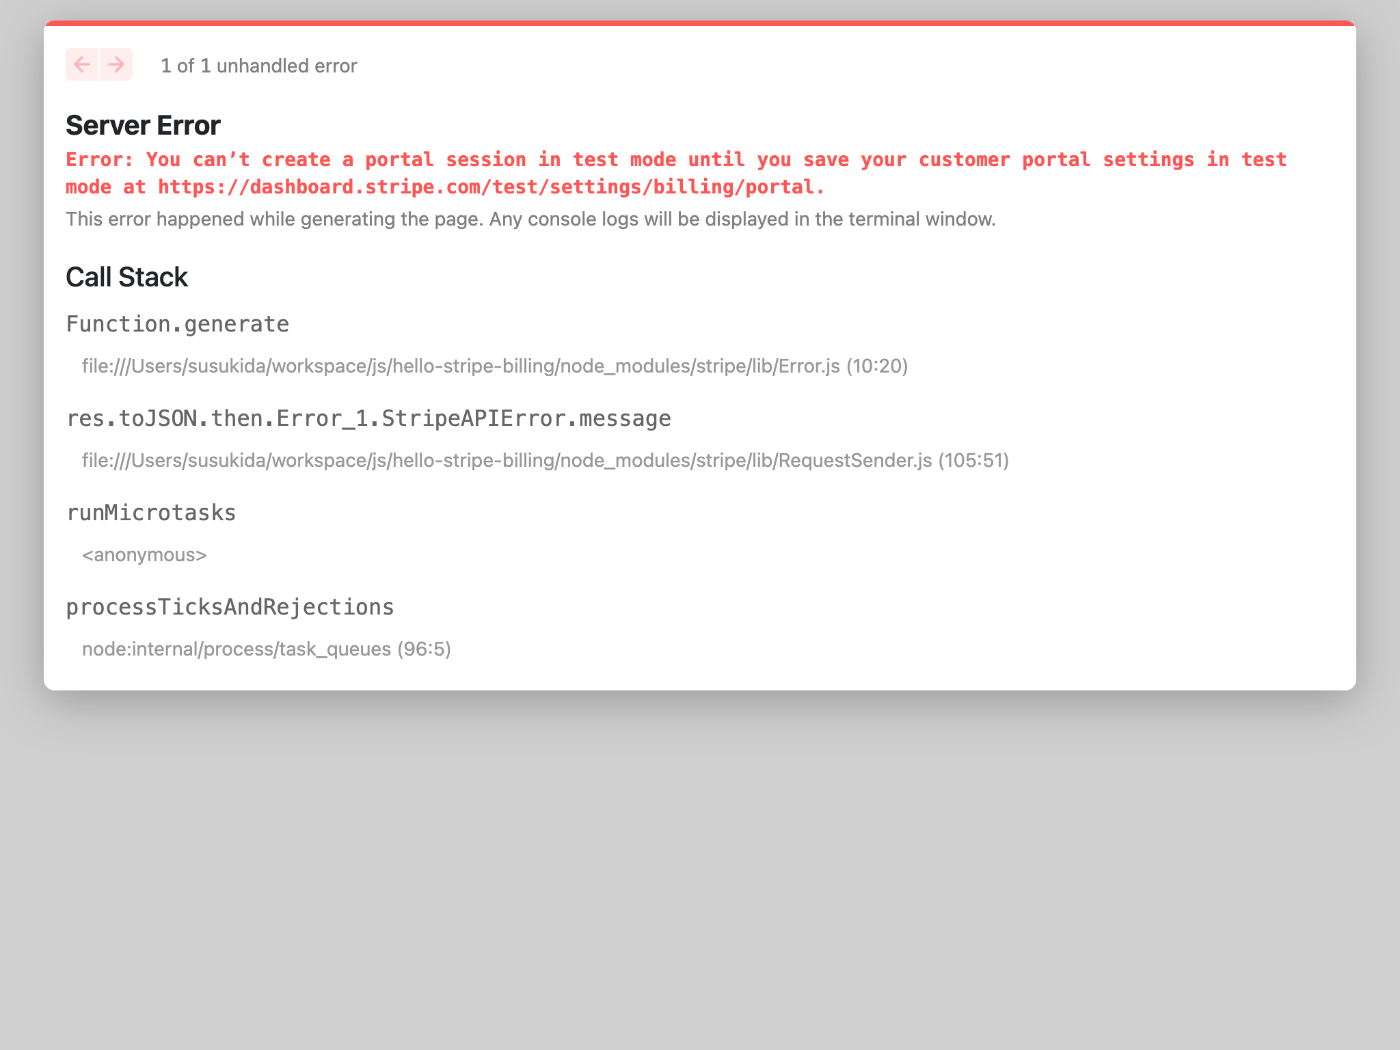
Error: You can’t create a portal session in test mode until you save your customer portal settings in test mode at https://dashboard.stripe.com/test/settings/billing/portal.
設定が不足しているようなので https://dashboard.stripe.com/test/settings/billing/portal にアクセスする。
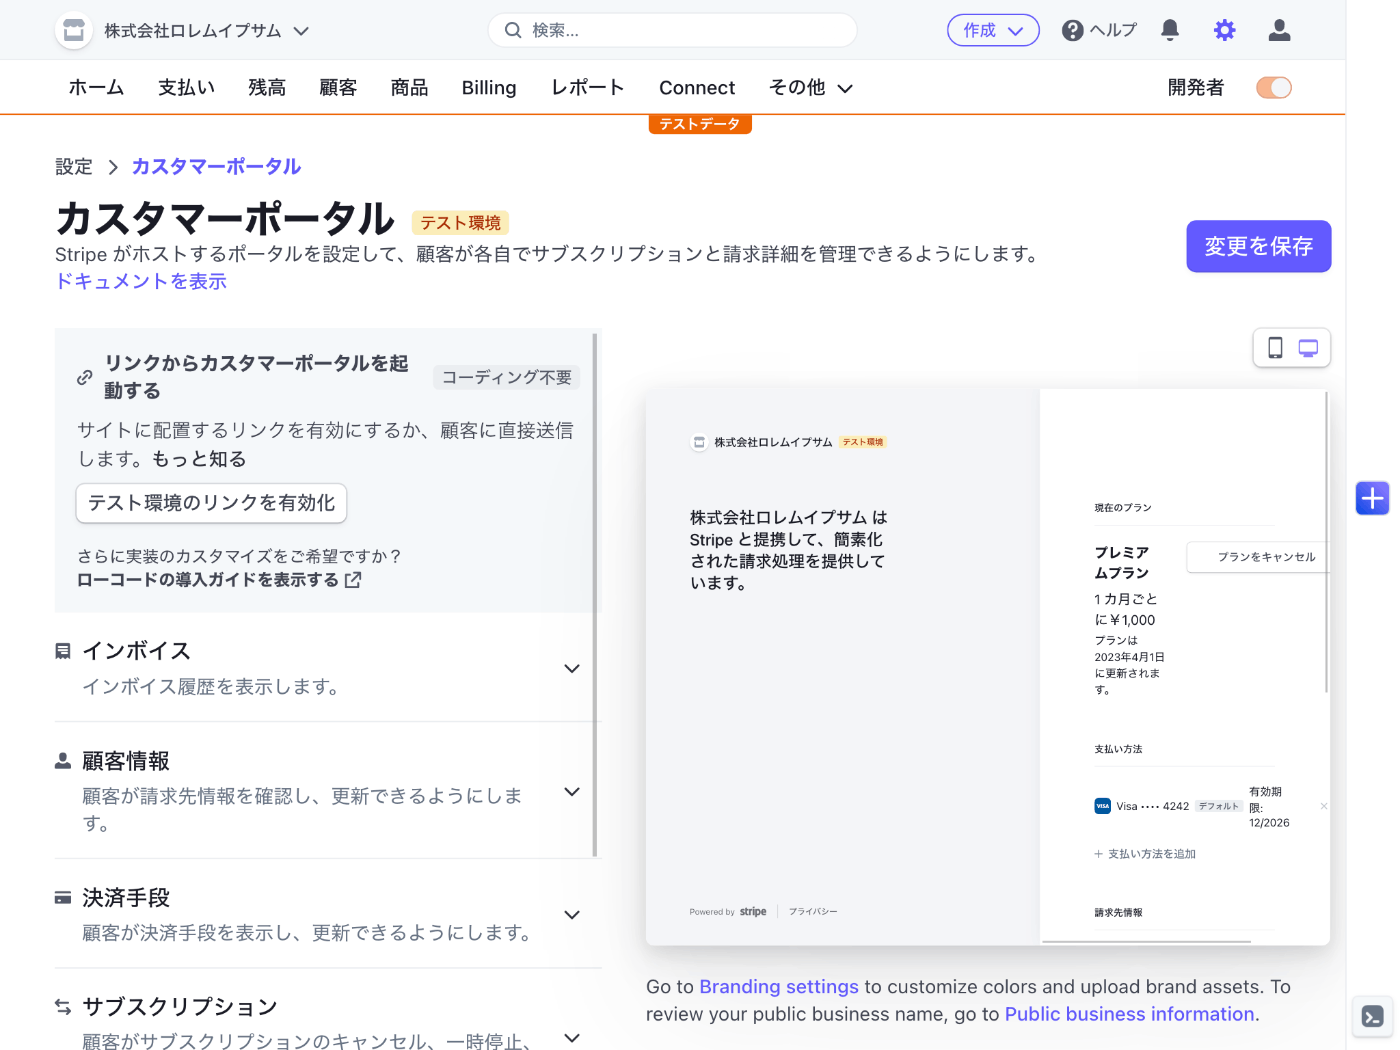
テスト環境のリンクを有効化ボタンを押してみる。
今度はちゃんと表示された、すごいなー。

時間が来てしまった
次回は Webhook の検証から再開する。
複数のサブスクリプション
ユーザーが複数のサブスクリプションを設定したい場合はどうなるのかな?
調べたいことが尽きない。
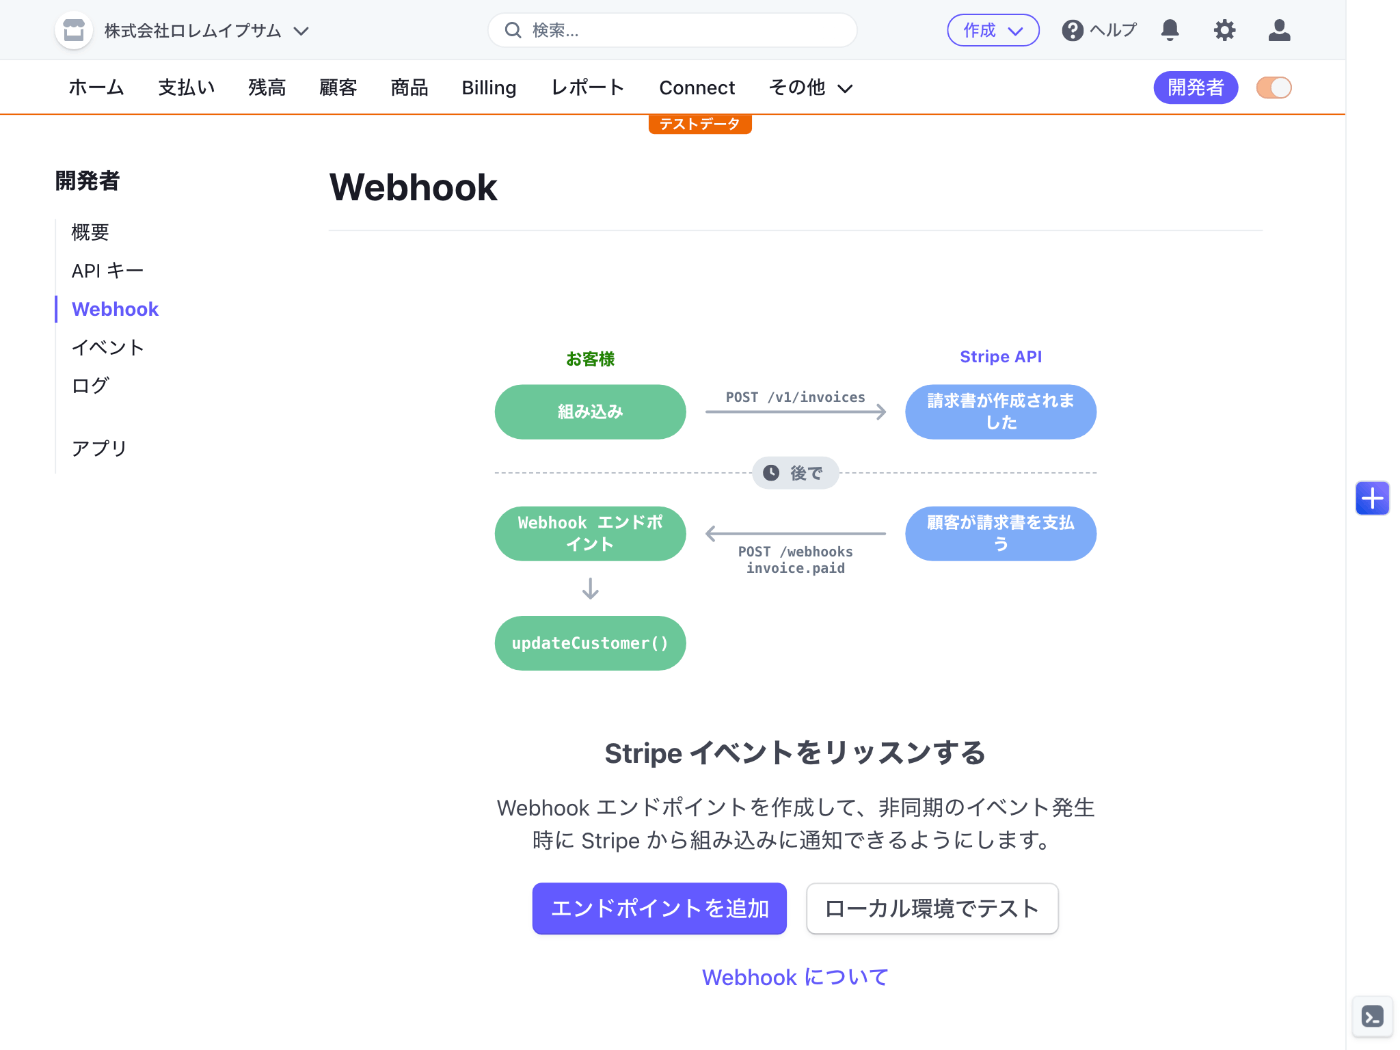
Webhook シークレットキーの取得
まずは https://dashboard.stripe.com/test/webhooks にアクセスする。
ローカル環境でテストボタンがあるがローカルでもテストできるのだろうか、それはとても助かる。
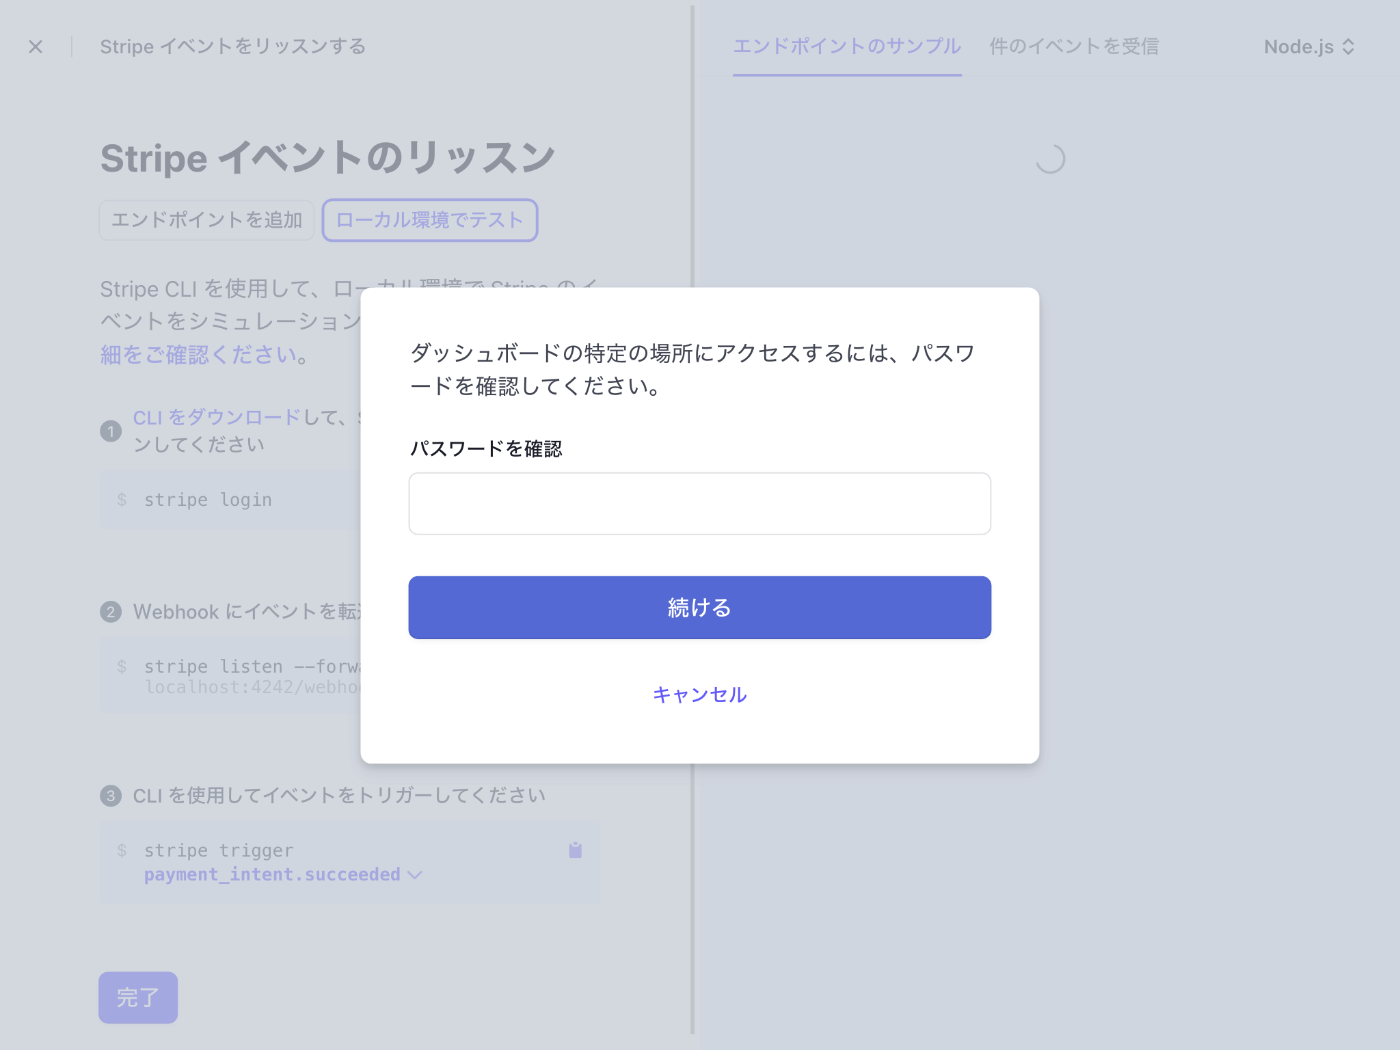
CLI をインストールする必要があるようだ。
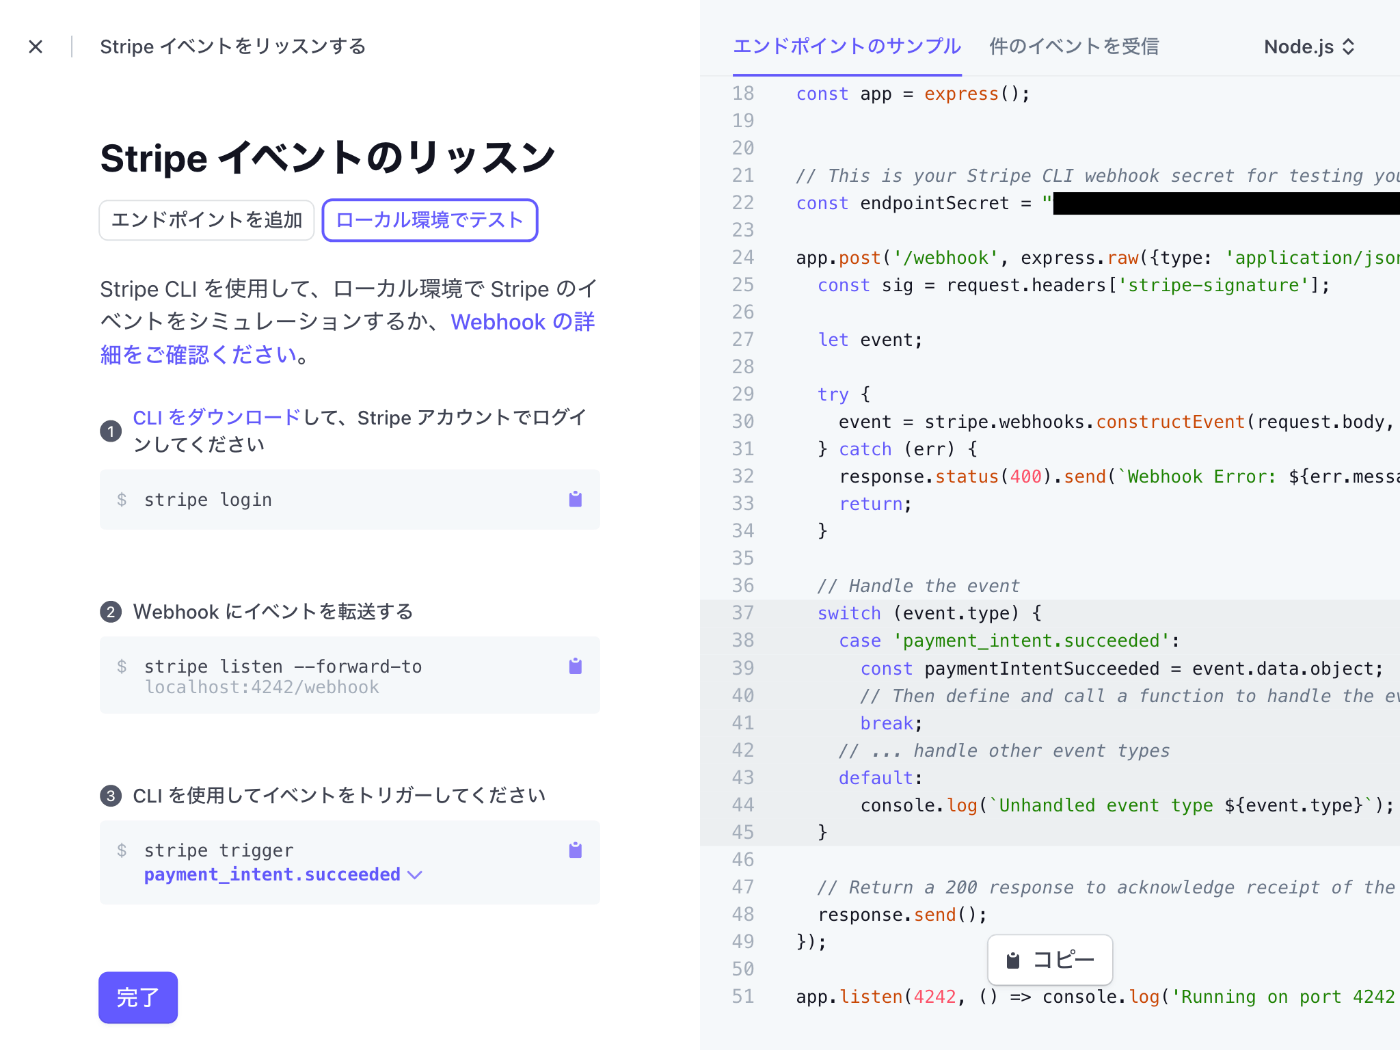
上記のドキュメントによると下記のコマンドでインストールが可能。
brew install stripe/stripe-cli/stripe
インストールが完了したら下記のコマンドを実行してログインする。
stripe login
ログインが完了したら下記のコマンドを実行してサーバーを起動する。
stripe listen --forward-to localhost:3000/api/webhook
> Ready! You are using Stripe API Version [2022-11-15]. Your webhook signing secret is whsec_12345 (^C to quit)
ありがたいことに Webhook シークレットキーが表示される。
Webhook イベントをトリガーするには新規ターミナルを開いて下記のコマンドを実行する。
stripe trigger payment_intent.succeeded
2023-03-02 08:25:14   --> charge.succeeded [evt_3Mgz1NFAkO08wdKW1UfZkhi3]
2023-03-02 08:25:14            [ERROR] Failed to POST: Post "http://localhost:3000/api/webhook": dial tcp [::1]:3000: connect: connection refused

2023-03-02 08:25:15   --> payment_intent.succeeded [evt_3Mgz1NFAkO08wdKW1YiX2aPk]
2023-03-02 08:25:15            [ERROR] Failed to POST: Post "http://localhost:3000/api/webhook": dial tcp [::1]:3000: connect: connection refused

2023-03-02 08:25:15   --> payment_intent.created [evt_3Mgz1NFAkO08wdKW1DGhB8re]
2023-03-02 08:25:15            [ERROR] Failed to POST: Post "http://localhost:3000/api/webhook": dial tcp [::1]:3000: connect: connection refused
今はまだ Webhook を実装していないのに加えてそもそもサーバーを起動していないので上記のようなエラーメッセージが表示される。
イベントの一覧を表示するには stripe trigger --help を実行する。
Webhook の実装を始める
touch src/pages/api/webhook.ts
import type { NextApiRequest, NextApiResponse } from "next";
import getRawBody from "raw-body";
import { Stripe } from "stripe";

export default async function handler(
  req: NextApiRequest,
  res: NextApiResponse
) {
  const stripe = new Stripe(process.env.STRIPE_SECRET_KEY!, {
    apiVersion: "2022-11-15",
  });

  const endpointSecret = process.env.STRIPE_WEBHOOK_SECRET!;
  let event;

  const requestBody = await getRawBody(req);

  if (endpointSecret) {
    const signature = req.headers["stripe-signature"] as string;

    try {
      event = stripe.webhooks.constructEvent(
        requestBody,
        signature,
        endpointSecret
      );
    } catch (err) {
      if (err instanceof Error) {
        console.error("Webhook signature verification failed.", err.message);
      }

      return res.status(400).end();
    }
  }

  console.log(requestBody.toString());

  res.status(200).end();
}

export const config = {
  api: {
    bodyParser: false,
  },
};
環境変数を追加する。
STRIPE_WEBHOOK_SECRET="whsec_12345"
Next.js を起動するのを忘れない。
npm run dev
新規ターミナルを開いて下記のコマンドを実行する。
stripe trigger payment_intent.succeeded
うまくいくと stripe listen のターミナルで下記のコンソール出力が得られる。
2023-03-02 08:51:00   --> charge.succeeded [evt_3MgzQGFAkO08wdKW2JXLr4Bb]
2023-03-02 08:51:00   --> payment_intent.succeeded [evt_3MgzQGFAkO08wdKW2Wl7bgDL]
2023-03-02 08:51:00   --> payment_intent.created [evt_3MgzQGFAkO08wdKW2BXOEviC]
2023-03-02 08:51:00  <--  [200] POST http://localhost:3000/api/webhook [evt_3MgzQGFAkO08wdKW2Wl7bgDL]
2023-03-02 08:51:00  <--  [200] POST http://localhost:3000/api/webhook [evt_3MgzQGFAkO08wdKW2JXLr4Bb]
2023-03-02 08:51:00  <--  [200] POST http://localhost:3000/api/webhook [evt_3MgzQGFAkO08wdKW2BXOEviC]
config の TypeScript の型
PageConfig であることをやっと見つけた。
Webhook の実装
import type { NextApiRequest, NextApiResponse, PageConfig } from "next";
import getRawBody from "raw-body";
import { Stripe } from "stripe";

export default async function handler(
  req: NextApiRequest,
  res: NextApiResponse
) {
  const stripe = new Stripe(process.env.STRIPE_SECRET_KEY!, {
    apiVersion: "2022-11-15",
  });

  let event: Stripe.Event;

  const requestBody = await getRawBody(req);
  const signature = req.headers["stripe-signature"] as string;
  const endpointSecret = process.env.STRIPE_WEBHOOK_SECRET!;

  try {
    event = stripe.webhooks.constructEvent(
      requestBody,
      signature,
      endpointSecret
    );
  } catch (err) {
    console.error(
      "Webhook signature verification failed.",
      err instanceof Error ? err.message : err
    );

    return res.status(400).end();
  }

  if (event.type.startsWith("customer.subscription.")) {
    const subscription = event.data.object as Stripe.Subscription;
    const status = subscription.status;

    console.log(`Subscription status is ${status}`);
  } else {
    console.log(`Unhandled event type ${event.type}`);
  }

  res.status(200).end();
}

export const config: PageConfig = {
  api: {
    bodyParser: false,
  },
};
stripe trigger subscription_schedule.created
Unhandled event type payment_method.attached
Unhandled event type customer.source.created
Unhandled event type customer.created
Unhandled event type product.created
Unhandled event type plan.created
Unhandled event type price.created
Unhandled event type subscription_schedule.created
Unhandled event type customer.updated
Unhandled event type invoice.created
Subscription status is active
サブスクリプションの作成だけではなく様々な Webhook が実行されている。
試しにもう 1 回実行してみる。
Unhandled event type payment_method.attached
Unhandled event type customer.source.created
Unhandled event type customer.created
Unhandled event type product.created
Unhandled event type plan.created
Unhandled event type price.created
Unhandled event type subscription_schedule.created
Unhandled event type customer.updated
Subscription status is active
Unhandled event type invoice.created
同じ Webhook が実行されたが最後の 2 つの順序が変わっている。
ちなみに stripe trigger コマンドを実行するとダッシュボードに商品や支払いが追加されている。
できれば追加しないで欲しいがシミュレートするために仕方ないのかなという感じもする。
次回
無事に Webhook の検証が終わった。
次は従量課金の機能を試してみたい。
公式ドキュメントを見ながらやるのはしんどそうなので適宜他のサイトを参照しながら進めよう。
テストクロック
サブスクリプションのテストをする時に便利そう。
今日は従量課金の検証
まずは商品のモデリングから始める。
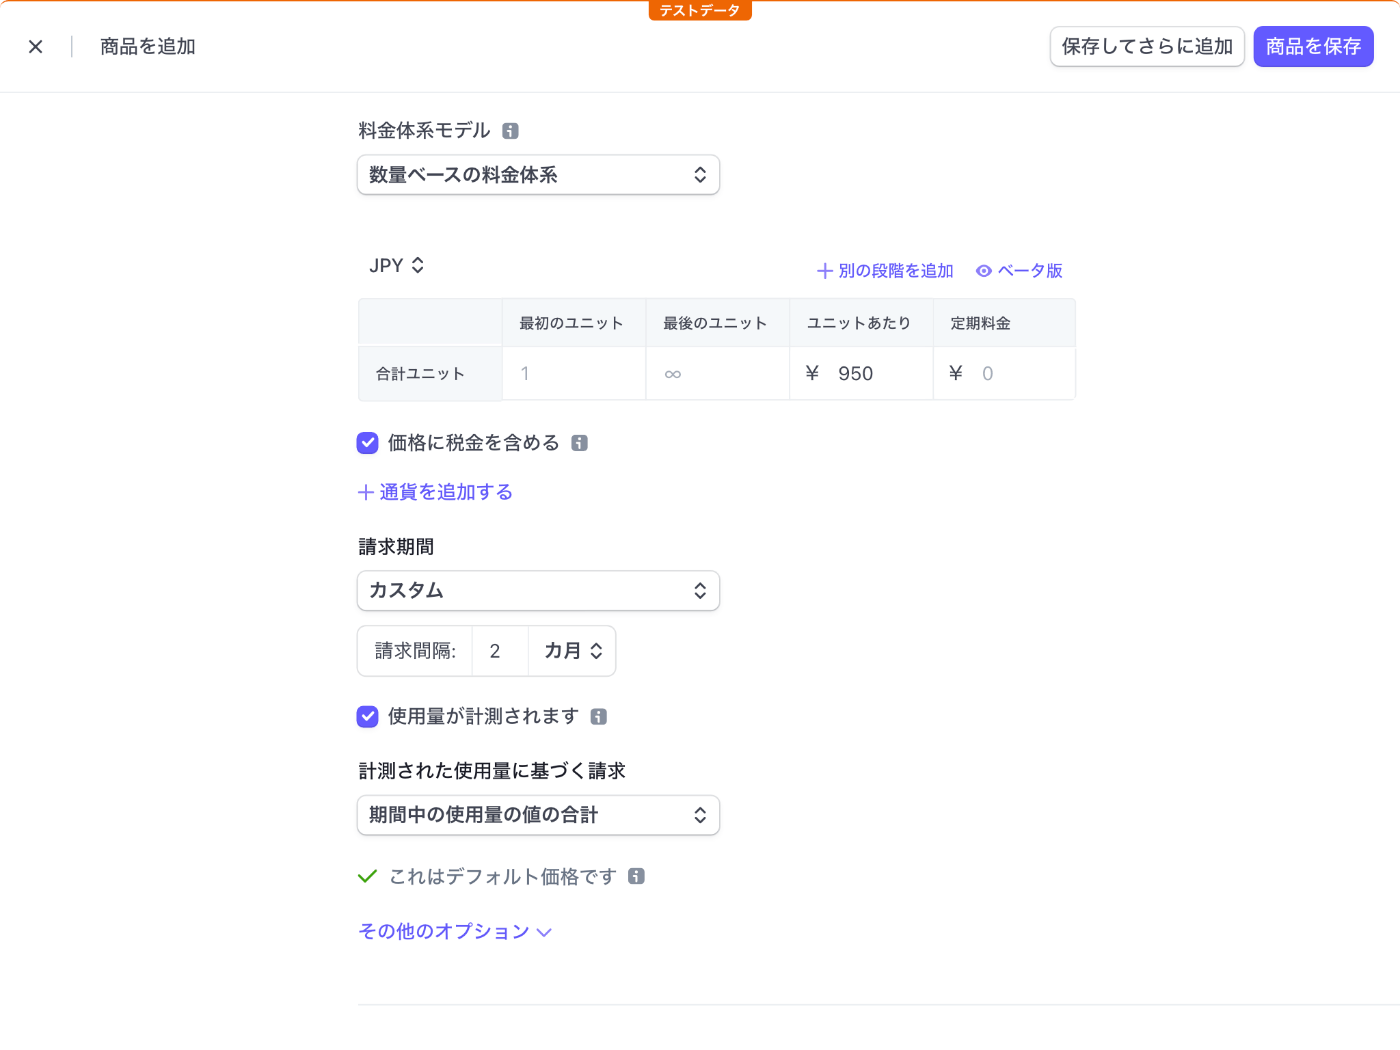
数量ベースの料金体系の商品を登録してみた

続いて顧客の登録
ドキュメントでおすすめされているように Payment Links を使おうと思ったけど登録した表示されない。
標準的な料金体系じゃないとダメなのかな?

でも公式ドキュメントで紹介されているやり方だから出来ないはずはないか。
一旦削除して標準的な料金体系にしてみたけどまだ表示されない。
請求期間を月次にしてみたけどまだ表示されない。
使用量の計測を外したらやっと表示された。
請求期間を 2 カ月にしても大丈夫。
数量ベースの料金体系にするとダメ。
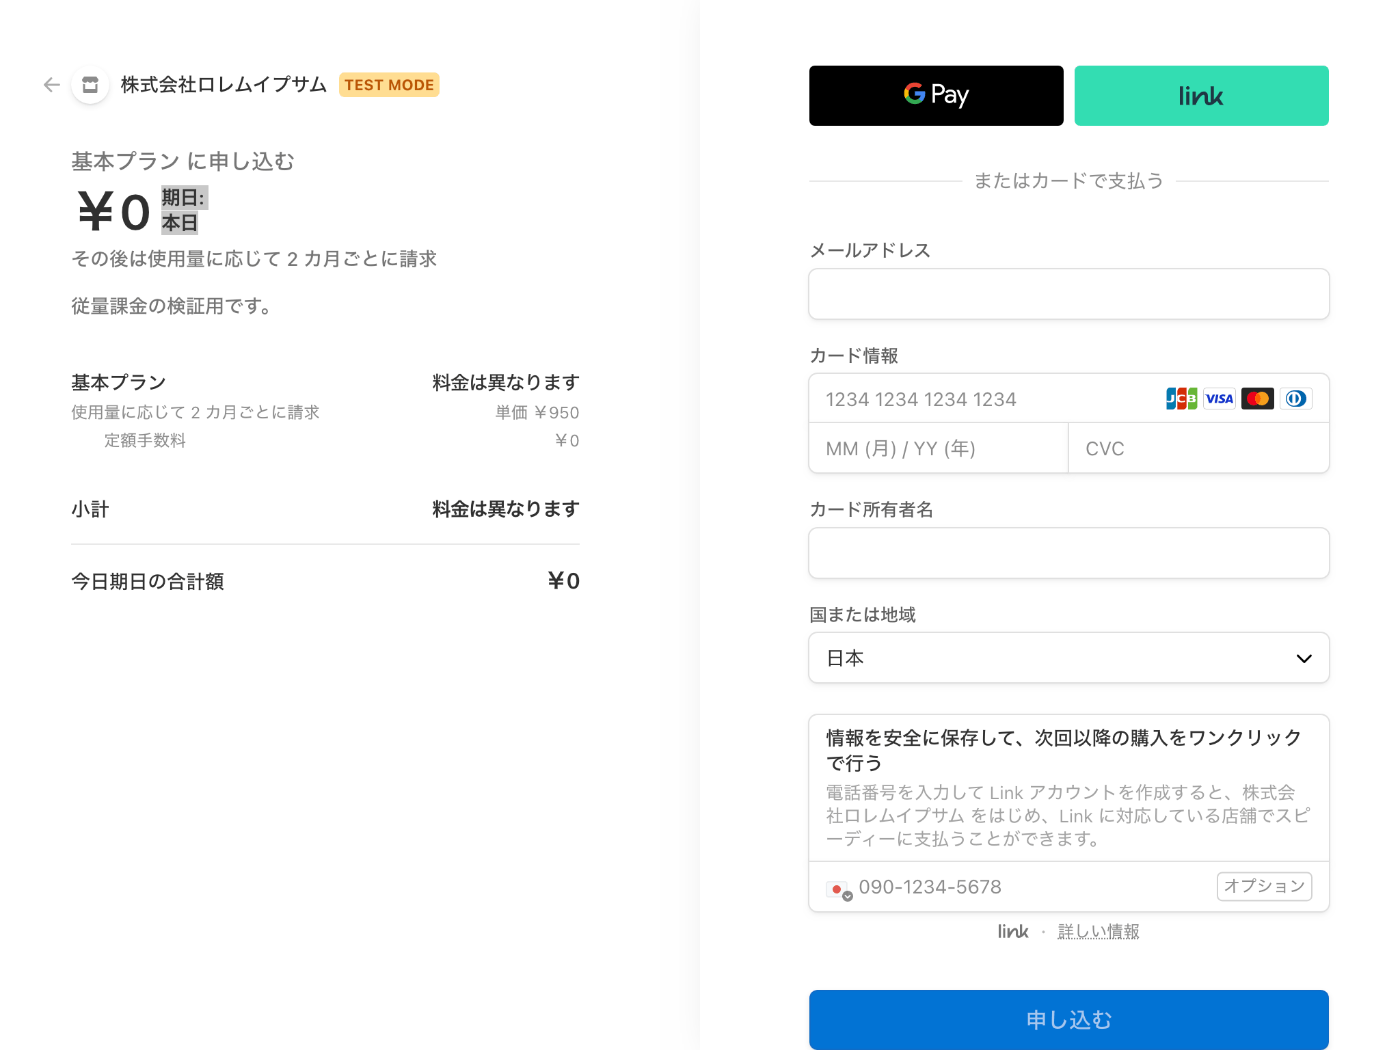
仕方ないので Checkout を使う
決済ページがどのように表示されるのか気になるので復習を兼ねて Web アプリを作ってみよう。
npx create-next-app --typescript --eslint --src-dir --import-alias "@/*" --use-npm stripe-usage-based
cd stripe-usage-based
npm install --save stripe
touch src/pages/api/create_session.ts .env.local
npm run dev
// import '@/styles/globals.css'
import type { AppProps } from "next/app";

export default function App({ Component, pageProps }: AppProps) {
  return <Component {...pageProps} />;
}
export default function Home() {
  return (
    <>
      <h1>Stripe Usage Based</h1>
      <form action="/api/create-session" method="POST">
        <button type="submit">Checkout</button>
      </form>
    </>
  );
}
import type { NextApiRequest, NextApiResponse } from "next";
import { Stripe } from "stripe";

export default async function handler(
  req: NextApiRequest,
  res: NextApiResponse
) {
  const stripe = new Stripe(process.env.STRIPE_SECRET_KEY!, {
    apiVersion: "2022-11-15",
  });

  const session = await stripe.checkout.sessions.create({
    mode: "subscription",
    line_items: [
      {
        price: process.env.STRIPE_PRICE_ID,
      },
    ],
    success_url: process.env.BASE_URL + "/?success=true",
    cancel_url: process.env.BASE_URL + "/?canceled=true",
  });

  res.redirect(303, session.url!);
}
BASE_URL="http://localhost:3000"
STRIPE_SECRET_KEY="sk_test_12345"
STRIPE_PRICE_ID="price_12345"
STRIPE_PRICE_ID はダッシュボードの商品詳細ページの料金セクションからコピーする。
間違えて商品の ID をコピーしないように注意。
http://localhost:3000/ にアクセスして Checkout ボタンを押すと下記のページが表示される。
期日を月末に設定したいので下記のページを参考に請求サイクルアンカーを指定してみる。
よく見ると stripe.subscriptions.create という別のメソッドを使っている。
Stripe Checkout では期日を月末に設定することはできないのだろうか?
あとキャンセル料を徴収したい場合はどうやれば良いだろう。
気になることが尽きない。
使用量の報告
色々と寄り道をしてしまったけど従量課金に戻ろう。
Google Pay などを使ってサブスクリプションを申し込むとダッシュボードの顧客ページやサブスクリプションページで確認できる。
ところで同じメールアドレスや名前の顧客が重複しているけど頑張れば一つにまとめられるのかな?
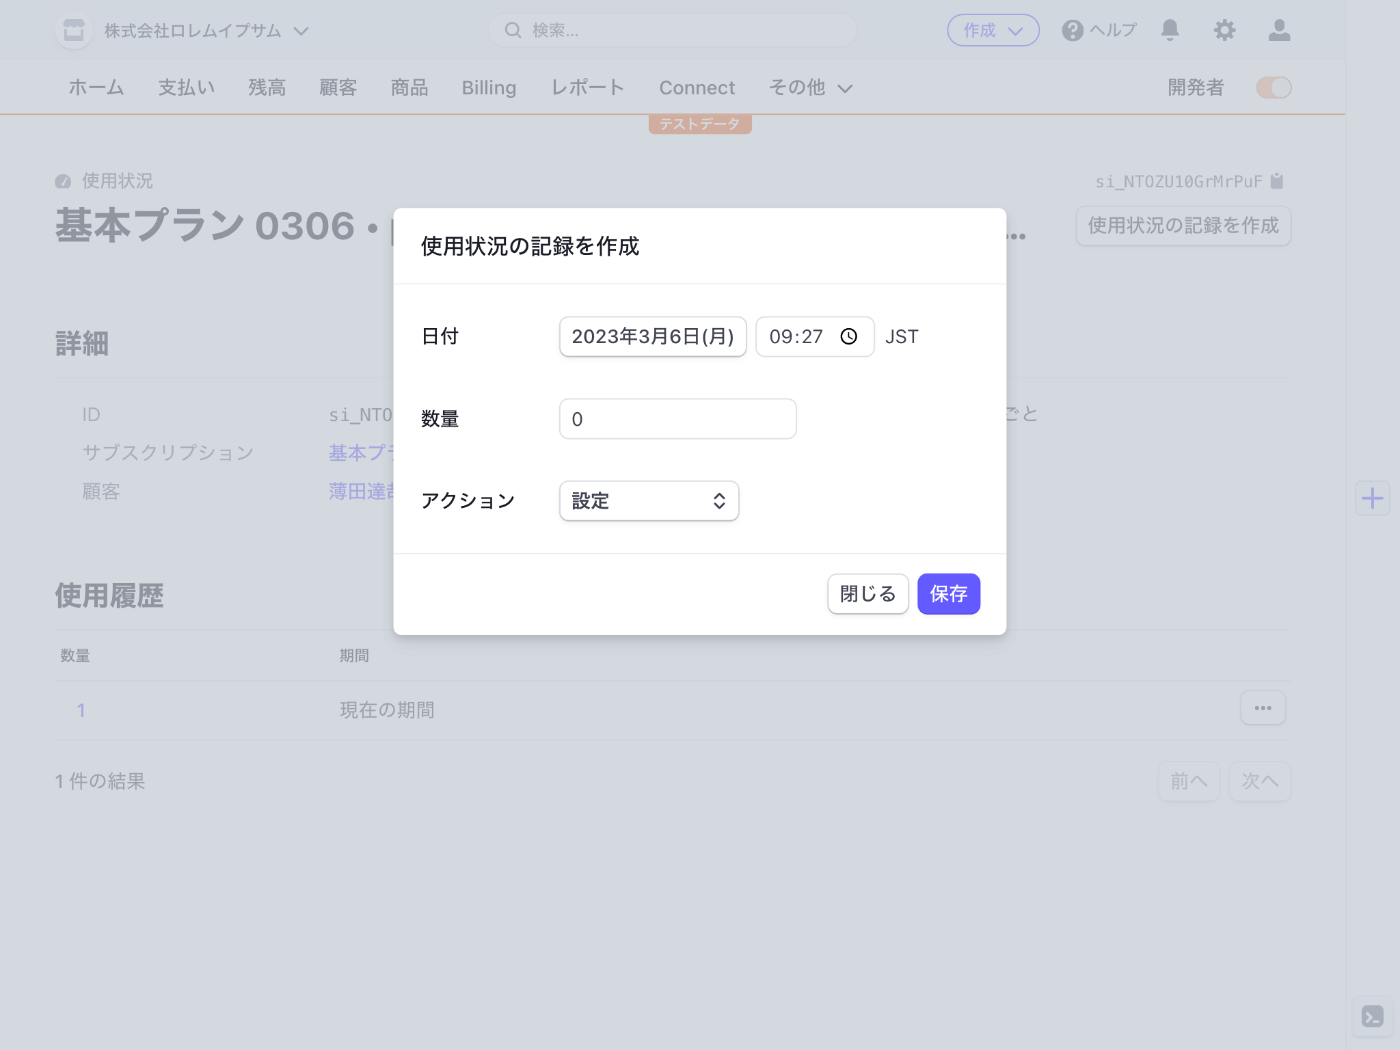
サブスクリプションの詳細ページにある使用状況を表示ボタンを押すと使用状況がモーダル表示される。
少しわかりにくいが料金体系セクションの ... ボタンを押すと使用履歴を表示というメニューがあるのでこれを押すと使用履歴ページが表示される。

右上にある使用状況の記録を作成ボタンを押すとフォームがモーダルが表示される。
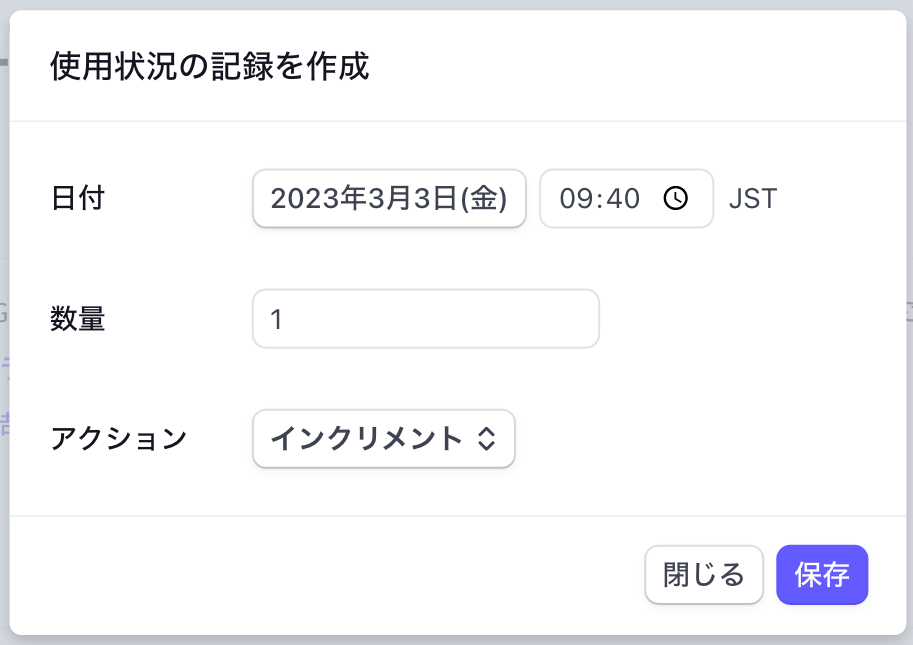
保存ボタンを押すと使用状況が追加される。
間違って作成してしまった使用状況は削除できるのだろうか?
できないようであればアクションでインクリメントではなく設定を選択すれば良いのかな?
0 に設定してもページ上は変更された様子が見受けられないのだが...
べき等キーが便利そう
べき等キー(idempotent key)を使うことで重複するリクエストを排除できるらしい、これはとても便利だ。
計測された使用量に基づく請求
期間中の使用量の値の合計に基づいて請求しているから使用状況を設定しても反映されないのかな?
期間中の最新の使用量の値に基づけば使用状況を上書きできるかもしれない。
あと最新の使用量の値と期間中の最新の使用量の値の違いって何だろうと思ったら下記の記事がめちゃくちゃわかりやすかった。
次回はキャンセル料や期間中の最新の使用量の値に基づいたサブスクリプションを試してみよう。
Next.js で jest
Next.js で jest を使いたいのだが皆どうやっているのだろう。
公式にも紹介されている。
jest を使いたいといっても Stripe API にリクエストを送信するコードを実行するくらいしかやらないので jest 公式ドキュメントのやり方に則ってセットアップすれば良いかも知れない。
他にもやることがあるので今日は一旦中断。
料金体系についても理解が曖昧なので次回やる時にしっかり復習したい。
今日は使用量報告を stripe パッケージを使ってやってみる。
使用量報告のコード実行には jest を使う。
先日登録した料金体系は既に使用していて変更できないので新規の料金体系を登録する。
ワークスペースの作成
先週で記憶が曖昧なのでワークスペースから作り直そう。
npx create-next-app --typescript --eslint --src-dir --import-alias "@/*" --use-npm hello-stripe-0306
cd hello-stripe-0306
npm install --save stripe
touch src/pages/api/create-session.ts .env.local
npm run dev
段階的な料金体系と数量ベースの料金体系の違い
料金情報を登録するときのヘルプメッセージを引用する。
料金について段階を利用している場合は、段階的な料金体系を選択してください。注文内の一部に異なる価格が適用される場合があります。たとえば、最初の 100 ユニットについてはユニット当たり ¥1,000、以降の 50 ユニットについてはユニット当たり ¥500 を請求するなど。
販売する合計ユニット数に基づく単価で請求する場合は、数量ベースの料金体系を選択してください。たとえば、50 ユニットの場合はユニット当たり ¥1,000、100 ユニットの場合はユニット当たり ¥700 を請求するなど。
よくわからないけど仮に合計ユニット数が 150 ユニットの場合、段階的な料金体系では 100 ユニットに対して @¥1,000 、50 ユニットに対して @¥500 で合計 ¥125,000 になるってことかな?
一方、数量ベースの料金体系では 150 ユニットに対して @¥700 で合計 ¥105,000 になるってことかな?
商品と価格の登録
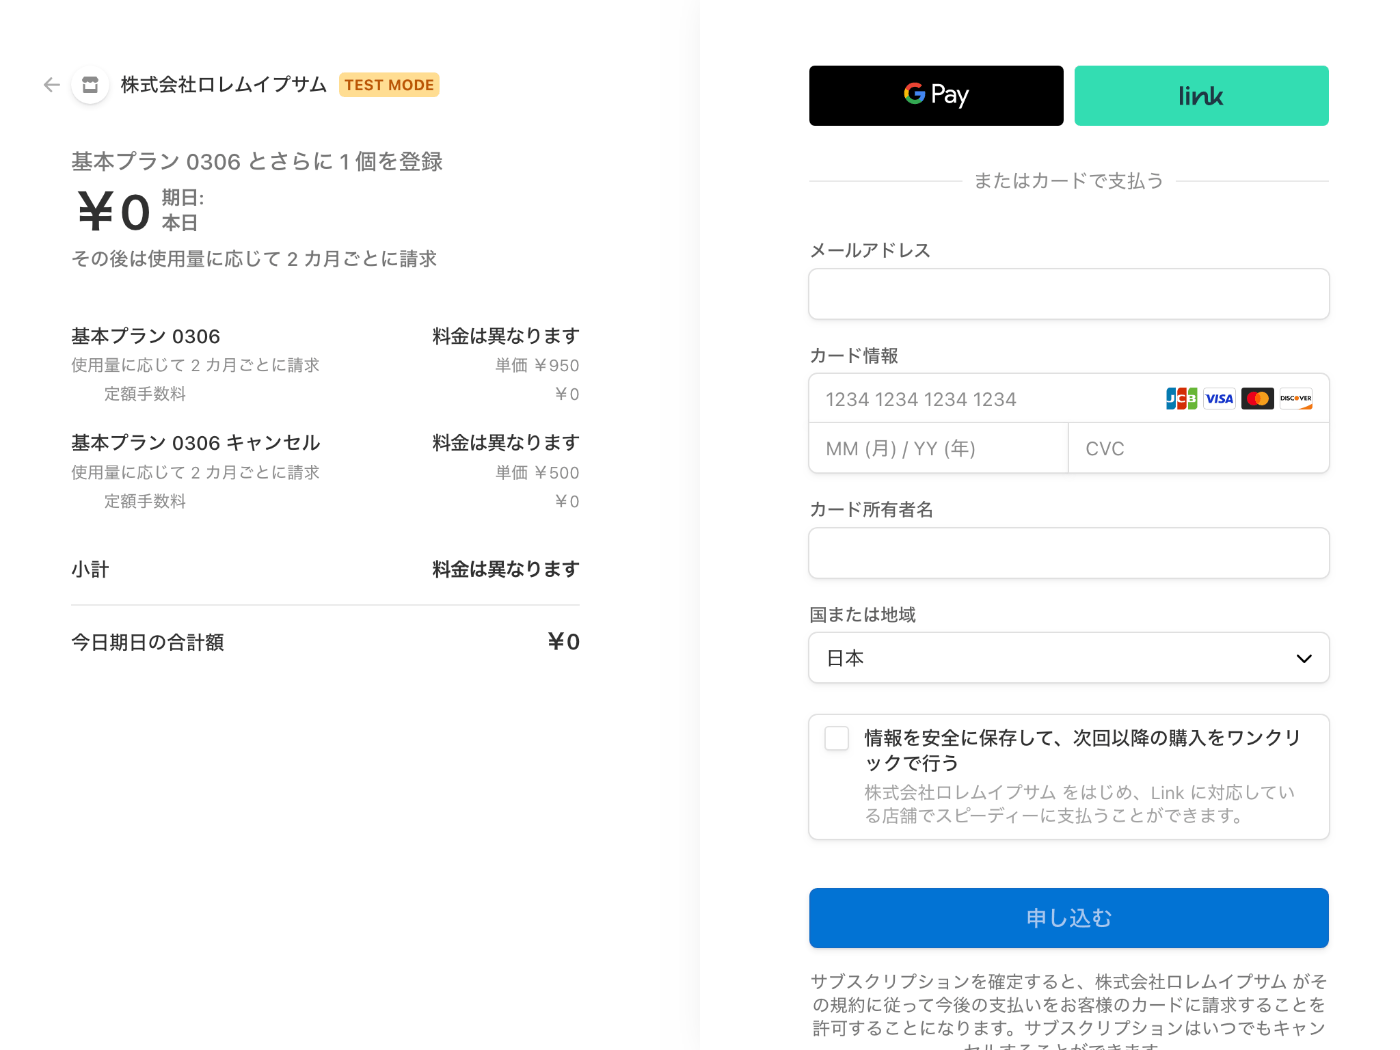
基本プラン 0306 という名前で新たに商品を登録してみた。
ほとんど前回の内容と同一だが計測された使用量に基づく請求を「期間中の最新の使用量の値」に設定した。

キャンセル商品の登録
同じ要領でキャンセル料を商品として登録した。
ほとんど同じだが料金を ¥500 にした。

キャンセル料を商品として登録する場合の懸念
商品のサブスクリプションは解約したけどキャンセル料のサブスクリプションは解約していないという中途半端な状態が起こり得る。
キャンセル料は別の手段で請求した方が良いのかな?例えばダッシュボードの顧客詳細ページから支払いを作成するとか。
追記
後から検証してみたところ同時に申し込んだ商品は同時に解約しなければならない様子だったので杞憂でした。
コーディング
export default function Home() {
  return (
    <>
      <h1>Hello Stripe 0306</h1>
      <form action="/api/create-session" method="POST">
        <button type="submit">Checkout</button>
      </form>
    </>
  );
}
import type { NextApiRequest, NextApiResponse } from "next";
import { Stripe } from "stripe";

export default async function handler(
  req: NextApiRequest,
  res: NextApiResponse
) {
  const stripe = new Stripe(process.env.STRIPE_SECRET_KEY!, {
    apiVersion: "2022-11-15",
  });

  const session = await stripe.checkout.sessions.create({
    mode: "subscription",
    line_items: [
      { price: process.env.STRIPE_PRICE_ID! },
      { price: process.env.STRIPE_CANCEL_PRICE_ID! },
    ],
    success_url: process.env.BASE_URL! + "/?success=true",
    cancel_url: process.env.BASE_URL! + "/?canceled=true",
  });

  res.redirect(303, session.url!);
}
BASE_URL="http://localhost:3000"
STRIPE_SECRET_KEY="sk_test_12345678"
STRIPE_PRICE_ID="price_1234"
STRIPE_CANCEL_PRICE_ID="price_5678"
顧客 ID の取得
Google Pay などを使ってサブスクリプションの申し込みを完了するとダッシュボードの顧客ページから確認できるようになるので顧客 ID をコピーする。
コピーした顧客 ID は .env.local にペーストする。
STRIPE_CUSTOMER_ID="cus_1234"
ポータルの確認
サブスクリプションの管理ページを表示する。
touch src/pages/api/create-portal-session.ts
import type { NextApiRequest, NextApiResponse } from "next";
import { Stripe } from "stripe";

export default async function handler(
  req: NextApiRequest,
  res: NextApiResponse
) {
  const stripe = new Stripe(process.env.STRIPE_SECRET_KEY!, {
    apiVersion: "2022-11-15",
  });

  const session = await stripe.billingPortal.sessions.create({
    customer: process.env.STRIPE_CUSTOMER_ID!,
    return_url: process.env.BASE_URL! + "/?success=true",
  });

  res.redirect(303, session.url!);
}
export default function Home() {
  return (
    <>
      <h1>Hello Stripe 0306</h1>
      <form action="/api/create-session" method="POST">
        <button type="submit">Checkout</button>
      </form>
      <form action="/api/create-portal-session" method="POST">
        <button type="submit">Manage</button>
      </form>
    </>
  );
}
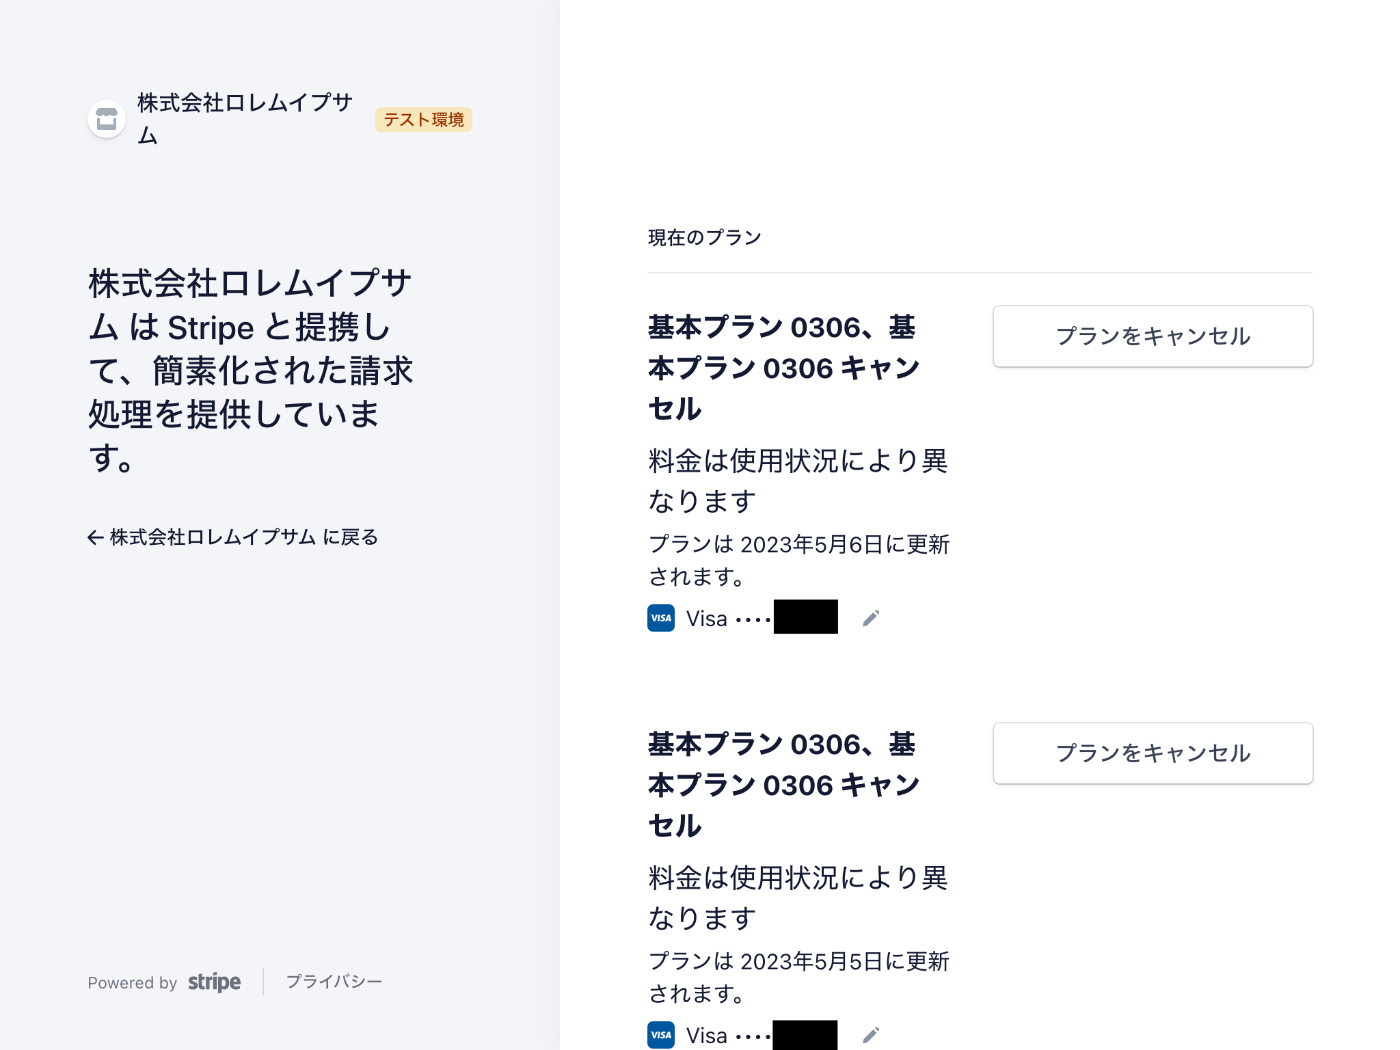
http://localhost:3000 にアクセスして Manage ボタンを押すとサブスクリプション管理ページが表示される。

見る限りでは基本プランと基本プランキャンセルは同時に解約しなければならない様子、良かった!
チェックアウトセッション作成時に顧客 ID を指定してみる
ずっとどうなるか気になっていたがせっかくなので試してみる。
import type { NextApiRequest, NextApiResponse } from "next";
import { Stripe } from "stripe";

export default async function handler(
  req: NextApiRequest,
  res: NextApiResponse
) {
  const stripe = new Stripe(process.env.STRIPE_SECRET_KEY!, {
    apiVersion: "2022-11-15",
  });

  const session = await stripe.checkout.sessions.create({
    mode: "subscription",
    customer: process.env.STRIPE_CUSTOMER_ID!, // この行を追加しました。
    line_items: [
      { price: process.env.STRIPE_PRICE_ID! },
      { price: process.env.STRIPE_CANCEL_PRICE_ID! },
    ],
    success_url: process.env.BASE_URL! + "/?success=true",
    cancel_url: process.env.BASE_URL! + "/?canceled=true",
  });

  res.redirect(303, session.url!);
}
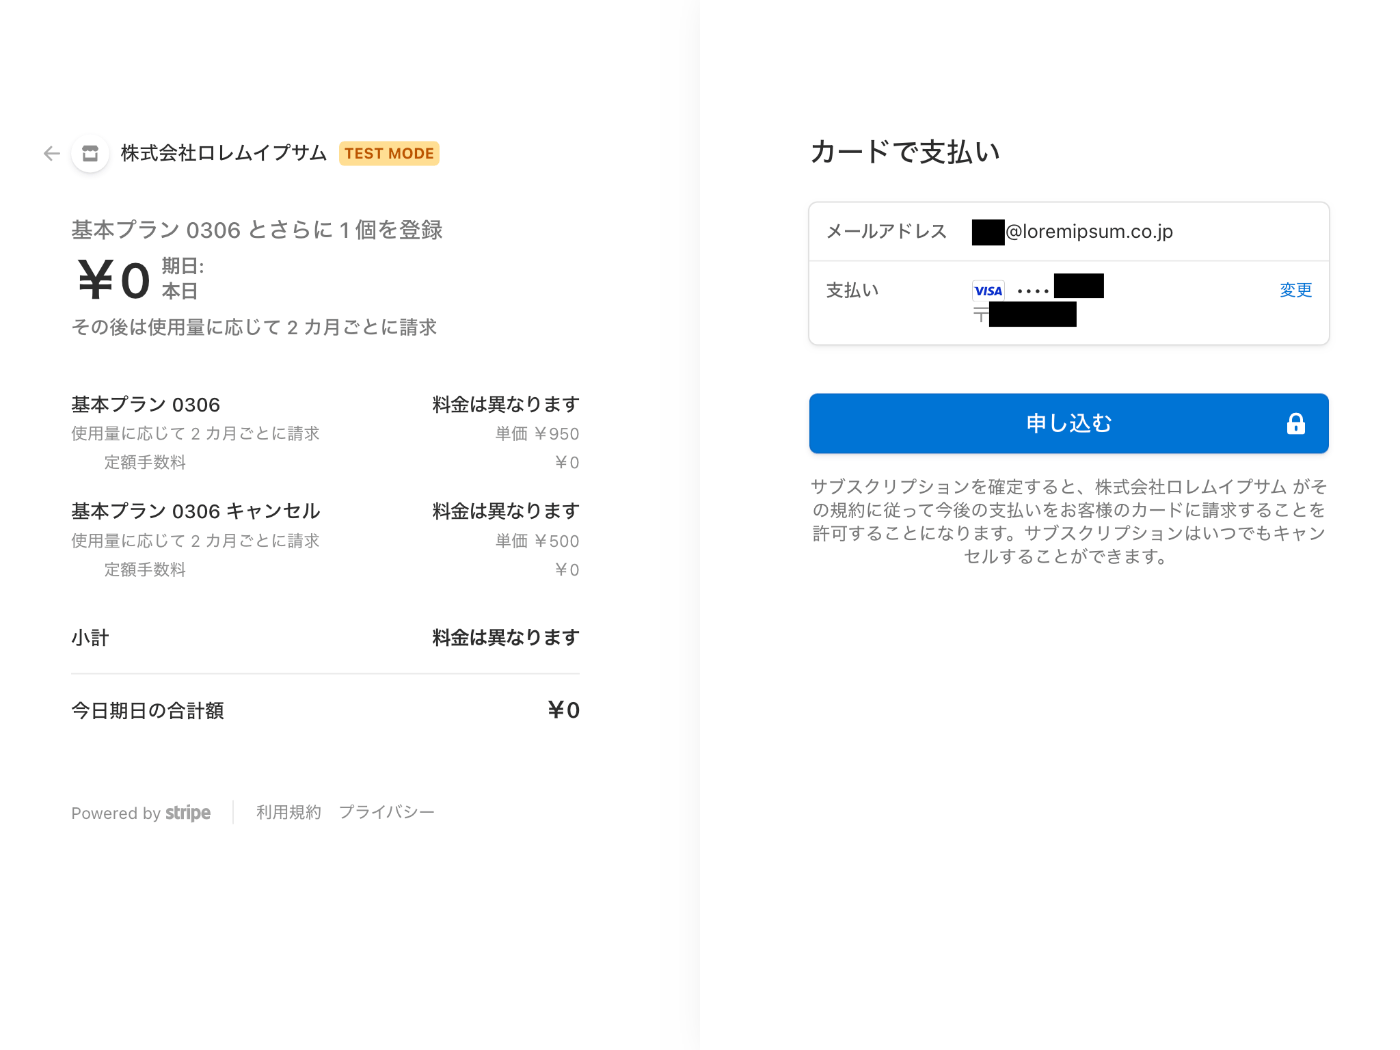
決済ページにアクセスしてみる。
新たに申し込んでから管理ページにアクセスしてみる。
期待通りの動作だった、2 つのことがわかった。
- チェックアウトセッションを作成する時に顧客 ID を指定するとクレジットカードの入力を省略できる。
- 同じサブスクリプションを複数申し込むことができる。
使用量報告をダッシュボードから試してみる
サブスクリプション詳細ページの料金体系セクションから使用状況のページへ移動して使用量を登録する。

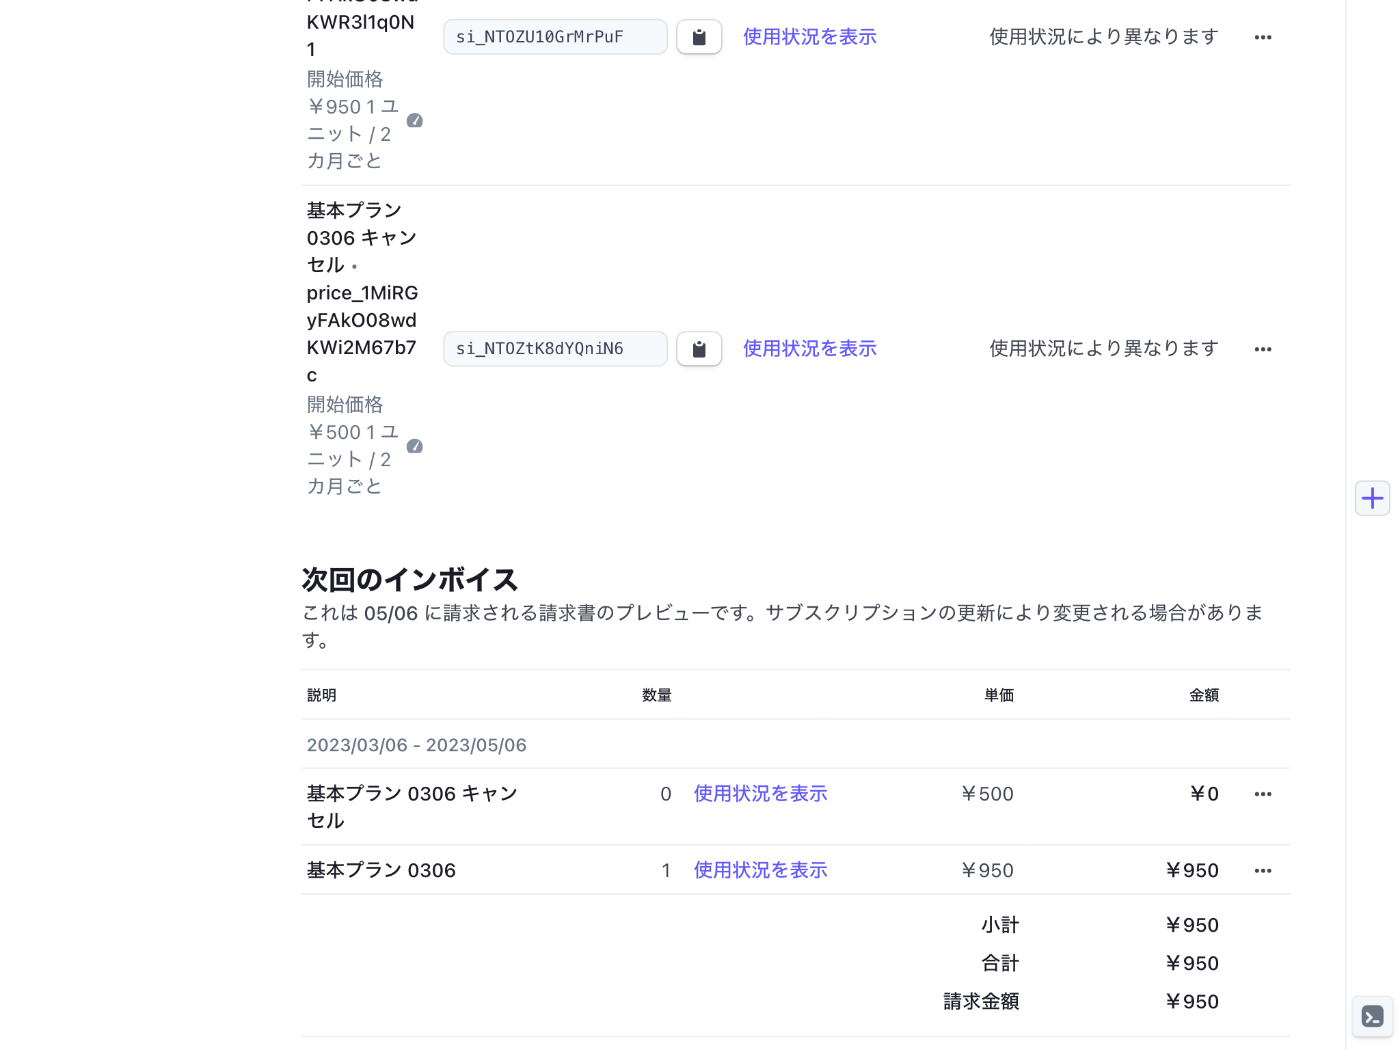
次回のインボイスが更新されて合計額が ¥950 になる。
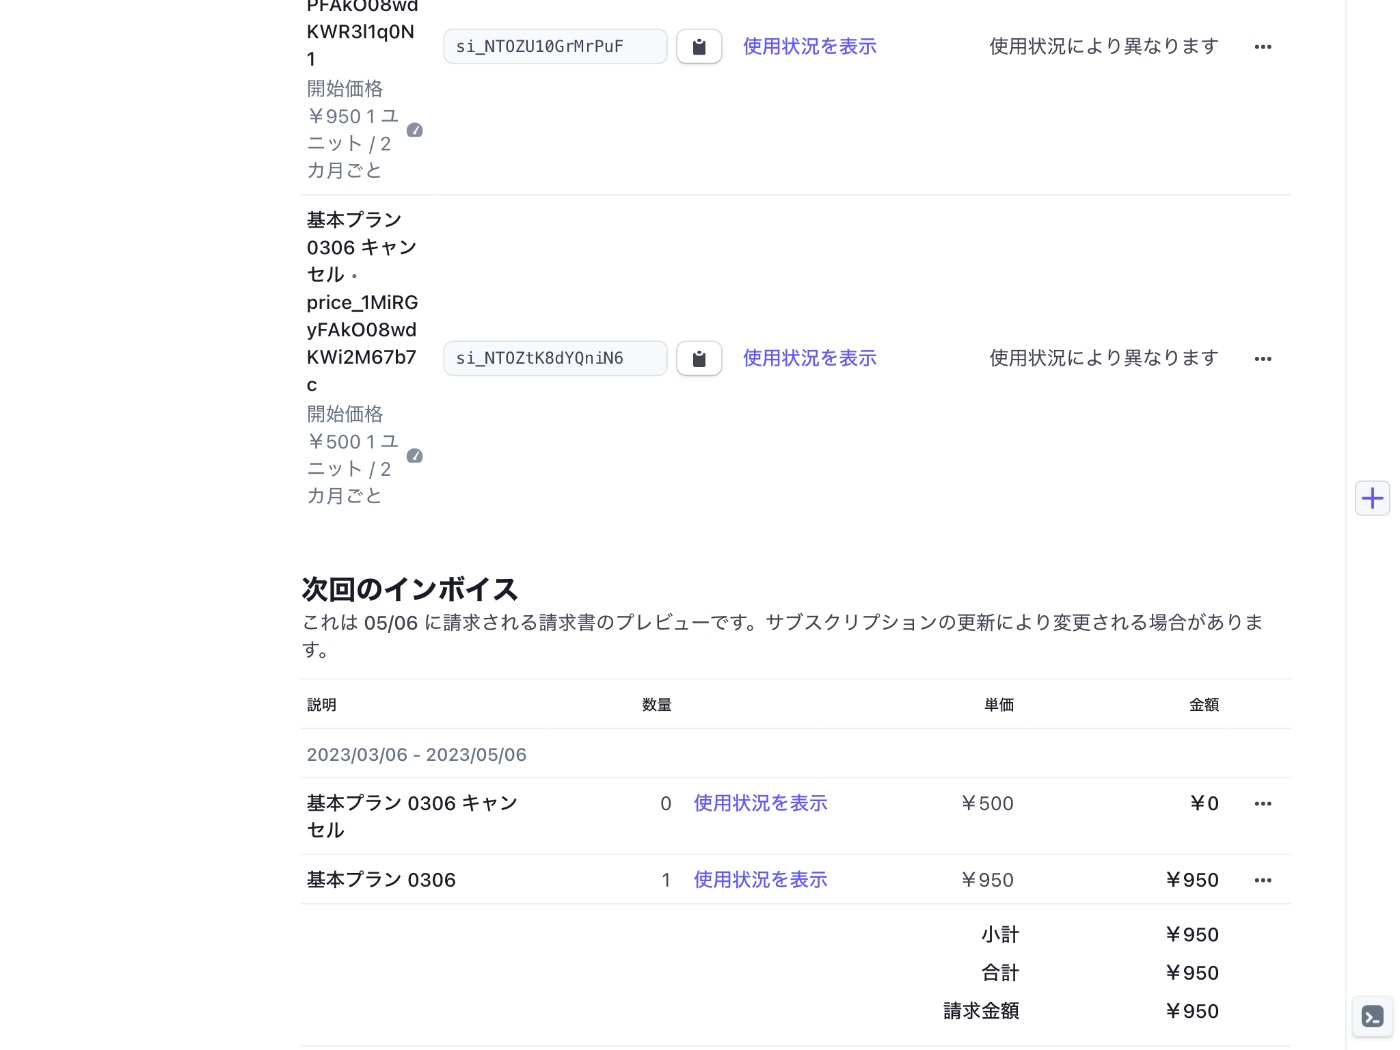
これで使用量をゼロに戻したらどうなるか?
期待通りインボイスも ¥0 になっている!
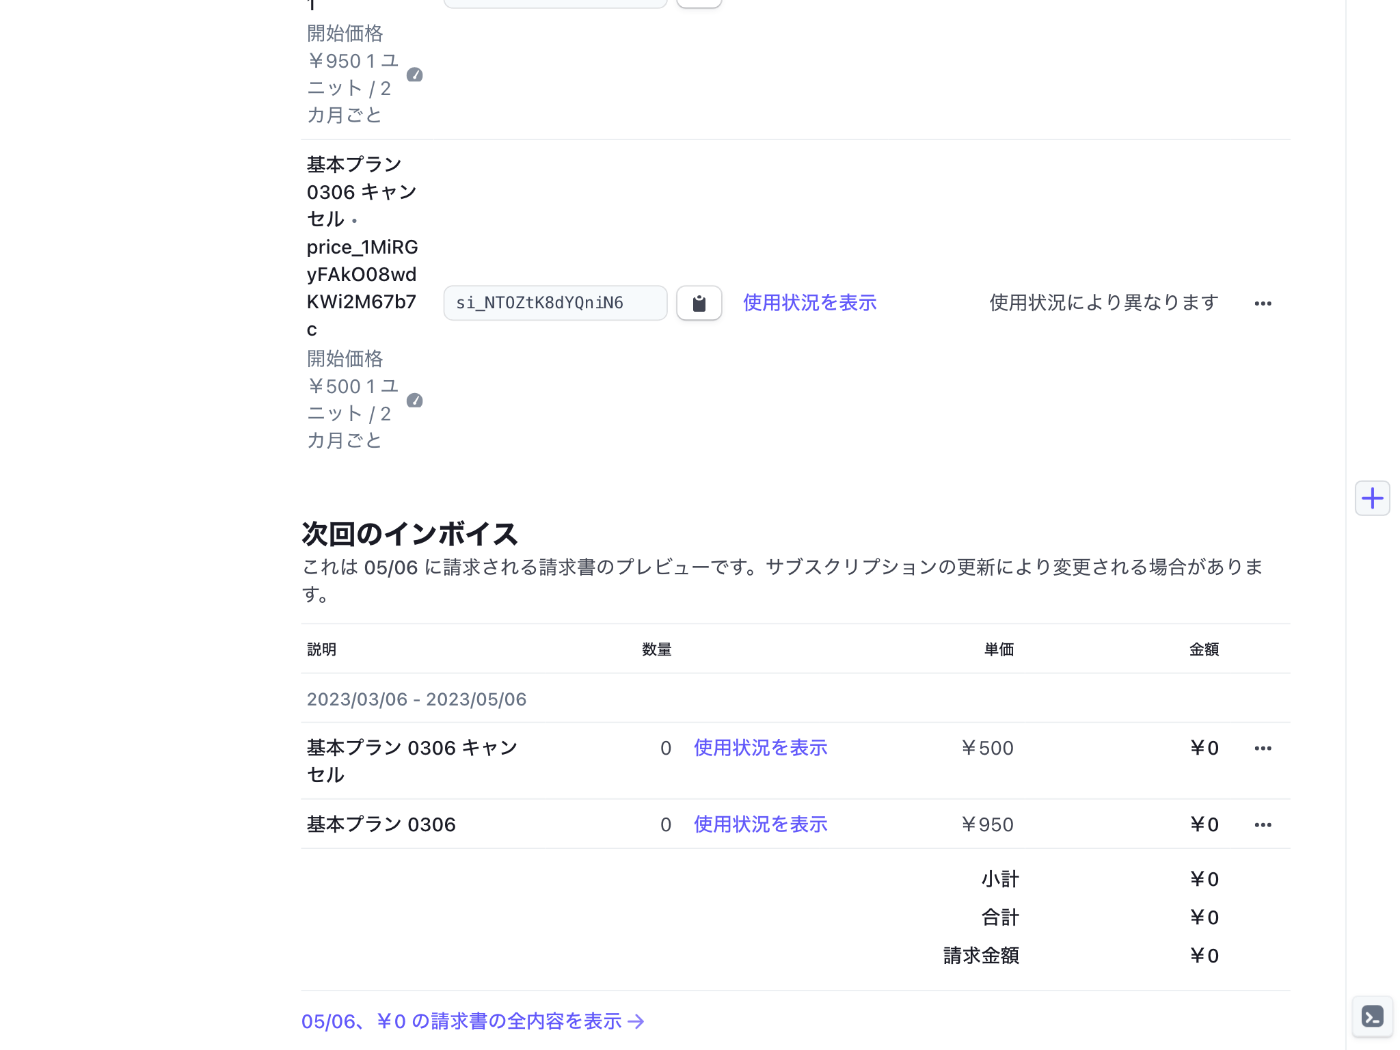
料金体系を設定する時に計測された使用量に基づく請求を「期間中の最新の使用量の値」することで請求金額を上書きできることがわかった。
Jest のセットアップ
次は使用量報告を API を使って試してみようと思うがその前に Jest のセットアップ。
Jest 公式ドキュメントに従ってセットアップを進める。
npm install --save-dev jest @types/jest ts-jest
npx ts-jest config:init # jest.config.js を生成します。
mkdir tests
touch tests/usage-report.test.ts
package.json に test スクリプトを追加する。
{
  "scripts": {
    "test": "jest"
  }
}
空のテストコードを作成する。
test("Stripe API を使用して使用量を報告します。", () => {});
エディタの警告を消すために tsconfig.json の isolatedModules を false に設定する。
{
  "compilerOptions": {
    "isolatedModules": false
  }
}
テストを実行するには npm test コマンドを使用する。
 PASS  tests/usage-report.test.ts
  ✓ Stripe API を使用して使用量を報告します。

Test Suites: 1 passed, 1 total
Tests:       1 passed, 1 total
Snapshots:   0 total
Time:        0.251 s, estimated 1 s
Ran all test suites.
API を使用した使用量報告
import Stripe from "stripe";

test("Stripe API を使用して使用量を報告します。", async () => {
  const stripe = new Stripe(process.env.STRIPE_SECRET_KEY!, {
    apiVersion: "2022-11-15",
  });

  const subscriptionItemId = process.env.STRIPE_SUBSCRIPTION_ITEM_ID!;
  const response = await stripe.subscriptionItems.createUsageRecord(
    subscriptionItemId,
    {
      quantity: 1,
      action: "set",
      timestamp: "now",
    }
  );

  console.log(JSON.stringify(response, null, 2));
});
ダッシュボードでサブスクリプションアイテムを調べてコピー&ペーストします。
STRIPE_SUBSCRIPTION_ITEM_ID="si_1234"
.env.local を読み込むために dotenv をインストールします。
npm install --save-dev dotenv
テスト実行は少しコマンドが長いです。
DOTENV_CONFIG_PATH=.env.local npm test -- --setupFiles dotenv/config
  console.log
    {
      "id": "mbur_1MiSarFAkO08wdKWkUoLDDtp",
      "object": "usage_record",
      "livemode": false,
      "quantity": 1,
      "subscription_item": "si_NTOZU10GrMrPuF",
      "timestamp": 1678065121
    }

      at tests/usage-report.test.ts:18:11

 PASS  tests/usage-report.test.ts
  ✓ Stripe API を使用して使用量を報告します。 (486 ms)

Test Suites: 1 passed, 1 total
Tests:       1 passed, 1 total
Snapshots:   0 total
Time:        2.351 s, estimated 4 s
Ran all test suites.
使用量報告の動作確認
ダッシュボードからサブスクリプション詳細ページを表示してインボイスの金額を確認する。
ついでに使用量も確認してみる。

ばっちりですね。
次回
ほぼ確認したいことは終わったが決済完了時に Webhook かリダイレクトを使って顧客 ID やサブスクリプションアイテム ID を取得する方法など細かい部分については未検証なので確認していきたいと思う。
今更だけど
検証のために Next.js を使っていたがボタンを表示しているくらいなので Jest があれば必要なかったかも知れない。
まあ Webhook 検証にはサーバーだったので結果的には必要だったがそれなら NestJS で良かったのではないかという感じもする。
顧客 ID の取得
顧客 ID は決済成功時のリダイレクト先 URL にセッションの ID を仕込むことで実現できる。
まずは関連ドキュメントを探すところから始めよう。
CHECKOUT_SESSION_ID
Stripe Billing の server.js のソースコードでは CHECKOUT_SESSION_ID を使って決済成功時のリダイレクト先 URL にセッション ID を仕込んでいる
  const session = await stripe.checkout.sessions.create({
    billing_address_collection: 'auto',
    line_items: [
      {
        price: prices.data[0].id,
        // For metered billing, do not pass quantity
        quantity: 1,

      },
    ],
    mode: 'subscription',
    success_url: `${YOUR_DOMAIN}/?success=true&session_id={CHECKOUT_SESSION_ID}`,
    cancel_url: `${YOUR_DOMAIN}?canceled=true`,
  });
セッション ID を使うことで顧客 ID を取得できる。
app.post('/create-portal-session', async (req, res) => {
  // For demonstration purposes, we're using the Checkout session to retrieve the customer ID.
  // Typically this is stored alongside the authenticated user in your database.
  const { session_id } = req.body;
  const checkoutSession = await stripe.checkout.sessions.retrieve(session_id);

  // This is the url to which the customer will be redirected when they are done
  // managing their billing with the portal.
  const returnUrl = YOUR_DOMAIN;

  const portalSession = await stripe.billingPortal.sessions.create({
    customer: checkoutSession.customer,
    return_url: returnUrl,
  });

  res.redirect(303, portalSession.url);
});
この CHECKOUT_SESSION_ID について詳しく調べてみよう。
関連ドキュメント
ワークスペースの準備
npx create-next-app --typescript --eslint --src-dir --import-alias "@/*" --use-npm hello-stripe-0307
cd hello-stripe-0307
npm install --save stripe
touch src/pages/api/create-checkout-session.ts .env.local
npm run dev
コーディング
import { GetServerSideProps } from "next";
import Stripe from "stripe";

type Data = {
  customer: string | null;
};

export default function Home({ customer }: Data) {
  return (
    <>
      <h1>Hello Stripe 0307</h1>
      <form action="/api/create-checkout-session" method="POST">
        <button type="submit">Checkout</button>
      </form>
      {customer && (
        <dl>
          <dt>Customer ID</dt>
          <dd>{customer}</dd>
        </dl>
      )}
    </>
  );
}

export const getServerSideProps: GetServerSideProps<Data> = async (context) => {
  const stripe = new Stripe(process.env.STRIPE_SECRET_KEY!, {
    apiVersion: "2022-11-15",
  });

  const sessionId = context.query.session_id;
  let customer: string | null = null;

  if (sessionId && typeof sessionId === "string") {
    const checkoutSession = await stripe.checkout.sessions.retrieve(sessionId);
    if (typeof checkoutSession.customer === "string") {
      customer = checkoutSession.customer;
    }
  }

  return {
    props: {
      customer,
    },
  };
};
import type { NextApiRequest, NextApiResponse } from "next";
import { Stripe } from "stripe";

export default async function handler(
  req: NextApiRequest,
  res: NextApiResponse
) {
  const stripe = new Stripe(process.env.STRIPE_SECRET_KEY!, {
    apiVersion: "2022-11-15",
  });

  const checkoutSession = await stripe.checkout.sessions.create({
    mode: "payment",
    line_items: [
      {
        price: process.env.STRIPE_PRICE_ID!,
        quantity: 1,
      },
    ],
    success_url: process.env.BASE_URL + "/?session_id={CHECKOUT_SESSION_ID}",
    // 常に顧客情報を作成するように指定しています。
    // 顧客情報が作成されなかった場合は index.tsx で顧客 ID が表示されません。
    customer_creation: "always",
  });

  res.redirect(303, checkoutSession.url!);
}
BASE_URL="http://localhost:3000"
STRIPE_SECRET_KEY="sk_test_12345678"
STRIPE_PRICE_ID="price_1234"
実行結果
ブラウザで http://localhost:3000 にアクセスして Checkout ボタンを押す。

Stripe 決済ページで決済を実行する。
リダイレクト後に顧客 ID が表示されることを確認する。

EC サイトへの組み込み
チェックアウトセッション作成時、ユーザーに顧客 ID が未設定であれば customer_creation を "always" に設定して顧客 ID が作成されるようにする。
決済完了リダイレクト後にチェックアウトセッション ID から顧客 ID を取得してユーザーに紐付ける。
一方、顧客 ID が設定済みであれば customer を指定してチェックアウトセッションを作成する。
ユーザーと顧客 IDの関係は原理的には 1:1 で良いが、複数の顧客が作成されてしまった場合を想定して方が良さそう。
その場合はユーザー : 顧客 ID = 1 : Nになる。
ダメ元で PaymentIntents を試してみる
checkoutSession に含まれる PaymentIntentId を使えば顧客 ID を取得できるのではないかと思ったがダメだった。
import type { NextApiRequest, NextApiResponse } from "next";
import { Stripe } from "stripe";

export default async function handler(
  req: NextApiRequest,
  res: NextApiResponse
) {
  const stripe = new Stripe(process.env.STRIPE_SECRET_KEY!, {
    apiVersion: "2022-11-15",
  });

  const checkoutSession = await stripe.checkout.sessions.create({
    mode: "payment",
    line_items: [
      {
        price: process.env.STRIPE_PRICE_ID!,
        quantity: 1,
      },
    ],
    success_url: process.env.BASE_URL + "/?session_id={CHECKOUT_SESSION_ID}",
    // customer_creation: "always",
  });

  res.redirect(303, checkoutSession.url!);
}
import { GetServerSideProps } from "next";
import Stripe from "stripe";

type Data = {
  customer: string | null;
};

export default function Home({ customer }: Data) {
  return (
    <>
      <h1>Hello Stripe 0307</h1>
      <form action="/api/create-checkout-session" method="POST">
        <button type="submit">Checkout</button>
      </form>
      {customer && (
        <dl>
          <dt>Customer ID</dt>
          <dd>{customer}</dd>
        </dl>
      )}
    </>
  );
}

export const getServerSideProps: GetServerSideProps<Data> = async (context) => {
  const stripe = new Stripe(process.env.STRIPE_SECRET_KEY!, {
    apiVersion: "2022-11-15",
  });

  const sessionId = context.query.session_id;
  let customer: string | null = null;

  if (sessionId && typeof sessionId === "string") {
    const checkoutSession = await stripe.checkout.sessions.retrieve(sessionId);
    const paymentIntentId = checkoutSession.payment_intent;

    if (paymentIntentId && typeof paymentIntentId === "string") {
      const paymentIntent = await stripe.paymentIntents.retrieve(
        paymentIntentId,
        {
          expand: ["customer"],
        }
      );

      console.log(paymentIntent.customer); // null が表示されます。
    }
  }

  return {
    props: {
      customer,
    },
  };
};
expand に関するドキュメント
API ドキュメントに expand に関する項目が無いと思っていたらガイドの方にあった。
expand 可能なレスポンスは expandable と API ドキュメントに表示されている。
もしかしてゲスト顧客のせいで顧客 ID が取得できない?
すっきりした。
解決策は customer_creation を "always" に設定することで大丈夫そうだ。
ちなみにサブスクリプションの場合は常に顧客が作成されるそうです。
setup モード
そういえば一回も使っていない setup モードとは何だろうと思って調べたら事前にカード情報を登録できる機能のようだ。
使い方は下記の通り。
import type { NextApiRequest, NextApiResponse } from "next";
import { Stripe } from "stripe";

export default async function handler(
  req: NextApiRequest,
  res: NextApiResponse
) {
  const stripe = new Stripe(process.env.STRIPE_SECRET_KEY!, {
    apiVersion: "2022-11-15",
  });

  const checkoutSession = await stripe.checkout.sessions.create({
    mode: "setup",
    payment_method_types: ["card"],
    success_url: process.env.BASE_URL + "/?session_id={CHECKOUT_SESSION_ID}",
  });

  res.redirect(303, checkoutSession.url!);
}
下記のようなページが表示される。

残りはサブスクリプション項目の取得
顧客 ID の取得はゲスト顧客の機能のおかげで想定外に苦戦したがサブスクリプション項目の取得はすぐに終わると信じたい。
Stripe Billing を使わなくても継続請求できる?
できそう。
サブスク請求には Stripe Billing を使わなければならないという固定観念があったが、オフセッション支払いという機能を使えば好きな時に請求できるらしい(それも怖いが。。。)
気になる、早く検証したい、明日やろう。
今日で最後の検証にしたい
検証したい内容は下記。
- API を使用した顧客情報の作成
- オフセッション支払い
タイムリミットは 2 時間くらい。
すごくどうでも良いけど
オフセッションがお布施っしょんに変換されて地味に面白い。
ワークスペースの作成
npx create-next-app --typescript --eslint --src-dir --import-alias "@/*" --use-npm hello-stripe-0308
cd hello-stripe-0308
npm install --save stripe
touch src/pages/api/create-customer.ts src/pages/api/create-checkout-session.ts src/pages/api/create-payment-intent.ts .env.local
npm run dev
本番環境の申請をやってみたい
特に EC サイトとか無いけどできるのかな?
API を使用した顧客情報の作成
export default function Home() {
  return (
    <>
      <h1>Hello Stripe 0308</h1>
      <form action="/api/create-customer" method="POST">
        <button type="submit">Create Customer</button>
      </form>
    </>
  );
}
import type { NextApiRequest, NextApiResponse } from "next";
import { Stripe } from "stripe";

export default async function handler(
  req: NextApiRequest,
  res: NextApiResponse
) {
  const stripe = new Stripe(process.env.STRIPE_SECRET_KEY!, {
    apiVersion: "2022-11-15",
  });

  const createCustomerResponse = await stripe.customers.create();

  console.log(JSON.stringify(createCustomerResponse, null, 2));

  res.status(200).send("OK");
}
STRIPE_SECRET_KEY="sk_test_12345678"
http://localhost:3000/ にアクセスして Create Customer ボタンを押すと OK ページが表示される。
ダッシュボードの顧客ページで確認すると確かに作成されている。

ユーザー登録完了時に顧客データを作成しておいても良いかも知れない。
顧客一覧ページでわかりやすいように名前とメールアドレスくらいは登録した方が良さそう。
後の手順のために顧客 ID を .env.local にコピー&ペーストしておく。
STRIPE_CUSTOMER_ID="cus_NU8LauqJsLCoDl"
オフセッション支払方法の登録
Create Checkout Session ボタンを追加する。
export default function Home() {
  return (
    <>
      <h1>Hello Stripe 0308</h1>
      <form action="/api/create-customer" method="POST">
        <button type="submit">Create Customer</button>
      </form>
      <form action="/api/create-checkout-session" method="POST">
        <button type="submit">Create Checkout Session</button>
      </form>
    </>
  );
}
チェックアウトセッション作成時に payment_method_options.card.setup_future_usage オプションを使用してオフセッション支払が可能なように設定する。
import type { NextApiRequest, NextApiResponse } from "next";
import { Stripe } from "stripe";

export default async function handler(
  req: NextApiRequest,
  res: NextApiResponse
) {
  const stripe = new Stripe(process.env.STRIPE_SECRET_KEY!, {
    apiVersion: "2022-11-15",
  });

  const checkoutSession = await stripe.checkout.sessions.create({
    mode: "payment",
    customer: process.env.STRIPE_CUSTOMER_ID!,
    line_items: [{ price: process.env.STRIPE_PRICE_ID!, quantity: 1 }],
    success_url: process.env.BASE_URL + "/",
    payment_method_options: {
      card: {
        setup_future_usage: "off_session",
      },
    },
  });

  if (!checkoutSession.url) {
    throw new Error("Failed to create checkout session");
  }

  res.redirect(checkoutSession.url);
}
.env.local に必要な環境変数を追加する。
BASE_URL="http://localhost:3000"
STRIPE_SECRET_KEY="sk_test_12345678"
STRIPE_CUSTOMER_ID="cus_1234"
STRIPE_PRICE_ID="price_123456"
http://localhost:3000/ にアクセスして Create Checkout Session ボタンを押すと OK ページが表示される。
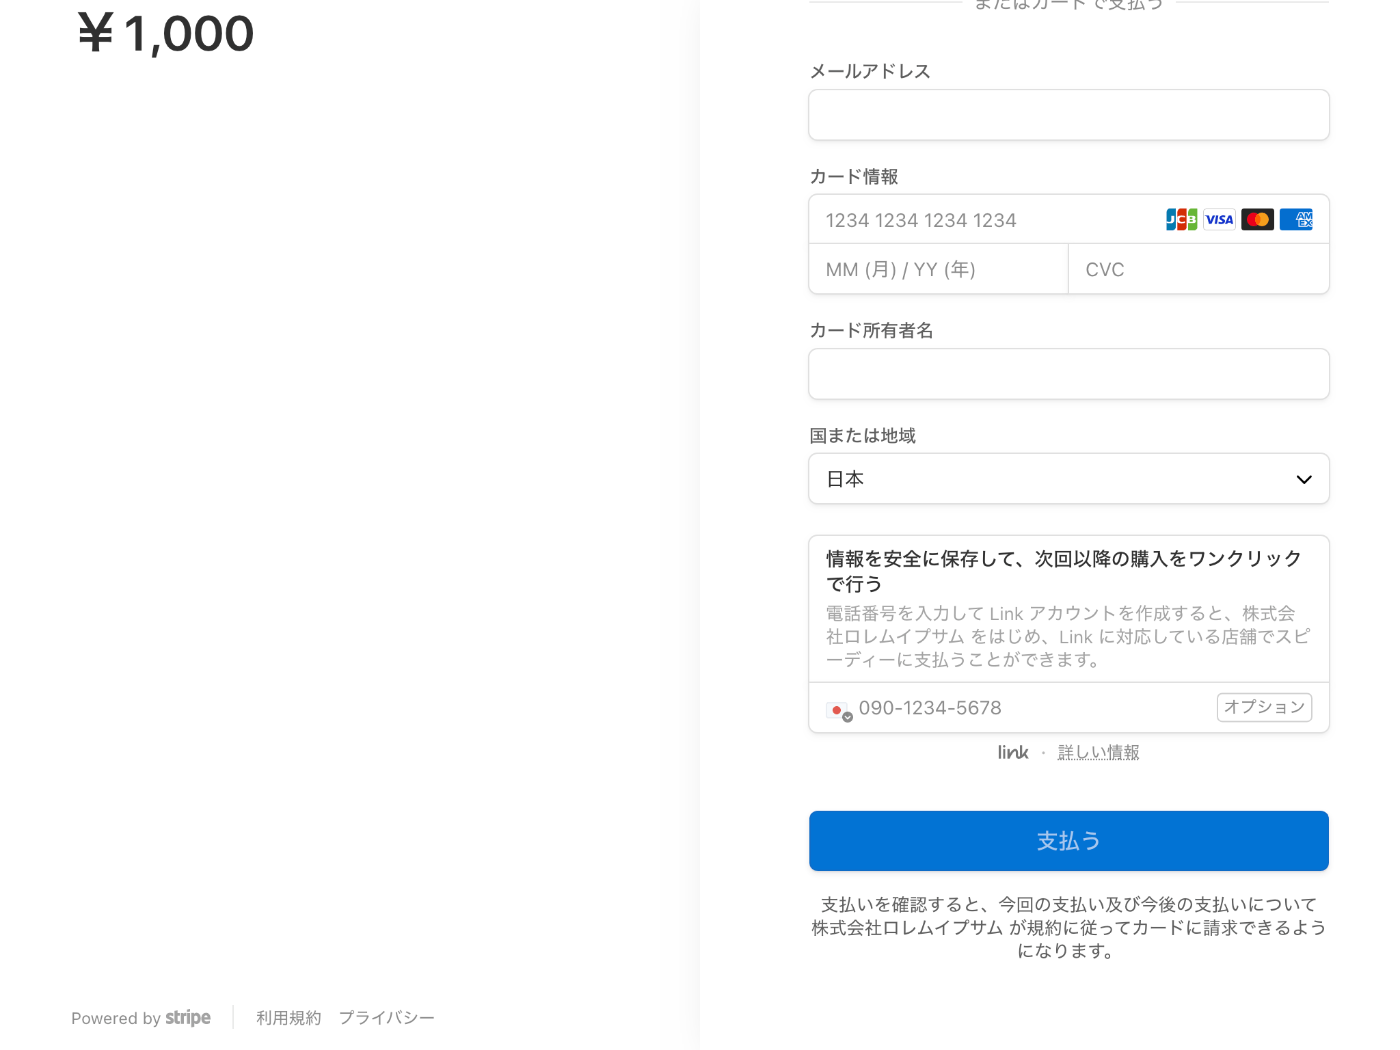
支払うボタンの下に下記のテキストが表示されている。
支払いを確認すると、今回の支払い及び今後の支払いについて 株式会社ロレムイプサム が規約に従ってカードに請求できるようになります。
Google Pay やテストカード番号(4242...)を使って決済すると顧客詳細ページで確認できるようになる。

残念ながらオフセッション支払に対応しているかどうかはダッシュボードでは確認できないみたいだ。
確認するには顧客詳細ページのアクション > 支払いを作成できるかどうかが一つの方法として考えられそう。
テストに関するドキュメント
実運用する前に熟読した方が良さそう。
オフセッションに関するドキュメント
オフセッション支払の実行
ドキュメントが見つからないので支払いモーダルを見ながら試行錯誤でやってみた。

Create Payment Intent ボタンを追加する。
export default function Home() {
  return (
    <>
      <h1>Hello Stripe 0308</h1>
      <form action="/api/create-customer" method="POST">
        <button type="submit">Create Customer</button>
      </form>
      <form action="/api/create-checkout-session" method="POST">
        <button type="submit">Create Checkout Session</button>
      </form>
      <form action="/api/create-payment-intent" method="POST">
        <button type="submit">Create Payment Intent</button>
      </form>
    </>
  );
}
import type { NextApiRequest, NextApiResponse } from "next";
import { Stripe } from "stripe";

export default async function handler(
  req: NextApiRequest,
  res: NextApiResponse
) {
  const stripe = new Stripe(process.env.STRIPE_SECRET_KEY!, {
    apiVersion: "2022-11-15",
  });

  const paymentIntent = await stripe.paymentIntents.create({
    // 金額
    amount: 100,
    // 通貨
    currency: "jpy",
    // 顧客
    customer: process.env.STRIPE_CUSTOMER_ID!,
    // 支払い方法
    payment_method: process.env.STRIPE_PAYMENT_METHOD!,
    // 明細書表記
    statement_descriptor: "Lorem Ipsum / ロレムイプサム",
    // 説明
    description: "ここに説明が入ります。",
    // 請求をすぐに実行するかどうか
    confirm: true,
  });

  console.log(JSON.stringify(paymentIntent, null, 2));

  res.status(200).send("OK");
}
明細書表記に日本語を入れても削除されが方法が無い訳ではないようだ。
最後に支払方法の環境変数を追加する。
STRIPE_PAYMENT_METHOD="pm_1MjAS2FAkO08wdKWHOXN7u0E"
http://localhost:3000/ にアクセスして Create Payment Intent ボタンを押すと OK ページが表示される。
ダッシュボードからオフセッション支払いが完了したことを確認できる。
試しにオンセッションに設定してみる
決済時に setup_future_usage をオンセッションに設定したところ決済ページのテキストが下記のように変わった。
支払いを確定すると、お客様は 株式会社ロレムイプサム が規約に従って今回の支払いをお客様のカードに請求し、支払い情報を保存することを許可したことになります。
支払い情報を保存するだけで支払いはできないはずと期待した所、普通に支払いができて成功してしまった。
それではオンセッションとオフセッションの違いは何なのだろうか?
オンセッションかオフセッションかは setup モードでしか関係ないのかな?
でもそうすると決済ページのテキスト表記と矛盾することになる。
もやもやする。
もやもやがちょっと解決
オンセッション用に設定されたカードをオフセッション支払いに使用することもできますが、銀行がオフセッション支払いを拒否し、顧客に認証を求める確率が高くなります。
オフセッション支払いができることはわかったけど
PaymentIntents API を使うにあたっては入念なテストが必要になりそう。
3D セキュア認証などで失敗するケースなども想定されるので実案件で使う前にはその辺りのリスクを十分に説明し、理解してもらわないと決済ができなくてトラブルになりそうな気配が濃厚。
可能であれば Stripe Billing のような代替案を使えないか検討すべきだと感じた。
おわりに
まだまだ確認したいことが山ほどあるが一通り今回の案件に必要な機能を試すことができたのでクローズする。
決済関連機能は検証すればするほどかえって知らないことばかりであることに気付かされて不安が募る。
今後、余力があれば別のクレジットカード番号での動作も試してみたいが開発開始前に結局余力は残っていないんだろうな。
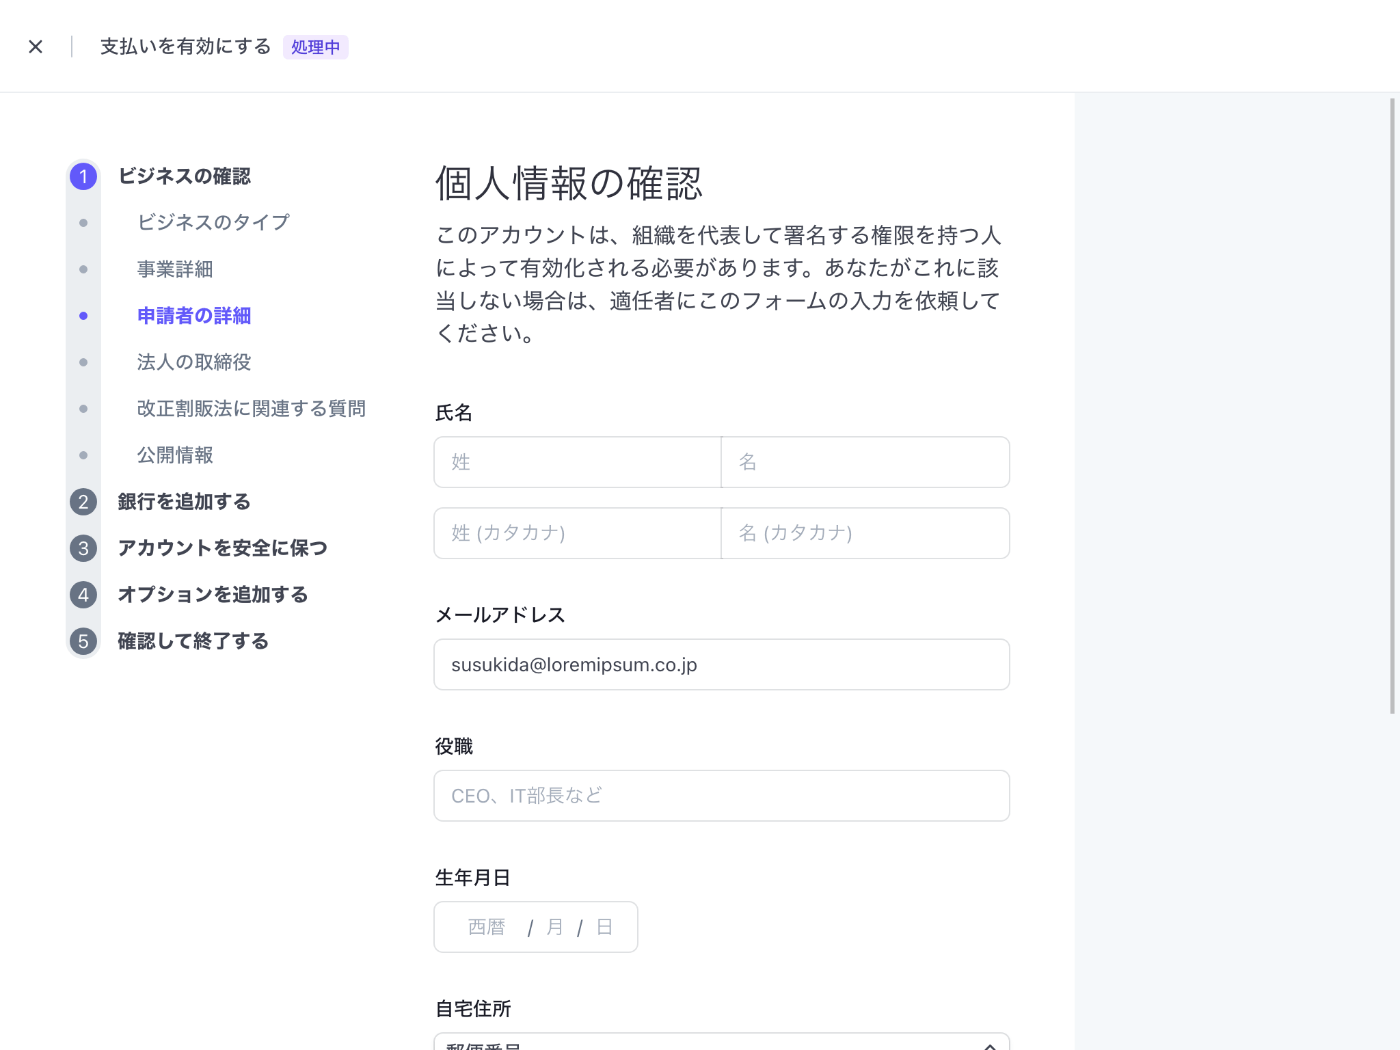
おまけ:本番環境の申請
商品、サービス内容の詳細はちょっと悩んで下記のようにした。
アクセシブルな Web アプリをスクラッチ開発するソフトウェア受託開発サービスです。請求するタイミングは納入したソフトウェアの検収完了後です。クレジットカード決済を希望するお客様に対して決済ページへのリンクを記載したメールを送付します。


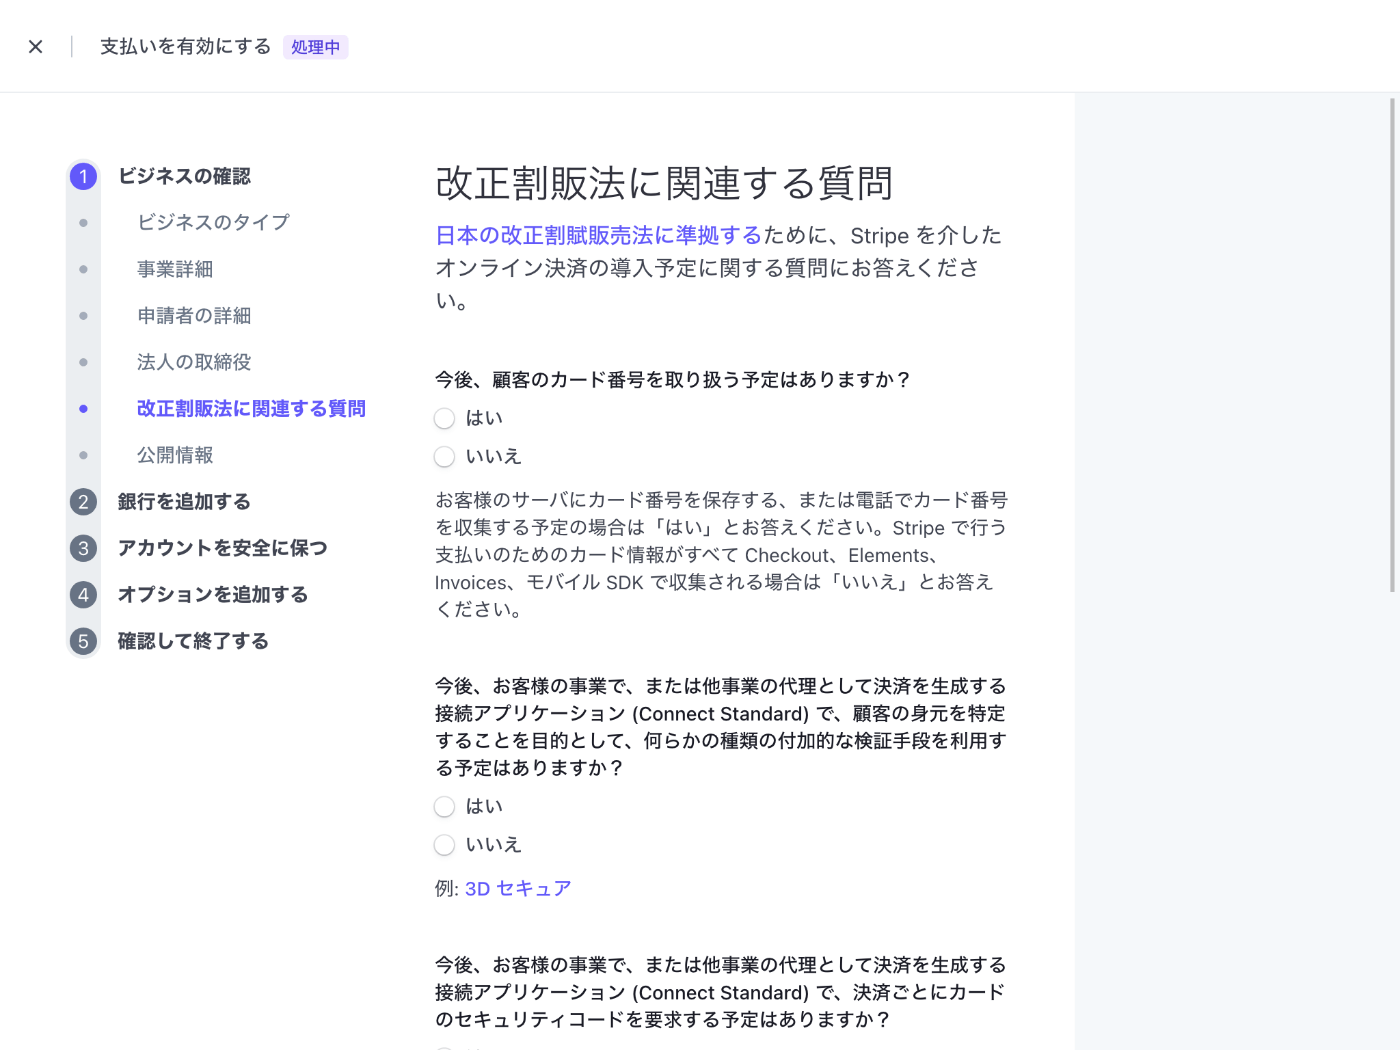
改正割販法に関連する質問はすべて「いいえ」にした。
口座名義人に(カ)はいるのかな?


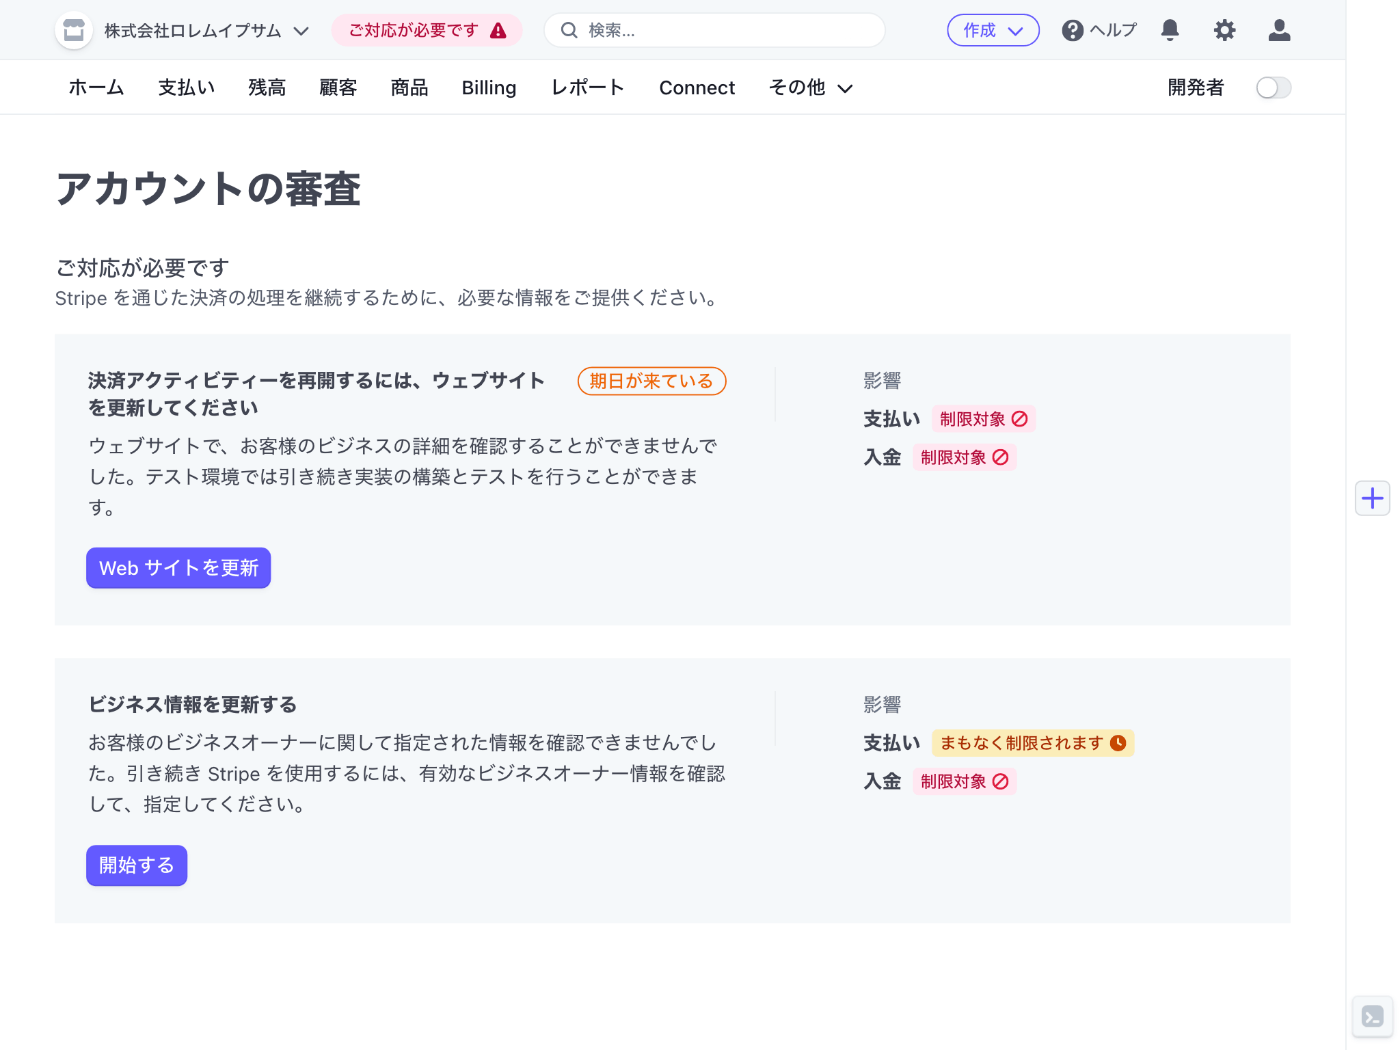
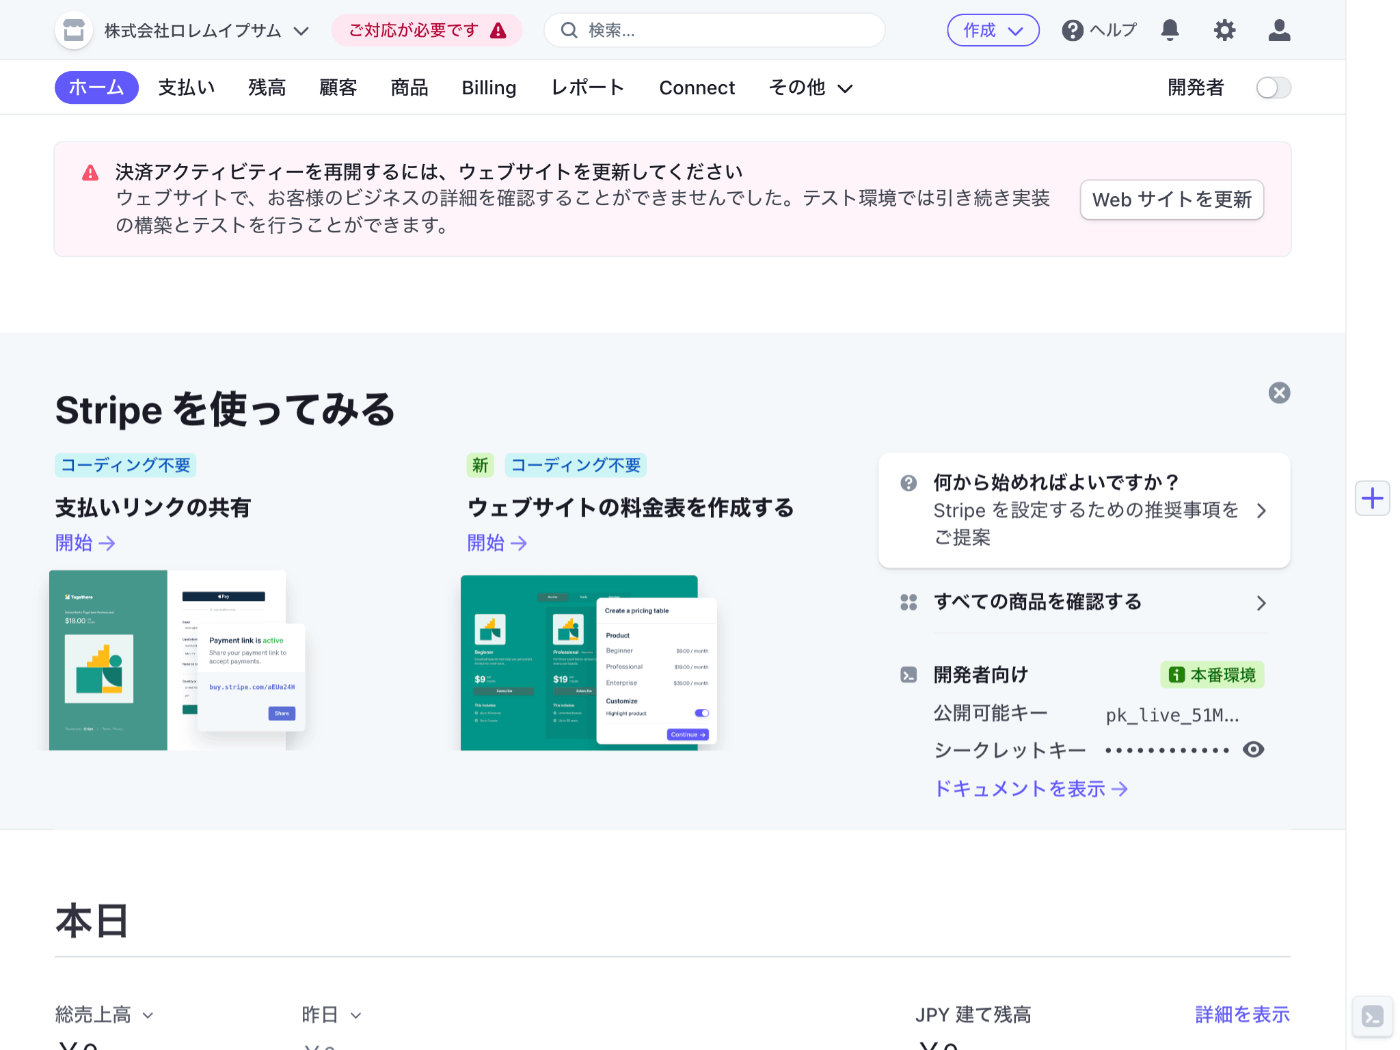
下記の解決はなかなか難しそう。
ウェブサイトで、お客様のビジネスの詳細を確認することができませんでした。テスト環境では引き続き実装の構築とテストを行うことができます。
審査は Web だけで完結するので簡単。
一方でしっかり審査してくれているので安心感がある。
恐ろしい記事
扱う商品によっては NG になるケースがある。
全部完成してからいざ本番運用という段階で発覚したら悲劇だな。
制限される業種
次のスクラップ
次は Headless CMS の Strapi を試してみる。