Vue3
リアクティブとは
変数値の変化によって表示項目が連動すること
ref()とreactive()
import {ref, reactive} from 'vue'

const testRef = ref('textRef')
const testRef = reactive({
  name: name
  id: id
})
『Vue3 フロントエンド開発の教科書』より
ディレクティブ
v-bindのように"v-"から始まる属性
例)
| ディレクティブ | 意味 |
|---|---|
| v-bind | データバインディング |
| v-on | イベント |
| v-model | 双方向データバインディング |
| v-if | 条件分岐 |
| v-show | 表示・非表示 |
| v-for | 繰り返し処理 |
『Vue3 フロントエンド開発の教科書』より
v-on イベント
v-on は @ に置き換えられる
例)よく使いそうなもの
| イベント | 意味 |
|---|---|
| @click | クリックイベント |
| @change | inputなどを入力した時 |
| @scroll | スクロールした時 |
| @mouse~... | マウスイベント系 |
『Vue3 フロントエンド開発の教科書』より
computedの使い方
算出プロパティと呼ばれる、読み取り専用の計算結果をリアクティブにするもの。
<script setup lang="ts">
const 変数名 = computed(
  (): 計算結果の型の種類 => {
    計算の処理
    return 計算結果
  }
)
</script>

<template>
  <p>{{ 変数名 }}</p>
</template>
『Vue3 フロントエンド開発の教科書』より
vuex
サイト・アプリ内での要素(データ)状態管理ができる代物
import type { InjectionKey } from 'vue';
import { createStore, Store, useStore as baseUseStore } from "vuex";

type StateName = {
  user: string
  id: number
}

// stateの型定義
type State = {
 userArr: StateName[];
};

// storeをprovide/injectするためのキー
export const key: InjectionKey<Store<State>> = Symbol();

// store本体
export const store = createStore<State>({
  state: {
    userArr: [
     {
        user: name,
        id: 1,
     }
   ]
 },
  mutations: {
    //stateの値を変える時は必ずmutationsで!!
  },
  actions: {
    //非同期、同期に関わらずに処理をするとき。stateを変更するならmutationsを通して。
  }
  getters: {
    //stateの値を変えたくないときかつ、計算後の値を使いたい時。 computed的な。
    return 計算結果
  }
});

// useStoreを使う時にキーの指定を省略
export const useStore = () => {
  return baseUseStore(key);
}
import { ComponentCustomProperties } from 'vue'
import { Store } from 'vuex'
import { State } from '@/store'

declare module '@vue/runtime-core' {
  // this.$storeの型を宣言
  interface ComponentCustomProperties {
    $store: Store<State>
  }
}
import { createApp } from "vue";
import App from "./App.vue";
import { store, key } from './store/store'

// import './assets/main.css'

createApp(App).use(store, key).mount("#app");
<script setup lang="ts">
import { useStore } from "@/store/store";

const store = useStore();

const usersItem = computed(() => store.state.userArr);
</script>

<template>
  <ul>
    <li>{{ usersItem.name }}</li>
    <li>{{ usersItem.id}}</li>
  </ul>
</template>
引用 : https://zenn.dev/ryo_kawamata/articles/intoroduce-vuex4-with-composition-api
引用 : https://vuex.vuejs.org/ja/guide/typescript-support.html#vue-コンポーネントでの-store-プロパティの型付け
v-for
ループ処理できるディレクティブ
<script setup lang="ts">
// 連想配列のv-for
const arr:{[key:number]: string} =  {
   1235: "a",
   2345: "b",
   3455: "c",
 }

 const arr = new Map<number,string>()
 arr.set(1,"a")

 const refArr = ref(arr)
</script>

<template>
    <ul>
      <li v-for="(ele,id,index) in refArr"
      :key="ele+id"
      >
      {{index+1}}は{{id}} : {{ele}}
     </li>
   </ul>
</template>
:void
戻り値がない関数の時に使う型指定
OK
const functionName = ():  void => {
  console.log("test")
})

functionName()
NG
const functionName = (a, b):  void => {
  return a + b
})

functionName(a,b)
引用 : https://typescriptbook.jp/reference/functions/void-type
watchEffect
引数としてとった関数(コールバック関数)の中のリアクティブなデータを監視し、どれか一つでも変化があれば、即座に実行される。
import {ref,watchEffect} from 'vue'

watchEffect(():void => {
  リアクティブ変数に応じて実行される処理
})
『Vue3 フロントエンド開発の教科書』より
watch
監視対象のリアクティブデータが変化すると、処理が走る。
import {ref,watch} from 'vue'

watch(監視対象のリアクティブなデータ, ():void => {
  リアクティブ変数に応じて実行される処理
})
複数監視も可能↓
import {ref,watch} from 'vue'

watch([data1,data2], ():void => {
  リアクティブ変数に応じて実行される処理
})
しかし下記のように'immediate'を付与すれば初回読み込み時にも処理が走る
import {ref,watch} from 'vue'

watch([data1,data2], ():void => {
  リアクティブ変数に応じて実行される処理
},
  {immediate: true}
)
『Vue3 フロントエンド開発の教科書』より
watchEffectとwatchの違い
常にwatchEffectで良いと思うが、watchは新しいデータ、古いデータを受け取れる
import {ref,watch} from 'vue'

watch(監視対象リアクティブデータ,(newVal:型,oldVal:型):void => {
  リアクティブ変数に応じて実行される処理
})
『Vue3 フロントエンド開発の教科書』より
ライフサイクル
下記のように処理するタイミングが決まっている。
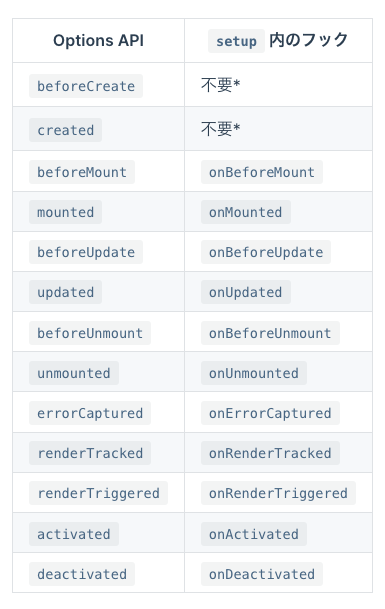
『Vue3 フロントエンド開発の教科書』より
引用 : https://v3.ja.vuejs.org/guide/composition-api-lifecycle-hooks.html
props
親コンポネントから子コンポネントへデータを受け渡せる
<script setup lang="ts">
import { ref, computed } from "vue";

  const point = computed(():number => {
    let total = 0
    return total
  })
</script>

//pointsとして、子コンポネントに渡す。
<Child :points = point />
<script setup lang="ts">
  import { ref } from 'vue';

  //型をinterfaceで指定
  interface props {
    points: number
  }

  const props = defineProps<props>();

  //propsで渡ってきたデータは直接いじれないので、いじれるように再定義
  const localPoint = ref(props.points)

  //ボタンを押したら1ずつ加算
  const pointUp = ():void => {
    localPoint.value++
  }
</script>

<h1 class="green">{{ localPoint }}</h1>
<button type="button" @click="pointUp">ポイント加算</button>
『Vue3 フロントエンド開発の教科書』より
emit
子コンポネントから親コンポネントへデータを受け渡せる
<script setup lang="ts">
import { ref, computed } from "vue";

const number = ref(0)
const onCreateNew = ():void => {
  number.value++
}
</script>

<h1>{{ number }}</h1>
<!--子からもらったeventでonCreateNewが発火している-->
<Child @createnew = "onCreateNew" />
<script setup lang="ts">
  import { ref } from 'vue';


  interface Emits {
    (event: "createnew"): void
  }

  const emit = defineEmits<Emits>();

  const clickNew = ():void => {
    // emitでcreatenewというeventをクリックしたら親へ渡してる
    emit("createnew")
  }
</script>

<button type="button" @click="clickNew">親へ渡す</button>
『Vue3 フロントエンド開発の教科書』より
provide/inject
親コンポネントから子孫コンポネントへデータを受け渡せる
<script setup lang="ts">
import { ref, computed, provide } from "vue";

// string | number型のデータ
provide<string | number>("id", 2)
// number[]型のデータ
provide<number[]>("arr", [])
//第二引数は初期値
</script>
<script setup lang="ts">
  import { ref, computed,inject} from 'vue';

  const data1 = inject<number>("id")
  const data2 = inject<number[]>("arr")
  console.log(data1)
  console.log(data2)
</script>
2
[]
『Vue3 フロントエンド開発の教科書』より
引用 : https://tekrog.com/use-provide-and-inject-with-composition-api-and-typescript/
slot
HTMLを受け渡せる(v-htmlとは違う)
<script setup lang="ts">
import Child from "./components/Child.vue";

const user = ref("name")
</script>

<template>
  <Child :user="user">
     <p>お名前</p>
  </Child>
</template>
<script setup lang="ts">
  interface props {
    user: string,
  }
  defineProps<props>();
</script>

<template>
  <slot/>
  <h1>{{ user }}</h1>
</template>
  お名前
  name
『Vue3 フロントエンド開発の教科書』より
引用 : https://tekrog.com/use-provide-and-inject-with-composition-api-and-typescript/
slotProps
子コンポネントから親コンポネントへデータを渡せる
<script setup lang="ts">
import Child from "./components/Child.vue";
</script>

<template>
    <template v-slot:default ="slotProps">
      <dl>
        <dt>名前</dt>
        <dd>{{slotProps.memberInfo.name}}</dd>
      </dl>
    </template>
</template>
<script setup lang="ts">
  import { reactive } from 'vue';
  const memberInfo = reactive({
    name: "tatatsuru"
  })
</script>

<template>
    <slot :memberInfo="memberInfo">
      <h1>{{ memberInfo.name }}</h1>
    </slot>
</template>
  名前
    tatatsuru
『Vue3 フロントエンド開発の教科書』より
Dynamic Components と KeepAlive
動的にコンポネントを表示したり、状態を維持したりできる仕組み
<script setup lang="ts">
  const currentComp = ref(Input)
  const currentCompName = ref("Input")

  const compList = [Input,Radio,Select]
  const compListName: string[] = ["Input","Radio","Select"]

  let currentCompIndex = 0

  const swirchComp = (): void => {
    currentCompIndex++
    if(currentCompIndex >= 3){
      currentCompIndex = 0
    }
  currentComp.value = compList[currentCompIndex]
  currentCompName.value = compListName[currentCompIndex]
}
</script>

<template>
  <p>{{currentCompName}}</p>
  <KeepAlive>
    <component :is="currentComp" />
  </KeepAlive>
  <button @click="swirchComp">切り替え</button>
</template>
<script setup lang="ts">
  import { ref,reactive } from 'vue';
  const inputNameModel = ref('tatatsuru')
</script>

<template>

  <input type="text" v-model="inputNameModel">
  <p>{{inputNameModel}}</p>

</template>
<script setup lang="ts">
  import { ref,reactive } from 'vue';
  const memberType = ref(1)
</script>

<template>
  <label>
    <input type="radio" name="memberType" value="1" v-model="memberType">
    通常会員
  </label>
  <label>
    <input type="radio" name="memberType" value="2" v-model="memberType">
    特別会員
  </label>
  <label>
    <input type="radio" name="memberType" value="3" v-model="memberType">
    優良会員
  </label>
  <br/>
  <p>選択されたラジオボタン : {{ memberType }}</p>
</template>
<script setup lang="ts">
  import { ref,reactive } from 'vue';
  const memberSelect = ref(1)
</script>

<template>
  <select name="memberSelect" v-model="memberSelect">
    <option value="1">普通会員</option>
    <option value="2">特別会員</option>
    <option value="3">優良会員</option>
  </select>
  <p>選択されたセレクトボタン : {{ memberSelect }}</p>
</template>
『Vue3 フロントエンド開発の教科書』より
Router と Dynamic Router
ページ遷移の仕組み。または必要になった際にコンポネントを読み込む仕組み。
<script setup lang="ts">
import { RouterLink } from 'vue-router';
</script>

<template>
  <h1>TOP</h1>
  <section>
    <RouterLink :to="{name: 'about'}">
      <p>会員管理はこちら</p>
    </RouterLink>
  </section>
</template>
<script setup lang="ts">
import { RouterLink } from 'vue-router';
import { inject } from 'vue';
import type { Member } from 'interfaces';
const memberList = inject('memberList') as Map<number, Member>
</script>

<template>
  <h1>ABOUT</h1>
  <section>
    <ul>
      <li
        v-for="[id,member] in memberList"
        :key="member.id"
      >
        <RouterLink
          :to="{name:'MemberDetail', params: {id: id}}"
        >
         IDが{{ id }}の{{member.name}}さん
        </RouterLink>
      </li>
    </ul>
  </section>
</template>
<script setup lang="ts">
import { RouterLink } from 'vue-router';
import { inject } from 'vue';
import type { Member } from 'interfaces';


const memberList = inject('memberList') as Map<number, Member>
</script>

<template>
  <h1>Detail</h1>
  <section>
    <h2>会員情報</h2>
  </section>
</template>
import { createRouter, createWebHistory } from 'vue-router'
import HomeView from '../views/HomeView.vue'

const router = createRouter({
  history: createWebHistory(import.meta.env.BASE_URL),
  routes: [
    {
      path: '/',
      name: 'home',
      component: HomeView
    },
    {
      path: '/about',
      name: 'about',
      // route level code-splitting
      // this generates a separate chunk (About.[hash].js) for this route
      // which is lazy-loaded when the route is visited.
      component: () => import('../views/AboutView.vue')
    },
    {
      //パラメータルートの指定も可能
      path: '/detail/:id',
      name: 'MemberDetail',
      component: () => import('../views/MemberDetail.vue')
    },
  ]
})

export default router
『Vue3 フロントエンド開発の教科書』より
useRouter と router.push
遷移先のURLにオブジェクトなどを渡せる
<script setup lang="ts">
import { RouterLink, useRouter } from 'vue-router'

const member = computed((): Member => {
  return memberList.get(props.id) as Member
})

const router = useRouter()

const routerPush = () => {
  //ここで
  //router.push({ path: 'home' })などもできる
  router.push('/')
}

</script>

<template>
   <button type="button" @click="routerPush">TOPへ戻る</button>
</template>
</script>
『Vue3 フロントエンド開発の教科書』より
pinia
Storeでの状態管理に使うライブラリ
import { ref, computed } from 'vue'
import { defineStore } from 'pinia'

interface State {
  counter: number
}

export const useCounterStore = defineStore({
  id: 'counter',
  state: (): State => {
    return {
      counter: 0
    }
  },
  getters: {
    doubleCount: (state): number => {
      return state.counter * 2
    }
  },
  actions: {
    incrementCount(): void {
      this.counter++
    }
  }
})
<script setup lang="ts">
import { computed } from 'vue';
import { useCounterStore } from '@/stores/counter';

const counterStore = useCounterStore()

const count = computed(
  (): number => {
    return counterStore.counter
  }
)

const doubleCount = computed(
  (): number => {
    return counterStore.doubleCount
  }
)

const onIncrementClick = (): void => {
  counterStore.incrementCount()
}


</script>

//tailwind使用
<template>
  <h1 class="text-6xl text-center pt-10 text-ejcorp">Counter Component</h1>

  <div class="">
    <p class="text-8xl text-center">{{count}}</p>
    <p class="text-8xl text-center">{{doubleCount}}</p>
  </div>

  <button
    class="bg-indigo-700 font-semibold text-white py-2 px-4 rounded hover:bg-sky-400 mx-auto my-0 block"
    @click="onIncrementClick"
  >
    ボタン
  </button>

</template>
『Vue3 フロントエンド開発の教科書』より
tailwind(https://tailwindcss.com/)
環境構築
pnpm init vite@latest
TSお勉強
勉強になります。ありがとうございます。
Debounce
composition APIの利点
ロジックの抽出と再利用
複雑に肥大化したコンポーネントを小分けにして関心事で分別し、クリーンな状態に整理
<script setup>
import { useMouse } from './mouse.ts'

const { x, y } = useMouse()
</script>
..................
このように、外部からimportして定義したロジックなどを使用できるため、プロジェクトが大きくなったときにメリットがある。
可読性
関数に使用している定数、変数などを関数の近くにおけるようになって、コードの可動性向上が考えられる。option APIではさまざまな異なるオプション(computed,watchなど)で仕切られていたため、上下にスクロールを余儀なくされていた感がある。
しかし、自由度が高いのでベストプラクティスに則ったコーディングの技術を求められることもある。
TypeScriptとの相性
option APIは型推論が複雑になってしまうほか、TSの使用を考えて作られたものではない。
Thisを使用しなくていい
個人的にはこれが一番。
(refとかではvalueが必要だけど。笑)
React Hooksとcomposition APIの比較
React Hooksは、コンポーネントが更新されるたびに繰り返し呼び出す
Reactにおける状態はイミュータブル(読み取り専用)で、値を直接更新することはできません。setStateによって値が更新されると、コンポーネントは再レンダリングされ、メモ化していない限りは全く新しいオブジェクトに変換されます。
vueではrefの挙動を見ると直接valueでアクセスして変えている!
副作用
- 引数以外の要因で結果が変わってしまう関数
- 関数の外に影響を与えてしまう関数
これの実行の仕方
- react ⇨ useEffect
- vue ⇨ watch
useEffectはコンポネント描画時に実行
watchは遅延実行であり、第一引数に設定された変数に変化があるまで実行しない。
useEffectと同じ挙動にするためにはwatchEffectを使用する。
副作用のクリーンアップ
クリーンアップ関数は副作用フックが返す関数です。
副作用フックが呼び出されたあと、DOMがアンマウントされた時に呼び出されるもの。
404とかのエラーハンドリング
<div
  v-for="(item, index) in data.res"
  :key="index"
>
  <image
    :src="item.imageSrc"
    @error="handleImageError(item.imageSrc)"
  >
</div>
このようにimageがundifinedとかになるものについてerrorハンドリングする際に使える。
再帰的なコンポーネント
コンポーネント自体をその中で再度呼び出すことができる機能を指します
SFC はそのファイル名を介して、暗黙的に自身を参照できます。例えば、FooBar.vue というファイル名は、そのテンプレート内で <FooBar/> として自身を参照できます。
これはインポートされたコンポーネントよりも優先度が低いことに注意してください。コンポーネントの推論された名前と競合する名前付きインポートがある場合、インポートでエイリアスを作成できます:
@click.stop
修飾子としてイベントを伝播させないようにする
supabase ログイン with Google
veeValidate
useField
useField = ref + バリデーション機能