Open vSwitchでSTP
はじめに
STP(Spanning Tree Protocol)ネットワークを1台のPCの中で作って遊びます。
Linuxでは仮想スイッチングハブの実装として大きく分けて2つあります。
- Linux Bridge
- 昔からある実装
- 特に何しなくても使える
- STPは使えるけどRSTP(Rapid Spanning Tree Protocol)は使えない
- Open vSwitch
- ここ10年くらい?で新しくできた実装
- Open vSwitchのインストール作業が必要(aptで入る)
- RSTPやLACP(Link Aggregation Control Protocol)のような「スイッチングハブらしい」機能が使える
Linux Bridgeを使うのは以下の記事で書きました。
パケットキャプチャでSTPを学ぶ(1) 環境構築
パケットキャプチャでSTPを学ぶ(2) 起動時のキャプチャ
パケットキャプチャでSTPを学ぶ(3) Root Bridge選出
パケットキャプチャでSTPを学ぶ(4) ポートの役割
パケットキャプチャでSTPを学ぶ(5) Bridge Priorityの変更
パケットキャプチャでSTPを学ぶ(6) Port Costの変更
パケットキャプチャでSTPを学ぶ(7) Bridge Priority変更でRoot Port選定
パケットキャプチャでSTPを学ぶ(8) Port Priority変更でRoot Port選定
ここではOpen vSwitchでSTP環境を作ります。
インストール
WSL2
WSL用Linuxカーネルの再構築が必要です。
以下にインストール手順、ovsを使うために必要なsystemd PID namespaceに入る手順を書いています。
WSL2にOpen vSwitchをインストール(カーネル再構築)
WSL2とsystemdとnslogin
普通のUbuntu22.04
以下のコマンドを打つだけです。
apt update
apt install -y openvswitch-switch
仮想ネットワーク構築
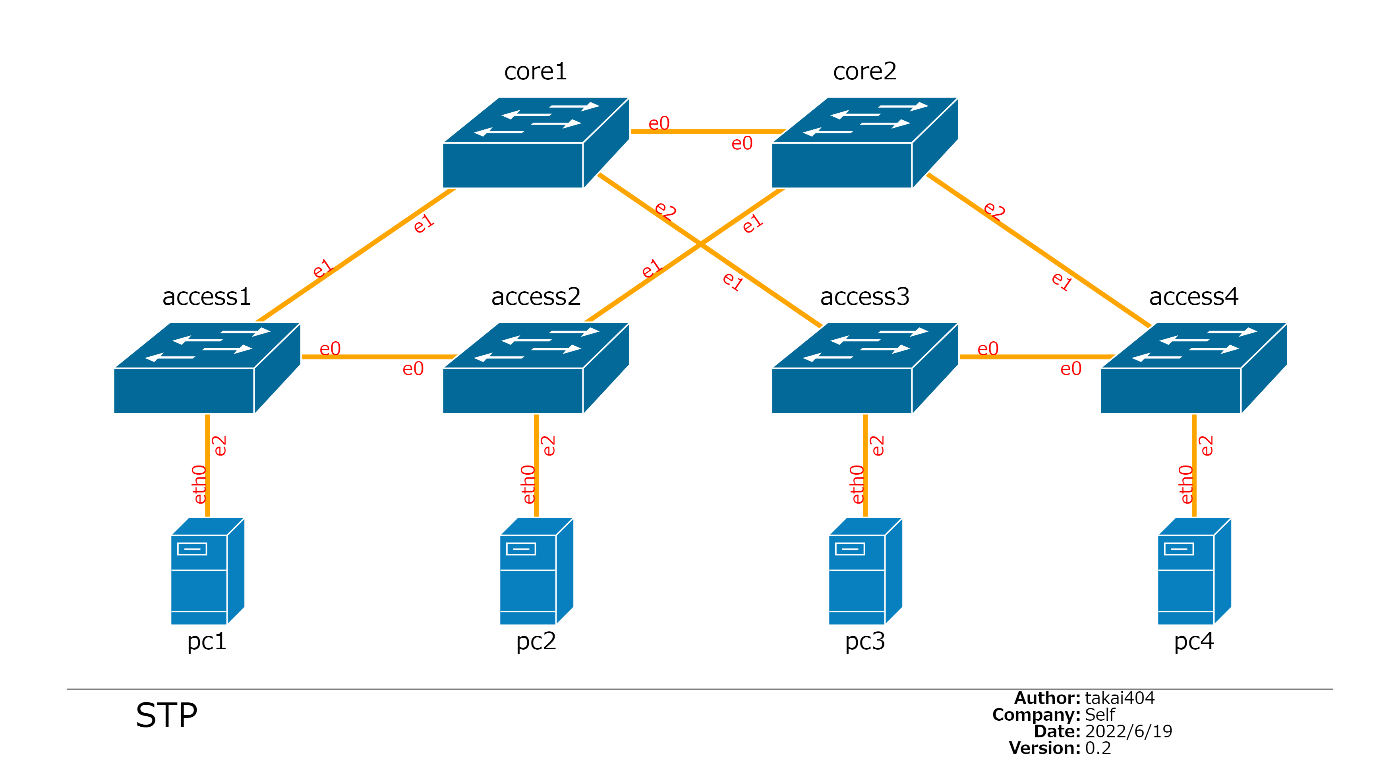
このネットワークを作ります。
論理NW図

物理NW図
構築スクリプトはこちらに置きました。
構築コマンド
network namespace作成
PC1~4に相当するnetwork namespaceの作成
ip netns add pc1
ip netns add pc2
ip netns add pc3
ip netns add pc4
vEthernet pair作成
仮想ケーブルの作成
ip link add core1_e0 type veth peer name core2_e0
ip link add core1_e1 type veth peer name access1_e1
ip link add core1_e2 type veth peer name access3_e1
ip link add core2_e1 type veth peer name access2_e1
ip link add core2_e2 type veth peer name access4_e1
ip link add access1_e0 type veth peer name access2_e0
ip link add access3_e0 type veth peer name access4_e0
ip link add access1_e2 type veth peer name eth0 netns pc1
ip link add access2_e2 type veth peer name eth0 netns pc2
ip link add access3_e2 type veth peer name eth0 netns pc3
ip link add access4_e2 type veth peer name eth0 netns pc4
Bridge作成
Open vSwitchのBridge作成
ovs-vsctl add-br core1
作成したBridgeにvethで作ったポートをくっつける
ovs-vsctl add-port core1 core1_e0
ovs-vsctl add-port core1 core1_e1
ovs-vsctl add-port core1 core1_e2
このBridgeでSTPを有効にする。
ovs-vsctl set Bridge core1 stp_enable=true
他の5個のBridgeを作成
# create node: core2
#   create openvswitch bridge
ovs-vsctl add-br core2
#   create openvswitch ports
ovs-vsctl add-port core2 core2_e0
ovs-vsctl add-port core2 core2_e1
ovs-vsctl add-port core2 core2_e2
ovs-vsctl set Bridge core2 stp_enable=true

# create node: access1
#   create openvswitch bridge
ovs-vsctl add-br access1
#   create openvswitch ports
ovs-vsctl add-port access1 access1_e1
ovs-vsctl add-port access1 access1_e0
ovs-vsctl add-port access1 access1_e2
ovs-vsctl set Bridge access1 stp_enable=true

# create node: access2
#   create openvswitch bridge
ovs-vsctl add-br access2
#   create openvswitch ports
ovs-vsctl add-port access2 access2_e1
ovs-vsctl add-port access2 access2_e0
ovs-vsctl add-port access2 access2_e2
ovs-vsctl set Bridge access2 stp_enable=true

# create node: access3
#   create openvswitch bridge
ovs-vsctl add-br access3
#   create openvswitch ports
ovs-vsctl add-port access3 access3_e1
ovs-vsctl add-port access3 access3_e0
ovs-vsctl add-port access3 access3_e2
ovs-vsctl set Bridge access3 stp_enable=true

# create node: access4
#   create openvswitch bridge
ovs-vsctl add-br access4
#   create openvswitch ports
ovs-vsctl add-port access4 access4_e1
ovs-vsctl add-port access4 access4_e0
ovs-vsctl add-port access4 access4_e2
ovs-vsctl set Bridge access4 stp_enable=true
PC用network namespaceのIP設定
# create node: pc1
ip netns exec pc1 sysctl -w net.ipv4.icmp_ratemask=0
ip netns exec pc1 ip addr add 10.0.0.1/24 dev eth0

# create node: pc2
ip netns exec pc2 sysctl -w net.ipv4.icmp_ratemask=0
ip netns exec pc2 ip addr add 10.0.0.2/24 dev eth0

# create node: pc3
ip netns exec pc3 sysctl -w net.ipv4.icmp_ratemask=0
ip netns exec pc3 ip addr add 10.0.0.3/24 dev eth0

# create node: pc4
ip netns exec pc4 sysctl -w net.ipv4.icmp_ratemask=0
ip netns exec pc4 ip addr add 10.0.0.4/24 dev eth0
リンクアップ
# linkup & set routes (routes can not be set before linkup.)
ip link set core1_e0 up
ip link set core1_e1 up
ip link set core1_e2 up
ip link set core1 up

ip link set core2_e0 up
ip link set core2_e1 up
ip link set core2_e2 up
ip link set core2 up

ip link set access1_e1 up
ip link set access1_e0 up
ip link set access1_e2 up
ip link set access1 up

ip link set access2_e1 up
ip link set access2_e0 up
ip link set access2_e2 up
ip link set access2 up

ip link set access3_e1 up
ip link set access3_e0 up
ip link set access3_e2 up
ip link set access3 up

ip link set access4_e1 up
ip link set access4_e0 up
ip link set access4_e2 up
ip link set access4 up

ip netns exec pc1 ip link set eth0 up
ip netns exec pc2 ip link set eth0 up
ip netns exec pc3 ip link set eth0 up
ip netns exec pc4 ip link set eth0 up
疎通確認
Pingでpc1からpc2宛に疎通確認します。標準STPなので遅くとも50秒あればSTPトポロジが完成して通信できるようになるでしょう。
# ip netns exec pc1 ping -D -c 50 10.0.0.2
PING 10.0.0.2 (10.0.0.2) 56(84) bytes of data.
[1658492519.174829] 64 bytes from 10.0.0.2: icmp_seq=31 ttl=64 time=0.372 ms
[1658492520.214751] 64 bytes from 10.0.0.2: icmp_seq=32 ttl=64 time=0.285 ms
[1658492521.254447] 64 bytes from 10.0.0.2: icmp_seq=33 ttl=64 time=0.042 ms
[1658492522.294509] 64 bytes from 10.0.0.2: icmp_seq=34 ttl=64 time=0.068 ms
[1658492523.334544] 64 bytes from 10.0.0.2: icmp_seq=35 ttl=64 time=0.053 ms

--- 10.0.0.2 ping statistics ---
35 packets transmitted, 5 received, 85.7143% packet loss, time 35381ms
rtt min/avg/max/mdev = 0.042/0.164/0.372/0.137 ms
50秒経っても通信できない場合は何か問題が起きていると思います。
uptimeコマンドも打っておきましょう。load averageが高騰しているのならSTPがうまく動作せずにL2ループが発生しています。ip link set インターフェイス名 downでCPUが落ち着くまでいくつかのインターフェイスを落としましょう。
# uptime
 21:22:36 up 2 days,  6:06,  0 users,  load average: 0.00, 0.00, 0.00
STP状態確認
Open vSwitchでSTP状態を確認するコマンドはovs-appctl stp/showです。
Bridgeごとの状態を表示してくれます
# ovs-appctl stp/show
---- core1 ----
Root ID:
  stp-priority  32768
  stp-system-id   16:ba:9a:9a:e9:41
  stp-hello-time  2s
  stp-max-age     20s
  stp-fwd-delay   15s
  root-port       core1_e0
  root-path-cost  4

Bridge ID:
  stp-priority  32768
  stp-system-id   42:99:7a:39:7f:43
  stp-hello-time  2s
  stp-max-age     20s
  stp-fwd-delay   15s

  Interface  Role       State      Cost  Pri.Nbr
  ---------- ---------- ---------- ----- -------
  core1_e2   alternate  blocking   2     128.1
  core1_e0   root       forwarding 2     128.2
  core1_e1   designated forwarding 2     128.3
core1について以下が読み取れます。
- core1がRoot Bridgeと認識しているBridgeの情報
- Bridge Priorityは32768(0x8000)
- Priorityはまだ設定していないのでデフォルト値です
- System ID(MACアドレス)は16:ba:9a:9a:e9:41
- どのBridgeにもPriorityを設定していないので"16:~"から始まるMACアドレスが最小値なのでしょう。(あとで出てきますが、このMACアドレスはaccess4です)
- タイマーはデフォルト
- Bridge Priorityは32768(0x8000)
- core1のRoot Portはcore1_e0
- core1のRoot Path Portは4
- Root Port(core1_e0)で受信したBPDUのRoot Path CostとRoot PortのPort Costを足し算した値です。
- core1自身の情報
- Bridge Priorityは32768(0x8000)
- System ID(MACアドレス)は42:99:7a:39:7f:43
- タイマーはデフォルト
- core1_e2
- 役割はAlternate Portでblocking状態
- Alternate PortはRapid STPでの名前で、標準STPではBlocking Portなのでは?とも思うのですが、まぁいいでしょう。
- Port Costは2
- Port IDは0x8001(Port Priorityが10進数128=16進数0x80、Port Numberが1)
- 役割はAlternate Portでblocking状態
- core1_e0
- さっきも出てきた通りRoot Port。forwarding状態。
- core1_e1
- designated Port。forwarding状態。
そのほかのBridgeも大体同じような要領で読み取れます。
ちょっと違うのがaccess4。
このBridgeはRoot Bridgeであり、Root IDとBridge IDに同じ情報が入ります。また、分かりやすいようにThis bridge is the rootと明記されてました。
---- access4 ----
Root ID:
  stp-priority  32768
  stp-system-id   16:ba:9a:9a:e9:41
  stp-hello-time  2s
  stp-max-age     20s
  stp-fwd-delay   15s
  This bridge is the root

Bridge ID:
  stp-priority  32768
  stp-system-id   16:ba:9a:9a:e9:41
  stp-hello-time  2s
  stp-max-age     20s
  stp-fwd-delay   15s

  Interface  Role       State      Cost  Pri.Nbr
  ---------- ---------- ---------- ----- -------
  access4_e2 designated forwarding 2     128.1
  access4_e0 designated forwarding 2     128.2
  access4_e1 designated forwarding 2     128.3
全Bridgeの出力はこちら
# ovs-appctl stp/show
---- core1 ----
Root ID:
  stp-priority  32768
  stp-system-id   16:ba:9a:9a:e9:41
  stp-hello-time  2s
  stp-max-age     20s
  stp-fwd-delay   15s
  root-port       core1_e0
  root-path-cost  4

Bridge ID:
  stp-priority  32768
  stp-system-id   42:99:7a:39:7f:43
  stp-hello-time  2s
  stp-max-age     20s
  stp-fwd-delay   15s

  Interface  Role       State      Cost  Pri.Nbr
  ---------- ---------- ---------- ----- -------
  core1_e2   alternate  blocking   2     128.1
  core1_e0   root       forwarding 2     128.2
  core1_e1   designated forwarding 2     128.3

---- core2 ----
Root ID:
  stp-priority  32768
  stp-system-id   16:ba:9a:9a:e9:41
  stp-hello-time  2s
  stp-max-age     20s
  stp-fwd-delay   15s
  root-port       core2_e2
  root-path-cost  2

Bridge ID:
  stp-priority  32768
  stp-system-id   b2:75:9a:f1:dc:48
  stp-hello-time  2s
  stp-max-age     20s
  stp-fwd-delay   15s

  Interface  Role       State      Cost  Pri.Nbr
  ---------- ---------- ---------- ----- -------
  core2_e2   root       forwarding 2     128.1
  core2_e1   designated forwarding 2     128.2
  core2_e0   designated forwarding 2     128.3

---- access1 ----
Root ID:
  stp-priority  32768
  stp-system-id   16:ba:9a:9a:e9:41
  stp-hello-time  2s
  stp-max-age     20s
  stp-fwd-delay   15s
  root-port       access1_e0
  root-path-cost  6

Bridge ID:
  stp-priority  32768
  stp-system-id   b2:42:2f:5c:2a:45
  stp-hello-time  2s
  stp-max-age     20s
  stp-fwd-delay   15s

  Interface  Role       State      Cost  Pri.Nbr
  ---------- ---------- ---------- ----- -------
  access1_e2 designated forwarding 2     128.1
  access1_e1 alternate  blocking   2     128.2
  access1_e0 root       forwarding 2     128.3

---- access2 ----
Root ID:
  stp-priority  32768
  stp-system-id   16:ba:9a:9a:e9:41
  stp-hello-time  2s
  stp-max-age     20s
  stp-fwd-delay   15s
  root-port       access2_e1
  root-path-cost  4

Bridge ID:
  stp-priority  32768
  stp-system-id   36:f7:5a:36:65:4c
  stp-hello-time  2s
  stp-max-age     20s
  stp-fwd-delay   15s

  Interface  Role       State      Cost  Pri.Nbr
  ---------- ---------- ---------- ----- -------
  access2_e2 designated forwarding 2     128.1
  access2_e1 root       forwarding 2     128.2
  access2_e0 designated forwarding 2     128.3

---- access3 ----
Root ID:
  stp-priority  32768
  stp-system-id   16:ba:9a:9a:e9:41
  stp-hello-time  2s
  stp-max-age     20s
  stp-fwd-delay   15s
  root-port       access3_e0
  root-path-cost  2

Bridge ID:
  stp-priority  32768
  stp-system-id   d6:e1:7a:c8:76:46
  stp-hello-time  2s
  stp-max-age     20s
  stp-fwd-delay   15s

  Interface  Role       State      Cost  Pri.Nbr
  ---------- ---------- ---------- ----- -------
  access3_e0 root       forwarding 2     128.1
  access3_e2 designated forwarding 2     128.2
  access3_e1 designated forwarding 2     128.3

---- access4 ----
Root ID:
  stp-priority  32768
  stp-system-id   16:ba:9a:9a:e9:41
  stp-hello-time  2s
  stp-max-age     20s
  stp-fwd-delay   15s
  This bridge is the root

Bridge ID:
  stp-priority  32768
  stp-system-id   16:ba:9a:9a:e9:41
  stp-hello-time  2s
  stp-max-age     20s
  stp-fwd-delay   15s

  Interface  Role       State      Cost  Pri.Nbr
  ---------- ---------- ---------- ----- -------
  access4_e2 designated forwarding 2     128.1
  access4_e0 designated forwarding 2     128.2
  access4_e1 designated forwarding 2     128.3
ところで、Open vSwitchでSTPの状態確認をしたいときにovs-appctl stp/showというコマンドを使えばよい、というのを見つけるのがちょっと分かりづらいです。[1]
man ovs-appctlとしてもstp/showのことは書いていないんですよね...
このマニュアルにはlist-commandsというサブコマンドが書いてあるので打ってみると、以下のようにstp/showというコマンドとstp/tcnというコマンドがあることが分かります。
# ovs-appctl list-commands
The available commands are:
  (省略)
  rstp/show               [bridge]
  rstp/tcn                [bridge]
  stp/show                [bridge]
  stp/tcn                 [bridge]
  (省略)
stp/showは何となくSTP情報を表示(show)するんだろうな、と分かるけどstp/tcnは何? topology change notificationをどうするの?って思いますよね。
結論をいうと、man ovs-vswitchdに書いてあります。
   stp/tcn [bridge]
          Forces a topology change event on bridge if it's running
          STP.  This may cause it to send Topology Change
          Notifications to its peers and flush its MAC table.  If no
          bridge is given, forces a topology change event on all
          bridges.

   stp/show [bridge]
          Displays detailed information about spanning tree on the
          bridge.  If bridge is not specified, then displays
          detailed information about all bridges with STP enabled.
stp/showは想像通りSTP状態表示でした。
stp/tcnは強制的にtopology change notificationを送るコマンドみたいですね。
tcpdumpしながらovs-appctl stp/tcnコマンドを打つとBPDUのFlags [none]がFlags [Topology change, Topology change ACK]に変わったので確かにTCNを送っていますね。トポロジに変化があれば自動的にTCNは送られるだろうからどういうケースで使えるのかは不明ですが...
# tcpdump -v -i access4_e1 &
[1] 5585
# tcpdump: listening on access4_e1, link-type EN10MB (Ethernet), snapshot length 262144 bytes
22:23:08.138364 STP 802.1d, Config, Flags [none], bridge-id 8000.16:ba:9a:9a:e9:41.8003, length 35
        message-age 0.00s, max-age 20.00s, hello-time 2.00s, forwarding-delay 15.00s
        root-id 8000.16:ba:9a:9a:e9:41, root-pathcost 0
22:23:10.142075 STP 802.1d, Config, Flags [none], bridge-id 8000.16:ba:9a:9a:e9:41.8003, length 35
        message-age 0.00s, max-age 20.00s, hello-time 2.00s, forwarding-delay 15.00s
        root-id 8000.16:ba:9a:9a:e9:41, root-pathcost 0
ovs-appctl stp/tcn
OK
# 22:23:11.149594 STP 802.1d, Topology Change
22:23:11.149941 STP 802.1d, Config, Flags [Topology change, Topology change ACK], bridge-id 8000.16:ba:9a:9a:e9:41.8003, length 35
        message-age 0.00s, max-age 20.00s, hello-time 2.00s, forwarding-delay 15.00s
        root-id 8000.16:ba:9a:9a:e9:41, root-pathcost 0
22:23:11.150083 STP 802.1d, Topology Change
22:23:12.153094 STP 802.1d, Config, Flags [Topology change, Topology change ACK], bridge-id 8000.16:ba:9a:9a:e9:41.8003, length 35
        message-age 0.00s, max-age 20.00s, hello-time 2.00s, forwarding-delay 15.00s
        root-id 8000.16:ba:9a:9a:e9:41, root-pathcost 0
22:23:14.157637 STP 802.1d, Config, Flags [Topology change], bridge-id 8000.16:ba:9a:9a:e9:41.8003, length 35
        message-age 0.00s, max-age 20.00s, hello-time 2.00s, forwarding-delay 15.00s
        root-id 8000.16:ba:9a:9a:e9:41, root-pathcost 0
STPパラメータ変更
閑話休題、Linux BridgeのSTPで以下でやったのと同じようにOpen vSwitchのSTPでもパラメータを変更しましょう。
パケットキャプチャでSTPを学ぶ(5) Bridge Priorityの変更
パケットキャプチャでSTPを学ぶ(6) Port Costの変更
Bridge Priority変更
Bridge Priority変更コマンドはovs-vsctl set Bridge ブリッジ名 other_config:stp-priority=数値です。
ovs-vsctl set Bridge core1 other_config:stp-priority=8192
ovs-vsctl set Bridge core2 other_config:stp-priority=16384
man ovs-vsctlを見るとstp-priorityは16進数で設定できるようにも見えるのですが、16進数で指定しても反映されませんでした。10進数で指定しましょう。
802.1D Spanning Tree Protocol (STP)
   Configure bridge br0 to participate in an 802.1D spanning tree:

          ovs-vsctl set Bridge br0 stp_enable=true

   Set the bridge priority of br0 to 0x7800:

          ovs-vsctl set Bridge br0 other_config:stp-priority=0x7800

   Set the path cost of port eth0 to 10:

          ovs-vsctl set Port eth0 other_config:stp-path-cost=10

   Deconfigure STP from above:

          ovs-vsctl set Bridge br0 stp_enable=false
ovs-appctlでみると、stp-priorityが32768だったのが8192に変わりました。This bridge is the rootとなっているので、このBridgeがRoot Bridgeになったことが分かります。
# ovs-appctl stp/show core1
---- core1 ----
Root ID:
  stp-priority  8192
  stp-system-id   42:99:7a:39:7f:43
  stp-hello-time  2s
  stp-max-age     20s
  stp-fwd-delay   15s
  This bridge is the root

Bridge ID:
  stp-priority  8192
  stp-system-id   42:99:7a:39:7f:43
  stp-hello-time  2s
  stp-max-age     20s
  stp-fwd-delay   15s

  Interface  Role       State      Cost  Pri.Nbr
  ---------- ---------- ---------- ----- -------
  core1_e2   designated learning   2     128.1
  core1_e0   designated forwarding 2     128.2
  core1_e1   designated forwarding 2     128.3
Port Priority変更
Bridge Priority変更コマンドはovs-vsctl set Port ポート名 other_config:stp-path-cost=数値です。
ovs-vsctl set Port core2_e0 other_config:stp-path-cost=3
core2_e0のCostが2から3に変わっています。
# ovs-appctl stp/show core2
---- core2 ----
Root ID:
  stp-priority  8192
  stp-system-id   42:99:7a:39:7f:43
  stp-hello-time  2s
  stp-max-age     20s
  stp-fwd-delay   15s
  root-port       core2_e0
  root-path-cost  3

Bridge ID:
  stp-priority  16384
  stp-system-id   b2:75:9a:f1:dc:48
  stp-hello-time  2s
  stp-max-age     20s
  stp-fwd-delay   15s

  Interface  Role       State      Cost  Pri.Nbr
  ---------- ---------- ---------- ----- -------
  core2_e2   designated forwarding 2     128.1
  core2_e1   designated forwarding 2     128.2
  core2_e0   root       forwarding 3     128.3
全Bridgeの出力はこちら
# ovs-appctl stp/show
---- core1 ----
Root ID:
  stp-priority  8192
  stp-system-id   42:99:7a:39:7f:43
  stp-hello-time  2s
  stp-max-age     20s
  stp-fwd-delay   15s
  This bridge is the root

Bridge ID:
  stp-priority  8192
  stp-system-id   42:99:7a:39:7f:43
  stp-hello-time  2s
  stp-max-age     20s
  stp-fwd-delay   15s

  Interface  Role       State      Cost  Pri.Nbr
  ---------- ---------- ---------- ----- -------
  core1_e2   designated forwarding 2     128.1
  core1_e0   designated forwarding 2     128.2
  core1_e1   designated forwarding 2     128.3

---- core2 ----
Root ID:
  stp-priority  8192
  stp-system-id   42:99:7a:39:7f:43
  stp-hello-time  2s
  stp-max-age     20s
  stp-fwd-delay   15s
  root-port       core2_e0
  root-path-cost  3

Bridge ID:
  stp-priority  16384
  stp-system-id   b2:75:9a:f1:dc:48
  stp-hello-time  2s
  stp-max-age     20s
  stp-fwd-delay   15s

  Interface  Role       State      Cost  Pri.Nbr
  ---------- ---------- ---------- ----- -------
  core2_e2   designated forwarding 2     128.1
  core2_e1   designated forwarding 2     128.2
  core2_e0   root       forwarding 3     128.3

---- access1 ----
Root ID:
  stp-priority  8192
  stp-system-id   42:99:7a:39:7f:43
  stp-hello-time  2s
  stp-max-age     20s
  stp-fwd-delay   15s
  root-port       access1_e1
  root-path-cost  2

Bridge ID:
  stp-priority  32768
  stp-system-id   b2:42:2f:5c:2a:45
  stp-hello-time  2s
  stp-max-age     20s
  stp-fwd-delay   15s

  Interface  Role       State      Cost  Pri.Nbr
  ---------- ---------- ---------- ----- -------
  access1_e2 designated forwarding 2     128.1
  access1_e1 root       forwarding 2     128.2
  access1_e0 designated forwarding 2     128.3

---- access2 ----
Root ID:
  stp-priority  8192
  stp-system-id   42:99:7a:39:7f:43
  stp-hello-time  2s
  stp-max-age     20s
  stp-fwd-delay   15s
  root-port       access2_e0
  root-path-cost  4

Bridge ID:
  stp-priority  32768
  stp-system-id   36:f7:5a:36:65:4c
  stp-hello-time  2s
  stp-max-age     20s
  stp-fwd-delay   15s

  Interface  Role       State      Cost  Pri.Nbr
  ---------- ---------- ---------- ----- -------
  access2_e2 designated forwarding 2     128.1
  access2_e1 alternate  blocking   2     128.2
  access2_e0 root       forwarding 2     128.3

---- access3 ----
Root ID:
  stp-priority  8192
  stp-system-id   42:99:7a:39:7f:43
  stp-hello-time  2s
  stp-max-age     20s
  stp-fwd-delay   15s
  root-port       access3_e1
  root-path-cost  2

Bridge ID:
  stp-priority  32768
  stp-system-id   d6:e1:7a:c8:76:46
  stp-hello-time  2s
  stp-max-age     20s
  stp-fwd-delay   15s

  Interface  Role       State      Cost  Pri.Nbr
  ---------- ---------- ---------- ----- -------
  access3_e0 designated forwarding 2     128.1
  access3_e2 designated forwarding 2     128.2
  access3_e1 root       forwarding 2     128.3

---- access4 ----
Root ID:
  stp-priority  8192
  stp-system-id   42:99:7a:39:7f:43
  stp-hello-time  2s
  stp-max-age     20s
  stp-fwd-delay   15s
  root-port       access4_e0
  root-path-cost  4

Bridge ID:
  stp-priority  32768
  stp-system-id   16:ba:9a:9a:e9:41
  stp-hello-time  2s
  stp-max-age     20s
  stp-fwd-delay   15s

  Interface  Role       State      Cost  Pri.Nbr
  ---------- ---------- ---------- ----- -------
  access4_e2 designated forwarding 2     128.1
  access4_e0 root       forwarding 2     128.2
  access4_e1 alternate  blocking   2     128.3
デフォルトに戻す
先ほどの設定をデフォルトに戻すコマンドです。
ovs-vsctl remove Bridge core1 other_config stp-priority
ovs-vsctl remove Bridge core2 other_config stp-priority
ovs-vsctl remove Port core2_e0 other_config stp-path-cost
環境削除
作った環境を削除するコマンドはこちら。
ちなみに、Linux Bridge(ip link add ~ type bridge)と違って、Open vSwitchで作ったBridgeはOS再起動しても消えません(ovsdbが保持しています)。vethはOS再起動で消えるので、単純に再起動するとBridgeに登録されているはずのポートが実際には存在しない、という状態になります。その場合はovs-vsctl del-br ~でBridgeを消してきれいにしましょう。
動作確認環境
# cat /etc/issue
Ubuntu 22.04 LTS \n \l

# uname -r
5.10.16.3-microsoft-standard-WSL2-ovs+
# dpkg -l iproute2 iputils-ping openvswitch-common openvswitch-switch
Desired=Unknown/Install/Remove/Purge/Hold
| Status=Not/Inst/Conf-files/Unpacked/halF-conf/Half-inst/trig-aWait/Trig-pend
|/ Err?=(none)/Reinst-required (Status,Err: uppercase=bad)
||/ Name               Version         Architecture Description
+++-==================-===============-============-===============================================
ii  iproute2           5.15.0-1ubuntu2 amd64        networking and traffic control tools
ii  iputils-ping       3:20211215-1    amd64        Tools to test the reachability of network hosts
ii  openvswitch-common 2.17.0-0ubuntu1 amd64        Open vSwitch common components
ii  openvswitch-switch 2.17.0-0ubuntu1 amd64        Open vSwitch switch implementations
-
Googleでopenvswitch stp statusとかで検索すれば見つかったりもするのですが... ↩︎
Discussion