Nuxt3, Vuetify3, Zod で管理画面 UI を作成する


はじめに
先日 Nuxt3.5 がリリースされました。
私自身 Nuxt3 をさわったことがなく今回は練習その 1 として、よくありそうな管理画面の UI を作ってみました。
やったこと
- Nuxt + Vuetify を使ってユーザー登録フォームを作成
- Zod を使ってフォームのバリデーション処理を作成
やってないこと
- 実際にユーザーのデータを DB に登録
プロジェクトの作成
以下のコマンドを実行することで Nuxt3 のプロジェクトを作成できます。
npx nuxi init <project-name>
レイアウトの作成
今回は以下のようなレイアウトを作成します。
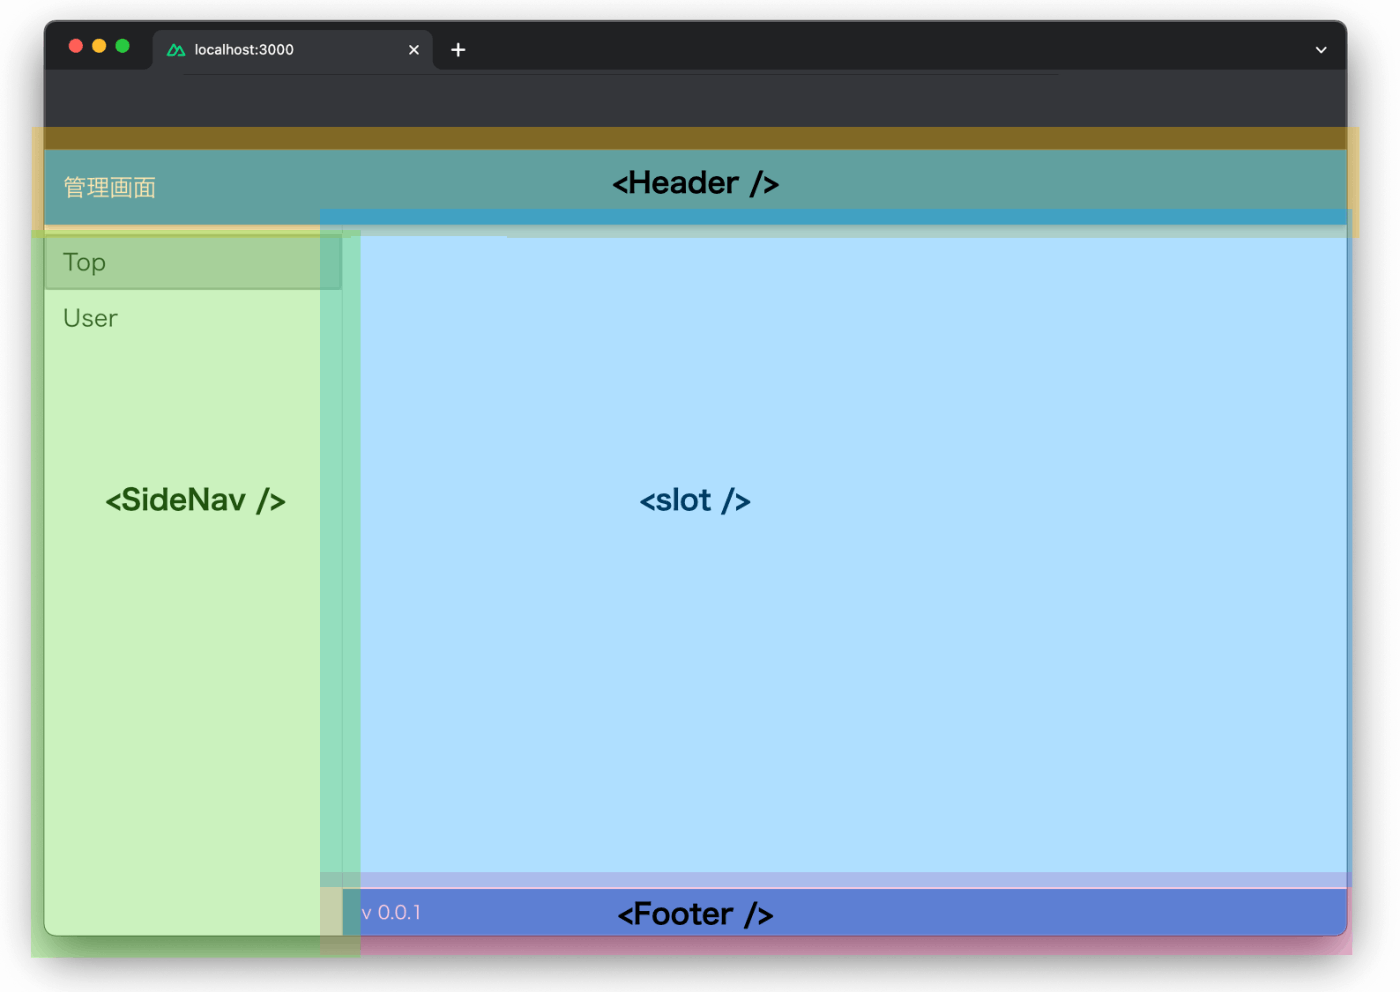
Nuxt3 のプロジェクト配下に layouts ディレクトリを作成し、レイアウトファイルを作成します。
これにより、非同期インポートによって自動的にロードされアプリケーション全体でレイアウトが適用されます。
<template>
  <v-app>
    <Header />
    <SideNav />
    <v-main>
      <v-container>
        <slot />
      </v-container>
    </v-main>
    <Footer />
  </v-app>
</template>
またヘッダーなどの各種コンポーネントは components ディレクトリ配下に作成しています。
Nuxt は、components ディレクトリにあるコンポーネントを自動的にインポートします。
Header の作成
Vuetify の v-app-bar を使用しました。
<template>
  <v-app-bar color="light-blue-accent-4">
    <v-app-bar-title>
      管理画面
    </v-app-bar-title>
  </v-app-bar>
</template>
SideNav の作成
Vuetify の v-navigation-drawer を使用しました。
<script setup lang="ts">
  const menus = [
    {
      name: 'Top',
      path: '/'
    },
    {
      name: 'User',
      path: '/user'
    }
  ]
</script>

<template>
  <v-navigation-drawer permanent>
    <v-list>
      <v-list-item
        v-for="(menu, i) in menus"
        :key="i"
        :to="menu.path"
      >
        <v-list-item-title class="text-h6">
          {{ menu.name }}
        </v-list-item-title>
      </v-list-item>
    </v-list>
  </v-navigation-drawer>
</template>
Footer の作成
Vuetify の v-footer を使用しました。
<template>
  <v-footer color="light-blue-accent-4" app>
    v 0.0.1
  </v-footer>
</template>
app.vue でレイアウトを表示
app.vue に NuxtLayout タグを追加して上記で作成したレイアウトを表示します
<template>
  <NuxtLayout>
    <NuxtPage />
  </NuxtLayout>
</template>
ユーザー登録画面の作成
Nuxt3 のプロジェクト配下に pages ディレクトリを作成します。
それにより Vue Router を使用しすべてのページに対して自動的にルーティングが設定されます。
<template>
  <div>
    <h1>ユーザ一覧</h1>
    <v-sheet class="ma-4">
      <v-btn color="light-blue-accent-4" class="mt-4 w-20" to="/user/create">
        ユーザ作成
      </v-btn>
    </v-sheet>
  </div>
</template>
<script setup lang="ts">
  const name = ref('')
  const email = ref('')
  const submit = () => {
    // 後ほどバリデーション処理を追記
  }
</script>

<template>
  <div>
    <h1>ユーザ登録</h1>
    <v-sheet class="ma-4">
      <v-form @submit.prevent="submit">
        <v-row>
          <v-col cols="2">
            <v-list-subheader>
              ユーザ名
            </v-list-subheader>
          </v-col>
          <v-col cols="10">
            <v-text-field
              v-model="name"
              label="ユーザ名"
            >
            </v-text-field>
          </v-col>
        </v-row>
        <v-row>
          <v-col cols="2">
            <v-list-subheader>
              メールアドレス
            </v-list-subheader>
          </v-col>
          <v-col cols="10">
            <v-text-field
              v-model="email"
              label="メールアドレス"
              type="email"
            >
            </v-text-field>
          </v-col>
        </v-row>
        <v-btn color="light-blue-accent-4" type="submit" class="mt-4 w-20">Submit</v-btn>
      </v-form>
    </v-sheet>
  </div>
</template>
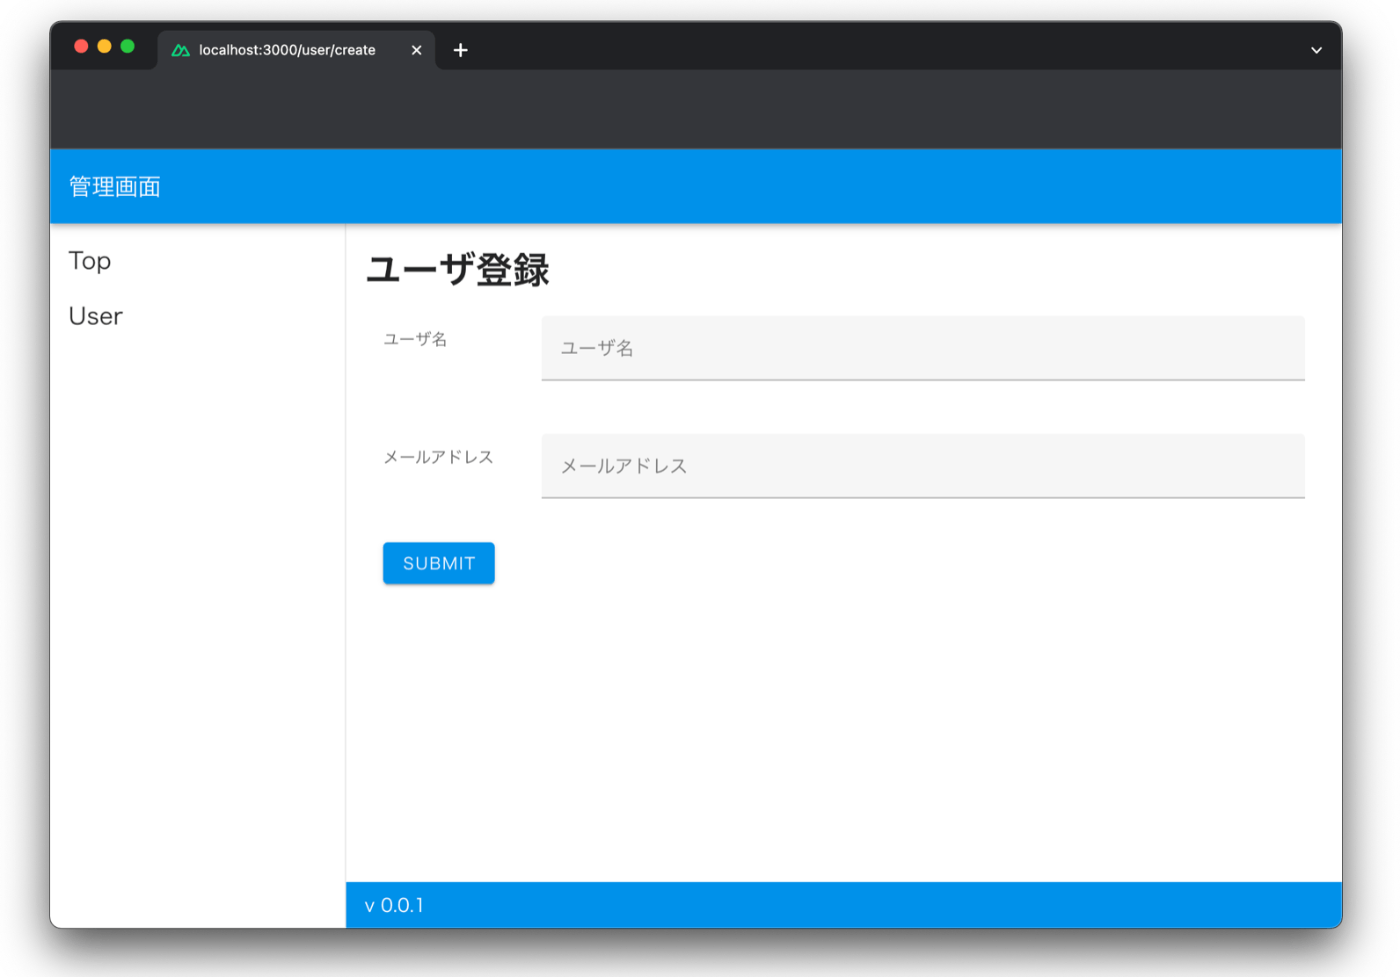
フォームにバリデーションを追加する
今回の画面では、ユーザー名とメールアドレスを入力するフォームがありますが、それらの入力に対してバリデーションを追加します。
v-text-field の props に rules を渡すことでバリデーションを実装できますが、今回は Zod を使用しました。
npm i zod
バリデーションスキーマの作成
Zod のインストールができたら、バリデーションのスキーマの作成です。
今回は、ユーザー名とメールアドレス 2 つの入力フォームに対して以下のようにバリデーションスキーマを作成しました。
各スキーマの詳細についてはドキュメントを参照ください。
import z from 'zod'

export const createUserSchema = z.object({
  name: z.string().nonempty(),
  email: z.string().email().nonempty()
})

export type CreateUser = z.TypeOf<typeof createUserSchema>
composable 関数の作成
バリデーションを行う composable 関数を作成します。
ここでは、parse メソッドでスキーマに定義したバリデーションの実行と、エラーになったときはエラーメッセージを返すようにします。
Nuxt3 のプロジェクト配下に、composables ディレクトリを作成することで、アプリケーションに自動的にインポートされます。
import { createUserSchema, CreateUser } from '@/schema/user'
import { ZodError } from 'zod'

export const useCreateUserValidation = () => {
  const errorMessages = ref<ZodError | null>(null)
  const validate = (data: CreateUser) => {
    try {
      createUserSchema.parse(data)
      if(errorMessages.value) {
        errorMessages.value = null
      }
    } catch(e) {
      if(e instanceof ZodError) {
        errorMessages.value = e
      }
    }
  }

  return {
    errorMessages,
    validate
  }
}
フォームにバリデーションを実装
上記で作成した composable 関数を pages/user/create.vue で使用します。
<script setup lang="ts">
  const { errorMessages, validate } = useCreateUserValidation()  // 追記
  const name = ref('')
  const email = ref('')
  const submit = () => {
    // フォームの submit 時にバリデーションを実行
    validate({
      name: name.value,
      email: email.value
    })
  }
</script>

<template>
  <div>
    <h1>ユーザ登録</h1>
    <v-sheet class="ma-4">
      <v-form @submit.prevent="submit">
        <v-row>
          <v-col cols="2">
            <v-list-subheader>
              ユーザ名
            </v-list-subheader>
          </v-col>
          <v-col cols="10">
            <v-text-field
              v-model="name"
              label="ユーザ名"
            >
            </v-text-field>

            <!-- バリデーションのエラーメッセージを表示する -->
            <template
              v-if="errorMessages && errorMessages.flatten().fieldErrors.name?.length"
            >
              <p
                class="text-red-lighten-1 mb-4"
                v-for="(error, i) in errorMessages.flatten().fieldErrors.name"
                :key="i"
              >
                {{ error }}
              </p>
            </template>
            <!--  -->
          </v-col>
        </v-row>
        <v-row>
          <v-col cols="2">
            <v-list-subheader>
              メールアドレス
            </v-list-subheader>
          </v-col>
          <v-col cols="10">
            <v-text-field
              v-model="email"
              label="メールアドレス"
              type="email"
            >
            </v-text-field>
            <template
              v-if="errorMessages && errorMessages.flatten().fieldErrors.email?.length"
            >
              <p
                class="text-red-lighten-1 mb-4"
                v-for="(error, i) in errorMessages.flatten().fieldErrors.email"
                :key="i"
              >
                {{ error }}
              </p>
            </template>
          </v-col>
        </v-row>
        <v-btn color="light-blue-accent-4" type="submit" class="mt-4 w-20">Submit</v-btn>
      </v-form>
    </v-sheet>
  </div>
</template>
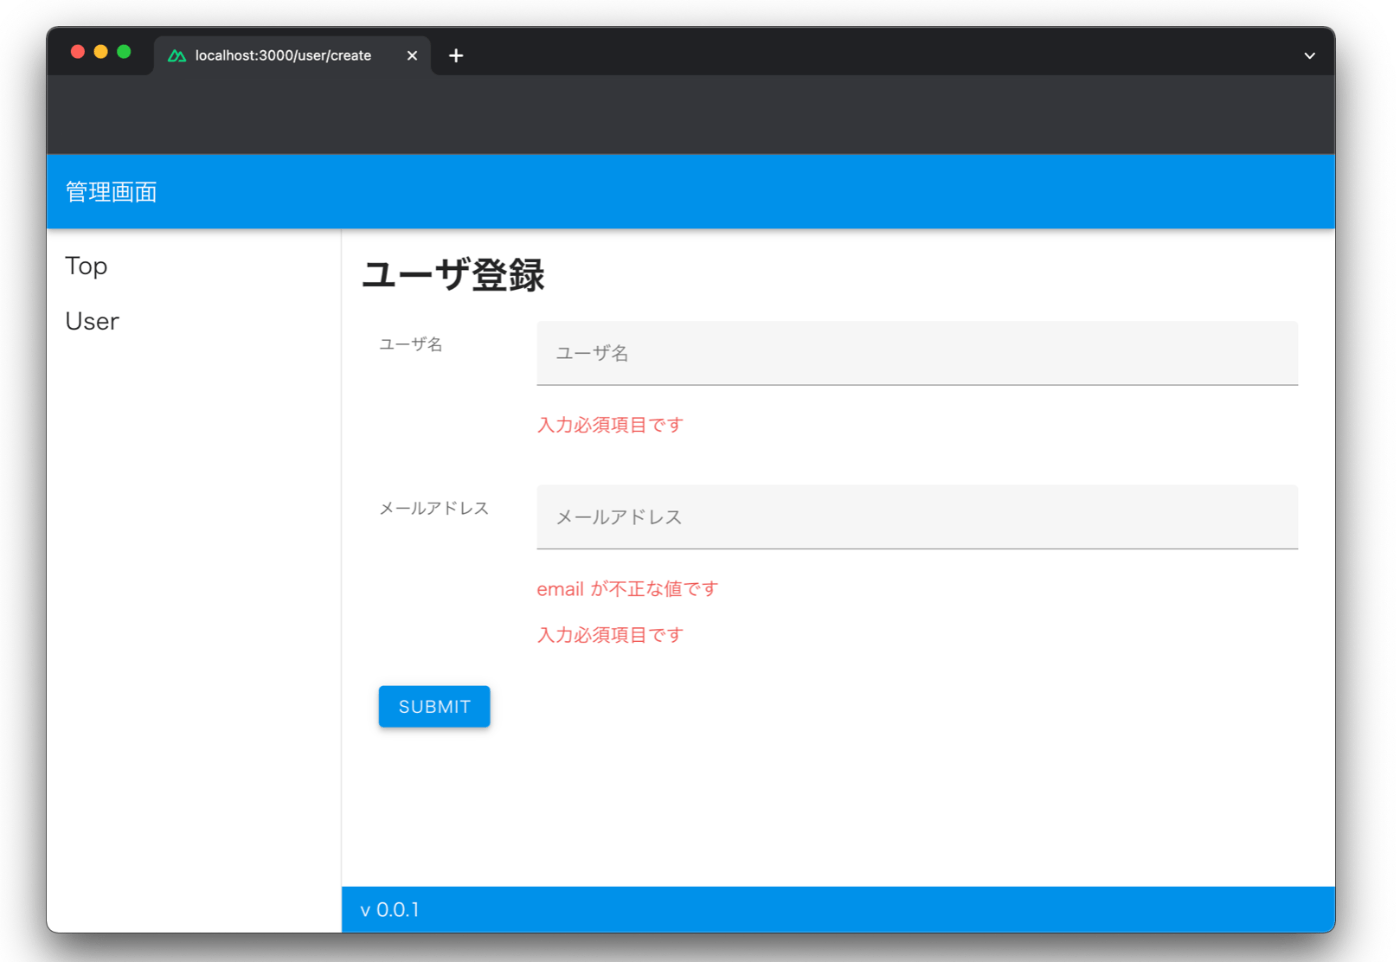
これによってバリデーションの実装とエラーメッセージが表示できるようになりました。

エラーメッセージを日本語にする
現状だとエラーメッセージが上記のように英語になっているので日本語にしたいと思います。
Zod のエラーメッセージをカスタマイズする方法は以下のドキュメントによると 3 つありますが、今回は Global error map を採用します。
まず customErrorMap を定義します。その後、 Zod の setErrorMap 関数の引数に先ほど定義した customErrorMap を設定することでグローバルにカスタマイズできます。
import { ErrorMapCtx, z } from 'zod'

const customErrorMap = (issue: any, ctx: ErrorMapCtx) => {
  switch (issue.code) {
    case z.ZodIssueCode.too_small:
      if(issue.minimum === 1) {
        return { message: "入力必須項目です" }
      }
      return { message: `${issue.minimum}以上入力してください` }
    case z.ZodIssueCode.invalid_string:
      if(issue.validation === "url") {
        return { message: "url が不正な値です" }
      }
      if(issue.validation === "email") {
        return { message: "email が不正な値です" }
      }
      if(issue.validation === "uuid") {
        return { message: "uuid が不正な値です" }
      }
    default:
      return { message: ctx.defaultError }
  }
}

export default z.setErrorMap(customErrorMap)
issue の中身は以下のようになっており、code の値で switch 文を作成しエラーメッセージをカスタマイズします。
{
  "code": "too_small",
  "minimum": 1,
  "type": "string",
  "inclusive": true,
  "exact": false,
  "path": ["name"]
}
先ほど作成した customErrorMap.ts を user.ts にインポートします
import z from 'zod'
import '@/schema/customErrorMap' // 追加

// 省略
これによって先ほど英語になっていたエラーメッセージが、カスタマイズした日本語になりました。
おわりに
今回はじめて Nuxt3 を使って簡単な UI を実装してみました。
この記事では、layouts や composables ディレクトリの機能を体験しました。
Nuxt3 の便利な機能はまだまだたくさんあるので、これからもキャッチアップしていきたいです。
参考記事
Discussion