Notion APIで自分のポートフォリオサイトを作ってみた
Notionのbeta版のパブリックAPIで現時点でどこまでのことができるか試してみるため、自分のポートフォリオサイトを実際にNotion APIで作ってみました。
この記事ではNotion APIの使い方と、どのようにポートフォリオサイトを作ったかをご紹介したいと思います。
完成したもの
実際に完成したポートフォリオサイトはこちら
こちらはその元となっているNotionのページになります。
使用技術
使用技術は以下のようになります。最近自分の中でNext.jsとTypeScriptは切っても切れない技術になってきてます。
- Next.js
- TypeScript
- Notion API
また、@notionhq/clientというNotionが公式で提供しているnpmライブラリを使うことで簡単に記事データを取得することができました。
ポートフォリオサイトを作った手順
- Notionにてデータベースを作る
- NotionにてSecret KeyとデータベースIDを取得する
-
@notionhq/clientを使って自分のNotionからデータを取得し描画する
1. Notionにてデータベースを作る
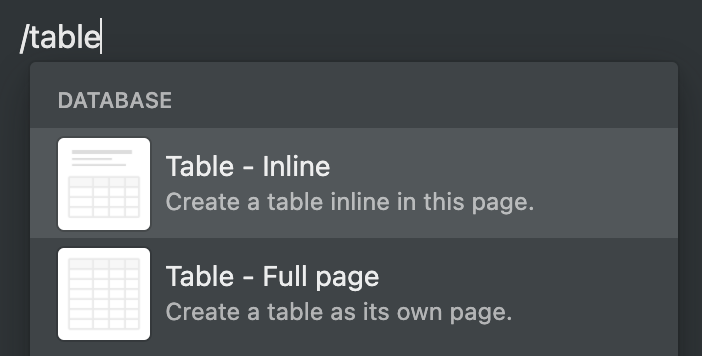
まずはNotionにてデータベースを作りましょう。/tableと入力するとテーブルブロックが作成できますが、これがデータベースに当たります。
次に実際にデータを作っていきます。私の場合は以下のようなプロパティを用意しました。
- Page ポートフォリオのタイトル
- Slug ポートフォリオを表示する際のURLに使用
- Published ポートフォリオを表示するかどうか
- Date ポートフォリオの日付
- Authors この記事を書いた人
- Thumbnail 記事のサムネイル
- Description ポートフォリオの簡単な説明

2. NotionにてSecret KeyとデータベースIDを取得する
次にNotionにてSecret KeyとデータベースIDを取得します。
まずはSecret Keyを取得しましょう。
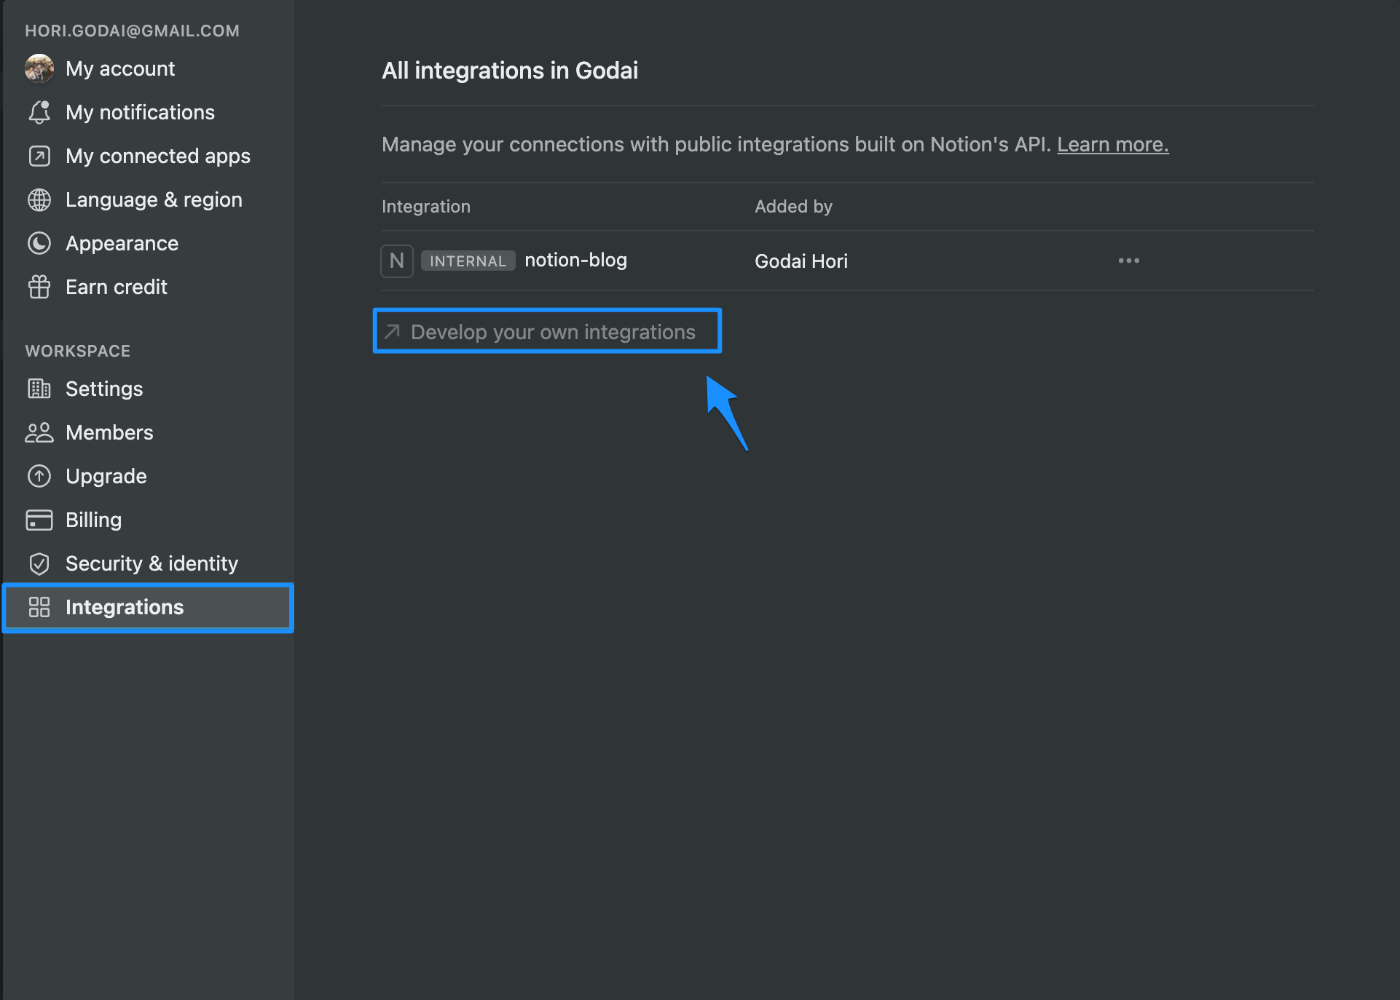
NotionのページよりSettings & Members → Integrations → Develop your own integrationsの順に移動していただき、新しいIntegrationを作成することでSecret Keyを取得できます。
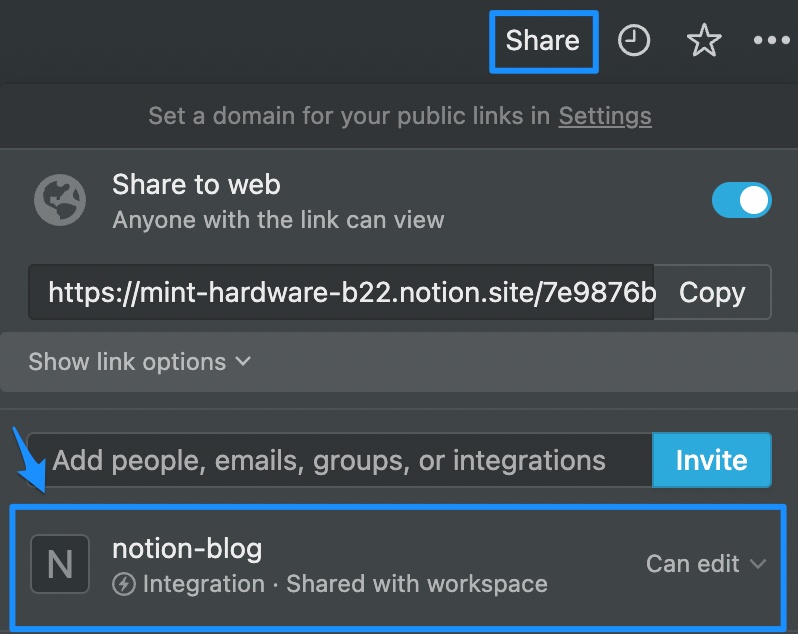
次に先ほど作成したテーブルに対して作成したintegrationを招待します。
Notionのの右上にあるShareボタンをクリックし表示されるポップオーバーにて、Inviteより作成したintegrationを招待してください
次にデータベースIDを取得します。
テーブルのページは以下のようなURLになっていて、
*****************の部分がデータベースIDになるので控えておきます。
3. @notionhq/clientを使って自分のNotionからデータを取得し描画する
最後に@notionhq/clientを使って実際にNotionからデータを取得して描画してみましょう。
まずは以下のようにnotionに接続するClientを作ります。
import { Client } from '@notionhq/client'

const notion = new Client({
  auth: process.env.NOTION_SECRET_KEY,
})
一覧ページ
控えておいたデータベースIDを使って対象のテーブルからレコードを取得します。
const response = await notion.databases.query({
  database_id: process.env.NOTION_DATABASE_ID,
})
かなり雑ですが取得できたデータを以下のような関数で加工して一覧データとして扱いやすい形に変換しています。
DBから取得した値を扱いやすい形に変換する
export const getDatabase = async (databaseId: string) => {
  const response = await notion.databases.query({
    database_id: databaseId,
    sorts: [
      {
        property: 'rEYP',
        direction: 'descending',
      },
    ],
  })
  const { results } = response
  const posts = results.map((result) => {
    const d = result.properties
    const item: Post = {
      thumbnail: '',
      authors: [],
      slug: '',
      published: 'no',
      date: 0,
      description: '',
      page: '',
      id: result.id,
    }
    Object.keys(d).forEach((key) => {
      const property = d[key]
      if (property.type === 'people') {
        item[key.toLowerCase()] = property.people.map((p) => (p as any).name)
      } else if (property.type === 'rich_text') {
        item[key.toLowerCase()] = property.rich_text[0].plain_text
      } else if (property.type === 'files') {
        if (property.files[0].type === 'external') {
          item[key.toLowerCase()] = property.files[0].name
        } else {
          item[key.toLowerCase()] = property.files[0].file?.url
        }
      } else if (property.type === 'title') {
        item[key.toLowerCase()] = property.title[0].plain_text
      } else if (property.type === 'checkbox') {
        item[key.toLowerCase()] = property.checkbox
      } else if (property.type === 'multi_select') {
        item[key.toLowerCase()] = property.multi_select[0].name
      } else if (property.type === 'date') {
        item[key.toLowerCase()] = property.date.start
      }
    })
    return item
  })
  return posts
}
最終的にNext.jsでgetStaticPropsを使って以下のようなイメージでISRで一覧ページを表示しています。
import { Portfolio } from '../components/portfolio'
import { getDatabase } from '../lib/notion'

export async function getStaticProps() {
  const posts = await getDatabase(process.env.NOTION_DATABASE_ID as string)
  return {
    props: {
      posts,
    },
    revalidate: 60,
  }
}

const Index = ({ posts = [], preview }) => {
  return (
    <>
      <Portfolio posts={posts} />
    </>
  )
}

export default Index
詳細ページ
また対象のページのデータを以下のようにClientから取得できます。
export const getPage = async (pageId: string) => {
  const response = await notion.pages.retrieve({ page_id: pageId })
  return response
}
対象ページのブロック一覧も以下のようにClientから取得できます。
export const getBlocks = async (blockId: string) => {
  const response = await notion.blocks.children.list({
    block_id: blockId,
    page_size: 50,
  })
  return response.results
}
当ポートフォリオサイトでは各記事のブロック一覧を以下のようにReactとTailwindCSSで表示しています。
ブロック表示のソースコード
const renderBlock = (block: GetBlockResponse) => {
  const { type, id } = block
  const value = block[type]

  switch (type) {
    case 'paragraph':
      return (
        <p className="text-gray-500 sm:text-lg mb-6 md:mb-8">
          <Text text={value.text} />
        </p>
      )
    case 'code':
      return (
        <pre className="text-gray-500 sm:text-lg mb-6 md:mb-8">
          <Text text={value.text} />
        </pre>
      )
    case 'heading_1':
      return (
        <h1 className="text-gray-800 text-xl sm:text-2xl font-semibold mb-2 md:mb-4">
          <Text text={value.text} />
        </h1>
      )
    case 'heading_2':
      return (
        <h2 className="text-gray-800 text-xl sm:text-2xl font-semibold mb-2 md:mb-4">
          <Text text={value.text} />
        </h2>
      )
    case 'heading_3':
      return (
        <h3>
          <Text text={value.text} />
        </h3>
      )
    case 'bulleted_list_item':
    case 'numbered_list_item':
      return (
        <li>
          <Text text={value.text} />
        </li>
      )
    case 'to_do':
      return (
        <div>
          <label htmlFor={id}>
            <input type="checkbox" id={id} defaultChecked={value.checked} />{' '}
            <Text text={value.text} />
          </label>
        </div>
      )
    case 'toggle':
      return (
        <details>
          <summary>
            <Text text={value.text} />
          </summary>
          {value.children?.map((block) => (
            <Fragment key={block.id}>{renderBlock(block)}</Fragment>
          ))}
        </details>
      )
    case 'child_page':
      return <p>{value.title}</p>
    case 'image':
      const src =
        value.type === 'external' ? value.external.url : value.file.url
      const caption = value.caption ? value.caption[0]?.plain_text : ''
      return (
        <figure className="bg-gray-100 overflow-hidden rounded-lg shadow-lg relative mb-6 md:mb-8">
          <img src={src} alt={caption} />
          {caption && <figcaption>{caption}</figcaption>}
        </figure>
      )
    default:
      return `❌ Unsupported block (${
        type === 'unsupported' ? 'unsupported by Notion API' : type
      })`
  }
}
NotionAPIを使ってみた感想
@notionhq/clientを使えばTypeScriptで書いてにデータベースから取得したデータの型情報を調べることができ、開発体験はとてもよかったです。
ただし、2021年11月6日現在では、まだデータ的に情報が足りていないブロックもいくつかあり、本格的なものを作るにはもう少し待ちたいなと思いました。
テキストや見出し、リスト、画像を使った簡単なブログなら現時点でも十分に作れそうなことがわかりました。
ソースコード
実際のポートフォリオサイトのソースコードはこちらです。
コードはかなり雑ですがご容赦ください。
Discussion
ポートフォリオに行ってみると画像のリンクが切れてるのはなんでですかね。
GitHubもリンク切れの様です。