VSCodeで作成したSpring BootをCloud Run へデプロイ
目的
VisualStudioCode で作成した SpringBoot アプリケーションをCloud Runにデプロイし、「Hello,World!」 を表示します。
課金が発生しない範囲で可能です。
動作環境
- VisualStudioCode +拡張機能に DevContainers
- Docker Desktop
- Windows11
参考
- Cloud Run のクイックスタート
- DevContainers で開発環境構築するため、詳細な画面キャプチャなどはこちら
(1) 拡張機能に Spring Boot Extension Pack を追加
- 開発コンテナー構成テンプレート:Java
- Java version:17-bookworm
- Java 開発コンテナーのオプション:Install Gradle, a build ~
- インストールする追加機能:Python
できあがった devcontainer.json は以下の通り
// For format details, see https://aka.ms/devcontainer.json. For config options, see the
// README at: https://github.com/devcontainers/templates/tree/main/src/java
{
	"name": "Java",
	// Or use a Dockerfile or Docker Compose file. More info: https://containers.dev/guide/dockerfile
	"image": "mcr.microsoft.com/devcontainers/java:1-17-bookworm",
	"features": {
		"ghcr.io/devcontainers/features/java:1": {
			"version": "none",
			"installMaven": "false",
			"installGradle": "true"
		},
		"ghcr.io/devcontainers/features/python:1": {}
	},
	"customizations": {
		"vscode": {
			"extensions": [
				"vmware.vscode-boot-dev-pack"
			]
		}
	}
	// Use 'forwardPorts' to make a list of ports inside the container available locally.
	// "forwardPorts": [],
	// Use 'postCreateCommand' to run commands after the container is created.
	// "postCreateCommand": "java -version",
	// Configure tool-specific properties.
	// "customizations": {},
	// Uncomment to connect as root instead. More info: https://aka.ms/dev-containers-non-root.
	// "remoteUser": "root"
}
VSCode の左下からコンテナを再接続しましょう。
(2) 開発用コンテナで Spring Initializr
Spring Initializr で開発環境を整えていきます。
- コンテナに接続されていることを確認
- Ctrl+Shift+P でコマンドパレットを呼び出し、「spring init」と入力すると Spring Initializr が候補にでます。ここでは「Create a Gradle project...」を選択します。
- Spring Boot version:3.3.0
- project language:Java
- Group Id:com.example(デフォルト)
- Artifact Id:helloworld
- packing type:Jar
- Java version:17(とりあえず公式に合わせただけ)
- Choose dependencies
- Spring Web
(3) ソースコード編集
クイックスタートに記載されているソースコードを使用します。
- HelloworldApplication クラスの更新
src/main/java/com/example/helloworld/HelloworldApplication.java
package com.example.helloworld;

import org.springframework.beans.factory.annotation.Value;
import org.springframework.boot.SpringApplication;
import org.springframework.boot.autoconfigure.SpringBootApplication;
import org.springframework.web.bind.annotation.GetMapping;
import org.springframework.web.bind.annotation.RestController;

@SpringBootApplication
public class HelloworldApplication {

  @Value("${NAME:World}")
  String name;

  @RestController
  class HelloworldController {
    @GetMapping("/")
    String hello() {
      return "Hello " + name + "!";
    }
  }

  public static void main(String[] args) {
    SpringApplication.run(HelloworldApplication.class, args);
  }
}
- サーバーポートの設定
src/main/resources/application.propertiesを編集します
server.port=${PORT:8080}
- Java バージョンの指定
最上位の helloworld ディレクトリに project.toml ファイルを作成して、Java バージョンを指定
[[build.env]]
name =  "GOOGLE_RUNTIME_VERSION"
value = "17"
VSCode と Google Cloud を接続
ソースコードの編集を終えたため、VisualStudioCode と Google Cloud を接続します。
(1) Google Cloud の拡張機能を追加
- Ctrl+Shift+P でコマンドパレットを呼び出し「gemini code」と入力。
「Gemini Code Assist + Google Cloud Code for Visual Studio Code」 をインストール

(2) Google Cloud へサインイン
-
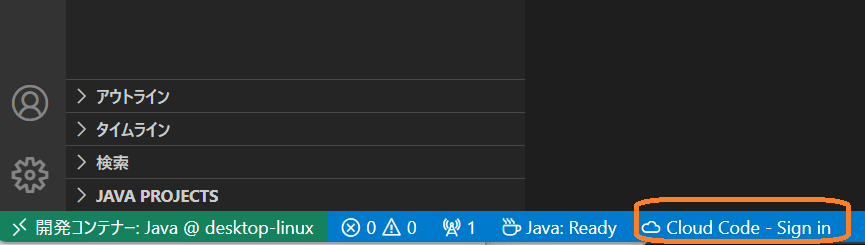
VSCode 左下の「Cloud Code - Sign in」をクリック
-
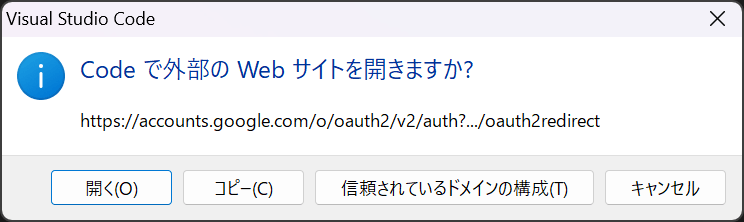
VSCode から GoogleCloud にアクセスするための承認をするためのポップアップが出るので「開く」を選択
-
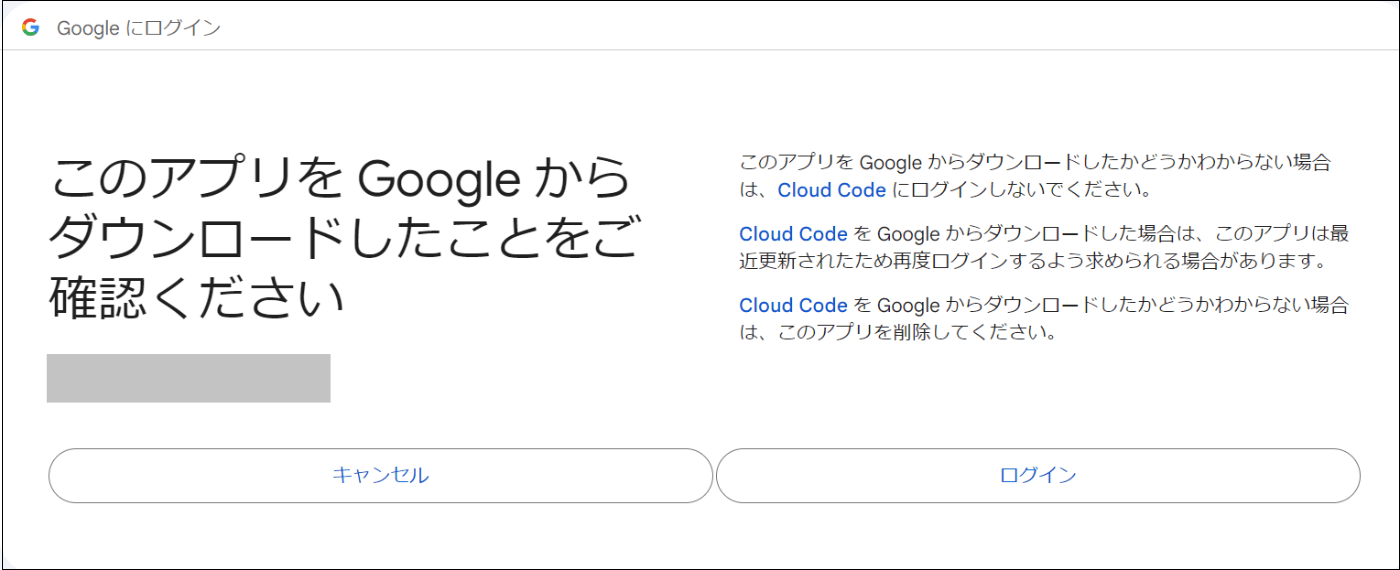
Google アカウント選択画面が開くので自分が使用したいアカウントを選択
-
「ログイン」を選択(拡張機能をインストールし当画面に遷移したため)
-
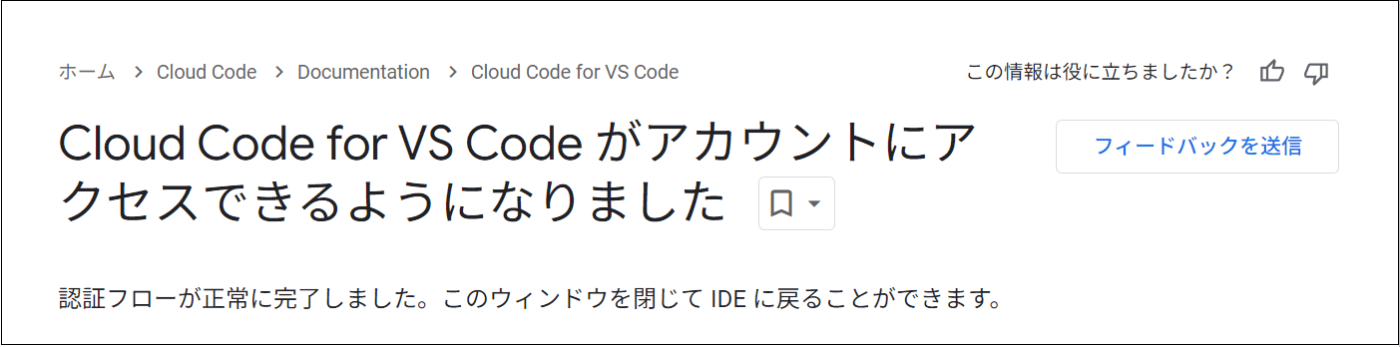
Cloud Code for VS Code とアカウントの紐づけ完了
ページは閉じて問題ないです
-
VSCode 左下の雲マークの横に現在接続されているプロジェクト名が出る(画像 GoogleCloudRunTest が接続されている)

(3) プロジェクト新規作成 / プロジェクト切り替え
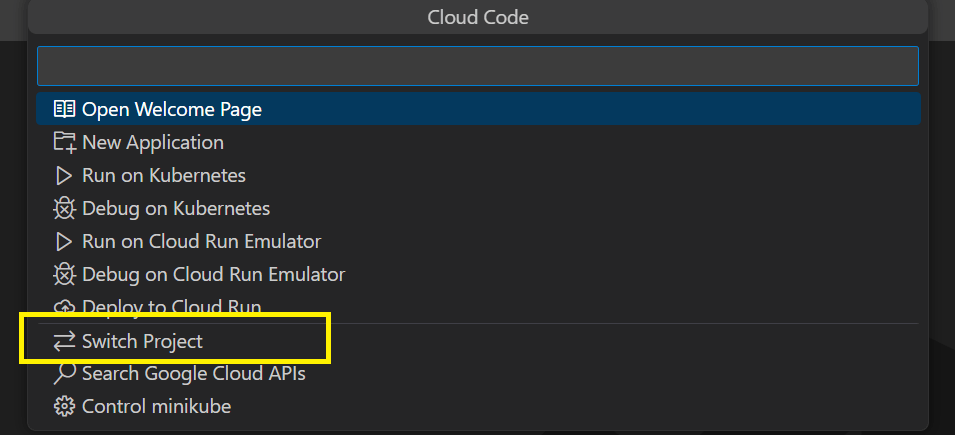
- 先ほどの Google Cloud のマークをクリック
- Switch Project を選択
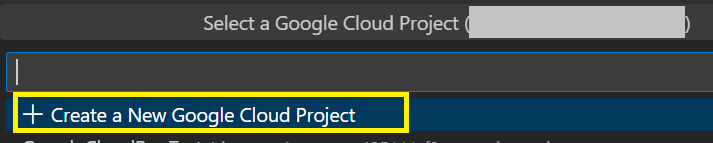
- Create a New Google Cloud Project
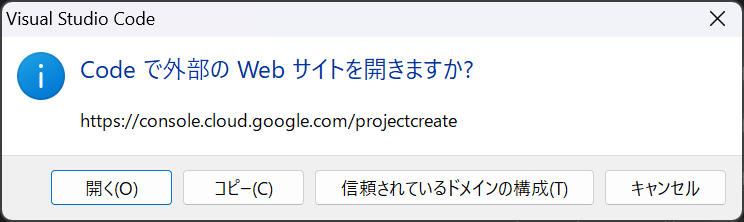
- 開くを選択
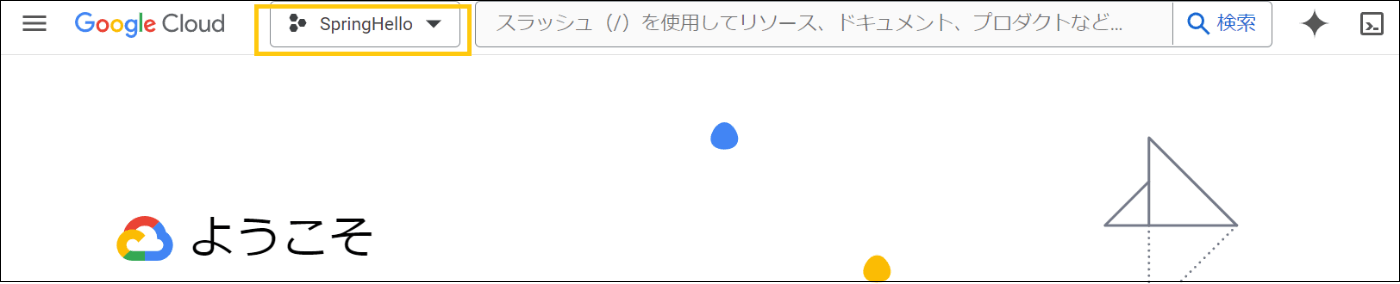
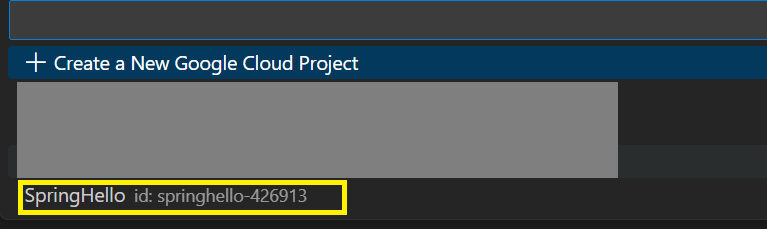
- プロジェクト名を入力。今回は「SpringHello」
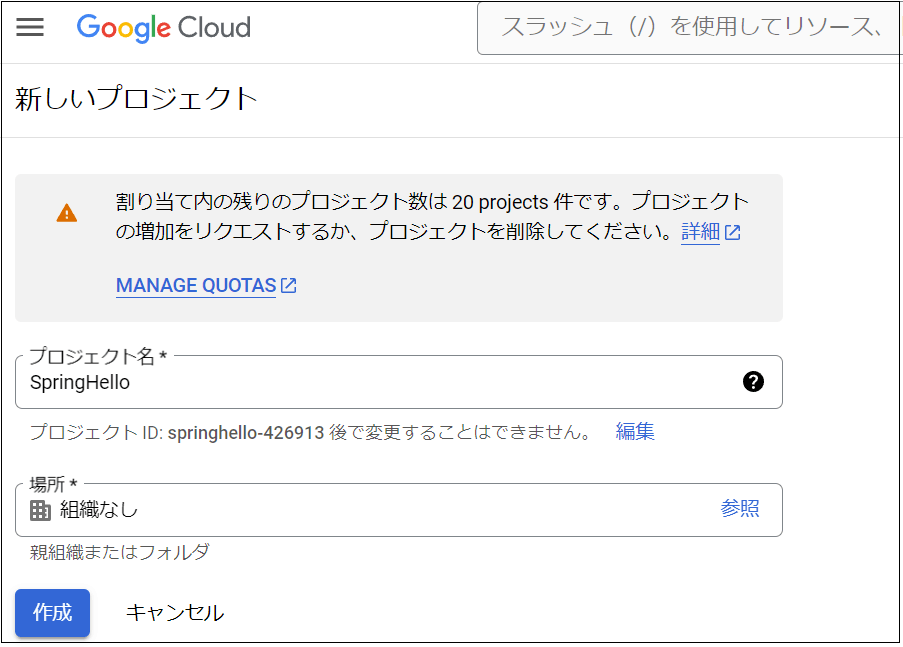
- プロジェクトが作成されるとコンソールにプロジェクト名が表示されます。
- VSCode に戻ると「Refresh」が表示されるためクリック

- 先ほど作成したプロジェクトが一覧に追加されていることを確認しクリック
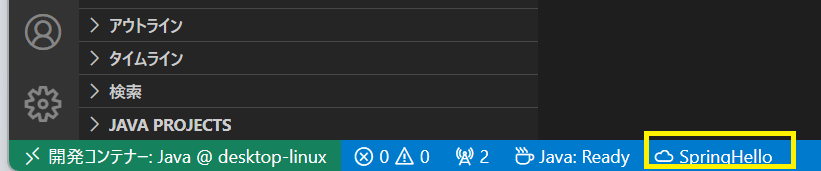
- VSCode 下部の GoogleCloud マークに接続したプロジェクト名が表示されます
(4) Deploy to Cloud Run(初期設定)
ここからデプロイ準備を進めます
-
Ctrl+Shift+x でコマンドパレットを開き「Deploy to Cloud Run」を実行しましょう

-
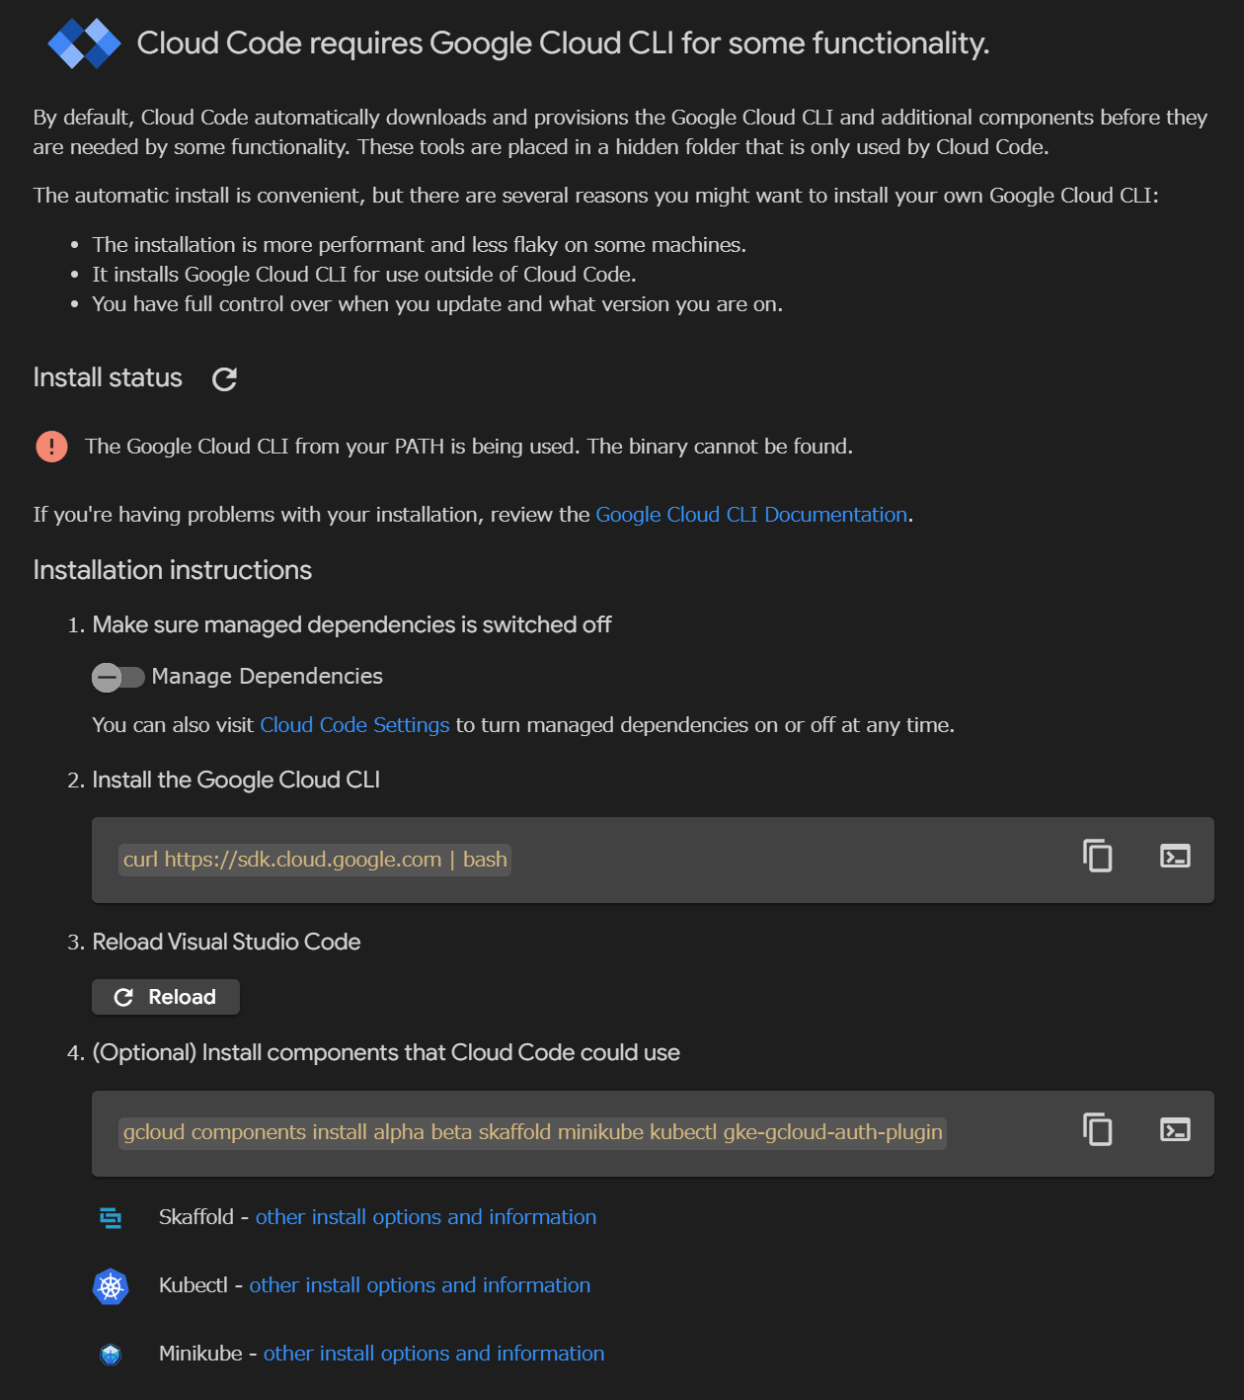
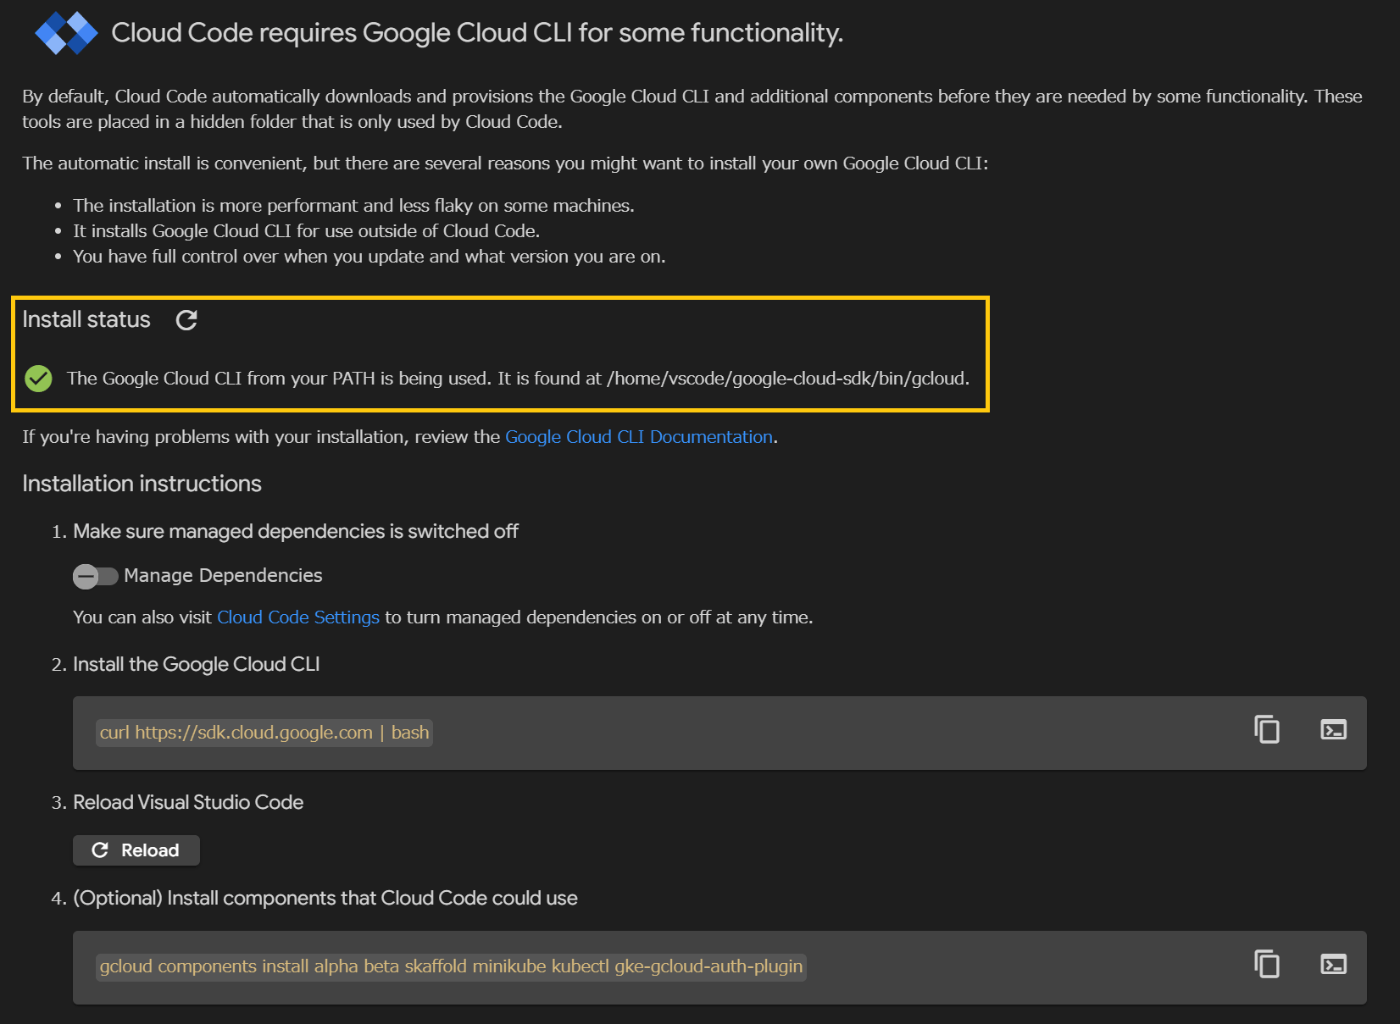
VSCode から Cloud Run へデプロイするために必要な設定を行います。
「Install Status」のアイコンが赤になっており、Google Cloud CLI が見つからないようなので、
Ctrl+@でターミナルを開き「2. Install the Google Cloud CLI」のコマンドを実行します。
-
「2. Install the Google Cloud CLI」のコマンドを実行すると、下記のようにダウンロードが開始されます。
はじめにインストールディレクトリを聞かれますがデフォルトでよいので何も入力せずに Enter で進めます。
vscode ➜ /workspaces/spring_hello/helloworld $ curl https://sdk.cloud.google.com | bash
  % Total    % Received % Xferd  Average Speed   Time    Time     Time  Current
                                 Dload  Upload   Total   Spent    Left  Speed
100   443  100   443    0     0   8503      0 --:--:-- --:--:-- --:--:--  8519
Downloading Google Cloud SDK install script: https://dl.google.com/dl/cloudsdk/channels/rapid/install_google_cloud_sdk.bash
######################################################################## 100.0%
Running install script from: /tmp/tmp.l3M1JMqFYx/install_google_cloud_sdk.bash
which curl
curl -# -f https://dl.google.com/dl/cloudsdk/channels/rapid/google-cloud-sdk.tar.gz
############################################################################################################################################## 100.0%

Installation directory (this will create a google-cloud-sdk subdirectory) (/home/vscode): # ★Enter押下でよい
- Google Cloud CLI の改善に協力要求なのでどちらでもよいため、ここでは y で回答
Do you want to help improve the Google Cloud CLI (y/N)? # ★yで回答
- インストールするコンポーネント一覧が表示されたらインストールするか聞かれるので、y で回答
Your current Google Cloud CLI version is: 481.0.0
Installing components from version: 481.0.0

┌─────────────────────────────────────────────────────────────────────────────┐
│                     These components will be installed.                     │
├─────────────────────────────────────────────────────┬────────────┬──────────┤
│                         Name                        │  Version   │   Size   │
├─────────────────────────────────────────────────────┼────────────┼──────────┤
│ BigQuery Command Line Tool                          │      2.1.6 │  1.7 MiB │
│ BigQuery Command Line Tool (Platform Specific)      │    2.0.101 │  < 1 MiB │
│ Bundled Python 3.11                                 │     3.11.8 │ 75.1 MiB │
│ Cloud Storage Command Line Tool                     │       5.30 │ 11.3 MiB │
│ Cloud Storage Command Line Tool (Platform Specific) │       5.27 │  < 1 MiB │
│ Google Cloud CLI Core Libraries (Platform Specific) │ 2024.01.06 │  < 1 MiB │
│ Google Cloud CRC32C Hash Tool                       │      1.0.0 │  1.2 MiB │
│ gcloud cli dependencies                             │ 2021.04.16 │  < 1 MiB │
└─────────────────────────────────────────────────────┴────────────┴──────────┘
~~~~
Do you want to continue (Y/n)? # ★yで回答
- Google Cloud CLI の環境設定を bashrc に設定してもよいかの確認です。そのまま Enter で進めます
The Google Cloud SDK installer will now prompt you to update an rc file to bring the Google Cloud CLIs into your environment.

Enter a path to an rc file to update, or leave blank to use [/home/vscode/.bashrc]: # ★Enter押下でよい
-
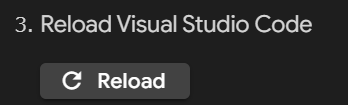
VSCode に戻り「3. Reload Visual Studio Code」の Reload ボタンをクリックし、VSCode を再読み込みします
-
Install Status が緑になったことが確認できれば必要な設定は完了です
(5 Deploy to Cloud Run(CloudRunAPI 有効化とデプロイ)
-
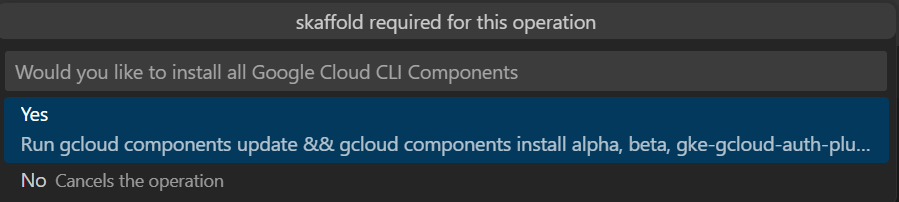
Ctrl+Shift+x でコマンドパレットを開き「Deploy to Cloud Run」を実行
-
コンポーネントアップデートするか確認されるため Yes を選択します。
-
下記の「Do you want to Continue(Y/n)? 」も y で回答します。
Your current Google Cloud CLI version is: 481.0.0
Installing components from version: 481.0.0

┌────────────────────────────────────────────────┐
│      These components will be installed.       │
├────────────────────────┬────────────┬──────────┤
│          Name          │  Version   │   Size   │
├────────────────────────┼────────────┼──────────┤
│ Minikube               │     1.33.1 │ 34.4 MiB │
│ Skaffold               │     2.11.1 │ 24.1 MiB │
│ gcloud Alpha Commands  │ 2024.06.14 │  < 1 MiB │
│ gcloud Beta Commands   │ 2024.06.14 │  < 1 MiB │
│ gke-gcloud-auth-plugin │      0.5.8 │  7.9 MiB │
│ kubectl                │    1.27.14 │ 73.4 MiB │
│ kubectl                │    1.27.14 │  < 1 MiB │
└────────────────────────┴────────────┴──────────┘

For the latest full release notes, please visit:
  https://cloud.google.com/sdk/release_notes

Do you want to continue (Y/n)? # ★yで回答
-
デプロイに必要な Cloud Run API を有効にするよう要求がありました。
「Enable API」をクリックします。

-
有効化の処理が動きます

-
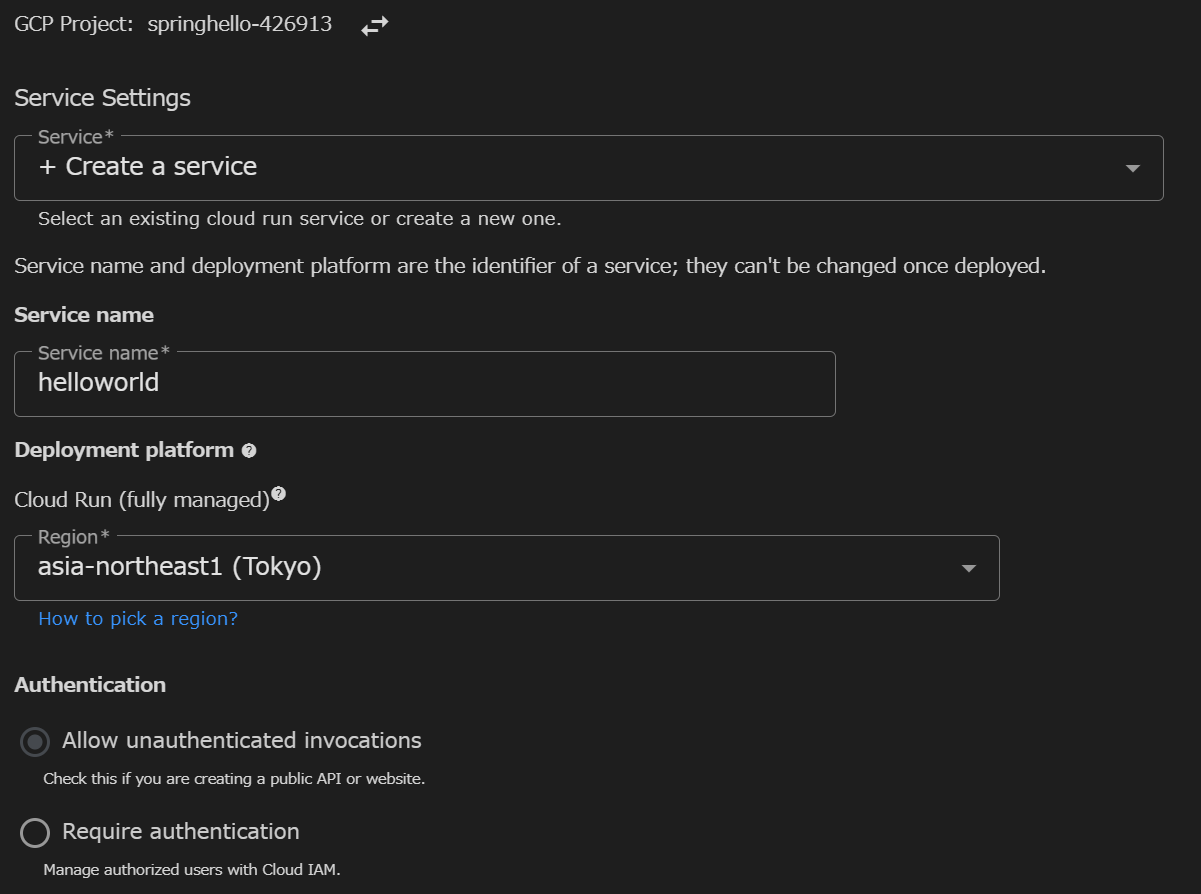
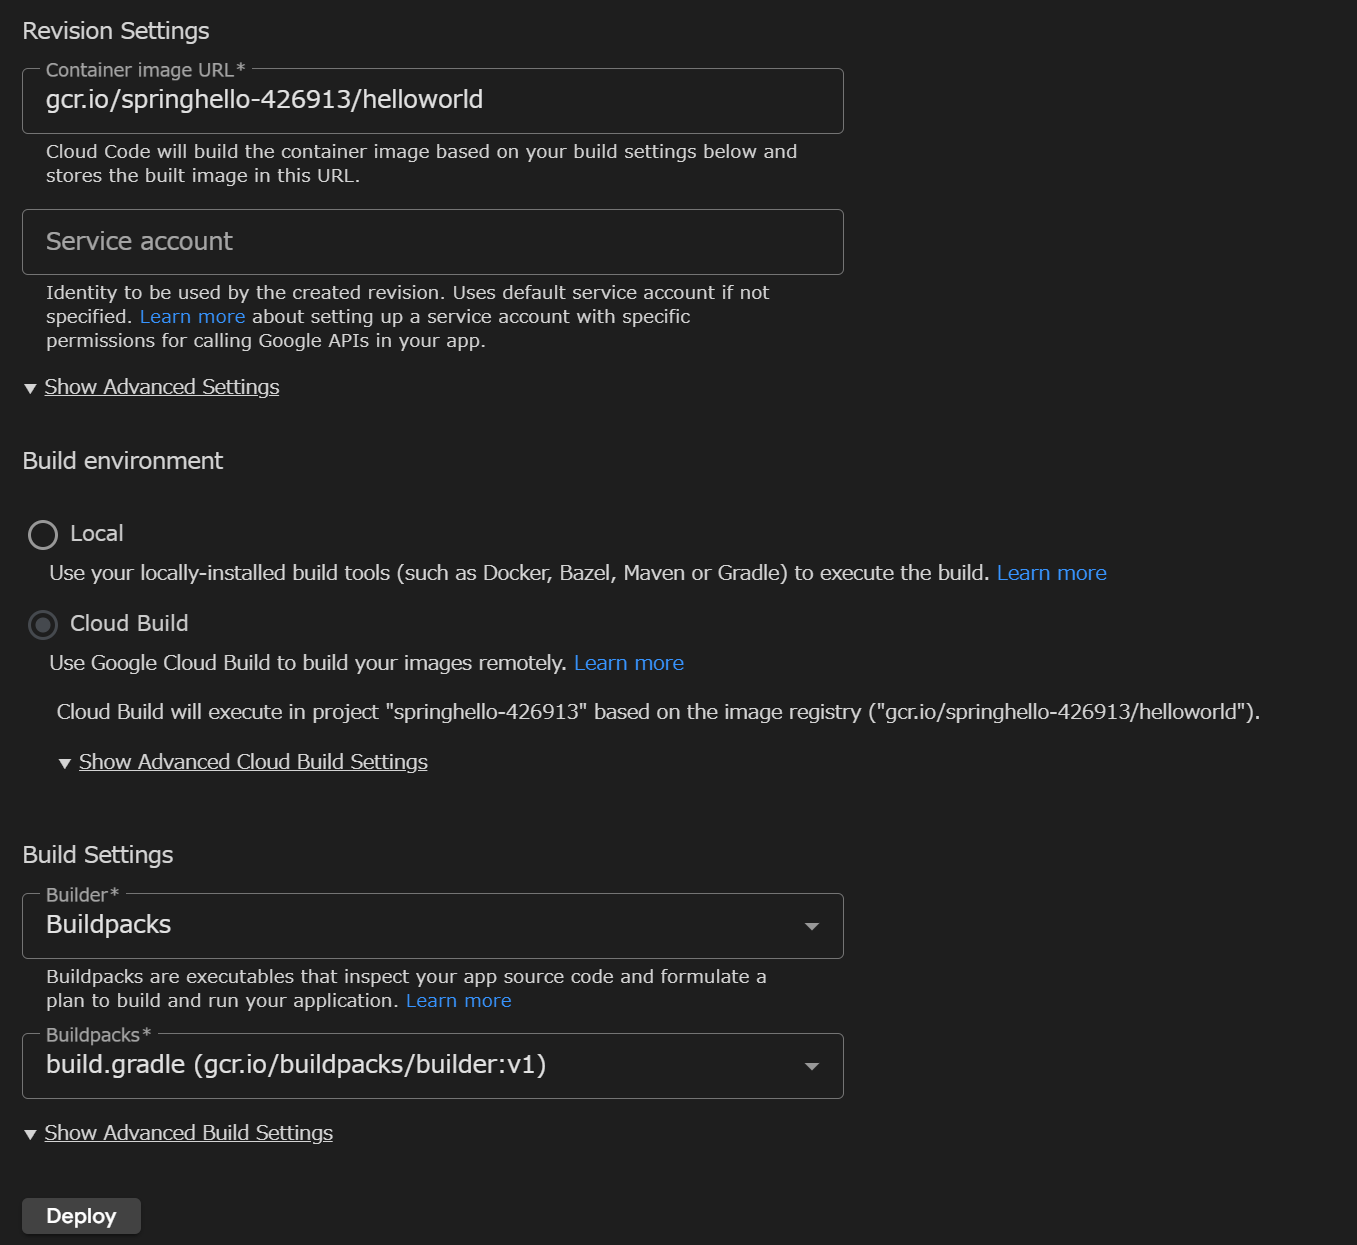
CloudRunAPI が有効化されるとデプロイに必要な設定画面が表示されます。
Deployment platform の Region を「asia-northeast1(Tokyo)」に変更
-
Build Environment を CloudBuild に変更します。
Cloud Build の API を有効化するよう要求されるため「Enable Cloud Build API」をクリックします。

-
Cloud Build の API を有効化されると下図のようになります。
最下部の「Deploy」ボタンを押下します。
-
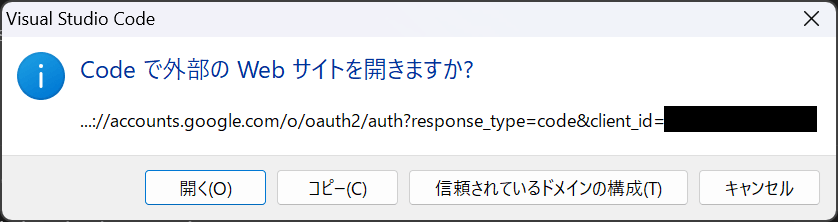
GoogleCloud と接続するときと同様、アクセス確認されるので開いてログインまで行います。
-
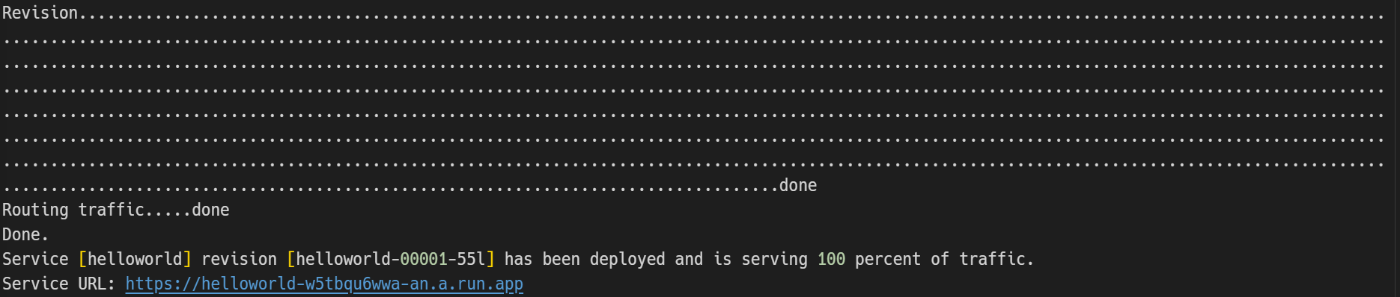
問題がなければコンソールのログでデプロイ完了が確認できます。
Service URL が表示されるため、URL を開きましょう。
-
「Hello, World!」と表示されればデプロイ成功です。

後始末
課金が発生しないよう、Google Cloud コンソールから不要な資材を削除します。
- CloudRun で実際に動かしたサービスの削除
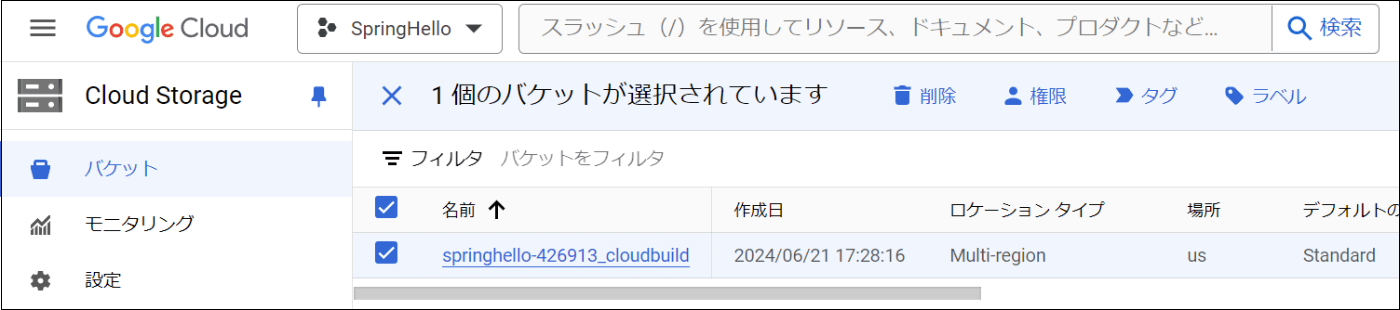
- CloudStorage からデプロイ時の資材を削除
-
Cloud Run を開くと先ほどの「helloworld」が動いていることが確認できます
チェックボックスにチェックを入れ削除します

-
Cloud Storage を開き、対象資材にチェックを入れ削除します
-
今後使用しないようであればプロジェクトの削除しましょう
Discussion