【Remix v2】remix-auth・remix-auth-googleによる認証機能の実装方法
はじめに
本記事では、Remixとremix-auth・remix-auth-googleを用いた、Credential認証(メールアドレス・パスワードによる認証)とGoogle認証の実装方法について解説します。
コードの全容はGitHubにありますので、気になる方やより詳しく見たい方は見てみてください。
環境
実装環境は以下のとおりです。
- @remix-run/react ^2.8.0
- @remix-run/node ^2.8.0
- @remix-run/serve ^2.8.0
- remix-auth ^3.6.0
- remix-auth-form ^1.4.0
- remix-auth-google 2.0.0
- remix-validated-form ^5.1.5
- zod ^3.22.4
- bcryptjs: ^2.4.3
- @types/bcryptjs: ^2.4.6
- vite: ^5.1.0
- prisma: ^5.10.2
- @prisma/client: 5.10.2
remixテンプレートのviteのMinimal serverで作成したものになります。
DBにはplanet scaleを利用しました。
実装
本記事では以下の実装内容について解説します。
- ログイン・ログアウト機能
- ユーザー登録機能
- フォームのバリデーション
- Google認証機能
それでは実際の実装の方を見ていきましょう。
ライブラリの導入
まずは必要なライブラリをインストールします。
以下のコマンドを実行し、ライブラリを導入します。
npm install remix-auth remix-auth-form remix-auth-google
prisma schema
認証で使用するのはユーザー情報のみなのでUser Modelを以下のように定義しています。
generator client {
  provider = "prisma-client-js"
}

datasource db {
  provider     = "mysql"
  url          = env("DATABASE_URL")
  relationMode = "prisma"
}

model User {
  id        String   @id @default(cuid())
  email     String   @unique
  password  String
  name      String
  image     String?
  provider  String   @default("Credentials")
  createdAt DateTime @default(now())
  updatedAt DateTime @updatedAt
}
ログイン機能
まず、ログイン機能ですが、ビジネスロジック部分から説明し、次にフロントエンド部分を説明します。
このログイン機能の実装はremix-authのドキュメントにも記載があるので、細かい点はそちらを確認してください。
ログイン機能 -ビジネスロジック-
まずは、セッションストレージオブジェクトを作成します。
理由としては、remix-authには、ユーザーセッションを保存するためのセッションストレージオブジェクトが必要なので、まずはこれを作成します。
早速、セッションストレージオブジェクトを作成してくのですが、その前に、セッションシークレットを作成する必要があるので、以下のコマンドで作成し、環境変数として定義をします。
openssl rand -base64 32
SESSION_SECRET = '********************'
import { createCookieSessionStorage } from '@remix-run/node'

export const sessionStorage = createCookieSessionStorage({
  cookie: {
    name: '_session',
    sameSite: 'lax',
    path: '/',
    httpOnly: true,
    secrets: [process.env.SESSION_SECRET || ''],
    secure: process.env.NODE_ENV === 'production',
    maxAge: 60 * 60 * 24 * 30,
  },
})

export const { getSession, commitSession, destroySession } = sessionStorage
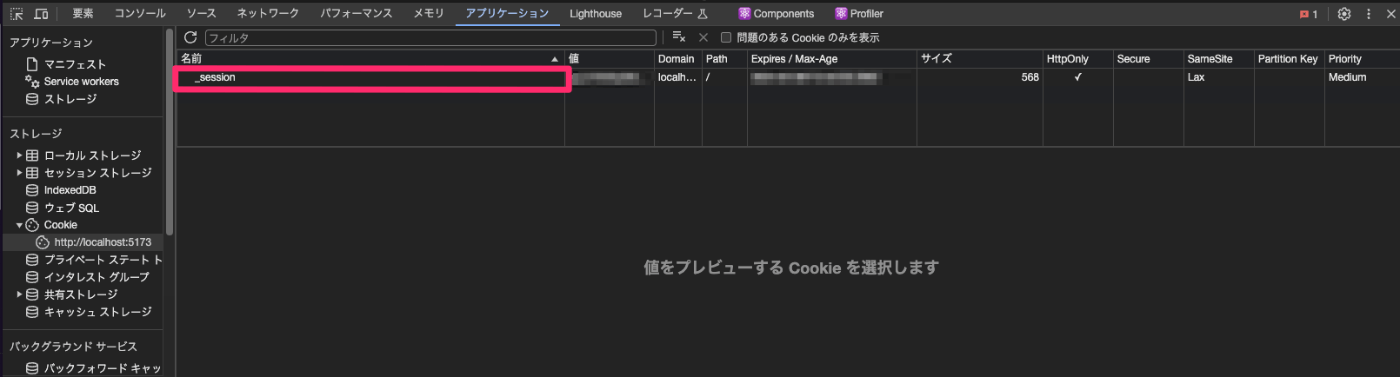
セッションストレージオブジェクトの作成は以上で完了です。
ログイン時には_sessionという名称で値が入っていることを確認することができます。
次にログイン処理のロジックを作成します。
import { User } from '@prisma/client'
import bcrypt from 'bcryptjs'
import { Authenticator, AuthorizationError } from 'remix-auth'
import { FormStrategy } from 'remix-auth-form'
import { prisma } from '../libs/db'
import { sessionStorage } from './session.server'

const SESSION_SECRET = process.env.SESSION_SECRET

if (!SESSION_SECRET) {
  throw new Error('SESSION_SECRET is not defined')
}

const authenticator = new Authenticator<Omit<User, 'password'>>(sessionStorage)

const formStrategy = new FormStrategy(async ({ form }) => {
  const email = form.get('email')
  const password = form.get('password')

  if (!(email && password)) {
    throw new Error('Invalid Request')
  }

  const user = await prisma.user.findUnique({ where: { email: String(email) } })

  if (!user) {
    throw new AuthorizationError()
  }

  const passwordsMatch = await bcrypt.compare(String(password), user.password)

  if (!passwordsMatch) {
    throw new AuthorizationError()
  }

  const { password: _, ...userWithoutPassword } = user

  return userWithoutPassword
})

authenticator.use(formStrategy, 'user-pass')

export { authenticator }
ここではremix-auth-formのFormStrategyを使用して、フロントエンドでauthenticatorによるログインのアクションをした呼び出した際の処理を記述します。
処理としては以下のことをしています。
- formからemail・passwordを取得
- userが存在しないとエラー
- パスワードが正しいかを判定
- レスポンスからパスワードを除外
- authenticator.useにより、
user-passという名前でCredntial認証処理をauthenticatorに登録
次に、フロントエンドの部分を見ていきましょう。
ログイン機能 -フロントエンド-
フロントエンドでは、コンポーネントとフォームバリデーションを実施しています。
それぞれ見ていきましょう。
まずは、バリデーションのスキーマからです。
import { withZod } from '@remix-validated-form/with-zod'
import { z } from 'zod'

const loginFormSchema = z.object({
  email: z
    .string()
    .email('メールアドレスを正しい形式で入力してください')
    .max(128, 'メールアドレスは128文字以下で入力してください'),
  password: z
    .string()
    .min(8, 'パスワードは8文字以上で入力してください')
    .max(128, 'パスワードは128文字以下で入力してください')
    .refine(
      (password: string) => /[A-Za-z]/.test(password) && /[0-9]/.test(password),
      'パスワードは半角英数字の両方を含めてください',
    ),
})

export const loginValidator = withZod(loginFormSchema)
Remixでzodのバリデーションを使用するにはremix-validated-formを使用して、withZodに対して、バリデーションスキーマを渡すことで簡単に実装できます。
これをコンポーネント部分でフォームに紐づけバリデーションエラーを表示することができます。
続いて、コンポーネント部分です。
import {
  ActionFunctionArgs,
  LoaderFunctionArgs,
  MetaFunction,
} from '@remix-run/node'
import { Link } from '@remix-run/react'
import { ValidatedForm } from 'remix-validated-form'
import { tv } from 'tailwind-variants'
import { TextField } from '../components/TextField'
import { authenticator } from '../services/auth.server'
import { loginValidator } from '../types/validators/LoginValidator'

export const meta: MetaFunction = () => {
  return [{ title: 'New Remix App login' }]
}

const loginPageStyles = tv({
  slots: {
    base: 'h-full justify-center items-center flex flex-col gap-y-5',
    form: 'rounded-2xl bg-white p-6 w-[420px]',
    title: 'text-3xl font-extrabold text-black-600 mb-5',
    btnWrapper: 'text-center mt-5',
    btn: 'rounded-xl mt-2 bg-red-500 px-3 py-2 text-white font-semibold transition duration-300 ease-in-out hover:bg-red-600',
    text: 'text-gray-600',
    link: 'text-red-600 px-2 hover:underline',
  },
  compoundSlots: [{ slots: ['btnWrapper', 'btn'], class: 'w-full' }],
})

export const loader = async ({ request }: LoaderFunctionArgs) => {
  const user = await authenticator.isAuthenticated(request, {
    successRedirect: '/',
  })

  return user
}

export const action = async ({ request }: ActionFunctionArgs) => {

  return authenticator.authenticate('user-pass', request, {
    successRedirect: '/',
    failureRedirect: '/auth/login',
  })
}

const LoginPage = () => {
  const { base, form, title, btnWrapper, btn, text, link } = loginPageStyles()

  return (
    <div className={base()}>
      <div className={form()}>
        <ValidatedForm validator={loginValidator} method="POST">
          <h2 className={title()}>Login</h2>
          <TextField htmlFor="email" label="Email" />
          <TextField htmlFor="password" type="password" label="Password" />
          <div className={btnWrapper()}>
            <button
              type="submit"
              name="_action"
              value="Sign In"
              className={btn()}
            >
              Login
            </button>
          </div>
        </ValidatedForm>
      </div>
      <p className={text()}>
        Don't have an account?
        <Link to="/auth/signup">
          <span className={link()}>Sign Up</span>
        </Link>
      </p>
    </div>
  )
}

export default LoginPage
ここでは、まずバリデーション部分について解説します。
remix-validated-formのValidatedFormのvalidatorというpropsに上記で定義した、バリデーションスキーマを渡すことでバリデーションスキーマがフォームに紐づけられます。
また、バリデーションエラーの表示ですが、今回はTextFieldコンポーネント内で実装しています。
import { ComponentProps, FC } from 'react'
import { useField } from 'remix-validated-form'
import { tv } from 'tailwind-variants'

const textFieldStyles = tv({
  slots: {
    base: 'flex flex-col w-full',
    labelSlot: 'text-gray-600 font-semibold',
    textField: 'w-full p-2 rounded-xl my-2 border border-gray-300 outline-none',
    errMsg: 'text-red-500 mb-2',
  },
  variants: {
    hasError: {
      true: { textField: 'border-red-500' },
    },
  },
})

type TextFieldProps = Readonly<{
  htmlFor: string
  label: string
  type?: ComponentProps<'input'>['type']
  errorMessage?: string
}>

export const TextField: FC<TextFieldProps> = ({
  htmlFor,
  label,
  type,
  errorMessage,
}) => {
  const { error } = useField(htmlFor)
  const { base, labelSlot, textField, errMsg } = textFieldStyles({
    hasError: !!error,
  })

  return (
    <div className={base()}>
      <label htmlFor={htmlFor} className={labelSlot()}>
        {label}
      </label>
      <input type={type} id={htmlFor} name={htmlFor} className={textField()} />
      {error && <span className={errMsg()}>{error}</span>}
      {errorMessage && <span className={errMsg()}>{errorMessage}</span>}
    </div>
  )
}
上記のようにuseFieldを使用して該当するinput要素のname属性を渡すことで各フィールドのバリデーションを管理できます。(例えば、emailなら、useField('email')となります)
注意点としては、useFieldはValidatedForm内でのみ使用できるので、auth.login.tsxなどで呼び出すとエラーとなるので、そこだけ注意が必要です。
次に、実際のログイン処理ですが、action関数で行っています。
export const action = async ({ request }: ActionFunctionArgs) => {

  return authenticator.authenticate('user-pass', request, {
    successRedirect: '/',
    failureRedirect: '/auth/login',
  })
}
上記のように、authenticatorのauthenticateを呼び出し、auth.server.tsで設定した、user-passを指定することで、Credential認証のロジックが行われます。
そして、ログインに成功したら/にリダイレクトし、失敗の場合は、/auth/loginにリダイレクトします。
最後に、loader関数では、isAuthenticatedを使用してログインユーザーの情報を取得します。ここで取得されるユーザーはauth.server.tsのレスポンスの値、つまり今回は、userからpasswordを除外したオブジェクトが取得されます。
export const loader = async ({ request }: LoaderFunctionArgs) => {
  const user = await authenticator.isAuthenticated(request, {
    successRedirect: '/',
  })

  return user
}
ログイン処理は以上です。
ログアウト処理
ログアウトの処理はホーム画面などのaction関数で、以下の処理を記述します。
また、loader関数で以下のようにuserを取得し、failureRedirectでユーザーが未ログインの場合にリダイレクトさせることもできます。
import { ActionFunctionArgs, LoaderFunctionArgs } from '@remix-run/node'
import { Form, useLoaderData } from '@remix-run/react'
import { TaskList } from '../components/TaskList'
import { authenticator } from '../services/auth.server'

export const loader = async ({ request }: LoaderFunctionArgs) => {
  const user = await authenticator.isAuthenticated(request, {
    failureRedirect: '/auth/login',
  })

  return user
}

export const action = async({ request }: ActionFunctionArgs) => {
  return await authenticator.logout(request, { redirectTo: '/auth/login' })
}

const Index = () => {
  const { user } = useLoaderData<typeof loader>()
  return (
    <>
      <h1>Hello {user.name}さん</h1>
      <Form method='POST'>
        <button type='submit' name='action' value='logout'>Logout</button>
      </Form>
    </>
  )
}
以上が、ログアウトの処理です。
Google認証
次にGoogle認証ですが、こちらはremix-auth-googleを使用して実装します。
以下の記事を参考に実装した部分が多いので、参考にしてみてください。
Google認証 -ビジネスロジック-
Google認証ですが、実装の前に以下の記事の「Google Developer Consoleにアクセス」の部分から「認証情報の取得」の取得までの設定を行い、環境変数に値を定義します。
私の場合は、以下のような設定値となっていますので、環境変数は以下のようになります。
また、CLIENT_URLもGoogle認証では必要なので設定しておきます。
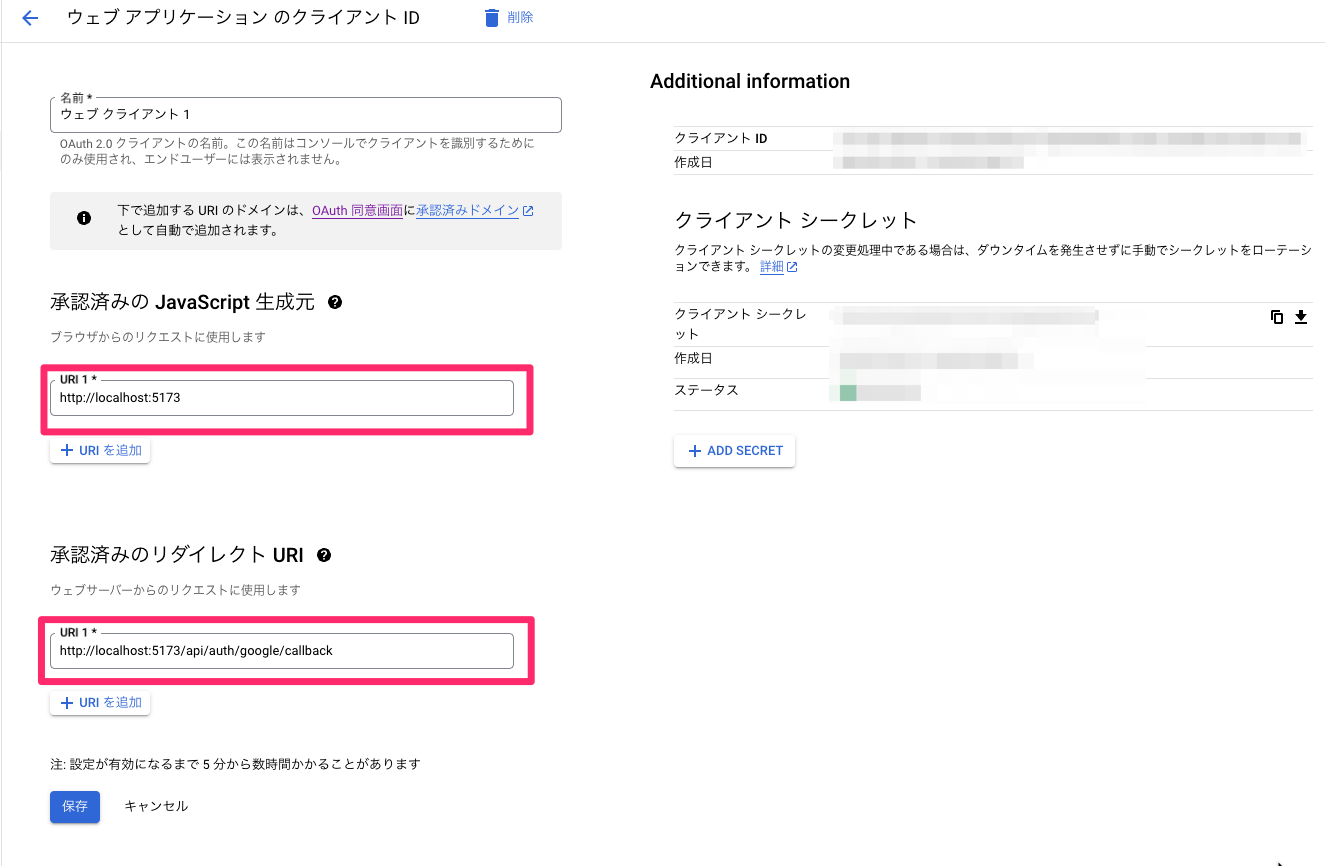
+ CLIENT_URL='http://localhost:5173'
 SESSION_SECRET='**********************'
+ GOOGLE_CLIENT_ID='**********************'
+ GOOGLE_CLIENT_SECRET='**********************'
 import { User } from '@prisma/client'
 import bcrypt from 'bcryptjs'
 import { Authenticator, AuthorizationError } from 'remix-auth'
 import { FormStrategy } from 'remix-auth-form'
+ import { GoogleStrategy } from 'remix-auth-google'
 import { prisma } from '../libs/db'
 import { sessionStorage } from './session.server'

 const SESSION_SECRET = process.env.SESSION_SECRET

 if (!SESSION_SECRET) {
   throw new Error('SESSION_SECRET is not defined')
 }

 const authenticator = new Authenticator<Omit<User, 'password'>>(sessionStorage)

 const formStrategy = new FormStrategy(async ({ form }) => {
   const email = form.get('email')
   const password = form.get('password')

   if (!(email && password)) {
     throw new Error('Invalid Request')
   }

   const user = await prisma.user.findUnique({ where: { email: String(email) } })

   if (!user) {
     throw new AuthorizationError()
   }

   const passwordsMatch = await bcrypt.compare(String(password), user.password)

   if (!passwordsMatch) {
     throw new AuthorizationError()
   }

   const { password: _, ...userWithoutPassword } = user

   return userWithoutPassword
 })

 authenticator.use(formStrategy, 'user-pass')

+ if (
+   !(
+     process.env.GOOGLE_CLIENT_ID &&
+     process.env.GOOGLE_CLIENT_SECRET &&
+     process.env.CLIENT_URL
+   )
+ ) {
+   throw new Error(
+     'GOOGLE_CLIENT_ID、GOOGLE_CLIENT_SECRET、CLIENT_URLが設定されていません。',
+   )
+ }

+ const googleStrategy = new GoogleStrategy<User>(
+   {
+     clientID: process.env.GOOGLE_CLIENT_ID || '',
+     clientSecret: process.env.GOOGLE_CLIENT_SECRET || '',
+     callbackURL: `${process.env.CLIENT_URL}/api/auth/google/callback`,
+   },
+   async ({ profile }) => {
+     const user = await prisma.user.findUnique({
+       where: { email: profile.emails[0].value },
+     })
+
+     if (user) {
+       return user
+     }
+
+     const newUser = await prisma.user.create({
+       data: {
+         id: profile.id,
+         email: profile.emails[0].value || '',
+         password: '',
+         name: profile.displayName,
+         image: profile.photos[0].value || '',
+         provider: 'google',
+       },
+     })
+
+     return newUser
+   },
+ )
+
+ authenticator.use(googleStrategy)

export { authenticator }
Google認証では、GoogleStrategyを使用します。
そこの引数に環境変数で設定した値を渡します。また、callbackURLはGoogle認証後のリダイレクト先となります。
処理としては、ユーザー登録済みならDBのユーザーをGoogle認証時に返却し、未登録ユーザーであれば、DBに登録し、そのユーザーを返却するという処理をしています。
そうしないと、2回目以降のログインでもDBに登録しに行くので、Google認証の認証が通っているけどDBにいるユーザーと判別され認証が最後まで通らないためです。
Google認証 -フロントエンド-
次にフロントエンド部分の実装です。
フロントエンド部分は以下のように変更を加えました。
 import {
   ActionFunctionArgs,
   LoaderFunctionArgs,
   MetaFunction,
 } from '@remix-run/node'
 import { Link } from '@remix-run/react'
 import { ValidatedForm } from 'remix-validated-form'
 import { tv } from 'tailwind-variants'
+ import { GoogleForm } from '../components/GoogleForm'
 import { TextField } from '../components/TextField'
 import { authenticator } from '../services/auth.server'
 import { loginValidator } from '../types/validators/LoginValidator'

 export const meta: MetaFunction = () => {
   return [{ title: 'New Remix App login' }]
 }

 const loginPageStyles = tv({
   slots: {
     base: 'h-full justify-center items-center flex flex-col gap-y-5',
     form: 'rounded-2xl bg-white p-6 w-[420px]',
     title: 'text-3xl font-extrabold text-black-600 mb-5',
     btnWrapper: 'text-center mt-5',
     btn: 'rounded-xl mt-2 bg-red-500 px-3 py-2 text-white font-semibold transition duration-300 ease-in-out hover:bg-red-600',
     text: 'text-gray-600',
     link: 'text-red-600 px-2 hover:underline',
   },
   compoundSlots: [{ slots: ['btnWrapper', 'btn'], class: 'w-full' }],
 })

 export const loader = async ({ request }: LoaderFunctionArgs) => {
   const user = await authenticator.isAuthenticated(request, {
     successRedirect: '/',
   })

   return user
 }

 export const action = async ({ request }: ActionFunctionArgs) => {
+  const formData = await request.clone().formData()
+  const action = String(formData.get('_action'))
+
+  switch (action) {
+    case 'Sign In':
      return authenticator.authenticate('user-pass', request, {
        successRedirect: '/',
        failureRedirect: '/auth/login',
      })
+
+    case 'Sign In Google':
+      return authenticator.authenticate('google', request)
+
+    default:
+      return null
+  }
 }

  const LoginPage = () => {
    const { base, form, title, btnWrapper, btn, text, link } = loginPageStyles()

    return (
     <div className={base()}>
       <div className={form()}>
         <ValidatedForm validator={loginValidator} method="POST">
           <h2 className={title()}>Login</h2>
           <TextField htmlFor="email" label="Email" />
           <TextField htmlFor="password" type="password" label="Password" />
           <div className={btnWrapper()}>
             <button
               type="submit"
               name="_action"
               value="Sign In"
               className={btn()}
             >
               Login
             </button>
           </div>
         </ValidatedForm>
+        <GoogleForm />
       </div>
       <p className={text()}>
         Don't have an account?
         <Link to="/auth/signup">
           <span className={link()}>Sign Up</span>
         </Link>
       </p>
     </div>
   )
 }

 export default LoginPage
import { Form } from '@remix-run/react'
import { FaGoogle } from 'react-icons/fa'
import { tv } from 'tailwind-variants'

const googleFormStyles = tv({
  slots: {
    googleForm: 'my-4',
    btn: 'w-full rounded-xl mt-2 bg-white px-3 py-2 text-white border border-gray-600 font-semibold transition duration-300 ease-in-out hover:bg-gray-200',
    icon: 'mr-2',
    btnText: '',
  },
  compoundSlots: [
    { slots: ['googleForm', 'btn'], class: 'flex justify-center items-center' },
    { slots: ['icon', 'btnText'], class: 'text-gray-700' },
  ],
})

export const GoogleForm = () => {
  const { googleForm, btn, icon, btnText } = googleFormStyles()
  return (
    <Form method="POST" className={googleForm()}>
      <button
        type="submit"
        name="_action"
        value="Sign In Google"
        className={btn()}
      >
        <FaGoogle size={22} className={icon()} />
        <span className={btnText()}>Sign In with Google</span>
      </button>
    </Form>
  )
}
ここで注目してほしいのはログインページのaction関数です。
export const action = async ({ request }: ActionFunctionArgs) => {
  const formData = await request.clone().formData()
  const action = String(formData.get('_action'))

  switch (action) {
    case 'Sign In':
      return authenticator.authenticate('user-pass', request, {
        successRedirect: '/',
        failureRedirect: '/auth/login',
      })

    case 'Sign In Google':
      return authenticator.authenticate('google', request)

    default:
      return null
  }
}
この関数でGoogle認証と通常の認証を切り分けています。
まず、request.clone().formData()でフォームデータを取得します。
ここで1点解説すると、通常であればrequest.formData()とclone()を挟まずにフォームデータを取得します。
しかし、cloneせずに値を取得すると、action関数とremix-authで2回リクエスト本文(formData)にアクセスすることになってしまい、「Response body object should not be disturbed or locked」というエラーが出ます。
Remixではリクエストには1回しかアクセスできないため、リクエストのクローンを作成して、そのクローンをリクエストとして読み取る必要があります。
以下のissueが参考になるので見てみてください。
続いて、button要素の値を取得します。
export const GoogleForm = () => {
  const { googleForm, btn, icon, btnText } = googleFormStyles()
  return (
    <Form method="POST" className={googleForm()}>
      <button
        type="submit"
        name="_action"
        value="Sign In Google"
        className={btn()}
      >
        <FaGoogle size={22} className={icon()} />
        <span className={btnText()}>Sign In with Google</span>
      </button>
    </Form>
  )
}
上記のように各buttonに属性が施されており、nameが_actionとなっているので、formData.get('_action')で取得できます。
これでログイン処理を切り分けることができます。
最終的にGoogleのボタンが押されるとauthenticator.authenticate('google', request)が呼び出され、googleという名称で登録したauthenticatorが実行されます。
そして、Google認証時には、認証後に指定のCallbackURLにリダイレクトするようになっています。今回の場合、以下のcallbackURLの部分で/api/auth/google/callbackというページに認証後はリダイレクトされるように指定しました。(この引数部分はGoogle developer consoleの「承認済みのリダイレクト URI」の値と一致させる必要があります。)
そのため、app/routesディレクトリにapi.auth.google.callback.tsxというファイルを作成する必要があります。
これを作らないとGoogle認証後にリダイレクト先(callbackURL)のページがないためエラーとなります。
CLIENT_URL='http://localhost:5173'
const googleStrategy = new GoogleStrategy<User>(
  {
    clientID: process.env.GOOGLE_CLIENT_ID || '',
    clientSecret: process.env.GOOGLE_CLIENT_SECRET || '',
    callbackURL: `${process.env.CLIENT_URL}/api/auth/google/callback`,
  },
  async ({ profile }) => {
    const user = await prisma.user.findUnique({
      where: { email: profile.emails[0].value },
    })

    if (user) {
      return user
    }

    const newUser = await prisma.user.create({
      data: {
        id: profile.id,
        email: profile.emails[0].value || '',
        password: '',
        name: profile.displayName,
        image: profile.photos[0].value || '',
        provider: 'google',
      },
    })

    return newUser
  },
)
以下のように、app/routesにページを作成します。
ここのloader関数でログインユーザー取得をし、ユーザーが取得できたら/にリダイレクトさせ、取得できない場合は/auth/loginにリダイレクトさせます。
要するに、①Google認証時のコールバックでリダイレクトされるので、②そのレダイレクト先のページを用意してあげて、③そのページ内でさらに本来のログイン処理のリダイレクト処理をするという3段階の工程を踏む必要があるということです。
import { LoaderFunctionArgs } from '@remix-run/node'
import { authenticator } from '../services/auth.server'

export const loader = ({ request }: LoaderFunctionArgs) => {
  return authenticator.authenticate('google', request, {
    successRedirect: '/',
    failureRedirect: '/auth/login',
  })
}
以上がGoogle認証の実装です。
ユーザー登録機能
最後にユーザー登録機能ですが、こちらもビジネスロジック部分から説明し、次にフロントエンド部分を説明します。
ユーザー登録機能 -ビジネスロジック-
ということで、以下がビジネスロジックの部分です。
import bcrypt from 'bcryptjs'
import { prisma } from '../libs/db'

export const createUser = async (
  data: Record<'name' | 'email' | 'password', string>,
) => {
  const { name, email, password } = data

  if (!(name && email && password)) {
    throw new Error('Invalid input')
  }

  const existingUser = await prisma.user.findUnique({ where: { email } })

  if (existingUser) {
    return { error: { message: 'メールアドレスは既に登録済みです' } }
  }

  const hashedPassword = await bcrypt.hash(data.password, 12)
  const newUser = await prisma.user.create({
    data: { name, email, password: hashedPassword, image: '' },
  })

  return { id: newUser.id, email: newUser.email, name: newUser.name }
}
ここでは、以下の処理をしています。
- パラメーターの確認
- ユーザーの存在確認
- パスワードのハッシュ化
- ユーザー作成
ユーザー登録機能 -フロントエンド-
次にフロント部分ですが、こちらもバリデーションとコンポーネントでそれぞれ以下のように実装しています。
まずは、バリデーションです。
import { withZod } from '@remix-validated-form/with-zod'
import { z } from 'zod'

const signUpFormSchema = z.object({
  name: z
    .string()
    .min(1, 'ユーザー名は必須入力です')
    .max(64, 'ユーザー名は64文字以下で入力してください'),
  email: z
    .string()
    .email('メールアドレスを正しい形式で入力してください')
    .max(128, 'メールアドレスは128文字以下で入力してください'),
  password: z
    .string()
    .min(8, 'パスワードは8文字以上で入力してください')
    .max(128, 'パスワードは128文字以下で入力してください')
    .refine(
      (password: string) => /[A-Za-z]/.test(password) && /[0-9]/.test(password),
      'パスワードは半角英数字の両方を含めてください',
    ),
})

export const signUpValidator = withZod(signUpFormSchema)
バリデーションスキーマですが、ログイン処理で実装したものと同じように実装していきます。
次にコンポーネント部分ですが、以下のように実装しています。
import { ActionFunctionArgs, LoaderFunctionArgs, json } from '@remix-run/node'
import { Link, useActionData } from '@remix-run/react'
import { ValidatedForm } from 'remix-validated-form'
import { tv } from 'tailwind-variants'
import { GoogleForm } from '../components/GoogleForm'
import { TextField } from '../components/TextField'
import { authenticator } from '../services/auth.server'
import { createUser } from '../services/signup.server'
import { signUpValidator } from '../types/validators/SignUpValidator'

const signUpPageStyles = tv({
  slots: {
    base: 'h-full justify-center items-center flex flex-col gap-y-5',
    form: 'rounded-2xl bg-white p-6 w-[420px]',
    title: 'text-3xl font-extrabold text-black-600 mb-5',
    btnWrapper: 'text-center mt-5',
    btn: 'rounded-xl mt-2 bg-red-500 px-3 py-2 text-white font-semibold transition duration-300 ease-in-out hover:bg-red-600',
    text: 'text-gray-600',
    link: 'text-red-600 px-2 hover:underline',
  },
  compoundSlots: [{ slots: ['btnWrapper', 'btn'], class: 'w-full' }],
})

export const loader = async ({ request }: LoaderFunctionArgs) => {
  const user = await authenticator.isAuthenticated(request, {
    successRedirect: '/',
  })

  return { user }
}

export const action = async ({ request }: ActionFunctionArgs) => {
  const formData = await request.clone().formData()
  const action = String(formData.get('_action'))

  switch (action) {
    case 'Sign Up': {
      const name = String(formData.get('name'))
      const email = String(formData.get('email'))
      const password = String(formData.get('password'))
      const errors: { [key: string]: string } = {}

      if (
        typeof action !== 'string' ||
        typeof name !== 'string' ||
        typeof email !== 'string' ||
        typeof password !== 'string'
      ) {
        return json(
          { error: 'Invalid Form Data', form: action },
          { status: 400 },
        )
      }

      const result = await createUser({ name, email, password })

      if (result.error) {
        errors.email = result.error.message
      }

      if (Object.keys(errors).length > 0) {
        return json({ errors })
      }

      return await authenticator.authenticate('user-pass', request, {
        successRedirect: '/',
        failureRedirect: '/auth/signup',
        context: { formData },
      })
    }

    case 'Sign In Google':
      return authenticator.authenticate('google', request)

    default:
      return null
  }
}

const SignUpPage = () => {
  const { base, form, title, btnWrapper, btn, text, link } = signUpPageStyles()

  const actionData = useActionData<typeof action>()
  const errors = (actionData as { errors?: { [key: string]: string } })?.errors

  return (
    <div className={base()}>
      <div className={form()}>
        <ValidatedForm validator={signUpValidator} method="POST">
          <h2 className={title()}>Create an account</h2>
          <TextField htmlFor="name" type="name" label="Name" />
          <TextField
            htmlFor="email"
            label="Email"
            errorMessage={errors?.email}
          />
          <TextField htmlFor="password" type="password" label="Password" />
          <div className={btnWrapper()}>
            <button
              type="submit"
              name="_action"
              value="Sign Up"
              className={btn()}
            >
              Create an account
            </button>
          </div>
        </ValidatedForm>
        <GoogleForm />
      </div>
      <p className={text()}>
        Already have an account?
        <Link to="/auth/login">
          <span className={link()}>Sign In</span>
        </Link>
      </p>
    </div>
  )
}

export default SignUpPage
loader・action・jsxの順に解説します。
まず、loaderですが、以下のようにして、ユーザーを取得し、ログイン済みなら/にリダイレクトさせます。(新規登録ページを登録済みユーザーに見せる必要はないためです)
export const loader = async ({ request }: LoaderFunctionArgs) => {
  const user = await authenticator.isAuthenticated(request, {
    successRedirect: '/',
  })

  return { user }
}
次にactionですが、Google認証の時のようにbutton要素の値を取得し、処理を切り分けます。
また、errorsオブジェクトではsignup.service.tsからメールアドレスが登録済みの場合のエラーを格納するようにしています。
このようなサーバー側のバリデーションは、Remixの公式ドキュメントに記載があるので、同様の実装をしています。
最後に、ユーザー登録後に認証も済ませたいので、authenticatorに登録しているログインの処理を呼び出し、ログイン処理まで行います。
「authenticator.authenticate('user-pass', request, { successRedirect: '/', failureRedirect: '/auth/signup', context: { formData } })」とcontextを使用することで、新規登録時に入力したフォームの値をサーバー側の認証処理の値として使用することができます。
export const action = async ({ request }: ActionFunctionArgs) => {
  const formData = await request.clone().formData()
  const action = String(formData.get('_action'))

  switch (action) {
    case 'Sign Up': {
      const name = String(formData.get('name'))
      const email = String(formData.get('email'))
      const password = String(formData.get('password'))
      const errors: { [key: string]: string } = {}

      if (
        typeof action !== 'string' ||
        typeof name !== 'string' ||
        typeof email !== 'string' ||
        typeof password !== 'string'
      ) {
        return json(
          { error: 'Invalid Form Data', form: action },
          { status: 400 },
        )
      }

      const result = await createUser({ name, email, password })

      if (result.error) {
        errors.email = result.error.message
      }

      if (Object.keys(errors).length > 0) {
        return json({ errors })
      }

      return await authenticator.authenticate('user-pass', request, {
        successRedirect: '/',
        failureRedirect: '/auth/signup',
        context: { formData },
      })
    }

    case 'Sign In Google':
      return authenticator.authenticate('google', request)

    default:
      return null
  }
}
また、ここでもactionとremix-authでリクエストを読み取るので、リクエストにあたるformDataをクローンする必要があります。
これは、仮にGoogle認証の処理を記述しない場合でも、今回の場合は必須の処理です。
なぜなら、ユーザー登録後にauthenticatorを呼び出し、remix-authによる認証処理を行うためformDataをremix-authのサーバー側のコード(user-passのコード)にリクエスト値を渡すためです。
今回のように、ユーザー登録後に即ログインではなく、一旦登録後にログイン処理を挟みたい場合は、通常のrequest.formData()を使用して、戻り地をremixが用意しているredirect()を使用します。
redirectを使用方法は、redirect(/login)のようにし、authenticatorの呼び出し部分(戻り値)を変更するようにします。
その場合のコードは以下のようになります。
 export const action = async ({ request }: ActionFunctionArgs) => {
-  const formData = await request.clone().formData()
-  const action = String(formData.get('_action'))

-  switch (action) {
-    case 'Sign Up': {
-      const name = String(formData.get('name'))
-      const email = String(formData.get('email'))
-      const password = String(formData.get('password'))
-      const errors: { [key: string]: string } = {}
-
-      if (
-        typeof action !== 'string' ||
-        typeof name !== 'string' ||
-        typeof email !== 'string' ||
-        typeof password !== 'string'
-      ) {
-        return json(
-          { error: 'Invalid Form Data', form: action },
-          { status: 400 },
-        )
-      }
-
-      const result = await createUser({ name, email, password })
-
-      if (result.error) {
-        errors.email = result.error.message
-      }
-
-      if (Object.keys(errors).length > 0) {
-        return json({ errors })
-      }
+  const formData = await request.formData()
+
+  const name = String(formData.get('name'))
+  const email = String(formData.get('email'))
+  const password = String(formData.get('password'))
+  const errors: { [key: string]: string } = {}
+
+  if (
+    typeof action !== 'string' ||
+    typeof name !== 'string' ||
+    typeof email !== 'string' ||
+    typeof password !== 'string'
+  ) {
+    return json({ error: 'Invalid Form Data', form: action }, { status: +400 })
+  }

-      return await authenticator.authenticate('user-pass', request, {
-        successRedirect: '/',
-        failureRedirect: '/auth/signup',
-        context: { formData },
-      })
-    }
+  const result = await createUser({ name, email, password })

-    case 'Sign In Google':
-      return authenticator.authenticate('google', request)
+  if (result.error) {
+    errors.email = result.error.message
+  }

-    default:
-      return null
+  if (Object.keys(errors).length > 0) {
+    return json({ errors })
+  }

+  return redirect('/auth/login')
}
最後にJSXの部分です。
こちらについては特別な処理はないですが、useActionDataでactionの結果を取得しています。
今回はサーバー側のエラーがあるため、その場合にエラーメッセージを表示したいので、以下のようにしています。
const SignUpPage = () => {
  const { base, form, title, btnWrapper, btn, text, link } = signUpPageStyles()

  const actionData = useActionData<typeof action>()
  const errors = (actionData as { errors?: { [key: string]: string } })?.errors

  return (
    <div className={base()}>
      <div className={form()}>
        <ValidatedForm validator={signUpValidator} method="POST">
          <h2 className={title()}>Create an account</h2>
          <TextField htmlFor="name" type="name" label="Name" />
          <TextField
            htmlFor="email"
            label="Email"
            errorMessage={errors?.email}
          />
          <TextField htmlFor="password" type="password" label="Password" />
          <div className={btnWrapper()}>
            <button
              type="submit"
              name="_action"
              value="Sign Up"
              className={btn()}
            >
              Create an account
            </button>
          </div>
        </ValidatedForm>
        <GoogleForm />
      </div>
      <p className={text()}>
        Already have an account?
        <Link to="/auth/login">
          <span className={link()}>Sign In</span>
        </Link>
      </p>
    </div>
  )
}
以上でユーザー登録の実装も完了です。
おわりに
長くなりましたが、ここまで読んでくださりありがとうございます。
個人的にはリクエストをクローンして扱う部分に手間取り、ずっとrequest.formData()で処理をしてエラー連発していたので、そこだけ注意する必要があるのかなと思いました。
少しでも参考になれば嬉しいです。
(それにしても、Remix自体の情報がまだまだ少ないなと改めて感じました。)
参考文献
Discussion