【Next.js・prisma】クエリ文字列から動的にAPIにパラメータを渡す方法
はじめに
今回は、Next.jsを用いて、クエリ文字列を動的に扱いAPIに動的にリクエストパラメータを渡す方法について解説します。
作成する機能の概要は、検索機能でフォームのすべての値で検索をするのではなく、全ての値だろうと一部の値だろうと、クエリ文字列を動的に変化させ、検索内容と合致するデータを取得する機能です。
環境
- Next 13.5.5
- date-fns 2.30.0
- react-date-range 1.4.0
- react-select 5.8.0
- react-hook-form 7.47.0
- zod 3.22.4
- @hookform/resolvers 3.3.2
- prisma 5.5.2
- query-string 8.1.0
- world-countries 5.0.0
実装
まずは、APIの実装から解説します。
APIの実装
以下が、実際に検索結果を取得するAPIです。
役割としては、「一覧取得」をする役割で、queryつまりURLのクエリ文字列の値が存在しなければ、データを全件取得するようになっています。
逆に、queryが存在すれば、その値に合致したデータを取得してきます。
import type { NextRequest } from 'next/server'
import { NextResponse } from 'next/server'

import prisma from '@/libs/prismadb'

export const GET = async (req: NextRequest) => {
  try {
    const searchParams = req.nextUrl.searchParams
    const userId = searchParams.get('userId')
    const guestCount = searchParams.get('guestCount')
    const roomCount = searchParams.get('roomCount')
    const bathroomCount = searchParams.get('bathroomCount')
    const startDate = searchParams.get('startDate')
    const endDate = searchParams.get('endDate')
    const locationValue = searchParams.get('locationValue')
    const category = searchParams.get('category')

    const query: any = {}

    if (userId) query.userId = userId
    if (locationValue) query.locationValue = locationValue
    if (category) query.category = category
    if (guestCount)
      query.guestCount = {
        gte: +guestCount,
      }
    if (roomCount)
      query.roomCount = {
        gte: +roomCount,
      }
    if (bathroomCount)
      query.bathroomCount = {
        gte: +bathroomCount,
      }

    if (startDate && endDate) {
      query.NOT = {
        reservations: {
          some: {
            OR: [
              {
                endDate: { gte: startDate },
                startDate: { lte: startDate },
              },
              {
                startDate: { lte: endDate },
                endDate: { gte: endDate },
              },
            ],
          },
        },
      }
    }

    const listings = await prisma.listing.findMany({
      where: query,
      orderBy: { createdAt: 'desc' },
    })

    return NextResponse.json(listings, { status: 200 })
  } catch (err) {
    return NextResponse.json(
      { message: 'Internal Server Error' },
      { status: 500 },
    )
  }
}
ここからは細かい部分の解説をしていきます。
クエリ文字列の取得
const searchParams = req.nextUrl.searchParams
const userId = searchParams.get('userId')
const guestCount = searchParams.get('guestCount')
const roomCount = searchParams.get('roomCount')
const bathroomCount = searchParams.get('bathroomCount')
const startDate = searchParams.get('startDate')
const endDate = searchParams.get('endDate')
const locationValue = searchParams.get('locationValue')
const category = searchParams.get('category')
まず、URLのクエリ文字列の部分を取得する場合、NextRequestのnextUrl.searchParamsで取得できます。このオブジェクトのgetで指定したクエリ文字列の値をすることができます。
例えば、URLがhttp://localhost:3000/?userId=hogeの際、クエリ文字列のuserIdを取得したい場合にはコードにあるようにget('userId')とすれば、値の「hoge」が取得できます。
URLのパラメータの取得方法については、公式ドキュメントか以下の記事が参考になりますので、興味がある方は読んでみてください。
prisma gte
if (guestCount)
  query.guestCount = {
    gte: +guestCount,
  }
if (roomCount)
  query.roomCount = {
    gte: +roomCount,
  }
if (bathroomCount)
  query.bathroomCount = {
    gte: +bathroomCount,
  }
続いて、上記の部分ですが、gte演算子について解説します。
gteとは「greater than or equal to」の略で、「指定した値以上」という「〇〇以上」という条件を表します。
(逆に「〇〇以下」とするには「less than or equal to」の略のlteを使用します)
ただ、ここでクエリ文字列で取得したguestCountなどを+guestCountとしている部分が「なぜ?」となるかと思います。これは「+(プラス演算子)」を使用して文字列を数値に変換するということをしています。
それはprismaのスキーマ定義を見るとわかります。
以下が、prismaのスキーマです。
model Listing {
  id            String        @id @default(auto()) @map("_id") @db.ObjectId
  userId        String        @db.ObjectId
  title         String
  description   String
  imageSrc      String
  category      String
  roomCount     Int
  bathroomCount Int
  guestCount    Int
  locationValue String
  price         Int
  createdAt     DateTime      @default(now())
  updatedAt     DateTime      @updatedAt
  user          User          @relation(fields: [userId], references: [id], onDelete: Cascade)
  reservations  Reservation[]
}
今回のクエリ文字列ではIntのカラムに検索をかけるようにしています。
ただ、クエリ文字列はstringで取得されるため、gteやlteでDBに検索をかけにいくには数値に変換する必要があります。
そのために「+(プラス演算子)」をつけた値をqueryに格納しています。
gteなどの演算子については、以下の公式ドキュメントに記載があります。
prisma NOT
続いて、この部分です。
if (startDate && endDate) {
  query.NOT = {
    reservations: {
      some: {
        OR: [
          {
            endDate: { gte: startDate },
            startDate: { lte: startDate },
          },
          {
            startDate: { lte: endDate },
            endDate: { gte: endDate },
          },
        ],
      },
    },
  }
}
まず、query.NOTのNOTですが、「指定した条件に一致しないレコードを除外する」ためのものです。
ここでは、指定した日付範囲内に予約(reservations)が存在するlistingsを除外するために使用しています。
つまり、検索フォームで入力された日付の範囲で予約がまだされていないlistingsを取得するためにNOTをつけています。
prisma some
次にsomeですが、これは、リレーションフィールドに対するフィルタリングに使用します。
つまり、リレーションフィールドの要素内の、少なくとも1つが指定した条件に一致するレコードを検索するためのものです。
以下は公式ドキュメントの例ですが、この場合は、「contentに"prisma"という単語を含んでいるpostをもつすべてのuserレコードを取得する」という条件になります。
const result = await prisma.user.findMany({
  where: {
    post: {
      some: {
        content: {
          contains: "Prisma"
        }
      }
    }
  }
}
someは少し難解なので、より詳細に説明します。
まず、前提としてsomeは「リレーションフィールドの検索(フィルタリング)に使用する」必要があります。
そこで、someの有無によって取得結果がどのように変わるかを見てみましょう。
まず、例題の取得結果は以下ということをおさらいしておきましょう。
-
post配列のうち1つでもcontentに"Prisma"が含まれているuser配列を取得する - コードで表現すると・・・
users.fileter((user) => user.posts.some((post) => post.content.includes('Prisma')))
someは配列内の要素のうち1つでも条件に合致する場合にtrueを返却するメソッドです。
これをsome無のバージョンに置き換えてみます。
-
post配列の全ての要素のcontentに"Prisma"を含んでいるuser配列を取得する - コードで表現すると・・・
users.filter((user) => user.posts.every((post) => post.content.includes('Prisma')))
everyは配列内のすべての要素が条件に合致する場合のみtrueを返却するメソッドです。
コードに置き換えると違いが明確になり、理解も深まると思います。
つまり、prismaのsomeの有無は配列操作のメソッドのsomeかeveryかの違いということになります。
prisma初見の方向けにもう少し詳細に解説します。
例えば、以下のデータがあるとします。
- User1: "Prisma is great"という
contentを持つPostAと、"What Prisma?"というconetntを持つPostBを持っている - User2: "How to Prisma"という
contentを持つPostCと、"TypeScript is great"というcontentを持つPostDを持っている
上記をsomeの有無で比較してみます。
1.someがある場合
この場合、User1とUser2の両方を取得します。
なぜなら、両ユーザーのPostのcontentの、いずれかには"Prisma"という文字列が含まれているためです。
2.someがない場合
この場合、User1のみ取得します。
なぜなら、User1のPostには全てのcontentで"Prisma"という文字列が含まれていますが、User2のPostには"Prisma"という文字列が片方のcontentにしか含まれていないためです。
このようにsomeの有無によって取得結果が大きく異なります。
ここで、今回の実装に話を戻します。
まず、スキーマ定義ですが、以下のようになっています。
model Listing {
  id            String        @id @default(auto()) @map("_id") @db.ObjectId
  userId        String        @db.ObjectId
  title         String
  description   String
  imageSrc      String
  category      String
  roomCount     Int
  bathroomCount Int
  guestCount    Int
  locationValue String
  price         Int
  createdAt     DateTime      @default(now())
  updatedAt     DateTime      @updatedAt
  user          User          @relation(fields: [userId], references: [id], onDelete: Cascade)
  reservations  Reservation[]
}

model Reservation {
  id         String   @id @default(auto()) @map("_id") @db.ObjectId
  userId     String?  @db.ObjectId
  listingId  String?  @db.ObjectId
  startDate  DateTime
  endDate    DateTime
  totalPrice Int
  createdAt  DateTime @default(now())
  updatedAt  DateTime @updatedAt
  user       User?    @relation(fields: [userId], references: [id], onDelete: Cascade)
  listing    Listing? @relation(fields: [listingId], references: [id], onDelete: Cascade)
}
そして、実装部分は以下となっています。
if (startDate && endDate) {
  query.NOT = {
    reservations: {
      some: {
        OR: [
          {
            endDate: { gte: startDate },
            startDate: { lte: startDate },
          },
          {
            startDate: { lte: endDate },
            endDate: { gte: endDate },
          },
        ],
      },
    },
  }
}
今回の場合は、reservations配列のうち、指定した日付範囲内のreservationを1つでも持つlistings配列を取得します。
それを、最終的にはNOTで除外します。
つまり、指定した日付範囲内のreservationを除外したlistingsを返却することができます。
そのため、検索で指定した日付範囲で予約可能なlistingsを返却するというユースケースを実現することができます。
理解を深めるために、someがない場合も解説します。
someがない場合、reservations配列のすべての要素が指定した日付範囲内であるlistings配列を取得します。それを最終的にNOTで除外します。
この実装の違いを聞くと「someなしでも同じじゃない?」と思うかもしれないですが、具体的な値を用いるとsomeの必要性が実感できます。
- Listing1: 2022年1月1日から2022年1月3日までのReservationAと、2022年1月10日から2022年1月12日までのReservationBを持ってる
- Listing2: 2022年1月1日から2022年1月7日までのReservationCを持っている
- ユースケース: ユーザーが2022年1月2日から2022年1月6日までの
listingを検索する
まず、someがある場合ですが、この場合は、Listing1・Listing2の両方を取得します。
理由は、公式ドキュメントの例でも見たように、両方のlistingは少なくとも1つのreservationがユーザーが検索した日付範囲に重なっているからです。
(Listing1のReservationAとListing2のReservationCが重なっている)
これを最終的にNOTで除外するため、ユーザーが検索した日付範囲では予約できるlistingはないという結果をユーザーが得ることができます。
続いて、someがない場合ですが、Listing2のみ取得します。
理由は、こちらも公式ドキュメントの例と同じで、Listing2の予約(ReservationC)はユーザーの検索範囲に重なっており、Listing1では、片方の予約(ReservationA)のみ検索範囲に重なっているためです。
(everyと同じなので、リレーションフィールドの全ての要素が条件に合致する必要があります)
そのため、最終的にNOTで除外した際に、本来予約できないListing1(ReservationAでユーザー検索の「2022年1月2日から2022年1月6日まで」の範囲に予約がある)を取得してしまい、システムとして欠陥が生まれます。
このようにsomeの有無によって取得結果に違いが出るため、someを使用する必要があります。
prismaのクエリや演算子については、以下の記事がおすすめなので興味がある人は読んでみてください。
ここまででAPIの解説は終わりました。
続いて、画面側の実装に移ります。
フロントエンドの実装
まず、検索結果を表示する画面から解説します。
検索結果表示UI
export type ListingsParams = {
  userId?: string
  guestCount?: number
  roomCount?: number
  bathroomCount?: number
  startDate?: string
  endDate?: string
  locationValue?: string
  category?: string
}
import { getServerSession } from 'next-auth'

import Container from '@/components/Container'
import EmptyState from '@/components/EmptyState'
import ListingCard from '@/components/listings/ListingCard'
import useFetchCurrentUser from '@/hooks/useFetchCurrentUser'
import useFetchListings from '@/hooks/useFetchListings'
import authOptions from '@/libs/authOptions'
import type { ListingsParams } from '@/types/ListngsParams'

type HomeProps = {
  searchParams: ListingsParams
}

const Home: React.FC<HomeProps> = async ({ searchParams }) => {
  const listings = await useFetchListings(searchParams)

  const session = await getServerSession(authOptions)
  const currentUser = await useFetchCurrentUser(session?.user?.id || '')

  if (listings.length === 0) return <EmptyState showReset />

  return (
    <Container>
      <div className="grid grid-cols-2 gap-8 pt-24 sm:grid-cols-2 md:grid-cols-3 lg:grid-cols-4 xl:grid-cols-5 2xl:grid-cols-6">
        {listings.map((listing) => {
          return (
            <ListingCard
              key={listing.id}
              data={listing}
              currentUser={currentUser}
            />
          )
        })}
      </div>
    </Container>
  )
}

export default Home
まず、propsの部分ですが、サーバーコンポーネントでは、このようにすることでURLのクエリ文字列を取得することができます。
サーバーコンポーネントやクライアントコンポーネントでのパラメータの取得などについては以下の記事が参考になります。
ここのカスタムフックであるuseFetchListingで先ほど解説したAPIにリクエストしています。
カスタムフック useFetchListings
以下が、カスタムフックの内容です。
import type { Listing } from '@prisma/client'

import type { ListingsParams } from '@/types/ListngsParams'

const useFetchListings = async (params?: ListingsParams) => {
  try {
    let url = `${process.env.API_BASE_URL}/api/listing`

    const queryParams = new URLSearchParams()

    if (params?.userId) queryParams.append('userId', params.userId)
    if (params?.guestCount)
      queryParams.append('guestCount', params.guestCount.toString())
    if (params?.roomCount)
      queryParams.append('roomCount', params.roomCount.toString())
    if (params?.bathroomCount)
      queryParams.append('bathroomCount', params.bathroomCount.toString())
    if (params?.startDate) queryParams.append('startDate', params.startDate)
    if (params?.endDate) queryParams.append('endDate', params.endDate)
    if (params?.locationValue)
      queryParams.append('locationValue', params.locationValue)
    if (params?.category) queryParams.append('category', params.category)

    url += '?' + queryParams.toString()

    const response = await fetch(url, { cache: 'no-store' })
    const listings: Listing[] = await response.json()

    return listings
  } catch (err) {
    throw new Error('Internal Server Error')
  }
}

export default useFetchListings
ここで重要となるのが、APIにパラメータを渡す処理です。
今回は、URLSearchParamsを使用して、カスタムフック呼び出し時に引数として渡ってきたパラメータごとにクエリパラメータを追加していくようにしています。
URLSearchParamsは、URLのクエリ文字列を操作するためのWeb APIです。
このAPIのappendメソッドを使用して、クエリ文字列を作成するようにしています。
(appendメソッドは新しいクエリ文字列を追加したり、既存のクエリ文字列を更新したりすることができます)
最終的には、url += '?' + queryParams.toString()の部分で、作成したクエリパラメータをURLに追加するようにしています。
ただ、クエリパラメータは「?」で始まり、複数のパラメータは「&」でつながれるので、例えば、userIdとguestCountの2つのパラメータがある場合、URLは?userId=hoge&guestCount=1のようになります。
このようにすることでURLを動的に生成しAPIにリクエストを送ることができます。
検索フォームUI
次に、実際に検索のための値を入力するためのフォームを備えたUIについて解説します。
以下が、このUIの実装です。
ここも、APIの解説と同じく、分割して見ていきましょう。
'use client'

import { zodResolver } from '@hookform/resolvers/zod'
import { formatISO } from 'date-fns'
import dynamic from 'next/dynamic'
import { useRouter, useSearchParams } from 'next/navigation'
import qs from 'query-string'
import React, { useCallback, useMemo, useState } from 'react'
import type { Range } from 'react-date-range'
import type { SubmitHandler } from 'react-hook-form'
import { useForm } from 'react-hook-form'
import { z } from 'zod'

import Heading from '@/components/Heading'
import Calendar from '@/components/inputs/Calendar'
import Counter from '@/components/inputs/Counter'
import CountrySelect from '@/components/inputs/CountrySelect'
import Modal from '@/components/modals/Modal'
import useSearchModal from '@/hooks/useSearchModal'
import type { CountrySelectValue } from '@/types/CountrySelectValue'
import type { SearchForm } from '@/types/SearchForm'
import { searchSchema } from '@/types/SearchForm'

enum STEPS {
  LOCATION = 0,
  DATE = 1,
  INFO = 2,
}

const SearchModal = () => {
  const router = useRouter()
  const searchParams = useSearchParams()
  const searchModal = useSearchModal()

  const [step, setStep] = useState(STEPS.LOCATION)

  const stepSchemas = {
    [STEPS.LOCATION]: z.object({
      location: searchSchema.shape.location,
    }),
    [STEPS.DATE]: z.object({
      dateRange: searchSchema.shape.dateRange,
    }),
    [STEPS.INFO]: z.object({
      guestCount: searchSchema.shape.guestCount,
      roomCount: searchSchema.shape.roomCount,
      bathroomCount: searchSchema.shape.bathroomCount,
    }),
  }

  const {
    handleSubmit,
    watch,
    setValue,
    formState: { errors },
  } = useForm<SearchForm>({
    resolver: zodResolver(stepSchemas[step]),
    defaultValues: {
      location: undefined,
      guestCount: 1,
      roomCount: 1,
      bathroomCount: 1,
      dateRange: {
        startDate: new Date(),
        endDate: new Date(),
        key: 'selection',
      },
    },
  })

  const location = watch('location') as CountrySelectValue | undefined
  const guestCount = watch('guestCount')
  const roomCount = watch('roomCount')
  const bathroomCount = watch('bathroomCount')
  const dateRange: Range = watch('dateRange')

  const setCustomValue = (
    id: 'location' | 'guestCount' | 'roomCount' | 'bathroomCount' | 'dateRange',
    value: any,
  ) =>
    setValue(id, value, {
      shouldValidate: true,
      shouldDirty: true,
      shouldTouch: true,
    })

  const Map = useMemo(
    () => dynamic(() => import('../Map'), { ssr: false }),
    [location],
  )

  const onBack = useCallback(() => setStep((prev) => prev - 1), [])
  const onNext = useCallback(() => setStep((prev) => prev + 1), [])

  const onSubmit: SubmitHandler<SearchForm> = useCallback(
    async (data) => {
      if (step !== STEPS.INFO) return onNext()

      let currentQuery = {}

      if (searchParams) currentQuery = qs.parse(searchParams.toString())

      const updatedQuery: any = {
        ...currentQuery,
        locationValue: location?.value,
        guestCount,
        roomCount,
        bathroomCount,
      }

      if (dateRange.startDate)
        updatedQuery.startDate = formatISO(dateRange.startDate)

      if (dateRange.endDate) updatedQuery.endDate = formatISO(dateRange.endDate)

      const url = qs.stringifyUrl(
        {
          url: '/',
          query: updatedQuery,
        },
        { skipNull: true },
      )

      setStep(STEPS.LOCATION)
      searchModal.onClose()
      router.push(url)
    },
    [
      bathroomCount,
      dateRange.endDate,
      dateRange.startDate,
      guestCount,
      location?.value,
      onNext,
      roomCount,
      router,
      searchModal,
      searchParams,
      step,
    ],
  )

  const actionLabel = useMemo(() => {
    if (step === STEPS.INFO) return 'Search'

    return 'Next'
  }, [step])

  const secondaryActionLabel = useMemo(() => {
    if (step === STEPS.LOCATION) return undefined

    return 'Back'
  }, [step])

  let bodyContent: React.ReactElement

  switch (step) {
    case STEPS.DATE:
      bodyContent = (
        <div className="flex flex-col gap-8">
          <Heading
            title="When do you plan to go?"
            subtitle="Make sure everyone is free!"
          />
          <Calendar
            onChange={(value) => setCustomValue('dateRange', value.selection)}
            value={dateRange}
          />
        </div>
      )
      break

    case STEPS.INFO:
      bodyContent = (
        <div className="flex flex-col gap-8">
          <Heading
            title="More information"
            subtitle="Find your perfect place!"
          />
          {errors.guestCount && (
            <span className="text-red-500">{errors.guestCount.message}</span>
          )}
          {errors.roomCount && (
            <span className="text-red-500">{errors.roomCount.message}</span>
          )}
          {errors.bathroomCount && (
            <span className="text-red-500">{errors.bathroomCount.message}</span>
          )}
          <Counter
            onChange={(value) => setCustomValue('guestCount', value)}
            value={guestCount}
            title="Guests"
            subtitle="How many guests are coming?"
          />
          <hr />
          <Counter
            onChange={(value) => setCustomValue('roomCount', value)}
            value={roomCount}
            title="Rooms"
            subtitle="How many rooms do you need?"
          />
          <hr />
          <Counter
            onChange={(value) => {
              setCustomValue('bathroomCount', value)
            }}
            value={bathroomCount}
            title="Bathrooms"
            subtitle="How many bathrooms do you need?"
          />
        </div>
      )
      break

    default:
      bodyContent = (
        <div className="flex flex-col gap-8">
          <Heading
            title="Where do you wanna go?"
            subtitle="Find the perfect location!"
          />
          <CountrySelect
            value={location}
            onChange={(value) => setCustomValue('location', value)}
          />
          <hr />
          <Map center={location?.latlng} />
        </div>
      )
      break
  }

  return (
    <Modal
      isOpen={searchModal.isOpen}
      title="Filters"
      actionLabel={actionLabel}
      onSubmit={handleSubmit(onSubmit)}
      secondaryActionLabel={secondaryActionLabel}
      secondaryAction={step === STEPS.LOCATION ? undefined : onBack}
      onClose={searchModal.onClose}
      body={bodyContent}
    />
  )
}

export default SearchModal
フォームの型 SearchForm
まずは、以下の部分について解説します。
enum STEPS {
  LOCATION = 0,
  DATE = 1,
  INFO = 2,
}

const stepSchemas = {
  [STEPS.LOCATION]: z.object({
    location: searchSchema.shape.location,
  }),
  [STEPS.DATE]: z.object({
    dateRange: searchSchema.shape.dateRange,
  }),
  [STEPS.INFO]: z.object({
    guestCount: searchSchema.shape.guestCount,
    roomCount: searchSchema.shape.roomCount,
    bathroomCount: searchSchema.shape.bathroomCount,
  }),
}

const {
  handleSubmit,
  watch,
  setValue,
  formState: { errors },
} = useForm<SearchForm>({
  resolver: zodResolver(stepSchemas[step]),
  defaultValues: {
    location: undefined,
    guestCount: 1,
    roomCount: 1,
    bathroomCount: 1,
    dateRange: {
      startDate: new Date(),
      endDate: new Date(),
      key: 'selection',
    },
  },
})
やっていることとしては、各STEPSごとにバリデーションをするスキーマを定義し直していることと、useFormでフォームの定義をしています。
(UIの仕様としては、各STEPSでモーダルをウィザード画面の形式で進めていくようなUI仕様となっています)
私の記事ですが、ウィザード画面ごとのreact-hook-formとzodのバリデーション実装の方法についてまとめていますので、気になる方は覗いてみてください。
また、フォームの型定義は以下のようにしています。
import z from 'zod'

const dateRangeSchema = z
  .object({
    startDate: z.date(),
    endDate: z.date(),
    key: z.string(),
  })
  .refine((value) => value.startDate <= value.endDate, {
    message: 'startDate must be less than or equal to endDate',
    path: ['dateRange'],
  })

export const searchSchema = z.object({
  location: z
    .object({
      value: z.string().max(128, 'please enter at max 128 characters'),
    })
    .optional(),
  guestCount: z.number().min(1, 'The number must be greater than 0'),
  roomCount: z.number().min(1, 'The number must be greater than 0'),
  bathroomCount: z.number().min(1, 'The number must be greater than 0'),
  dateRange: dateRangeSchema,
})

export type SearchForm = z.infer<typeof searchSchema>
dateRnageScchemaはreact-date-rangeの以下のRange型なので、それに合わせるようにしています。
export interface Range {
    startDate?: Date | undefined;
    endDate?: Date | undefined;
    color?: string | undefined;
    key?: string | undefined;
    autoFocus?: boolean | undefined;
    disabled?: boolean | undefined;
    showDateDisplay?: boolean | undefined;
}
またrefineでカスタムバリデーションを実装しています。
内容としては、予約開始日が予約終了日以前の日付の場合にバリデーションエラーとなるようにしています。
pathを指定することで、searchSchemaのdateRangeフィールドに紐づけすることができます。
あとlocationですが、これも以下のCountrySelectValue型の値を設定するので、objectとし、その中のvalueにバリデーションを実装するようにしています。
export type CountrySelectValue = {
  flag: string
  label: string
  latlng: number[]
  region: string
  value: string
}
フォームに関する各関数
次にフォームに関する関数について解説します。
※各全ての関数についての解説は趣旨と逸れるので割愛させていただきます
const {
  handleSubmit,
  watch,
  setValue,
  formState: { errors },
} = useForm<SearchForm>({
  resolver: zodResolver(stepSchemas[step]),
  defaultValues: {
    location: undefined,
    guestCount: 1,
    roomCount: 1,
    bathroomCount: 1,
    dateRange: {
      startDate: new Date(),
      endDate: new Date(),
      key: 'selection',
    },
  },
})

const location = watch('location') as CountrySelectValue | undefined
const guestCount = watch('guestCount')
const roomCount = watch('roomCount')
const bathroomCount = watch('bathroomCount')
const dateRange: Range = watch('dateRange')

const setCustomValue = (
  id: 'location' | 'guestCount' | 'roomCount' | 'bathroomCount' | 'dateRange',
  value: any,
) =>
  setValue(id, value, {
    shouldValidate: true,
    shouldDirty: true,
    shouldTouch: true,
  })
まずは、setCustomeValueですが、これは、ウィザード画面形式のUIであるために実装したものです。
通常、react-hook-formは、SubmitHandlerの引数にdataを取ることでフォームの値を取得できますが、今回はウィザードUIの各画面で入力した値を最後にまとめて送信したいのでカスタムの値を設定するための関数を用意しています。
そのため各値を監視するためのwatchを使用しています。
また、setValueの各オプションについての内容は以下となります。
-
shouldValidate: trueに設定すると値が設定された後にフィールドのバリデーションが実行される -
shouldDirty: trueに設定すると、フィールドが「dirty(変更された)」状態に設定される(ユーザーが入力した状態が設定される) -
shouldTouch: trueに設定すると、フィールドが「touched(触られた)」状態に設定される(ユーザーがフィールドにフォーカスした状態)
const searchParams = useSearchParams()

const onSubmit: SubmitHandler<SearchForm> = useCallback(
  async (data) => {
    if (step !== STEPS.INFO) return onNext()

    let currentQuery = {}

    if (searchParams) currentQuery = qs.parse(searchParams.toString())

    const updatedQuery: any = {
      ...currentQuery,
      locationValue: location?.value,
      guestCount,
      roomCount,
      bathroomCount,
    }

    if (dateRange.startDate)
      updatedQuery.startDate = formatISO(dateRange.startDate)

    if (dateRange.endDate) updatedQuery.endDate = formatISO(dateRange.endDate)

    const url = qs.stringifyUrl(
      {
        url: '/',
        query: updatedQuery,
      },
      { skipNull: true },
    )

    setStep(STEPS.LOCATION)
    searchModal.onClose()
    router.push(url)
  },
  [
    bathroomCount,
    dateRange.endDate,
    dateRange.startDate,
    guestCount,
    location?.value,
    onNext,
    roomCount,
    router,
    searchModal,
    searchParams,
    step,
  ],
)
最後にonSubmitですが、これがreact-hook-formのSubmitHandlerとなり、フォームの値を受け取ることができる関数となります。
handleSubmitの引数に渡すことで本関数の処理がreact-hook-formでできるようになります。
まず、qs.parseですが、これはquery-stringライブラリの関数で、URLのクエリ文字列をJavaScriptのオブジェクトに変換することができます。例えば?userId=hogeというクエリ文字列は{ userId: 'hoge' }と変換されます。
次にupdateQueryで各フォームに設定した値を設定します。
guestCount・roomCount・bathroomCountは値が必ず1以上なので、そのままプロパティとして追加しています。
また、locationValueはzodでoptionalとしているため、null・undefinedなどを許容できるので、これも初期状態で追加しています。
残りの値は動的なパラメータとして扱うので条件分岐により、追加の有無を決めています。
formatISOではDate型のstartDate・endDateをISO形式の文字列に変換しています。
これでクエリ文字列とすることができます。
最後にqs.stringifyUrlで与えられたURL(今回の場合は/)とクエリ文字列のオブジェクト(今回の場合はupdateQuery)から完全なURLを作成する関数です。
第一引数には、上記の内容を渡し、第二引数には、オプションを渡します。
今回のskipNull: trueはnullの値を持つクエリ文字列はURLから省略(除外)されるというオプションです。
最後にrouter.push(url)でapp/page.tsxにクエリ文字列があるURLで遷移し、そこのクエリ文字列を取得することで動的なパラメータを持つURLでAPIにリクエストをし、検索結果を取得することができます。
skipNull: trueがあるため、検索結果の遷移先URLには不正な値を持つクエリ文字列は表示されないですし、APIも正しくクエリ文字列を受け取ることができます。
ウィザードUIの構成要素
続いて、ウィザードUIを構成する部分の解説です。
let bodyContent: React.ReactElement

switch (step) {
  case STEPS.DATE:
    bodyContent = (
      <div className="flex flex-col gap-8">
        <Heading
          title="When do you plan to go?"
          subtitle="Make sure everyone is free!"
        />
        <Calendar
          onChange={(value) => setCustomValue('dateRange', value.selection)}
          value={dateRange}
        />
      </div>
    )
    break

  case STEPS.INFO:
    bodyContent = (
      <div className="flex flex-col gap-8">
        <Heading title="More information" subtitle="Find your perfect place!" />
        {errors.guestCount && (
          <span className="text-red-500">{errors.guestCount.message}</span>
        )}
        {errors.roomCount && (
          <span className="text-red-500">{errors.roomCount.message}</span>
        )}
        {errors.bathroomCount && (
          <span className="text-red-500">{errors.bathroomCount.message}</span>
        )}
        <Counter
          onChange={(value) => setCustomValue('guestCount', value)}
          value={guestCount}
          title="Guests"
          subtitle="How many guests are coming?"
        />
        <hr />
        <Counter
          onChange={(value) => setCustomValue('roomCount', value)}
          value={roomCount}
          title="Rooms"
          subtitle="How many rooms do you need?"
        />
        <hr />
        <Counter
          onChange={(value) => {
            setCustomValue('bathroomCount', value)
          }}
          value={bathroomCount}
          title="Bathrooms"
          subtitle="How many bathrooms do you need?"
        />
      </div>
    )
    break

  default:
    bodyContent = (
      <div className="flex flex-col gap-8">
        <Heading
          title="Where do you wanna go?"
          subtitle="Find the perfect location!"
        />
        <CountrySelect
          value={location}
          onChange={(value) => setCustomValue('location', value)}
        />
        <hr />
        <Map center={location?.latlng} />
      </div>
    )
    break
}
各UIでpropsとしてカスタムのsetValueを渡すことで、値を設定するようにしています。
各コンポーネントは以下のようになっています。
Calendarはreact-date-rangeを用いて構成しています。
import 'react-date-range/dist/styles.css'
import 'react-date-range/dist/theme/default.css'

import React from 'react'
import { DateRange, type Range, type RangeKeyDict } from 'react-date-range'

type CalendarProps = {
  value: Range
  disabledDates?: Date[]
  onChange: (value: RangeKeyDict) => void
}

const Calendar: React.FC<CalendarProps> = ({
  value,
  disabledDates,
  onChange,
}) => {
  return (
    <DateRange
      rangeColors={['#262626']}
      ranges={[value]}
      date={new Date()}
      direction="vertical"
      showDateDisplay={false}
      minDate={new Date()}
      disabledDates={disabledDates}
      onChange={onChange}
    />
  )
}

export default Calendar
Counterは、onChangeをコンポーネント内で、編集することで値の設定を実現しています。
'use client'

import React, { useCallback } from 'react'
import { AiOutlineMinus, AiOutlinePlus } from 'react-icons/ai'

type CounterProps = {
  title: string
  subtitle: string
  value: number
  onChange: (value: number) => void
}

const Counter: React.FC<CounterProps> = ({
  title,
  subtitle,
  value,
  onChange,
}) => {
  const onAdd = useCallback(() => onChange(value + 1), [onChange, value])

  const onReduce = useCallback(() => {
    if (value === 1) return

    onChange(value - 1)
  }, [onChange, value])

  return (
    <div className="flex flex-row items-center justify-between">
      <div className="flex flex-col">
        <div className="font-medium">{title}</div>
        <div className="font-light text-gray-600">{subtitle}</div>
      </div>
      <div className="flex flex-row items-center gap-4">
        <div
          onClick={onReduce}
          className="flex h-10 w-10 cursor-pointer items-center justify-center rounded-full border-[1px] border-neutral-400 text-neutral-600 transition hover:opacity-80"
        >
          <AiOutlineMinus />
        </div>
        <div className="text-xl font-light text-neutral-600">{value}</div>
        <div
          onClick={onAdd}
          className="flex h-10 w-10 cursor-pointer items-center justify-center rounded-full border-[1px] border-neutral-400 text-neutral-600 transition hover:opacity-80"
        >
          <AiOutlinePlus />
        </div>
      </div>
    </div>
  )
}

export default Counter
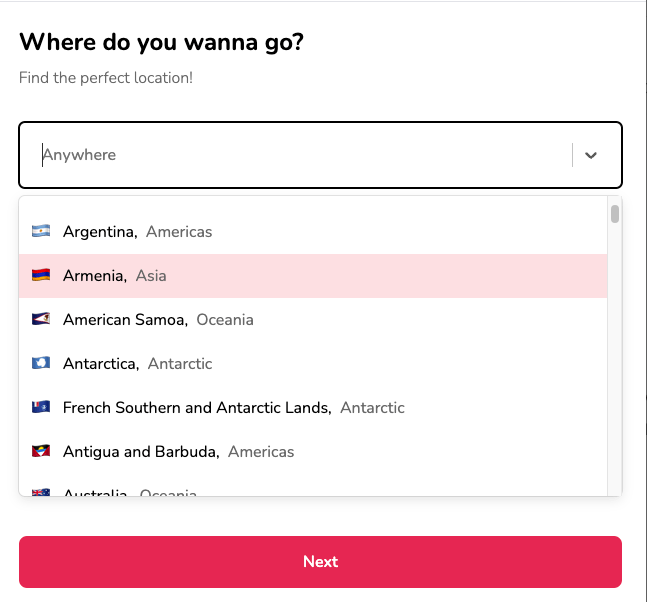
CountrySelectはworld-countriesとreact-selectを用いてセレクトボックスによるUIを構築しています。
このUIはセレクトボックスで国を選択しますが、その際にCountrySelectValue型として定義したvalueがセレクトボックスのvalueとなるので、カスタムのsetValueにそれを設定するようにしています。
セレクトボックスのoptionにはworld-countriesの全ての国を設定します。
UIとしては、以下のような表示となります。
詳しくはドキュメントがあるので、以下を読んでみると良いと思います。
import countries from 'world-countries'

const formattedCountries = countries.map((country) => ({
  value: country.cca2,
  label: country.name.common,
  flag: country.flag,
  latlng: country.latlng,
  region: country.region,
}))

const useCountries = () => {
  const getAll = () => formattedCountries
  const getByValue = (value: string) =>
    formattedCountries.find((item) => item.value === value)

  return {
    getAll,
    getByValue,
  }
}

export default useCountries
export type CountrySelectValue = {
  flag: string
  label: string
  latlng: number[]
  region: string
  value: string
}
'use client'

import React from 'react'
import Select from 'react-select'

import useCountries from '@/hooks/useCountries'
import type { CountrySelectValue } from '@/types/CountrySelectValue'

type CountrySelectProps = {
  value?: CountrySelectValue
  onChange: (value: CountrySelectValue) => void
}

const CountrySelect: React.FC<CountrySelectProps> = ({ value, onChange }) => {
  const { getAll } = useCountries()

  return (
    <div>
      <Select
        placeholder="Anywhere"
        isClearable
        options={getAll()}
        value={value}
        onChange={(value) => onChange(value as CountrySelectValue)}
        formatOptionLabel={(options: CountrySelectValue) => (
          <div className="flex flex-row items-center gap-3">
            <div>{options.flag}</div>
            <div>
              {options.label},{' '}
              <span className="ml-1 text-neutral-500">{options.region}</span>
            </div>
          </div>
        )}
        classNames={{
          control: () => 'p-3 border-2',
          input: () => 'text-lg',
          option: () => 'text-lg',
        }}
        theme={(theme) => ({
          ...theme,
          borderRadius: 6,
          colors: { ...theme.colors, primary: 'black', primary25: '#ffe4e6' },
        })}
      />
    </div>
  )
}

export default CountrySelect
以上が各ウィザードUIのコンポーネントの解説となります。
Modalコンポーネント
最後にModalコンポーネントに、handleSubmit等各種propsを渡して実装は完了です。
以下は、Modalコンポーネントの実装です。
'use client'

import React, { useCallback, useEffect, useState } from 'react'
import { IoMdClose } from 'react-icons/io'

import Button from '@/components/Button'

type ModalProps = {
  isOpen?: boolean
  onClose: () => void
  onSubmit: () => void
  title?: string
  body?: React.ReactElement
  footer?: React.ReactElement
  actionLabel: string
  disabled?: boolean
  secondaryAction?: () => void
  secondaryActionLabel?: string
}

const Modal: React.FC<ModalProps> = ({
  isOpen,
  onClose,
  onSubmit,
  title,
  body,
  footer,
  actionLabel,
  disabled,
  secondaryAction,
  secondaryActionLabel,
}) => {
  const [showModal, setShowModal] = useState(isOpen)

  useEffect(() => setShowModal(isOpen), [isOpen])

  const handleClose = useCallback(() => {
    if (disabled) return

    setShowModal(false)
    setTimeout(() => onClose(), 300)
  }, [disabled, onClose])

  const handleSubmit = useCallback(() => {
    if (disabled) return

    onSubmit()
  }, [disabled, onSubmit])

  const handleSecondaryAction = useCallback(() => {
    if (disabled || !secondaryAction) return

    secondaryAction()
  }, [disabled, secondaryAction])

  if (!isOpen) return null

  return (
    <div
      className="fixed inset-0 z-50 flex items-center justify-center overflow-y-auto overflow-x-hidden bg-neutral-800/70 outline-none focus:outline-none"
      onClick={handleClose}
    >
      <div
        className="h-ful relative mx-auto my-6 w-full md:h-auto md:w-4/6 lg:h-auto lg:w-3/6 xl:w-2/5"
        onClick={(e) => e.stopPropagation()}
      >
        {/* Content */}
        <div
          className={`translate h-full duration-300 ${
            showModal ? 'translate-y-0' : 'translate-y-full'
          } ${showModal ? 'opacity-100' : 'opacity-0'}`}
        >
          <div className="translate relative flex h-full w-full flex-col rounded-lg border-0 bg-white shadow-lg outline-none focus:outline-none md:h-auto lg:h-auto">
            {/* Header */}
            <div className="relative flex items-center justify-center rounded-t border-b-[1px] p-6">
              <button
                onClick={handleClose}
                className="absolute left-9 border-0 p-1 transition hover:opacity-70"
              >
                <IoMdClose size={18} />
              </button>
              <div className="text-lg font-semibold">{title}</div>
            </div>
            {/* Body */}
            <div className="relative flex-auto p-6">{body}</div>
            {/* Footer */}
            <div className="flex flex-col gap-2 p-6">
              <div
                className="
                    flex
                    w-full
                    flex-row
                    items-center
                    gap-4
                  "
              >
                {secondaryAction && secondaryActionLabel && (
                  <Button
                    disabled={disabled}
                    label={secondaryActionLabel}
                    onClick={handleSecondaryAction}
                    outline
                  />
                )}
                <Button
                  disabled={disabled}
                  label={actionLabel}
                  onClick={handleSubmit}
                />
              </div>
              {footer}
            </div>
          </div>
        </div>
      </div>
    </div>
  )
}

export default Modal
'use client'

import React from 'react'
import type { IconType } from 'react-icons'

type ButtonProps = {
  label: string
  onClick: (e: React.MouseEvent<HTMLButtonElement>) => void
  disabled?: boolean
  outline?: boolean
  small?: boolean
  icon?: IconType
}

const Button: React.FC<ButtonProps> = ({
  label,
  onClick,
  disabled,
  outline,
  small,
  icon: Icon,
}) => {
  return (
    <button
      onClick={onClick}
      disabled={disabled}
      className={`relative w-full rounded-lg transition hover:opacity-90 disabled:cursor-not-allowed disabled:opacity-70 ${
        outline ? 'bg-white' : 'bg-rose-500'
      } ${outline ? 'border-black' : 'border-rose-500'} ${
        outline ? 'text-black' : 'text-white'
      } ${small ? 'py-1' : 'py-3'} ${small ? 'text-sm' : 'text-md'} ${
        small ? 'font-light' : 'font-semibold'
      } ${small ? 'border-[1px]' : 'border-2'}`}
    >
      {Icon && <Icon size={24} className="absolute left-4 top-3" />}
      {label}
    </button>
  )
}

export default Button
ButtonコンポーネントにModalコンポーネント内部で編集したhandleSubmitを渡して、ButtonコンポーネントのonClickのイベントハンドラーとすることで検索をすることができます。
本記事の解説自体は以上で終わります。
細かい部分のリーディングは読者の皆様にお任せします。
おわりに
ここまで、長らくお読みいただき、ありがとうございます。
渡しも記事にする際はprismaのsomeなどは曖昧な部分がありましたので、ドキュメントを改めて読んでみたり、AIと対話して理解を深めるなりしました。
ややこしい部分もあるかと思いますが、自分の実装のアウトプットをしたり振り返ることは重要だなと思います。
何より重要なのは、「とりあえず動くものはできた」・「実装できた」で終わりにしないことだと感じました。
自分の中に噛み砕いて、自分なりの解釈を加えて、理解して自分のものにして、最終的には調べないで実装できる状態であったり、少し調べて実装できるくらいになるのが理想なので、今後も実装後の振り返り等はしていきたいなと思いました。
参考文献
Discussion
いつも丁寧なアウトプットありがとうございます!
知識を整理して自分で理解しやすい形にすることの大切さを感じました。
私も学んだことを知識として取り出せる状態にしていきたいです🎁