Open5
react-three/xrを使って、next.jsでVRアプリを作ってみた。#v0 #MetaQuest3
まずは、コード自動生成ができるAIツール「v0」を使って世界を作成。

とりあえず、簡単に50個のキューブと物理演算を追加してみました。
プロンプト履歴はこちら👇
こちらのサイトを参考に簡単にコードを作ってみようとしたが、どうやら最新のreact-three/xrライブラリは書き方が少し変わっているらしい。VRButtonが非推奨となっており、動かなかった。
公式のドキュメントを見てみると、サンプルコードが載っていた。
import { Canvas } from '@react-three/fiber'
import { XR, createXRStore } from '@react-three/xr'
import { useState } from 'react'

const store = createXRStore()

export function App() {
  const [red, setRed] = useState(false)
  return (
    <>
      <button onClick={() => store.enterAR()}>Enter AR</button>
      <Canvas>
        <XR store={store}>
          <mesh pointerEventsType={{ deny: 'grab' }} onClick={() => setRed(!red)} position={[0, 1, -1]}>
            <boxGeometry />
            <meshBasicMaterial color={red ? 'red' : 'blue'} />
          </mesh>
        </XR>
      </Canvas>
    </>
  )
}
必要な作業としては、
- const store = createXRStore()を追加
- <button onClick={() => store.enterVR()}>Enter VR</button>を追加
- 今回はVRなのでAR→VRに変更
- <XR>タグでメッシュを囲う
これだけで良いっぽい。
create-next-appでnextアプリを作成後、page.jsを下のように書き換える。
※型定義がめんどくさいのでtypescript使わずにjsで実装している
// app/page.js
"use client";

import { Canvas } from "@react-three/fiber";
import { XR, createXRStore } from "@react-three/xr";
import Scene from "../components/scene"

export default function Home() {
  const store = createXRStore({});
  return (
    <main className="container mx-auto">
      <h1 className="mt-4 mb-4 text-4xl">React Three XR</h1>
      <button onClick={() => store.enterVR()}>Enter VR</button>
      <Canvas
        shadows
        className="aspect-video border border-gray-300"
        camera={{ position: [0, 20, 20], fov: 50 }}
      >
        <XR store={store} >
          <Scene />
        </XR>
      </Canvas>
    </main>
  );
}
v0で作ったコードを張り付け👇
今回は物体を掴む物理演算を行いたかったので、その部分は手動で修正を加えています。
react-three/xr公式リポジトリに載っていたexamples内で使っているコードをそのまま持ってきている。
// components/scene.js
"use client";

import { Suspense, useEffect, useRef, useState } from "react";
import { Physics, usePlane, useBox } from "@react-three/cannon";
import {
  AccumulativeShadows,
  RandomizedLight,
} from "@react-three/drei";
import { Cursor } from "./Drag"
import { useDragConstraint } from "./Drag";

function Box({ color }) {
  const [ref] = useBox(() => ({
    mass: 1,
    position: [
      (Math.random() - 0.5) * 0.5,
      (Math.random() + 5) * 0.5,
      (Math.random() - 0.5) * 0.5,
    ],
    rotation: [Math.random(), Math.random(), Math.random()],
    args: [0.1, 0.1, 0.1],
  }));
  const bind = useDragConstraint(ref);

  return (
    <mesh ref={ref} {...bind } castShadow>
      <boxGeometry args={[0.1, 0.1, 0.1]} />
      <meshStandardMaterial color={color} roughness={0.5} metalness={0.5} />
    </mesh>
  );
}

function Plane() {
  const [ref] = usePlane(() => ({ rotation: [-Math.PI / 2, 0, 0], position: [0, 1, 0] }));
  return (
    <mesh ref={ref} receiveShadow>
      <planeGeometry args={[5, 5]} />
      <meshStandardMaterial color="#f0f0f0" roughness={0.4} metalness={0.3} />
    </mesh>
  );
}

function Lights() {
  return (
    <>
      <ambientLight intensity={0.8} />
      <directionalLight
        position={[10, 20, 10]}
        intensity={1.5}
        castShadow
        shadow-mapSize-width={4096}
        shadow-mapSize-height={4096}
        shadow-camera-left={-25}
        shadow-camera-right={25}
        shadow-camera-top={25}
        shadow-camera-bottom={-25}
        shadow-camera-near={0.1}
        shadow-camera-far={100}
      />
      <directionalLight
        position={[-10, 20, -10]}
        intensity={1}
        castShadow
        shadow-mapSize-width={4096}
        shadow-mapSize-height={4096}
        shadow-camera-left={-25}
        shadow-camera-right={25}
        shadow-camera-top={25}
        shadow-camera-bottom={-25}
        shadow-camera-near={0.1}
        shadow-camera-far={100}
      />
      <pointLight position={[0, 20, 0]} intensity={0.5} />
    </>
  );
}

function Shadows() {
  return (
    <AccumulativeShadows
      temporal
      frames={100}
      color="#316d39"
      colorBlend={0.5}
      opacity={1}
      scale={20}
      position={[0, -0.01, 0]}
    >
      <RandomizedLight
        amount={8}
        radius={10}
        ambient={0.5}
        position={[5, 5, -10]}
        bias={0.001}
      />
    </AccumulativeShadows>
  );
}

export default function Scene() {
  const [boxes, setBoxes] = useState([]);

  useEffect(() => {
    const colors = [
      "#ff6b6b",
      "#4ecdc4",
      "#45aaf2",
      "#fed330",
      "#fd9644",
      "#a55eea",
    ];
    setBoxes(
      Array.from({ length: 50 }, (_, i) => (
        <Box
          key={i}
          color={colors[Math.floor(Math.random() * colors.length)]}
        />
      ))
    );
  }, []);

  return (
    <>
      <color attach="background" args={["#f0f0f0"]} />
      <Lights />
      <Shadows />
      <Suspense>
        <Physics>
          <Cursor />
          <Plane />
          {boxes}
        </Physics>
      </Suspense>
    </>
  );
}
フォルダ構成

npm run dev --experimental-https
を実行してhttpsでローカルサーバーを起動します。
httpだと、MetaQuest3からアクセスしたときにWebXR not supportedと表示されてしまう👇
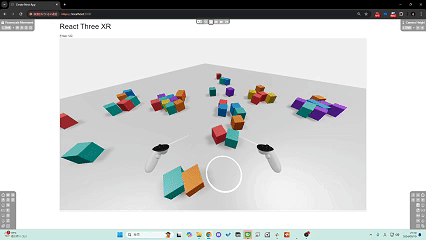
こんな感じで表示される👇(めちゃくちゃちっさいのはVR用にサイズ調整しているせいです)

EnterVRを押して起動!
PCからアクセスすると、VRの動きをエミュレーションできる!
MetaQuest3からアクセスすると、無事動きました!!