【Unity】 URP10,URP12,URP14でのMRTの実装の方法の違い
はじめに
URPのバージョンが変わると、MRT (Multi Render Targets) を実装する方法が変わります。
今回はURP10, URP12, URP14でのMRTの実装方法について比較してみます。
環境
- Unity2020.3.23f1 (URP 10.7.0)
- Unity2021.3.16f1 (URP 12.1.8)
- Unity2022.2.20f1 (URP 14.0.7)
GitHub サンプル
Chapter1. MRTの実装
MRT (Multi Render Targets)とは
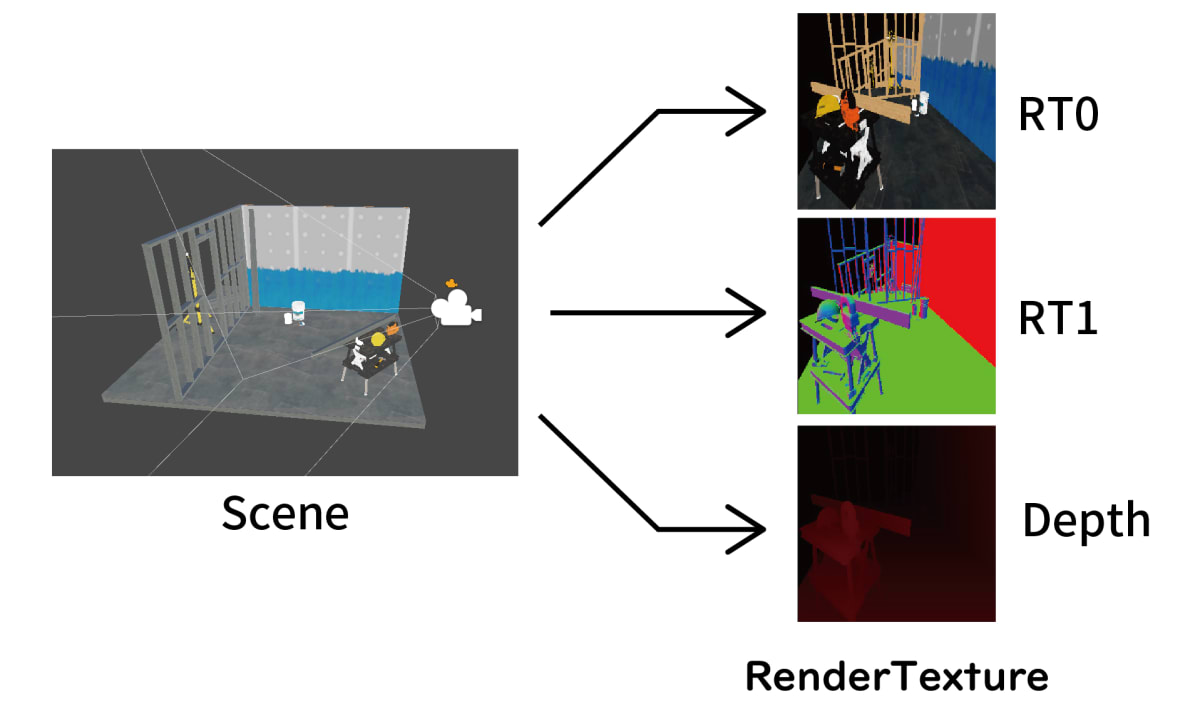
MRTを利用することで、オブジェクトを同時に複数のレンダーターゲット(テクスチャ)に対して一度に描画することができます。
MRT向けのシェーダーの書き方
MRT向けのシェーダーでは、fragにて構造体をreturnします。
こちらはURP10とURP14の両方で動作します。
struct BufferOutput
{
    half4 color : COLOR0; // RT0
    half3 normal : COLOR1; // RT1
};

BufferOutput frag (v2f i) : SV_Target
{
    BufferOutput o = (BufferOutput)0;
    o.color = tex2D(_MainTex, i.uv);
    o.normal = i.normal;
    return o;
}
シェーダーコード
Shader "Unlit/NewUnlitShader"
{
    Properties
    {
        _MainTex ("Texture", 2D) = "white" {}
    }
    SubShader
    {
        Tags { "RenderType"="Opaque" }
        LOD 100

        Pass
        {
            CGPROGRAM
            #pragma vertex vert
            #pragma fragment frag
            #include "UnityCG.cginc"

            struct appdata
            {
                float4 vertex : POSITION;
                float2 uv : TEXCOORD0;
                float3 normal : NORMAL;
            };

            struct v2f
            {
                float2 uv : TEXCOORD0;
                float4 vertex : SV_POSITION;
                float3 normal : TEXCOORD2;
            };

            struct BufferOutput
            {
                half4 color;
                half3 normal;
            };

            sampler2D _MainTex;
            float4 _MainTex_ST;

            v2f vert (appdata v)
            {
                v2f o;
                o.vertex = UnityObjectToClipPos(v.vertex);
                o.uv = TRANSFORM_TEX(v.uv, _MainTex);
                o.normal = UnityObjectToWorldNormal(v.normal);
                return o;
            }

            BufferOutput frag (v2f i) : SV_Target
            {
                BufferOutput o = (BufferOutput)0;
                o.color = tex2D(_MainTex, i.uv);
                o.normal = i.normal;
                return o;
            }
            ENDCG
        }
    }
}
レンダーターゲットの作り方の違い
URPでは、プログラマーが自分でレンダーターゲット(テクスチャ)を作成することになります。
URP12以前
URP12以前(Unity2021.3系)では、 一時的に使用するレンダーターゲットを作成するには、
CommandBuffer.GetTemporaryRT を使用する形になっていました。
var desc = renderingData.cameraData.cameraTargetDescriptor;
var colorTexture =  new RenderTargetIdentifier("_CustomPassHandle");
commandBuffer.GetTemporaryRT(colorTexture, desc);
テクスチャを使い終わったら、CommandBuffer.ReleaseTemporaryRT を呼び出してテクスチャを解放します。
URP14
URP14 では、 レンダーターゲットを管理する仕組みRTHandlesが追加されました。
RenderingUtils.ReAllocateIfNeeded やRTHandles.Alloc
を使用し、RTHandleを作成します。
RenderingUtils.ReAllocateIfNeeded を使うと、RTHandleがテクスチャを確保していた場合にテクスチャを自動で解放してくれます。
var desc = renderingData.cameraData.cameraTargetDescriptor;
// Then using RTHandles, the color and the depth properties must be separate
desc.depthBufferBits = 0;
RenderingUtils.ReAllocateIfNeeded(ref m_Handle, desc, FilterMode.Point,
                                    TextureWrapMode.Clamp, name: "_CustomPassHandle");
var desc = renderingData.cameraData.cameraTargetDescriptor;
desc.depthBufferBits = 0;
m_Handle = RTHandles.Alloc(desc, name: "_CustomPassHandle");
テクスチャが不要になったタイミングでは、RTHandles.Releaseを呼び、テクスチャを解放することができます。
MRTを実装してみる
URP10.7.0 での MRT
URP10.7.0のRenderObjects.csの実装を参考に、
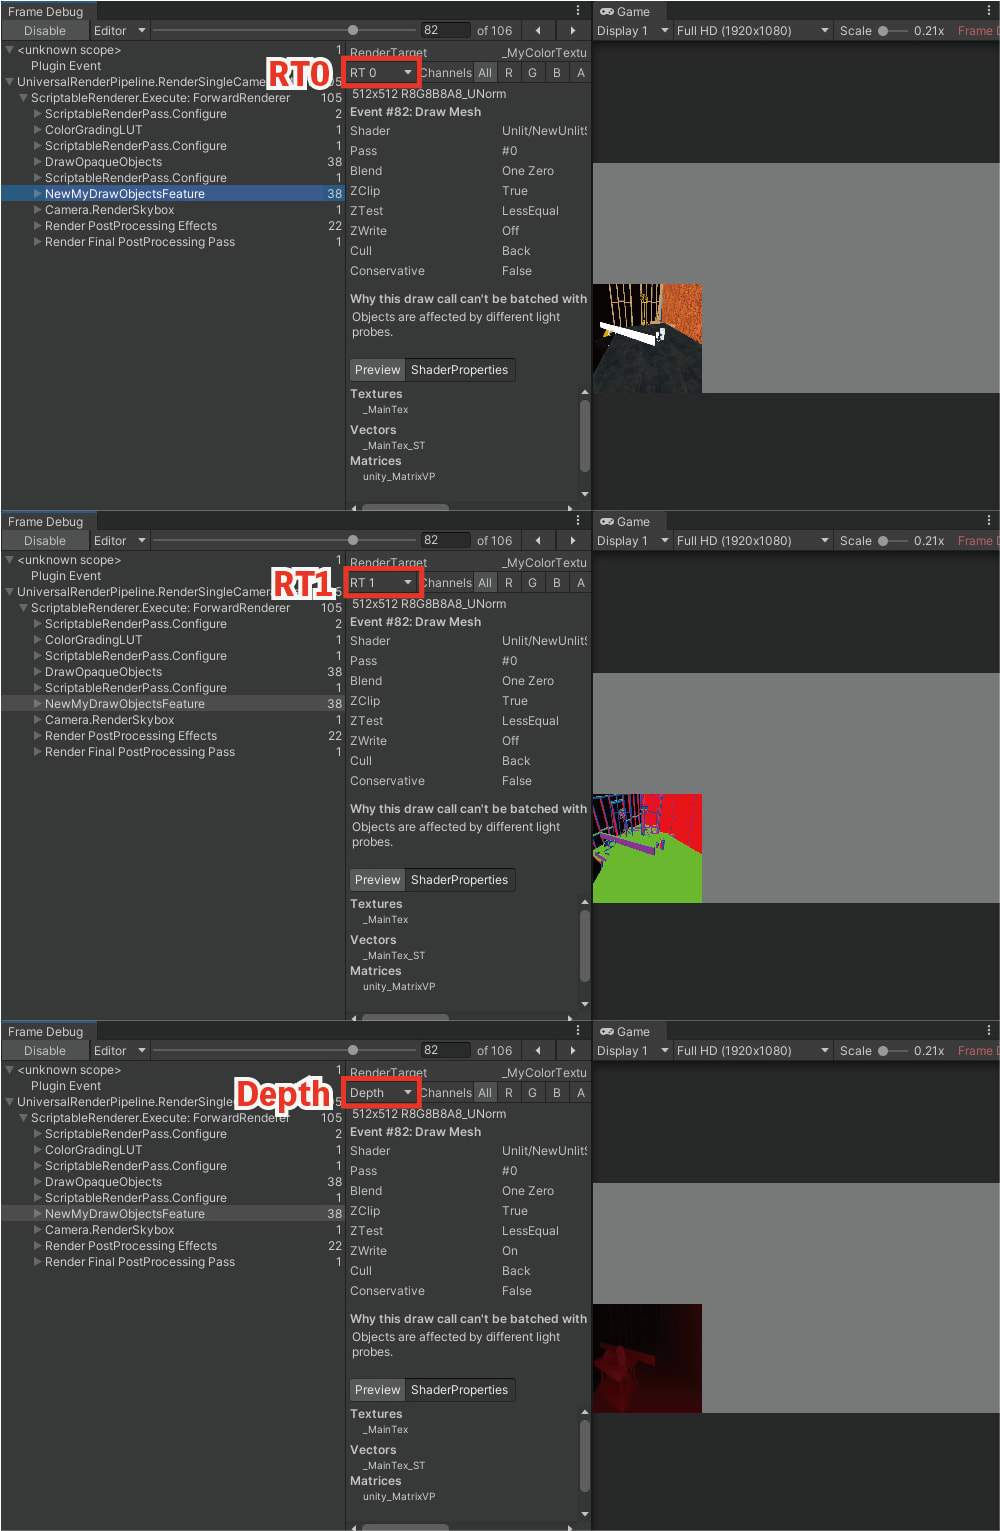
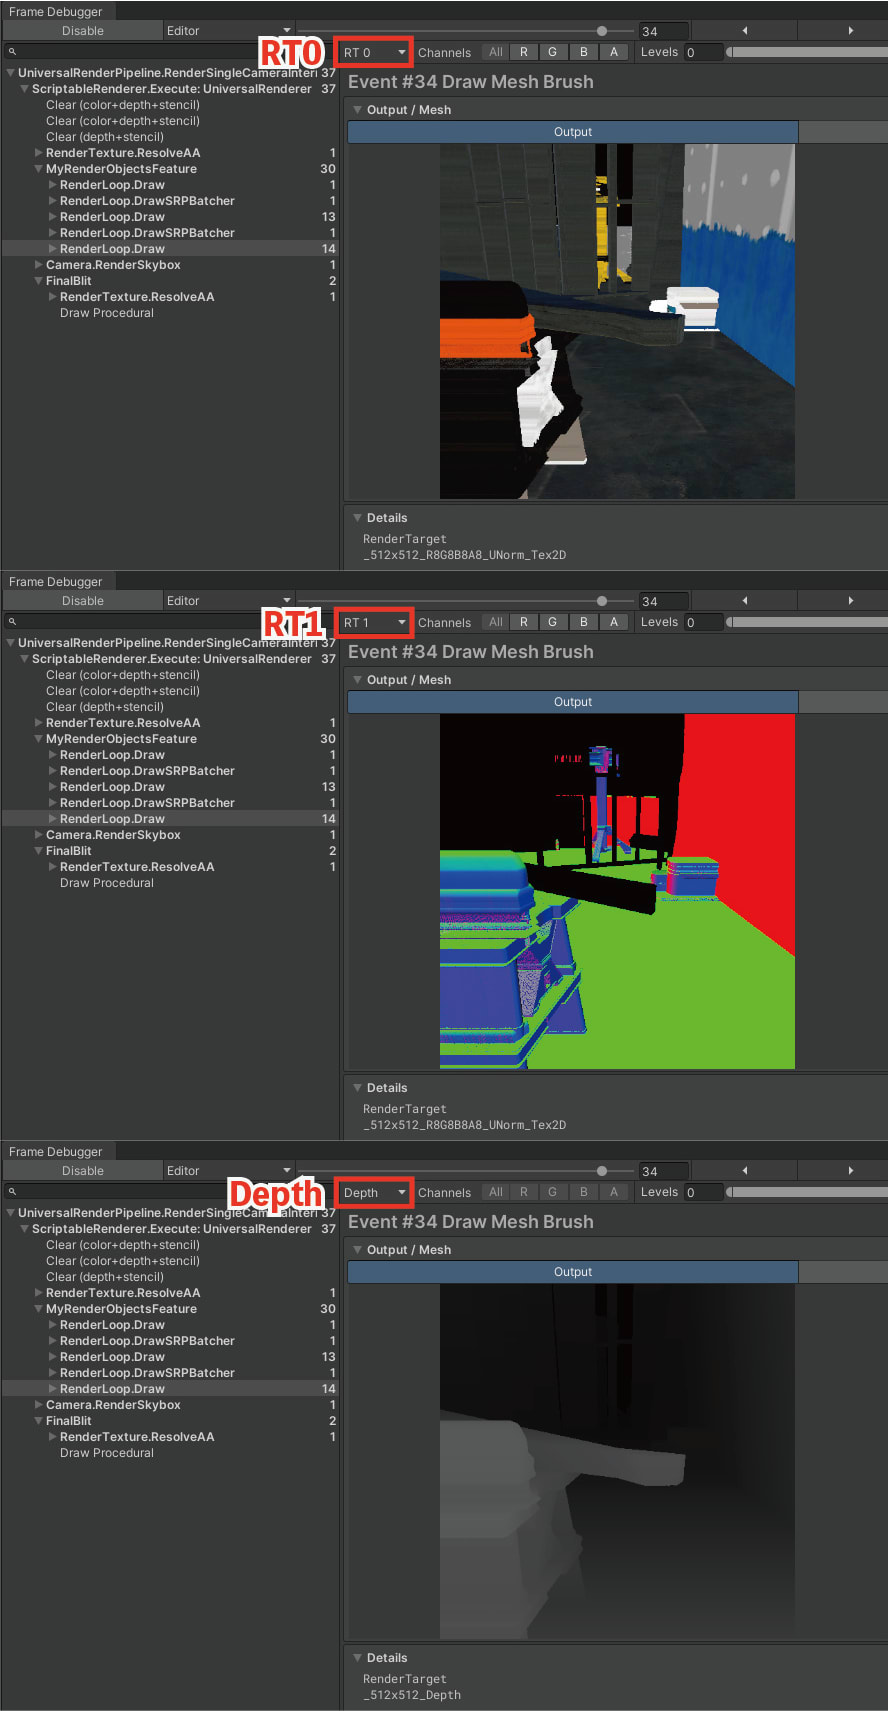
オブジェクトを Color, Normal, Depth へのレンダリングを行うRendererFeatureを作成します。
URP12.1.8 での MRT
URP12.1.8のRenderObjects.csの実装を参考に、
オブジェクトを Color, Normal, Depth へのレンダリングを行うRendererFeatureを作成します。
URP10.7.0との差分
RenderPassEvent.BeforeRenderingPrepasses が BeforeRenderingPrePasses に変更されました。
- if (settings.Event < RenderPassEvent.BeforeRenderingPrepasses)
+ if (settings.Event < RenderPassEvent.BeforeRenderingPrePasses)
-     settings.Event = RenderPassEvent.BeforeRenderingPrepasses;
+     settings.Event = RenderPassEvent.BeforeRenderingPrePasses;

...

- setupRenderPass = new SetupRenderPass(RenderPassEvent.BeforeRenderingPrepasses);
+ setupRenderPass = new SetupRenderPass(RenderPassEvent.BeforeRenderingPrePasses);
URP14.0.7 での MRT
URP14のRenderObjects.csの実装を参考に、
オブジェクトを Color, Normal, Depth へのレンダリングを行うRendererFeatureを作成します。
URP12.1.8との差分
差分1: レンダーターゲット指定方法の違い
URP12以前では、RenderTargetIdentifier を使用していましたが、
URP14では、RTHandle を使う形になりました。
- public void ConfigureTarget(RenderTargetIdentifier[] colorAttachments, RenderTargetIdentifier depthAttachment)
+ public void ConfigureTarget(RTHandle[] colorAttachments, RTHandle depthAttachment)
差分2: テクスチャ作成方法の違い
URP12以前では、SciriptableRenderPass内でテクスチャを作成しています。
// URP10.7.0, URP12.1.8
public class SetupRenderPass : ScriptableRenderPass
{
    ....
    public override void Configure(CommandBuffer cmd, RenderTextureDescriptor desc)
    {
        base.Configure(cmd, desc);

        var colorDesc = new RenderTextureDescriptor(desc.width, desc.height, RenderTextureFormat.ARGB32, 0);
        var depthDesc = new RenderTextureDescriptor(desc.width, desc.height, RenderTextureFormat.Depth, 8);
        var normalDesc = new RenderTextureDescriptor(desc.width, desc.height, RenderTextureFormat.ARGB32, 0);
        cmd.GetTemporaryRT(ShaderPropertyId.MyColorTexture, colorDesc);
        cmd.GetTemporaryRT(ShaderPropertyId.MyDepthTexture, depthDesc);
        cmd.GetTemporaryRT(ShaderPropertyId.MyNormalTexture, normalDesc);
URP14では、SciriptableRendererFeature内でテクスチャを作成しています。
// URP14
public static class MyRenderTargetBuffer
{
    static RTHandle m_MyColorTexture;
    static RTHandle m_MyDepthTexture;
    static RTHandle m_MyNormalTexture;
    ....
    public static void Setup(RenderTextureDescriptor desc)
    {
        ....
        var colorDesc = new RenderTextureDescriptor(desc.width, desc.height, RenderTextureFormat.ARGB32, 0);
        var depthDesc = new RenderTextureDescriptor(desc.width, desc.height, RenderTextureFormat.Depth, 8);
        var normalDesc = new RenderTextureDescriptor(desc.width, desc.height, RenderTextureFormat.ARGB32, 0);

        // URP14
        RenderingUtils.ReAllocateIfNeeded(ref m_MyColorTexture, colorDesc, FilterMode.Point, TextureWrapMode.Clamp, name: "_MyColorTexture");
        RenderingUtils.ReAllocateIfNeeded(ref m_MyDepthTexture, depthDesc, FilterMode.Point, TextureWrapMode.Clamp, name: "_MyDepthTexture");
        RenderingUtils.ReAllocateIfNeeded(ref m_MyNormalTexture, normalDesc, FilterMode.Point, TextureWrapMode.Clamp, name: "_MyNormalTexture");
RTHandleについて
RTHandleには、RenderTextureとRenderTargetIdentifierが定義されています。
RTHandleはレンダーターゲットIDとレンダーテクスチャの実体を抽象化しており、
これらを1つのものとして扱うことができます。
public class RTHandle
{
    internal RTHandleSystem m_Owner;
    internal RenderTexture m_RT;
    internal Texture m_ExternalTexture;
    internal RenderTargetIdentifier m_NameID;
    ...
}
暗黙的な型変換
RTHandle は暗黙的な型変換が定義されています。
public static implicit operator RenderTargetIdentifier(RTHandle handle) { ... }
public static implicit operator Texture(RTHandle handle) { ... }
暗黙的な型変換のおかげで、CommandBufferのSetGlobalTextureで、
RenderTargetIdentifier の代わりにRTHandleを渡すことができるなど、取り回しが良くなっています。
public void SetGlobalTexture(int nameID, RenderTargetIdentifier value)
Chapter2. Deferred Lighting を実装してみる
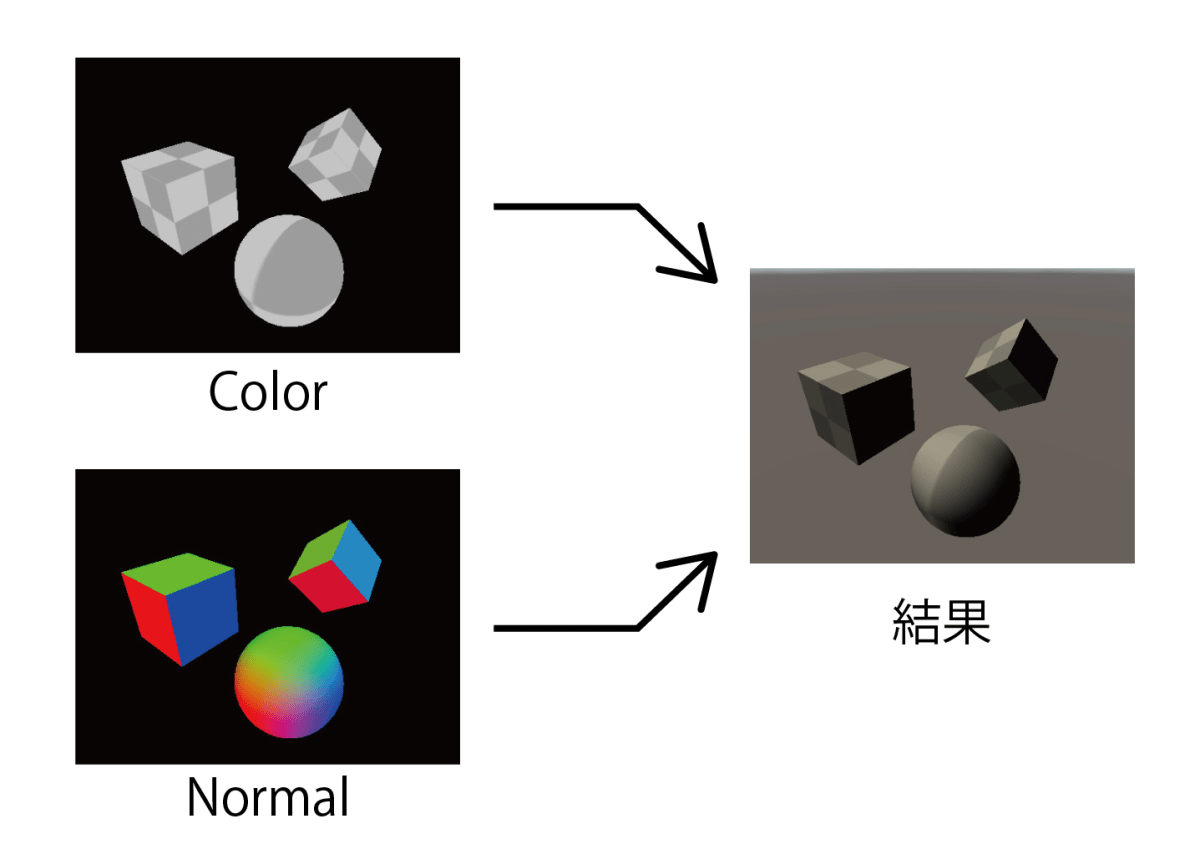
今回は_MyColorTexture, _MyNormalTextureをテクスチャに書き出しました。
これらのテクスチャを使ってライティングを実装してみます。
シェーダー
MyDeferredLighting.shader
Shader "Hidden/MyDeferredLighting"
{
    SubShader
    {
        Cull Off ZWrite Off ZTest Always

        Pass
        {
            Blend SrcAlpha OneMinusSrcAlpha

            HLSLPROGRAM
            #pragma vertex vert
            #pragma fragment frag

            #include "Packages/com.unity.render-pipelines.universal/ShaderLibrary/Core.hlsl"
            #include "Packages/com.unity.render-pipelines.universal/ShaderLibrary/Lighting.hlsl"

            struct appdata
            {
                float4 vertex : POSITION;
                float2 uv : TEXCOORD0;
            };

            struct v2f
            {
                float2 uv : TEXCOORD0;
                float4 vertex : SV_POSITION;
            };

            v2f vert (appdata v)
            {
                v2f o;
                o.vertex = TransformObjectToHClip(v.vertex);
                o.uv = v.uv;
                return o;
            }

            sampler2D _MyColorTexture;
            sampler2D _MyNormalTexture;

            half4 frag (v2f i) : SV_Target
            {
                half4 col = tex2D(_MyColorTexture, i.uv);
                float3 normal = tex2D(_MyNormalTexture, i.uv).xyz;
                Light light = GetMainLight();
                half lambert = saturate(dot(normalize(normal), light.direction));
                return half4(col.rgb * lambert * light.color.rgb, col.a);
            }
            ENDHLSL
        }
    }
}
URP 10.7.0
URP10.7.0でのRendererFeatureは以下になります。
URP 12.1.8
URP12.1.8でのRendererFeatureは以下になります。
URP 14.0.7
URP14.0.7でのRendererFeatureは以下になります。
まとめ
URP12以前とURP14の実装方法の違いについてまとめます。
差分1: レンダーターゲットの作成
URP12以前
CommandBuffer.GetTemporaryRT() でレンダーターゲットを作成し、
CommandBuffer.ReleaseTemporaryRT() でレンダーターゲットを解放します。
public void GetTemporaryRT(int nameID, RenderTextureDescriptor desc) {...}
public extern void ReleaseTemporaryRT(int nameID);
URP14
RTHandles.Alloc() でレンダーテクスチャ(レンダーターゲット)を作成し、
RTHandles.Release() でレンダーテクスチャ(レンダーターゲット)を解放します。
public static RTHandle Alloc(RenderTargetIdentifier tex, string name) { ... }
public static void Release(RTHandle rth) { ... }
RTHandles.Alloc を安全に使えるようにラップした、
RenderingUtils.ReAllocateIfNeeded が用意されています。
public static bool ReAllocateIfNeeded(
    ref RTHandle handle,
    in RenderTextureDescriptor descriptor,
    FilterMode filterMode = FilterMode.Point,
    TextureWrapMode wrapMode = TextureWrapMode.Repeat,
    bool isShadowMap = false,
    int anisoLevel = 1,
    float mipMapBias = 0,
    string name = "")
{
    if (RTHandleNeedsReAlloc(handle, descriptor, filterMode, wrapMode, isShadowMap, anisoLevel, mipMapBias, name, false))
    {
        handle?.Release();
        handle = RTHandles.Alloc(descriptor, filterMode, wrapMode, isShadowMap, anisoLevel, mipMapBias, name);
        return true;
    }
    return false;
}
差分2: レンダーターゲットの指定
URP12以前
ConfigureTarget でレンダーターゲットを指定します。
public void ConfigureTarget(RenderTargetIdentifier[] colorAttachments, RenderTargetIdentifier depthAttachment) { ... }
URP14
URP14では、RTHandleを使用します。
public void ConfigureTarget(RTHandle[] colorAttachments, RTHandle depthAttachment)
関連
Discussion