CDKでFargateを作成する
$ cdk init app --language=typescript
Best Practice
インフラストラクチャコードとアプリケーションコードを同じパッケージにする
Lambdaコードや Dockerイメージなどインフラだけでなくアプリケーションの内容も含める。
書けるものはDescriptionを書く
new CdkStack(app, 'CdkStack', {
  description: 'API Gatewayを管理するStack',
  env: { region: 'ap-northeast-1' },

  /* For more information, see https://docs.aws.amazon.com/cdk/latest/guide/environments.html */
});
Stackのコンストラクタだけで記述を済ませず、シンプルにする
Stackクラスのコンストラクタ内を見れば全体像がひと目でわかったほうが内容の把握はもちろん、メンテナンス性も上がる。
そのため、コンストラクタ内にすべてをベタ書きするのではなく、メソッドに抽出するなどプログラミングと同じようなプラクティスを適用する。
デプロイ時ではなく合成時に決定する
cdk synth
自動で生成されるリソース名を使用し、物理的な名前を使用しない
より良い方法は、できるだけ名前を指定しないことです。リソース名を省略すると、一意の新しい名前が生成されるので、この種の問題は発生しません。次にアプリケーションをパラメータ化します。例えば実際に生成されたテーブル名 (AWS CDKアプリケーションではtable.tableNameとして参照できます) を環境変数としてLambda関数に渡したり、EC2インスタンスの起動時にコンフィグファイルを生成したり、実際のテーブル名を AWS Systems Manager Parameter Store に書き込み、アプリケーションがそこから読み込んで実際のテーブルを把握したりします。これはリソースのための依存性の注入のようなものです。
cdk.context.jsonをコミットして、外部的な要因で合成結果が変わってしまうことを避ける
AWS CDKアプリには、cdk synthする時に外部問い合わせを必要とするコードを入れないようにしましょう。不適切なタイミングで呼び出しが失敗する可能性があるだけでなく、その呼び出しは状況によって毎回異なる答えを返す可能性があります。これにより以下の例のように、意図しない副作用が生じる可能性があります。
AWS CDKには、非決定性情報のソースを記録する仕組み (cdk.context.json) があり、明示的にファイルからエントリを消去しない限り(cdk context)、将来のcdk synthでも同じテンプレートが生成されるようになっています。これらの情報はコンテキストプロバイダと呼ばれるAWS CDKのメカニズムを使用して、.fromLookup()などの呼び出しで参照できます。
コンテキストプロバイダが存在しない情報を使用する必要がある場合は、AWS CDKとは別にこの情報を生成するスクリプトを書き、それをJSONファイルに書き込み、AWS CDKアプリケーションからそのファイルを読み込んで使用することをお勧めします。
Runtime Contextをうまく活用する
Contextという形で、パラメータ値をスタックに流し込むことができる。
活用することで環境間の差をコードから分離して管理したりすることができる。
Runtime context - AWS Cloud Development Kit (CDK) v2
ステートレスとステートフルを意識する
とはいえ、多くのリソースがログを出力するので全部をステートフルなスタックにするのが厳しい場合があります。
そういったときに、データの保持さえ出来れば良いのであればRemovalPolicyでRETAINを指定してステートレスなスタックとして扱ってしまうことができます。
参考資料
- API Gateway経由でのみアクセス可能なAPIをECSで構築する - Qiita
- AWS CDKv2にマイグレーションしてみた #reinvent | DevelopersIO
- AWS CDK の歩き方 〜 ECS 環境構築編
- AWS CDKでリソース間の依存性をaddDependsOnで明示的に定義する | DevelopersIO
- 実践!AWS CDK #26 Version 2 | DevelopersIO
- AWS CDKを使えばTypeScriptでAWSインフラを定義できるらしい - Qiita
- ECS(Fargate)のServiceをCDKで構築・デプロイしてみた | DevelopersIO
- Docker Compose と Amazon ECS を利用したソフトウェアデリバリの自動化 | Amazon Web Services ブログ
- AWS CDKで既存のSubnetを参照する方法 | DevelopersIO
Best Practice
API Gateway

以下4種類がある。
- HTTP API
- 特徴
- 低コスト
- JWT Authorizer (OpenID Connect)をサポート
- 参考資料
- 特徴
- WebSocketAPI
- REST API
- REST API(プライベート)
CDKで利用できるライブラリの種類
以下2種類があり、それぞれで構築できるAPI Gatewayの種類が異なる。 (WebSocketはCDKのLibraryとしては存在しない?)
- aws_apigateway
- REST APIの構築
- aws-cdk-lib.aws_apigateway module · AWS CDK
- aws_apigatewayv2
- HTTP APIの構築
- aws-cdk-lib.aws_apigatewayv2 module · AWS CDK
基本的な書き方
-
RestApiやLambdaRestApi、StepFunctionsRestApiなどでAPI Gateway自体の定義を行う。(以降の例はRestAPIを使用した場合) -
addResource、addMethodを使ってリソースとメソッドを定義していく -
〜Integrationを使って対象のメソッドで呼び出される処理を定義する
import { Stack, StackProps } from 'aws-cdk-lib';
import { Construct } from 'constructs';
import {
aws_apigateway as apigateway
} from 'aws-cdk-lib';
export class CdkStack extends Stack {
constructor(scope: Construct, id: string, props?: StackProps) {
super(scope, id, props);
const api = new apigateway.RestApi(this, 'fargate-api');
api.root.addMethod('ANY');
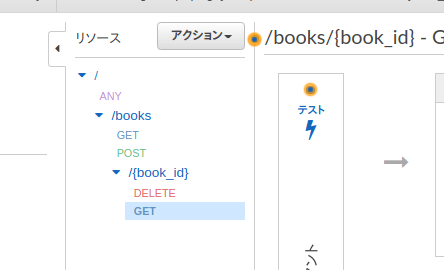
const books = api.root.addResource('books');
books.addMethod('GET');
books.addMethod('POST');
const book = books.addResource('{book_id}');
const getBookIntegration = new apigateway.HttpIntegration('http://amazon.com');
book.addMethod('GET', getBookIntegration);
// book.addMethod('DELETE');
}
}
リソース等が削除されることの確認
cdk deployを実行してまずリソースが作成されることを確認。

リソースとメソッドを削除後、cdk deployで反映されることを確認。
VPCリンク
公式ドキュメントのPrivate Integrationsを参照。
import * as elbv2 from '@aws-cdk/aws-elasticloadbalancingv2';

const vpc = new ec2.Vpc(this, 'VPC');
const nlb = new elbv2.NetworkLoadBalancer(this, 'NLB', {
  vpc,
});
const link = new apigateway.VpcLink(this, 'link', {
  targets: [nlb],
});

const integration = new apigateway.Integration({
  type: apigateway.IntegrationType.HTTP_PROXY,
  options: {
    connectionType: apigateway.ConnectionType.VPC_LINK,
    vpcLink: link,
  },
});
非プロキシ統合の動作
API Gatewayにリクエストを送ると{"message": "Unsupported Media Type"}が返される。
設定は以下のような内容。
 endpointArray.forEach((endpoint) => {
      const resource = text.addResource(endpoint)
      const integration = new apigateway.Integration({
        type: apigateway.IntegrationType.HTTP,
        uri: `https://${nlb.loadBalancerDnsName}/text/${endpoint}`,
        integrationHttpMethod: 'POST',
        options: {
          connectionType: apigateway.ConnectionType.VPC_LINK,
          vpcLink: vpcLink,
          integrationResponses: [{
            statusCode: '200',
            selectionPattern: '2\d{2}',
          }, {
            statusCode: '400',
            selectionPattern: '4\d{2}'
          }],
          passthroughBehavior: apigateway.PassthroughBehavior.NEVER,
        },
      });

      resource.addMethod('POST', integration, {
        apiKeyRequired: false,
        methodResponses: [
        {
          // Successful response from the integration
          statusCode: '200',
          responseModels: {
            'application/json': apigateway.Model.EMPTY_MODEL,
          }
        },
        {
          // Same thing for the error responses
          statusCode: '400',
          responseModels: {
            'application/json': apigateway.Model.EMPTY_MODEL,
          },
        }
      ]
      })
Corsの設定
- [AWS CDK] API Gateway(REST API)のCORSの動作を確認してみた | DevelopersIO
-
amazon cloudformation - enabling CORS for AWS API gateway with the AWS CDK - Stack Overflow
【AWS CDK】API Gateway で S3 をプロキシしてオブジェクトをダウンロードしてみた | DevelopersIO
ResponseModelの定義
CloudFormationでは以下のように定義していたが
ResponseModels: { 'application/json': 'Empty' }
CDKでは以下のようにModelをimportすればいいみたい。
responseModels: {
  'application/json': apigateway.Model.EMPTY_MODEL,
}
詳細は以下の記事参照。
API GatewayバックのLambda関数にアプリケーションからカスタムヘッダーを渡す際にハマったこと | DevelopersIO
アクセスログの設定
     const api = new apigateway.RestApi(this, `${this.stackName}RestApi`, {
        restApiName: 'API',
        deployOptions: {
          stageName: 'development',
          accessLogDestination: new apigateway.LogGroupLogDestination(prdLogGroup),
          accessLogFormat: apigateway.AccessLogFormat.jsonWithStandardFields()
        },
        defaultCorsPreflightOptions: {
          allowOrigins: apigateway.Cors.ALL_ORIGINS
        }
    });
上記の設定を入れることで以下のようにアクセスログがCloudWach Logsに出力される。

参考資料
VPCの定義
以下の定義でVPCが作成できる。
import * as ec2 from 'aws-cdk-lib/aws-ec2';

export class CdkNetworkStack extends Stack {
  constructor(scope: Construct, id: string, props?: StackProps) {
    super(scope, id, props);

    // The code that defines your stack goes here
    const vpc = new ec2.Vpc(this, 'VPC', {
      cidr: '10.0.0.0/16'
    });
  }
}
VPCの作成をするだけでサブネットが自動で作成される。
東京リージョンで1a、1cそれぞれにPublic SubnetとPrivate Subnetが作られていたので、そういう設定になっていると思われる。
以下のリソースが作成される。
- Subnet
- Internet Gateway
- NAT Gateway
- Route Table
- VPC Gateway


CDKのドキュメントを見ると以下の記載が有り、設定によってはNat Gatewayを作らないようにできるっぽい。
A default VPC configuration will create public and private subnets. However, if natGateways:0 and subnetConfiguration is undefined, default VPC configuration will create public and isolated subnets. See Advanced Subnet Configuration below for information on how to change the default subnet configuration.
Constructs using the VPC will "launch instances" (or more accurately, create Elastic Network Interfaces) into one or more of the subnets. They all accept a property called subnetSelection (sometimes called vpcSubnets) to allow you to select in what subnet to place the ENIs, usually defaulting to private subnets if the property is omitted.
If you would like to save on the cost of NAT gateways, you can use isolated subnets instead of private subnets (as described in Advanced Subnet Configuration). If you need private instances to have internet connectivity, another option is to reduce the number of NAT gateways created by setting the natGateways property to a lower value (the default is one NAT gateway per availability zone). Be aware that this may have availability implications for your application.
Subnet Types
以下3種類のSubnetがあり、デフォルトの設定ではPublicと Private with Internet AccesssのSubnetが作られる。
- Public
- Private with Internet Accesss
- Isolated
const vpc = new ec2.Vpc(this, 'VPC', {
      cidr: '10.0.0.0/16',
      natGateways: 0,
    });
natgatewayの定義を後から変えようとしたらエラーになった。
CdkNetworkStack: creating CloudFormation changeset...
2:03:56 AM | CREATE_FAILED        | AWS::EC2::Subnet                      | VPCIsolatedSubnet2Subnet4B1C8CAA
The CIDR '10.0.192.0/18' conflicts with another subnet (Service: AmazonEC2; Status Code: 400; Error Code: InvalidSubnet.Conflict; Request ID:
5688c2cd-e664-4b5e-9f9d-a04fed7c53e6; Proxy: null)

2:03:56 AM | CREATE_FAILED        | AWS::EC2::Subnet                      | VPCIsolatedSubnet1SubnetEBD00FC6
The CIDR '10.0.128.0/18' conflicts with another subnet (Service: AmazonEC2; Status Code: 400; Error Code: InvalidSubnet.Conflict; Request ID:
36867eca-077b-4aa6-b2ce-5f34f4419abb; Proxy: null)
一度cdk destroyしてから再度デプロイし直すとSubentの種類がIsolatedになり、Nat Gatewayが作成されないようになった。

CDKのAdvanced Subnet Configuration にあるように、より詳細な設定を行い場合にはsubnetConfigurationを記載すればいいみたい。
const vpc = new ec2.Vpc(this, 'TheVPC', {
  // 'cidr' configures the IP range and size of the entire VPC.
  // The IP space will be divided over the configured subnets.
  cidr: '10.0.0.0/21',

  // 'maxAzs' configures the maximum number of availability zones to use
  maxAzs: 3,

  // 'subnetConfiguration' specifies the "subnet groups" to create.
  // Every subnet group will have a subnet for each AZ, so this
  // configuration will create `3 groups × 3 AZs = 9` subnets.
  subnetConfiguration: [
    {
      // 'subnetType' controls Internet access, as described above.
      subnetType: ec2.SubnetType.PUBLIC,

      // 'name' is used to name this particular subnet group. You will have to
      // use the name for subnet selection if you have more than one subnet
      // group of the same type.
      name: 'Ingress',

      // 'cidrMask' specifies the IP addresses in the range of of individual
      // subnets in the group. Each of the subnets in this group will contain
      // `2^(32 address bits - 24 subnet bits) - 2 reserved addresses = 254`
      // usable IP addresses.
      //
      // If 'cidrMask' is left out the available address space is evenly
      // divided across the remaining subnet groups.
      cidrMask: 24,
    },
    {
      cidrMask: 24,
      name: 'Application',
      subnetType: ec2.SubnetType.PRIVATE_WITH_NAT,
    },
    {
      cidrMask: 28,
      name: 'Database',
      subnetType: ec2.SubnetType.PRIVATE_ISOLATED,

      // 'reserved' can be used to reserve IP address space. No resources will
      // be created for this subnet, but the IP range will be kept available for
      // future creation of this subnet, or even for future subdivision.
      reserved: true
    }
  ],
});
既存VPCの読み込み
Importing an existing VPCに記載があるように VPC.fromLookupを使用する。
    const vpc = ec2.Vpc.fromLookup(this, 'VPC', {
        vpcId: VPCID
    })
既存VPC読み込み時の問題点
VPCEndpointの作成と共存が出来ない?
cdk.context.jsonがにVPCの情報が存在する状態なら問題ないが、情報がないと以下のエラーが発生する。
Cannot create a VPC Endpoint with no subnets
参考資料
LB
以下2種類があるが、基本的にv2を使えばいいっぽい?
NLBの構築
-
NetworkLoadBalancerでNLBの定義 -
addListenerでListenerの追加 -
addTargetsでTarget Groupの追加
 const nlb = new elbv2.NetworkLoadBalancer(this, 'LB', {
      vpc,
      internetFacing: false,
      vpcSubnets: {subnets: vpc.publicSubnets}
    });

    const listener = nlb.addListener('Listener', {
      port: 80,
    });

    listener.addTargets('targetGroup', {
      port: 80,
      protocol: elbv2.Protocol.TCP,
    })
Private Linkの設定

class VpcEndpointService (construct) · AWS CDK を使って定義する。
公式ドキュメントの例そのままだが、ec2.VpcEndpointServiceを定義して紐付けたいLBを指定すればOK。
declare const networkLoadBalancer1: elbv2.NetworkLoadBalancer;
declare const networkLoadBalancer2: elbv2.NetworkLoadBalancer;

new ec2.VpcEndpointService(this, 'EndpointService', {
  vpcEndpointServiceLoadBalancers: [networkLoadBalancer1, networkLoadBalancer2],
  acceptanceRequired: true,
  allowedPrincipals: [new iam.ArnPrincipal('arn:aws:iam::123456789012:root')]
});
Stackの分割と依存関係
Stack間でリソースを共有する
StackPropsを継承してinterfaceを定義。
使いたい側でそのPropsをimportすればOK?
- 共有したいリソースを作る側
-
public readonlyで共有したいリソースを定義 -
thisで共有したいリソースを定義
-
- 共有したいリソースを受け取る側
-
interfaceでStackPropsを継承して、受け取りたいリソースを定義する
-
- App
- 共有したいリソースを作成しているスタックからリソースを取得し、interfaceで指定したキーで渡す
/**
 * Stack that defines the bucket
 */
class Producer extends cdk.Stack {
  public readonly myBucket: s3.Bucket;

  constructor(scope: cdk.App, id: string, props?: cdk.StackProps) {
    super(scope, id, props);

    const bucket = new s3.Bucket(this, 'MyBucket', {
      removalPolicy: cdk.RemovalPolicy.DESTROY,
    });
    this.myBucket = bucket;
  }
}

interface ConsumerProps extends cdk.StackProps {
  userBucket: s3.IBucket;
}

/**
 * Stack that consumes the bucket
 */
class Consumer extends cdk.Stack {
  constructor(scope: cdk.App, id: string, props: ConsumerProps) {
    super(scope, id, props);

    const user = new iam.User(this, 'MyUser');
    props.userBucket.grantReadWrite(user);
  }
}

const producer = new Producer(app, 'ProducerStack');
new Consumer(app, 'ConsumerStack', { userBucket: producer.myBucket });
FargateでClusterを渡す例
基本的に上記のS3の例と同じだが、ファイルとして分割する場合の例。
export class InfrastructureStack extends Stack {
  public readonly cluster: ecs.Cluster // public readonlyで定義
  constructor(scope: Construct, id: string, props?: StackProps) {
    super(scope, id, props);
    ...
    this.cluster = new ecs.Cluster(this, 'Cluster', {
      vpc: vpc,
    });
const infra = new InfrastructureStack(app, 'InfrastructureStack', {
  env: { region: 'ap-northeast-1' },
})

new BackendStack(app, 'BackendStack', {
  env: { region: 'ap-northeast-1' },
  cluster: infra.cluster,   // InfrastructureStackで定義したリソースをpropsとして渡す
});
interface backendStackProps extends StackProps {
  cluster: ecs.Cluster
}


export class BackendStack extends Stack {
  constructor(scope: Construct, id: string, props: backendStackProps) {
    super(scope, id, props);
    ...
    const backendService = new ecs.FargateService(this, 'BackendService', {
      cluster: props.cluster, // propsとして渡されたclusterを使う
      ...
参考資料
ECS(Fargate)
Clusterの定義
const cluster = new ecs.Cluster(this, 'Cluster', {
  vpc,
});
Serviceの定義
Task Definitionの定義
Imageの定義
以下のように使用するイメージによって色々なやり方があるので、状況に合わせてどのメソッドを使うか決める。
-
ecs.ContainerImage.fromRegistry(imageName)- パブリックイメージを使う場合
-
ecs.ContainerImage.fromRegistry(imageName, { credentials: mySecret })- クレデンシャルが必要なプライベートイメージを使う場合
-
ecs.ContainerImage.fromEcrRepository(repo, tag)- 指定したECR Repositoryのイメージを使う
-
ecs.ContainerImage.fromAsset('./image')- ローカルのDockerfileから直接イメージのビルドとアップロードを行う場合
-
ecs.ContainerImage.fromDockerImageAsset(asset)-
@aws-cdk/aws-ecr-assets.DockerImageAssetで定義されたイメージを使う
-
ECRのイメージを使う場合にはclass EcrImage · AWS CDK を使ったほうが良いかも。
デプロイフローの構築
cdk deployを実行する際にタグで指定をする場合、タグ名が変わらない時には差分がないと判断されデプロイが行われない。
開発環境等で常にlatestタグで運用を行いたい場合にはdigestで指定するのも考える必要がある。
# Digestで指定
   ecs.ContainerImage.fromEcrRepository(
      props.repository,
      "sha256:8b49246788dc37dede413a5f90e3f33a450ab4df9fb8fb89f415a1b7d0a53008"
    );

# タグで指定
new ecs.EcrImage(props.repository, 'nginx-latest'),
詳細は以下の記事参照。
ECS(Fargate)のServiceをCDKで構築・デプロイしてみた | DevelopersIO
エラー
CannotPullContainerError: ref pull has been retried 5 time(s): failed to copy: httpReadSeeker: failed open: failed to do request: Get https://prod-ap-northeast-1-starport-layer-bucket.s3.ap-northeast-1.amazonaws.com/4
- 参考資料
ResourceInitializationError: failed to validate logger args: : signal: killed
ResourceInitializationError: unable to pull secrets or registry auth: pull command failed: : signal: killed
上記のエラーが出るときはプライベートサブネットでS3にアクセスできないことを示す?
S3のVPC Endpointを作成したら解消した。
Digestの取得方法
- digestはリモートのイメージも取得できる?
- docker inspect results into Error: No such object even if image exists - Stack Overflow を見ると、まずイメージがローカルにないとだめっぽい
- 特にローカルでビルド等を行っていない状態で以下のコマンドを実行しても
Error: No such object:のエラーが出る
# digest=$(docker images --no-trunc -q $imageName) # これはローカルのimageのdigestなので間違い
digest=$(docker inspect $imageName:latest --format='{{index .RepoDigests 0}}' | sed -e 's/.*\@\(.*\)/\1/')
yarn cdk deploy '*' -c stage=$stage -c digest=$digest --require-approval=never
- docker pullでイメージを取得した後に実行したらinspectコマンドが実行できた
- 結論として、push時にダイジェストは発行されるので、build, pushを行ったタイミングでダイジェストを取得して後続に渡すのが一番効率が良い
参考資料
ECR
定義
const repository = new ecr.Repository(this, 'Repository');
ECRへのプッシュ
$ aws ecr get-login --no-include-email
$ docker-compose push
ERROR: no basic auth credentials
上記のエラーが出たのはdocker loginコマンドを使い忘れたのが原因。
CDKのデバッグ
cdk synthコマンドでconsole.logの内容を出力できる。
--quietオプションをつけるとテンプレートの内容は出力せず、コンソール(標準出力)の内容だけ出力してくれる。
cdk synth --quiet
CDKのトラブルシューティング
There is already a Construct with name
There is already a Construct with name〜というエラーが出るときは、同じIDで作られたリソースがあるから。
Error: Resolution error
envの設定が異なるStackをCross Referenceにすると以下のエラーが出る?
Resolution error: Resolution error: Cannot use resource 'RepositoryStack/BackendRepository' in a cross-environment fashion, the resource's physical name must be explicit set or use `PhysicalName.GENERATE_IF_NEEDED`.
ドメイン、証明書
証明書の取得
- AWS Certificate Managerを利用してSSL/TLS認証書をリクエストしてCloudFrontに統合してみた。 | DevelopersIO
- AWS運用には無料のSSL証明書を活用しよう!(取得も簡単、難易度低です) | AWS運用最適化サービス cloud link (クラウドリンク)
既存のCetificateをimport
const arn = 'arn:aws:...';
    const certificate = cert.Certificate.fromCertificateArn(this, 'Certificate', arn);
- @aws-cdk/aws-certificatemanager module · AWS CDK
- API Gatewayにカスタムドメインを設定するためのリソースを全てAWS CDKでつくってみた | DevelopersIO
ドメイン
Hostzoneの取得
@aws-cdk/aws-route53 module · AWS CDK によれば既存のHostzoneをCDK上でimportする方法は以下3つがある。
HostedZone.fromLookupHostedZone.fromHostedZoneAttributesHostedZone.fromHostedZoneId
ただし、HostedZone.fromHostedZoneIdを使ってドメイン名を取得しようとしたら以下のエラーが出たので、ドメイン名は情報として持っておく必要がある?
Error: HostedZone.fromHostedZoneId doesn't support "zoneName"
Aレコードの追加
-
fromIpAddresses- IPを直に指定してターゲットにする場合
-
fromAlias- CloudFront等をターゲットにする場合
    const zone = route53.HostedZone.fromHostedZoneAttributes(this, 'MyZone', {
      zoneName: HOSTZONE_NAME,
      hostedZoneId: HOSTZONE_ID,
    });
    new route53.ARecord(this, 'ARecord', {
      zone: zone,
      recordName: SUBDOMAIN_NAME + '.' + HOSTZONE_NAME,
      target: route53.RecordTarget.fromAlias(new targets.LoadBalancerTarget(this.nlb)),
    });
ターゲットとして指定するもの(CloudFront, LoadBalancer等)による書き方は@aws-cdk/aws-route53-targets module · AWS CDK を参照
Contextの活用
Contextの目的はデプロイ時の不測な変更を防ぐことにある。
仕組みとしてはデプロイがされる度にcdk.context.jsonに使い回しが行える値を保存し、次回以降のデプロイでも利用される。
上記の説明だけだとすべてCDK側で設定をしてくれるように思えるが、Contextの機能的には以下2種類があり、開発者側で値を受け渡すこともできる。
- AWS CDK が自動で生成して使い回すもの
- 開発者が明示的に保管しておくもの
cdk コマンドの機能を 実際に叩いて理解する 【 AWS CDK Command Line Interface 】 | DevelopersIO
Context methods
context methodsと呼ばれるものがあり、既存リソースを条件を指定して取得することができる。
- Vpc.fromLookup
- HostedZone.fromLookup
以下のような動きをするので、cdk.context.jsonに対象の値がすでに存在すれば値を取得しに行かないし、なければCDK appの実行前に取得してcdk.context.jsonに記載する。
If a required context value isn't available, the AWS CDK app notifies the AWS CDK CLI that the context information is missing. The CLI then queries the current AWS account for the information, stores the resulting context information in the cdk.context.json file, and executes the AWS CDK app again with the context values.
CDKの項目を利用する
CfnOutputを利用することでOutputの設定ができる。
import { Stack, StackProps, CfnOutput } from 'aws-cdk-lib';
import { Construct } from 'constructs';
import * as ecr from 'aws-cdk-lib/aws-ecr';

export class RepositoryStack extends Stack {
  // 共有するリソースについてpublicで定義を行う
  public readonly repository: ecr.Repository

  constructor(scope: Construct, id: string, props?: StackProps) {
    super(scope, id, props);

    // ECRのレポジトリ作成
    this.repository = new ecr.Repository(this, 'BackendRepository');

    // 後続で利用するためOutputを設定
    new CfnOutput(this, 'ecrUri', {
      value: this.repository.repositoryUri,
      description: 'The Uri for ECR Repository'
    });
  }
}
Outputの項目は--output-fileオプションでJSON形式で出力できるので、これを使えばアウトプットした値にアクセスすることができる。
cdk deploy RepositoryStack --outputs-file ./cdk-outputs.json
How to use Outputs in AWS CDK | bobbyhadz
JSONファイルへのCI/CDでのアクセス
      throw new Error('Cannot create a VPC Endpoint with no subnets');
            ^
Error: Cannot create a VPC Endpoint with no subnets
参考資料
CDKでCloudFormationを使う
基本的な使い方
CfnIncludeを使ってCloudFormationテンプレートを読み込むことで、テンプレートファイルからCDKでリソースを作成できる。
パラメータはparametersで渡せる。
import * as cfn from 'aws-cdk-lib/cloudformation-include';

// CloudFormationテンプレートを読み込んでリソースを作成する
    const cfnTemplate = new cfn.CfnInclude(this, 'Template', {
        templateFile: 'lib/cfn/template.yml',
        parameters: {
          'VPCID': vpcId,
      },
    });
テンプレートの要素を更新、追加
作成したリソースからgetResourceでリソース名を指定することでリソースの内容を更新することができる。
以下はSubnetの指定をCDKの中で追加する例。
 const cfnVpcEndpoint = cfnTemplate.getResource('ResourceName') as ec2.CfnVPCEndpoint;
cfnVpcEndpoint.subnetIds = subnetIds;
参考資料
VPC Endpoint
以下のエラーメッセージがでて作成できない。
1:38:53 AM | CREATE_FAILED        | AWS::EC2::VPCEndpoint | EcrApiVpcEndpoint
Resource handler returned message: "private-dns-enabled cannot be set because there is already a conflicting DNS domain for api.ecr.
ap-northeast-1.amazonaws.com
- VPCエンドポイントの作成時にはDNSの設定が自動で行われる
- 再作成の時などは前に作られていたDNSの設定が残っていると上記のメッセージが出てしまうのので、削除がDNSにまで反映されるまで時間をおく必要がある
CDKでのアカウント情報へのアクセス
アプリでのアクセス方法
profileが設定されていれば、以下の環境変数名でアクセスできる。
{
    region: process.env.CDK_DEFAULT_REGION,
    account: process.env.CDK_DEFAULT_ACCOUNT,
}
Stackの中でのアクセス方法
    console.log('accountId: ', cdk.Stack.of(this).account);
    console.log('region: ', cdk.Stack.of(this).region);
以下の記載があるように、上記の方法でアクセスできる。
The recommended way is: Stack.of(this).account and Stack.of(this).region. Closing for now. Feel free to reopen.
CI/CDパイプラインでのAWSの利用
GitLab Runnerの作成
Docker in Dockerを動かすにはモードをPriviledgedにする必要がある。上記を参考に権限の設定を行う。
sudo gitlab-runner register \
  --non-interactive \
  --url "https://gitlab.com/" \
  --registration-token "o8GVtFJZmsAEa6JyApN_" \
  --executor "docker" \
  --docker-image alpine:latest \
  --docker-privileged \
  --description "docker-runner" \
参考資料
- Install GitLab Runner using the official GitLab repositories | GitLab
- Install GitLab Runner manually on GNU/Linux | GitLab
- EC2インスタンスをAWS CDKとGitLab CIでCI/CDする - Qiita
- CDK で GitLab Shared Runner 作ってみた - アイリッジ開発者ブログ
- hawksnowlog: Gitlab CI で dind 超入門
- Use Docker to build Docker images | GitLab
- GitLab の CI/CD で Docker in Docker - Qiita