概要
あけましておめでとうございます、Offers を運営している株式会社 overflow でフロントエンドのテックリードをしている Kazuya です。
新年一発目なので、少し軽めの内容でお送りします。今回は冬休みの宿題(勝手に自分で宿題化させているだけ)として取り組んだ、Github Actionsのneedsを活用して静的テストの並列化させた方法を紹介します。Github Actionsをあまり触れたことないという方でも理解できるよう内容だと思いますので、ぜひ最後まで読んでいただけると幸いです。
[AD] Offers MGR(オファーズマネージャー)
本記事で紹介する方法は、筆者が担当しているプロダクトである「Offers MGR(オファーズマネージャー) 」で活用されています。「Four Keys分析」や「サイクルタイム分析」など開発組織の生産性を最大化するために必要となる指標を可視化させることができます。開発組織の健全性・生産性を中長期的に改善していきたい方はぜひお問い合わせください!
はじめに
本記事では、Next.jsの静的テストをGithub Actionsのneedsを活用して並列化させる方法を紹介します。基本的に構築方法は、他のフレームワークや言語でも活用できますが、正常に動作しない可能性があります。今回は構築の一例であることをご理解の上、参考にしていただけると幸いです。
前提と経緯
今回のテストは以下のような静的テストを内包しており、すべて直列で実行されています。
- ESlint / Stylelint
- Next.js Build
- StoryBook Build
内容自体は以前こちらの記事で紹介した内容と変わりないですが、LintとStoryBookのビルドも追加しています。純粋に実行するべきものが増えたことで、実行時間も比例して増加傾向にあったため、どうにか短縮できないかと思い至ったのが事の始まりです。
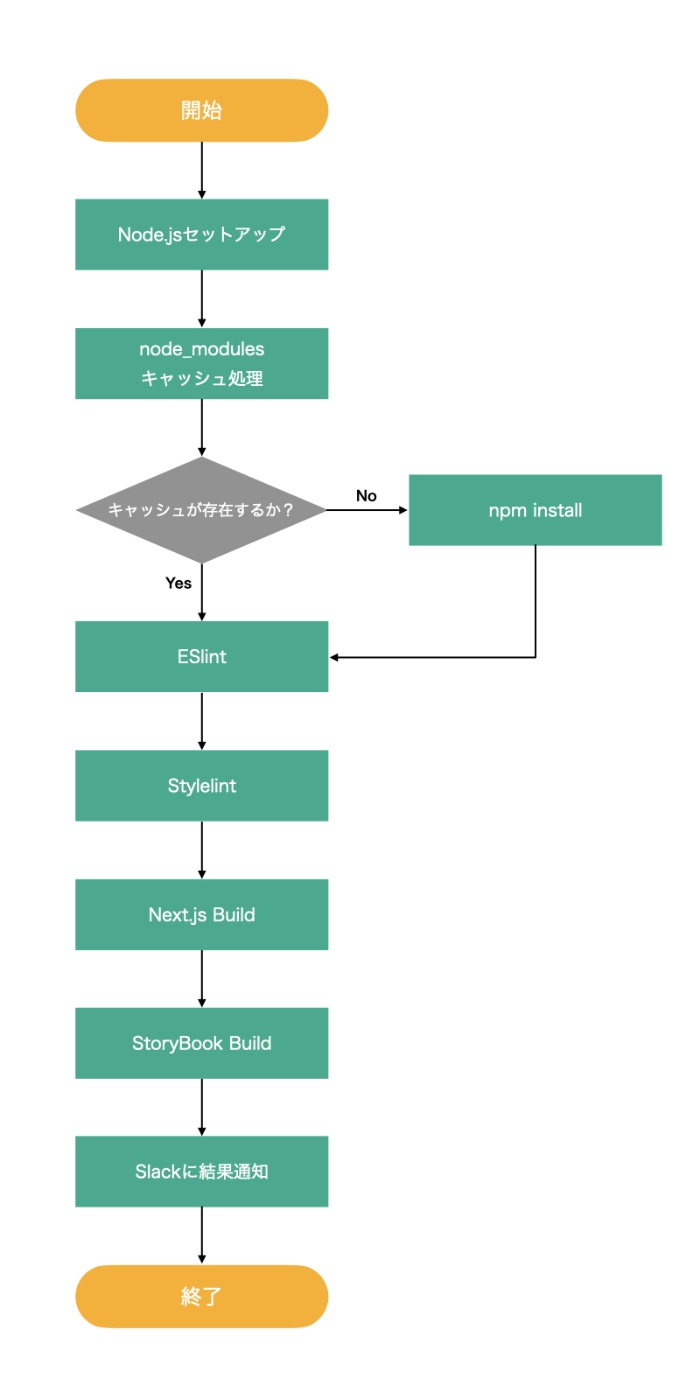
変更前のフローチャート
変更後のフローチャート

変更前のファイル
ファイルを見ていただくと分かりますが、以下のフローが直列で実行されています。
- nodeのセットアップ
- node_modulesのキャッシュ処理
- npm installの実行(キャッシュヒットしなかった場合のみ)
- ESlintの実行
- Stylelintの実行
- Next.jsのビルド実行
- Storybookのビルド実行
- Slackへ結果を通知
どこを短縮できるか考えたときに注目したのが、1~3の処理を共通化できる点でした。1~3の処理を共有させることで4~7の処理を並列化させることができそうだったため、取り組んでみることにしました。
on:
  push:
    branches-ignore:
      - main
      - development

name: Frontend - Static Test

env:
  SLACK_WEBHOOK: ${{ secrets.SLACK_WEBHOOK_URL }}
  SLACK_FOOTER: ""
  WORKING_DIR: frontend

defaults:
  run:
    working-directory: frontend

frontend-static-tests:
  runs-on: ubuntu-latest
  steps:
    - name: checkout
      uses: actions/checkout@v4

    - name: setup-node
      uses: actions/setup-node@v4
      with:
        node-version: 20
        cache: npm

    - name: cache-node-modules
      uses: actions/cache@v3
      id: node_modules_cache_id
      env:
        cache-name: cache-node-modules
      with:
        path: ${{ env.WORKING_DIR }}/node_modules
        key: ${{ runner.os }}-${{ env.cache-name }}-${{ hashFiles('${{ env.WORKING_DIR }}/package-lock.json') }}

    - name: npm-install
      if: ${{ steps.node_modules_cache_id.outputs.cache-hit != 'true' }}
      run: npm i

    - name: lint
      run: npm run lint

    - name: stylelint
      run: npm run stylelint

    - name: app-build
      run: npm run build

    - name: storybook-build
      run: npm run build:storybook

    - name: slack-notification-success
      if: ${{ success() }}
      uses: rtCamp/action-slack-notify@v2
      env:
        SLACK_COLOR: good
        SLACK_TITLE: "[Frontend] Success to Static Test(Required) :rocket:"
        SLACK_MESSAGE: ":closed_book: ${{ github.repository }}"

    - name: slack-notification-failure
      if: ${{ failure() }}
      uses: rtCamp/action-slack-notify@v2
      env:
        SLACK_COLOR: danger
        SLACK_TITLE: "[Frontend] Failure to Static Test(Required) :boom:"
        SLACK_MESSAGE: ":closed_book: ${{ github.repository }}"
実装方法
セットアップのJobを追加する
処理の1~3までは変更が無いためそのまま活用していきます。以前の記事でも紹介しましたが、node_modulesをキャッシュ化させて無駄なインストールを避けています。また後述しますが、並列処理側ではキャッシュされたnode_modulesを参照するため、この処理は本実装の重要なポイントになっています。
on:
  push:
    branches-ignore:
      - main
      - development

name: Frontend - Static Test

env:
  SLACK_WEBHOOK: ${{ secrets.SLACK_WEBHOOK_URL }}
  SLACK_FOOTER: ""
  CACHE_NAME: node_modules_cache
  WORKING_DIR: frontend

defaults:
  run:
    working-directory: frontend

frontend-setup:
  runs-on: ubuntu-latest
  steps:
    - name: checkout
      uses: actions/checkout@v4

    - name: setup-node
      uses: actions/setup-node@v4
      with:
        node-version: 20
        cache: npm

    - name: cache-node-modules
      uses: actions/cache@v3
      id: node_modules_cache_id
      with:
        path: ${{ env.WORKING_DIR }}/node_modules
        key: ${{ runner.os }}-${{ env.CACHE_NAME }}-${{ hashFiles('${{ env.WORKING_DIR }}/package-lock.json') }}

    - name: npm-install
      if: ${{ steps.node_modules_cache_id.outputs.cache-hit != 'true' }}
      run: npm i
LintのJobを追加する
セットアップのJobを設定できたので、次に各並列処理を設定していきます。まずは、ESlintとStylelintを実行するJobをセットアップのJobとは別で作ります。
1.セットアップJobの完了を待ってから実行させる
当たり前の話にはなりますが、セットアップ完了前に実行しても必要なプラグインが存在しないため、エラーで落ちてしまいます。なので、前項のセットアップJobの完了を待ってから実行するようにします。具体的には、needs: frontend-setupの部分になります。この記述を追加することで、指定したステップの完了を待ってから実行されるようになります。
2.node_modulesをキャッシュから読み込む
セットアップJobでインストールしたnode_modulesをキャッシュ経由で読み込みます。こうすることで並列のJob間で同じnode_modulesを参照するため、無駄なインストールを防げ、実行時間の短縮にも繋がります。
on:
  push:
    branches-ignore:
      - main
      - development

name: Frontend - Static Test

env:
  SLACK_WEBHOOK: ${{ secrets.SLACK_WEBHOOK_URL }}
  SLACK_FOOTER: ""
  CACHE_NAME: node_modules_cache
  WORKING_DIR: frontend

defaults:
  run:
    working-directory: frontend

frontend-setup:
  runs-on: ubuntu-latest
  steps:
    - name: checkout
      uses: actions/checkout@v4

    - name: setup-node
      uses: actions/setup-node@v4
      with:
        node-version: 20
        cache: npm

    - name: cache-node-modules
      uses: actions/cache@v3
      id: node_modules_cache_id
      with:
        path: ${{ env.WORKING_DIR }}/node_modules
        key: ${{ runner.os }}-${{ env.CACHE_NAME }}-${{ hashFiles(format('{0}/package-lock.json', env.WORKING_DIRECTORY)) }}

    - name: npm-install
      if: ${{ steps.node_modules_cache_id.outputs.cache-hit != 'true' }}
      run: npm i

+ frontend-lint:
+    runs-on: ubuntu-latest
+    needs: frontend-setup
+    steps:
+      - name: checkout
+        uses: actions/checkout@v4

+      - name: setup-node
+        uses: actions/setup-node@v4
+        with:
+          node-version: 20
+          cache: npm

+      - name: restore-node_modules-cache
+        uses: actions/cache@v3
+        with:
+          path: ${{ env.WORKING_DIR }}/node_modules
+          key: ${{ runner.os }}-${{ env.CACHE_NAME }}-${{ hashFiles(format('{0}/package-lock.json', env.WORKING_DIRECTORY)) }}

+      - name: eslint
+        run: npm run lint

+      - name: stylelint
+        run: npm run stylelint
Next.js / StoryBook BuildのJobを追加する
残りの並列処理も同じようにJobを追加していきます。処理自体は前項で紹介した内容とほぼ同じなので、別途注意すべきことなどはありません。
on:
  push:
    branches-ignore:
      - main
      - development

name: Frontend - Static Test

env:
  SLACK_WEBHOOK: ${{ secrets.SLACK_WEBHOOK_URL }}
  SLACK_FOOTER: ""
  CACHE_NAME: node_modules_cache
  WORKING_DIR: frontend

defaults:
  run:
    working-directory: frontend

frontend-setup:
  runs-on: ubuntu-latest
  steps:
    - name: checkout
      uses: actions/checkout@v4

    - name: setup-node
      uses: actions/setup-node@v4
      with:
        node-version: 20
        cache: npm

    - name: cache-node-modules
      uses: actions/cache@v3
      id: node_modules_cache_id
      with:
        path: ${{ env.WORKING_DIR }}/node_modules
        key: ${{ runner.os }}-${{ env.CACHE_NAME }}-${{ hashFiles(format('{0}/package-lock.json', env.WORKING_DIRECTORY)) }}

    - name: npm-install
      if: ${{ steps.node_modules_cache_id.outputs.cache-hit != 'true' }}
      run: npm i

frontend-lint:
   runs-on: ubuntu-latest
   needs: frontend-setup
   steps:
     - name: checkout
       uses: actions/checkout@v4

     - name: setup-node
        uses: actions/setup-node@v4
        with:
          node-version: 20
          cache: npm

     - name: restore-node_modules-cache
       uses: actions/cache@v3
       with:
         path: ${{ env.WORKING_DIR }}/node_modules
         key: ${{ runner.os }}-${{ env.CACHE_NAME }}-${{ hashFiles(format('{0}/package-lock.json', env.WORKING_DIRECTORY)) }}

     - name: eslint
       run: npm run lint

     - name: stylelint
       run: npm run stylelint

+ frontend-build:
+    runs-on: ubuntu-latest
+    needs: frontend-setup
+    steps:
+      - name: checkout
+        uses: actions/checkout@v4

+      - name: setup-node
+        uses: actions/setup-node@v4
+        with:
+          node-version: 20
+          cache: npm

+      - name: restore-node_modules-cache
+        uses: actions/cache@v3
+        with:
+          path: ${{ env.WORKING_DIR }}/node_modules
+          key: ${{ runner.os }}-${{ env.CACHE_NAME }}-${{ hashFiles(format('{0}/package-lock.json', env.WORKING_DIRECTORY)) }}

+      - name: app-build
+        run: npm run build

+ storybook-build:
+   runs-on: ubuntu-latest
+   needs: frontend-setup
+   steps:
+     - name: checkout
+       uses: actions/checkout@v4

+     - name: setup-node
+       uses: actions/setup-node@v4
+       with:
+         node-version: 20
+         cache: npm

+     - name: restore-node_modules-cache
+       uses: actions/cache@v3
+       with:
+         path: ${{ env.WORKING_DIR }}/node_modules
+         key: ${{ runner.os }}-${{ env.CACHE_NAME }}-${{ hashFiles(format('{0}/package-lock.json', env.WORKING_DIRECTORY)) }}

+     - name: storybook-build
+       run: npm run build:storybook
並列化の結果
今回の対応で実行時間をどの程度短縮できたかですが、以下の通りです。いずれもキャッシュされた状態で計測しています。
| 実行時間 | 削減率 | |
|---|---|---|
| 対応前(直列) | 7m11s | - |
| 対応後(並列) | 5m39s | 21% |
今回の検証では、直列実行から並列実行に変更したことで変更前と比べて実行時間を約21%削減できました🎉
まとめ
今回は、Next.jsの静的テストをGithub Actionsのneedsを活用して並列化させる方法について紹介しました。エンジニアの師匠でもある前職のCTOから「デリバリーに直接影響するから、CIは早ければ早いほうがいい」とよく言われていたので、初心を思い出し、改善に取り組んでみました。比較簡単に導入できる内容だと思いますので、ぜひお試しいただけると幸いです。
質問等あれば、ぜひコメントいただければと思います。少々長くなりましたが、本記事を最後まで読んで頂き、ありがとうございました。
更新履歴
- キャッシュキーをFormatを活用してEnvを引数を渡す方式に変更しました
関連記事
参考記事

Discussion