ProseMirrorで差し込み用のチップを実装した
始めに
エディタで「ユーザー名」など、後から実際のデータが差し込まれるような動的なものを差し込む時に、チップのようなもので表示させることがあると思います。
ProseMirrorでは画像を事前に作ると実現できるようで、以下の記事で紹介されていました。
しかし画像で作ってしまうとチップが長すぎた場合に3点リーダーに対応できなかったり、一々画像を事前に作らなければいけない問題があります。ProseMirrorではスキーマに基づいて自由にDOMを設定できるのでspanタグで設定したらそもそも画像はいらないのでは?と思い、その辺の検証をしてみました。更にNodeViewというプラグインを使うとチップそのものに色々ロジックを仕込みやすくなったので、その辺についても記事にまとめてみました。
作ったもの
今回検証で作ったものを先に紹介すると2つになります。
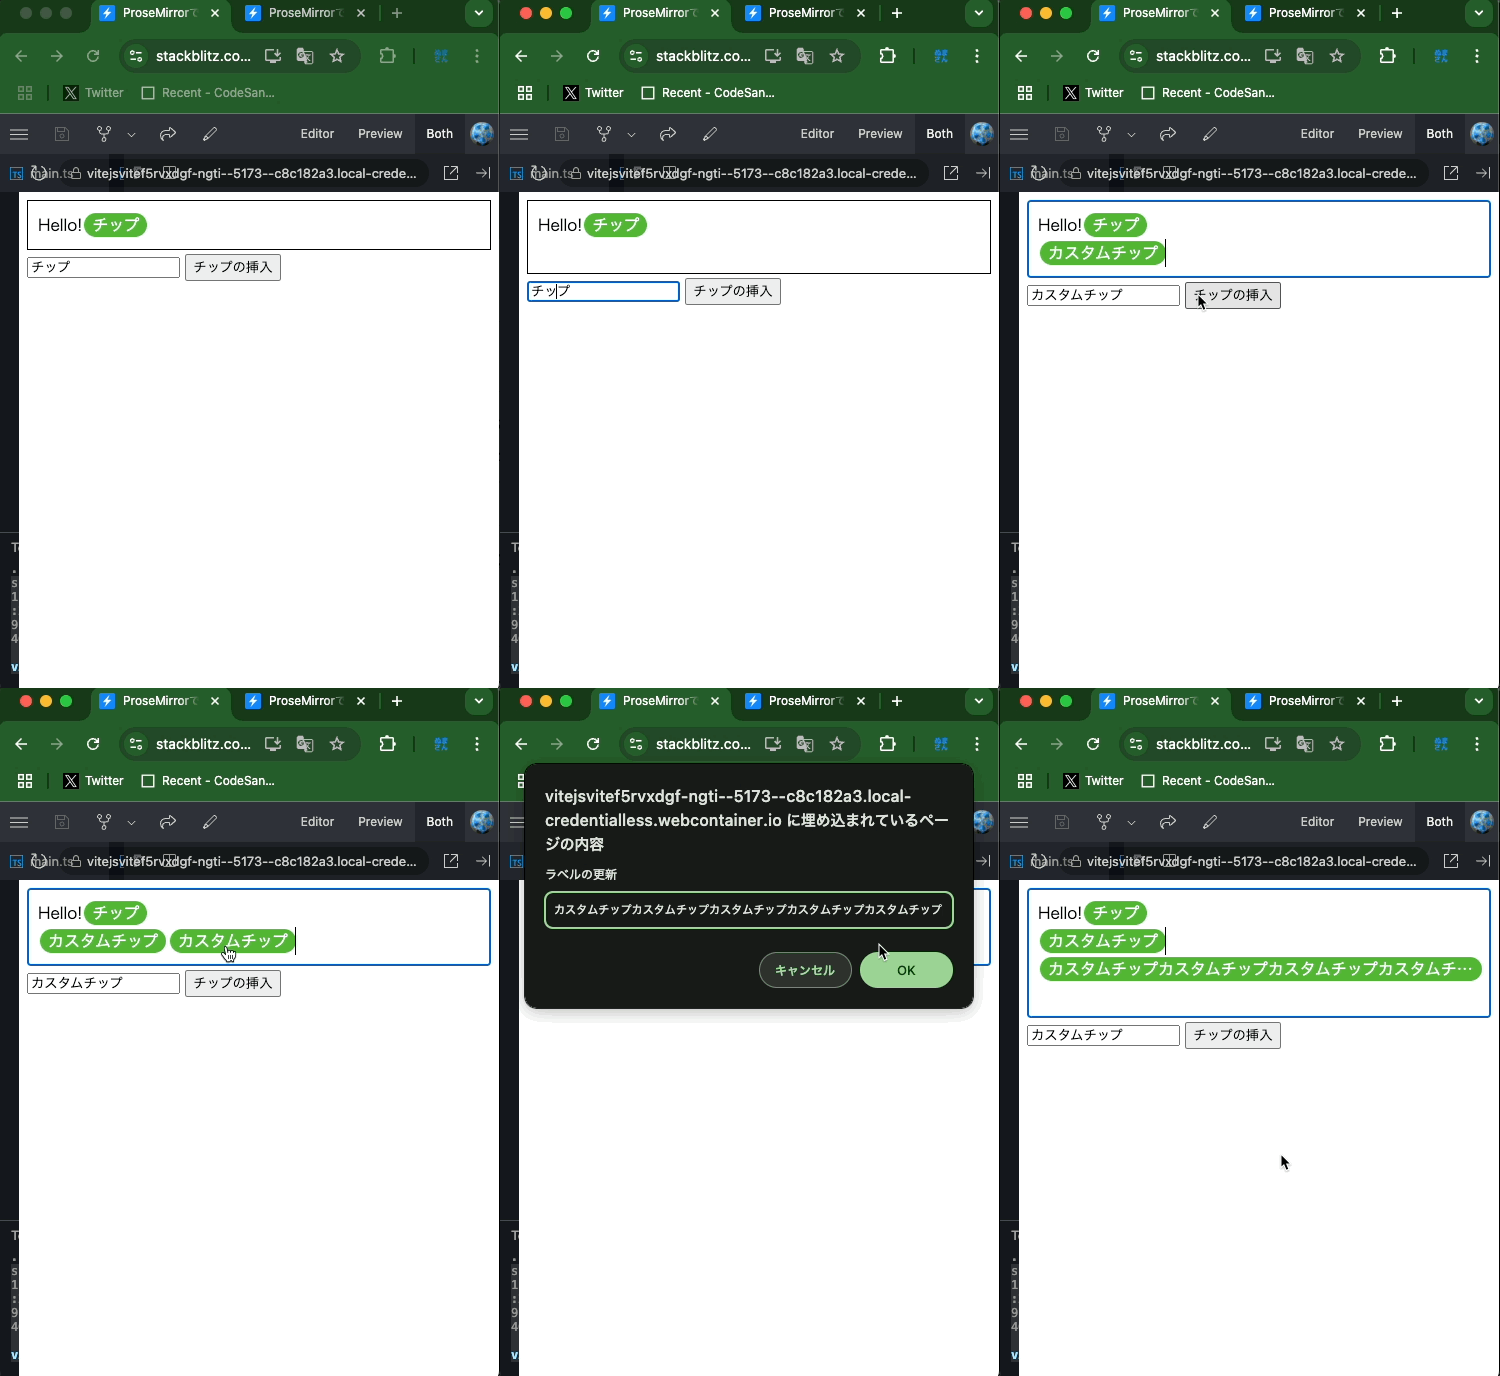
チップ名変更可能、かつ3点リーダー対応のチップ
一つは挿入時にチップ名を自由に決められて、かつ文字数が多すぎる場合は3点リーダー表示になるチップです。更にチップをクリックするとプロンプトが出てチップの文字を変更することが可能になります。

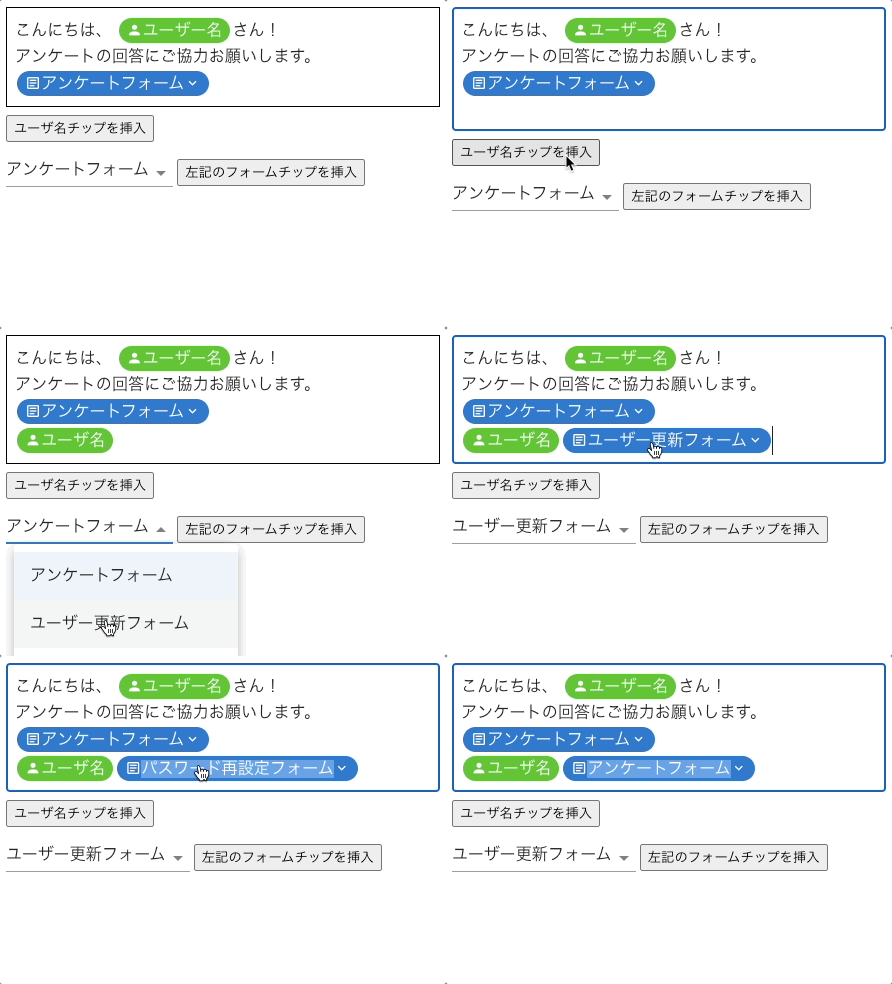
選択可能なチップ
二つ目はチップをクリックして選択肢から選べることができるチップです。先頭にアイコンやアイコンもつけてカテゴリ分けして、更にそのカテゴリの中から選択するような機能を想定して作りました。

チップ名変更可能、かつ3点リーダー対応のチップの実装
最初にチップ名変更可能でかつ3点リーダー対応のチップの実装について説明します。
ProseMirrorの基本については以下がとても参考になったので、これをベースにして差分のところだけ記したいと思います。
画像ではなくspanタグでチップを表現
上の記事ではtoDOMの部分でラベルを画像に変換して表示させましたが、そこを単純にspanタグで定義することでspanタグで表示できます。後はそこに適切なスタイルを当てたらOKです。前後にmarginを入れる関係上spanタグを2つ囲っております。
 const schema = new Schema({
   nodes: {
     // 他のNodeは省略
     chip: {
       inline: true,
       attrs: {
-        name: { default: 'チップ' }
+        label: { default: 'チップ' }
       },
       group: 'inline',
       draggable: true,
       parseDOM: [
         {
-          tag: 'img[data-chip-name]',
+          tag: 'span.chip',
           getAttrs(dom) {
             if (typeof dom === 'string') {
               return false;
             }
             return {
-              name: dom.getAttribute('data-chip-name')
+              label: dom.textContent
             };
           }
         }
       ],
       toDOM(node) {
-        const chipImageUrl = createChipImage(node.attrs.name);
         return [
-          'img',
+          'span',
-          {
-            src: chipImageUrl,
-            'data-chip-name': node.attrs.name,
-            style: 'height: 25px'
-          }
+          { class: 'chip' },
+          ['span', { class: 'chip__content' }, node.attrs.label]
         ];
       }
     }
   }
 });
スタイルは以下のように設定しました。
.ProseMirror .chip {
  display: inline-block;
  margin: 2px;
  max-width: 100%;
}

.ProseMirror .chip__content {
  display: inline-block;
  padding: 4px 8px;
  color: #fff;
  background-color: #53b634;
  border-radius: 100vh;
  max-width: 100%;
  line-height: 1;
  white-space: nowrap;
  overflow: hidden;
  text-overflow: ellipsis;
  vertical-align: bottom;
  cursor: pointer;
}
チップをクリックしたらプロンプトが出てラベルを変更できるようにする
最後にチップをクリックしたらプロンプトを出してラベルを変更できるようにしますが、これをする場合はNodeViewというプラグインを使うと良いです。これはNodeスキーマのDOM描画をより高度に行えるようにしたプラグインとなります。
詳しい設定は以下の記事が参考になりましたので、詳細はこちらなどをご参照ください。
まずはこちらのプラグインで元々表示していたチップを描画するように設定すると以下のようなコードになります。
import { Node } from 'prosemirror-model';
import { EditorView, NodeView } from 'prosemirror-view';

type DOMNode = InstanceType<typeof window.Node>;
class ChipNodeView implements NodeView {
  dom: DOMNode;

  constructor(node: Node, view: EditorView, getPos: () => number | undefined) {
    const chipElement = document.createElement('span');
    chipElement.classList.add('chip');

    const chipContentElement = document.createElement('span');
    chipContentElement.classList.add('chip__content');
    chipContentElement.textContent = node.attrs.label;

    chipElement.appendChild(chipContentElement);
    this.dom = chipElement;
  }
}
こちらのプラグインはEditorViewを生成するときに設定するため、以下のところで追加します。
 const view = new EditorView(document.getElementById('app'), {
   state,
+  nodeViews: {
+    chip(node, view, getPos) {
+      return new ChipNodeView(node, view, getPos);
+    },
+  },
 });
これでDOMの描画はNodeViewの方で行われるようになったので、schemaで定義したtoDOMは不要になります。(定義されていても無視されます)
 const schema = new Schema({
   nodes: {
     // 他のNodeは省略
     chip: {
       inline: true,
       attrs: {
         label: { default: 'チップ' }
       },
       group: 'inline',
       draggable: true,
       parseDOM: [
         {
           tag: 'span.chip',
           getAttrs(dom) {
             if (typeof dom === 'string') {
               return false;
             }
             return {
               label: dom.textContent
             };
           }
         }
       ],
-      // ChipNodeViewで描画するため以下は不要になった
-      toDOM(node) {
-        return [
-          'span',
-          { class: 'chip' },
-          ['span', { class: 'chip__content' }, node.attrs.label]
-        ];
-      }
     }
   }
 });
先ほどのChipNodeViewは見ての通りJSをゴリゴリ書いていけば良いため、後はaddEventListenerでclickイベントをフックし、プロンプトで入力して貰った後に更新用のコマンドを実行したらOKです。
 import { Node } from 'prosemirror-model';
 import { EditorView, NodeView } from 'prosemirror-view';

 type DOMNode = InstanceType<typeof window.Node>;
 class ChipNodeView implements NodeView {
   dom: DOMNode;

   constructor(node: Node, view: EditorView, getPos: () => number | undefined) {
     const chipElement = document.createElement('span');
     chipElement.classList.add('chip');

     const chipContentElement = document.createElement('span');
     chipContentElement.classList.add('chip__content');
     chipContentElement.textContent = node.attrs.label;

     chipElement.appendChild(chipContentElement);
     this.dom = chipElement;

+    this.dom.addEventListener('click', (event) => {
+      const newLabel = window.prompt('ラベルの更新', node.attrs.label);
+      if (newLabel) {
+        view.dispatch(
+          view.state.tr.setNodeMarkup(getPos() ?? 0, null, {
+            ...node.attrs,
+            label: newLabel,
+          })
+        );
+      }
+      event.preventDefault();
+    });
   }
 }
選択可能なチップを実装
先ほどはチップのラベルを自由に変更できるというものでしたが、実際のユースケースでは決まったパターンの差し込み要素があり、それをドロップダウンで選択できると良いかなと思い、そのパターンも試しました。ドロップダウンになるとpureなJSだと実装が面倒になってくるので、ここからはReactとMUIを使って実装しました。
なお、ReactとProseMirrorの連携はこちらの記事を参考にしました。
ReactでNodeViewのところを描画する
新しく指定の要素を起点にReactのrenderをする場合、createRootで要素を指定してその返り値のインスタンスを使ってrenderすることで実現できます。念の為destroyメソッドでReactをアンマウントする処理も書いています。
import { createRoot, Root } from 'react-dom/client';
import { Node } from 'prosemirror-model';
import { EditorView, NodeView } from 'prosemirror-view';

export class ChipNodeView implements NodeView {
  dom: HTMLElement;
  reactRoot: Root;

  constructor(node: Node, view: EditorView, getPos: () => number | undefined) {
    this.dom = document.createElement('span');

    this.reactRoot = createRoot(this.dom);

    this.reactRoot.render(
      // チップコンポーネントを描画する
    );
  }

  destroy() {
    // 以下の警告が出てしまうのでワンサイクル置いてからunmountする
    // Attempted to synchronously unmount a root while React was already rendering.
    // React cannot finish unmounting the root until the current render has completed, which may lead to a race condition.
    // @see https://stackoverflow.com/questions/73459382/react-18-async-way-to-unmount-root
    setTimeout(() => {
      this.reactRoot.unmount();
    }, 0);
  }
}
選択可能なチップコンポーネントの実装
今回チップの種類は 'user' | 'form' の2種類を用意し、 'form' の時だけドロップダウンで選択できるようにしてみました。更にアイコンや背景色が変わるようにクラス名を条件分岐で切り替えながら実装すると以下のようなコードになりました。
ちなみに、アイコンはMaterial Design Iconをグローバルでimportしてmdi-*のクラス名をつけて設定しています。
import { FC, ReactNode, useState, MouseEvent as ReactMouseEvent } from 'react';
import { Box, Menu, MenuItem } from '@mui/material';

import { FORM_OPTIONS } from '../../constants/FormOptions';

export type EditorChipProps = {
  /** チップ種別 */
  type: 'user' | 'form';
  /** 値 */
  value?: number | null;
  /**
   * 値更新時
   * @param newValue - 新しい値
   */
  onChangeValue: (newValue: number) => void;
  /** 子要素 */
  children: ReactNode;
};

export const EditorChip: FC<EditorChipProps> = ({
  type,
  value,
  onChangeValue,
  children,
}) => {
  const [elAnchor, setElAnchor] = useState<HTMLElement | null>(null);

  const handleClick =
    type === 'form'
      ? (event: ReactMouseEvent<HTMLElement>) => {
          setElAnchor(event.currentTarget);
        }
      : undefined;

  return (
    <>
      <Box component="span" className={`chip -${type}`}>
        <Box
          component="span"
          className={`chip__content mdi ${
            type === 'form' ? 'mdi-text-box-outline' : 'mdi-account'
          }`}
          sx={
            handleClick
              ? {
                  cursor: 'pointer',
                }
              : undefined
          }
          onClick={handleClick}
        >
          {children}
          {handleClick && <span className="mdi mdi-chevron-down" />}
        </Box>
      </Box>
      {handleClick && (
        <Menu
          open={elAnchor != null}
          anchorEl={elAnchor}
          MenuListProps={{
            dense: true,
          }}
          onClose={() => {
            setElAnchor(null);
          }}
        >
          {FORM_OPTIONS.map((option) => (
            <MenuItem
              key={option.value}
              selected={option.value === value}
              onClick={() => {
                onChangeValue(option.value);
                setElAnchor(null);
              }}
            >
              {option.label}
            </MenuItem>
          ))}
        </Menu>
      )}
    </>
  );
};
スタイルは以下のコードを追加しました。また最初の時は.ProseMirrorの子孫を条件にしていましたが、プレビューを表示する際にスタイルが当たらなくなるので外しました。
 .chip {
   display: inline-block;
   margin: 2px;
   max-width: 100%;
 }

 .chip__content {
   display: inline-block;
   padding: 4px 8px;
   color: #fff;
   background-color: #53b634;
   border-radius: 100vh;
   max-width: 100%;
   line-height: 1;
   white-space: nowrap;
   overflow: hidden;
   text-overflow: ellipsis;
   vertical-align: bottom;
 }

+.chip.-form .chip__content {
+  background-color: #1976d2;
+}
最後にこのコンポーネントをChipNodeViewでrenderしたら完成です。チップのスタイルの関係上inline-blockにしないと上下の位置が変になってしまったのでrender元のスタイルも少し足しています。またmax-widthは3点リーダーにするため合わせて追加しています。こういうことがあるので理想はReactで描画したものだけにしたかったのですが、どうしてもrootになるものは残さないといけなそうな雰囲気だったので仕方なくこのような対応にしています。
 import { createRoot, Root } from 'react-dom/client';
 import { Node } from 'prosemirror-model';
 import { EditorView, NodeView } from 'prosemirror-view';
+import { EditorChip } from '../EditorChip';

+import { FORM_OPTIONS } from '../../constants/FormOptions';

 export class ChipNodeView implements NodeView {
   dom: HTMLElement;
   reactRoot: Root;

   constructor(node: Node, view: EditorView, getPos: () => number | undefined) {
     this.dom = document.createElement('span');
+    this.dom.style.display = 'inline-block';
+    this.dom.style.maxWidth = '100%';

     this.reactRoot = createRoot(this.dom);

     this.reactRoot.render(
+      <EditorChip
+        type={node.attrs.type}
+        value={node.attrs.value}
+        onChangeValue={(newValue) => {
+          const option = FORM_OPTIONS.find((opt) => opt.value === newValue);
+          view.dispatch(
+            view.state.tr.setNodeMarkup(getPos() ?? 0, null, {
+              ...node.attrs,
+              value: newValue,
+              label: option?.label,
+            })
+          );
+        }}
+      >
+        {node.attrs.label}
+      </EditorChip>
     );
   }

   // destroyメソッドは同じなので省略
 }
その他: 編集用のDOMを取り除いたHTMLを出力する方法
以上で基本実装は終わりですが、最終的なHTMLを出力する際にエディタのDOMをそのまま使うとNodeViewプラグインで描画した編集用のDOMもそのまま出力されてしまいます。
これを回避する場合はschemaの方でtoDOMを定義し、DOMSerializerでシリアライズすると良いです。二重管理になってしまいそうですが、そもそも編集中のDOMと完成版のHTMLテキストは別物だと思うので仕方ないのかなと思ってます。今回はやりませんでしたが、できるだけ差分を減らすために共通の描画メソッドを通すなどをすると二重管理の負担は軽減されるのかなと思いました🤔
 import { Schema, Node, DOMParser, DOMSerializer } from 'prosemirror-model';

 const schema = new Schema({
   nodes: {
     // 他のNodeは省略
     chip: {
       inline: true,
       attrs: {
         type: { default: 'user' },
         value: { default: null },
         label: { default: 'チップ' },
       },
       group: 'inline',
       draggable: true,
       parseDOM: [
         {
           tag: 'span.chip',
           getAttrs(dom) {
             if (typeof dom === 'string') {
               return false;
             }
             const parseNumber = (str: string | null) => {
               if (str == null) {
                 return null;
               }
               const value = parseInt(str);
               return Number.isNaN(value) ? null : value;
             };
             return {
               type: dom.classList.contains('-form') ? 'form' : 'user',
               value: parseNumber(dom.getAttribute('data-value')),
               label: dom.textContent,
             };
           },
         },
       ],
+      // シリアライズ用に復活させる
+      toDOM(node) {
+        return [
+          'span',
+          { class: `chip -${node.attrs.type}`, 'data-value': node.attrs.value },
+          [
+            'span',
+            {
+              class: `chip__content mdi ${
+                node.attrs.type === 'form'
+                  ? 'mdi-text-box-outline'
+                  : 'mdi-account'
+              }`,
+            },
+            node.attrs.label,
+          ],
+        ];
+      },
     },
   },
 });

 export const Editor: FC<EditorProps> = ({
   initialValue = '',
   onChangeValue,
 }) => {
   const [_, forceUpdate] = useReducer((x) => x + 1, 0);
   const elContentRef = useRef<HTMLDivElement | null>(null);
   const editorViewRef = useRef<EditorView>();

   useEffect(() => {
     const doc = createDoc(initialValue, schema);
     const state = createPmState(schema, { doc });
+    const serializer = DOMSerializer.fromSchema(schema);

     const editorView = new EditorView(elContentRef.current, {
       state,
       nodeViews: {
         chip(node, view, getPos) {
           return new ChipNodeView(node, view, getPos);
         },
       },
       dispatchTransaction(transaction) {
         const newState = editorView.state.apply(transaction);
         editorView.updateState(newState);

-        onChangeValue(editorView.dom.innerHTML)
-        forceUpdate();
+        const newHtml = serializer.serializeFragment(
+          newState.doc.content,
+          undefined,
+          document.createElement('div')
+        );
+        if (newHtml instanceof HTMLElement) {
+          onChangeValue(newHtml.innerHTML);
+          forceUpdate();
+        }
       },
     });
     editorViewRef.current = editorView;
     forceUpdate();

     return () => {
       editorView.destroy();
       editorViewRef.current = undefined;
     };
   }, []);

   return (
     // 省略
   )
 }
終わりに
以上がProseMirrorを使って編集可能な差し込み用チップの実装方法でした。チップを直接編集できるようになるとかなり表現の幅が広がると思うので、エディタ内でチップを表示したい時の参考になれば幸いです。
Discussion