【農系IoT】M5を使って発酵熱をハックしてみる その2
前回の記事のデバイス部分の解説をしていきます。
前回記事は↓こちら↓
作ろうとしているもの
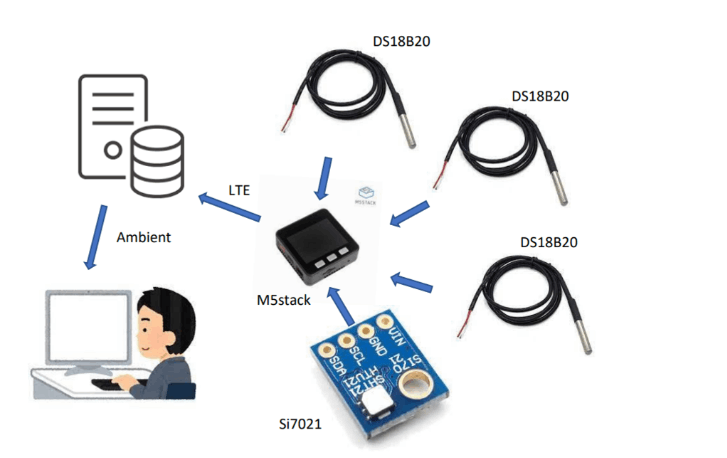
M5stackでDS18B20を3個、Si7021を繋ぎ、結果をwifi(⇒LTE)でAmbientへ飛ばしてブラウザでグラフを確認できるようにする。
Ambientについて
[https://ambidata.io/:embed:cite]
登録してログインをしてチャネルを作るとチャネルIDとライトキーが発行されますので、コードにいれたらデータを飛ばせるようになります。便利!
⇒こちらまた別途記事書きます。
使用機器
Wifiに簡単に接続できるためマイコンはM5Stackを使用を選択した。
①Si7021 温湿度センサ(外気測定(DS18B20が怪しかったときの校正用))
[https://www.switch-science.com/products/2975:embed:cite]

M5stackは画面中央の赤いコネクタがI2Cコネクタ
SCL⇒C、SDA⇒D、5V,Gと接続して回路は完了
今回はコードを触る感覚のリハビリのためArduinoを選択
「 Adafruit Si 7021 Library」 という ライブラリ と、「 Adafruit Unified Sensor」というライブラリをインストールします。
②DS18B20 防水プローブ
1.外気計測用
2.標準区計測用
3.対照区計測用
計3個使用
配線方法などは↓こちら↓の記事を参考にさせて頂きました。
[https://qiita.com/e-katayama/items/b3140dd45e5e802f53a7:embed:cite]
ライブラリのインストールなど↓のHPを参考にさせて頂きました。
[http://7ujm.net/micro/arduino_ds18b20.html:embed:cite]
各センサにアドレスが割り当てられているので、そのアドレスをメモる必要があります。
↓のコードをAruduino Unoに入れてアドレス取得用マイコンを作りました。
#include <OneWire.h>
#include <DallasTemperature.h>

OneWire oneWire(4);
DallasTemperature sensors(&oneWire);
DeviceAddress temp;

void setup(void)
{
  Serial.begin(9600);

  sensors.begin();
  sensors.getAddress(temp,0);
}

void loop(void)
{
  for(int i=0;i<8;i++){
    Serial.print(" 0x");
    Serial.print(temp[i],HEX);
  }
  Serial.println();
  sensors.requestTemperatures();
  Serial.println(sensors.getTempC(temp));

  delay(500);
}
M5スタックに書き込んだコードは以下です。
※解説は別途
#include <M5Stack.h>
#include <WiFi.h>
#include <Ambient.h>
#include "Adafruit_Si7021.h"
#include <OneWire.h>//温度表示確認用DS18B20用
#include <DallasTemperature.h>//温度表示確認用DS18B20用
#define SENSER_BIT    9      // 精度の設定bit

//温度表示確認用DS18B20用
#define ONE_WIRE_BUS 26 // データ(黄)で使用するポート番号

OneWire oneWire(ONE_WIRE_BUS);//DS18B20用
DallasTemperature sensorsds(&oneWire);//温度表示確認用DS18B20用

DeviceAddress temp1 = {0x28,0xF4,0x97,0x96,0xF0,0x1,0x3C,0xEA};//orenge
DeviceAddress temp2 = {0x28,0xB8,0xF5,0x96,0xF0,0x1,0x3C,0x70};//blue
DeviceAddress temp3 = {0x28,0x59,0x73,0x96,0xF0,0x1,0x3C,0x39};//brown

const char* ssid ="SSID";    //使用したいwifiルーターのSSIDを入力
const char* password = "password";      //使用したいwifiルーターのpasswordを入力

WiFiClient client;
Ambient ambient;

unsigned int channelId = *****;
const char* writeKey = "***********";

Adafruit_Si7021 sensor = Adafruit_Si7021();

void setup(void){
M5.begin();
Serial.begin(9600); //温度表示確認用DS18B20用

sensorsds.setResolution(SENSER_BIT);//温度表示確認用DS18B20用
pinMode(ONE_WIRE_BUS,INPUT);

WiFi.begin(ssid,password);
while(WiFi.status() != WL_CONNECTED){
delay(500);
M5.Lcd.print("_");
}
M5.Lcd.print("\r\nWiFi connected\r\nIP address:");
M5.Lcd.println(WiFi.localIP());
ambient.begin(channelId,writeKey,&client);

if(!sensor.begin()){
M5.Lcd.println("Did not find Si7032 sensor");
while(true){
delay(0);
}
}

}

void loop(void){
float temp = sensor.readTemperature();
float humid = sensor.readHumidity();
M5.Lcd.printf("temp:%.2f,humid:%2f\r\n",temp,humid);

//温度表示確認用DS18B20用(1)
sensorsds.requestTemperatures();              // 温度取得要求
M5.Lcd.println(sensorsds.getTempC(temp1));  //温度1の取得&シリアル送信
M5.Lcd.println(sensorsds.getTempC(temp2));  //温度2の取得&シリアル送信
M5.Lcd.println(sensorsds.getTempC(temp3));  //温度3の取得&シリアル送信
int t1 = sensorsds.getTempC(temp1);
int t2 = sensorsds.getTempC(temp2);
int t3 = sensorsds.getTempC(temp3);

ambient.set(1,temp);
ambient.set(2,t1);
ambient.set(3,t2);
ambient.set(4,t3);
ambient.send();
delay(1000**60*15*);
}
Discussion