🔎
ホストのポート53が使えないローカルDocker環境下で自前のDNSサーバーを構築する方法
TL;DR
- bridgeモードのDockerネットワークを作成し、固定IPでdnsmasqを起動する
- カスタムDNSを使いたいコンテナを同一ネットワークに配置し、dnsmasqのIPをdnsセクションで指定する
想定シーン
- dockerコンテナ間でサブドメイン不定の特定ドメイン(偽装)でアクセスしたいが、ホストマシンの53番ポートが何らかの理由で使用できない
- ローカルDockerに閉じた環境が前提で、ホストマシンや外からdockerコンテナへのアクセスはしない
事前準備
dnsmasq検証用コンテナイメージ作成
Dockerfile
FROM ubuntu:22.04

RUN apt-get update && \
    apt-get install -y \
    dnsmasq \
    dnsutils \
    iputils-ping \
    net-tools \
    curl \
    nano
※dnsmasq起動だけで良いのであればdnsutils以降のインストール不要
command
docker build -t dnstest .
Docker単体起動の場合
システムイメージ

※Docker⇔ホストマシン⇔インターネットの通信は省略。
手順
-
ネットワークを手動作成
cmmanddocker network create \ --subnet 192.128.128.0/24 dns_test_nw -
dnsmasq用設定ファイル作成
google.com→192.128.128.50(目的サーバーのコンテナIP)に解決dnsmasq.confport=53 address=/.google.com/192.128.128.50 -
dnsmasq起動
1のネットワークと固定IPを指定して起動commanddocker run --rm \ --name dns_server \ -itd \ --rm \ --network dns_test_nw \ -v ./dnsmasq.conf:/etc/dnsmasq.conf:ro \ --ip 192.128.128.100 \ dnstest dnsmasq --no-daemon -
目的サーバーをHTTPで起動
1のネットワークと2で指定したIPで起動
※このサーバーでも自前DNSを経由して別サーバーにアクセスしたい場合は--dnsでdnsmasqのIPを指定する。commanddocker run --rm \ --name http_server \ -itd \ --rm \ --network dns_test_nw \ --ip 192.128.128.50 \ --entrypoint=/usr/local/bin/python \ python:3.12.2-slim-bookworm -m http.server -
クライアント用コンテナでアクセス
1のネットワークとDNSにdnsmasqのIPを指定して起動(入力待ち状態になる)commanddocker run --rm \ --name dns_client \ -it \ --rm \ --network dns_test_nw \ --dns 192.128.128.100 \ dnstest- 名前解決の確認
nslookup www.example.com

Server:         127.0.0.11
Address:        127.0.0.11#53

Non-authoritative answer:
Name:   www.example.com
Address: 93.184.216.34
Name:   www.example.com
Address: 2606:2800:220:1:248:1893:25c8:1946
nslookup www.google.com Server: 127.0.0.11 Address: 127.0.0.11#53 Name: www.google.com Address: 192.128.128.50 Name: www.google.com Address: 2404:6800:4004:820::2004- curlでのアクセス結果
curl https://www.example.com

<!doctype html>
<html>
<head>
    <title>Example Domain</title>
・・・
curl http://www.google.com:8000 <!DOCTYPE HTML> <html lang="en"> <head> <meta charset="utf-8"> <title>Directory listing for /</title> </head> <body> <h1>Directory listing for /</h1> <hr> <ul> <li><a href=".dockerenv">.dockerenv</a></li> <li><a href="bin/">bin@</a></li> <li><a href="boot/">boot/</a></li> ・・・
単一/複数docker-composeの場合
システムイメージ
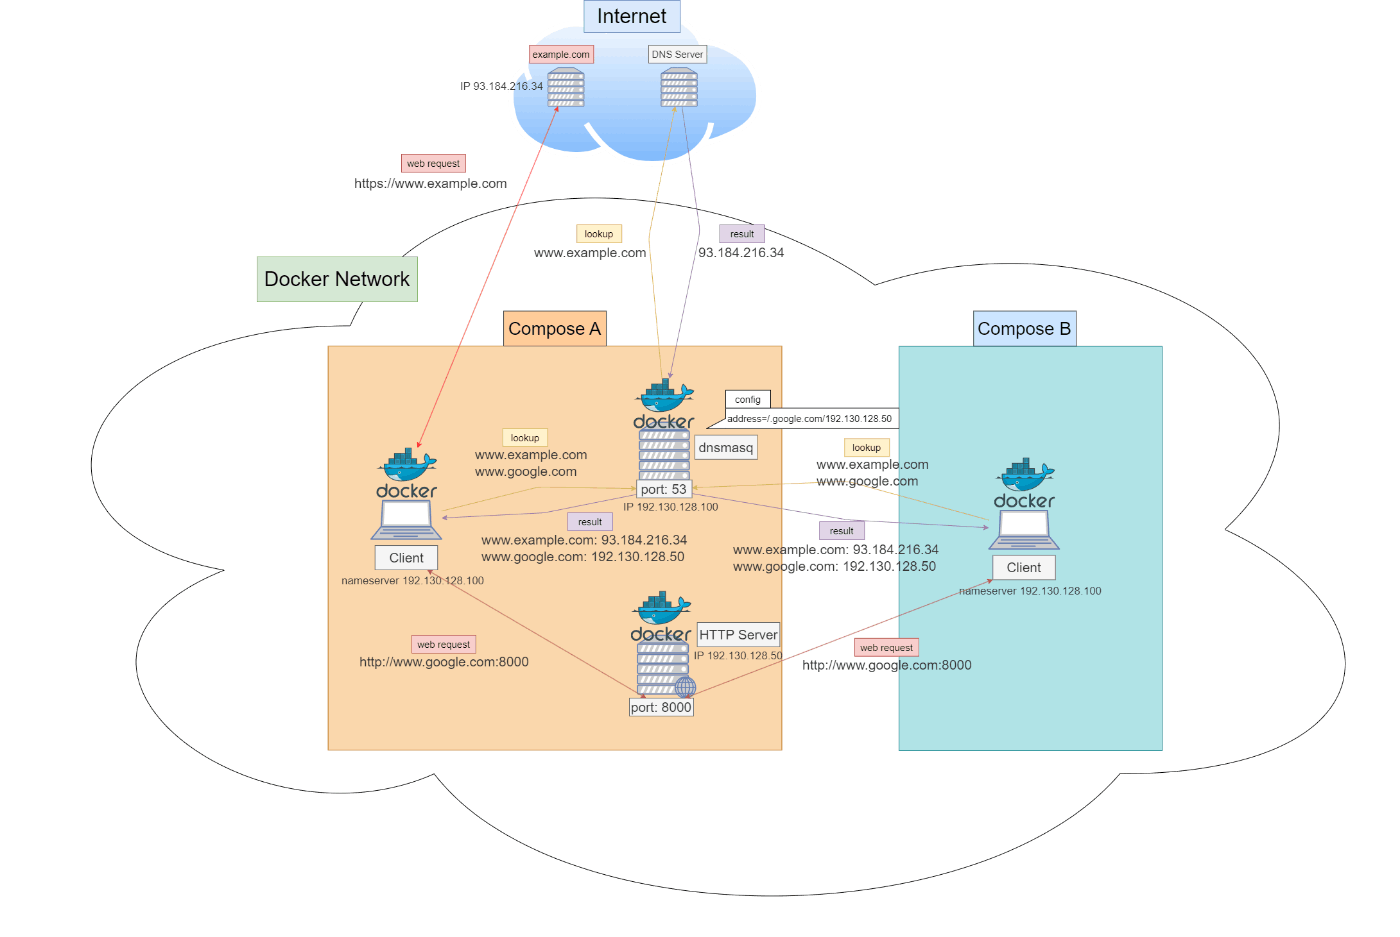
手順
- docker-compose用にdnsmasq.dc.confを作成dnsmasq.dc.conf
port=53 address=/.google.com/192.130.128.50 - dnsmasq用docker-compose起動
dnsmasq/HTTPサーバー/同一プロジェクト内からの確認用クライアントdocker-compose.dns.ymlversion: "3" services: dns: image: dnstest container_name: dns_server_dc command: ["dnsmasq", "--no-daemon"] volumes: - ./dnsmasq.dc.conf:/etc/dnsmasq.conf:ro networks: dns_nw: ipv4_address: 192.130.128.100 http_server: image: python:3.12.2-slim-bookworm container_name: http_server_dc entrypoint: ["/usr/local/bin/python"] command: ["-m", "http.server"] networks: dns_nw: ipv4_address: 192.130.128.50 client_internal: image: dnstest container_name: dns_client_internal tty: true networks: - dns_nw dns: 192.130.128.100 networks: dns_nw: driver: bridge name: dns_test_nw_dc ipam: driver: default config: - subnet: 192.130.128.0/24ネットワークはDNS側のプロジェクトで作成commanddocker compose \ -f docker-compose.dns.yml \ up -d - 別プロジェクトのdocker-compose起動DNS側のプロジェクトでのネットワーク名をexternalとして指定docker-compose.other.yml
version: "3" services: client_other: image: dnstest container_name: dns_client_other tty: true networks: - other_nw dns: 192.130.128.100 networks: other_nw: name: dns_test_nw_dc external: truecommanddocker compose \ -p other_compose \ -f docker-compose.other.yml \ up -d - 同一docker-composeからのアクセス
- 名前解決の確認
commanddocker exec \ -it dns_client_internal \ bashnslookup www.example.com Server: 127.0.0.11 Address: 127.0.0.11#53 Non-authoritative answer: Name: www.example.com Address: 93.184.216.34 Name: www.example.com Address: 2606:2800:220:1:248:1893:25c8:1946nslookup www.google.com Server: 127.0.0.11 Address: 127.0.0.11#53 Name: www.google.com Address: 192.130.128.50 Name: www.google.com Address: 2404:6800:4004:801::2004- curlでのアクセス結果
curl https://www.example.com

<!doctype html>
<html>
<head>
    <title>Example Domain</title>
・・・
curl http://www.google.com:8000 <!DOCTYPE HTML> <html lang="en"> <head> <meta charset="utf-8"> <title>Directory listing for /</title> ・・・ - 別プロジェクトからのアクセスcommand
docker exec \ -it dns_client_other \ bash- 名前解決の確認
- curlでのアクセス結果
いずれも4と同じ結果となるため省略
Discussion