ドキュメント作成ツールの決定版!Markdown + React の体験を Docusaurus で
What is Docusaurus ?
 Build optimized websites quickly, focus on your content - Docusaurus Keytar
Docusaurus とは "最適化されたウェブサイトを迅速に構築し,本質に集中させる" というスローガンのもと Facebook 傘下のチームが開発している 静的サイトジェネレータです.特徴として,次の五つが挙げられています.
- Powered by
Markdown=> MDX - Built Using React
- Content Search
- Ready for Translations
- Document Versioning
※ただし,まだまだアルファなので4,5については工事が進行中
追記:2021 年 5 月 12 日に β 版がリリースされ,2022/02/23 現在では beta.15 までヴァージョンアップしました!🎉🎉🎉
より詳細な特徴の説明
1. Powered by MDX

ドキュメンテーションの作成に時間を取られて開発が疎かになっていては本末転倒です.Docusaurus では Markdown に加えて MDX を採用し,これらでドキュメントやブログ記事を書くだけで簡単に静的 HTML ファイルを公開できるようにしています.MDX のおかげで,Markdown に JSX コンポーネントを埋め込むこともできます(これがマジで強い).
追記:2022/02/23 時点ではまだ MDX v2 に追いついていないが,メジャーバージョンアップまでには追いつくと思いたい(願望)
2. Built Using React

React コンポーネントを再利用してレイアウトを拡張できます.見るのも嫌になるようなお硬い UI から開放され,React を通じて好きなだけカスタマイズできるでしょう.sphinx テメーのことだよ返事しろ
3. Content Search

デフォルトで文書検索システム「DocSearch」が含まれています.設定ファイルから有効化することで,Ctrl+K というショートカットからすぐに検索を行なうことができます.めっちゃ便利 :eyes:
cf. DocSearch: Search made for documentation | DocSearch
4. Ready for Translations

Localization comes pre-configured. Use Crowdin to translate your docs into over 70 languages.
5. Document Versioning

Support users on all versions of your project. Document versioning helps you keep documentation in sync with project releases.
Getting Started
取り敢えず触れてみようということでチュートリアルをやってみます.流れとしては以下のとおりです.
1. Requirements を整える
2.npx 経由でプロジェクトを作成する
3. GitHub Pages にデプロイする
1. Requirements を整える
- Node.js version >= 14 or above (which can be checked by running node -v). You can use nvm for managing multiple Node versions on a single machine installed.
- When installing Node.js, you are recommended to check all checkboxes related to dependencies.
- Yarn version >= 1.5 (which can be checked by running yarn --version). Yarn is a performant package manager for JavaScript and replaces the npm client. It is not strictly necessary but highly encouraged.
cf. Installation | Docusaurus
上記の通り,v14.X 以上の Node.js と v1.5 以上の Yarn が必要です.既存のものがあればそれを活用しても問題ないと思います.もし未だ手元に環境がない場合,NVM(Node.js のバージョン管理ツール)経由で最新の LTS 版 Node.js をインストールするのが良いでしょう.
手元に環境がない方はこちらをご覧ください
1.1 NVM のインストール
# firstly, execute setup script
$ curl -o- https://raw.githubusercontent.com/nvm-sh/nvm/v0.39.1/install.sh | bash
  or
$ wget -qO- https://raw.githubusercontent.com/nvm-sh/nvm/v0.39.1/install.sh | bash

# secondly, run a command below
$ export NVM_DIR="$([ -z "${XDG_CONFIG_HOME-}" ] && printf %s "${HOME}/.nvm" || printf %s "${XDG_CONFIG_HOME}/nvm")"
[ -s "$NVM_DIR/nvm.sh" ] && \. "$NVM_DIR/nvm.sh" # This loads nvm
  or
$ vi ~/.bash_profile # or, ~/.zshrc, ~/.profile, ~/.bashrc , then write the command above.

# Finally, verify nvm version
$ command -v nvm
詳細は以下を参照のこと
cf. Installing and Updating | nvm-sh/nvm
1.2 Node.js (LTS version) のインストール
$ nvm install --lts --latest-npm
$ nvm alias default lts/*
$ node -v # v14.15.X (2021-02-13 現在)
$ yarn -v
# if error or warning occured
$ npm install -g yarn
※パスが通ってないよとか言われたら一旦シェルを再起動して読み込み直してみましょう
cf. nvm(Node Version Manager)を使って Node.js をインストールする手順 - Qiita
cf. Introduction | Yarn - Package Manager

2 npx 経由でプロジェクトを作成する
Docusaurus では,NPX を活用してプロジェクトを作成するというアプローチを採用しています.
NPX とは
馴染みのない方もいるかも知れないので一言説明しておくと,「NPM で公開されているライブラリをインストールなしで実行できる」コマンドです.
もちろんサーバとの通信が発生して多少遅いこともありますが,一度しか使わないようなスクリプトをローカルにいちいち持ってくる必要がないというのは革新的でもあるかと思います.
2.1 Scaffold project website: プロジェクトの "足場" を組む
「website」というプロジェクトを作成してみます.これはサイト名の初期値も兼ねています.
$ npx create-docusaurus@latest website classic --typescript
`classic` テンプレートとは何か ?
ここでは「classic」というテンプレートを使用しました.
実は他にも「bootstrap」「facebook」という公式テンプレートが用意されています.
しかし,このテンプレートには公式で提供している便利なプラグインやテーマが含まれています.
敢えて「classic」以外を選ぶ積極的な理由はありません.
cf. docusaurus/packages/docusaurus-init/templates at master · facebook/docusaurus
こうして,プロジェクトを育てていくための 足場 あるいは 土台 となるべきものが生成されました.
 工事現場で組み立てた足場の上を歩いている、ヘルメットをかぶった作業員のイラスト
ディレクトリ構造の詳細
my-website
├── blog
│   ├── 2019-05-28-hola.md
│   ├── 2019-05-29-hello-world.md
│   └── 2020-05-30-welcome.md
├── docs
│   ├── doc1.md
│   ├── doc2.md
│   ├── doc3.md
│   └── mdx.md
├── src
│   ├── css
│   │   └── custom.css
│   └── pages
│       ├── styles.module.css
│       └── index.js
├── static
│   └── img
├── docusaurus.config.js
├── package.json
├── README.md
├── sidebars.js
└── yarn.lock
2.2 開発サーバの立ち上げ
プロジェクトの構造理解や細かな設定は後回しにして,一旦開発サーバを立ち上げてみましょう.
$ cd website
$ yarn start --port 3333
コンパイルが済んだら http://localhost:3333 へアクセスしてみましょう.もちろんポート番号は任意に変更できます.
 HINC OMNE PRINCIPIVM
3. GitHub Pages にデプロイする
ローカルで万全に動いて気持ちいいかと思いますが,チュートリアルの最後に GitHub Pages への自動デプロイまで設定してしまいましょう.
このフェーズまでやり遂げてしまえば,あとはリポジトリへプッシュするたびに自動でビルドが走り,(初心者フロントエンドエンジニア諸兄の多くにとって)悲願の完全無料静的ファイルホスティング環境が手に入ります.
あと少しだけ頑張って,次の二つの設定を済ませてしまいましょう!

3.1 docusaurus.config.js の設定
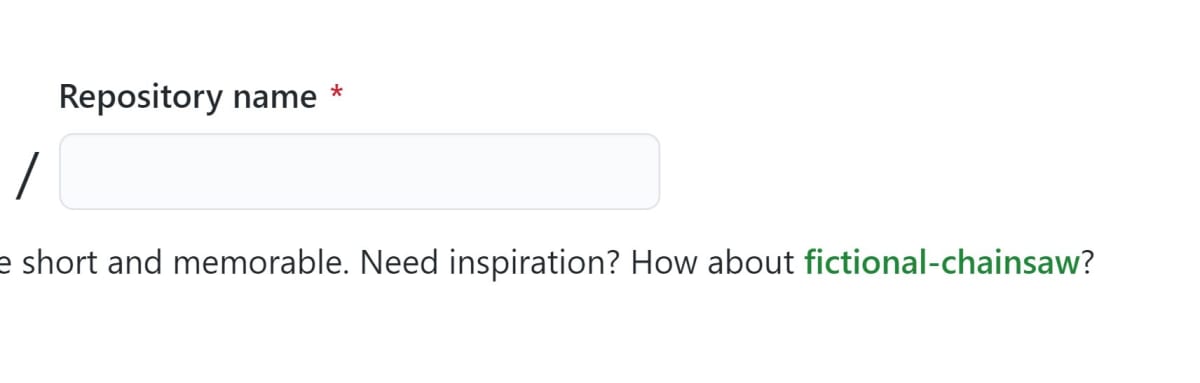
まず,Docusaurus に対していくつかのメタ情報を教える必要があります.①organizationName ②projectName ③url ④baseUrl の4つです.
module.exports = {
  // ...
  url: 'https://_username_.github.io',
  baseUrl: '/your-repository-name/',
  projectName: '_username_.github.io',
  organizationName: '_username_',
  // ...
};
cf. docusaurus.config.js settings | Deployment | Docusaurus
organizationName
organization と銘打ってありますが,個人で使う場合は GitHub username を指定してください.例えば Docusaurus の場合であれば,「Facebook」が organizationName になります.デプロイ先リポジトリのオーナーの Username を入れておくという認識で大体あっているかと思います.
projectName
プロジェクト名,もとい リポジトリ名を入力してください.例えば Docusaurus の場合であれば,「docusaurus」が projectName になります.
※実際にはプロジェクト名は可変ですが,リポジトリ名は不変であるという前提に基づいている仕様であると思われます.まぁ強引に settings からリポジトリ名も変えられちゃうけど
url
特に GitHub に課金してカスタムドメインを得ているわけでなければ,https://_username_.github.io の形式で入力してください.すなわち,github.io のサブドメインとして自分の Username を付け加えるという認識です.例えば Docusaurus の場合であれば,「https://facebook.github.io」が url になります(が,流石に大企業なのでカスタムドメインで公開している模様).
cf. GitHub Pages サイトのカスタムドメインを設定する - GitHub Docs
baseUrl
Docusaurus が Listen するパスを入力してください.ここまで素直に設定していれば,projectName と同じものをスラッシュで挟む形になります. Docusaurus の場合であれば,/docusaurus/ が baseUrl となります.ただし,実際には GitHub リポジトリ側での設定次第で公開パスは変更することが出来ます.GitHub リポジトリのトップページ右上の settings タブから,Options >> GitHub Pages (ちょっと下へスクロールする)を探して source を変更してください.
※パスなしの純粋ルート URL (e.g. https://_username_.github.io) で GitHub Pages にアクセスしたい場合,ここを参考にしてください.
3.2 GitHub Actions の設定
あと少しです!以下の工程を残すだけとなりました.
- GitHub との ssh 接続の確立
-
.github/workflows/documentation.ymlファイルの作成 - GitHub Actions の設定
cf. Triggering deployment with GitHub Actions | Deployment | Docusaurus
3.2.1 GitHub との ssh 接続の確立
GitHub へプッシュする際にどのような接続方法を用いていますか?ssh 接続で毎回プッシュしている場合,新たに鍵を生成する必要はありません.HTTPS 接続で毎回ユーザ名とパスワードを入力している方であれば,まず強固な鍵を生成するところから始めていきましょう.
SSH 接続の設定が必要な方はこちらをご覧ください
SSH 鍵ペアの作成
少しでも ssh 鍵での接続について調べたことがあれば,「お前らの SSH Keys の作り方は間違っている」という記事は見たことがあるかも知れません.しかし,2021 年 02 月現在ではこの記事の情報でさえあまりよろしくないという事態になっているようです(cf. GitHub ユーザーの SSH 鍵 6 万個を調べてみた <= 2014 年時点で指摘されている……).
いまから鍵を作らねばならない状況があれば,迷わず Ed25519 を採用しましょう.俺もよくわかってないけど多分これが一番カタいと思います
GitHub への ssh 接続のための具体的な手続きは以下のとおりです.
- 鍵を生成する:
$ cd ~/.ssh && ssh-keygen -t ed25519 -C your-mail-address[at]example.com - どうにかして公開鍵
*.pubの中身をクリップボードへコピーする - GitHub に公開鍵を登録する (Settings >> SSH keys >> Add SSH Key)
-
ssh -T git@github.comコマンドで接続が確立されるか確認する
cf. お前らの SSH Keys の作り方は間違っている
cf. SSH Key を Ed25519 に変更した - fu9da
※デフォルトの鍵名から変更しなければ ssh -T git@github.com でコマンドが通るはずですが,異なる名前で鍵を生成した場合は別途設定が必要です.
# firstly, write configuration file
$ export YOUR_SECRET_KEY_NAME=your_ed25519_secret_key
$ export YOUR_HOST_ALIAS=exampleAlias
$ echo -e "Host ${YOUR_HOST_ALIAS}\n  Hostname github.com\n  IdentityFile ~/.ssh/${YOUR_SECRET_KEY_NAME}\n  User git" > ~/.ssh/config
# or $ vi ~/.ssh/config

# secondly, confirm connection to github.com
$ ssh -T exampleAlias
# ---> "Hi __username__! You've successfully authenticated, but GitHub does not provide shell access."
![]()
3.2.2 .github/workflows/documentation.yml ファイルの作成
GitHub Actions を利用するためには,リポジトリ内に .github というディレクトリを作成し,その中へさらに workflows ディレクトリを作ることが推奨されています.実際に実行する Action スクリプトは,このディレクトリ直下に置くことになります.
$ cd website
$ mkdir -p .github/workflows/
$ vi .github/workflows/documentation.yml
.github/workflows/documentation.yml
name: Deploy to GitHub Pages

on:
  push:
    branches: [main]
    paths: [website/**]
  workflow_dispatch:

jobs:
  deploy:
    name: Deploy to GitHub Pages
    runs-on: ubuntu-latest
    steps:
      - uses: actions/checkout@v2
      - uses: actions/setup-node@v2
        with:
          node-version: 14.x
          cache: yarn
      - name: Build website
        working-directory: website
        run: |
          yarn install --frozen-lockfile
          yarn build

      # Popular action to deploy to GitHub Pages:
      # Docs: https://github.com/peaceiris/actions-gh-pages#%EF%B8%8F-docusaurus
      - name: Deploy to GitHub Pages
        uses: peaceiris/actions-gh-pages@v3
        with:
          github_token: ${{ secrets.GITHUB_TOKEN }}
          # Build output to publish to the `gh-pages` branch:
          publish_dir: ./website/build
          # Assign commit authorship to the official GH-Actions bot for deploys to `gh-pages` branch:
          # https://github.com/actions/checkout/issues/13#issuecomment-724415212
          # The GH actions bot is used by default if you didn't specify the two fields.
          # You can swap them out with your own user credentials.
          user_name: github-actions[bot]
          user_email: 41898282+github-actions[bot]@users.noreply.github.com
3.2.3 GitHub Actions の設定
チュートリアル最後の工程までたどり着きました.もうひと踏ん張りやっていこうと思います.
ところで GitHub Actions は,各リポジトリごとに設定せねばなりません.すなわち,まずはともあれ GitHub 上にリモートリポジトリを作成する必要があります.GitHub 上でリモートリポジトリの初期化まで済ませたらプロジェクトのルートディレクトリへ戻り,Git の設定とこれまでの成果をプッシュしましょう.
$ cd website
$ #export YOUR_HOST_ALIAS=exampleAlias  # for SSH
$ #export YOUR_GITHUB_USERNAME=__username__
$ #export YOUR_REPOSITORY_NAME=your-repository-name
$ git init
$ git branch -M main
$ git config --local user.email "you@example.com"
$ git config --local user.name "${YOUR_GITHUB_USERNAME}"
$ git add .
$ git commit -m "Initial commit"
$ git remote add origin $YOUR_HOST_ALIAS:$YOUR_GITHUB_USERNAME/$YOUR_REPOSITORY_NAME.git
$ git push --set-upstream origin main
 ところでこれは俺が引き当てたくそカッコイイ名前
再度 GitHub のリモートページのページに戻ります.二つ確認事項があります.
- ディレクトリとファイル,README がうまく表示されたでしょうか?
- HTTPS 接続ではなく SSH 接続で滞りなくプッシュすることが出来たでしょうか?
上記が確認できたら,次に環境変数 GH_PAGES_DEPLOY を登録します.この変数は,リポジトリの Settings >> Secrets >> Repository secrets に格納します.
 https://github.com/_username_/_repositoryName_/settings/secrets/actions
ここへ入力するのは,SSH 接続に利用した 鍵ペアの 秘密鍵 の値です.同様の手順でコピペしてきましょう.こうすることで,Action Script からであっても,${{ secrets.GH_PAGES_DEPLOY }} として参照することが出来るようになります.
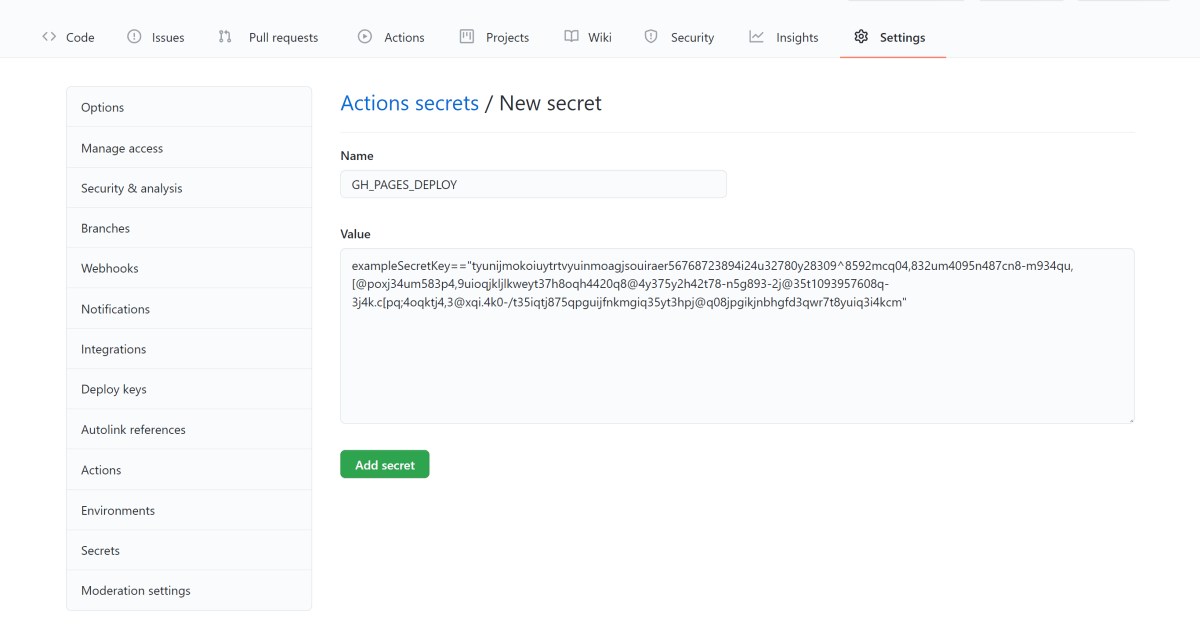 秘密鍵の中身をコピペする
 リポジトリの環境変数が設定されていることを確認する
3.2.4 最後の仕上げ
 Go to GitHub Actions Tab
最後の仕上げとして,ページ上部センターあたりにある Actions タブへ移りましょう.
画面左側に "All workflows" がでているかと思います(もし「設定ファイルを新規作成する」的な画面になっていたら焦らず .github/workflows/documentation.yml をコピペしてください.その後,main ブランチにコミットします).
 Run workflow
documentation というワークフローが見つかるでしょうか?それをクリックすると This workflow has a workflow_dispatch event trigger という青いバナーが見えるはずです.その右に見える "Run workflow" を選択するとポップアップが出てきます.main になっていることを確認し,緑の Run workflow をクリックして実行を確定します.
 workflow is running
そのまま待機しているとページが遷移し,ワークフローが実行されている様子が観察できると思います.ワークフロー名をクリックするとより詳細なジョブの実効過程を見ることも出来ます.
そうこうしているうちに無事ビルド&デプロイが終わったでしょうか?リモートリポジトリのトップページに戻ってみると,何やら右側の Languages の上にロケットが飛んでいるではありませんか~~!アイコンをクリックして Activity log を開き,さらに View deployment ボタンを押せば,ページがデプロイされていることを確認できるかと思います.
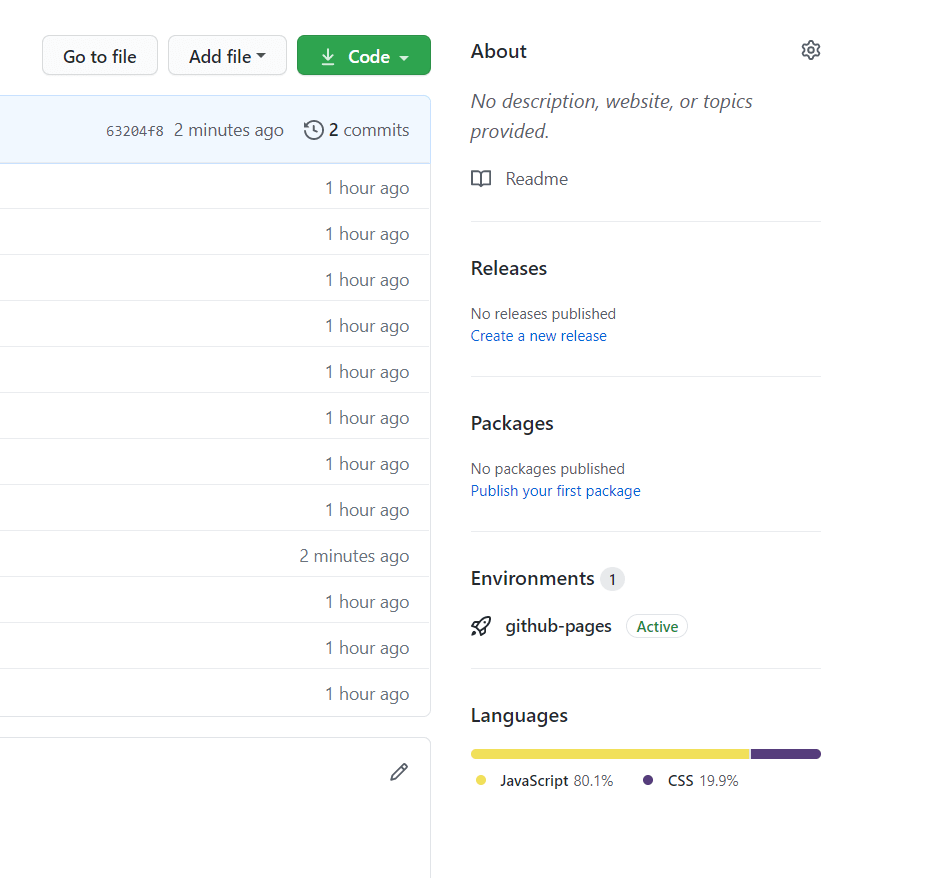 github-pages is Active 🚀
これで,main ブランチに何らかの変更があった場合,あるいは今回のように手動で発火させた場合にワークフローが実行されるようになりました.
ここまでお疲れさまでした.あとは自分で好きなだけカスタマイズを楽しみましょう!
次の章では,具体的にどのようにカスタマイズしていけばよいのかについてお伝えします.
Customize
Docusaurus をカスタマイズするためには,以下のいくつかの方法があります.それぞれ適用範囲を確認し,正しいアプローチで快適に楽しくつくりましょう."Build optimized websites quickly, focus on your content" をお忘れなく……
- サイドバーの調整:
sidebars.js - 上記以外の設定:
docusaurus.config.js
設定に関するファイルはこの二つです.サイドバーナビゲーションに関する記述だけ抽出されているという理解でいいと思います.ドキュメントが膨大になるとそれだけ sidebars.js も長大になりますが,それでも視認性を担保できる構成になっています.
sidebars.js:サイドバーの調整
Docusaurus には,Markdown の先頭で Front Matter を定義することでファイルを検知し,.md から .html へと変換するという機能が備わっています.Zenn CLI で記事・本を管理する方法 においても同様のアプローチが取られています(ので,実は Zenn.dev と Docusaurus は記法次第で共存できてしまいます,最高か? ).
具体的には,次の二つの工程を経ることで機能しています.実際に見ていきましょう.
-
.mdごとに Front Matter を指定する -
sidebars.jsでドキュメント全体の構成を定義する
1. .md ごとに Front Matter を指定する
すべての .md ファイルはユニークな ID を持っていなければなりません.何もしない状態では,ID は拡張子を抜いたファイル名が ID として認識されます.子ディレクトリ以下に配置した場合には,「ディレクトリ名 + / + 拡張子を抜いたファイル名」が ID になります.
website # Root directory of your site
└── docs
   ├── greeting.md # id is `greeting`
   └── guide
      └── hello.md # id is `guide/hello`
一方で,Front Matter を使用してファイル内部で ID を定義することも出来ます.こちらで定義すると上述のファイル名に依存した ID は上書きされます.子ディレクトリ以下に配置した場合については,「ディレクトリ名 + / + 定義した ID 名」が ID になります.
このように書くことでファイルに関するメタデータを一箇所にまとめられるため,ぜひとも活用したほうが後々のために有効かもしれません.また,Front Matter については ID 以外の属性も用意されています.(title, keywords, image, description, slug etc. )
cf. Markdown Front Matter | 📦 plugin-content-docs | Docusaurus
2. sidebars.js でドキュメント全体の構成を定義する
sidebars.js において sidebar object を定義することで,Docusaurus は自動でサイドバーナビゲーションを生成できるようになります.
(参考:上級者向け)sidebar object の型定義
// cf. https://github.com/facebook/docusaurus/blob/11c24268a15af49351a115bf09c05fe911664f48/packages/docusaurus-plugin-content-docs/src/types.ts#L90-L120
export type SidebarItemBase = {
  customProps?: object;
};

export type SidebarItemDoc = SidebarItemBase & {
  type: "doc" | "ref";
  id: string;
};

export type SidebarItemLink = SidebarItemBase & {
  type: "link";
  href: string;
  label: string;
};

export type SidebarItemCategory = SidebarItemBase & {
  type: "category";
  label: string;
  items: SidebarItem[];
  collapsed: boolean;
};

export type SidebarItem =
  | SidebarItemDoc
  | SidebarItemLink
  | SidebarItemCategory;

export type Sidebar = SidebarItem[];
export type SidebarItemType = SidebarItem["type"];

export type Sidebars = Record<string, Sidebar>;
module.exports = {
  docs: [
    {
      type: 'category',
      label: 'Getting Started',
      items: ['greeting'],
    },
    {
      type: 'category',
      label: 'Docusaurus',
      items: [
        'doc1',
        {
          type: 'category',
          label: 'Nested item',
          items: ['doc2'],
        },
        'doc3'
      ],
    },
  ],
};
例えば上記のように定義したとき,items 配列が持つ greeting, doc1, doc2, doc3 はすべて /docs/ 配下の .md ファイルの ID です.加えて type に category, label に カテゴリ名を入力することで,サイドバーに表示されるカテゴリ名のリストを制御することができます.
重要なポイントとして,items は入れ子構造を受け入れるという仕様があります.このように書くことで,カテゴリ名から更に一つ深い層へのアコーディオンを提供することが出来ます.めちゃきもちいい UI で優勝しましょう
また,複数のサイドバーを定義することもできます.たとえば一つはリファレンス用,一つはチュートリアル用といった使い分けができるようになっています.以下に示すように,Docusaurus 公式で利用している sidebars.js では docs, api という分離を行なっていました.ご活用ください.
Docusaurus 公式の sidebars.js ( Last update: 2021-02-13 )
/*
 * Copyright (c) Facebook, Inc. and its affiliates.
 *
 * This source code is licensed under the MIT license found in the
 * LICENSE file in the root directory of this source tree.
 */

module.exports = {
  docs: [
    {
      type: "category",
      label: "Docusaurus",
      items: ["introduction", "design-principles", "contributing"],
    },
    {
      type: "category",
      label: "Getting Started",
      collapsed: false,
      items: ["installation", "configuration", "typescript-support"],
    },
    {
      type: "category",
      label: "Guides",
      items: [
        "guides/creating-pages",
        {
          Docs: [
            "guides/docs/introduction",
            "guides/docs/create-doc",
            "guides/docs/sidebar",
            "guides/docs/versioning",
            "guides/docs/markdown-features",
            "guides/docs/multi-instance",
          ],
        },
        "blog",
        {
          type: "category",
          label: "Markdown Features",
          items: [
            "guides/markdown-features/introduction",
            "guides/markdown-features/react",
            "guides/markdown-features/tabs",
            "guides/markdown-features/code-blocks",
            "guides/markdown-features/admonitions",
            "guides/markdown-features/inline-toc",
            "guides/markdown-features/assets",
            "guides/markdown-features/plugins",
          ],
        },
        "styling-layout",
        "static-assets",
        "search",
        "deployment",
        {
          type: "category",
          label: "Internationalization",
          items: [
            "i18n/introduction",
            "i18n/tutorial",
            "i18n/git",
            "i18n/crowdin",
          ],
        },
      ],
    },
    {
      type: "category",
      label: "Advanced Guides",
      items: ["using-plugins", "using-themes", "presets"],
    },
    {
      type: "category",
      label: "Migrating from v1 to v2",
      items: [
        "migration/migration-overview",
        "migration/migration-automated",
        "migration/migration-manual",
        "migration/migration-versioned-sites",
        "migration/migration-translated-sites",
      ],
    },
  ],
  api: [
    "cli",
    "docusaurus-core",
    "api/docusaurus.config.js",
    "lifecycle-apis",
    {
      type: "category",
      label: "Plugins",
      items: [
        "api/plugins/plugins-overview",
        "api/plugins/plugin-content-docs",
        "api/plugins/plugin-content-blog",
        "api/plugins/plugin-content-pages",
        "api/plugins/plugin-client-redirects",
        "api/plugins/plugin-debug",
        "api/plugins/plugin-google-analytics",
        "api/plugins/plugin-google-gtag",
        "api/plugins/plugin-ideal-image",
        "api/plugins/plugin-pwa",
        "api/plugins/plugin-sitemap",
      ],
    },
    {
      type: "category",
      label: "Themes",
      items: [
        "api/themes/themes-overview",
        "api/themes/theme-configuration",
        "api/themes/theme-classic",
        "api/themes/theme-bootstrap",
        "api/themes/theme-live-codeblock",
        "api/themes/theme-search-algolia",
      ],
    },
  ],
};
docusaurus.config.js:ドキュメント全体の設定
docusaurus.config.js では,大きく分けて以下の4つについて設定を記述しています.
- サイトのメタデータ定義
- デプロイ方法
-
Theme,plugin,presetに関わる設定 - その他カスタム設定
個々の詳細について紹介していると深入りしすぎてしまうので割愛します.これらの詳細については こちら を参照してください.
DocSearch by Algolia(プロダクション環境では有料 API が必要)
紹介だけというのも味気ないので,デフォルトで Docusaurus に付属している目玉機能「文書検索 powered by Algolia」を有効化してみます.
cf. What goes into a docusaurus.config.js? | Configuration | Docusaurus
cf. API | docusaurus.config.js | Docusaurus
Algolia DocSearch によるドキュメント検索
といっても,docusaurus.config.js に以下の設定を追加するだけです.
module.exports = {
  // ...
  themeConfig: {
    // ここから ----------------------------------------
    algolia: {
      apiKey: 'YOUR_API_KEY',
      indexName: 'YOUR_INDEX_NAME',
      // Optional: see doc section bellow
      contextualSearch: true,
      // Optional: Algolia search parameters
      searchParameters: {},
      //... other Algolia params
    },
    // ここまで ----------------------------------------
  },
};
再度開発サーバを立ち上げてみましょう.設定が読み込まれていれば,右上に検索フォームが追加されているのがわかると思います.サイトにフォーカスがある状態で Ctrl+k のショートカットキーを押せば,すぐさまサイト内検索ができるようになっています.最高!
More Advanced
さらに一つ上の段階へとカスタマイズしたいという要求もあるでしょう.ここまで来るとそれなりの規模な OSS のドキュメントにも適用することも視野に入れ始めるかもしれません.詳しくはぜひ公式ドキュメントを参照してほしく思いますが,カスタマイズの手がかりとしては以下のようなトピックが挙げられると思います.ご確認ください.
- スタイル調整:
/src/css/custom.cssor Other approachs - プラグインの導入: → Plugins | Docusaurus
- テーマの利用: → Themes | Docusaurus
- ヴァージョン管理: → Versioning | Docusaurus
- i18n; 国際化: → i18n | Docusaurus
特に最後の i18n すなわち国際化(複数言語への対応)は世界中で使われるような OSS となるためには必須となる項目と言えるでしょう(なにも世界は英語だけが全てではないため).Docusaurus ではそのような課題について明確な問題意識を持っており,いくつかの目標を掲げ課題解決に向けて取り組んでいます.
参考:Docusaurus の掲げる目標についての詳細(英語)
Goals
This section should help you understand the design decisions behind the Docusaurus i18n support.
For more context, you can read the initial RFC and PR.
i18n goals
The goals of the Docusaurus i18n system are:
- Simple: just put the translated files in the correct file-system location.
- Flexible translation workflows: based on Git (monorepo, forks or submodules), SaaS software, FTP...
- Flexible deployment options: single or multiple domains.
- Modular: allow plugin author to provide i18n support.
- Low-overhead runtime: static json/markdown content does not require a heavy i18n JS library.
- Acceptable build-times: allow building and deploying localized sites independently.
- Localize assets: an image of your site might contain text that should be translated.
- No coupling: not forced to use any SaaS, yet the integration is possible.
- Easy to use with Crowdin: multiple Docusaurus v1 sites use Crowdin, and should be able to migrate to v2.
-
Good SEO defaults: setting useful SEO headers like
hreflangfor you. - RTL support: locales reading right-to-left (Arabic, Hebrew...) should be easy to use.
i18n goals (TODO)
Features that are not yet implemented:
- Contextual translations: reduce friction to contribute to the translation effort.
- Anchor links: linking should not break when you localize headings.
- Advanced configuration options: customize route paths, file-system paths.
i18n non-goals
We don't provide support for:
- Automatic locale detection: opinionated, and best done on the server.
- Translation SaaS software: you are responsible to understand the external tools of your choice.
- Translation of slugs: technically complicated, little SEO value.
Docusaurus においては,従来の「GitHub 等の公開リポジトリで翻訳 PR を募る」という形式だけでなく,"翻訳のためのローカライゼーションマネージメントプラットフォーム" である Crowdin との統合を簡単に行えるような仕組みを整えています(注:まだまだアルファ版ではあります……応援しましょう).
この仕組みを用いて,Docusaurus 自体の翻訳作業も進められています.とても気軽に翻訳作業へ参加できるため,これまでの Git を経由して PR を投げるやり方に手を出せなかったであろう初心者であっても貢献しやすくなっています.次の章では,Crowdin を活用した翻訳作業への貢献方法についてお伝えします.
i18n Contribution
Crowdin から翻訳作業に参加するために必要なことは,以下の通りです.
- Crowdin に Sign up & Log in する
- Docusaurus v2 の翻訳プロジェクトのページを開く
- 翻訳の優先順位に従って実際に翻訳作業を進める
上記を行なうために必要なのは,GitHub のアカウントだけです(つまり,ここまで手を動かしてついてきた方は既に準備が整っています)!
1. Crowdin に Sign up & Log in する
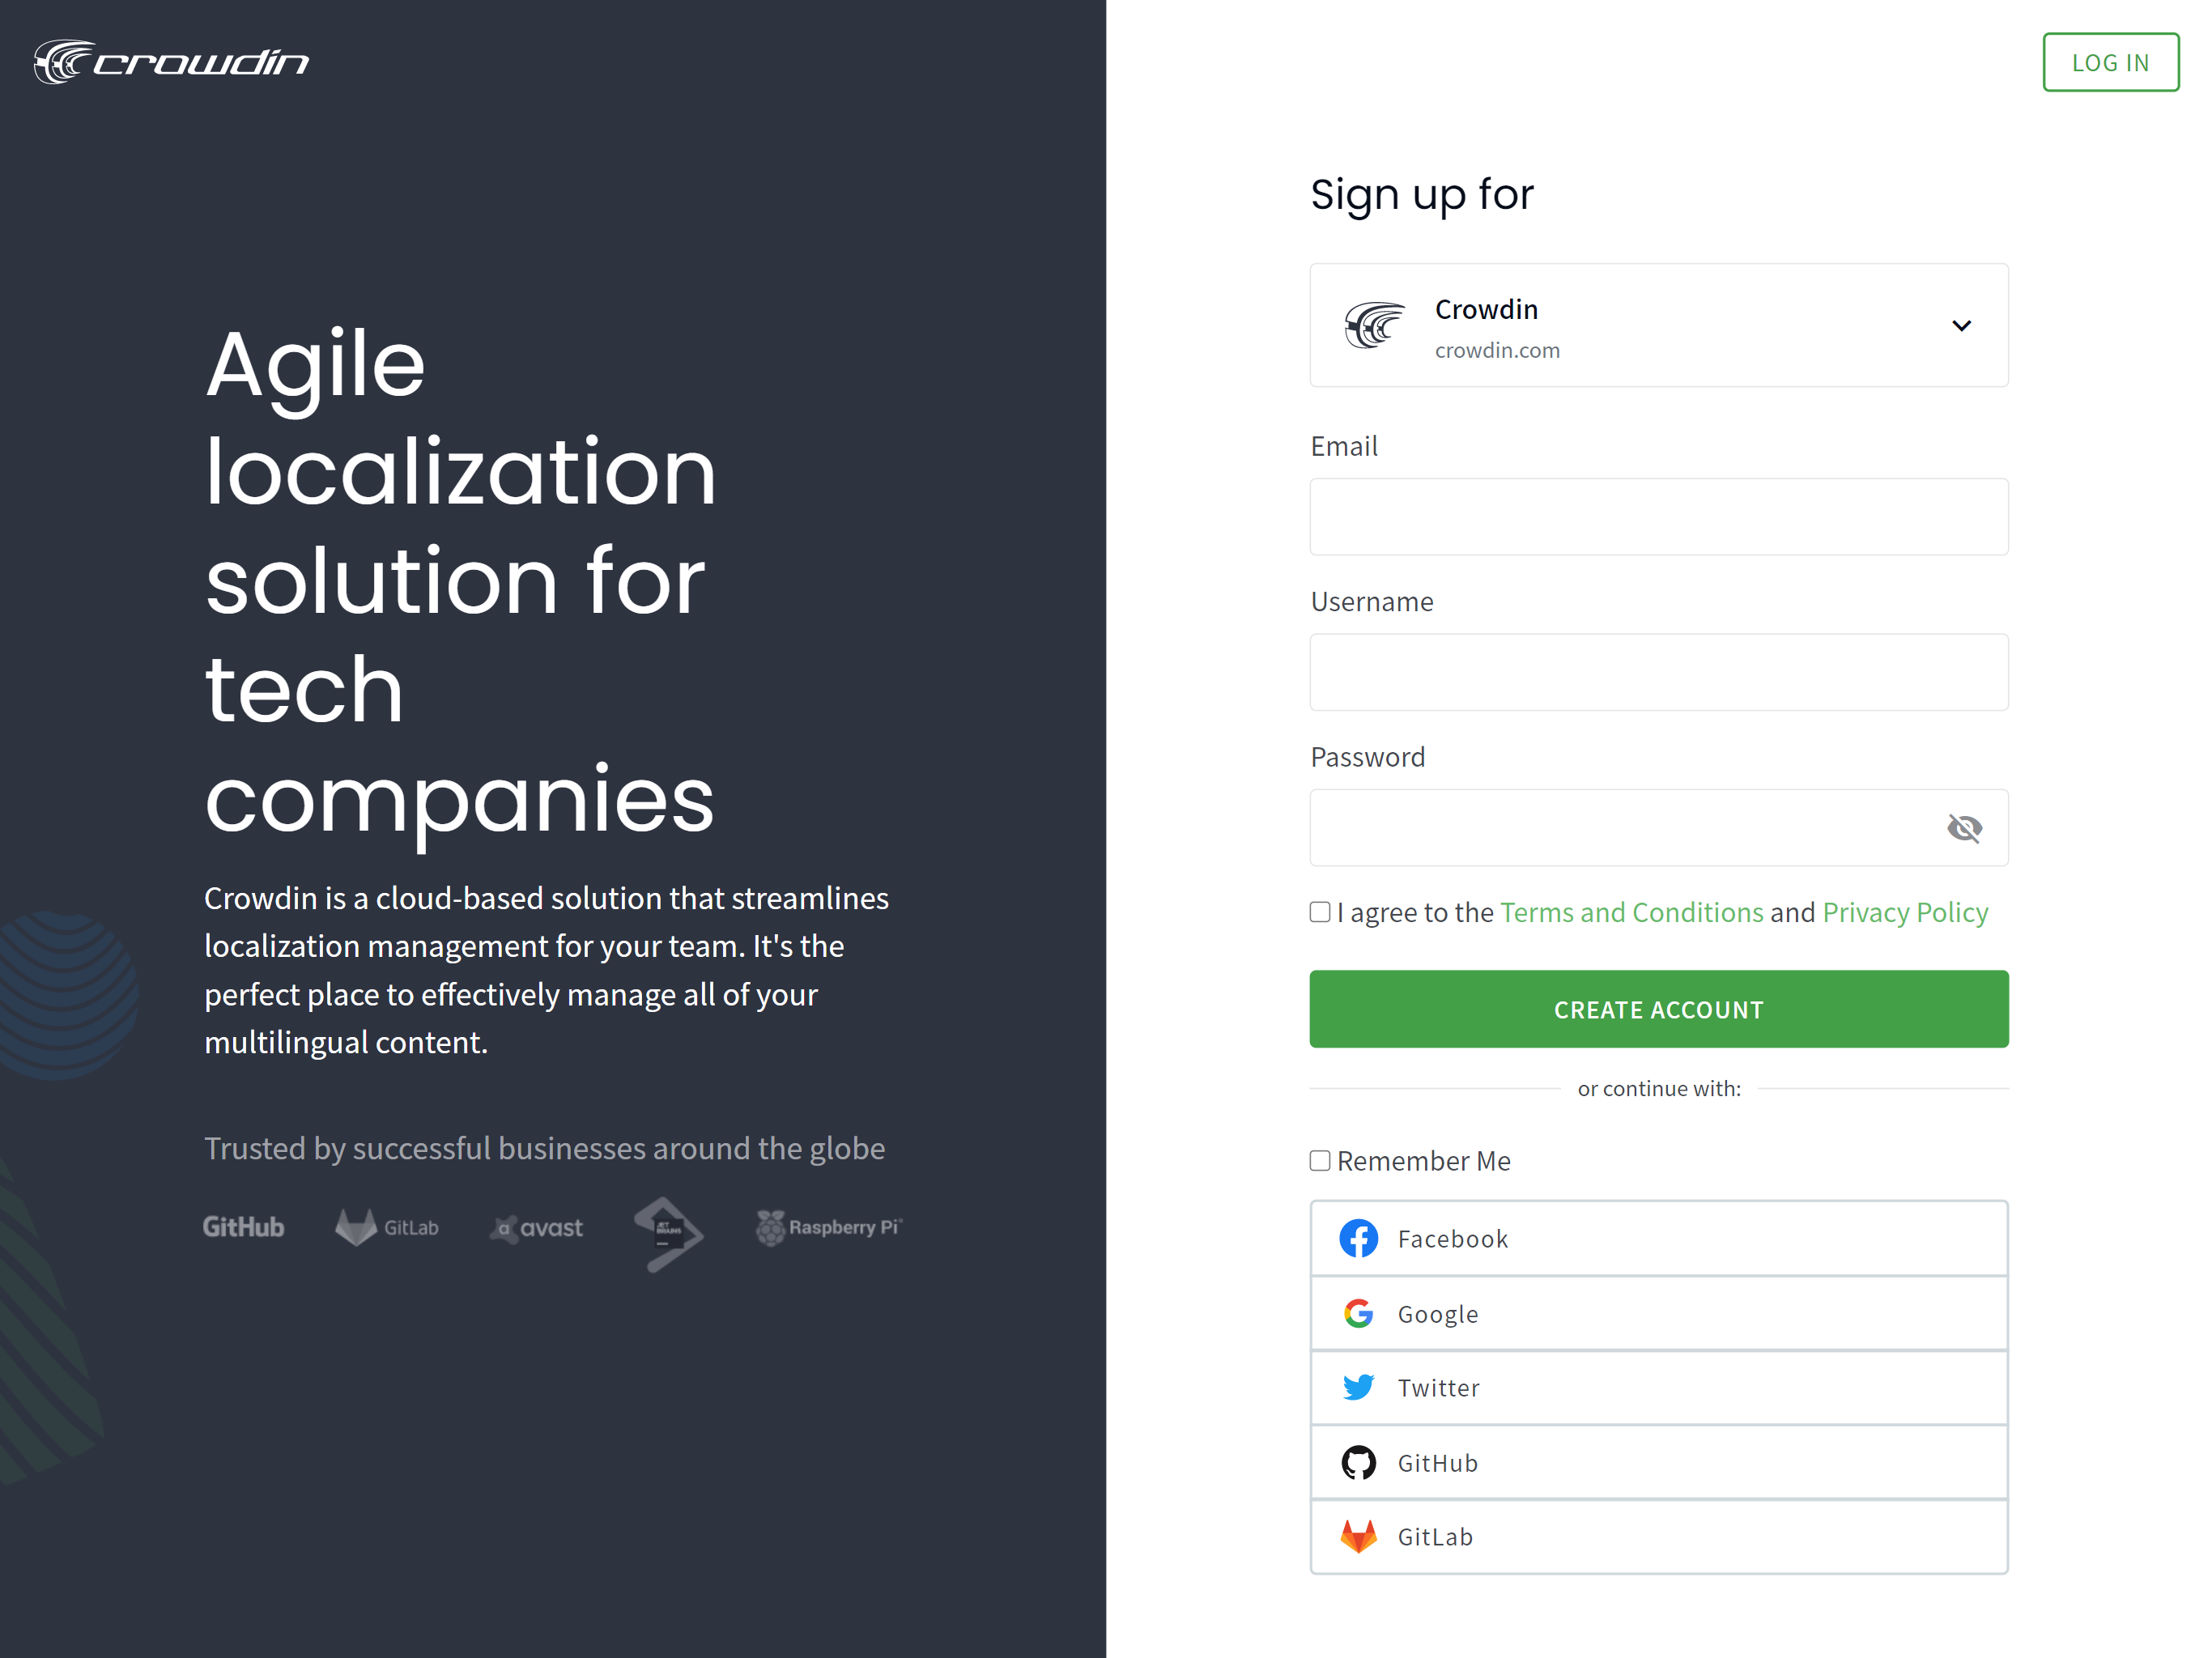 Sign up to Crowdin
まずはともあれ,Crowdin にアカウントを登録します.メールアドレス・ユーザー名とパスワードでも作成できますが,SNS アカウントを連携させるのが便利かと思います.
2. Docusaurus v2 の翻訳プロジェクトのページを開く
Docusaurus v2 の翻訳プロジェクトページ を開きましょう.現時点 (2021-02-14) においては以下のような状態であることがわかるかと思います.
 Achievement by language
ここからさらに,翻訳したい言語のページを開きます.日本語に翻訳したいので,Japanese をクリックしてみます.
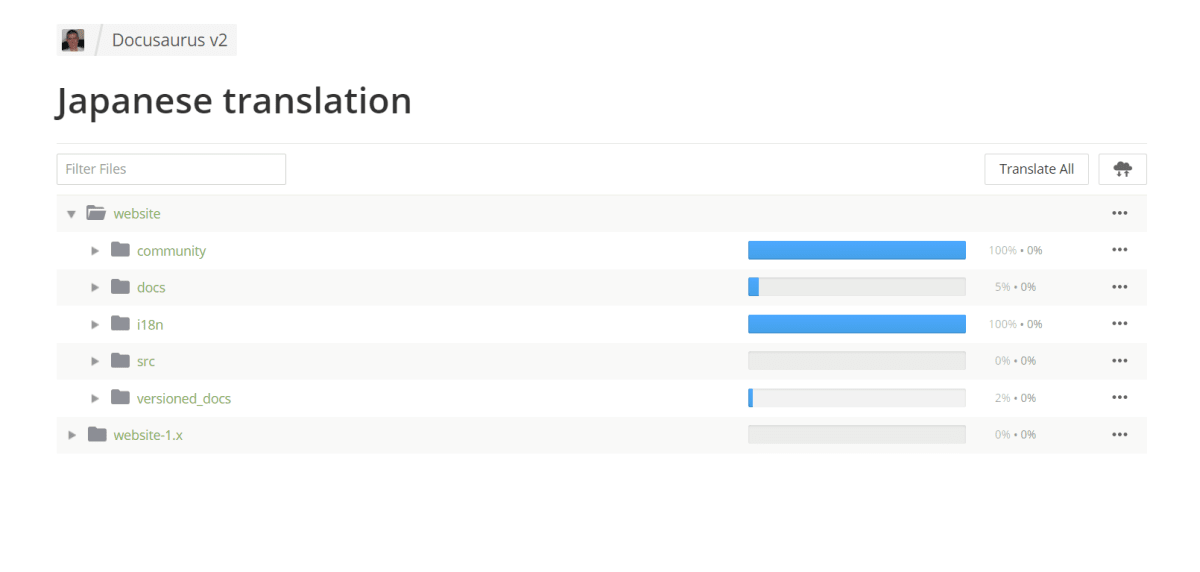 Achievement Overview in Japanese
フォルダごとにどれくらい翻訳が進んでいるか見えるかと思います.「XX %・YY %」という表示は「翻訳済み割合・承認された翻訳済み割合」を表しています.このように分けてあるのは,アカウントさえあれば誰でも翻訳に参加できてしまうため,粗悪な翻訳内容であっても translated ratio としてカウントされてしまうからです.質を担保するために 翻訳内容の承認 というプロセスを経てはじめて,翻訳されたドキュメントと認められることになります.
3. 翻訳の優先順位に従って実際に翻訳作業を進める
実際に翻訳作業に参加してみましょう.どのような手順で進めていけばいいのかについては,以下の issue に書いてあります.
Help us translate the Docusaurus 2 website #3526
Last updated: 11/02/2021
Help us translate the Docusaurus 2 website
The Docusaurus 2 i18n support is ready, and it's time for Docusaurus 2 website to be translated
This issue is here to organize the translation effort.
Translation process
- Get familiar with the Docusaurus i18n support
- Sign-up on Crowdin and join the Docusaurus-v2 project
- Get familiar with the Crowdin translation UI, as you will need to use it to translate JSON and Markdown files
- Ask for your locale to be enabled on Crowdin
- Translate the content
Files to translate
Please translate in priority:
- The
website/i18n/enfiles (layout/homepage JSON files)- The
website/communitymd files- The
website/docsmd filesPlease do not translate for now:
- All the
.mdxfiles- Versioned docs
- Frontmatter such as id, slug, URLs...
Preview your translation work
Unfortunately, it is not possible for you to test the translated site locally (the Crowdin auth system is not very flexible)
If you are actively working on a locale, please ask to add that locale to our i18n staging deployment:
- Preview: https://docusaurus-i18n-staging.netlify.app/
- Netlify site: https://app.netlify.com/sites/docusaurus-i18n-staging
- Trigger a build:
curl -X POST -d {} https://api.netlify.com/build_hooks/602511032ce0923d1b6cd220(manually for now)Production
We ask for a minimal amount of translations to be reached:
website/i18n/en> 90%website/community> 40%website/docs> 20%Once a locale has enough translations, and the preview looks good on the i18n staging environment, we'll add it to our production site.
Theme translation fallback
The classic theme also ships with some default translation bundles for theme labels, like "next" / "previous" pagination buttons... Please help us provide default theme label translations for your own language/locale.
You can just copy this file, localize the messages and send a PR:
https://github.com/facebook/docusaurus/blob/master/packages/docusaurus-theme-classic/codeTranslations/fr.jsonThanks for your help 😃
要約すると,まず翻訳に取り組むべきは以下のフォルダ配下のファイルです.
website/i18n/enwebsite/communitywebsite/docs
上述したように,ドキュメントがいくら翻訳されていても,それが承認: Approved されなければ意味がありません.しかし,よほどダイバーシティに富んだグローバル開発チームでもない限りレビュワーを確保するのは難しいし,そのようなチームであれば自前で翻訳を用意することが出来るでしょう.
そこで,非母語話者である開発チームの管理者が翻訳を承認するために参考とする材料が用意されています.それが Upvote です.

例えばこの画面では,すでにいくつかの和文翻訳が存在しています.右側真ん中すぐ下辺りをみると,誰かの提案した翻訳内容が表示されています.このすぐ隣りにある「+と-」こそが Upvote / Downvote です.
もしこの先人の翻訳がよさそうと感じたのであれば,それはぜひ + を押して Upvote すべきです.あなたが母語話者の一人としてそれを読み,自然に内容を理解できたということを示しておけば,それが積もり積もって「多数の匿名レビュワーの査読を経た」ことの証明になります.外国語をイチから母語に翻訳するのはなかなか難しいかと思いますが,まずはこの査読タスクに参加することから始めてみてください.
そして次に目指すべき段階は,Docusaurus の i18n 担当者から次のように示されています.
翻訳された分量の割合について,最低限度の閾値として以下の数値に達することをお願いしています.
- website/i18n/en > 90%
- website/community > 40%
- website/docs > 20%
ロケールに十分な翻訳があり,i18n のステージング環境でプレビューが良く見えるようになったら,本番環境のサイトに追加します.
website/docs は移り変わりが比較的早く,かつ分量も多いため低めのハードルが設定されています.しかし,真に翻訳するべきはここに配置されているファイルです.皆様のご参加をお待ちしています.
他の二つについては比較的分量が少なく,すでに私一人でもすべて翻訳出来る程度のものでした.こちらもぜひ皆様のレビューをお待ちしています.
ここまでこの記事を読んで「Docusaurus 面白そう!」とか「革新的だしウチでもつかいたい!」という方が増えてくれたら嬉しい限りです.そして使い方を覚える段階で公式ドキュメントを読む機会が多くなるかと思いますが,その際にお手元の翻訳をぜひわずかでもこの Crowdin での翻訳プロジェクトに供与していただけたら幸いです.
Future Work
- 既存プロジェクトへの組み込み方;そのチュートリアル
- TypeScript と共存するためのアプローチ
-
.tsx形式のページの作り方 - MDX で typescript を使えるのか
-
- スタイリングのチュートリアル
- プラグインの導入のチュートリアル
- テーマの利用方法
- ヴァージョン管理の方法
- 個別プロジェクトにおける i18n; 国際化の設定方法
Reference
Github
Docusaurus
- Installation | Docusaurus
- Routing | Creating Pages | Docusaurus
docusaurus.config.jssettings | Deployment | Docusaurus- Triggering deployment with GitHub Actions | Deployment | Docusaurus
- Sidebar | Docusaurus
- Using Algolia DocSearch | Search | Docusaurus
- What goes into a
docusaurus.config.js? | Configuration | Docusaurus - API | docusaurus.config.js | Docusaurus
- i18n | Docusaurus
- docusaurus/packages/docusaurus-init/templates at master · facebook/docusaurus
Others
- i18n - Wikipedia
- Localization Management Platform for agile teams | Crowdin
- Docusaurus v2 translations in Crowdin
- Installing and Updating | nvm-sh/nvm: Node Version Manager - POSIX-compliant bash script to manage multiple active node.js versions
- Introduction | Yarn - Package Manager
- npm/npx: npm package executor | GitHub
Discussion
凄い面白そうです!!
やってみます!!😆