cdktfでTiDB Clusterを作成してみる
cdktf=>TiDB
cdktfを触る機会を探しており、折角なのでAWSでないサービスをと思い、最近一番好きで勉強しているTiDBのClusterを作成してみる事にしました。
やってみます。
cdktfをinstall
$ npm install --global cdktf-cli@latest

added 506 packages in 34s

101 packages are looking for funding
  run `npm fund` for details
typescriptを指定しinit
以前「cdktfというくらいだからHCLで書くんだろうな」と思っていましたが、確認してみるとTypescriptを含めたいくつかの言語で記述可能との事です。
$ mkdir cdktfTiDB && cd cdktfTiDB && cdktf init --template=typescript --providers=hashicorp/aws
Welcome to CDK for Terraform!

By default, cdktf allows you to manage the state of your stacks using Terraform Cloud for free.
cdktf will request an API token for app.terraform.io using your browser.

If login is successful, cdktf will store the token in plain text in
the following file for use by subsequent Terraform commands:
    /Users/hoge/.terraform.d/credentials.tfrc.json

Note: The local storage mode isn't recommended for storing the state of your stacks.

? Do you want to continue with Terraform Cloud remote state management? no
? Project Name cdktfTiDB
? Project Description This is a test to create a TiDB resource with cdktf.
? Do you want to start from an existing Terraform project? no
? Do you want to send crash reports to the CDKTF team? Refer to https://developer.hashicorp.com/ter
raform/cdktf/create-and-deploy/configuration-file#enable-crash-reporting-for-the-cli for more
information no
結果は長いので畳んでいます。
added 2 packages, and audited 57 packages in 2s

7 packages are looking for funding
  run `npm fund` for details

found 0 vulnerabilities

added 314 packages, and audited 371 packages in 27s

38 packages are looking for funding
  run `npm fund` for details

found 0 vulnerabilities
========================================================================================================

  Your CDKTF TypeScript project is ready!

  cat help                Print this message

  Compile:
    npm run get           Import/update Terraform providers and modules (you should check-in this directory)
    npm run compile       Compile typescript code to javascript (or "npm run watch")
    npm run watch         Watch for changes and compile typescript in the background
    npm run build         Compile typescript

  Synthesize:
    cdktf synth [stack]   Synthesize Terraform resources from stacks to cdktf.out/ (ready for 'terraform apply')

  Diff:
    cdktf diff [stack]    Perform a diff (terraform plan) for the given stack

  Deploy:
    cdktf deploy [stack]  Deploy the given stack

  Destroy:
    cdktf destroy [stack] Destroy the stack

  Test:
    npm run test        Runs unit tests (edit __tests__/main-test.ts to add your own tests)
    npm run test:watch  Watches the tests and reruns them on change

  Upgrades:
    npm run upgrade        Upgrade cdktf modules to latest version
    npm run upgrade:next   Upgrade cdktf modules to latest "@next" version (last commit)

 Use Providers:

  You can add prebuilt providers (if available) or locally generated ones using the add command:

  cdktf provider add "aws@~>3.0" null kreuzwerker/docker

  You can find all prebuilt providers on npm: https://www.npmjs.com/search?q=keywords:cdktf
  You can also install these providers directly through npm:

  npm install @cdktf/provider-aws
  npm install @cdktf/provider-google
  npm install @cdktf/provider-azurerm
  npm install @cdktf/provider-docker
  npm install @cdktf/provider-github
  npm install @cdktf/provider-null

  You can also build any module or provider locally. Learn more https://cdk.tf/modules-and-providers

========================================================================================================

[2023-12-24T09:37:26.639] [INFO] default - Checking whether pre-built provider exists for the following constraints:
  provider: aws
  version : latest
  language: typescript
  cdktf   : 0.19.2

[2023-12-24T09:37:29.580] [INFO] default - Found pre-built provider.
Adding package @cdktf/provider-aws @ 18.2.0
[2023-12-24T09:37:29.584] [INFO] default - Installing package @cdktf/provider-aws @ 18.2.0 using npm.
[2023-12-24T09:37:43.157] [INFO] default - Package installed.
initが完了しました。

provider addを行う
$ cdktf provider add "tidbcloud/tidbcloud"
[2023-12-24T10:00:03.442] [INFO] default - Checking whether pre-built provider exists for the following constraints:
  provider: tidbcloud/tidbcloud
  version : latest
  language: typescript
  cdktf   : 0.19.2

[2023-12-24T10:00:04.107] [INFO] default - Pre-built provider does not exist for the given constraints.
[2023-12-24T10:00:04.107] [INFO] default - Adding local provider registry.terraform.io/tidbcloud/tidbcloud with version constraint undefined to cdktf.json
Local providers have been updated. Running cdktf get to update...
Generated typescript constructs in the output directory: .gen
↓
cdktf.jsonを確認してみるとterraformProvidersにtidbcloud/tidbcloud@~> 0.2が追加されていました。
{
  "language": "typescript",
  "app": "npx ts-node main.ts",
  "projectId": "xxxxxxxx-xxxx-xxxx-xxxx-xxxxxxxxxxx",
  "sendCrashReports": "false",
  "terraformProviders": [
    "tidbcloud/tidbcloud@~> 0.2"
  ],
  "terraformModules": [],
  "context": {}
}
↓
.gen/providers 以下にも反映されているのが確認出来ました。

上画像では解消されていますが、lazy-index.tsというファイルで赤文字エラーが発生していました。
↓
// generated by cdktf get
Object.defineProperty(exports, 'backup', { get: function () { return require('./backup'); } });
Object.defineProperty(exports, 'cluster', { get: function () { return require('./cluster'); } });
Object.defineProperty(exports, 'import', { get: function () { return require('./import'); } });
Object.defineProperty(exports, 'restore', { get: function () { return require('./restore'); } });
Object.defineProperty(exports, 'dataTidbcloudBackups', { get: function () { return require('./data-tidbcloud-backups'); } });
Object.defineProperty(exports, 'dataTidbcloudClusterSpecs', { get: function () { return require('./data-tidbcloud-cluster-specs'); } });
Object.defineProperty(exports, 'dataTidbcloudClusters', { get: function () { return require('./data-tidbcloud-clusters'); } });
Object.defineProperty(exports, 'dataTidbcloudProjects', { get: function () { return require('./data-tidbcloud-projects'); } });
Object.defineProperty(exports, 'dataTidbcloudRestores', { get: function () { return require('./data-tidbcloud-restores'); } });
Object.defineProperty(exports, 'provider', { get: function () { return require('./provider'); } });
↓
マウスオンすると「npm i --save-dev @types/nodeを試してください。」と表示された為、素直に実行します。
$ npm i --save-dev @types/node

added 314 packages, and audited 372 packages in 2s

38 packages are looking for funding
  run `npm fund` for details

found 0 vulnerabilities
↓
解消されました。
AWS Secrets ManagerにTiDBのAPI Key等を保存
cdktfの機密情報の扱いについては私も完全に理解しておりませんので、これからする事はそんな面倒な事しないで良いなのかもしれません。
私の頭の中の方針では、
①機密情報はAWS Secrets Managerに手動で保存。
②cdktfではTerraformVariableを利用してdeploy時に値を渡す。
③deployコマンドを叩く際に渡す環境変数の値にAWS Secrets Managerから取得した各値利用。
④deploy・destroyは.shファイルの実行で行う。
とします。(後で見た時に「この時何やってんだろう」と思いそうな気がすごくしますが、cdktf初日の私のベストですので生暖かい目でご覧ください。)
API Keyの作成についてはこちらをご覧ください。(projectIdもコンソールを見れば見つかると思います。今回rootPasswordはお好きな文字列で大丈夫です。)
↓
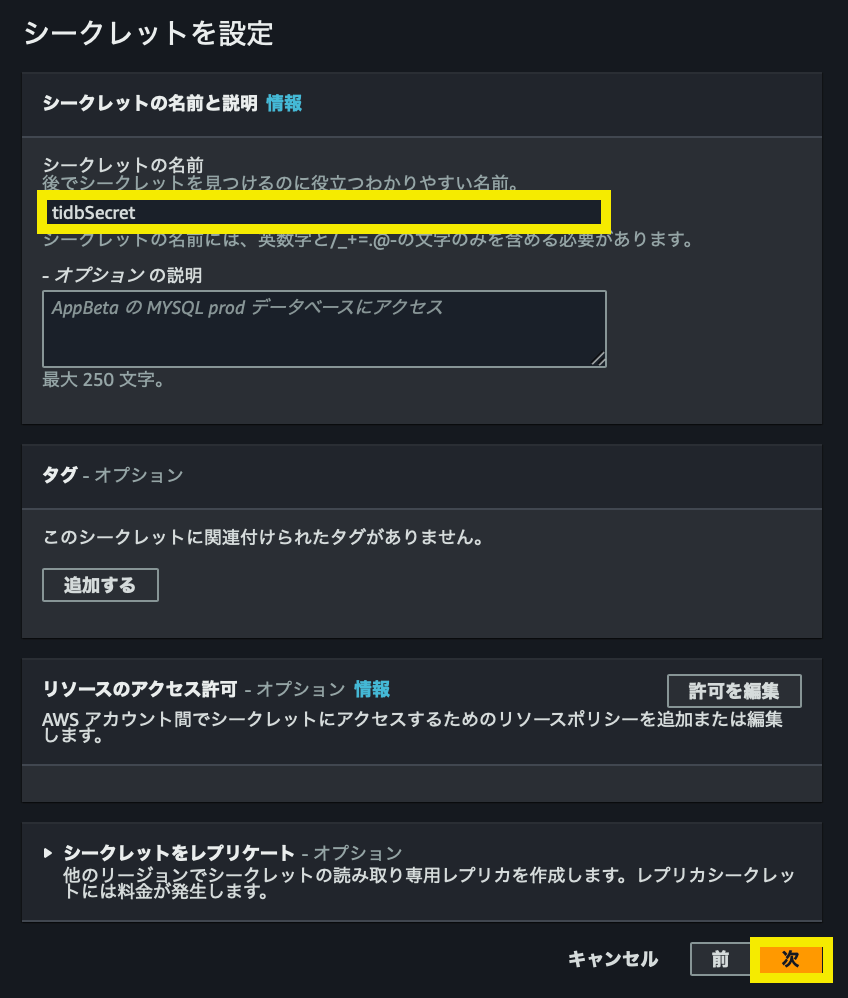
Secrets Managerコンソールにアクセス→「新しいシークレットを作成する」を押下。

↓
それぞれの値を以下のように用意し「次」

↓
任意の名前をつけて「次」
↓
「次」→「次」→「保存」で完了です。
main.tsを書いてみる
import { Construct } from 'constructs';
import { App, TerraformStack } from 'cdktf';
import { TerraformVariable } from 'cdktf'
import { prodParameter } from './parameter'
import * as tidb from './.gen/providers/tidbcloud';

class MyStack extends TerraformStack {
  constructor(scope: Construct, id: string) {
  super(scope, id);
  //-------------------------------------------------------//
  // 以下4項目についてDeploy実行時に環境変数を渡す形にする。
  const publicKey = new TerraformVariable (this, 'publicKey', {type : 'string', sensitive : true});
  const privateKey = new TerraformVariable (this, 'privateKey', {type : 'string', sensitive : true});
  const projectId = new TerraformVariable (this, 'projectId', {type : 'string', sensitive : true});
  const rootPassword = new TerraformVariable (this, 'rootPassword', {type : 'string', sensitive : true});
  //-------------------------------------------------------//
  // API Keyを環境変数を介して渡す。
  new tidb.provider.TidbcloudProvider(this, 'tidbcloudProvider', {
    publicKey: publicKey.value,
    privateKey: privateKey.value,
  });
  //-------------------------------------------------------//
    // Clusterを作成する。(regionはparameter.tsを作成しそこに収めた値を参照)
  new tidb.cluster.Cluster(this, 'tidbCluster', {
    projectId: projectId.value,
    name : 'MyCluster',
    clusterType : 'DEDICATED',
    cloudProvider : 'AWS',
    region : prodParameter.region,
    config : {
      rootPassword :rootPassword.value,
      port : 4000,
      components : {
        tidb : {
          nodeSize : '8C16G',
          nodeQuantity : 1,
        },
        tikv: {
          nodeSize : '8C32G',
          storageSizeGib : 500,
          nodeQuantity : 3,
        }
      }
    },
  });
  //-------------------------------------------------------//
  }
}
const app = new App();
new MyStack(app, 'cdktfTiDB');
app.synth();
↓
synthしてみる。
$ cdktf synth

Generated Terraform code for the stacks: cdktfTiDB
↓
cdktf.jsonを確認。(長いので畳んでいます。)
{
  "//": {
    "metadata": {
      "backend": "local",
      "stackName": "cdktfTiDB",
      "version": "0.19.2"
    },
    "outputs": {
    }
  },
  "provider": {
    "tidbcloud": [
      {
        "private_key": "${var.privateKey}",
        "public_key": "${var.publicKey}"
      }
    ]
  },
  "resource": {
    "tidbcloud_cluster": {
      "tidbCluster": {
        "//": {
          "metadata": {
            "path": "cdktfTiDB/tidbCluster",
            "uniqueId": "tidbCluster"
          }
        },
        "cloud_provider": "AWS",
        "cluster_type": "DEDICATED",
        "config": {
          "components": {
            "tidb": {
              "node_quantity": 1,
              "node_size": "8C16G"
            },
            "tikv": {
              "node_quantity": 3,
              "node_size": "8C32G",
              "storage_size_gib": 500
            }
          },
          "port": 4000,
          "root_password": "${var.rootPassword}"
        },
        "name": "MyCluster",
        "project_id": "${var.projectId}",
        "region": "us-east-1"
      }
    }
  },
  "terraform": {
    "backend": {
      "local": {
        "path": "/Users/hoge/cdktfTiDB/terraform.cdktfTiDB.tfstate"
      }
    },
    "required_providers": {
      "tidbcloud": {
        "source": "tidbcloud/tidbcloud",
        "version": "0.2.2"
      }
    }
  },
  "variable": {
    "privateKey": {
      "sensitive": true,
      "type": "string"
    },
    "projectId": {
      "sensitive": true,
      "type": "string"
    },
    "publicKey": {
      "sensitive": true,
      "type": "string"
    },
    "rootPassword": {
      "sensitive": true,
      "type": "string"
    }
  }
}
今回はdeploy・destroyを.shファイルを作成して行う
cdktfTiDB 直下にshファイルを2つ作成します。
※シェルはもっといい書き方があると思いますが一旦動いたものです。適宜書き換えてご利用下さい。
#!/bin/bash
region=us-east-1  # 選択リージョンに適宜書き換えてください。
secrets=`aws secretsmanager get-secret-value --region ${region} --secret-id tidbSecret | jq '.SecretString'| tr -d '{}" \\' `
secret=(${secrets//,/ })
i=0
while [[ $i -lt 3 ]]
do
    arr+=(`echo ${secret[i]} | awk '{print substr($0,index($0,":")+1)}'`)
    i=`expr $i + 1`
done
TF_VAR_publicKey=`echo ${arr[0]}` TF_VAR_privateKey=`echo ${arr[1]}` TF_VAR_projectId=`echo ${arr[2]}` TF_VAR_rootPassword=`echo ${arr[3]}` cdktf deploy
#!/bin/bash
region=us-east-1  # 選択リージョンに適宜書き換えてください。
secrets=`aws secretsmanager get-secret-value --region ${region} --secret-id tidbSecret | jq '.SecretString'| tr -d '{}" \\' `
secret=(${secrets//,/ })
i=0
while [[ $i -lt 3 ]]
do
    arr+=(`echo ${secret[i]} | awk '{print substr($0,index($0,":")+1)}'`)
    i=`expr $i + 1`
done
TF_VAR_publicKey=`echo ${arr[0]}` TF_VAR_privateKey=`echo ${arr[1]}` TF_VAR_projectId=`echo ${arr[2]}` TF_VAR_rootPassword=`echo ${arr[3]}` cdktf destroy
↓
問題なければApproveしてあげてください。
$ bash deploy.sh

#(中略)
Apply complete! Resources: 1 added, 0 changed, 0 destroyed.

No outputs found.
↓
作成が開始されました。

↓
確認が出来たら削除します。
(Dedicatedは作成が完了するまでそこそこの時間(数十分)要しますので、完成まで待たずに削除してもOKです。)
$ bash destroy.sh
以上でした
AWSとのコネクション等についてはまた、次回以降に頑張りたいと思います。
有難うございました。
Discussion