新しいMacBookのセットアップ
先週MacBookAirのM3モデルが発表されて、勢いで買ってしまいました。
普段は行き当たりばったりで必要なアプリをインストールする感じでセットアップしているのですが、もう少しスマートにセットアップしたいので、整理しながらセットアップしようと思います。
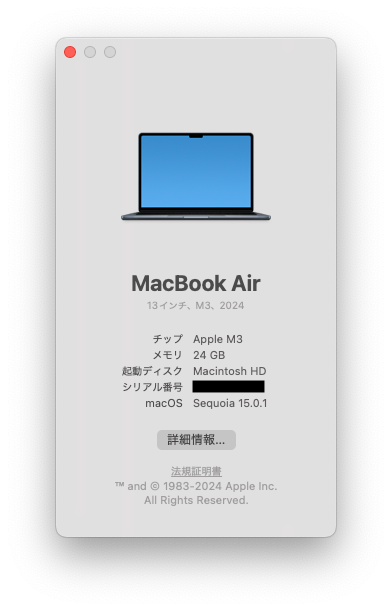
スクリーンショットの見た目等が変わると思うのでOSVersion等貼っておきます。
MacBookAirのスペック
また、この記事で紹介されていないアプリでおすすめなものやおすすめ設定があればコメントしていただけると喜びます!
OS設定
トラックパッド
まず一番最初にやりたいのはOS設定からトラックパッドを選択して軌跡の速さを最速にします。
これをしておくとこの後の作業も早くなるのでまずはこれ。

Dockの整理
MacにはDockというよく使うアプリや起動中のアプリが表示される領域が存在します。
個人的には1軍のアプリしかDockに置いておきたくないのであまり使わないアプリはDockから削除します。これは他の1軍アプリをインストールした後にやった方が良さそうです。
最終的にはこんな感じになりました。

Finderの設定変更 (2024/03/17追記)
Finderのサイドバーにある項目は変更できます。特に初期設定だとホームディレクトリがサイドバーに表示されていないため、私はホームディレクトリをサイドバーから開けるように追加しています。
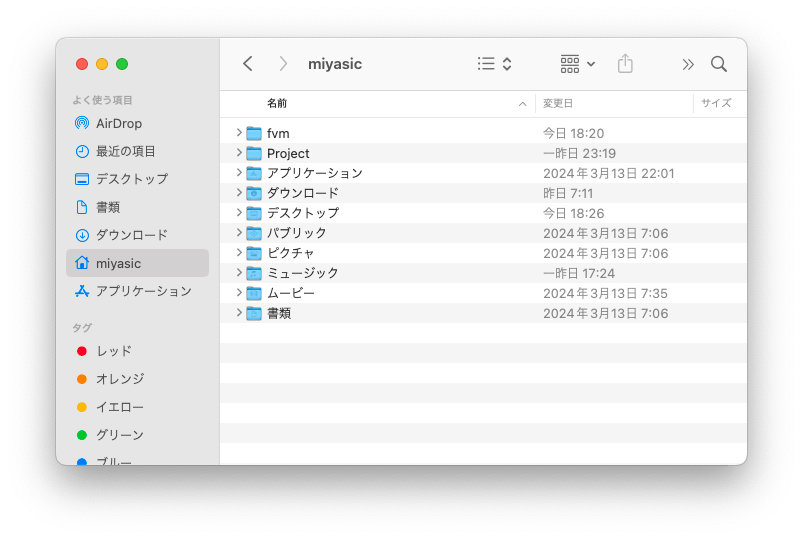
Finderを開いて メニュー->設定->サイドバーから好きな項目を追加したり削除したりできます。
日本語入力時の数字の設定変更
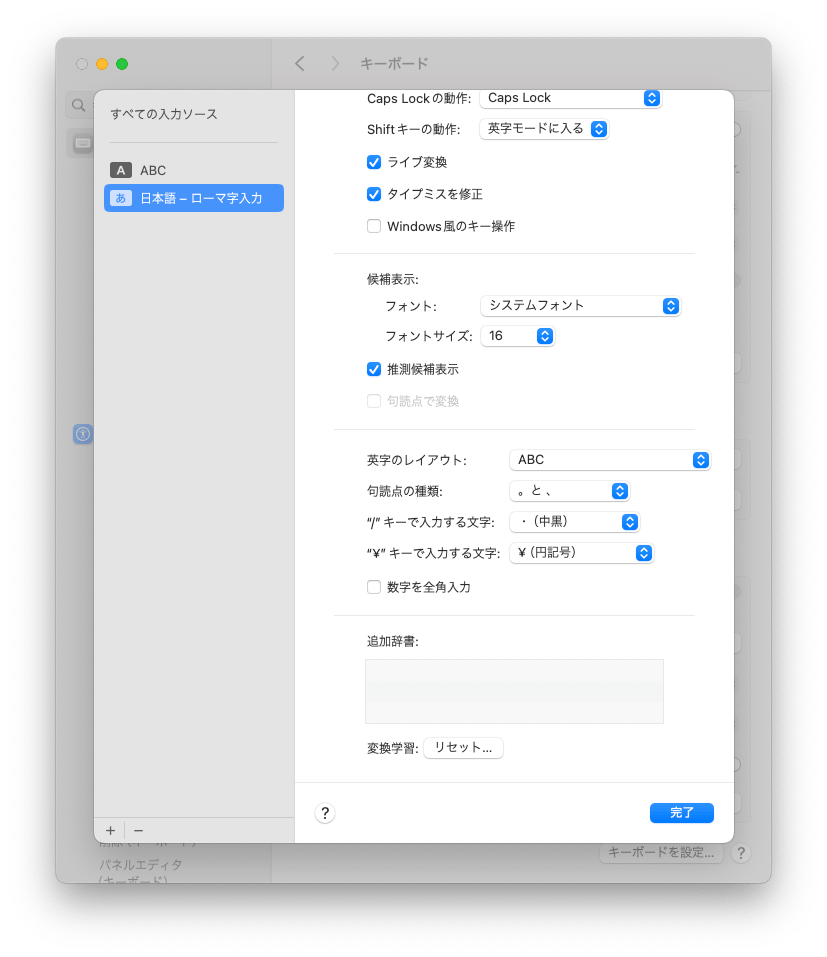
日本語入力状態で数字を入力するとデフォルトだと全角数字が出てきます。基本的には半角数字を利用したいので、設定を変更しておきます。画像の下の方にある「数字を全角入力」のチェックを外します。
数字の半角設定
設定メニュー -> キーボード -> 入力ソース -> 日本語 - ローマ字入力
キーボードのキー変更(2024年3月20日追記)
今までAppleの純正のキーボードを利用していましたが、この度Logicool製のキーボードを導入しました。
一部キー変更をした方が楽そうなのでキーの変更をしておきます。
今回はcapslockをctrlにctrlを地球儀キーに割り当てました。
キーボード->キーボードショートカット->修飾キーから変更できます。
アプリケーションのインストール
この世の中には2種類のアプリケーションがあります。
「Homebrewでインストールできるか、それ以外か。」
Homebrewでインストールする
かなり多くのアプリケーションがHomebrewでインストールできるので、原則Homebrew経由でインストールすることで、あれこれってどうやってインストールしたんだっけ?どこからアプデすればいいんだみたいなことを減らします。
Homebrew自体のインストール
まずはbrewコマンドのインストールからしましょう。
/bin/bash -c "$(curl -fsSL https://raw.githubusercontent.com/Homebrew/install/HEAD/install.sh)"
これだけだとbrewにパスが通っていないので下記のコマンドを叩きます。
(echo; echo 'eval "$(/opt/homebrew/bin/brew shellenv)"') >> /Users/miyasic/.zprofile
eval "$(/opt/homebrew/bin/brew shellenv)"
これでbrewコマンドが叩けるようになったかなと思います。
Applite
brew install applite
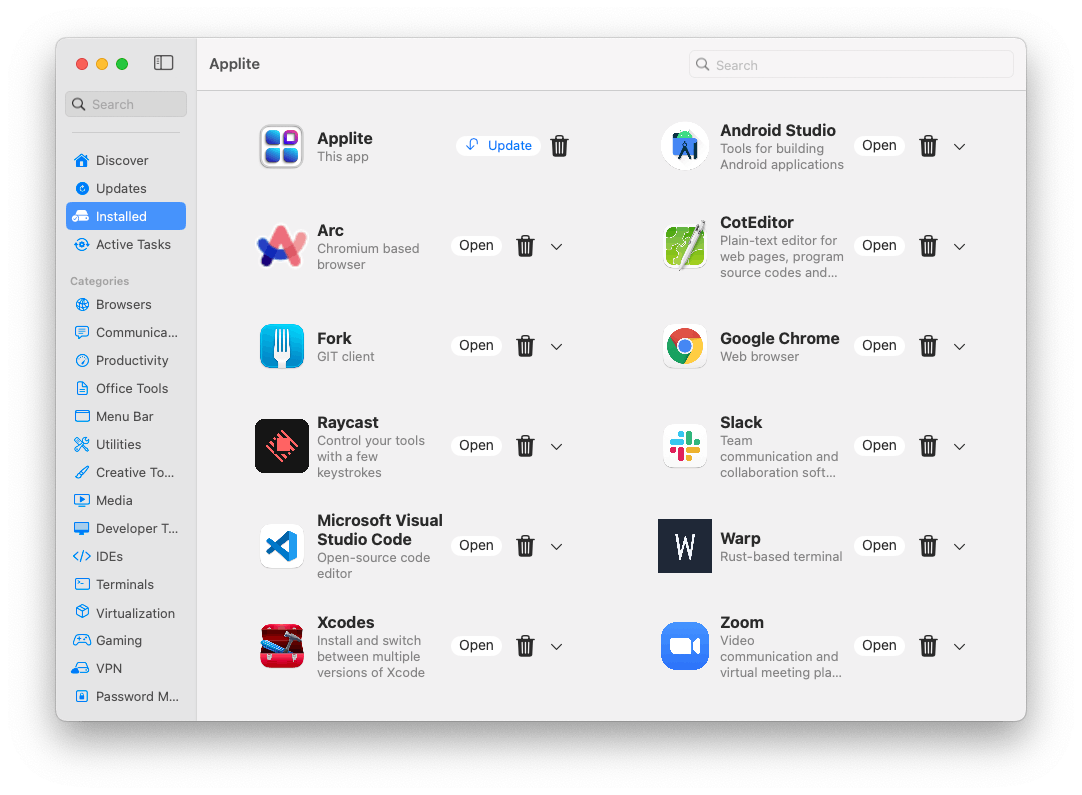
HomebrewでインストールできるアプリをGUIで(AppStoreLikeに)インストールできるアプリ。
カタログみたいに見れるので色々なアプリを見てみるのにおすすめ。
もちろんCUIからインストールしたものもこちらに反映されてアップデート状況など見れるっぽい。
(と言いつつ今回は全てCUIからインストールしました)
Google Chrome
brew install google-chrome
Googleアカウントでログインすることで他端末の設定がそのまま引き継がれるのでインストール後のセットアップは基本的に不要ですが、自分は次のショートカットだけ登録しています。
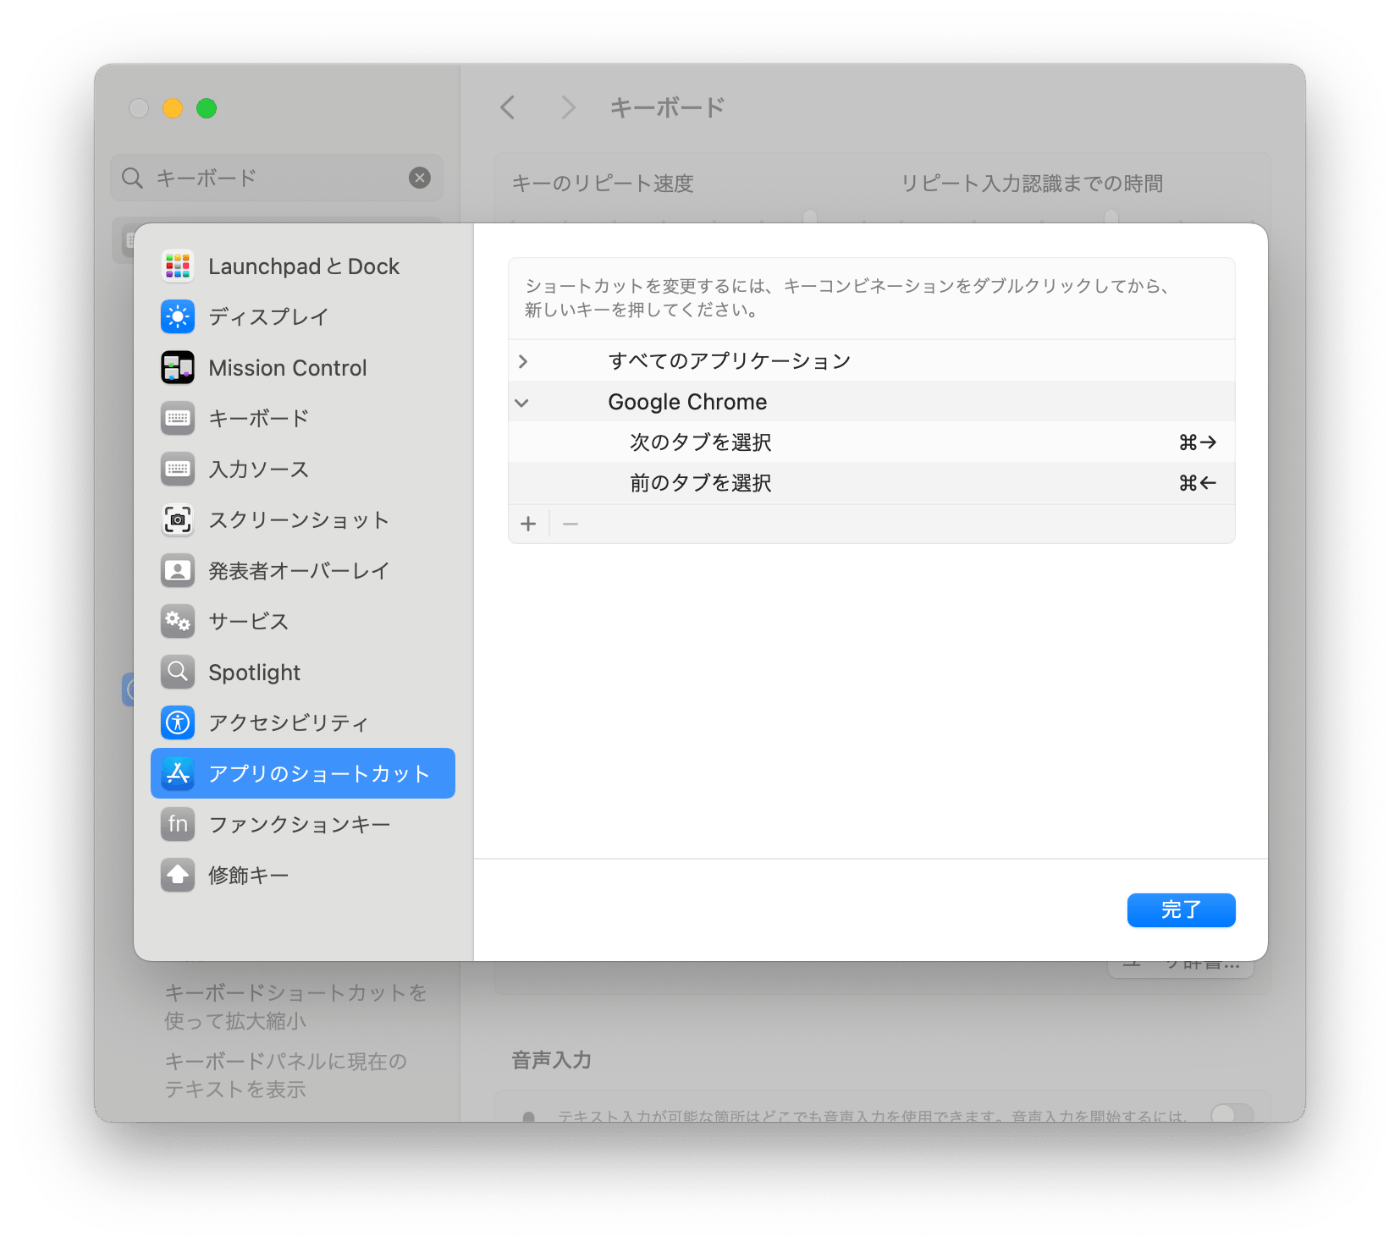
次or前のタブに移動するショートカットですが、デフォルトではoption+cmd+矢印になっていますが普段よく使うのでcmd+矢印に変更している感じです。
Arc
brew install arc
こちらはArcというブラウザです。タブを開きすぎないことを目的にしたChromeベースのブラウザです。Arcの方が使いやすい時とChromeの方が使いやすい時があるのでなんとなく使い分けてます。
Slack
brew install slack
ログインするとアプリに追加するWorkSpaceを選ぶことになるので必要なものだけピックアップして追加します。
環境設定のテーマから色を変更可能です。今回MoodIndigoを選びました。
Raycast
brew install raycast
こちらはSpotlight Lv100みたいなアプリです。
Spotlight検索に加えて、ClipyみたいなClipboard管理機能や画面分割機能などなんでもできます。
個人的にはSpotlightの代わりに使いたいのでcmd+Spaceで開けるように設定します。
まずOS設定からSpotlightのショートカットキーをオフにします。
Raycastを立ち上げた状態でcmd + ,をするとRaycastの設定画面が開くので、General -> Raycast Hotkeyを選択し、cmd + spaceを登録します。
Raycastには色々設定ができますが、この記事で触れるには膨大すぎるので他の方の記事を参考にお好み設定を探してみてください。
Warp
brew install warp
こちらはTerminal Lv100みたいなアプリです。
Raycastのaliasでterminalと登録しておくことで、いつもの癖で標準Terminalを開く代わりにWarpがサジェストされるのでおすすめです。
Zoom
brew install zoom
ビデオ通話アプリ。ブラウザでも動くけどよく使うのでアプリインストール。
CotEditor
brew install coteditor
軽量なエディタ。なぜかとても気に入ってて簡単なメモはこれを使っている。
開発に使うアプリなどのインストール
ここからは開発につかうアプリ系を入れていきます。
筆者はFlutterでのスマホアプリ開発をメインにしているエンジニアなので、スマホアプリメインの環境構築になること前提に読み進めてください。
最近Flutterでの開発はVSCodeとAndroidStudio行ったり来たりしているので両方用意しておきます。
VSCode
brew install visual-studio-code
万能エディタです。拡張機能をインストールすることで自分好みにカスタマイズできます。
自分はあまり拡張機能を知らないので、便利な拡張機能があったらコメントで教えて欲しいです!
私がインストールしたVSCodeの拡張機能一覧
miyasic@mac ~ % code --list-extensions
arjun.swagger-viewer
chflick.firecode
dart-code.dart-code
dart-code.flutter
dbaeumer.vscode-eslint
djbkwon.flutter-dependency-docs
eamodio.gitlens
github.copilot
github.copilot-chat
mathematic.vscode-pdf
ms-python.debugpy
ms-python.python
ms-python.vscode-pylance
redhat.vscode-yaml
streetsidesoftware.code-spell-checker
verygoodventures.dart-frog
yzane.markdown-pdf

AndroidStudio
brew install android-studio
Android開発のためのJetBrains製IDE
Xcodes
brew install --cask xcodes
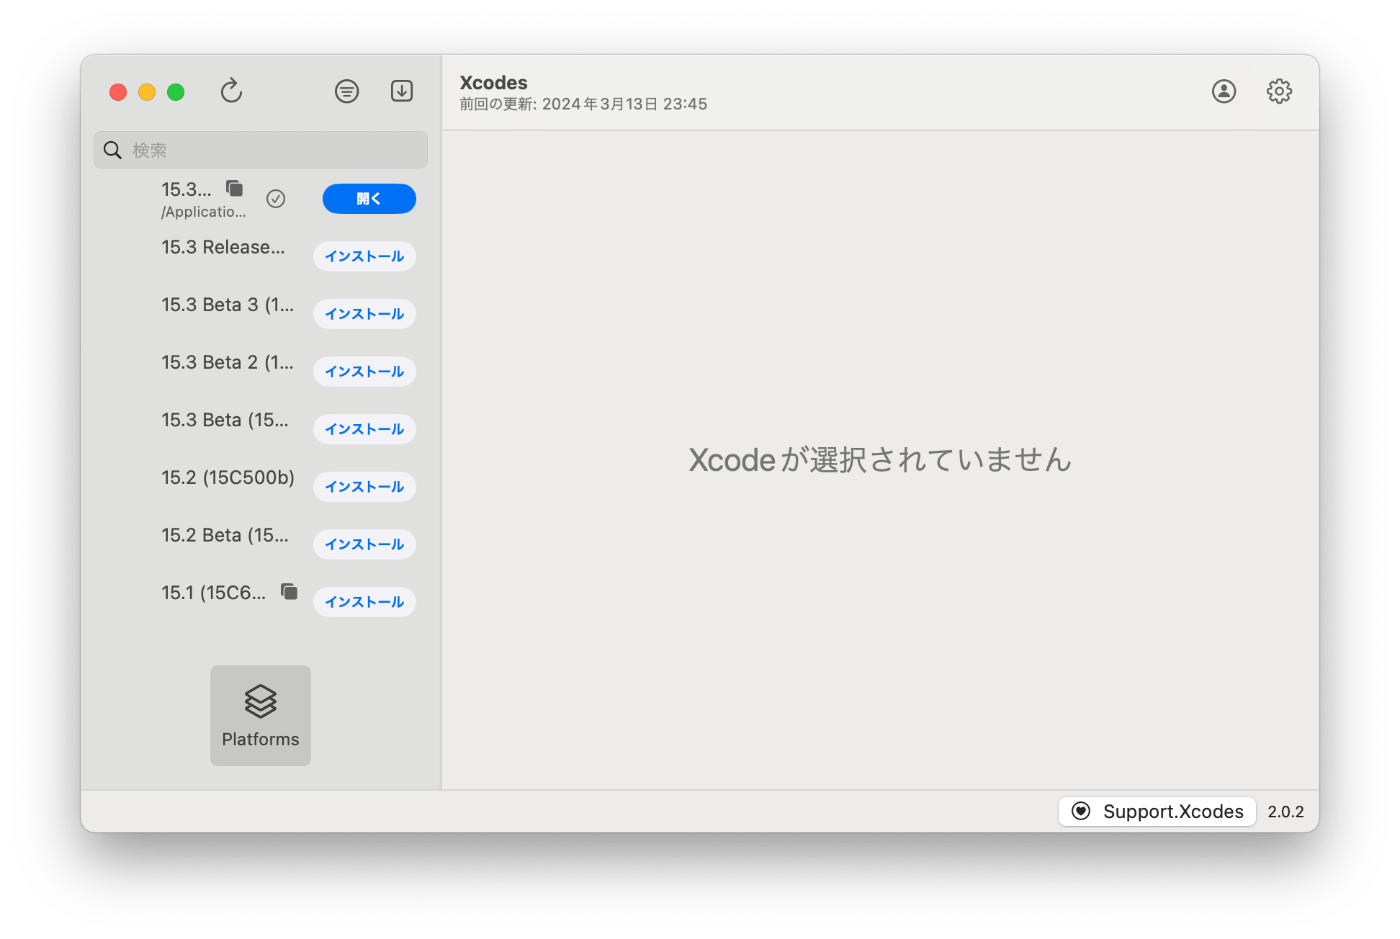
XcodeではなくXcodesです。複数VersionのXcodeをインストールして扱うことができるようになります。
installしたら、好きなXcodeのversionを選択してインストールします。
Fork
GUIのGit clientです。
以前はSourceTreeを使っていましたが、Forkの方がかなりサクサク使えるので乗り換えました。有料ですが買い切りなのも嬉しい。
brew install fork
Terraform (2024/07/10追記)
brew tap hashicorp/tap
brew install hashicorp/tap/terraform
Terraformはインフラの構築をコードで管理するやつです。(多分)
FVM
brew tap leoafarias/fvm
brew install fvm
FlutterVersionManagementです。以前はdart pub globalでインストールしていましたが、今回はHomebrewで入れてみます。
Flutterプロジェクトで利用する際はfvm use {利用したいVersion}でインストールと設定ができます。
Flutterプロジェクト以外でFlutterを利用する場合はfvm installとfvm globalで設定できます。
fvm install stable
fvm global
今回は現在stableのversion(現時点では3.19.3でした。)をglobalに設定しました。
dartとflutterをそのまま呼び出せるようにする。(2024/03/17追記)
fvmのdartとflutterのコマンドはfvm dartやfvm flutterで呼び出せますが、aliasを貼ってdartやflutterで呼び出せるようにしている人が多いと思います。
しかし、aliasを貼るだけだとdart pub globalでインストールしたアプリを実行する際にdartコマンドを見つけられず、失敗してしまいます。そのため今回はdartやflutterの実行ファイルのシンボリックリンクを適切に貼ることで対応しました。
今回/usr/local/binにシンボリックリンクを貼るのが良さそうだったので下記コマンドを叩きます。
sudo ln -s ~/fvm/default/bin/flutter /usr/local/bin/
sudo ln -s ~/fvm/default/bin/dart /usr/local/bin/
上記コマンドで/usr/local/binにシンボリックリンクが作成されます。また、fvm/defaultもシンボリックリンクであり、fvm globalでflutterのversionを変更するたびに変わるため、シンボリックリンクを貼り直す必要もありません。
DVM(x)
brew tap blendfactory/tap
brew install blendfactory/tap/dvm
DartVersionManagementです。Flutterでの開発であればFVMで事足りますがDartのCLIやサーバーサイドのプロジェクトを開発際に利用します。
DVMのglobalコマンドは未実装のようでissueが立てられていました。
Flutterのセットアップ
ここまで準備した状態でFlutter Doctorを叩いてみると、、、
flutter doctorの結果 Doctor found issues
miyasic@mac ~ % fvm flutter doctor
Doctor summary (to see all details, run flutter doctor -v):
[✓] Flutter (Channel stable, 3.19.3, on macOS 14.4 23E214 darwin-arm64, locale ja-JP)
[!] Android toolchain - develop for Android devices (Android SDK version 34.0.0)
    ✗ cmdline-tools component is missing
      Run `path/to/sdkmanager --install "cmdline-tools;latest"`
      See https://developer.android.com/studio/command-line for more details.
    ✗ Android license status unknown.
      Run `flutter doctor --android-licenses` to accept the SDK licenses.
      See https://flutter.dev/docs/get-started/install/macos#android-setup for more details.
[✗] Xcode - develop for iOS and macOS
    ✗ Xcode installation is incomplete; a full installation is necessary for iOS and macOS development.
      Download at: https://developer.apple.com/xcode/
      Or install Xcode via the App Store.
      Once installed, run:
        sudo xcode-select --switch /Applications/Xcode.app/Contents/Developer
        sudo xcodebuild -runFirstLaunch
    ✗ CocoaPods not installed.
        CocoaPods is used to retrieve the iOS and macOS platform side's plugin code that responds to your plugin usage on the Dart side.
        Without CocoaPods, plugins will not work on iOS or macOS.
        For more info, see https://flutter.dev/platform-plugins
      To install see https://guides.cocoapods.org/using/getting-started.html#installation for instructions.
[✓] Chrome - develop for the web
[✓] Android Studio (version 2023.2)
[✓] VS Code (version 1.87.2)
[✓] Connected device (2 available)
[✓] Network resources

! Doctor found issues in 2 categories.
4つほど問題が見つかりました。
cmdline-toolsが見つからない問題
こちらの記事で解決しました。
AndroidSDKのlicenseの同意
下記コマンドを叩くことでコマンドライン上で同意できました。
fvm flutter doctor --android-licenses
Xcode installation is incomplete; a full installation is necessary for iOS and macOS development.
先ほどXcodesからインストールしたXcodeは/Applications/Xcode-15.3.0.appにインストールされているので下記コマンドで解決しました。
適宜versionは読み替えてください。
sudo xcode-select --switch /Applications/Xcode-15.3.0.app/Contents/Developer
Unable to get list of installed Simulator runtimes.
上の対応をしたらSimulatorがインストールされていないというエラーも出ました。
こちらはXcodeを開いて、上部のSimlatorを選択する箇所にgetという表示があるのでそこからインストールできました。
CocoaPods not installed.
cocoapodsもbrewでインストールできます。
brew install cocoapods
flutter doctorでNo issues foundとなったらFlutterのセットアップは一旦終了です。
flutter doctorの結果 No issues found
miyasic@mac ~ % fvm flutter doctor
Doctor summary (to see all details, run flutter doctor -v):
[✓] Flutter (Channel stable, 3.19.3, on macOS 14.4 23E214 darwin-arm64, locale ja-JP)
[✓] Android toolchain - develop for Android devices (Android SDK version 34.0.0)
[✓] Xcode - develop for iOS and macOS (Xcode 15.3)
[✓] Chrome - develop for the web
[✓] Android Studio (version 2023.2)
[✓] VS Code (version 1.87.2)
[✓] Connected device (2 available)
[✓] Network resources

• No issues found!
Node (2024/03/16追記)
※ 結局Nodeはnvmを使ってインストールすることにしました。
brew install node
Zenn CLIを導入するのにNodeが必要だったのでインストールしました。
nvm (2024/04/13追記)
brew install nvm
Nodeもversion管理できた方が良くないと思ったので、インストールし直しました。
installするだけだと使えなかったので、インストール時のログに従ってnvmディレクトリの作成と.zshrcへの記述を追加することで利用できるようになりました。
brew installした際のログ
You should create NVM's working directory if it doesn't exist:
  mkdir ~/.nvm

Add the following to your shell profile e.g. ~/.profile or ~/.zshrc:
  export NVM_DIR="$HOME/.nvm"
  [ -s "/opt/homebrew/opt/nvm/nvm.sh" ] && \. "/opt/homebrew/opt/nvm/nvm.sh"  # This loads nvm
  [ -s "/opt/homebrew/opt/nvm/etc/bash_completion.d/nvm" ] && \. "/opt/homebrew/opt/nvm/etc/bash_completion.d/nvm"  # This loads nvm bash_completion

You can set $NVM_DIR to any location, but leaving it unchanged from
/opt/homebrew/Cellar/nvm/0.39.7 will destroy any nvm-installed Node installations
upon upgrade/reinstall.
下記のコマンドでNodeをインストールしました。
nvm install --lts
ffmpeg(2024/03/20追記)
brew install ffmpeg
動画処理ができるCLIツール。簡単に動画をGifに変換したりできるのでインストールした。
例えば下記コマンドで一発でGifに変換できる
ffmpeg -i ~/Desktop/movie.mov -r 30 ~/Desktop/movie.gif
Rive(2024/03/20追記)
brew install rive
インタラクティブなアニメーションを簡単に実現できるRiveのエディタ
Flutterでも利用でき、便利そうなのでインストール
lcov(2024/03/20追記s)
brew install lcov
テストのカバレッジを可視化する際に利用する。
yabaiとskhd(2024/03/23 追記)
brew install koekeishiya/formulae/yabai
brew install skhd
yabaiはタイル形式のウィンドウマネジメントツールで、skhdはショートカットキーをyabaiに割り当てるツールです。
これらを使いこなすことで、Macの少し足りていないWindow操作を補ってくれます。
筆者はこの記事を実現したくて導入しましたが、とても便利に感じています。
JankyBorders(2024/03/23追記)
brew tap FelixKratz/formulae
brew install borders
こちらはフォーカスが当たっているWindowの枠に色をつけることができるツールです。yabaiの機能で、マウスのポインタ直下のWindowにフォーカスを切り替える機能がありそれと組み合わせることで、フォーカス切り替えが楽になり、さらに今フォーカスが当たっているWindowが一目でわかるようになります。
Docker
brew install --cask docker
バックエンドの開発する際に環境差異をなくすために使うDocker。
Brew以外でインストールするアプリ
LINE(2024/03/17追記)
特に昔からの友人とビデオ通話をするときなどはLINEをPCで触りたくなることが多いのでインストールしました。
インストールはAppStoreから行いました。
LOGI OPTIONS+(2024/03/20追記)
logicool製のキーボードやマウスなどを便利に扱うアプリケーション
下記のチュートリアルを進めていってインストールした。
Firebase CLI
Firebaseのプロジェクトの管理やデプロイ、エミュレータの起動などができるツールです。
npmを利用してインストールします。
npm install -g firebase-tools
FirebaseCLIのコマンド
できること多すぎ😂
firebase
Usage: firebase [options] [command]
Options:
-V, --version output the version number
-P, --project <alias_or_project_id> the Firebase project to use for this command
--account <email> the Google account to use for authorization
-j, --json output JSON instead of text, also triggers non-interactive mode
--token <token> DEPRECATED - will be removed in a future major version - supply an
auth token for this command
--non-interactive error out of the command instead of waiting for prompts
-i, --interactive force prompts to be displayed
--debug print verbose debug output and keep a debug log file
-c, --config <path> path to the firebase.json file to use for configuration
-h, --help output usage information
Commands:
appdistribution:distribute [options] <release-binary-file> upload a release binary
appdistribution:testers:add [options] [emails...] add testers to project (and possibly group)
appdistribution:testers:remove [options] [emails...] remove testers from a project (or group)
appdistribution:group:create <displayName> [alias] create group in project
appdistribution:group:delete <alias> delete group from a project
apps:create [options] [platform] [displayName] create a new Firebase app. [platform] can be IOS, ANDROID or WEB
(case insensitive).
apps:list [platform] list the registered apps of a Firebase project. Optionally filter
apps by [platform]: IOS, ANDROID or WEB (case insensitive)
apps:sdkconfig [options] [platform] [appId] print the Google Services config of a Firebase app. [platform] can
be IOS, ANDROID or WEB (case insensitive)
apps:android:sha:list <appId> list the SHA certificate hashes for a given app id.
apps:android:sha:create <appId> <shaHash> add a SHA certificate hash for a given app id.
apps:android:sha:delete <appId> <shaId> delete a SHA certificate hash for a given app id.
auth:export [options] [dataFile] Export accounts from your Firebase project into a data file
auth:import [options] [dataFile] import users into your Firebase project from a data file(.csv or
.json)
crashlytics:symbols:upload [options] <symbolFiles...> upload symbols for native code, to symbolicate stack traces
crashlytics:mappingfile:generateid [options] generate a mapping file id and write it to an Android resource
file, which will be built into the app
crashlytics:mappingfile:upload [options] <mappingFile> upload a ProGuard/R8-compatible mapping file to deobfuscate stack
traces
database:get [options] <path> fetch and print JSON data at the specified path
database:import [options] <path> [infile] non-atomically import the contents of a JSON file to the specified
path in Realtime Database
database:instances:create [options] <instanceName> create a realtime database instance
database:instances:list [options] list realtime database instances, optionally filtered by a
specified location
database:profile [options] profile the Realtime Database and generate a usage report
database:push [options] <path> [infile] add a new JSON object to a list of data in your Firebase
database:remove [options] <path> remove data from your Firebase at the specified path
database:set [options] <path> [infile] store JSON data at the specified path via STDIN, arg, or file
database:settings:get [options] <path> read the realtime database setting at path
database:settings:set [options] <path> <value> set the realtime database setting at path.
database:update [options] <path> [infile] update some of the keys for the defined path in your Firebase
deploy [options] deploy code and assets to your Firebase project
emulators:exec [options] <script> start the local Firebase emulators, run a test script, then shut
down the emulators
emulators:export [options] <path> export data from running emulators
emulators:start [options] start the local Firebase emulators
experimental:functions:shell [options] launch full Node shell with emulated functions. (Alias for
`firebase functions:shell.)
experiments:list list all experiments, along with a description of each experiment
and whether it is currently enabled
experiments:describe <experiment> describe what an experiment does when enabled
experiments:enable <experiment> enable an experiment on this machine
experiments:disable <experiment> disable an experiment on this machine
ext display information on how to use ext commands and extensions
installed to your project
ext:configure [options] <extensionInstanceId> configure an existing extension instance
ext:info [options] <extensionName> display information about an extension by name (extensionName@x.y.z
for a specific version)
ext:export [options] export all Extension instances installed on a project to a local
Firebase directory
ext:install [options] [extensionRef] add an uploaded extension to firebase.json if
[publisherId/extensionId] is provided;or, add a local extension if
[localPath] is provided
ext:list list all the extensions that are installed in your Firebase project
ext:uninstall [options] <extensionInstanceId> uninstall an extension that is installed in your Firebase project
by instance ID
ext:update [options] <extensionInstanceId> [updateSource] update an existing extension instance to the latest version, or to
a specific version if provided
ext:dev:init initialize files for writing an extension in the current directory
ext:dev:list <publisherId> list all extensions uploaded under publisher ID
ext:dev:register register a publisher ID; run this before publishing your first
extension.
ext:dev:deprecate [options] <extensionRef> [versionPredicate] deprecate extension versions that match the version predicate
ext:dev:undeprecate <extensionRef> <versionPredicate> undeprecate extension versions that match the version predicate
ext:dev:upload [options] <extensionRef> upload a new version of an extension
ext:dev:usage <publisherId> get usage for an extension
firestore:delete [options] [path] Delete data from Cloud Firestore.
firestore:indexes [options] List indexes in your project's Cloud Firestore database.
firestore:locations List possible locations for your Cloud Firestore project.
firestore:databases:list List databases in your Cloud Firestore project.
firestore:databases:get [database] Get database in your Cloud Firestore project.
firestore:databases:create [options] <database> Create a database in your Firebase project.
firestore:databases:update [options] <database> Update a database in your Firebase project. Must specify at least
one property to update.
firestore:databases:delete [options] <database> Delete a database in your Cloud Firestore project. Database delete
protection state must be disabled. To do so, use the update command:
firebase firestore:databases:update <database> --delete-protection
DISABLED
firestore:databases:restore [options] Restore a Firestore database in your Firebase project.
firestore:backups:list [options] List all Cloud Firestore backups in a given location
firestore:backups:get <backup> Get a Cloud Firestore database backup.
firestore:backups:delete [options] <backup> Delete a backup under your Cloud Firestore database.
firestore:backups:schedules:list [options] List backup schedules under your Cloud Firestore database.
firestore:backups:schedules:create [options] Create a backup schedule under your Cloud Firestore database.
firestore:backups:schedules:update [options] <backupSchedule> Update a backup schedule under your Cloud Firestore database.
firestore:backups:schedules:delete [options] <backupSchedule> Delete a backup schedule under your Cloud Firestore database.
functions:config:clone [options] clone environment config from another project
functions:config:export Export environment config as environment variables in dotenv format
functions:config:get [path] fetch environment config stored at the given path
functions:config:set [values...] set environment config with key=value syntax
functions:config:unset [keys...] unset environment config at the specified path(s)
functions:delete [options] [filters...] delete one or more Cloud Functions by name or group name.
functions:log [options] read logs from deployed functions
functions:shell [options] launch full Node shell with emulated functions
functions:list list all deployed functions in your Firebase project
functions:secrets:access <KEY>[@version> Access secret value given secret and its version. Defaults to
accessing the latest version.
functions:secrets:destroy [options] <KEY>[@version> Destroy a secret. Defaults to destroying the latest version.
functions:secrets:get <KEY> Get metadata for secret and its versions
functions:secrets:describe <KEY> Get metadata for secret and its versions. Alias for
functions:secrets:get to align with gcloud
functions:secrets:prune [options] Destroys unused secrets
functions:secrets:set [options] <KEY> Create or update a secret for use in Cloud Functions for Firebase.
help [command] display help information
hosting:channel:create [options] [channelId] create a Firebase Hosting channel
hosting:channel:delete [options] <channelId> delete a Firebase Hosting channel
hosting:channel:deploy [options] [channelId] deploy to a specific Firebase Hosting channel
hosting:channel:list [options] list all Firebase Hosting channels for your project
hosting:channel:open [options] [channelId] opens the URL for a Firebase Hosting channel
hosting:clone <source> <targetChannel> clone a version from one site to another
hosting:disable [options] stop serving web traffic to your Firebase Hosting site
hosting:sites:create [options] [siteId] create a Firebase Hosting site
hosting:sites:delete [options] <siteId> delete a Firebase Hosting site
hosting:sites:get <siteId> print info about a Firebase Hosting site
hosting:sites:list list Firebase Hosting sites
init [feature] Interactively configure the current directory as a Firebase project or initialize new features in an already configured Firebase project directory.
This command will create or update 'firebase.json' and '.firebaserc' configuration files in the current directory.
To initialize a specific Firebase feature, run 'firebase init [feature]'. Valid features are:
- database
- emulators
- extensions
- firestore
- functions
- hosting
- hosting:github
- remoteconfig
- storage
login [options] log the CLI into Firebase
login:add [options] [email] authorize the CLI for an additional account
login:ci [options] generate an access token for use in non-interactive environments
login:list list authorized CLI accounts
login:use <email> set the default account to use for this project directory or the
global default account if not in a Firebase project directory
logout [email] log the CLI out of Firebase
open [link] quickly open a browser to relevant project resources
projects:addfirebase [projectId] add Firebase resources to a Google Cloud Platform project
projects:create [options] [projectId] creates a new Google Cloud Platform project, then adds Firebase
resources to the project
projects:list list all Firebase projects you have access to
remoteconfig:get [options] get a Firebase project's Remote Config template
remoteconfig:rollback [options] roll back a project's published Remote Config template to the one
specified by the provided version number
remoteconfig:versions:list [options] get a list of Remote Config template versions that have been
published for a Firebase project
serve [options] start a local server for your static assets
setup:emulators:database downloads the database emulator
setup:emulators:firestore downloads the firestore emulator
setup:emulators:pubsub downloads the pubsub emulator
setup:emulators:storage downloads the storage emulator
setup:emulators:ui downloads the ui emulator
target [type] display configured deploy targets for the current project
target:apply <type> <name> <resources...> apply a deploy target to a resource
target:clear <type> <target> clear all resources from a named resource target
target:remove <type> <resource> remove a resource target
use [options] [alias_or_project_id] set an active Firebase project for your working directory
TypeScript
TypeScriptのツールのインストールはnpmを使って行いました。
npm install -g typescript
まとめ
ここまで書いてみて気づいたのですが、僕の辞書にはBrewでインストールできるアプリしかなかったですw
というか今まで「何で」インストールするのかを意識できてなかったので今回改めて大概なんでもBrewでインストールできることを知れて良かったです。
今後インストールするアプリもこHomebrewでインストールしてこの記事に追記していこうと思います。
今回Homebrewでインストールしたアプリ一覧
brew list
==> Formulae
ca-certificates	dvm		gettext		libgpg-error	openssl@3	ruby
cocoapods	fvm		libassuan	libyaml		pinentry-mac	velero

==> Casks
android-studio		coteditor		raycast			warp
applite			fork			slack			xcodes
arc			google-chrome		visual-studio-code	zoom
記事で紹介していないアプリもインストールされているみたいですが、これは依存してインストールされているってことですかね?
おわりに
最後まで読んでいただきありがとうございました。
2024年は技術発信も頑張ろうと思っているので、記事が参考になった方はいいねとフォローをしていただけると励みになります!GitHubのフォローも!
よろしくお願いします!
参考
Discussion
私もM3 MacBook Airを購入したので、この記事を非常に参考にさせていただきました!
特にXcodeをよく使うので、Xcodesの便利さが際立ちました。
また、Raycastではアプリを手軽に起動でき、作業効率が格段に上がりますね。
使い続けていたら「1234 + 4321」「3mins to sec」などの計算の構文も使えることに気づき、さらに活用の幅が広がりそうです。
P.S. MacBook Airのスペック表示についてですが、シリアル番号は隠しておくのが安全かと思います!
追記:
おすすめの他のアプリ:
コメントありがとうございます!Xcodes、Raycast便利ですよね!!
Macのシリアル番号についてもアドバイスありがとうございます。黒塗りの画像に差し替えました👍
追記のおすすめのアプリの紹介もありがとうございます。ぜひ触ってみようと思います🫡